1
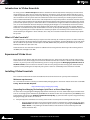
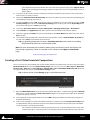
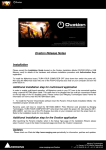
User Manual
Essentials
USER MANUAL
No part of this documentation may be reproduced in any form whatsoever or be stored in any
data retrieval system without prior written permission of the copyright owners.
This documentation is supplied on an as-is basis. Information contained within this documentation is subject to change at any time without notice and must not be relied upon.
All company and product names are ™ or Registered Trademarks ® of their respective owners.
Windows Vista, Windows XP and Windows 2000 are trademarks of Microsoft Corporation.
Merging Technologies makes no warranties express or implied regarding this software, its quality, performance, merchantability or fitness for a particular purpose. The software is supplied “as
is” you, the purchaser, are assuming the entire risk of the results of using this Merging Technologies software.
In no circumstances will Merging Technologies, its owners, directors, officers, employees or
agents be liable to you for any consequential, incidental or indirect loss or damages including
loss of time, loss of business, loss of profits, loss of data or similar resulting from the use of or
inability to use the Merging Technologies hardware and or software or for any defect in the
hardware software or documentation.
© Copyright Merging Technologies Inc. 2011. All rights reserved
Merging Technologies
Le Verney 4 1070 Puidoux Switzerland
Tel: +41 21 946 04 44 • Fax: +41 21 946 04 45
www.merging.com
Introduction
Thank you!
Scope of this Guide
About this Guide
5
5
5
6
Assumptions
6
Conventions
6
Important Note
Introduction to VCube Essentials
7
8
What is VCube Essentials?
8
Experienced VCube Users
Installing VCube Essentials
Creating a First VCube Essentials Composition
Quick Settings
Synchronizing VCube Essentials with Pyramix
Managing VCube Essentials Resources
8
8
9
11
13
16
Output Page Diagnostic Tools
16
System Tab
17
Playback Info Tab
19
Buffer & Cache Tab
Index
21
23
:
iii
:
Document revision-02
Date: 5th-July-2011
:
Page 4
Introduction
Thank you!
Thank you for purchasing Merging Technologies VCube Essentials video player software package! VCube is the
"Swiss Army Knife" of video players with options available for playing back all common (and not so common) SD
and HD file formats. Whether replacing an existing QuickTime® Video Player when upgrading to Pyramix 7, or as a
packaged bundle with a new Pyramix 7 system, VCube Essentials is your entry into the world of VCube. Essentials
enables you to use QuickTime® or Windows® Direct Show compatible video files in a single player. Optional support for other formats can be purchased from your Merging Technologies Sales partner.
Note: IMPORTANT! - The first thing you need to do is register your software to acquire your
VCube key(s) and to be included in our user support list.
Please also subscribe to the User Forum at:
http://www.merging.com/forum/
Scope of this Guide
This guide aims to help new users of VCube Essentials video player software (catalog: PSO-VCP) to get up and running as quickly as possible and to help users as to appreciate the technical considerations and possible limitations
of VCube Essentials v3 in a multi-task environment alongside Pyramix v7 in one machine.
Introduction : Thank you!
Page 5
About this Guide
Assumptions
This User Manual and the other documentation assume you are thoroughly familiar with PCs and Windows terms
and concepts. If the PC is new, please ensure the machine is working correctly before attempting to install VCube.
Note: Although VCube version 3 runs under the 32 bit versions of Windows XP, Windows Vista
and Windows 7, it does not support the “Aero” style transparency display features present in
Windows Vista and Windows 7. This will be turned off automatically for the duration of the
VCube session.
Conventions
Conventions used in this document:
Names found on screens and in menus are shown in bold. E.g. Information & Settings
Menu and sub-menu selections are shown like this:
User-Interface > Output > Show Buffer Tab
Which means:
Go to the User-Interface pull-down menu, mouse down to the Output sub-menu, mouse down to the Show
Buffer Tab entry and Click.
References to VCube Settings Tabs are shown thus:
Settings : Formats & Sync : Composition Video Format : Height
Which means:
In the Settings Page accessed via Settings > Show All Settings click on the Down Arrow and Click Format &
Sync to open the Tab. In the Composition Video Format Section the Height field is the one we are interested in.
Keyboard Shortcuts are shown thus: [Ctrl + Num 9].
The VCube User Interface uses a number of buttons. These are dark when unchecked (inactive, not selected) and
orange when checked (active, selected) The state of these buttons is referred to as checked or unchecked.
VCube button states
In the screenshot above the Transparent Overlay Box is inactive (unchecked) and Chase TimeCode is active
(checked).
Documentation
Automatically installed with VCube and available under the Help menu or [F1].
To ensure the document is visible please uncheck TopMost in Settings > Show User Interface Tab : Display Manual Resize or use [Ctrl + Shift + Alt +P] to open the page.
All the documentation is in the Adobe Acrobat pdf format. (.pdf file extension)
In order to read the documentation you will need to have Adobe Acrobat Reader V5 or later installed on your
computer.
Other documentation can be found in the Windows Start menu in All Programs > VCube > Docs. Please check
for the most recent versions at:
http://www.merging.com
Introduction : About this Guide
Page 6
Note: All features described in the documentation are available in the Advanced Mode. If the
user-interface is set to Simple Mode some features may remain hidden or unavailable. To
change the UI Mode:
User Interface > WorkSpace > UIMode: Advanced [Alt + F3]
User Interface > WorkSpace > UIMode: Simple [Alt + F1]
Navigation
In electronic form, all the Contents and Index entries and Cross-references are hyperlinks. I.e. Clicking on them
will jump to the relevant item.
ToolTips
VCube software is equipped with ‘ToolTips’. Hovering the mouse cursor over a tool icon pops-up a box with the
name of the function and the keyboard shortcut (where applicable).
Support
If you cannot find an answer to a query in the documentation, please consult the on-line support at:
http://www.merging.com
where you will find answers to F.A.Q.s (Frequently Asked Questions) and further support.
Multiple Monitors
VCube supports 2 screen extended desktop operation. Depending on the Vcube version and the hardware available, analog and digital video outputs are available to feed monitors and or projectors.
Important Note
VCube is not only a very powerful video player/recorder, it is also a highly configurable one, the User Interface as
much as the Video and Audio. Therefore screenshots in this document may differ from what you see on screen.
PLEASE DO NOT PRINT THIS DOCUMENT UNLESS ABSOLUTELY NECESSARY
SAVE TREES AND INK BY USING THE HYPERLINKS
Introduction : Important Note
Page 7
Introduction to VCube Essentials
For many years the Virtual Transport module in combination with the QuickTime® Video player and the Direct
Show Video Player, either sold as stand-alone options or included in certain Pyramix software bundles, has provided the opportunity to play back video clips efficiently, synchronized with Pyramix on the same CPU, with very
little encumbrance to the system itself. The combination of the Direct Show Player to handle playback of video
files encoded with Windows® based codecs and the QuickTime® Player for QuickTime® based files meant that users
had to either choose between the two groups of possible file formats when preparing Pyramix projects or had to
purchase both optional players in order to be able to accommodate the highest number of video file types. However, since the introduction of these two players, Merging Technologies has co-developed, released and continued the fervent development of the highly sophisticated stand-alone video player/recorder, "VCube". Now that
VCube has reached full maturity with its third software revision (as of July 2011) Merging is confident that the time
has come to gradually phase out the QuickTime® Video Player option and eventually to discontinue the Direct
Show Video Player altogether in favor of VCube. This is why we created the VCube Essentials Video Player option
for Pyramix.
What is VCube Essentials?
VCube Essentials is a full VCube HD player equivalent in functionality to a VCube LE system. It enables almost any
type of video file to be loaded and played out whether they are QuickTime® based or Windows® based and allows
for the addition of specialized decoder options like MXF, MPEG2-HD (Sony XDCam HD), DVCPro HD, VC-3 (Avid®
DNxHD) and AVC Intra (Panasonic P2).
VCube Essentials also allows for the optional addition of interchange formats from major video editing stations
like OMF, AAF and Apple FCP® XML.
Experienced VCube Users
Those of you already familiar with the VCube installation process, and general operation, loading video into the
VCube time line etc., will be happy to learn that the VCube Essentials user interface is identical to all other VCube
versions. So, you may wish to skip the following sections and go straight to the Managing System Resources of
VCube Essentials section to discover the built-in tools that may help you better manage your VCube Essentials
experience when pushing the envelope of your system's resources comfortably to the maximum in full HD.
Installing VCube Essentials
This section describes how to install the VCube Essentials for the first time on your Pyramix workstation.
Minimum requirements:
For a list of the IT hardware currently recommended by Merging please consult our website under the section: PC
Config - Recommended/ Required
http://www.merging.com/pages/pcconfig
Upgrading from Merging Technologies QuickTime® or Direct Show Players
For users who are migrating from Merging's QuickTime® Video Player or Direct Show Video Player to VCube Essentials on an existing Pyramix workstation you must run the VCube installer that corresponds to your exact Pyramix
build number and import your VCube Essentials MT Security Key, (as you would with any other key) provided by
Merging through your reseller, to activate it.
1. Verify that Pyramix and VCube have exactly same installer versions prior to installing VCube Essentials.
•
Begin by determining the exact version of your Pyramix 7 installation by carefully taking note of the
build number indication in the Pyramix splash screen as it launches, by noting the build number in
Help > About... or by looking at the build numbers indicated in the names of the Pyramix and
VCube installation files.
Introduction : Introduction to VCube Essentials
Page 8
•
If the VCube Essentials build number does not match that of Pyramix, logon to the Support / Download page on the Merging Technologies website and obtain the correct, corresponding releases of
both installers.
2. Launch the VCube installer and proceed with the installation of VCube to your system in the same location
where Pyramix is already installed.
3. Import your VCube Essentials Activation Key. This key is included in the e-mail notification provided by your
local Merging Technology sales partner.
4. To import the Key save the *.mtk attachment to your PC and double-click on it to automatically open the MT
Security Settings panel or open the MT Security Settings panel manually and click the Import Key(s) button to locate and select the *.mtk key manually.
5. Launch the VS3 Control Panel from Start > All Programs > Merging Technologies > VS3 Runtime.
6. Choose VCube in the Application drop-down menu to show the VCube audio interface options.
7. Choose the appropriate ASIO driver to be used by VCube in the Driver Name drop-down menu and click on
OK to validate.
8. Launch VCube and, if prompted to choose the first startup mode, check the Software Mode: SE, LE, XE button and click on OK to launch VCube for the first time.
Tip: It is generally good practice to always launch Pyramix first (and wait for it to initialize
fully) followed by VCube on a multi-tasked system.
Note: For more comprehensive installation details please consult the Pyramix and VCube Installation Guides respectively. These are available on our website in the Support > Downloads
page.
http://www.merging.com/download
Creating a First VCube Essentials Composition
There are several ways to load Media Files into the VCube timeline. The simplest way is to open a file by using the
Media File Browser located in the VCube Settings Pages. (You can also access it via File > Import > Media File
Browser (Ctrl + Shift + O) or in User Interface > Settings Tabs > File > Show Media FileBrowser Tab.) Browse to
the required Media File and use the Load & Auto-Config function.
Tip: To display all the VCube Settings pages use the F2 shortcut key.
Media File Browser header
1. Open the Media File Browser and click on the three periods (full-stops) … button to the right of the File Path
field to open a standard Windows Browse For Folder dialog box and navigate to the folder where the Media
File you wish to play is located.
2. Select the folder containing the Media File and click OK to display the Media Files that VCube recognizes in
the Media File Browser.
3. Click once on the Media File itself in the Media File Browser and then click on the Load & Auto-Config button
to adjust VCube's settings automatically to match the format of the Media File itself and to place the Media
File on the timeline at its original TimeCode.
•
If the video has no TimeCode value but you wish to place it at a specific TimeCode start value, then
another way to place a clip into the time line would be to place the Playhead Cursor at the desired
Introduction : Creating a First VCube Essentials Composition
Page 9
TimeCode in the Timeline and then use the Place to Cursor button in the Media File Browser. For
further methods of offsetting clips or offsetting the incoming TimeCode used to synchronize VCube,
please refer to the VCube User Manual.
Media File Browser bottom buttons
Note: VCube only displays recognized media files and will mask any other files present in a
folder.
Note: From the Media File Browser you may access any folder on any drive in your local machine
or available on your network to stream media instantly from any location without importing it or
converting it.
Note: Please see next section: Quick Settings before attempting Playback.
Introduction : Creating a First VCube Essentials Composition
Page 10
Quick Settings
VCube SD and HD Quick Settings
Tip: When creating a new composition by placing Media Files into the VCube Timeline manually with the Load& Auto-Config button, ALWAYS use the Quick Settings functions
to preset the VCube to the appropriate format in which you wish to display your media
before attempting playback. The Quick Settings are accessed via the Settings menu or
by keying Alt + F5 (SD) or Alt + F6 (HD).
Introduction : Quick Settings
Page 11
Quick Settings
VCube can play virtually any video format in the timeline and will compensate for frame rate, resolution, aspect
ratio, pixel size, color depth down sampling or size differences automatically to the best values possible but the
overall settings should be aligned to a single video format listed in either one of the two Quick Settings menus.
These Quick Settings help to avoid accidental user omission of an important setting that may hinder the proper
display of video played back by VCube.
Using the Quick Settings aligns up to 11 parameters automatically, spread out over the various menus within
VCube. So get into the habit of always using the Quick Settings every time you begin a new Composition and
adjust individual settings afterwards only if necessary to fit your needs. All settings modified with a Quick Settings
load are subsequently saved in the Composition and recalled when the Composition is reloaded.
For more details about the individual settings in VCube please refer to the VCube User Manual.
Introduction : Quick Settings
Page 12
Synchronizing VCube Essentials with Pyramix
Currently, as of Pyramix v7.1 and VCube v3.1, synchronization of the two programs is achieved via Virtual Transport. The following checklists will help you set up all three programs with adequate settings.
Pyramix Checklist for Synchronization
Pyramix Settings All Settings > Remote Control > Virtual Transport page
1. Launch Pyramix
2. Open the All Settings menu in Pyramix (Alt + G)
3. Open the Remote Control > Virtual Transport sub menu
4. Tick the Enable Virtual Transport Communication box
5. Tick the Automatically Set as Clock Master box
6. Tick the Automatically Set as Time Code Master box
7. Click OK to save settings and activate Virtual Transport
Introduction : Synchronizing VCube Essentials with Pyramix
Page 13
VCube Checklist for Synchronization
VCube Settings page : Format & Sync Tab
1. Launch VCube Essentials
2. In the Settings page open the Format & Sync Tab
3. Scroll down to the Synchronization section and check the Follow VT button to activate it
4. Un-check the VCube as VT Clock Master button
Virtual Transport Checklist for Synchronization
VT - Client pane
1. Open VT from the Windows Task Bar (it will be hidden in the notification area by default under Windows 7 so
click on the tiny triangle in the bottom right side of the task bar to show the hidden VT icon)
2. Click on the Client button (yellow CL)
3. In the Pyramix Client verify that the following boxes are checked on:
Introduction : Synchronizing VCube Essentials with Pyramix
Page 14
•
Clock Master
•
TC Master
•
Lock
4. In the Pyramix Client verify that the Chase check box is off
5. In the VCube client verify that the following check boxes are checked on:
•
Lock
•
Chase
6. In the VCube Client verify that the following boxes are checked off:
•
Clock Master
•
TC Master
Note: Note: Take special care to always use the same TimeCode base in both Pyramix and VCube
to insure proper synchronization through VT. I.e.: 25 to 25, 29.97 to 29.97, 23.98 to 23.98 etc.
VT cannot synchronize Pyramix and VCube if they do not have the same frame rate. Any change in either Pyramix
or VCube alone to a new frame rate will automatically change VT to match but not the other program that has not
yet been changed so remember to change them both.
Introduction : Synchronizing VCube Essentials with Pyramix
Page 15
Managing VCube Essentials Resources
Pyramix and VCube are powerful real-time audiovisual applications, both with the potential to play out massive
amounts of sound and HD picture data while recording audio and performing real-time editing processes. When
the resources of your workstation are understood and well balanced, multi-tasking of Pyramix and VCube is a
powerful audiovisual tool. Typically VCube can handle all video files in the SD formats efficiently and the vast
majority of HD video file formats elegantly and effortlessly on the latest multi-core Intel® CPU platforms. However,
some HD video files may prove to be highly CPU or disk intensive and tip the scale sending any system "over the
red line" causing stalls and skipped frames during playback. Thus it is important to know how to determine if a
video file is simply too demanding for real-time play out by using VCube's built-in resource diagnostic meters.
Output Page Diagnostic Tools
The Output page has three diagnostic monitoring pages which enable you to read the current status of different
points of system resource consumption and potentially detect a "bottleneck" which is hindering smooth and reliable playback of the most demanding HD video files.
1. System
2. Buffer
3. Playback Info
So if you encounter a file that just does not play out smoothly, check these diagnostic tools first in order to determine where the bottleneck is so that you may find a solution such as:
1. Changing the buffering scheme of VCube
2. Moving the Media file to a faster drive
3. Replacing the Media File itself in favor of a new version encoded using a faster, more efficient codec than that
used for the original encode.
Note: VCube Essentials is sold as a player only, devoid of any recording, rendering or wrapping
capabilities, so it may be necessary to use another VCube version with these capabilities activated (VCube Turnkey, XE or SE versions) or a 3rd party video processing software or editing station to re-render or down-convert the most resource hungry HD files that persistently cause
system stalls.
Introduction : Managing VCube Essentials Resources
Page 16
System Tab
The first diagnostic tool in the Output page is the System Tab. This shows a real-time graph of the overall CPU
usage and the Memory consumption of VCube itself. The CPU display shows a graphical percentage plot of each
CPU core for use by VCube under Windows to the right and on the left an average percentage of all cores combined.
Output Page - System Tab
CPU
In order to understand what is to be investigated while comparing the CPU consumption and the other indicators
in the diagnostic tabs, it is first necessary to understand the two extremes of the HD video file scale.
At one end of the scale is video that is encoded with a high data compression ratio and therefore uses a large
amount of CPU resources at the moment of decoding but has a very small file size and therefore a reduced bit rate
(requiring less disk performance). At the other extreme are totally uncompressed (RGB, YCrCb, YCbCr) type video
formats that require almost no CPU usage (due to the absence of decoding) but require huge amounts of disk data
throughput do to extreme bit rates.
So if your CPU is exceeding 100% while playing a certain file, the file is most likely highly data compressed or
encoded with a codec that is too CPU intensive for your system. Try increasing the Playback Buffer or use a file that
is encoded with a lower data compression ratio (higher bit rate) or encoded with a different and more efficient
codec altogether.
Introduction : Managing VCube Essentials Resources
Page 17
Memory
Below the CPU graphs is a graph showing the estimated memory consumption of VCube. This memory consumption graph does not include the other processes running under Windows so it is good to compare the memory
consumption graphs of the Windows Task Manager under the Performance tab with that of VCube for comparison purposes. To access the Windows Task Manager key Ctrl + Shift + Esc (or Ctrl + Alt + Del and choose Start
Task Manager) and click on the Performance tab.
Windows Task Manager - Performance Tab
Memory consumption is critical in any system and VCube can potentially consume large amounts of memory
depending on three main factors:
1. Resolution and frame rate of the VCube Timeline.
2. Number of Frames set in the Playback Buffer (Settings Page : Buffer & Cache).
3. The codec used to encode the video file in question.
4. The number of Clips playing simultaneously in the Timeline at any given moment
Warning: The system memory consumption should be kept as low as possible and never exceed approximately
75-80% of the total amount of RAM installed in the system. This is especially critical in 32-bit versions of Windows
as only the first 3 gigabytes of RAM are actually addressable by Windows and therefore VCube should never take
so much of the RAM for itself as to hinder Pyramix and Windows itself. Exceeding the 80% mark of memory consumption for any reason can render any system unresponsive and even critically unstable.
The Playback buffer can be either an ally or an enemy in cases where HD video files do not seem to playback well.
Increasing the Number of Frames in the Buffer helps to remedy playback stalls but increases the memory consumption footprint of VCube proportionally leaving less memory for Pyramix and Windows.
When determining what the optimum size should be, begin with the default value of 7 Frames and increase the
number of Frames incrementally until playback is satisfactory whilst keeping an eye on memory consumption
during playback. There is no point pushing the buffer to an excessive value in the hope that you will have smooth
playback all the time if it means sacrificing precious memory elsewhere and causing the system to become unstable. For this reason keep the buffers as small as possible without stalling. If an increase in Playback Buffer size does
Introduction : Managing VCube Essentials Resources
Page 18
not remedy playback stalls then investigate further to determine if your media volume is adequately outputting
media to VCube or use a smaller more efficient version of the HD video encoded in a different format or at a different bit rate.
Buffer Tab
The Buffer tab shows three graphical plots:
1. Available Video Buffer
2. Queued Buffer
3. Available Audio Buffer
Output Page - Buffer Tab
All three of these graphs show a direct correlation of the scale of available buffer resources in relation to the Playback Buffer frame size. Raising or lowering the number of frames in the buffer also raises or lowers the scales of
the graphs. The Available Video Buffer and Available Audio Buffer scales are subtractive and the red line is
lower as the buffers are used in playback while the Queued Buffer graph is additive and rises to show the overall
headroom of both the Video and Audio buffers. None of the three buffers should ever bottom out during playback. If they do this indicates a stall in the system due either to a CPU problem, a data throughput problem from
the Media Volume to the playback engine or even possibly a PCI(e) bus problem on the Motherboard due to a saturation of activity in the system (although this is rare).
The Buffers should remain relatively flat and stable without bottoming out so, once again, watch for dips in buffers
and adjust the Number of Frames in the Playback Buffer accordingly without over consuming system memory.
Playback Info Tab
The Playback Info tab shows two graphical plots with Video Disk Read (ms) and Audio Disk Read (ms) timings
and 11 individual diagnostic numeric value boxes. The principal indicators, which are relevant to VCube Essentials
and therefore that will be explained here, are:
1.Video Disk Read graph
2.Audio Disk Read graph
3.Read Drop counter
4.Read Time Average
5.Preview Drop counter
Introduction : Managing VCube Essentials Resources
Page 19
6.Current FPS
Output Page - Playback Info Tab
Note: The remaining counters not listed above either do not apply to VCube Essentials due to
the absence of an AJA® video board in the system or are not helpful in determining the cause of
poor playback.
Video and Audio Disk Read graphs
The Video and Audio Disk Read graphs show the delays between the moment a media frame is requested from a
disk volume and the moment it is available for use by VCube. These graphs therefore show the transfer time
before the media is decoded and placed into the Playback Buffer. So the number of Frames in the buffer itself has
no bearing on this information. As the bit-rate of the media increases so will the time it takes to read it from a disk
volume. The overall transfer time in milliseconds, displayed in the upper right corners of each graph as well as
plotted out in red, should never exceed the delay in milliseconds of the duration of one frame of video of the current VCube playback engine. Just to be on the safe side it should even be considered that a safe ratio of Disk Read
delay to a single frame of video should be about half that of the time of a single frame to allow for occasional
media volume transfer bottlenecks. These bottlenecks may occur in very short periods of time but must never
exceed the remaining number of frames in the Playback Buffer. That is what the Playback Buffer is there for. Here is
a quick table to show the length of a single frame of video in milliseconds for each major frame rate and the subsequent approximate target Disk Read delays that should give reliable play out performance.
Frame rate
Milliseconds
Safe Delay
24
41.67
20.83-30
25
40
20-30
29.97
33.37
16.68-28
If the Disk Read delays systematically exceed the safe delay values then the Buffer will quickly empty out causing
stalling and skipped frames during playback.
Remedy: Use higher performance disk volumes that transfer the media files uninterrupted and fast enough for
VCube to process them and put them into the Play Buffer continuously or use a Media File with a lower bit rate.
Introduction : Managing VCube Essentials Resources
Page 20
Read Drop Counter
The Read Drop Counter shows a continuous display of how many frames of video were dropped (due to insufficient throughput of the media volume to the VCube playback engine) during a single playback pass. If the raw
media data arrives late to VCube because the disks are too slow, then VCube does not even have a chance to process them.
Note: Stopping and restarting playback resets the values in all the counters so consult them during playback.
Read Time Average
The Read Time Average shows the delay of processed video frames (post playback engine) from disk-to-Playback
Engine to the Playback Buffer. This value must never exceed the Safe Delay values listed above for a succession of
frames larger than the size of the Number of Frames in the Playback Buffer. If it does the result is a playback stall.
Preview Drop Counter
The Preview Drop counter shows the number of frames dropped in the VCube Preview Window running on the
display engine of the computers graphic board (as opposed to video frames dropped on the AJA board shown in
the Video Drop counter). When in doubt as to if VCube is dropping frames, consult this counter during playback.
It is also displayed at the lower left-hand side of the VCube interface Drop=0.
Current FPS
The Current FPS counter shows the real-time frame rate per second of the VCube playback engine. If this value
varies after the initial lock cycle of VCube is established then VCube has detected a drift in the playback speed.
This is most likely due to a problem between the lock reference of VCube and the incoming TimeCode value. It
may also be due to a conflict between the frame rate of VCube and that of Pyramix or Virtual Transport.
Remedy: Verify that all three are running at the same frame.
Buffer & Cache Tab
The Buffer and Cache Tab located on the Settings Page is crucial to the proper setup of VCube and, as discussed
in the previous section, must be carefully adjusted for the type of Media being played back by VCube.
It has been found that the best general default parameters are:
1. Start with a Buffer value of 7 for SD picture and 15 for HD picture
2. Deactivate all four of the read and write caches and restart VCube for the cache changes to take effect.
Adjustments may be made to facilitate certain HD files that prove to be problematic during playback but the
Buffer itself should be gradually increased and not just set to it's maximum value at all times which (like any buffer)
may seriously hinder the performance and reliability of the system by consuming excessive amounts of precious
RAM, especially on a 32-bit operating system.
Note: The Multi Thread Seeking button has negligible effect due to the vast improvements in IT
hardware in general since the introduction of VCube v1.0 and may be left off.
For further detail and contact information visit Merging Technologies' website:
www.merging.com
Introduction : Buffer & Cache Tab
Page 21
Introduction : Buffer & Cache Tab
Page 22
Index
A
About this Guide
Advanced Mode
Assumptions 6
O
6
7
Output Page Diagnostic Tools
P
Playback Info Tab 19
Preview Drop Counter
B
Buffer & Cache Tab
Buffer Tab 19
21
21
Q
C
Quick Settings
Conventions used in this document 6
CPU 17
Creating a First VCube Essentials Composition
Current FPS 21
R
9
11
Read Drop Counter
Resources 16
21
S
D
Documentation
16
Scope 5
Simple Mode 7
Support 7
Synchronizing VCube Essentials with Pyramix
System Tab 17
6
E
Experienced VCube Users
8
I
T
Installing VCube Essentials 8
Introduction 5
Introduction to VCube Essentials
Thank you 5
ToolTips 7
13
8
V
M
Managing VCube Essentials Resources
Memory 18
Minimum requirements 8
Multiple Monitors 7
16
VCube Essentials Resources 16
Video and Audio Disk Read graphs
Vista 6
20
W
What is VCube Essentials?
Windows Vista 6
8
Page 23