1
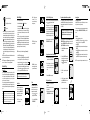
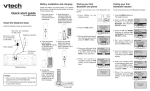
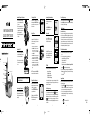
i 5867 5.8GHz SYSTEM
QUICK START GUIDE
Installation of Battery Pack in Handset
Checking for Dial Tone
1. Remove the battery cover by pressing on the indentation and sliding
downward.
2. Place the new battery cells in the
Handset with the metal contacts
aligned with the charge contacts in
the battery compartment.
3. Replace the battery cover by sliding
it upwards.
After the battery is charged, pick up the
Handset and press ON. PHONE ON should
appear on the screen, and you should
hear a dial tone.
Answering Calls from the Handset
1
Press ON or any number key to answer a call.
Phone on
HOLD
12:00 PM
MUTE
2. Place the Handset in the Charge
Cradle and allow it to charge for 12
hours.
Message LED
Earpiece
OK
ON
1
OFF
ABC
22ABC
DEF
3 DEF
55
GHI
4 GHI
MNO
6 MNO
JKL
JKL
TUV
88TUV
PQ
7PQ
RS
RS
LE
CT
#
SE
ER
AK
SPE
PH
WX
YZ
9 WX
Z
0 OPER
TONE
TONE
ON
E
SO
U
ND
1. Make sure the answering system is on.
2. Press TIME/SET. The system will announce
the current clock setting, then announce
“To set date and time, press TIME/SET.”
3. Press TIME/SET.
4. Press CHANGE until the system announces
the correct day, then press TIME/SET.
5. Press CHANGE until the system announces
the correct hour, then press TIME/SET.
6. Press CHANGE until the system announces
the correct minute, then press TIME/SET.
The system announces the current clock
setting.
Volume
On/Flash Key
Lighted Keypad
Microphone
BEFORE USING YOUR i 5867, CAREFULLY PEEL OFF THE PROTECTIVE
FILM COVERING THE DISPLAYS.
Handset Speakerphone
Sound Select
Connecting to the Telephone Line
Plug one end of the telephone line cord
into the jack on the bottom of the Base
Unit. Plug the other end of this cord into
the wall jack.
1
96-5652-30-00.P65
1
Traditional - Press ON or SPEAKERPHONE. After hearing a dial tone,
dial the desired number.
1
HOLD
One-Time Software Installation
M
12:00 PM
MUTE
Pictures
Your i 5867 is preset with the following number of images:
Images – 18 images
Emotions – 9 images
My Pictures – 0 images
CD ROM – 25 new images
1
1. Insert the enclosed Image Editor Software into your personal com
puter.
2. You will see a pop-up window giving you three options:
a. Install/Uninstall the Image Editor Software.
b. Browse the installation CD.
c. Visit Vtech on the web.
To install the software, click on the Install/Uninstall the Image Editor Soft
and follow the download instructions.
ware icon
3. After the installation process is complete, you will find an Image Editor
Software icon
on your PC desktop. Click on this icon to run the Image
Editor software.
Image Download
You have the ability to assign one image as your background for the idle
screen (wallpaper) or assign a specific image to a phonebook directory in
the available 50 directories.
Making Calls from the Handset
Predial - With the Handset Off, dial the
number. If you make a mistake, press
left NavKey ( ) to backspace.
Press ON or SPEAKERPHONE to call
your predialed number.
H
Press MUTE to mute the microphone. You can still hear the other
caller. Press MUTE again to return to
the two-way conversation.
NOTE: You can press and hold CHANGE to
advance the minutes in increments of ten.
3 Mailbox Answering System
Softkey
Off/Cancel Key
Download Your Own Image
Do you have a favorite image stored in your personal computer that you
would like to use as your i 5867 Handset wallpaper or to assign to one of
your 50 available phonebook directories? Using the provided Image Editor Software, you can view and convert your image. Once you have selected your file and viewed your image in the software, use the included
USB cord to send the converted image directly into the Handset. You’ll
start by downloading the software into your computer.
Hold and Mute
12:00 PM
LCD Display
Soft/Select Key
To clear a wallpaper image, select the icon Pictures
in the main menu.
Select Clear Wallpaper using the NavKeys. Then press the middle NavKey
or left softkey to clear the wallpaper.
Picture Download
Press the HOLD soft key to temporarily suspend the conversation.
Press ON to return to the call.
Incoming Caller ID/Call Waiting ID will set
the clock automatically. If you wish to set
the time manually:
1. Plug the AC power adapter into an
electrical outlet, and the DC connector
into the bottom of the Base Unit.
incoming call...
Press SPEAKERPHONE to answer
using the handsfree option.
Setting the Time
Setup of the i 5867
Clear a Wallpaper image
Once you have installed the software, follow these steps to view and convert your selected image.
•
Set a Wallpaper image
555 5555
SAVE
12:00 PM PAUSE
To set a wallpaper image, select the icon Pictures
in the main menu.
Then choose an image in one of the three (My Pictures, Images or
Emotions) menu options. Once you have selected the image, press the
softkey to set the image as your wallpaper. You will receive a
message on the screen confirming Wallpaper Set! and an audio
confirmation.
3
2
04/04/23, 16:43
•
Click on the OPEN open
icon. Then the pictures in the accompanied
CD-ROMDisc can be found automatically. Or navigate to the direc
tory where your desired image file is stored, and open the file.
You will see your image displayed in the middle of the screen and
inside the telephone display on the right. You can select the following
options to edit your image:
- Zoom In and Zoom Out
4
96-5652-30-00
ISSUE 0
- Rotate Left and Rotate Right
Recordable Ringer
MID - Mid-Range sounds
e n h a n c e d (This is the
recommended setting for
hearing aid users.)
To record a ringer, follow these steps:
•
- Adjust Brightness and Contrast
•
- Adjust Color
•
•
Before downloading your image, make sure that the provided USB
cord is correctly installed into your computer (using the large end of
the connector) and Handset (using the small end of the connector). After
you have completed the image editing process, press Send to Phone
and your image will be downloaded into the Handset. Within a few
seconds, you will see the new image displayed on your Handset and it
will be saved in your My Pictures directory. You have the option to either
SET (set the picture to be wallpaper) or DELETE the downloaded image.
You can have a total of 14 images stored in the My Pictures directory.
You can delete the preset images in this directory to make room for more
if you wish. Additional image samples can be found on the accompanying
CD-ROM.
NOTE: Do not leave the USB cord connected to the Handset for an extended
period of time as it will drain the battery cells.
NOTE: All preset images in My Pictures can be deleted and replaced by
new ones. You can store a total of 14 images in My Pictures.
Recordable Ringer
Record a Ringer
You can easily record a unique ringer to be used as either your Default
Ringer or for a Distinctive Ringer assigned to a specific phonebook directory.
You can record with either the provided Audio Patch Cord (not the USB
cord), or with the Handset microphone. You may record up to 9 unique
ringers for a maximum of 10 seconds each.
Cued-up music typically produces the best sounding recorded ringer. It is
recommended to begin recording your ringer at the beginning of a song,
rather than a portion from the middle to produce an audibly pleasing custom
ringer.
Note: Your i 5867 Handset is preset with many musical ringer options (i.e. Jazz,
R&B, Reggae, Rock, etc) for you to use as your default ringer or a distinctive
ringer. Three of them are protected, you can’t replace them.You can replace the
other 6 preset ringers with your own. You can also record your own ringers in
another 3 blank locations in My Clips. You will find 10 additional sound clips excluding
those preset in the Handset on the accompanying CD-ROM.
5
96-5652-30-00.P65
2
Select the Sounds & Alerts icon
in the Main Menu.
.
Select the Sound Clips icon
If you are using the Audio Patch Cord, insert the 3.5mm plug (the larger
end) into the headset jack of your PC or audio source. Insert the 2.5mm
plug (the smaller end) into the Headset jack on the side of the i 5867
Handset.
You can listen to the playing music through your Handset speaker after
connecting the Audio Patch Cord and selecting the Record Preview menu
option. Adjust the recording volume at the audio source. To begin recording,
press RECORD. If you want to use the Handset microphone to record ringers,
select the Record Clip menu option. After the beep, and with the Handset
microphone facing the audio source, start recording.
1
12:00 PM
HOLD
MUTE
Registration and Operation of the Accessory Handsets
Answering System
View Caller ID/Call Waiting ID records by pressing the CID LOG softkey.
Use the and NavKeys to review the records.
Your i 5867 system can operate up to 8 Handsets. Accessory Handsets
(models i 5803 or i 5807) are sold separately. To order accessory Handsets,
replacement battery cells or Headsets, call VTech Communications Inc. at
1-800-595-9511
Turn Answering System On/Off
Press ON/OFF to turn the system on or off. When the system is turned on,
the light inside the button will glow steadily.
Dialing from CID - If the CID record displayed is in the correct format for dialing,
press ON or SPEAKERPHONE to dial your
call. If it is not in the correct dialing format, press
middle Navkey. With each press of # key, you
will see 4 possible dialing formats, such as:
Scroll to the desired option, then press ON or
SPEAKERPHONE to dial the number.
1
TREBLE - High Frequency
sounds enhanced
Caller ID/ Call Waiting ID - Handset
The original Handset that is shipped with your i 5867 system is
already registered to the Base Unit. The steps below will assist you in
registering additional Handsets as you expand your system.
1 of 10
Dial Options
After charging the Handset, if it displays SEARCHING FOR BASE or
ENTER BASE ID ###, you must register the Handset in order to use it. If the
display says SEARCHING OR BASE, press NEW. The screen will now display ENTER BASE ID ###. Now, follow these steps:
1. Find the BASE ID Code on the underside
of the Base Unit.
NOTE: If the memory is full, the Handset will prompt Clip memory full!
12:00 PM
HOLD
•
•
Hit the STOP softkey stop the recording.
After recording, you may PLAY or SAVE the melody. If you choose SAVE,
you will be prompted to Enter Clip Name. Enter a name (up to 8
characters) for the recording. If you make a mistake, press the
softkey to backspace. Press SAVE to confirm. Clip has been saved will
display. The melody will be stored in the My Clips section. You can listen
to all of your recorded musical ringers in My Clips. If you want, when in
My Clips, you can press DELETE then YES to erase one of them.
MUTE
Storing a Name and Number in Phonebook Memory
2. Enter the 15-digit BASE ID Code into the
Handset. If you make a mistake, press the
left NavKey ( ) to backspace or the right
softkey ( ) to erase a character.
1. Enter the phone number you wish to save
into the Handset. Press the SAVE softkey.
1
2. Using the keypad, enter the desired
name. Press the left softkey to backspace, use right NavKey to insert a
space.
NATURAL - No frequency
enhancement (Your Handset
is preset with this selection)
3. Press OK to complete the registration
process.
1 of 10
HOLD
NOTE: When you want to use the Handset microphone to record ringers,
do not insert the Audio Patch Cord into the headset jack.
12:00 PM
MUTE
3. Press OK then SAVE to store your entry.
Press REDIAL to display the last 10
telephone numbers dialed from the
Handset. The number on the top line
represents the last number dialed.
• Use the
and
NavKey to
highlight the desired number.
During a call, you can adjust the quality of the sound to best suit your
hearing. Pressing SOUND SELECT
repeatedly will cycle you through four
different frequency responses:
BASS - Low Frequency
sounds enhanced
•
6
1
Redial
880-8808
555-1234
555-5555
To dial, press ON/FLASH or
SPEAKERPHONE.
SAVE
1. Press any NavKey then OK to enter the
Phonebook.
2. Use the up and down NavKeys to scroll to
the desired entry.
3. With the desired record displayed, press ON
or SPEAKERPHONE to dial the number.
1 of 10 DELETE
8
04/04/23, 16:43
NOTE: You can press and hold change to advance the minutes by ten.
Searching
for Base. . .
new
1
HOLD
7
ok
Set the Clock
1 Make sure the answering system is on.
2 Press TIME/SET. The system announces the clock setting, then
announces "To set Date and Time, press TIME/SET."
3 Press TIME/SET.
4 Press CHANGE until the system announces thecorrect day, then press
TIME/SET .
5 Press CHANGE until the system announces the correct hour, then
press TIME/SET.
6 Press CHANGE until the system announces the correct minutes, then
press TIME/SET. The system announces the current clock setting.
4. Within 15-60 seconds, the Handset will
display FOUND BASE, and will be assigned an extension number.
Dialing from the Phonebook
Redial
Sound Select
Enter Base ID
################
For details on recording your own outgoing announcements and changing
system settings, see ANSWERING SYSTEM OPERATION in your User’s
manual.
5. Your expansion Handset is ready for use.
12:00 PM
MUTE
9
10