1
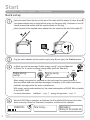
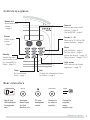
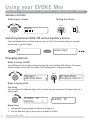
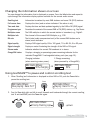
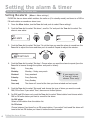
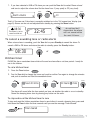
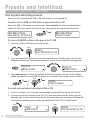
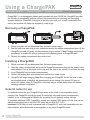
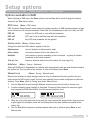
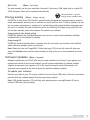
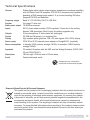
Owner’s manual
Safety instructions
Warranty information
Keep the radio away from heat sources.
Do not use the radio near water.
Avoid objects or liquids getting into the radio.
Do not remove screws from or open the radio casing.
Fit the mains adaptor to an easily accessible socket, located near the radio and
ONLY use the mains power adapter supplied.
Imagination Technologies Ltd. warrants to the end user that this product will be
free from defects in materials and workmanship in the course of normal use for
a period of two years from the date of purchase (One year for ChargePAK). This
guarantee covers breakdowns due to manufacturing or design faults; it does
not apply in cases such as accidental damage, however caused, wear and tear,
negligence, adjustment, modification or repair not authorised by us. Please
visit www.pure.com/register to register your product with us. Should you have a
problem with your unit please contact your supplier or contact PURE Support at
the address shown on the rear of this manual. If you need to return your product
please use the original packaging and include all parts and accessories. We
reserve the right to refuse incomplete or badly packaged returns.
ChargePAK safety instructions
Read the instructions for ChargePAK replacement and use in this document.
Only use your ChargePAK with ChargePAK-ready PURE products with original PURE
power adapters.
Store ChargePAK in a cool, dry place at normal room temperature. Remove from
devices that will be stored unused for extended periods.
Dispose of ChargePAK as per normal rechargeable batteries according to the local
laws and regulations of your region. Some batteries may be recycled, and may be
accepted for disposal at your local recycling centre.
Do not tear or remove the plastic covering or any part of ChargePAK. Do not
puncture, modify, drop, throw, or cause other unnecessary shocks to your
ChargePAK. Batteries may present a risk of fire, explosion, or chemical burn if
mistreated.
Do not dispose of ChargePAK in a fire or incinerator, or leave in hot places such
as a motor car under direct sunlight. Do not store batteries near an oven, stove,
or other heat source.
Do not connect ChargePAK directly to an electrical source, such as a building
outlet or automobile power-point. Do not place batteries into a microwave oven,
or into any other high-pressure container.
Do not immerse ChargePAK in water or otherwise get it wet.
Do not short circuit ChargePAK.
Do not use, or charge a ChargePAK that appears to be leaking, discoloured, rusty,
deformed; emitting an odour; or is otherwise abnormal.
Do not touch a leaking ChargePAK directly; wear protective material to remove
and dispose of it properly immediately.
Do not give ChargePAK to young children, or store where children may have
access.
Disclaimer
Imagination Technologies Limited makes no representation or warranties with
respect to the content of this document and specifically disclaims any implied
warranties of merchantability or fitness for any particular purpose. Further,
Imagination Technologies Limited reserves the right to revise this publication
and to make changes in it from time to time without obligation of Imagination
Technologies Limited to notify any person or organization of such revisions or
changes.
Copyright
Copyright 2008 by Imagination Technologies Limited. All rights reserved. No part
of this publication may be copied or distributed, transmitted, transcribed, stored
in a retrieval system, or translated into any human or computer language, in any
form or by any means, electronic, mechanical, magnetic, manual or otherwise, or
disclosed to third parties without the express written permission of Imagination
Technologies Limited.
Trademarks
EVOKE Mio, the EVOKE Mio logo, Intellitext, textSCAN, ChargePAK, PURE, the
PURE logo, PURE Digital, the PURE Digital logo, EcoPlus, the EcoPlus logo,
Imagination Technologies, and the Imagination Technologies logo are trademarks
or registered trademarks of Imagination Technologies Limited. All other product
names are trademarks of their respective companies. Version 1 October 2008.
Contents
Start ........................................................................ 2
Quick set up ......................................................................................... 2
Controls at a glance .............................................................................. 3
Rear connectors .................................................................................... 3
Using your EVOKE Mio ...........................................................4
Volume controls ..................................................................................... 4
Switching between DAB, FM and an Auxiliary device ................................. 4
Changing stations .................................................................................. 4
Changing the information shown on screen .............................................. 5
Using textSCAN™ to pause and control scrolling text ................................ 5
Setting the alarm & timer .......................................... 6
Setting the alarm .................................................................................. 6
To cancel a sounding tone or radio alarm ................................................ 7
Kitchen timer ........................................................................................ 7
Presets and Intellitext ............................................... 8
Storing and selecting presets ................................................................. 8
Intellitext ® ..................................................................................................................................................................9
Using a ChargePAK................................................................10
Removing ChargePAK ............................................................................................. 10
Installing ChargePAK .............................................................................................. 10
General notes for use ............................................................................................ 10
Setup options ......................................................... 11
Options available in DAB ...................................................................... 11
Options available in FM ........................................................................ 12
General options ................................................................................... 12
Adjusting the display ........................................................................... 12
Energy saving ...................................................................................... 13
Software Updates ................................................................................ 13
Help and Specifications ........................................... 14
Secondary and inactive stations ........................................................... 14
Hints and tips ..................................................................................... 14
Technical Specifications ....................................................................... 15
Contents
1
Start
Quick set up > Controls at a glance > Rear connectors
Quick set up
Unclip the aerial from the clip on the rear of the radio and fully extend it (steps A and B).
Your power adapter may be supplied with a two-pin European plug. Customers in the UK
should remove and replace with the supplied three-pin UK plug.
Insert the jack of the supplied mains adapter into the socket on the rear of the radio (C).
B
A
6V DC
Stereo Out
Stereo Out
Aux In
Aux In
D
C
6V DC
6V DC
Plug the mains adapter into the mains supply (step D) and press the Standby button.
a) When you see the message ‘Enable energy saving?’ push the Tune dial.
b) Select ‘On’ to switch on energy saving mode (push the Tune dial).
Tune
Enable energy
saving?
Tune
EcoPlus
Energy saving
On
When energy saving mode is switched on, the radio uses less power because it
does not collect and store Intellitext messages in standby. It still collects and stores
Intellitext messages while the radio is switched on.
With energy saving mode switched on, the power consumption of EVOKE Mio in standby
is less than 1 Watt.
For more information: Intellitext > page 9 energy saving mode > page 13
Wait for EVOKE Mio to complete an Autotune for all available DAB stations (this takes
about a minute). When the Autotune is complete, a station will be selected.
1
EVOKE Mio
2 Start
Now tuning...
BBC Radio 2
Talking to the people wh
Controls at a glance
Volume dial
Adjust and mute
volume
> page 4
Tune dial
Browse and select radio
stations > page 4
Use textSCAN > page 5
Source
Switch audio
source
> page 4
1
Standby
Switch the radio
into standby or off
if a ChargePAK is
fitted > page 10
Presets 1 − 6+
Store up to 30 DAB or FM
preset stations > page 8
Tune
Volume
+
2
Menu
Use Intellitext > page 9
Set the alarm > page 6
Adjust the display > page 11
Setup options > pages 11-13
3
4
5
6+
Source
Info
Menu
Standby
Timer
Light sensor
Auto-adjusts the display
brightness > page 12
Timer
Set the kitchen
timer > page 7
Info
Change the information shown
on screen > page 5
Rear connectors
Aux In
Mini-B type
USB connector
for upgrades
only.
Analogue
stereo input
for iPod,
MiniDisc, etc.
Stereo Out
3.5 mm
headphone
socket.
Connect to
an external
amplifier.
6V DC
Connect to
supplied
mains
adapter only.
Controls at a glance
3
Using your EVOKE Mio
Adjust volume > Switch DAB/FM/Aux > Change stations > Change on-screen info > textSCAN™
Volume controls
Adjusting the volume
Muting the volume
Volume
Volume
Volume
-
+
-
+
Switching between DAB, FM and an Auxiliary device
Press the Source button and then repeat to listen to DAB, FM or Auxiliary device (a separate
device such as an MP3 player).
Source
FM
Source
Auxiliary Input
Changing stations
When listening to DAB
Turn the Tune dial left or right to browse through the list of available DAB stations. The current
station remains at the top of the screen. Push the Tune dial to change the station.
Tune
Tune
BBC Radio 2
BBC Radio 6Music
BBC Radio 6Music
Now playing: Race For T
When listening to FM
Seek Tuning
Turn and release the Tune dial right or left to seek to the next or previous FM station that has a
strong signal.
Tune
87.50MHz FM
Searching...
>
96.60MHz FM
Manual Tuning
1. Change the FM tuning mode to ‘Manual’ (see page 11).
2. Turn the Tune dial right or left to step up or down 0.05 MHz.
4 Using your EVOKE Mio
Changing the information shown on screen
You can change the information that is displayed on screen. Press the Info button and repeat to
cycle through the information display options available for the current audio source.
Scrolling text
Full screen time
Time and date
Programme type
Multiplex name
Multiplex info
Bit rate
Signal quality
Signal strength
Stereo mode
ChargePAK status
Information broadcast by most DAB stations and some FM (RDS) stations.
Displays the time (and an alarm indicator if the alarm is set).
Displays the time and date updated regularly by the DAB or FM (RDS) signal.
Describes the content of the current DAB or FM (RDS) station, e.g., Pop Music.
The DAB multiplex in which the current station is broadcast, e.g., Digital1.
The channel of the current DAB Multiplex, e.g., 12B.
The bit rate (audio compression level) of the current DAB station and a
stereo/mono indicator.
Displays DAB signal quality: 85 to 100 good; 70 to 84 OK; 0 to 69 poor.
Displays a meter illustrating the strength of the DAB or FM signal.
Indicates whether the current FM broadcast is in stereo.
Displays a charging or percentage power remaining indicator for the
included ChargePAK E1 rechargeable battery pack (see page 10).
Charging indicator
(when receiving mains power).
BBC Radio 6Music
50% charging
% Charge remaining
(when powered by a ChargePAK)
OR
BBC Radio 6Music
50%
Using textSCAN™ to pause and control scrolling text
1. When ‘Scrolling text’ information is displayed in either DAB or FM, push the Tune dial to
pause the scrolling text.
Tune
BBC Radio 6Music
Now playing: Race For T
BBC Radio 6Music
Playing: Race For Th
2. Turn the Tune dial right and left to scroll forwards and backwards through the current scrolling
text. To exit textSCAN push the Tune dial again.
Tune
BBC Radio 6Music
Prize by Flaming Lips
Tune
> Exit
Using your EVOKE Mio
5
Setting the alarm & timer
Set the alarm > Set the kitchen timer
Setting the alarm
(Menu > Alarm settings)
EVOKE Mio has an alarm which switches the radio on (if in standby mode) and tunes to a DAB or
FM radio station or sounds an alarm tone.
1. Press the Menu button, turn the Tune dial and push to select ‘Alarm settings’.
2. Push the Tune dial to select ‘Set alarm’, scroll to ‘On’ and push the Tune dial to select. The
alarm is now active.
Tune
Tune
Off
Set alarm
Tune
Off
On
3. Push the Tune dial to select ‘Set time’. To set the time you want the alarm to sound turn the
Tune dial to adjust the hours and then push to confirm. Repeat to adjust the minutes.
07:00
08:00 set hours
Tune
Tune
4. Push the Tune dial to select ‘Set days’. Choose when you want the alarm to repeat (turn the
Tune dial to browse through the options and push to select).
Daily
Weekday
Weekend
Saturday
Sunday
Once only
Every day
Monday – Friday, every week
If you want to set
Every weekend
a ‘one-off’ alarm
Every Saturday
choose ‘Once only’.
Every Sunday
The alarm will sound at the time you have selected and not repeat.
5. Push the Tune dial to select ‘Set mode’ and choose the type of alarm you want to sound:
DAB, FM or Tone. If you select ‘Tone’, there are no further options.
6. For DAB and FM alarms only, push the Tune dial to select ‘Select station’ and choose which
DAB or FM radio station you want to sound for the alarm.
For DAB alarms
Select a DAB station from the station list.
For FM alarms
Choose between ‘Last tuned’ or an FM preset station. If you select ‘Last tuned’ the alarm will
tune to the last FM station you listen to before the alarm sounds.
6 Setting the alarm & timer
7. If you have selected a DAB or FM alarm you can push the Tune dial to select ‘Alarm volume’
and turn to adjust the volume level for the alarm from 1 (very quiet) to 32 (very loud).
Tune
08
Alarm volume
Tune
Tune
10
That’s it! You can see if the alarm is currently switched on in the ‘Full screen time’ display (see
page 5). Alarms can be set and adjusted from standby by pressing the Menu button.
08:30
08:30
The alarm is set to
sound at 8:30 am
An outlined bell
shows that the alarm
will not sound within
the next 24 hours.
22:45
To cancel a sounding tone or radio alarm
When a tone alarm is sounding, push the Tune dial or press Standby to cancel the alarm. To
cancel a DAB or FM alarm and return the radio to standby, press the Standby button.
Tune
08:30
08:30
or
Standby
Kitchen timer
EVOKE Mio has a countdown timer which will sound an alarm after a set time period – handy for
use in the kitchen.
To set a kitchen timer
1. Press the Timer button.
Timer
2. Turn the Tune dial to change the hours and push to confirm. Turn again to change the minutes
and push to confirm and start the countdown timer.
Tune
Tune
01 hours 00 mins
Tune
Tune
01 hours 25 mins
The alarm will sound after the time period you have set whether the radio is on or in standby.
Cancel the beeping alarm tone by pressing any button on the radio.
To stop and reset the kitchen timer to zero
To stop and reset the kitchen countdown timer to zero before it sounds a beeping tone, press and
hold down the Timer button for three seconds until you see the message ‘Timer cleared’.
Timer cleared
Timer
Setting the alarm & timer
7
Presets and Intellitext
Store and select preset stations > Browse Intellitext
Storing and selecting presets
Store up to 30 of your favourite DAB or FM radio stations in a combined list.
To quick-store a DAB or FM station to a preset button (1–5)
Tune to the DAB or FM station you want to store. Press and hold one of the numbered Preset
buttons (1–5) for two seconds until you see the ‘Preset saved’ message on the bottom line.
2
BBC Radio 6 Music
Now playing: No Cars G
BBC Radio 6Music
Preset 01 saved
To store a DAB/FM station to the preset list (1–30)
1. Tune to the DAB or FM station you want to store.
Tune
Tune
theJazz
Now: Remember by Ha
2. Press and release the 6+ button to view the numerical list of stored presets, then turn the
Tune dial to choose any Preset number between 1 and 30. You can overwrite existing presets.
Tune
Preset 06
Empty preset
Preset 10
Empty Preset
3. Press and hold the 6+ button (or the Tune dial) for two seconds until you see the ‘Preset
saved’ message. The current DAB/FM station is now stored to that number on the Preset list.
Tune
2
2
theJazz
Preset 10 saved
To recall a preset when listening to DAB or FM
1. To tune to Presets 1 to 5, press the corresponding numbered button on the unit (1 to 5).
2. To access the full list of presets (from 1 to 30), press and release the 6+ button, turn the
Tune dial right or left to scroll through the list of presets, then push and release the Tune dial
to tune to the selected preset. Presets are labelled with ‘DAB’, ‘FM’ or ‘Empty Preset’.
Tune
Preset
10
DAB theJazz
8 Presets and Intellitext
Tune
theJazz
Now: Remember by Ha
Intellitext®
Intellitext provides on-demand text information such as sports headlines, weather, and news from
DAB stations that support the service including BBC Radio Five Live and talkSPORT. The text is
updated by the broadcasters and stored in your radio while you listen to stations. Intellitext is
listed by station and split into categories. For example, the broadcaster may send information
on Football, Cricket, Headlines, etc. When energy saving mode is switched on, Intellitext will be
collected for stations that you have been tuned to for a while. If you have switched off energy
saving mode, the radio will also collect Intellitext in standby (from the last station from which you
viewed Intellitext) which you are able to view when you next switch on.
To view Intellitext messages
(Menu > Intellitext)
1. Press Menu and select ‘Intellitext’ to view a list of stations for which you have Intellitext
information. Push the Tune dial to select a station and use the Tune dial to select and
view Intellitext categories for that station, e.g., BBC Radio 5Live > SPORT > FOOTBALL. The
selected information will scroll across the screen.
Tune
SPORT
FOOTBALL
FOOTBALL
Man City complete the s
2. You can use textSCAN when viewing the text by pushing the Tune dial. To exit textSCAN press
Menu.
To change Intellitext options
(Menu > Intellitext > Options)
Set timeout
Choose to delete old Intellitext messages after 1 week (default) or 1 day.
Clear all
Delete all stored Intellitext messages immediately.
Presets and Intellitext
9
Using a ChargePAK
+
ChargePAK ™
Removing ChargePAK > Installing ChargePAK > General notes for use
ChargePAK E1 is a rechargeable battery pack provided with your EVOKE Mio. ChargePAK provides
the benefits of rechargeable batteries without the inconvenience of removing and recharging
separate batteries. ChargePAK is designed to be left in your unit, so if usually connected to the
mains, your product will always be charged up, ready to go.
+
Model E1
ChargePAK ™
Removing a ChargePAK
1. Switch your radio off and disconnect from the mains power supply.
2. Turn the radio over and using a coin, unlock and remove the battery compartment door. Lift the
ChargePAK out and pull gently on the connector plug to remove it. Note Damage may occur if
you attempt to remove the plug by pulling on the connecting wires or ChargePAK itself.
3. Replace the battery compartment door and re-lock.
Installing a ChargePAK
1. Switch your radio off and disconnect from the mains power supply.
2. Open the battery compartment and push the ChargePAK connector plug into the socket in the
compartment. Line up the ridges on the plug with the slots in the socket. Do not force the plug.
3. Insert ChargePAK into the battery compartment.
4. Replace the battery door and connect your product to a power supply.
5. ChargePAK will begin charging. Note When charging your ChargePAK for the first time or after
an extended period of inactivity we recommend that you charge it for around 24 hours to
ensure full battery power. If ChargePAK is flat there may be a slight delay before the battery
charging indicator is displayed.
General notes for use
It is perfectly normal for your ChargePAK to get warm to the touch in use, especially during
charging. Your ChargePAK should give years of trouble-free use under normal circumstances,
however, as for all rechargeable batteries the operating life will gradually reduce with age.
To purchase additional PURE ChargePAKs, contact your nearest PURE dealer, visit the shop on our
website at www.pure.com or call the PURE order line on 0845 045 1122.
Important: EVOKE Mio can only be powered with a ChargePAK E1 and is not compatible with any
other batteries, either disposable or rechargeable, or any other ChargePAK model.
10 Using a ChargePAK
Setup options
Options available in DAB > Options available in FM > General options
Options available in DAB
When listening to DAB, press the Menu button, turn the Tune dial to scroll through the options
and push the Tune dial to select.
DRC value (Menu > DRC value)
DRC (Dynamic Range Control) value makes the quieter sounds in a DAB broadcast easier to hear
at low volume or in a noisy environment. Check with the broadcasters to find out if they use DRC.
DRC full
Applies the DRC level as sent with the broadcast.
DRC half
DRC level is set to half that sent with the broadcast.
DRC off
Any DRC level broadcast will be ignored.
Station order (Menu > Station order)
Change the order that DAB stations appear in the list.
Alphanumeric
Lists all stations in alphanumeric order.
Active station
Lists active stations first on the station list
Multiplex
Lists stations in groups according to their multiplex – a group of stations
broadcast by the same operator.
Trim stn. list
Removes inactive stations from the station list (see page 14).
Autotune
(Menu > Tuning > Autotune)
Scans all DAB Band III frequencies for stations and automatically adds any new stations found to
the station list. This may take a few minutes. To stop an Autotune press Menu.
Manual tune
(Menu > Tuning > Manual tune)
Manual tune displays a signal strength meter to help you determine the best position for your
radio where the DAB signal is weak. You can also manually tune to weak multiplexes to add new
stations. Press Menu, scroll to ‘Tuning’ and select ‘Manual tune’.
1. Turn the Tune dial to scroll through different channels and push the dial to choose one.
2. A meter indicating signal strength is displayed. The empty block shows the minimum signal
level required and the filled blocks show the current reception level.
12B
225.64MHz
12B BBC National DAB
3. Move the unit or the aerial and try to raise the meter beyond the empty block. Once you have
a good signal the multiplex name will be displayed and any new stations are added to the
station list.
4. Turn the Tune dial to browse to another channel and push to select or press Menu to exit
Manual tune.
Setup options
11
Options available in FM
FM tuning mode
(Menu > FM tuning mode)
Seek
When you turn the Tune dial, the radio tunes to the next station with a good signal.
Manual
When you turn the Tune dial, the radio tunes up or down the FM frequency range by 0.05 MHz.
FM stereo mode
(Menu > FM stereo mode)
Choose from Stereo or Mono (default). Mono may improve audio clarity where stereo signals are
weak.
General options
Adjusting the display (Menu > Display settings)
OLED displays are more powerefficient than LCD displays because
they do not require a backlight.
You can adjust the brightness and time-out duration of the display for when the unit is switched
on and in standby. To change display options:
1. Press Menu, scroll to ‘Display settings’ and push the Tune dial.
2. Now choose either ‘Active’ to change settings that apply when the unit is switched on, or
‘Standby’ to change settings that apply in standby.
Changing the display time-out duration
Select ‘Duration’ and choose from the following two modes:
Always on The screen is always set to your preferred brightness level.
Timed off
The screen is set to your preferred brightness level when a button is pressed and
then switches off after 7 seconds of inactivity.
Changing your preferred brightness level
Select ‘Brightness’ and choose from the following options:
Automatic
The brightness of the screen adjusts automatically depending on the ambient light
levels in the room (default).
1–10
Turn the Tune dial to vary the brightness level between 1 (very dim) and 10 (very
bright) and push to confirm your preferred setting.
Screensaver
EVOKE Mio has a screensaver that appears when the unit is left unattended whilst on or in
standby. To avoid screen burn-in over a long period, it is recommended that you do not switch the
screensaver off. Two options are available:
On (default) The screensaver appears after no buttons have been pressed for 15 minutes. Press
any button to exit the screensaver and operate the radio.
Off
12 Setup options
Screensaver does not appear.
Set clock
(Menu > Set clock)
You can manually set the time and date if required. If you have a DAB signal and/or a good FM
(RDS) reception these will be updated automatically.
Energy saving
(Menu > Energy saving)
This product has a special
energy saving standby mode.
EVOKE Mio is part of the PURE EcoPlus product family, designed and manufactured to minimize
power consumption when the unit is switched on and to use less than 1 Watt in standby. One way
this low power consumption is enabled is by not collecting and storing Intellitext messages when
the unit is in standby. You can override this option by switching off energy saving mode, but this
will increase standby power consumption. Two options are available:
Energy saving On (the default setting)
EVOKE Mio updates the Intellitext data when you tune to a station that broadcasts Intellitext.
Intellitext data is not collected in standby.
Energy saving Off
EVOKE Mio collects Intellitext data in standby from the last station you tuned to with Intellitext,
which increases standby power consumption.
Note: When you have the ChargePAK E1 fitted (see page 10) the unit will switch off when you
press the Standby button and not enter standby, as long as the unit is not connected to mains
power.
Software Updates
(Menu > Upgrade)
Software updates for your EVOKE Mio may be made available in the future. If you register your
product and include a valid e-mail address you will receive notification of software updates
(register at www.pure.com/register or fill in the supplied warranty card). Alternatively, visit
www.pure.com/support at any time to check for available software updates.
To update your software
Connect your radio to your PC using a suitable A-to-mini B type USB cable. Follow the instructions
provided with the software download at www.pure.com/support.
Note: USB update requires a PC (not Mac) with internet access running Windows XP and a
suitable USB cable (not included).
Setup options
13
Help and Specifications
Secondary and inactive stations > Hints and tips > Technical Specifications
Secondary and inactive stations
(<</>>) Secondary DAB services
Some stations have accompanying secondary services which provide extra information or alternative content
and may only be broadcast at certain times. If a station has a secondary service available, the station shows
‘>>’ next to its name in the station list and the secondary service appears next to the station in the list. A
secondary service has a ‘<<’ before its name in the station list.
(?) Inactive or unavailable DAB stations
Inactive or unavailable stations appear on the station list preceded by ‘?’ and cannot be tuned to. A station
may be inactive or unavailable because the station is not broadcasting at the current time (check with the
station) or has stopped broadcasting altogether. Also, you may not have a strong enough signal to receive
the Multiplex on which the station is broadcast.
Hints and tips
Display says ‘No stations available’
Use Autotune (page 11) to search for stations. Try adjusting your aerial or radio position.
Receiving new DAB stations that have started broadcasting
Use Autotune (page 11) to scan for new stations and add any new DAB services to the station list.
The screen is very dark
Check that the light sensor on the front panel is not obstructed.
Using the alarm when a ChargePAK E1 is fitted
When the radio is powered by a ChargePAK E1 for portable listening, i.e., a ChargePAK rechargeable battery
is fitted and the unit is not connected to mains power, the radio switches off completely when the Standby
button is pressed and the alarm will not sound. In this case, the message ‘Disabling alarm’ will be displayed
when the Standby button is pressed.
Resetting your radio
Resetting your radio removes all presets, clears the station list and resets all options to defaults.
1. Press and hold the Menu button for three seconds.
2. Push the Tune dial within 3 seconds to confirm the reset or the reset will cancel.
14 Help and Specifications
Technical Specifications
General
Stereo digital radio (stereo output requires headphones or external amplifier)
with full Band III and FM reception. ETS 300 410 compliant and capable of
decoding all DAB transmission modes 1-4 up to and including 256 kbps.
Supports FM RDS and RadioText.
Frequency ranges
Band III 174-240 MHz, FM 87.5-108 MHz.
Speaker
Full-range 3" drive unit.
Audio power output 7W RMS per channel.
Inputs
6V DC power adaptor socket (230V supplied). 3.5mm Aux In for auxiliary
devices. USB connection (Mini-B type) for product upgrades only.
Outputs
3.5mm headphone, 3.5mm stereo out (analogue).
Presets
30 DAB and FM presets in a combined list.
Display
High contrast yellow graphical 128 x 22 pixel organic LED (OLED) display.
Power supply
230V AC to 6V DC external power adapter or ChargePAK E1 (supplied).
Power consumption In standby 0.9W (industry average 2.64W); in operation 2.48W (industry
average 5.49W).
Approvals
CE marked. Compliant with the EMC and Low Voltage Directives (2004/108/
EC and 2006/95/EC).
Dimensions
181mm high x 210mm wide x 125mm deep.
Aerial
Captive telescopic aerial.
Components are selected for
minimised environmental impact.
Disposal of Waste Electrical & Electronic Equipment
This symbol on the product or on its packaging indicates that this product should not be
treated as household waste. Instead it should be handed over to a suitable collection
point for the recycling of electrical and electronic equipment. By ensuring this product
is disposed of correctly, you will help prevent potential negative consequences for the
environment and human health, which could otherwise be caused by inappropriate
waste handling of this product. The recycling of materials will help to conserve natural
resources. For more detailed information about recycling of this product, please contact
your local council office, your household waste disposal service or the shop where you
purchased the product.
Help and Specifications
15
www.pure.com
PURE Digital
Imagination Technologies Ltd.
Home Park Estate
Kings Langley
Herts, WD4 8LZ
United Kingdom
+44 (0)845 148 9001 sales and support
+44 (0)845 148 9002 trade sales and support
+44 (0)845 148 9003 fax
PURE Digital
Karl-Marx Strasse 6
64589 Stockstadt/Rhein
Germany
+49 (0)6158 878872
+49 (0)6158 878874
PURE Digital - Vertrieb über:
TELANOR AG
Unterhaltungselektronik
Bachstrasse 42
4654 Lostorf
Schweiz/Switzerland
+41 (0)62 285 95 95 sales
+41 (0)62 285 95 85 fax
PURE Australasia Pty Ltd
PO Box 5049
Wonga Park.
Victoria 3115
Australia
+61 (0)3 9722 2422
+61 (0)3 9722 2104
EcoPlus
[email protected]
[email protected]
sales
fax
[email protected]
[email protected]
www.telanor.ch
sales and support
fax
[email protected]
[email protected]
EVOKE Mio is a member of the PURE EcoPlus™ product family.
All EcoPlus products are designed and manufactured to
minimise their environmental impact.
Documentation is printed on 100% recycled paper using
soya-based ink.
The retail carton protecting your product is printed on at
least 70% recycled card finished using a water-based
varnish and sized for maximum transport efficiency.
For more information please visit www.pure.com/ecoplus
Printed on 100% recycled paper
101DT