1
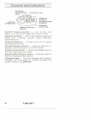
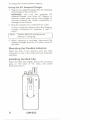
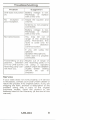
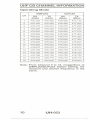
uniden
@
Sundowner
UH-O53
16-Channel Personal
UHF2-Way Radio
Operating Manual
Please
read carefully
Safety
Information
. 00
before
operating
this radio.
NOT operate the transmitter of any radio
equipment with the antenna touching, or close to the
eyes, face, or exposed body parts.
. 00
NOT operate the transmitter of any radio
equipment unless all the Radio Frequency (RF)
connectors are secure and any open connectors are
properly terminated.
. 00
.
NOT operate the transmitter of any radio
equipment near electrical blasting caps or in an
explosiveatmosphere.
00 NOT let children operate any transmitterequippedradio equipment.
. Have
your radio equipment serviced by a qualified
technician.
Nickel-Cadmium
. This
equipment
Battery Warning
contains
a nickel-cadmium
battery.
. The
nickel-cadmium
battery contained in
equipment may explode if disposed of in a fire.
. Do
this
not short circuit the battery.
. Do
not charge the nickel-cadmium battery used in
this equipment in any other charger other than the
one designed to charge this battery. Using another
charger may damage the battery, or cause the
battery to explode.
Uniden@ is
Corporation.
a
registered
trademark
of
Uniden
Features, Specifications, and availability of Optional
Accessories are all subject to change without notice.
Table of Contents
Introduction...
Warning!
Feature Highlights
Unpacking
OptionalAccessories
Controls and Indicators
2
2
3
3
3
4
Getting Started
Chargingthe Battery
Mountingthe Antenna.
Installingthe BeltClip
5
5
....6
6
Operation
....
7
Simplex/Duplex
Communication...7
low Batterylevel Detection
8
Care and Maintenance
8
Replacingthe Rechargeable
Battery
8
Troubleshooting
9
Service
9
UHFCB Channel Information ...10
Specifications
UH-O53
11
1
Introduction
Congratulations
on your purchase of the
Sundowner UH-O53. This 16-channel personal
UHF-CB 2-way radio represents a great value in
professional portable communications. You'll find
that it provides reliable, consistent performance
for short-distance 2-way personal communications.
The Sundowner UH-O53 is designed to operate
in simplex mode on CH 1 to CH 16 or duplex
mode on CH 1 to CH8 where repeater service is
available.
Warning!
The Citizens Band Radio Communication
Service (CBRS) is under the jurisdiction of the
Australian
Spectrum
Management
Agency
(SMA). Any adjustment or alteration which will
change the performance of the transceiver's
original SMA type acceptance is STRICTLY
PROHIBITED. Replacement or substitution of
power or frequency determining components
e.g. Crystals, Transistors, ICs, Diodes, etc. with
other than those recommended by UNIDEN will
cause violation to the SMA type acceptance
technical requirement.
2
UH-O53
Feature Hi~hts
.
.
.
One
-
Watt Power -
Reliable short range 2
- way communication.
Simplex/Duplex - Communication - Allows
the UH-oS3 to operate via a repeater station.
16 - Channel Capability - Uses any of the
first 16 Channels of the UHF CB Band.
.
.
LED Message Indicators - instantly see when
the radio is transmitting, the channel is busy, or
the battery is Iow.
Rechargeable Nickel - Cadmium Battery Eliminates the costly expense of frequently
purchasing replacement batteries.
AC Adaptor/Charger Use to charge/
recharge the Nickel- Cadmium battery.
Speaker/Microphone Jacks - Plug in the
.
.
optional Remote Speaker/Microphone for
easiercommunications.
Unpacking
.
..
..
.
Carefully check the contents against this list:
UH-OS3 16-Channel Personal UHF 2-Way
Radio
Nickel-Cadmium Battery (installed in radio)
Flexible Rubber Antenna
BeltClip
AC Adaptor/Charger
This Operating Guide (read carefully and
save)
If any items are missing or damaged, contact
your place of purchaseimmediately
Optional Accessories
.
.
Spare Battery
-
Replacement Recharge-
able battery.
Remote Speaker/Microphone
-
Use the
UH-oS3 while clipped to your belt or on a
desk.
UH-O53
3
Controls and Indicators
On-Off/ VolumeControl - Use to turn the
radio on or off, and to adjustthe volume level.
Squelch Control- Useto eliminatebackground
noise (the "rushing" sound) heard between
transmissions.
Channel Selector the desired channel.
Rotate this knob to select
Simplex/Duplex Switch - Selects Simplex or
Duplex. Communication on CH 1 to CH8.
Antenna Connector - Screw the flexible antenna
into this TNC-type connector.
Speaker/Microphone Jacks - Plug the optional
Remote Speaker/Microphone.
Charging Jack - Plug the supplied AC Adaptor/
Charger into this jack to charge/recharge the
battery while in the UH-oS3.
4
UH-O53
1Dden"
"""""""""'"
PTT
SWITCH
'" '" 0 0 ~.;' .;' I
'" 0 0 0 0 0 '"
"'00000'"
'" '"
0 00 0
00
0 0"' '"
'"
ti
1
BUILT-IN
SPEAKER
BUILT-IN
MICROPHONE
l::J". .~
~
TXlBATT.
LO
INDICATOR
~
La,)
c
Et
0
"0
C
::a
Cl)
I
BUSY
"".ONAL
UHI'Z-WAY
RADIO
PIT (Press- To-Talk) Switch - Press to transmit.
TXlBAIT Le Indicator - This red LED lights
when you press the PIT switch to transmit. The
LED blinks when the battery is Iow and needs
recharging.
BUSY Indicator - This amber LED lights when
the signal being received on the current channel
is strong enough to break squelch.
Built-in Microphone - Speak into here when
transmitting.
Built-in Speaker - Provides audio output when
receiving.
Getting Started
Charging the Battery
Before using the UH-QS3for the first time, or
whenever the red BATT LO indicator lights
showing the battery is Iow, you should fully
charge the unit.
UH-O53
5
To charge the nickel-cadmium battery:
Using the AC Adaptor/Charger
1. Plug the AC adaptor/Charger into the Charging
Jack located on top of the unit.
WARNING! Use only the supplied AC
Adaptor/Charger. Any other AC Adaptor or
external power plug having over-voltage or
reversed polarity can cause overheating or
damage to the circuitry.
2. Plug the charger into a standard AC outlet.
To fully charge the battery, leave the Adaptor/
Charger connected for between 9 and 11
hours.
Note:
Switch OFF the unit while the
battery is charging.
3. When charging is complete, disconnect the
Adaptor/Charger from the AC outlet, and from
the radio.
Mounting the Flexible Antenna
Place the end of the antenna onto the TNC
connectoron top of the radio and turn clockwise
untiltight.
Installing the Belt Clip
Place the Belt Clip slightly above the mounting
area on the back of the radio, and press
downward and in.
6
U H-O53
"
Qperation
Note: Before operating the UH-oS3 for the
first time, make sure you have fully
charged the battery.
1. Turn the UH-oS3 on by rotating the
On-OffNolume Control clockwise until you
hear a click.
2. Adjust the Volume Control to a comfortable
level.
3. Turn the Squelch Control fully counterclockwise. You will hear background noise,
and the BUSY Indicator will light. Turn the
Squelch Control just until the background
noise disappears and the BUSY Indicator
goes out. At this setting, the received signal
must be strong enough (>0.25jlV) to break
squelch and be heard.
4. If the channel is clear, the BUSY Indicator will
be out. (If the BUSY Indicator is lit, the
channel is busy. Wait until the light goes out
before you begin transmitting.) Press the PTT
Switch to transmit. The TX Indicator lights to
indicate you are transmitting. Hold the built-in
microphone (or optional Speaker/Microphone)
approximately two inches from your mouth
and speak clearly in a normal voice.
5. When you are through speaking, release the
PTT switch and listen for a reply. (The TX
Indicator goes out.)
6. When you are finished using the radio, be
sure to turn it off to conserve battery power.
Simplex/Duplex
Communication
Duplex Operation allows the Sundowner
UH-oS3 to operate via a repeater station on
Channels 1 through8. The set receiveson these
channels but transmits 750 kHz higher than the
receiverfrequency.
When the Simplex/Duplex switch is set to
Simplex position, the set receives and transmits
on the same channel. (SimplexCommunication)
To use Duplex operation on a Channel where
Repeater Service is available, set the
Simplex/Duplexselectorswitch to "Duplex".
To put the Duplex channel back to normal
Simplex operation, set the Simplex/Duplex
Selectorswitch to "Simplex".
UH-O53
7
Low Battery Level Detection
Uniden Sundowner UH-oS3 has a built-in
battery level detector circuit. It evaluates your
Battery Pack everytime you transmit to
determine whether the power inside the Battery
is still sufficient enough to support normal
Receive and Transmit communications.
When the PTT switch is pressed and the TX
LED blinks. It means the battery level is already
Iow and needs recharging. Under this condition,
the unit no longer transmits RF Power. Have
your battery charged fully or replaced by a fully
charged battery to resume normal operation.
Care and Maintenance
TheUH-OS3 is designedto give you trouble-free
service. There are no user-serviceable parts
inside,and except for occasionally replacingthe
rechargeable battery, no maintenance is
required.
Warning!Unidendoes not representthis unit
to be waterproof Do not expose the unit to
moisture. Rain, dew, or other liquids may
damage the internalcomponents.
Replacing the Rechargeable Battery
When it is time to install a new battery, use only
the one made for this radio. Any other type of
battery may damage your unit.
To replace the battery:
1. Remove the Belt Clip by lifting the tab and
carefully sliding upward and out.
2. Remove the battery compartment cover on
the back of the radio by pressing in and
sliding the cover down and off.
3. Remove the rechargeable nickel-cadmium
battery and replace with a new one. Be sure
the terminals on the battery match up with the
contacts in the radio.
4. Replace the battery compartment cover by
sliding it back into place until it clicks.
5. Replace the Belt Clip.
Note: Be sure to recharge the battery before
using the radio.
8
UH-O53
Troubleshooting
Problem
Suggestion
Unit does not power Battery voltage is Iow.
on.
Recharge, or replace
with a new one.
No reception or Adjust the squelch and
volume.
poor reception.
Antenna is not properly
connected.
Battery voltage is Iow.
Recharge, or replace
with a new one.
You may be out of
range of the receiving
party. Remember, this
radio is used only for
short
distance
communication.
No transmission.
If you are using the
optional
Speaker /M icrophone,
make sure it is properly
connected.
Transmittingon any
channel between
CH1 to CH8 but the
receiving party cannot hear you.
Maybe out of range of
the receiving party or if
not using a repeater
station check the Simplex!
Duplex Swch Setting
(should be set to
simplex)
Service
If your radio does not work properly, or if service
is necessary, contact your local Uniden dealer or
retum the product in its original carton. If you are
shipping the item, enclose a description of the
problem along with a copy of the original
purchase receipt. Send the product to the
address listed in the Warranty (at the end of this
manual).
UH-O53
9
UHF CB CHANNEL INFORMATION
Operating Mode
SIMPLEX
CH
DUPLEX
1
RX
(MHz)
476.425
TX
(MHz)
476.425
RX
(MHz)
476.425
TX
(MHz)
477.175
2
476.450
476.450
476.450
477.200
3
476.475
476.475
476.475
477.225
4
476.500
476.500
476.500
477.250
5
476.525
476.525
476.525
477.275
6
476.550
476.550
476.550
477.300
7
476.575
476.575
476.575
477.325
8
476.600
476.600
476.600
477.350
9
476.625
476.625
476.625
476.625
10
476.650
476.650
476.650
476.650
11
476.675
476.675
476.675
476.675
12
476.700
476.700
476.700
476.700
13
476.725
476.725
476.725
476.725
14
476.750
476.750
476.750
476.750
15
476.775
476.775
476.775
476.775
16
476.800
476.800
476.800
476.800
Note: From Channel 9 to 16, irregardlessof
SIMPLEx/DUPLEX Switch setting, the
transmit and receive frequency is the
same.
10
UH-O53
S~ecifications
General
Channel:
16 (PLL)
Frequency Range: Simplex
476.425 MHz to
476.800 MHz
Duplex (TX) 477.175 MHz to
477.350 MHz
Antenna Connector: TNC type
Size:
150 mm(H) x
41 mm(D) x
63 mm(W)
Weight:
410 g
Speaker:
16Q, O.4W max
Microphone:
Built-in Electret type
Approvals:
SMAS250
Transmitter
Frequency
Tolerance at 25°C:
::!:500Hz (nominal)
Frequency Stability
oac to +55°C:
::!:5PPM
Carrier Power
1W
Spurious Emission
-30 dBm (or Better)
Modulation
Frequency
Response
(1 kHz REF)
500 Hz:
2000 Hz:
-6 dB
+6dB
Microphone
Sensitivity for +/-3
kHz Dev.
5mV
MaximumDeviation :!:4.7 kHz
(100 mV input)
Current Drain
550 mA
UH-O53
11
Receiver
12 dB SINAD
Sensitivity:
0.2511V
SquelchSensitivity
Threshold:
0.251lV
1!lV
Tight:
Audio Frequency
Response
(1 kHz REF)
500 Hz:
2000 Hz:
+3 dB
-6 dB
AdjacentChannel
Selectivity
(:!:25kHz)
55 dB
Image Rejection
(1st& 2nd):
40 dB
Hum & Noise Ratio 38 dB
THD at Standard
Output Power:
3%
Audio Output Power
at 10% THD:
0.25 W
Maximum Audio
Output Power:
0.5W
Oscillator Dropout
Voltage:
6 V (max.)
Standby Current
Drain:
40mA
Current Drain at
Maximum Audio
Output:
250 mA
Specifications shown are typical and subject to change without notice.
12
UH-O53
WARRANTY
Uniden Sundowner UH-o53
16-Channel Personal UHF 2-Way Radio
Australian 1 Year Warranty
Note:
Please keep your sales docket as it provides evidence
of warranty.
WARRANTOR:
Uniden Australia Pty. Umited ACN 001 865498
ELEMENTS OF WARRANTY: Uniden warrants to the original
retail owner for the duration of this warranty, its Sundowner UH053 16-Ghannel Personal UHF 2-Way Radio (hereinafter referred to as the Product), to be free from defects in materials and
craftsmanship with only the limitations or exclusions set out below.
WARRANTY
DURATION: This warranty to the original retail
owner only, shall terminate and be of no further effect ONE (1)
Year after the date of original retail sale. This warranty will be
deemed Invalid if the product is; (A) Damaged or not maintained as reasonable and necessary, (B) Modified, altered or
used as part of any conversion kits, subassemblies, or any
configurations not sold by Uniden, (C) Improperly installed, (D)
Repaired by someone other than an authorized Uniden Repair
Agent for a defect or malfunction covered by this warranty, (E)
Used in conjunction with any equipment or parts or as part of a
system not manufactured by Uniden. (F) Installed, programmed or seNiced by anyone other than an authorized
Uniden Repair Agent. (G) Where the Serial Number label of
the product has been removed or damaged beyond recognition.
PARTS COVERED:
This warranty covers for 1 year, the
Sundowner UH-053 16-Channel Personal UHF 2-Way Radio
Unit only. All accessories, NICAD Battery, AC Adaptor/Battery
Charger, Antenna, Belt Clip, are covered for 90 days.
STATEMENT" OF REMEDY: In the event that the product
does not conform to this warranty at any time while this warranty is in effect, the warrantor at its discretion, will repair the
defect or replace the product and return it to you without
charge for parts and service.
THIS WARRANTY DOES NOT COVER OR PROVIDE FOR
THE REIMBURSEMENT
OR PAYMENT OF INCIDENTAL
OR CONSEQUENTIAL DAMAGES.
WARRANTY
CARD: If a warranty card has been included
with this product then please fill it in and retum it to us within
14 days of purchase. Your name and serial number of the
product will then be registered in our database and this will
help us process your claim with greater speed and efficiency
should you require warranty seNice.
PROCEDURE FOR OBTAINING PERFORMANCE OF
WARRANTY: In the event that the Productdoes not conform
to this warranty,the Product should be shipped or delivered,
freight pre-paid, with evidence of original purchase, (egl a
copy of the sales docket),to the warrantorat:
UNIDENAUSTRALIA PTY.LIMITED
SERVICEDIVISION
345 Princes Highway, Rockdale, NSW 2216
Ph (02) 599 3100 FAX(02) 599 3278
Customers in other States should ship or deliver the Product
freight pre-paid to their nearest Uniden Authorized Repair Centre.
(Contact Uniden for the nearest Warranty Agent to you)
'fI
I
i
I
I
+.,
unidE!n
@
UTZZO
-J..
Printed in Philippines
I 859ZZ
-
-'