1
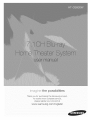
the possibilities
Thank you for purcnaslng this Samsung product.
To receive more complete service.
p_ease register your product at
www.samsung.com/reg_ster
,f
Ii fori n ioi
TOREDUCE
THERISKOFELECTRIC
SHOCK,DONOTREMOVE
THECOVER
(ORBACK).
NOUSER-SERVICEABLE
PARTS
AREINSIDE.
REFER
SERVICING
TOQUALIFIED
SERVICE
PERSONNEL.
,a,
The lightingflashandArrowhead
withinTriangleIsawarningsign
abrtingyou of dangerousvoltage
Insidethe product.
CAUTION :TOREDUCE
THE
RISK
OF The expbnation point within the
ELECTRIC
SHOCK,
DONOT
REMOVE triangle is a warning sign abrting
COVER
(ORBACK)
NOUSER
SERVICEABLE
you of important instructions
PARTS
INSIDE.
REFER
SERVICING
TO
accompanying the product.
QUALIFIED
SERVICE
PERSONNEL.
WARNING
CAUTION
- To reduce the risk of fire or electric shock, do
not expose this appliance to rain or moisture.
- Apparatus shallnot be exposed to dripping or
splashing and no objects filledwith liquids, such as
vases, shallbe placed on the apparatus.
- The Mains plug is used as a disconnect device and
shall stay readilyoperable at any time.
DANGER
VISIBLEAND INVISIBLELASER RADIATIONWHEN
CLASS 1 LASER
PRODUCT
, This product is classified as a CLASS 1
LASER product.
OPEN. AVOID DIRECTEXPOSURETO BEAM. (FDA
21 CFR)
CAUTION
Use of controls, adjustments or performance
of procedures other than those specified
herein may result in hazardous radiation
CLASS 3B VISIBLEAND INVISIBLELASER
RADIATIONWHEN OPEN.AVOID EXPOSURETO
exposure.
THE BEAM (lEO60825-1)
- Complies with 21CFR 1040.10 except for
deviations pursuant to Laser Notice No. 50,
dated June 24, 2007.
THIS PRODUCTUTILIZESA LASER. USEOF
CONTROLS ORADJUSTMENTSOR
PERFORMANCEOF PROCEDURESOTHER
THAN THOSE SPECIFIEDHEREINMAY RESULT
IN HAZARDOUSRADIATIONEXPOSURE.DO
NOT OPEN COVERAND DO NOT REPAIR
YOURSELF.REFERSERVICINGTO QUALIFIED
PERSONNEL.
2
English
This product satisfies FCC regulations when shielded cables and connectors are used to connect the
unit to other equipment, To prevent electromagnetic interference with electric appliances, such as
radios and televisions, use shielded cables and connectors for connections,
FCC NOTE (for U.S.A)
This equipment has been tested and found to comply with the limits for a Class B digital device,
pursuant to Part 15 of the FCC Rules, These limits are designed to provide reasonable protection
against harmful interference in a residential installation,
This equipment generates, uses and can radiate radio frequency energy and, if not installed and used
in accordance with the instructions, may cause harmful interference to radio communications,
However, there is no guarantee that interference will not occur in a particular installation.
If this equipment does cause harmful interference to radio or television reception, which can be
determined by turning the equipment off and on, the user is encouraged to try to correct the
interference by one or more of the following measures:
- Reorient or relocate the receiving antenna,
- Increase the separation between the equipment and receiver,
- Connect the equipment into an outlet on a circuit different from that to which the receiver is
connected,
- Consult the dealer or an experienced radio/TV technician for help,
CAUTION : FCC regulations state that any unauthorized changes or modifications
ment may void the user's authority to operate it,
RF Radiation
Exposure
to this equip-
Statement
This equipment complies with FCC RF Radiation Exposure limits set forth for an uncontrolled
environment.
This equipment should be installed and operated with a minimum distance of 20cm between the
radiator and your body.
This transmitter must not be co-located or operating in conjunction with any other antenna or
transmitter,
This device complies with part 15 of the FCC Rules. Operation is subject to the following two
conditions:
(1) This device may not cause harmful interference, and
(2) this device must accept any interference received, including interference that may cause
undesired operation.
Changes or modifications
not expressly approved by the party responsible
could void the user's authority to operate the equipment.
To comply with the FCC RF exposure compliance
must not be co-located
or operated in conjunction
requirements,
for compliance
this device and its antenna
The final device into which this transmitter module is installed must be labeled with the following
statement:
"This device contains TX FCC ID: A3LDNUBS1 ." If this transmitter will be configured as a pc
peripheral, it will be the OEM's responsibility to obtain authorization as such (either through
Certification of Declaration of Conformity) prior to marketing of the device,
English
,3
Read these operating instructions carefully before using the unit. Follow all the safety instructions listed
below. Keep these operating instructions handy for future reference.
1) Read these instructions.
2) Keep these Instructions.
3) Heed all warnings.
4) Follow all instructions.
5) Do not use this apparatus near water.
6) Clean only with dry cloth.
7) Do not block any ventilation openings. Install in accordance with the manufacturer's instructions.
8) Do not install near any heat sources such as radiators, heat registers, stoves, or other apparatus
(including amplifiers) that produce heat.
9) Do not defeat the safety purpose of the polarized or grounding-type plug. A polarized plug has two
blades with one wider than the other. A grounding type plug has two blades and a third grounding
prong. The wide blade or the third prong are provided for your safety. If the provided plug does not fit
into your outlet, consult an electrician for replacement of the obsolete outlet.
10) Protect the power cord from being walked on or pinched particularly at plugs, convenience receptacles,
and the point where they exit from the apparatus.
11) Only use attachment/accessories specified by the manufacturer.
12) Use only with the cart, stand, tripod, bracket, or table specified by the manufacturer, or
sold with the apparatus. When a cart is used, use caution when moving the caw
apparatus combination to avoid injury from tip-over.
13) Unplug this apparatus during lightning storms or when unused for long periods of time.
14) Refer all servicing to qualified service personnel. Servicing is required when the apparatus has been
damaged in any way, such as power supply cord or plug is damaged, liquid has been spilled or objects
have fallen into the apparatus, the apparatus has been exposed to rain or moisture, does not operate
normally, or has been dropped.
4'
English
_, Ensure that the AC power supply in your house complies with the identification sticker located on the back
of your product.
_, Install your product horizontally, on a suitable base (furniture), with enough space around it for ventilation
(3-4 inches).
_, Do net place the product on amplifiers or other equipment which may become hot.
Make sure the ventilation slots are net covered.
_, Do net stack anything on top of the product.
_, Before moving the product, ensure the Disc Insert Hole is empty.
_, In order to disconnect the product completely from the power supply, remove the main plug from the wall
outlet, especially when left unused for a long period of time.
_, During thunderstorms, disconnect the AC main plug from the wall outlet. Voltage peaks due to lightning
could damage the product.
_, Do net expose the product to direct sunlight or other heat sources. This could lead to overheating and
malfunction of the product.
_, Protect the product from moisture, and excess heat or equipment creating strong magnetic or electric
fields (i.e.speakers.).
_, Disconnect the power cable from the AC supply if the product malfunctions.
o Your product is not intended for industrial use. Use of this product is for personal use only.
_, Condensation may occur if your product or disc has been stored in cold temperatures. If transporting the
product during the winter, wait approximately 2 hours until the product has reached room temperature
before using.
_,The batteries used with this product contain chemicals that are harmful to the environment.
Do net dispose of batteries in the general household trash.
V!ewing
TV using 3D function
.......................................................
Important safety Information. Read the following warnings before you or your child use the 3D function.
,, The pregnant, elderly and epileptic and those suffering from a weak heart or serious carsickness are
advised to avoid watching 3D pictures.
- We don't recommend 3D pictures to those who are in bad physical condition, who are sleep-deprived or
who drank liquor. Some 3D pictures may startle viewers.
,, De net place a sharp-edged or easily breaking object around you when playing a 3D video. If you feel and
respond your body to the 3D video like it's real, you can break the object around you or be physically
damaged.
_, Photosensitive Seizure Warning and Other Health Risks
- Some viewers may experience an epileptic seizure or stroke when exposed to certain flashing
images or lights contained in certain television pictures or video games. If you or any of your
relatives has a history of epilepsy or strokes, please consult with a medical specialist before using
the 3D function.
- If you have any one of the following symptoms or conditions while watching 3D pictures, stop
watching immediately and rest: dizziness, eye or facial instability, involuntary movement, cramps,
clouded consciousness, mental disorder, disorientation or nausea. (If the symptom persists, please
consult a medical specialist.)
- In particular, children or teenagers need parent care and guard when they watching the 3D video.
- Do not watch 3D pictures when you feel incoherent, sleepy, tired or sick. Avoid watching 3D
pictures for long hours.
English
5
,f
II fOIrm iOI
Small scratches on the disc may reduce sound
and picture quality or cause skipping.
Thisproduct
iscovered
byoneormoreofthefollowing
U.S.patents:
5,060,220
5,457,669
5,561,649
5,705,762
6,043,912
6,438,099
6,467,061
6,556,521
6,578,163
6,697,307
6,728,474
6,771,891
Be especially careful not to scratch discs when
6,894,963
6,895,593
6,937,815
6,996,327
7,009,926
7,085,221
handling them.
7,088,649
7,092,327
7,099,566
7,123
5647,142,493
7,142,495
7,145,861
7,146,624
7,151,729
7,161,879
7,164,647
7,167,437
Holding discs
...............................................................................................................
7,173,891
7,177,250
7,194,187
7,203,891
7,209,423
7,210,067
7,228,062
7,245,566
7,245,567
7,257,065
7,263,045
7,269,110
- Donottouchtheplaybacksided thedisc.
7,272,086
7,272,106
7,280,460
7,283,729
7,286,454
7,304,938
- Holdthe discby the edgesso thatfingerprintswill not
Thisproduct
incorporates
copyright
protection
technology
thatis
geton the surface.
protected
byU.S.patents
andotherintelledual
property
rights.Useof
- Do not stick paperor tape on the
thiscopyright
protection
technology
mustbeauthorized
byRovi
disc.
Corporation,
andis intended
forhomeandotherlimited
viewing
uses
onlyunlessotherwise
authorized
byRoviCorporation.
Reverse
Disc Storage
engineering
ordisassembly
is prohibited.
- Do not keep in direct sunlight
created
byaivX,lnc.
This
is anofficial
Bid
Certified
ABOUT
DIVX
VIDEO:
DivX@
isadigital
video
format
device
thatplaysDivX
video.
Visitwww.divx.com
for
moreinformation
andsoftware
toolstoconvert
your
filesintoDivX
video.
ABOUT
BIVX
VIDEO-ON-DEMAND:
ThisaivXCerlJfied®
device
must
beregistered
inordertoplayDivXVideo-on-Demand
(VOB)
content.
Togenerate
theregistration
code,locate
theDidVOBsectioninthe
devicesetupmenu.Gotovod.divx.com
withthiscodetocomplete
theregistration
process
andlearnmoreaboutBivXVOB.
BivXCerlJfled
to playDivXvideouptoHa1080p,inchd[ngpremium
content.
- Keep in a cool ventilated area
- Keep in a clean Protection jacket.
Store vertically.
NOTE
_, Donot allowthe discsto becomecontaminatedwith
dirt.
_ Donot loadcrackedor scratcheddiscs.
Handling
and Storing
iPadisatrademark
ofApple
Inc.,registered
intheU.S.and
Disc s...........................................
othercountries.
ifyou get fingerprintsor dirt on the disc, dean it witha
milddetergentdilutedin water andwipe with a soft cloth.
- When cleaning, wipe gently from the inside to
the outside of the disc
NOTE
_s Condensationmay form if warm aircomes into
contact with cold partsinside the product. When
condensationforms insidethe product, it may not
operatecorrectly.If this occurs, removethe disc
and let the productstand for 1 or 2 hourswiththe
power on.
iPhone
isa trademark
ofAppleInc.
Manufactured
underlicense
fromDolbyLaboratories,
Doiby,
ProLogicandthedouble-Dsymbolaretrademarks
of Dolby
Laboratodes.
- Manufactured
underlicense
underU.S.Patent#'s:5,451,942;
5,956,674;5,974,380;
5,978,762;6,226,616;6,487,535;
7,212,872;7,333,929;7,392,195;7,272,567& otherU.S.
andworldwidepatentsissued
& pending.
DTSandtheSymbolareregistered
trademarks,
& DTS-HD,
DTS-HD
MasterAudioI Essential,
andtheDTSlogesare
trademarks
of DTS,Inc.Product[nchdes
software.© DTS,
Inc.AllRightsReserved.
- < OpenSourceLicenseNotice>
Inthecaseof usingopensourcesoftware,OpenSource
Licenses
areavailable
ontheproductmenu.
- "Bh-ray3D"and"Bh-ray3D"logoaretrademarks
ofBh-ray
DiscAssociation.
© 2010 Samsung Electronics Co., Ltd. All rights
reserved.
English
Coi t i t
2
4
5
Safety Warnings
Important Safety Instructions
Precautions
6
6
Cautions on Handling and Storing Discs
License
6
Copyright
g
10
Key features of your new Blu-ray Home Theater
Icons that will be used in manual
11
15
16
16
17
18
Disc Types and Characteristics
Accessories
Description
Front Panel
Rear Panel
Remote control
20
25
26
27
28
29
Connecting the Speakers
Connecting External Devices/your TVvia HDMI
Connecting the FM Antenna
Connecting the Video Out to your TV
Connecting Audio from External Components
Connecting to the Network
31
Before Starting (Initial settings)
iiiiiiiiiiiiiiiiiiiiiiiiiiiiiiiiiiiiiiiiiiiiiiiiiiiiiiiiiiiiiiiiiiiiiiiiiiiiiiiiiiiiiiiiiiiiiiiiiiiiiiiiiiiiiiiiiiiiiiiiii
32
Setting the Menu
33
33
Display
3D
34
34
34
36
36
36
36
36
37
37
38
38
38
TV Aspect Ratio
BD Wise (Samsung Products only)
Resolution
HDMI Format
Movie Frame (24 Fs)
Progressive Mode
Still Mode
HDMI Deep Color
Audio
Speaker Setting
Musical Room Calibration
EQ Optimizer
HDMI Audio
39
40
40
40
40
40
40
40
41
41
41
42
42
45
45
Digital Output
Dynamic Range Control
AV Sync
System
Initial Settings
Intemet@TV Screen Size
Anynet+ (HDMI-CEC)
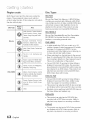
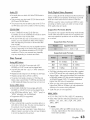
BD Data Management
Clock
DivX(R) Registration
DivX(R) Deactivation
Network Setup
Network Settings
Network Status
BD-LIVE Intemet Connection
45
46
46
46
Language
Security
Parental Rating
Change Password
English
7
CoNt I t
46
46
46
46
46
47
47
47
General
Background
Front Display
Power On/Off Sound
Light Effect
Support
Soffwar_ Upgrade
Contact Samsung
48
48
49
50
50
51
53
55
Playing a Disc
Using the Disc menu / Title menu / Popup menu
Using the Search and Skip Functions
Slow Motion Play/Step Motion Play
Repeat Playback
Using the TOOLS button
Listening to Music
Sound Mode
56
57
57
58
Playing back a Picture
Playing Back a USB Storage Device
Listening to Radio
Using an iPod
60
Using Intemet@TV
iiiiiiiiiiiiiiiiiiiiiiiiiiiiiiiiiiiiiiiiiiiiiiiiiiiiiiiiiiiiiiiiiiiiiiiiiiiiiiiiiiii
i
64
BD-LIVE
i
!
! i i i !ii!ii!ii!i! !
TM
64
64
Software Upgrade Notification
Using the AIIShare Function
66
69
70
Troubleshooting
Index
Specifications
_ Figures
andillustrations
inthisUserManual
areprovided
forreference
on!yandmaydifferfromactual
productappearance.
8
English
Product
Features
Playback of many disc types, plus an FM tuner
This product allows you to play various discs, including BD-ROM/RE/R, DVD-VIDEO, DVD-RW/-R
(V mode), DVD+RW/+R, MP3/WMA, JPEG, DivX/MKV/MP4, and CD-R/RW, and has a sophisticated
FM tuner, all in a single player.
Full HD audio decoding
support (Dolby Digital, Dolby Pro Logic IIx, Dolby Pro Logic
Dolby Digital Plus, Dolby TrueHD, DTS, DTS-HD HRA, DTS-HD MA Essential)
Please refer to www.DOLBY.COM and DTS.COM for more detail.
IIz,
HDMI
HDMI transmits Blu-Ray/DVD video and audio signals simultaneously, and provides a clearer picture.
The 1080p (Full HD) resolution provides even clearer pictures.
AV SYNC function
Video may lag behind the audio if the product is connected to a digital TV.
To compensate for this, you can adjust the audio delay time to sync up with the video.
Wireless receiver module
Samsung's rear-channel wireless receiver module does away with cables running between the product
and rear-channel speakers. Instead, the rear speakers connect to a compact wireless receiver module
that communicates with the product.
iPod & iPhone support
You can enjoy music files by connecting your iPod to the product with the supplied iPod dock.
BD Wise
BD Wise automatically adjusts BD Wise-compliant Samsung products to their optimal settings.
This feature is enabled only if BD Wise-compliant Samsung products are connected to each other using
an HDMI cable.
Internet@TV
You can download various fee charged or free of charge applications through the network connection.
Various internet services and content are provided, including news, weather forecast, stock
market, games, movies and music.
3D
This product can play 3D contents through an HDMI cable.
To implement the 3D effect, connect a 3D device (3D-compliant AV receiver, 3D-compliant TV) to the
product using an HDMI cable, and play the 3D content while wearing 3D vision glasses.
Blu-ray
Disc Features
Blu-ray Discs support the highest quality HD video available in the industry - Large capacity means no
compromise in video quality. Furthermore, a Blu-ray Disc has the same familiar size and look as a DVD.
* The following Blu-ray Disc features are disc dependant and will vary. Appearance and navigation of
features will also vary from disc to disc. Not all discs will have the features described below.
Video highlights
The BD-ROM format for movie distribution supports three highly advanced video codecs, including AVC,
VC-1, and MPEG-2.
HD video resolutions are also available:
1920 x 1080 HD
1280 x 720 HD
For high-definition
playback
To view high-definition content on a Blu-ray disc, an HDTV (High Definition Television) is required.
Some discs may require using the product's HDMI OUT to view high-definition content. The ability to view
high-definition content on Blu-ray disc may be limited depending on the resolution of your TV.
BD-LIVE
You can use a Blu-ray Disc supporting BD-LIVE through the network connection to enjoy special content
provided by the disc manufacturer.
English
9
etting Stai ted
Make sure to check the following terms before reading the user manual,
iiiiiiiiiiiiiiiiiiiiiiiiiiiiiiiiiiiiiiiiiiiiiiiiiiiiiiiiiiiiiiiiiiiiiiiiiiiiiiiiiiiiiiiiiiiiiiiiiiiiiiiiiiiiiiiiiiiiiiiiiiiiiiiiiii
BD-ROM
I
BD RE/-R
"_;
,
.
This indicatesa functionavailableon a BD-ROM.
This indicatesa functionavailableon a BD-RE/-Rdisc recordedinthe
BD-REformat.
i
DVDuVIDEO
This indicatesa functionavailableon a DVD-VlDEO,
DVDuR
This indicatesa functionavailableon recordedDVD+RWor DVD-RW6/)/
DVD+RW
@
_ s;_@
_
DVD-R/+Rdiscsthat havebeenrecordedandfinalized.
DVD+R
AudioOD
This indicatesa functionavailableon an audioOD-RW/-R(OD-DAformat
This indicatesa functionavailableina CD-RW/-R,DVD-RW/-Rdisc or a
WMA
USBstoragemediacontainingMP3or WMAcontents.
I
I
This indicatesa functionavailableina CD-RW/-R,DVD-RW/-Rdisc or a
USBstoragemediacontainingJPEGcontents.
DivX
MKV
MP4
This indicatesa functionavailableina CD-RW/-R,DVD-RW/-Rdisc or a
USBstoragemediacontainingDivXcontents.
This indicatesa functionavailableon a USBstoragedevice.
This indicatesa situationwhere a functiondoesnot operateor settings
may be cancelled.
NOTE
f
ShortcutKey
This indicatestips or instructionson the pagethat helpeach function
operate.
This indicates a button on the remote that provides direct and easy
access to a function,
o This product is compatible with the NTSC color system only,
PAL discs will not play,
1_
English
Logos of Discs that can be played
Blu"ray
Disc Compat!bilitY
.................................................
Blu-ray is a new and evolvingformat, Accordingly, disc
compatibilityissuesare possible,Not all discs are
compatible and not everydisc will play back, For
additional information,referto the DiscTypes and
Characteristicssection of this Manual, Ifyou encounter
compatibilityproblems, pleasecontact the SAMSUNG
customer care centerat 1-800 SAMSUNG,
N TSc J
NOTE
st.ysti
_ Playbackmay not work for some types of discs, or
when specificoperations,such asangle change
and aspect ratioadjustment, are being performed,
Informationaboutthe discs is written in detailon
the box, Pleasereferto this if necessary,
_ Do not allowthe discto become dirty or scratched,
Fingerprints,dirt, dust, scratchesor deposits of
cigarettesmoke on the recording surface may
[_BOLBY
i
High ResolutionAudb
make it impossibleto use the disc for playback,
_ When a BD-Javatitle is played,loading maytake
longerthan a normaltitle, or some functions may
perform slowly,
Discs that cannot
be played
- HD DVD Disc
- DVD-RAM
- 3,9 GB DVD-R Disc for Authoring,
- DVD-RW (VR mode)
- Super Audio OD (except OD layer)
- DVD-ROM/PD/MV-Disc, etc CVD/CD-ROM/
CDV/CD-G/CD-I/LD
- CDGs play audio only, not graphics,
NOTE
_ Some commercialdiscs and DVDdiscs purchased
outsideyourregionmay not be playablewiththis
product. When thesediscs are played,"Cannot read
this disc.Pleasecheck the regionalcode of the
disc." willbe displayed.
_ If a DVD-R/-RWdisc has not beenrecorded
properlyin DVDvideoformat,it willnot be playable.
English
ii
t rt ct
Region
code ....................................................................................................................................
Disc Types
Both this product and the discs are coded by
region, These regional codes must match in
order to play the disc, If the codes do not match,
the disc will not play,
w
Disc Type
Region
Code
Area
NorthAmerica,CentralAmerica,
South America,Korea,Japan,
Taiwan,HongKongandSouth
EastAsia.
Europe, Greenland, French
territories,MiddleEast, Africa,
AustraliaandNewZealand.
Blu-ray
tl llh_
India,China,Russia,Centraland
SouthAsia.
The U.S., U.S. territories and
Canada
Europe,Japan,the MiddleEast,
Egypt,SouthAfrica,Greenland
Taiwan,Korea,the Philippines,
Indonesia,HongKong
DVD-VIDEO
Mexico,SouthAmerica,Central
America,
Australia,NewZealand,
PacificIslands,Caribbean
Russia,EasternEurope,India,
most of Africa, North Korea,
Mongolia
China
BD-ROM
Blu-ray Disc Read Only Memory. A BD-ROM disc
contains pre-recorded data. Although a BD-ROM
may contain any form of data, most BD-ROM discs
will contain movies in High Definition format, for
playback on the product. This product can play
back pre-recorded commercial BD-ROM discs,
BD-RE/BD-R
Blu-ray Disc Rewritable/Blu-ray Disc Recordable,
BD-RE/BD-R is the ideal format for making
backups, or recording personal video,
DVD-VIDEO
* A digital versatiledisc (DVD)can contain up to 135minutesof images,8 audio languagesand 32 subtitle
languages,It is equipped with MPEG-2 picture
compressionand Do[by Digitalsurround,allowingyou
to enjoyvividand clear qua@ images,
* When switching from the first layer to the second
layer of a dual-layered DVD Video disc, there may
be momentary distortion in the image and sound.
This is net a malfunction of the product.
* Once a DVD-RW/-R recorded in Video Mode is
finalized, it becomes DVD-Videe. Pre-recorded
(pre-stamped) commercial DVDs with movies are
also referred to as DVD-Videos, This product can
play back pre-recorded commercial DVD discs
(DVD-Video discs) with movies,
DVD-R/-RW
* Once a DVD-R/-RW recorded in Video Mode is
finalized, it becomes DVD-Video, Ability to play
back may depend on recording conditions.
* This product can play back DVD-R disc recorded
and finalized with a Samsung DVD video recorder.
* Playback can be peffomed with DVD-RW discs in
the Video Mode and finalized only,
DVD+RW
* This product can play back a DVD+RW disc
recorded with a DVD Video recorder. Ability to
play back may depend on recording conditions,
DVD+R
* This product can play back a DVD+R disc recorded
and finalizedwith a DVDVideo recorder, Abilityto
play back may depend on recording conditions.
12
English
Audio CD
DivX (Digital Video Express)
o An audio disc on which 44,1kHz PCM Audio is
recorded.
DivXis a video file format developed by Microsoft and is
based on MPEG4 compression technology to provide
audio and video data over the Intemet in real-time,
This product can play back CD-DA format audio
OD-R and CD-RW discs.
The product may not be able to play some CD-R or
CD-RW discs due to the condition of the recording,
CD-R/-RW
MPEG4 is used for video encoding and MP3for audio
encoding so that the users can watch a movie at near
DVD-qualityvideo and audio.
Supported
,, Usea 700MB (80 minute)CD-R/-RWdisc,
If possible,do not use a 800MB (90 minute)or above
disc, as the disc may not play back,
If the CD-R/-RW disc was not recorded as a closed
session,you may experiencedelays when playing
back the beginningof the disc or all recorded files
may not play,
(DivX)
This product only supports the following media formats,
If both video and audio formats are not supported, the
user may experience problems such as broken images
or no sound,
Supported Video Formats
supposed
Ve io.s
Some CD-R/-RW discs may not be playablewith this
product, depending on the device which was used to
burn them, Forcontents recorded on CD-R/-RW
media from CDsfor your personaluse, playability
may vary dependingon contents and discs.
Formats
DivX3,11-DivX5,1,XviD
Supported Audio Formats
Disc Format
Using MP3 discs
CD-R/-RW, DVD-RW/-R recorded with UDF,
ISO9660or JOLIETformat can be played back
OnlyMP3 fileswith the Lmp3" or ".MP3" extension
can be played.
Playablebit rate range is from 56 Kbps to 320 Kbps.
Playablesample-rate is 32KHz to 48KHz,
The productcan handlea maximumof 1500filesand
foldersundera parentfolder,ForMP3filesrecordedwith
a VBR(VariableBit Rates),thesoundmay cutin andout,
Using JPEG discs
CD-R/-RW, DVD-RW/-R recorded with UDF,
ISO9660 or JOLIET format can be played back.
- Only JPEG files with the ".jpg", ".JPG", ",jpeg" or
"JPEG" extension can be displayed,
Progressive JPEG is supported.
DVD-RW/-R
(V)
,, This is a format that is used for recording data on a
DVD-RWor DVD-R disc, The disc can be played by
this product once it has been finalized,
If a disc has has been recorded in Video Mode by a
different maker's recorder but has not beenfinalized,
it cannot be played bythis product.
MP3
80-384kbps
44,1khz
AC3
128_384kbps
44,1/48khz
DTS
1,5Mbps
44,1khz
DivX files, including audio and video files, created
in the DTS format can only support up to 6Mbps.
Aspect Ratio : Although the default DivX resolution
is 640x480 pixels (4:3), this product supports up
to 800x600 pixels (16:9). TV screen resolutions
higher than 800 are not supported.
When you play a disc whose sampling frequency is
higherthan 48khz or 320kbps, you may experience
shaking on the screen during playback.
Opel and gmc is net supported,
MKV, MP4
CD-R/-RW, DVD-R/-RW, USB, PC streaming
Video Files with the following extensions can be
played, : ,avi, ,divx, ,mkv, ,mp4, ,AVI, ,DIVX,
,MKV, ,MP4
NOTE
_s Some DivX, MKV and MP4 format discs may
net play, depending on the video resolution and
frame rate condition,
English
13
ttin j
tart d
Supported
File Formats
Video File Support
Divx3,11/4,x/5,1/6,0
XviD
*,avi
AVl
MP4v3
H,264BP/MP/HP
MP3
AC3
DTS
WMA
PCM
DivX5,1/6,0
MKV
XviD
MP3
AC3
DTS
H,264BP/MP/HP
*,wmv
MP4
*,mpg
*,mpeg
PS
1920x1080
1920x1080
1920x1080
1920x1080
WMA
VC-1SM
*,mp4
1920x1080
1920x1080
VC-1AP
WMV
1920x1080
1920x1080
VC-1AP(wmvl)
*,mkv
1920x1080
1920x1080
MP4(mp4v)
1920x1080
AAC
1920x1080
H,264BP/MP/HP
MPEG1
MPEG2
H,264BP/MP/HP
MP1,2
AC3
DTS
1920x1080
1920x1080
1920x1080
Music File Support
*,mp3
MP3
MP3
CompliantwithWMAversion10
*,wma
WMA
WMA
* Samplingrates(in kHz)-8, 11, 16, 22, 32,
44,1, 48
* Bitrates- All bit-ratesinthe range5kbpsto
384kbps
14,
English
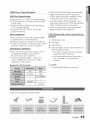
USB Host Specification
,, CBI (Control/Bulk/Interrupt) is not
......................................................................
supported.
o Digital Cameras that use PTP protocol or
require additional program installation when
USB Host Specification
connected to a PC are not supported.
,, SupportsUSB1.1 or USB2.0 compliantdevices.
,, Supports devices connected using the USB
A type cable.
• Supports UMS (USB Mass Storage Device)
V1.0 compliant devices.
,, Supports FAT (FAT, FAT16, FAT32)file
system formatting.
Non-compliance
• Does not support a device that requires installing
a separate driver on the PC (VVindows).
A device using the NTFS file system is not
supported. (Only the FAT 16/32 (File Allocation
Table 16/32) file system is supported.)
Does not operate with Janus enabled MTP
(Media Transfer Protocol) devices.
USB Devices that can be used with the
product
1. USB Storage Device
• Does not support connection to a USB hub.
• A USB device that is connected using a USB
extension cable may not be recognized.
2.
MP3 Player
3.
DigitalCamera
Operational
4.
USB card Reader: One slot USB card reader and
Multi-slot USB card reader.
Limitations
• If the connected device has multiple drives
(or partitions) installed, only one drive
(or partition) can be connected.
• A device supporting USB 1.1 alone may
cause a difference in the picture quality,
depending on the device.
Supported
The USB card reader may not be supported,
depending on the manufacturer.
If you install multiple memory devices into a
multi-card reader, you may experience
problems.
NOTE
file Formats
_ Theexternal
HDDdeviceisnotsupported.
JPG
MP3
JPG,JPEG
,MP3
-
80-384kbps
640x480
-
44,1kHz
Check for the supplied accessories below.
English
15
ttirq
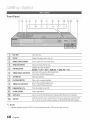
Front Panel
FUNC
\
_1_
.3
DISCTRAY
Insertdischere,
DISPLAY
Displaystheplayingstatus,time,etc,
REMOTE
CONTROL
SENSOR
Detectsdgnalsfromthe remotecontrol,
OPEN/CLOSE
BUT[ON
Opensandclosesthe disctray,
FUNCTION
BUTTON
Switchesthe modeasfollows:
BDIDVD--, D. IN --, AUX--, HDMI.INI --, HDMLIN2 - FM
Goesbackto the previoustitle/chapter/track,
TUNING
DOWN
&SKIPBUT[ON Tunesdownthe FMfrequencyband,
6
STOP
BUTTON
Stopsdiscplayback,
8
PLAY/PAUSE
BUTTON
Playsa discor pausesplayback,
-9
TUNING
UP& SKIPBUT[ON
Goesto the nexttitle/chapter/track,
Tunesup the FMfrequencyband,
_10
POWER
BUT[ON
((!.))
Turnsthe productonand off,
1.1
VOLUME
CONTROL
Volumeadjustment,
i2
ASCINJACK
Usedto connect
theASCMicrophone
forsettingupMRC(MusicalRoomCalibration).
I_
USBPORT
A USBstoragedevicecanbeconnected
hereandusedasstoragewhenconnected
to BDLIVE.itcanalsobeusedforsoftwareupgrades
andMP3/JPEG/DivX/MKV/MP4
playback.
NOTE
_ Softwareupgrades
usingtheUSBPortmustbeperformed
withaUSBmemoryflashstickonly.
16
English
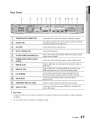
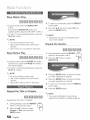
Rear Panel
1
SPEAKEROUTPUTCONNECTORS
Connectthefront, center,surroundback,subwooferspeakers,
COOLINGFAN
Thecoolingfansuppliescoolairto theproductto preventoverheating
andalwaysrevolveswhenthe powerison,
iPod JACK
Connectthe iPoddock connectorhere,
FM 75D COAXIALJACK
ConnecttheFM antenna,
5
TX CARDCONNECTION
WIRELESS)
TheTXcardenablescommunication
betweenthe productandthe
wirelessreceivermodule,
-
EXTERNAL
DIGITAL
OPTICAL
INJACKS
(OPTICAL)
Usethis to connectexternalequipmentcapableof digitaloutput,
HDMIIN JACKS
Receivesdigitalvideoandaudiosignalssimultaneouslyusingan
HDMIcable,
_8
HDMIOUTJACK
Usingan HDMIcable,connectthis HDMIoutputterminalto the
HDMIinput terminalon yourTV for the bestqualitypicture,
(9
LANTERMINAL
Canbe usedfor networkbasedservices(seepages60-65),
BD-LIVEandsoftwareupgradeunderthe networkconnection,
AUXINJACKS
Connectto the 2CHanalogoutputof an externaldevice
(suchasa VCR)
COMPONENT
VIDEOOUTJACKS
Connecta TVwith Componentvideoinputsto thesejacks,
VIDEOOUTJACK
ConnectyourTV'sVideoInputjack (VIDEO
IN)to the VIDEOOUT
Jackonthis product,
I4
I11
12
! CAUTION
_ Providea minimumof 4 inchesof clearanceon all sidesof the the hometheaterto ensureadequate
ventilation,
_ Donot obstructthe coolingfan or ventilationholes,
English
17
Q ttirq
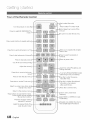
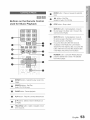
Tour of the Remote
Control
Turn the product on and off.
Press to select BD RECEWER/TV
mode.
Use to select the mode.
or
Press to select TV's video mode.
Set a Sleep time to shut off the
procuct.
To open and close the disc tray.
Press numeric buttons to operate options.
Press this to see the full screen on a TV.
Press to skip backwards or forwards.
Press to stop/play a disc.
Allowsyou to repeata title,chapter,
trackor disc.
Pressto searchbackwardsor
forwards.
Pressto pause a disc.
Cut off the sound temporarily.
Adjust the volume.
Press this to move to the home
menu.
Press to view the disc menu.
Press this to use the Tools menu.
Select on-screen menu items and
change menu value.
Search for active FM stations and
change channels.
YoucansettheSFE(Sound
HeldEffect)
Use this to enter the popup
menu/title menu.
Use this to display the playback
information when playing
a Blu-ray/DVD disc.
Press this to exit the menu.
Return to the previous menu.
These buttons are used both for menus
on the product and also several
Blu-ray Disc functions.
Press this to link to various
Internet@TV services.
Select the desired Dolby Pro
Logic ]l audio mode.
18
English
Used to set a preset radio
Select MONO or STEREO for radio
broadcasting.
Regulate and stabilize the volume
level. (Digital Signal Processor)
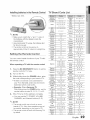
Installing batteries in the Remote Control
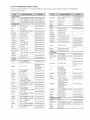
TV Brand Code
_ra_a
* Batterysize:AAA
Admiral
(M.Wards)
56, 57, 58
Mitsubishi/
MGA
A Mark
01, 15
MTC
18
01, 02, 03, 04, 05,
NEC
18,19,20,40,59,60
Nikei
03
Onking
03
Anam
06, 07, 08, 09, 10,
11,12, 16, 14
AOC
Bell &
Howell
(M.Wards)
NOTE
_ Make sure to match the "+" and "-" ends of
the batteries with the diagram inside the
compartment.
_ Assuming typical TV usage, the batteries last
for about one year.
_ The remote control can be used up to
approximately23 feet (7 meters)in a straight line.
Setting
the Remote
this remote control.
a TV with the remote control
1. Press the BD RECEIVER/TV button to set the
remote control to TV mode.
3.
57, 58, 81
06, 07, 08, 09, 54,
66, 67, 73, 74
59, 60
18
Citizen
While holding down the POWER button, enter
the code corresponding to your brand of TV.
o If there is more than one code listed for
Example : For a Samsung TV
While holding down the POWER button, use the
number buttons to enter 00, 15, 16, 17, or 40.
If the TV turns off, the setting is complete.
03,15,17,18,48,
54,59, 62,69,90
Philips
15, 17, 18, 40,
48, 54, 62, 72
97
Pioneer
63, 66, 80, 91
Classic
O3
Portland
15, 18, 59
Concerto
18
Proton
40
Contec
46
Quasar
06, 66, 67
Coronado
15
Craig
03,05,61,82,83,84
Radio
Shack
17, 48, 56, 60,
61,75
Croslex
62
RCA/
Proscan
18, 59, 67, 76, 77,
78, 92, 93, 94
Realistic
03, 19
Curtis
Mates
59, 61, 63
CXC
03
Daewoo
02,03,04,15,16,
17,18,19,20,21,
22,23,24,25,26,
27,28,29,30,32,
34,%,36,48,59,90
Daytron
4O
Dynasty
O3
03,15,40,46,59,61,
64,82,83,84,85
Fisher
19,65
Funai
O3
Futuretsch
General
Electric (GE)
Hall Mark
Hitachi
Inkel
JC Penny
JVC
KTV
KEC
O3
06,40,56,59,
66, 67, 68
40
45
56,59,67,86
40
Samsung
00,15,16,17,40,
43, 46, 47, 48,49,
59,60, 98
Sanyo
19, 61,65
Scott
03, 40, 60, 61
Sears
15, 18, 19
Sharp
15, 57, 64
Signature
2000
(M.Wards)
57, 56
Sony
50, 51, 52, 56, 55
Soundeeign
03, 40
Spectricon
01
SSS
18
Sylvania
18, 40, 48, 54,
59, 60, 62
Symphonic
61, 95, 96
Tatung
06
Techwood
18
Teknika
03, 15, 18, 25
70
59, 61,87,
88
03,15,40
15
CHANNEL, and Numeric buttons (0-9).
LG
(Goldstar)
01,15,16,17,37,38,
39,40,41,42,_,44
Luxman
18
LXI
19,54,56,59,
60, 62,63, 65, 71
(Sears)
Sampo
15,18,50,59,69
KMC
_ The remote control may not work on some
brands of TV's, Also, some operations may not
be possible, depending on your brand of TV,
_ The remote control will work with Samsung TVs
by default.
18
Philco
O3
03,18,25
You can use the TV POWER, VOLUME,
NOTE
Penney
Cinema
Turn on the TV.
your TV in the table, enter one at a time to
determine which code works.
4.
03
Panasonic
Candle
Emerson
2.
Onwa
Brocsonic
Cetronic
18,40, 59,60,75
01, 18, 40, 48
Control ...........................................
Crown
O3
You can control certainfunctions of your TVwith
When operating
List
TMK
18, 40
Toshiba
19, 57, 63, 71
Vidtech
18
Videsh
59, 60, 69
Wards
15, 17, 18, 40,
48, 54, 60, 64
Yamaha
18
York
40
Magnavox
15,17,18,48,54,
59,60,62,72,89
Yupiteru
03
Marantz
40, 54
Zenith
58, 79
Matsui
54
Zonda
01
MGA
18, 40
Dongyang
03, 54
English
ig
Thissectioninvolvesvariousmethodsof cor'nectingthe productto otherexternalcompor'ents,
Beforemovl'ngor i'nstalling
the product,be sureto turnoffthe poweranddisconnect
the powercord,
Position of the product
Placeit on a stand or cabinetshelf, or under the TV stand.
Selecting the Listening Position
The listeningpositionshould be locatedabout2.5 to 3 times the distanceof the TV's screensize awayfrom the TV.
Example : For 32" TV's 6.56 - 7.87 feet (2-2.4m)
For 55" TV's 11.5 - 13.1 feet (3.5_4m)
Placethesespeakersinfrontof yourlisteningposition,faringinwards(about45°)
towardyou, Placethespeakerssothattheirtweeterswillbe atthe sameheightasyour
ear.Alignthefrontfaceof thefrontspeakerswiththefrontfaceof thecenterspeakeror
placethemslightlyinfrontof thecenterspeakers.
It is bestto installitat thesameheightasthefrontspeakers.Youcan alsoinstallit
directlyoveror undertheTV.
Placethesespeakersto the sidesof your listeningposition.If thereisn't enough
room,placethesespeakerssothey face eachother,Placethemabout2 to 3 feet
(60to 90cm)aboveyourear,facingslightlydownward.
Unlikethefront andcenterspeakers,the surroundspeakersare usedto handle
mainlysound effectsandsoundwill notcome fromthemall the time.
If you are usingtwo back surroundspeakers,placethembehindthe listeningposition
andabout2.3-3.3feet(70cm to 1 m)aboveyourears.
Thepositionofthe subwooferis notsocritical.Placeit anywhereyou like.
20
English
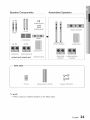
Speaker
Components
(L)(R)
................................................................................
Assembled
S#eaker s.....................................
??
SCREW
(Large):
2EA
????
?177
SCREW
(Sm@:8EA
CENTER SPEAKER
STAND
FRONT
CENTER
STAND BASE
(L)(R)
(L)(R)
FRONT SPEAKER
SUBWOOFER
SUBWOOFER
SURROUND
€_<_,_
_
SURROUND BACK
_cj:_
_
SPEAKER CABLE
SURROUND
SPEAKER
SURROUND BACK
SPEAKER
_-- SWA-5000
TX Card
Wirebss Receiver Module
Speaker Cabb (2EA)
NOTE
_ Referto page22 to installthe Speakerson the TallboyStand.
English
21
Conn otion
Insta!!ing the Speakers o n the Ta!lbo y Stand ............................................................................
1. Turn the Stand Base upside-down
and connect it to the Stand.
2, Insertfoursmallscrewsclockwiseintothe fourholesmarkedusinga
screwdriverasshowninthe illustration.
3.
Connect the upper Speaker to the assembled Stand.
4.
Insert another large screw clockwise into the hole on the rear of the
speaker using a screwdriver.
22
English
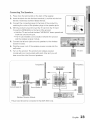
connect!ng
Thespeakers
..................................................................................
1. Press down the terminal tab on the back of the speaker.
2.
Insert the black wire into the black terminal (-) and the red wire into
the red (+) terminal, and then release the tab.
3.
Connect the connecting
plugs to the back of the product by
matching the colors of the speaker plugs to the speaker jacks.
4.
With the product turned off, insert the TX card into the TX Card
Connection (WIRELESS) on the back of the product.
- Hold the TX card so that the label "WIRELESS" faces upward and
insert the card into the port.
- The TX card enables communication
and the wireless receiver module.
between the product
5.
Connect the left and right surround speakers to the wireless
receiver module.
6.
Plug the power cord of the wireless receiver module into the
wall outlet.
7.
Turn on the product. The product and wireless receiver
module will now communicate
TX card
with each other and you will
hear sound from the Surround speakers.
FrontSpeaker
(R)
FrontSpeaker
(L)
Center Speaker
Surr0undBackSpeaker(L)
E ,ish23
Connections
! CAUTION
_ Do not let children play with or near the speakers. They could get hurt if a speaker falls.
_ When connecting the speaker wires to the speakers, make sure that the polarity (+/-) is correct.
_ Keep the subwoofer speaker out of reach of children to prevent children from inserting their hands
or alien substances into the duct (hole) of the subwoofer speaker.
_ Do not hang the subwoofer on the wall through the duct (hole).
_ Do not insert any other card except the TX card specifically for this product.
If you use a different TX card, the product may be damaged or you may not be able to remove
the card easily.
_ Do not insert the TX card upside down or in the reverse direction.
_ Insert the TX card when the product is turned off. Inserting the card when it is turned on may
cause a problem.
_ The wireless receiving antenna is built into the wireless receiver module. Keep it away from water
and moisture.
_ For optimal listening performance, make sure that the area around the wireless receiver module
location is clear of any obstructions.
_ If you hear no sound from the wireless surround speakers, switch the mode to DVD 5.1 channel
or Dolby Pro Logic II.
_ In 2-CH mode, you will hear no sound from the wireless surround speakers.
NOTE
_ If you place a speaker near your TV set, screen color may be distorted because of the magnetic
field generated by the speaker. If this occurs, place the speaker away from your TV set.
_ Place the wireless receiver module at the rear of the listening position. If the wireless receiver
module is too close to the product, it may cause some sound interruption due to interference.
_ If you use a device such as a microwave oven, wireless LAN Card or any other device that uses
the same frequency (2.4/5.8GHz) near the product, it may cause some sound interruption due to
interference.
_ The transmission distance from the product to the wireless receiver module is about 33 feet
(10m), but may vary depending on your operating environment. If a steel-concrete wall or metallic
wall is between the product and the wireless receiver module, the system may not operate at all,
because the radio wave cannot penetrate metal.
_ If the product doesn't make wireless connection, the system needs ID Setting between the
product and wireless receiver module. With the product turned off, press "0"->"1 "->"3"->"5" on
the remote control, and then turn on the product. With the wireless receiver module turned on,
press the "ID SET" button on the back of the wireless receiver module for 5 seconds.
24
English
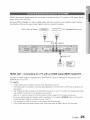
HDMI is the standard digital interface for connecting to devices such as a TV, projector, DVD player, Blu-ray
player, set top box, and more.
Because HDMI is all digital, you'll enjoy digital quality video and sound as it was originally created, without
the distortions that can be caused when digital content is converted to analog.
DVD or Blu-ray Player
(
}
[ _-_
o_o} SAT (Satellite/Set top box)
HDMI IN
HDMIOUT:
Conne ctingtoaTvwithanHDMI
Cable (BEST QUALITY) ...................
Connect an HDMI cable (not supplied) from the HDMI OUT jack on the back of the product to the
HDMI IN jack on your TV,
NOTE
_ Certain HDMI output resolutions may not work, depending on your TV.
_s If an HDMIcable is connected or removed during playback of a CD-DA, MP3 or JPEG file, the product will
stop playing,
_s After making the video connection, set the Video input source on your TV to match the correspondingVideo
output (HDMI, Component or Composite)on your product,
Seeyour TV owner's manual for more informationon how to select the TV's Video Input source,
_s If you have set the product's remote control to operate your TV, press the SOURCE button on the remote
control and select HDMI as the external source of the TV,
_ You must have an HDMI connection to enjoy videos with 3D technology,
_s A long HDMI cable may cause a screen noise, If this is the case, set Deep Color to Off in the menu,
English
25
HDMI
IN i Cennect!ng
to an External Component
with an HDMI Cable
1.
Connect an HDMI cable (not supplied)from the HDMI IN jack on the back of the product to the HDMI OUTjack
on your digital device,
2.
Pressthe FUNCTION button to select HDMI. IN1 or HDMI. IN2 input,
The mode switches as follows : BD/DVD ._ D. IN ._ AUX ._ HDMI. IN1 ._ HDMI. IN2 ._ FM
HDMI Auto Detection
Function
If you have connected your home theater by HDMI cable, the home theater's video output
automatically switches to the HDMI mode when you turn it on. For available HDMI video resolutions,
see page 35.
o This function is not available if the HDMI cable does not support CEC.
HDMI connection description
- HDMI outputs only a pure digital signal to the TV.
- If your TV does not support HDCP, random noise appears on the screen.
What is the HDCP?
HDCP (High-bandwidth DigitalContent Protection)is a system for preventingBD/DVD content outputted via
HDMIfrom being copied It provides a secure digital linkbetween a video source (PC, DVD,etc) and a display
device _,
made,
projector, etc), Content is encrypted at the source device to prevent unauthorizedcopies from being
! CAUTION
_ TheAnynet+functionis supportedonlywhen an HDMICableis connectedto the HDMIOUTof the
product.
FM Antenna (supplied)
1. Connect the FM antenna supplied to the
FM 750 COAXIAL jack.
2. Slowly move the antenna wire around until
you find a location where reception is good,
then fasten it to a wall or other rigid surface.
_.
NOTE
_ This product does not receive AM
broadcasts.
26
English
Red
Blue
Green
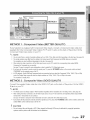
METHOD1
LAN
METHOD2
®
METHOD
1 " Component
Video (BETTER
QUALITY)
If your television is equipped with Component Video inputs, connect a Component video cable (not
supplied) from the Component Video Output (Pr, Pb and Y) jacks on the back of the product to the
Component Video Input Jacks on your TV,
NOTE
_ Youcanselectfromavarietyof resolution
settingssuchas108gi,720p,480pand480i,depending
onthedisctype.(Seepage35)
_ Theactualresolution
maydifferfromthesettingintheSetupmenuifbothComponent
andHDMIcablesareconnected.
Theresolution
mayalsobedifferentdepending
onthedisc.(Seepage35)
_ Aftermakingthevideoconnection,
settheVideoinputsourceonyourTVto matchthecorresponding
Videooutput(HDMI,
Component
or Composite)
onyourproduct.
SeeyourTVowner'smanual
for moreinformation
onhowtoselecttheTV'sVideoInputsource.
_ Ifyouhavesettheproduct'sremotecontrolto operate
yourTV,presstheTVSOURCE
buttonontheremotecontrolandselect
COMPONENT
astheexternal
sourceoftheTV.
_ InDVDplayback,
if bothHDMIandComponent
jacksareconnected
andyouselecttheComponent
108%,1080i,720por 480p
mode,theDisplay
Setupmenuwillshowtheoutputresolution
as108%,1080i,720por 480pinthemenu.
Theresolution
is actually480i.
METHOD
2 • Composite
Video (GOOD QUALITY)
Connect the supplied Video cable from the VIDEO OUT jack on the back of the product to the VIDEO
IN jack on your TV,
NOTE
_ TheVIDE0sourceis alwaysoutputin480i resohtionregardless
oftheresohtionsetin theSetupmenu,(Seepage35)
_ Aftermakingthevideoconnection,
settheVideoinputsourceonyourTVto matchthecorresponding
Videooutput(HDMI,
Component
or Composite)
onyourproduct,
SeeyourIV owner'smanualfor moreinformation
on howto selecttheTV'sVideoInputsource,
_ Ifyou havesetthe product'sremotecontrolto operateyourTV, presstheTVSOURCE
buttonon the remotecontroland
selectVIDEOasthe externalsourceof theTV,
! CAUTION
_ Donot connectthe unit throughaVCR,Videosignalsfed throughVCRsmay beaffectedbycopyrightprotection
systemsandthe picturewill bedistortedon thetelevision,
English
27
Connections
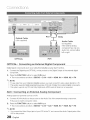
White
Optical Cable
(not supplied)
Audio Cable
(not supplied)
If the externalanalog
componenthas only one
AudioOut, connect either
left or right.
OPTICAL
AUX
O PTI CAL i C on n e ct!n g an Extern a D! g italC o m port ent ................................................
Digital signal components such as a Cable Box/Satellite receiver (Set-Top Box).
1.
Connect the Digital Input (OPTICAL) on the product to the Digital Output of the external digital
component.
2.
Press the FUNCTION button to select D.IN input.
o The mode switches as follows : BD/DVD -_ D. IN -_ AUX -_ HDMI. IN1 -_ HDMI. IN2 -_ FM
NOTE
_ To see video from your Cable Box/Satellite receiver, you must connect it's video output directly to a TV.
_ This system supports Digital sampling frequencies of 32 kHz of higher from external digital components.
_ This system supports only DTS and Delby Digitalaudio, MPEGaudio (bit stream)is not supported.
AUX"
Connect!rig
an External
Analog
Component
.........................................................
Analog signal components such as a VCR.
1.
Connect AUX IN (Audio) on the product to the Audio Out of the external analog component.
Be sure to match connector colors.
2.
Press the FUNCTION button to select AUX input.
The mode switches as follows : BD/DVD -_ D. IN -_ AUX -_ HDMI. IN1 -_ HDMI. IN2 -_ FM
NOTE
_ You connect the Video Output jack of your VCR to the TV, and connect the Audio Output jacks of the
VCR to this product.
28
English
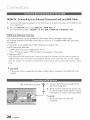
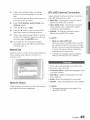
Thisproduct
enables
youtoviewnetwork
based
services
(See
pages
60-65)
such
asIntemet@TV
and
BD-LIVE,
aswellasreceive
software
upgrades
when
anetwork
connection
ismade,
Werecommend
using
anAP(Access
Point)
orIProuter
fortheconnection,
Formore
information
onrouter
connection,
refer
totheuser
manual
oftherouter
orcontact
therouter
manufacturer
fortechnical
assistance.
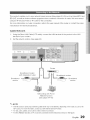
Cable Network
1. Using the Direct LAN Cable (UTP cable), connect the LAN terminal of the product to the LAN
terminal of your modem.
2.
Set the network options. (See page 42)
CD
®
Broadband modem
(with integrated router)
Broadband
service
Networking with PC for
AIIShare function
(See pages 64-65)
NOTE
_ Internetaccessto Samsung'ssoftwareupdateservermay not be allowed,dependingon the router you use or the
ISP'spolicy. Formoreinformation,contactyour ISP(InternetServiceProvider).
_ ForDSLusers,pleaseuse a routerto make a networkconnection.
_ For the AIIShare function, a PC must be connected in the network as shown in the figure,
English
29
Colqlq otiolq
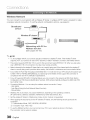
Wireless
Network
You can connect to your network with a Wireless IP sharer. A wireless AP/IP router is required to make
a wireless network connection. To set the network configuration options, see page 42.
i....... !
Networking
with
A[IShare
function
PC for
(See pages 64-65)
NOTE
_s To use a wirelessnetwork,your productmust be connectedto a wire[esslP sharer.If thewireless lPsharer
supports DHCP,your productcan use a DHCP(dynamic)or static IPaddressto connectto the wirelessnetwork.
_s This product supports IEEE802,11B, G, and N, We recommend using IEEE802.11N. When you play video
over a IEEE802.11B or G connection, the video may not play smoothly,
_s Selecta channelfor the wireless iP sharerthat is not currentlybeing used. Ifthe channelset for the wireless IP
sharer is currentlybeing used byanotherdevice nearby,this will result ininterferenceand communicationfailure,
_s If you select the Pure High-throughput (Greenfield)802,11n mode and setyour AP's Security Encryption type
to WEP, TKIP or TKIPAES_/PS2Mixed), your Samsung home theater will not support the connection in
compliance with new Wi-Fi certificationspecifications.
_s If your AP supports WPS 0Ni-FiProtected Setup),you can connect to the network via PBC(Push Button
Configuration) or PIN (PersonalIdentification Number). WPS will automatically configure the SSID and WPA
key in either mode,
_s Connection Methods : You can setup the wireless network connection 3 ways:
- PBC (WPS)
- Auto Setup (Using the Auto Network Search function)
- Manual Setup
_s Wireless LAN, by its nature, may cause interference,depending on the operating conditions.
(AP performance, distance, obstacles, interference by other radio devices, etc),
_s Set the wireless IP sharer to Infrastructure mode, Ad-hoc mode is not supported,
_s When applying the security key for the AP (wirelessIP sharer),only the following security protocols are
supported:
1) Authentication Mode : WEP, WPAPSK, WPA2PSK
2) Encryption Type : WEP, AES
_s To use the A[[Sharefunction, you must connect your PC to your network as shown inthe figure.
The connection can be wired or wireless.
30
English
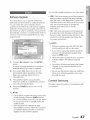
, ¢tup
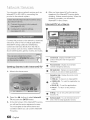
7,
Press the 4 I_ buttons to select the desired
Network Settings : Wired, Wireless or PBC
(WPS), and then press the ENTER button.
If you do not know your Network Settings,
press the BLUE (D) button on your remote
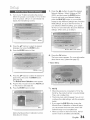
1. Turn on your TV after connecting the product.
(Whenthe product is connected to TV for the first
time, the product will turn on automatically and
display the InitialSettings screen.)
instead to skip Network Settings here, finish the
Initial Settings, and go to the Home menu. If
you selected a Network Setting, go to pages
40-43 for more information about the Network
settings. When done, go to Step 8.
2.
Press the A T buttons to select the desired
language,then press the ENTER button.
3.
Press the ENTER button to Start.
8.
Press the OK button.
The home menu appears. (For more information
about home menu, please see page 32)
* Home Menu
4.
Press the J, T buttons to select the desired TV
aspect ratio, then press the ENTER button.
(See page 34)
The Musical Room Calibration screenappears.
5.
Plug the ASC microphone into the ASC IN jack
on the product. (See page 38)
6.
Press the ENTER button to Start.
NOTE
_ When the product is connected to TV for the
first time, the product will turn on automatically.
This is not a malfunction.
t_ The home menu will not appear if you do not
configure the initial settings, with the exception
below.
Setting the Musical Room Calibrationfunction
takes about 3 minutes.
_* If you press the BLUE(I}) button during the
Musical Room Calibration or Network setup,
you can access the home menu even if the
network setup is not completed yet.
_* When you return to the home menu, the full
screen mode is cancelled automatically.
English
3_
Setup
_* If you want to display the InitialSettings screen
again to make changes, press the STOP(I)
button on the front panel of the product for
more than 5 seconds with no disc inserted.
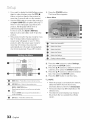
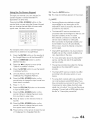
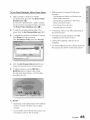
1, Press the POWER button.
The Home Menu appears.
• Home Menu
_* Use the HDMI cable to connect the product to
an Anynet+ (HDMI-CEC)-compliantSamsung TV.
If the TV uses a language supported by the
product, that language will be set to a
preferred language automatically.
For this to work, the Anynet+ (HDMI-CEC)
feature must be set to Onin both TV and the
product.
_ If the product is left in the stop mode for more
than 5 minutes without being operated, a
screen saver will appear on your TV. If the
product is left in the screen saver mode for
more than 25 minutes, the power will
automatically turn off except during playback
of a CD-DA (Automatic Power-Off Function).
SelectstheIntemet@TV.
SelectstheVideos.
0
SebctstheMusic.
O
SebctsthePhotos.
0
SelectstheSettings.
O
Displaysbuttonsavailable.
M_NU
3,
Press the 4 I_ buttons to select Settings,
then press the ENTER button.
Press the A T buttons to select the desired
4.
submenu, then press the ENTER button.
Press the A T buttons to select the desired
5.
item, then press the ENTER button.
Press the EXIT button to exit the menu.
2.
NOTE
AU
MENUButton : Pressthis to moveto the homemenu.
0
RETURNButton : Returnto the previousmenu.
ENTER/ DIRECTIONButton:
Pressthe arrowbuttonsto movethe cursorand select
an item.
Pressthe ENTERbuttonto launchthe selecteditemor
confirmthe setting.
EXITButton : Pressthis to exit the menu.
3:2
English
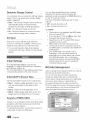
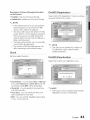
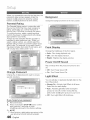
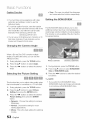
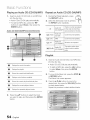
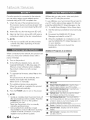
When the product is connected to the network,
select Internet@TVfrom the home menu.
Download desired content from San]sungAppS.
The access steps may differ depending en the
selected menu.
The OSD (OnScreen Display) may change in
this product after you upgrade the software
version.
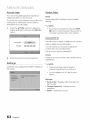
TV Screen
You can configure various display options such
as the TV Aspect, Resolution, 3D, etc.
3D
Select whether to play a Blu-ray Disc with 3D
contents in 3D Mode.
Size
Lets you enter the actual screen size of your
TV so that the product can adjust the image
according to the screen size and display an
optimal 3D image, (The maximum allowed
screen size is 116 inches for this product,)
! CAUTION
_ If you want to enjoy a 3D content, connect a
3D device (3D compliant AV receiver or TV)
to the product and wear a 3D glass before
playing the 3D content,
iiiiii
While watching the 3D video, all analog
component and composite signals will be
blocked automatically,
_ All 3D signals are output only using the
HDMI cable and through the HDMI OUT
port,
3D Mode
o Auto : The 3D Blu-ray Disc is played in 3D
mode if your product detects a TV which
supports it. It is played in 2D mode if your
product detects a TV which cannot support it,
3D : The 3D Blu-ray Disc is played in 3D mode
at all times, If a TV cannot support 3D Blu-ray
discs, the TV's screen can be black,
2D : The 3D Blu-ray Disc is played in 2D mode
at all times. Choose this to view a picture
without 3D effect or when a TV cannot support
3D Blu-ray discs,
NOTE
_ If you press the STOP(U) button once during
the 3D disc playback, 3D mode option will not
be deactivated,
To activate 3D mode option during the 3D disc
playback, press the STOP(m) button twice.
_ As the video resolution in 3D play mode is
fixed according to the resolution of the
original 3D video, you can not change the
resolution to your preference.
_ Some functions such as BD Wise, or setting
the screen size or resolution may not
operate properly in 3D play mode,
_ You must use a high-speed HDMI cable for
a proper output of the 3D signal,
_ Stay at least three times of the length of the
screen distant from the TV.
- It is recommended to place the 3D video
screen forward at eye level,
_ If the product is connected to some 3D
devices, the 3D effect may not function
properly,
_ You can not use this product for switching a
2D content to 3D,
_ Depending on the content and its play position,
vertical black bars could be seen on left or right
or both sides,
English
33
Setup
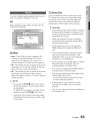
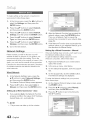
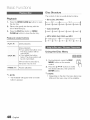
TV Aspect Ratio
BD Wise (Samsung
Depending on the type of television you have, you
may want to adjust the screen aspect ratio.
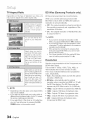
BDWiseis Samsung'slatestinter-connectivity
feature.
Certainmovies(4:3 source)
are displayedin4:3 Pillarbox
(black bars on sides of
picture) if 16:9 normal is
selected.
Products
only)
When you connect Samsung products with
BD-Wise to each other via HDMI, the optimum
resolution is set automatically.
,, Off : The output resolution is fixed according to
the resolution previously set, regardless of the
resolution of the disc.
,, On : The original resolution of the BD/DVD disc
is output to the TV.
NOTE
Select when you want to
see thefull 16:9ratioscreen
suppliedby a Blu-rayDisc/
DVD,eventhoughyou have
a TV witha 4:3 ratioscreen.
Black bars will appear at
the top and bottom of the
screen.
_!_111111%1!
i x_M
_B_!xl xx_!
_ii Selectwhenyou wantto see
iy _the 16:9videosuppliedbythe
Blu-rayDisc/DVDwithoutthe
blackbarsontopandbottom,
even thoughyou havea TV
with a 4:3 ratioscreen.The
extremeleftandrightportion
of themoviepicturewillbecut
Of_,
NOTE
_* Depending on the disc type, some aspect ratios
may not be available.
_* If you select an aspect ratio and option which is
different than the aspect ratio of your TV screen,
the picture might appear distorted.
_ If you select the 4:3 Pan-Scan or 4:3 Letter Box,
you can't see full screen by pressing the FULL
SCREEN
button on the remote control.
34
English
If you want to change the resolution in BD
Wise, you must set BD Wise to Offin advance.
_ If you set BD Wise to off, the resolution of the
connected TV will be adjusted to its maximum
resolution automatically.
_ If the product is connected to a device that
does not support BD Wise, you can net use
the BD Wise function.
_* Fora properoperationd BDWise,settheBD Wise
menuof boththe productandthe TVto On.
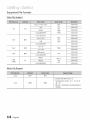
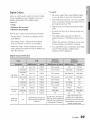
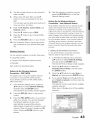
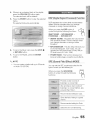
Resolution
Sets the output resolution of the Component and
HDMI video signal.
The number in 1080p, 1080i, 720p, 480p, or
480i indicates the number of lines of video.
The i and p indicate interlaced and progressive
scan, respectively.
,, Auto : Automatically checks and sets the optimal
resolution. (HDMI only)
,, BD Wise : Automatically sets the optimal
resolution when connected via HDMI to a TV with
the BD Wise feature. (TheBD Wise menu item
appears only if BD Wise is set to On.) HDMI only.
,, 1080p : Outputs1080linesofprogressive
video.(HDMIonly)
,, 1080i : Outputs 1080 lines of interlaced video.
,, 720p : Outputs 720 lines of progressive video.
,, 480p : Outputs 480 lines of progressive video.
,, 480i : Outputs 480 lines of interlaced video.
(Component & VIDEO only)
Resolution
according
to the output mode
., Blu-ray Disc playback
Auto
0ptimalResolu_on
480i
1080p,M0vie
Frame
(24Fs)
off
1080p@60F
480i
t080p/!080i,
Movie
Frame
(24Fs)
on
1080p@24F
480i
1080i,Movie
Frame
(24Fs)
0ff
1080i
480i
1080i
480i
720p
72@
480i
720p
480i
480p
48@
480i
48@
480i
480i
480i
480i
., DVD playback
mr,
Auto
1080p
0ptimalRes01uti0n
1080p@60F
480i
480i
1080i
1080i
480i
480p
480i
720p
720p
480i
480p
480i
480p
48@
480i
480p
480i
480i
480i
480i
NOTE
_ If the connected TV does not support Movie
Frame or the selected resolution, the message
"If no pictures are shown after the selection,
please wait for 15 seconds. And then, the
resolution will be reverted to the previous value
automatically. Would you like to make a
selection?" will be displayed.
If you select Yes and the resolution is not
supported, the TV's screen will be blank.
Please wait. After 15 seconds, the resolution
reverts to the previous value automatically.
_ If the screen is blank, press and hold the
STOP (I) button on the front of the product
for more than 5 seconds (no disc inserted).
All settings are restored to the factory default.
Follow the steps on the previous page to
access each mode and select the Display
Setup that your TV will support.
When the factory default settings are restored,
all user BD data is deleted.
The Blu-ray Disc must have the 24 frame
feature in order to use the Movie Frame (24Fs)
mode.
If both HDMI and Component jacks are
connected and you are currently viewing
component output, there may be a difference
between the resolution listed in the table and
actual resolution depending on your TV.
If the HDMI Auto Detection feature does not
work, you can't select the 1080p resolution or
Movie Frame (24Fs).
English
_
Setup
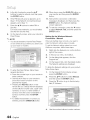
HDMI
Format ........................................................................
Progressive
Mode
You can optimize the color setting from the HDMI
output by selecting a connected device Type:
o TV : Select if connected to a TV via HDMk
Monitor
HDMI.
: Select if connected to a Monitor via
Set to improve picture quality when you view DVDs,
Auto : Select to have the product automatically
set the best picture for the DVD you're
watching.
Video : Select for the best picture from
Concert or TV show DVDs.
NOTE
_* A TV or monitor has to be connected to the
product before you select this option.
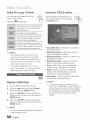
Still Mode
Set the type of picture the home theater shows
when you pause DVD playback.
Movie
Frame (24 Fs) ..................................................................
Setting the Movie Frame (24Fs) feature to On
allows you to adjust the product's HDMI output to
24 frames per second for improved picture quality.
You can enjoy the Movie Frame (24Fs) feature only
on a TV supporting this frame rate. This menu can
only be selected in 1080i or 1080p HDMI output
Auto: Automatically show the best still picture
depending on the content.
Frame : Select when pausing a scene with a
little action.
Field : Select when pausing a scene with a lot
of action.
resolution modes.
- Off : Movie Frame (24Fs) function is off,
HDMI
- On : Movie Frame (24Fs) function is on,
Set to output the picture from the HDMI OUT jack
with Deep Color or without. Deep Color allows mere
accurate color reproduction with deeper color depth,
NOTE
_* Two types of frame rates may be included,
depending on the disc: Movie material (24
frame) and Video material (30 frame). When the
setting switches between Movie (24 frame) and
Video (30 frame), the screen may blink for a
few seconds.
_ If your TV does net support Movie Frame
(24Fs) function, a pop-up message is
displayed.
36
English
Deep Color ...............
- Auto: The picture is output with Deep Color to
the connected TV which supports HDMI Deep
Color.
Off : The picture is output without Deep Color.
Distance
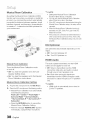
If the speakers cannot be placed at equal
Speaker
distances from the listening position, you can
Setting ........................................................................................................................
adjust the delay time of the audio signals from the
front, center, surround, surround back and
DPL IIz
subwoofer speakers.
o Off : Select when you place the Surround Back
speakers as shown.
On: Provide a more realistic 3D surround
You can set the Speaker Distance between
lft (0.3m) and 30ft (9.0m).
sound with vertical surround system.
Test Tone
NOTE
_ When selecting DPLII Mode, you can listen
to 7.1 channel sound from 2CH, 5.1CH
audio. With 7.1 channel audio, you can
listen to 7.1 channel sound as it is.
Use the Test Tone feature to check the speaker
connections.
Press the 4 or I_ button to select All.
A test tone will be sent to Front Left Center - Front Right - Surround Right Surround Back L - Surround Back R -
Level
You can adjustthe
speaker.
balance andlevelforeach
Adjusting
Front/Center/Surround
/Surround
BacWSubwoofer
Speaker Level
Surround Left - Subwoofer in order so you can
make sure the speakers are set up correctly.
To stop the test tone, press the 4 or _ button to
select Off,
• The volume level can be adjusted in steps from
+6dB to -6dB.
• The sound gets louder as you move closer to
+6dB and quieter as you get closer to -6dB.
NOTE
_ When HDMI Audiois ON,audio is produced
through the TVspeakers,The Test Tone
function is not available,
English
37
Setup
MusicaJ Room CaJibration
By setting the Musical Room Calibration (MRC)
function just once when you relocate or install the
product, you can have the product automatically
recognize the distance between speakers, levels
between channels, and frequency characteristics
to create a 7.1-channel sound field optimized for
your environment.
NOTE
_* Setting the Musical Room Calibration
function takes about 3 minutes.
_* You can only use the MusicalRoom Calibration
setup ifthere is no disc inthe player,
_* if the ASC microphone is disconnected duringthe
Musical Room Calibrationsetup, the setup will be
canceled,
_* When the MusicalRoom Calibrationfunction is
activated,the DSP, Dolby Pro Logic IIand SFE
Mode will not work,
_ if the product is connected to externaldevices or
other components (such as an iPod,AUX, DJN),
the Musical Room CalibrationSetup may not work
properly,
EQ Optimizer
..........................................................
Set optimal EQ automatically depending on the
region.
- Off : Turn EQ Optimizer off.
o On : Turn EQ Optimizer on.
HDMI Audio
Musical Room Calibration
The audio signals transmitted over the HDMI
Turns the Musical Room Calibration mode
Cable can be toggled On and Off.
Off : Video is transmitted over the HDMI
on and off.
o Off: You hear the speakers set to the User
Speaker Setting values.
On: You hear the speakers set to the Musical
Room Calibration mode values.
Musical Room Calibration
Setting
connection cable only, and audio is output
through your product speakers only.
On : Both video and audio signals are
transmitted over the HDMI connection cable,
and audio is output through your TV speakers
only.
NOTE
1.
Plug the ASC microphone into the ASC iN jack,
2.
Placethe ASC microphoneat the listeningposition,
Musical Room Calibration runs automatically
in the following sequence:
Front Left -_ Center -_ Front Right -,
Surround Right -_ Surround Back L
•-*Surround Back R -_ Surround Left -_
Subwoofer
Press the RETURN button to cancel the
Musical Room Calibration Setting.
When the message "REMOVE MIC" appears
in the display, unplug the ASC microphone.
38
English
_ HDMI Audio is automatically down-mixed to
2ch for TV speakers,
NOTE
Digital Output ............................................................................................
Lets you set the audio output format according
to the capabilities of your amplifier, (For more
details, please refer to the digital output
_s Be sure to select the correct Digital Output
or you will hear no sound or a loud noise.
_s If the HDMIdevice (Receiver,TV) is not compatible
with a compressed format (Doby digital, DTS),the
audio signal outputs as PCM.
selection),
* PCM
* Bistream
(Re-encode)
* Bistream
(Audiophile)
_s RegularDVDs do not haveSecondary and Effect
audio.
Blu-ray Discs may include three audio streams.
- Primary Audio : The audio soundtrack of the
main feature.
- Secondary Audio : Additional soundtrack
such as director or actor's commentary.
- Interactive Audio : Plays Interactive sounds
when selected. Interactive Audio is different on
each BID-ray Disc.
_s Some Bb-ray Discs do not have Secondaryand
Effect audio.
_s This DigitalOutput setup does not affect the
analog (L/R)audio or HDMIaudio output to your
TV.
It affects the optical and HDMI audio output when
the home theater is connected to a receiver.
_s If you play MPEG audio soundtracks, audio signal
outputs PCM regardlessof DigitalOutput
Selections (PCMor Bitstream).
Digital Output Selection
PCM
Upto7.1ch
PCM2ch
DTSre-encoded
PCM
PCM
2ch
D0lby
Digital
Upto5.1ch
PCM2ch
DTSre-encoded
Dolby
Digital
Doiby
Digital
D01by
Digital
Plus
AudioStream
Upto7.1ch
PCM2ch
DTSre-encoded
Doiby
DigitalPlus
Doiby
Digital
onBh-rayDisc D01by
TrueHD
Upto7.1ch
PCM2ch
DTSre-encoded
Dolby
TrueHD
Doiby
Digital
DTS
Upto6.1ch
PCM2ch
DTSre-encoded
DTS
DTS
DTS-HD
HRA
Upto7.1ch
PCM2ch
DTSre-encoded
DTS-HD
HRA
DTS
Upto7.1ch
PCM2ch
DTSre-encoded
DTS-HD
MA
DTS
DTS-HD
MR
PCM
AudioStream
U01by
Digital
onDVD
DTS
Definition
for
Bh-ray
Disc
Any
PDM2@
PDM2ch
POM2ch
PCM2@
PCM
2ch
Upto5.1ch
PCM2ch
U01by
Digital
DdbyDigital
Doiby
Digital
Upto6.1ch
PCM2ch
DTS
DTS
DTS
Outputs
0nlythePrimaB/audio
Decodes
Prlman/,
Secondary
and
(mainsoundtrack
0fthe
Decodes
Primary,
Secondary
and Effect
audio
streams
together
into s0undtrack
sothatyourreceiver
candecode
Effect
audiostreams
together
into PCM
audio,
thenre-encodes
the movie)
PDMaudio.
theaudiobitstream.
Youwillnothear
PCM
audiointoDTSbitstream.
Secondary
andEffect
audio.
English
39
Setup
Dynamic
Range
Control
You can listen at low volumes but still hear dialog
clearly. This is only active when a Dolby Digital
signal is detected.
o Auto : The Dynamic Range Control will be set
automatically based on the information
provided by the Dolby TrueHD Soundtrack,
Off : Turn Dynamic Range Control off,
On : Choose to listen to a movie at a lower
You can then operate this product using a
Samsung TV remote control and start disc
playback simply by pressing the PLAY (_) button
on the TV's remote control.
For more information, please see the TV user
manual,
Off : Anynet+ function is off.
On : Anynet+ function is on,
NOTE
_ This function is net available if the HDMI cable
volume without losing clarity of dialog.
does not support CEC,
_* If your Samsung TV has an _4_x,,_t÷ logo, then
AV Sync
it supports the Anynet+ function.
_* Depending on your TV, certain HDMI output
Video may not sync with the audio when the
resolutions may not work.
product is connected to a digital TV, If this occurs,
Please refer to the user manual of your TV,
adjust the audio delay time to match the video.
_ The Anynet+ function is supported only when
an HDMI Cable is connected to the HDMI OUT
You can set the audio delay time between
of the product.
0 msec and 300 msec, Adjust it to the optimal
_ If the HDMI cable or the power code is
setting.
unplugged, or if the product is turned off
abnormally due to power failure, first connect
the HDMI cable again; turn on all devices
including the product, and use the ANYNET+
function under the TV menu to activate all
Initi al Settings .................................................................................................................................
connected devices again,
By using the Initial Settings, you can set
language, TV aspect, Musical Room Calibration
BD Data Management
and Network setting, etc.
For more information on the settings, refer to the
Lets you managethe downloadedcontentsfrom a Blu-ray
corresponding section in this user manual.
Discthat supportsthe BD-LIVEservice.
Youcan check the device informationincludingthe
Internet@TV Screen Size
storagesize,deletethe BD dataor changethe Flash
memorydevice.ChangeDeviceallowsyou to selecteither
Set the Internet@TV Screen to the optimal size.
theproduct's InternalMemoryor ExternalMemory
- Size 1 : Display smaller application icons, You
(connectedUSBDevice).Ifthe datato be storedfrom
may see some black on the sides of the
screen.
Size 2 : Display normal application icons,
Size 3 : Display larger application icons. The
image may be too large for your TV screen.
Anynet+
(HDMI-CEC)
Anynet+ is a convenient function that offers linked
operations with other Samsung products that
have the Anynet+ feature,
To operate this function, connect this product to
a Samsung TV with an HDMI cable,
4'0
English
BD-LIVEis greaterthan thesizeof the remainingmemory
or the InternalMemoryis full, connectan ExternalUSB
device,thenselect ExternalDevicein the menu.
Description of Device (Storage) Information
on the Product
DivX(R) Registration
- Total Size : Totalsizeof the Device(Storage).
View DivX(R)VOD Registration Code to purchase
and play DivX(R)VOD content,
,, Available Size : Availablesizeof the Device(Storage).
.......................................
NOTE
_ In the external memory mode, disc playback
will be stopped if you disconnect the USB
device in the middle of the playback.
_ Only those USB devices formatted in FAT file
system (DOS 8.3 volume label) are supported.
We recommend you use USB devices that
support USB 2.0 protocol with a 4 MB/sec or
faster read/write speed.
_ The Resume Play function may not work after
you format the storage device.
_ The total size of BD Data Management may
differ, depending en the software version.
Clock
NOTE
_ This option is net activated if you select OK.
To activate this option, please activate
DivX(R)Deactivation.
Set time-related functions,
DivX(R) Deact !vation ......................................
Select this to get a new registration code,
,, Clock Mode : You can select Auto or Manual.
If you select Manual, the Clock Set menu will
be activated while DST will be deactivated.
,, Clock Set : You can specify the current time
and date manually.
,, Time Zone : You can specify the time zone
that is applicable to your area.
NOTE
_ Thisfunction can be operatedwhen DivX(R)
Registrationfunction is deactivated.
,, DST : You can set DST (Daylight Saving Time)
1 hour, 2 hours and off.
English
4'1,
, ¢tup
To begin setting up the network connection for
your product, follow these steps:
1.
In the Home menu, press the _1_. buttons to
select the Settings,
ENTER button.
2.
and then press the
Press the A _' buttons to select Network,
and then press the ENTER button.
3.
Press the A T buttons to select Network
2.
After the Network Function has acquired the
network values, press the RETURN button.
Then, run a Network Test to ensure the
product has connected to your network (See
page 45).
3.
If the Network Function does not acquire the
network values or you selected Manual, go to
the directions for Manual Setup.
Settings, and then press the ENTER button.
4.
Press the A T buttons to select Network
Type, and then press the ENTER button.
5.
Press the A T buttons to select Wired or
Wireless, and then press the ENTER button.
6.
Go to the next section.
Network
Setting
Settings
Please contact your ISP to find out if your IP
address is static or dynamic. If it is dynamic, we
recommend using the Auto setting. This is the
easiest and will work in the majority of cases. If it is
static, you must use the manual set up procedure.
Directions for wired networks are below. Directions
for wireless networks are after the directions for
wired networks.
Up a Wired Connecton
- Manual
If the Auto Setting does not work, you'll need to set
the Network Setting values manually.
To get the Network setting values from most
Windows computers, follow these steps:
1. Right click the Network icon on the bottom
right of the screen.
2.
In the pop-up menu, click Status.
3.
On the dialog that appears, click the Support
tab.
4.
On the Support tab, click the Details button.
The Network settings are displayed.
Wired Network
1.
In the Network Settings menu, press the
A T buttons to select Network Settings,
and then press the ENTER button.
The Intemet Protocol Setup screen appears.
2.
Press the _ button, then select Auto or
1. On the Intemet Protocol Setup screen, press
the ENTER button.
Manual, and then press the ENTER button.
2.
Press the A T buttons to select Manual,
and then press the ENTER button.
3.
Press the T button to go to the first entry
field (IP Address).
Setting
1.
Up a Wired Connecton
- Auto
If you selected Auto, the Network Function
acquires and fills in the values for IP Address,
Subnet Mask, etc. automatically.
NOTE
_* This process can take up to fiveminutes.
42
To enter the Network settings into your product,
follow these steps:
English
4.
Use the number buttons on your remote to
enter numbers.
5.
When done with each field, use the I_
button to move successively to the next
field.
You can also use the other arrow buttons to
move up, down, and back.
6.
Enter the IP Address,
Subnet Mask, and
Gateway values.
7.
Press the T button to go to DNS.
8.
Press the T button to go to the first DNS
entry field.
9.
Press the RETURN button on your remote.
10. Run a Network Test to ensure the product
has connected to your network (See page
45).
4.
After the network connection is set up,
press the RETURN button to exit the
Network Setting screen.
Setting Up the Wireless Network
Connection
- Auto Network Search
Most wireless networks have an optional security
system that requires devices that access the
network to transmit an encrypted security code
called an Access or Security Key. The Security Key
is based on a Pass Phrase, typically a word or a
series of letters and numbers of a specified length
you were asked to enter when you set up security
for your wireless network. If you use this method
of setting up the network connection, and have
a Security Key for your wireless network, you will
have to enter the Pass Phrase during the setup
process.
Wireless Network
[] Setting Up the Network Connection
You can setup the wireless connection three ways:
To set up the wireless connection using Auto
Network Search, follow these steps:
• Using PBC (WPS)
1.
o Using the Auto Network Search function.
and then press the ENTER button.
The Internet Protocol Setup screen appears.
• Manually.
Each method is described below.
Setting Up the Wireless Network
Connection
- PBC ONPS}
The easiest way to set up the wireless network
connection is using the PBC (WPS)function.
If your wireless router has a PBC (WPS) button,
follow these steps:
1.
In the Network Settings menu, press the
A T buttons to select Network Settings,
2.
Press the A T buttons to select the
Internet Protocol Setup, and then press
the ENTER button.
3.
Press the A T buttons to select Auto or
Manual, and then press the ENTER button.
In the Network Settings menu, press the
A T buttons to select Network Settings,
If you selected Auto, press the A button to
go to Select a network, and then press the
ENTER button.
The Network function searches for available
wireless networks.
and then press the ENTER button.
The Internet Protocol Setup screen appears.
When done, it displays a list of the available
networks.
2.
Press the RED (A) button on the remote
control.
3.
Press the PBC (WPS) button on your router
within two minutes. Your product displays
the Network Selection Screen, and
4.
automatically acquires all the network
setting values it needs and connects to your
network. When it is done, it displays an OK
button. Press the ENTER button on your
remote.
English
4'3
5.
6.
In the list of networks, press the A T
buttons to select a network, and then press
the ENTER button.
10. When done, press the BLUE (D) button on
your remote, and then press the ENTER
button.
If the PIN/Security pop-up appears, go to
11. Wait until the connection confirmation
Step 7. If the Network Connecting Screen
appears, go to Step 11.
7.
message is displayed, and then press the
ENTER button. The Network Settings
screen reappears.
Press the A T buttons to select PIN or
Security.
12. To test the connection,
For most home networks, you would select
Security (for Security Key).
8.
On the Security screen, enter your network's
Pass Phrase.
NOTE
_* You should be able to find the Pass Phrase
on one of the set up screens you used to set
up your router or modem.
_:,M0ve
9.
_Select
DRetuln
To enter the Pass Phrase, follow these
press the T button
to select Network Test, and then press the
ENTER button.
Setting Up the Wireless
Connection
- Manual
Network
If the Auto Setting does not work, you need to
enter the Network settng values manually.
To get the Network setting values from most
Windows computers, follow these steps:
1.
Right click the Network icon on the bottom
right of the screen.
2.
In the pop-up menu, click Status.
3.
On the dialog that appears, click the
Support tab.
4.
On the Support tab, click the Details button.
The Network settings are displayed.
To Enter the Network settings into your product,
follow these steps:
general directions:
1.
• Press the number keys on your remote to
enter numbers.
2.
Press the A T buttons to select Manual,
and then press the ENTER button.
3.
Press the T button to go to the first entry
field (IP Address).
• Use the arrow keys on your remote to
move from button to button on the
Security Key screen.
• Pressing the RED (A) button on the
remote lets you change the text displayed
on the buttons to lower case, upper case,
numbers, or icons. To enter a letter or
symbol, move the cursor to the letter or
symbol, and then press the ENTER
button.
On the Internet Protocol Setup screen,
press the ENTER button.
iiiii
iiiii
• To delete the last letter or number you
entered, press the GREEN (B) button.
iiiii _
iiiii_
4.
4'4'
English
Use the number buttons to enter numbers.
5.
When done with each field, use the I_
BD-LIVE
button to move successively to the next
field.
You can also use the other arrow buttons to
Select whether to allow an Intemet connection
when BD-LIVE service is used.
move up, down, and back.
6.
Enter the IP Address,
Subnet Mask, and
Internet
Connection
- Allow (All) : The Intemet connection will be
allowed for all BD-LIVE contents.
o Allow (Valid Only) : The Intemet connection
Gateway values.
7.
Press the T to go to DNS.
8.
Press the T button to go to the first DNS
entry field. Enter the numbers as above.
9.
When done, press the A button to return to
Access Point Selection. Select the network,
will be allowed only for BD-LIVE contents
containing a valid certificate.
Prohibit : No Intemet connection will be
allowed for any BD-LIVE content.
NOTE
and then press the ENTER button.
10. Go to Step 6 in the Automatic Wireless
procedure above, and follow the directions
from that point on.
Network Test
_ What is a valid certificate?
When the product uses BD-LIVE to send the
disc data and request to the server to certify
the disc, the server uses the transferred data
to check if the disc is valid and sends the
certificate back to the product.
Use this menu to connect to the wired network or
check whether your network connection
working or not.
is
_ The Internet connection may be restricted
while you are using BD-LIVE contents.
You can select the language you prefer for the
home menu, disc menu, etc.
• On-Screen
Menu : Select the language for the
on-screen displays.
• Disc Menu : Select the language for the disc
menu displays.
Audio : Select the language for disc audio.
Network
Status
Check whether a connection to the network and
the Intemet have been established,
Subtitle
: Select the language for disc subtitles.
NOTE
_ Theselectedlanguagewill 0nlyappearif it is
supportedonthe disc,
English
4'5
When you operate this menu for the first time, the
password setup screen appears. Enter the
desired 4-digit password using the number
buttons. (Default password is set to 0000.)
Parental
Background
..........................................................
Change the background theme of the menu screen.
Rating .....................
The Parental Rating works in conjunction with
Blu-ray Disc/DVDs that have been assigned a
rating, which helps you control the types of
Blu-ray Disc/DVDs that your family can watch.
To use this function, select a rating level that
restricts the player to playing discs with ratings
appropriate for your family.
A larger number indicates that the program is
intended for adult audiences only. When you
select a rating number, you should select the
highest rating number you want the player to be
able to play. For example, if you select Level 6,
the player will play discs rated 6 and below, and
will not play discs rated Level 7 or 8.
Front Display
Change the brightness of the front panel.
o Auto : Dim during playback only.
Dim : Dim the display window.
Bright : Brighten the display window.
Power
On/Off
Sound
Play a melody when the product is turned on and
off.
Off : Turn Power Sound Off.
¢: i¢i; i¸i !!:iili;¸i ¸ii!_iti;i;i;i;i;i;i;i;
i!
Change
Password
On : Turn Power Sound On.
Change the 4-digit password used to access
Light
security functions.
Effect
.........................................................
You can activate or deactivate the light effect on the
top of the product.
• Always On : Activate Light Effect at all times.
Select this for retail display.
Auto : Activate Light Effect when turning the
product on and off or when moving the tray.
Select when installing the product in your home.
Off : Turn Light Effect off at all times.
If you forgot
your
password
1.
Remove the disc.
2.
Press and hold the STOP (m) button on the
front panel for 5 seconds or more.
All settings will revert to the factory settings.
NOTE
_* When the factorydefaultsettingsare restored,all the
userdatastoredin the BD datawillbe deleted.
46
English
You can also update software in two other ways:
o USB : Visit www.samsung.com/bluraysupport,
then download and store the latest software
Software Upgrade ..................
This menu allows you to upgrade software for
performance improvements or additional services,
You can check the current software version,
upgrade on the Internet and set the Auto upgrade
notification. If the product is properly connected to
the network by cable or wirelessly, the product will
automatically connect to our website each time it is
turned on and download update files if any valid
upgrade exists.
(RUF file) onto a USB flash drive. Connect the
USB flash drive to the USB port of the product
(disc tray must be empty) to update the
software, then follow the on-screen
instructions.
CD : Visit www.samsung.com/bluraysupport,
download and write the latest software (RUF
file) onto a disc. Insert and play the disc in the
product to start the update, then follow the
on-screen instructions.
NOTE
_ Software upgrades using the USB Host jack
must be performed with no disc inside.
iiiii
iiiii_
1. To select By Internet, press the ENTER
button.
A popup message appears if an update is
available asking if you want to upgrade.
2.
If you select Yes, the product turns off
automatically before restarting, and then
begins the upgrade. (Never turn it on
manually here.)
3.
The update progress popup appears.
When the update is completed, the product
turns off automatically again.
4.
Press the POWER button to turn on the
_ Ifyou want to cancel the upgrade during the
process of downloading the upgrade data,
press the ENTERbutton.
_ When the system upgrade is done, check the
software details in the software Upgrade
menu.
_ Do net turn off the product during the System
Upgrade. It may cause the product to not
work properly.
_ Do net use USB devices other than USB Flash
Drives to do software upgrades when using
the USB Host jack.
Contact
Samsung
Provides contact information for assistance with
your product.
product.
_.
NOTE
_ The Update is complete when the product turns
off after restarting, Press the POWER
button to
turn on the updated product for your use. Never
turn the product off or on manually during the
update process.
_ Samsung Electronics shall take no legal
responsibility for product malfunction caused by
an unstable internet connection or consumer
negligence during software upgrade.
English
4'7
} asioFunctions
Disc Structure
........................................................
The contents of disc are usually divided as below.
Playback..........................................................
- Blu-ray Disc, DVD-VIDEO
I. PresstheOPEN/CLOSE
(_A)
buttontoopen
titlel ---,-I_--_
-, title2
1-_ chapter
2 ,_ chapter
1_ chapter
2-_ chapter
3
the disctray,
2. Placea discgentlyintothetraywiththe
disc'slabel
facingup,
3. PressthePLAY
(_,)
buttonorOPEN/
,, Audio CD (CD-DA)
_, track 1 "1_ track2 + track 3 *_ track 4 _
track 5 4
CLOSE (A) button to close the disc tray.
,, MP3, WMA, DivX, MKV and MP4
Playback related buttons
PLAY(_,)
sToPi,,i
Starts playback.
Stops playback.
• If you press the button once:
The stop position will be
memorized.
• If you press the button
twice: The stop position will
be not memorized.
With some Blu-raydiscs (BD-J),
this function may not work.
PAUSE (|1)
--folder (group)1--"1_
folder(group)2 ---"1
filel,-_ file2.p filel._ file2,-p file34
Pauses playback.
Using the D!sc Menu ............................................
1. During playback, press the DISC
MENU button on the remote
control.
2.
I
D_SCMENU
_
Press the A • _ _ buttons to make
the desired selection, then press the
ENTER button.
NOTE
NOTE
_ "Not Available" will appear when an invalid
button is pressed.
4'8
English
_ Depending on the disc, the menu items may
differ and this menu may not be available.
Using the Title Menu .............................................................................
During playback, you can search quickly through
1. During playback, press the TITLE
MENU button on the remote
control.
2.
a chapter or track, and use the skip function to
jump to the next selection,
TITLEMENU
I _bP I
Searching
for a Desired
Scene
Press the A'v _ _ buttons to
make the desired selection, then
press the ENTER button,
- During playback, press the SEARCH (_ _)
button,
NOTE
_ Depending on the disc, the menu items may
Each time you press the SEARCH (_ _)
button, the playback speed will change as
follows.
differ and this menu may not be available,
_ The Title Menu will only be displayed if there
are at least two titles on the disc.
Playing
BD,ROM,
BD_RE/-R,
DVD-RW/-R,
DVD÷RW/+R,
DVD-VIDEO
the Title List
1. During playback, press the DISC
MENU or TITLE MENU button,
DISCMENU
2.
Press the A'v buttons to select an
TITLE
MENU
entry you want to play from Title
List, then press the ENTER
button,
I P_upI
DivX,MKV, MP4
_1_2_3_
_ 4_ _
5_ _ 6---,_
7
_ 1 ---__ 2---__ 3 _
_4_5_6_7
_,_ 1 _ _,_ 2 _ _,_3
_
1--__
2--_ _ 3
• To return to normalspeed playback, pressthe
PLAY (_) button,
NOTE
_ No sound is played in search mode.
Using the Popup
Menu .........................................................................
Skipping
1. During playback, press the POPUP
button on the remote control,
2.
Chapters ..........................................
TITLEMENU
I po_upI
Press the A • _ _ buttons or
ENTER button to select the desired
menu,
NOTE
_ Depending on the disc, the menu items may
differ and this menu may not be available.
- During playback, press the SKIP (1_1)
button,
If you press the SKIP (_,_1)button, the disc
moves to the next chapter,
If you press the SKIP (1_) button, the disc
moves to the beginning of the chapter. One
more press makes it move to the beginning of
the previous chapter,
English
4'_
} asioFunctions
Slow Mot!on
Play ................................................................................................................
In pause mode, press the SEARCH (_.-_)
button.
3.
To return to normal play, press the REPEAT
button again.
4.
Press the • T buttons to select Off, then
If you press the SEARCH (_) button, the
playback speed is reduced to I_- 1/8 I_ 1/4 I_ 1/2
press the ENTER button.
To return to normal speed playback, press the
NOTE
PLAY (_) button.
_ Depending on the disc, the Repeat function
may not be available.
NOTE
_ No sound is played in slow mode.
Repeat
_ Slow motion operates only in the forward
direction.
the Section ...............................................
_ Slow motion can net operate on DivX discs.
Step Motion
Play
1.
During playback, press the REPEAT ¢--------q
REPEAT
button on the remote control.
[ _ J
Press the • • buttons to select
REPEAT A-B.
- In pause mode, press the PAUSE ( I| ) button.
Each time you press the PAUSE ( I| ) button, a
new frame appears.
To return to normal speed playback, press the
PLAY ( I_ ) button.
NOTE
3_
_ No sound is played in step mode.
_ Step motion operates only in the forward
direction.
you want repeat play to start (A).
_ Step motion does not work on DivX discs.
Repeat
Press the ENTER button at the point where
4.
Press the ENTER button at the point where
you want repeat play to stop (B).
5.
To return to normal play, press the REPEAT
button again.
6.
Press the ENTER button.
the Title or Chapter
%, NOTE
Ifyou set point(B)before5 secondshas
elapsed,the prohibitionmessagewill appear.
Repeat
1.
the disc title or chapter.
During playback, pressthe
REPEAT
button on the remote control.
2.
Press the • T buttons to select
Chapter or Title, then press the
ENTER button.
_
English
RE_AT
I
_J
_ Information about the primary / secondary
mode is also displayed if the Blu-ray Disc has a
BONUSVIEW section.
Use the 41_. button te switch between
During playback, you can operate the
disc menu by pressing the TOOLS
button.
primary and secondary audio modes.
_ This function depends on what audio
languages are encoded on the disc and may
net be available.
o TOOLS Menu Screen
_ A Blu-ray Disc can contain up to 32 audio
languages and a DVD up to 8.
_ Some Blu-ray Discs may allow you to select
either the multi-channel LPCM or Dolby digital
audio soundtrack in English.
Selecting
the Subtitle
Language
NOTE
m Dependingon the disc,the TOOLSmenumay
differ,
1.
During playback, press the TOOLS button.
2.
Press the A _' buttons to select Subtitle,
3.
Moving to a Des!red Scene Direct!y ......
Press the _1_ buttons to select the desired
subtitle language.
NOTE
_ Depending on the Blu-ray Disc / DVD, you may
1. During playback, press the TOOLS button.
2.
Press the A T buttons to select Title,
Chapter or Playing Time.
3.
Enter the desired Title, Chapter or Playing
Time using the number buttons, then press
the ENTER button.
be able to change the desired subtitle in the
Disc Menu,
Press the DISCMENUbutton.
_ This function depends on what subtitles are
encoded on the disc and may not be available
on all Blu-ray Discs/DVDs.
_ A Blu-ray Disc can contain up to 255 subtitle
languages and a
Selecting the Aud!o Language ......................................
DVD up to 32.
_ Information about the primary / secondary
mode is also displayed if the Blu-ray Disc has a
BONUSVIEW section.
1. During playback, press the TOOLS button,
_ This function changes both the primary and
2.
Press the A T buttons to select Audio,
3.
Press the _1_ buttons to select the desired
secondary subtitles at the same time.
_ The total number of subtitles is the sum of the
audio language.
primary and secondary ones,
NOTE
_ The ",__ indicator is not displayed on the
screen if the BONUSVIEW section does net
contain any BONUSVIEW audio settings.
English
_,
BasicFunctions
Caption
Function
o User : The user can adjust the sharpness
and noise reduction function respectively.
You must have some experience with video
Setting
the BONUSV[EW
....................................
extraction and editing in order to use this
feature properly.
To use the caption function, save the caption
file (*.smi) with the same file name as that of the
DivX media file (*.avi) within the same folder.
Example. Root Samsung_OO7CD1 .avi
Samsung_OO7CD1 .smi
You can use up to 60 alphanumeric charactersor 30
EastAsian characters (2 byte characters such as
Koreanand Chinese)for the file name.
Changing
the Camera
The BONUSVIEW feature allows you to view
additional content (such as commentaries) in a
small screen window while the movie is playing.
This function is only available if the disc has the
bonusview feature.
Angle ..............
When a Blu-ray Disc/DVD contains multiple
angles of a particular scene, you can use the
ANGLE function.
Primarya audio/video
Secondary a audio/video
1.
During playback, press the TOOLS button.
2.
Press the A _' buttons to select Angle.
3.
Press the 4 _ buttons to select the desired
1. During playback, press the TOOLS button.
angle.
2.
Press the A T buttons to select BONUSVIEW
Video or BONUSVIEW Audio.
Selecting
the P!cture
Setting
3. Press the _1_ buttons to select the desired
.......................
bonusview.
NOTE
This function lets you to adjust video quality when
the home theater is connected to a TV via HDMI.
1.
During playback, press the TOOLS button.
2.
Press the A T buttons to select Picture
Setting, then press the ENTER button.
3.
Press the 4 _ buttons to select the desired
Picture Setting, then press the ENTER
button.
Dynamic : Choose this setting to increase
Sharpness.
Normal : Choose this setting for most
viewing applications.
Movie : This is the best setting for watching
movies.
_2
English
_ If you switch from BONUSVIEW Video,
BONUSVIEW Audio will change automatically
in accordance with BONUSVIEW Video.
o ENTER
button:
P,ays
and
pauses
the
selected
track.
_,_
Buttons
on the Remote
used for Music
Control
Playback
4_" buttons: FastPlay.
(exceptfor AudioCD (CD-DA))
.............................................................
O
STOP button: Stopsa track.
SKIP (_l) button: Duringplayback,movesto
the next pagein theMusic Listor movesto the
next trackin the Raylist.
SKIP (1_) button: Duringplayback,movesto
the previouspageinthe MusicList or movesto
the previoustrack inthe Playlist.
_)
If you pressthis buttonafterthreeseconds
of playbackin thePhylist,the currenttrack is
replayedfrom thebeginning.But,if you pressthis
buttonwithinthreesecondsafterplaybackstarts
inthe Playlist,the previoustrack is played.
NUMBERbutton: Duringthe Phylistplayback,
pressthe desiredtrack number.Theselected
track willbe played.
u
REPEATbuttons: Selectsthe playmodeinthe
Phylist.
,_
SEARCHbuttons: FastPlay.
(AudioOD(CD-DA)only)
O
PAUSEbutton: Pausesplayback.
O
PLAY button: Playsthe currentlyselectedtrack.
O
A T buttons: Selectsa track in theMusic List
or Phylist.
,_,
YELLOW(0) button: Selector deselecta track
inthe musiclist.
English
53
BasicFunctions
Play!nganAud!oCD(CD-DA)!MP3
1.
.... Repeat an Audio CD(CD-DA)/MP3
Insert an Audio CD (CD-DA) or an MP3 Disc
into the disc tray.
1. During the Playlist playback, press
o Audio CDs (CD-DA) play automatically.
2.
the REPEAT button.
To start an MP3 disc, press the _
buttons to select Music, then press the
ENTER button.
REPEAT
I
_..J
Selectthe desired play mode by pressing
the REPEAT button repeatedly.
Off
Audio CD (CD-DA)/MP3 Screen Elements
Trackson a discare played
AudioCD
OD-DA;/MR3 intheorderinwhich they
were recordedon the disc.
(QO Track
AudioCD
OD-DA/
Currenttrack is repeated.
(¢_r) One
MP3
Currenttrack is repeated.
(_
AudioCD
OD-DA;/MP3 All tracksare repeated.
AJ
(3_)Shuffle
Therandomoptionplays
AudioCD
a disc'stracksinrandom
OD-DA//MP3
.
order.
Playlist .......................................................................
1.
O
Insert an Audio CD (CD-DA) or an MP3 Disc
into the disc tray.
Displaysthe musicinformation.
Audio CDs (CD-DA) play automatically.
Dfspbysthe pbylist.
To start an MP3 disc, press the 4 _ buttons
to select Music, then press the ENTER
button.
O
Shows thecurrenttrack/totaltracks.
O
Dfspbyscontrol buttonsavaibbb.
O
Shows thecurrentplaytime/totalplaytime.
O
Dfspbysthe currentplaybackstatus.
O
Dfspbysthe repeatedplaybackstatus.
2.
To move to the Music List, press the STOP (I)
or RETURN button.
The Music List screen appears.
3.
Press the A T 4 _. buttons to move to the
desired track, then press the YELLOW (C) button
to check desired tracks.
Repeat this procedureto select additional tracks.
2.
Press the A T buttons to select the track
you want to play, and then press the ENTER
button.
54'
English
4.
If there is an undesired track in the playlist,
press the YELLOW (C) button again,
The selected track will be deleted,
5.
Press the ENTER button to play the selected
tracks.
The selected tracks play automatically.
DSP (Digital Signal Processor} Function
DSP regulates the volume level and decreases
drastic volume changes when you change
channels or during a scene transitions.
DSP
When you press the DSP button, it
cycles through the following functions:
SMARTSOUND * MP3 ENHANCER
POWERBASS * DSP MODE OFF
• SMART SOUND : Regulates the volume level
and deceases drastic volume changes when
you change channels or during a scene
transition,
• MP3 ENHANCER : This also helps enhance your
sound experience (ex. mp3 music). You can
upscale your MP3 level sound (24 kHz, 8bit) to
CD level sound (44.1 kHz, 16bit).
6.
To go to the Music List, press the STOP (I)
or RETURN button,
7.
To go to the Playlist, press the ENTER
button,
• POWER BASS : This function stresses low
NOTE
SFE (Sound Field Effect)MODE
_.
_ You can create a playlist with up to 99 tracks
on Audio OD (CD-DA).
tones providing deep, powerful sound effects,
You can set the SFE mode best suited for the
type of music you are listening to.
SFEI_IODE
When you press the SFE MODE
button, it cycles through the following
functions:
Provides a clear vocal as if
listening in a concert hall.
Also provides a clear vocal as if
listening in a concert hall but, less
powerful than HALL1.
Recommended setting for Jazz,
Gives the feel of being in a grand
church.
Recommended setting for Rock.
Select this for normal listening.
English
55
BasicFunctions
Dolby
Pro Logic
II Mode ..................................................
Using the TOOLS
You can select the desired Dolby Pro
usPLx
Logic II audio mode.
Press the r]["l PL II button.
button
During the slide show playback, you
can use various function by pressing
the TOOLS button.
Whenlisteningto music,youcan experbnce
soundeffectsasifyou arelisteningto the
actualperformance,
Addsrealism
to themovies0undtrack.
Youwillexperiencea realisticmulti-channel
effect,asif usingsixspeakers,whib using
just thefrontleftandrightspeakers,
Youwillhearmultichannel
surroundsound,
Selectthisto listento soundfromthefrontleft
andfightspeakersandthesubwooferonly,
NOTE
_s When selecting Dolby Pro Logic II mode,
connect your external device to the AUDIO
INPUTjacks (L and R) on the product. Ifyou
connect to only one of the inputs (L or R),you
cannot listento surround sound.
_s This mode is availablewith both 2 channel
and 5.1 channel audio. 7.1ch audio is directly
transmitted without any transformation.
_, Stop Slide Show : Select this if you want to
stop the slide show.
_, Slide Show Speed : Select if you want to
adjust the Slide Show speed.
_, Slide Show Effect : Select if you want to set
the Slide Show Effect.
_, Background Music : Select if you want to
listen to music while viewing a picture.
_, Zoom : Select if you want to enlarge the
current picture. (Enlarged up to 4 times)
_, Rotate : Select if you want to rotate the
picture. (This will rotate the picture either
clockwise or counter clockwise.)
e Information : Shows the picture information
including the name and size, etc.
Playing
a JPEG Disc
1.
Insert a JPEG disc into the disc tray.
2.
Press the _ _- buttons to select Photos,
and then press the ENTER button.
3.
Press the A T _ D,-buttons to select the
folder you want to play, and then press the
ENTER button.
4.. Press the A T _ _ buttons to select the
photo you want to play, and then press the
ENTER button.
NOTE
_ You can't enlarge the subtitle and PG graphic
in the full screen mode.
56
English
NOTE
_ To enable the Background Music function,
both music and MP3 files must be contained in
the same folder. However, the sound quality
can be affected by the bit rate of the MP3 file,
the size of the photo, and the encoding
method.
NOTE
You must remove the USB storage device
safely by performing the "Safe to Remove
Hardware" function to prevent possible
damage to the USB memory. Press the MENU
button to move to the main screen, press the
YELLOW
(C)button, and then press the ENTER
button.
You can use the USB connection to play multimedia
files (MP3, JPEG, DivX, etc.) downloaded from a USB
storage device.
1. Move to the Home menu.
2. In Stop mode, connect the USB storage device
to the USB port on the front panel of the product.
The message "Do you want to access the
device?"appears.
3. Press the _ _, button to select Yes, then
press the ENTER button.
4. Press the RED (A) button or the BLUE (D)
button. If you pressed the RED (A) button,
go to Step 5. If you pressed the BLUE (D)
button, go to Step 44>
_
When the Audio-CD (CD-DA), MP3, or JPEG
files are in stop mode, you can't see the full
screen by pressing the FULLSCREEN
button on
the remote control.
_ If you insert a disc when playing a USB storage
device, the device mode is changed to "DVD
or CD" automatically.
_ To listento yourmusic fileswith 7.1 channelsound,
you must setthe DolbyPro LogicIImodeto Matrix.
(Seepage56)
Using buttons on the Remote Control
1.
2.
S,
Press the FUNCTION button to select FM.
Tune in to the desired station.
* Automatic Tuning 1 : When the I_ _1 button
is pressed,a presetbroadcaststation is selected.
Press the A _' buttons to select USB, then
press the ENTER button.
Press the _1_, buttons to select the desired
Videos, Music or Photos, then press the
ENTER button. Go to Step 7.
4 -1, Press the BLUE (D) button, the screen
below appears. Go to 5 1.
6.
* Automatic Tuning 2 : Press and hold the
TUNING/OH ("" v) button to search for active
broadcasting stations automatically.
* Manual Tuning : Press the TUNING/OH
(^ v) button to increaseor decrease the
frequency incrementally.
Using the buttons on the home theater
1,
Press the FUNCTION (F_c.) button to select FM.
2.
Select a broadcast station.
* Automatic Tuning 1 : Press the STOP (! )
button to select PRESET and then press the
I._q _,_1button to select the preset station.
5% Press the 4 I_ buttons to select USB, then
press the ENTER button.
6 -1. Press the A T buttons to select the desired
Videos, Music or Photos, then press the
ENTER button.
7.
To play back Video, Music, or Photo files,
see pages 48-56.
* Automatic Tuning 2 : Press the STOP ([] )
button to select MANUAL and then press and
hold the I.,_ _,€,1
button button to search the
band automatically
* Manual Tuning : Pressthe STOP ( [] ) button to
select MANUAL and then press the I_ _1
button to tune into a lower or higher frequency.
English
57
BasicFunctions
Setting
Mono/Stereo
.........................................................................................
Press the MO/ST button.
MOIST
" Each time the button is pressed, the
sound switches between STEREO
and MONO.
L__[.
You can enjoy music and video filesfrom an iPod
through the product.
- In a poor reception area, select
MONO for a clear, interference-free reception.
Presetting
Stations
Example : Presetting FM 89.10 into memory
1.
Press the FUNCTION button to select FM.
2.
Press the TUNING/CH
<89.10>.
3.
Press the TUNER MEMORY button.
(^v)
button to select
TUNER
ME_
4.
- NUMBER flashes on the display.
Press the I_ _.1 button to select
Listening
to Music
preset number.
- You can select between 1 and 15
You can play music files stored in the iPod player by
connecting it to the product.
presets.
5.
Press the TUNER MEMORY button again.
- Press the TUNER MEMORY button before
NUMBER disappears from the display.
- NUMBER disappears from the display and
the station is stored in memory.
6. To preset another station, repeat steps 2 to 5.
- To tune into a presetstation,press the I_ _4_1
button on the remotecontrol to select a channel.
1.
Connect the iPod dock connector to the iPod
jack on the rear panel of the product.
2.
Place the iPod in the supplied iPod Dock.
- Your iPod is automatically turned on.
- "iPod" message appears on the TV screen.
3.
Press the RED (A) button.
4.
Press the A V buttons to select iPod, then press
the ENTER button.
5.
Press the _ _ buttons to select Music, then
press the ENTER button.
6.
Select the music file to play.
- You can use the remote control or product to
control simple playback functions such as the
PLAY, PAUSE, STOP, 144/_1, _/_._
and
REPEAT buttons. See page 18.
58
English
NOTE
Watching
_ Adjust the volume to a moderate level before
you connect your iPod and product.
_ When the product is powered on and you
connect an iPod, the product charges your
iPod's battery.
_ Make sure to connect the dock connector so
You can play video files stored in the iPod player
by connecting it to the product.
1. Connect the iPod dock connector to the
iPod jack on the rear panel of the product.
2.
that the label "SAMSUNG" faces upward.
_ "Made for iPod" means that an electronic
accessory has been designed to connect
specifically to the iPod and has been certified
by the developer to meet Apple performance
standards.
_ "Workswith iPhone"meansthat an electronic
accessoryhas beendesignedto connectspecifically
to an iPhoneand has beencertifiedbythe developer
to meetApple performancestandards.
a Movie ...........................................
In the iPod screen, move to Settings >
Videos, then set the TV Out option and the
TV signal.
3.
Place the iPod in the supplied iPod Dock.
- "iPod" message appears on the TV screen.
4,
Press the RED (A) button.
5,
Press the A T buttons to select iPod, then press
the ENTER button.
6,
Press the 4 _ buttons to select Videos, then
press the ENTER button.
iPod Music categories
File information including the artist name, album
name, music title and genre is displayed
according to the ID3 Tag information on each
music file.
Plays a recently played file or
moves to the playback screen of
the current file.
7, Select the video file to play.
- You can use the remote control or the
product to control simple playback functions
such as the PLAY, PAUSE, STOP, 14,_/_1
and _'_/_,_ buttons. (See page 18.)
iPod models that can be used with
this product
To play by artist.
iPod hang
3rd generation
(video)
iPod
5th generation
(video)
iPod nano
4th generation
(video)
To play in numeric or alphabetical
order
iPod touch
1st generation
iPod touch
2nd generation
iPhone 3G
iPod classic
iPhone
To play by Playlist.
To play by album.
To play by genre.
To play by composer.
_. NOTE
_ The category list may differ, depending on the
iPod model.
_ What is an ID3 Tag?
This is what is attached to an MP3 to carry
information relevant to the file such as the title,
artist, album, year, genre and a comment field.
NOTE
_ You must have the VIDEOoutput (Composite)
connected to your TV to view iPod video (See
page 27).
_ If you want to view an iPod video via VIDEO
output, setAnynet+ (HDMFCEC)to off.
_ No other screen than the playback screen
appears on the TV screen. View other iPod
screens on the iPod player.
_ If the connected iPod does not support video
playback, the "Cannot playvideo filessaved on
this iPod" messageappears when you select the
Video menu.
_ Apple is not responsiblefor the operation of this
device or its compliance with safetyand
regulatory standards.
English
59
NetworkServices
You can enjoy various network services such as
Intemet@TV or BD-LIVE by connecting the
product to the network system.
4,
After you have signed off on the service
agreement, the Intemet@TV service starts
updating. It takes several minutes. When the
update is complete, you will see the
Intemet@TV menu screen.
Internet@TV at a Glance
Connect this product to the network to download
various for a fee or free-of-charge applications.
Intemet@TV brings useful and entertaining
content and services directly from the web to
your product such as news, weather forecasts,
stock market quotes, games, movies, and music.
Commercial: DisplaysInternet@TV
Guide,
O
Get ting Started
1,
Recommended: Displaysrecommended
contentsmanagedby Samsung.
with Internet@TV ....
Move to the home menu.
productintroductionand newapplication
introduction.
_,
MyApplication : Displaysyourpersonalgallery
inwhichyou can add anddeleteapplications.
Navigation Help: Displaystheremotecontrol
buttonsavailable.
• RED (A) : To log in to to Internet@TV.
O
GREEN (B) : To mark the application as
a favorite.
BLUE (D) : To sort the applications.
• Return : To return to the previous
menu.
t_,_, Settings : Youcan set up thesystemand create
accounts,etc.
2.
Press the _ _ buttons to select Internet@
TV and press the ENTER button.
3.
In the start screen of the Intemet@TV service,
you will see the service agreement screen.
You must agree to the service terms and
conditions before you can use the Intemet@
TV service.
60
English
@
SamsungAppS : Youcan downloadvariousfor
a feeor free-of-chargeapplicationservices.
Using the On-Screen
Keypad
Through your remote, you can use the OnScreen Keypad in several Intemet@TV
applications to enter text.
Pressing the FULL SCREEN button on the
remote while you are using the Screen Keypad
lets you change the text fields to lower case,
upper case, numbers, and icons.
13. Press the ENTER button.
14. The map and address appear on the screen.
NOTE
_ Samsung Electronics shall take no legal
responsibility for any interruption of the
Internet@TV service caused by the service
provider for any reasons.
_ The Internet@TVservice downloads and
processes data via the Internet so that you can
enjoy the contents on the TV screen.
If the Internet connection is unstable, the
_A
service may be delayed or interrupted,
If the connection is especially unstable, your
home theater may turn off automatically,
If this occurs, check the Internet connection
and try again.
For example, here is how to use the Keypad to
search for an address in Google Maps:
1.
Press the ENTER button on the remote at
the Google Maps icon at the Intemet@TV,
_ Internet@TV applications may be provided in
English only and the contents available may
vary, depending on the area,
_ For more information about the Intemet@TV
2.
Press the GREEN (B) button to use the
SEARCH function.
service, visit the web site of the applicable
3.
Press the _11_ buttons to move to the
"Search or address" window,
4.
Press the ENTER button to use the Search
or address function.
_ The services provided are subject to change,
depending on the Internet@TV service
provider,
5.
Let's say that you want to input "105
Challenger Rd., Ridgefield Park NJ',
6.
Press the FULL SCREEN button on the
remote twice to change the input mode from
lower case to numbers.
7.
Press'l',
8.
Press the YELLOW (C) button on the remote
to input a blank space,
'0', '5'.
9.
Press the FULL SCREEN button on the
service provider.
_ The Internet@TVservice contents may differ
according to the firmware version on your
device.
For-a-fee DivX contents with copy protection
can only be played using HDMI cable. If you
have connected your product to your W using
Component or video cables, the DivX video
signal can net output. You may see the popup
message "Connect with a HDMI cable to play
this file."or "Cannot play current file".
remote 3 times to change the input mode
from numbers to upper case,
10. Press '2' button on the remote 3 times to
input C.
11. Press the FULL SCREEN button on the
remote 3 times to change the input mode
from upper case to lower case.
12. Press buttons on the remote to input the rest
of 'Challenger Rd., Ridgefield Park NJ'.
English
61
NetworkServices
Account
Login
System Setup
For a more enjoyable application experience,
register and log in to your account.
To do this, you must create an account first. (For
instructions on creating an account, refer to
Intemet@TV ID on this page)
1.
Press the A T 4 _. buttons to select the
desired application and press the RED (A)
button.
Reset
Resets Intemet@TV settings to factory default
settings.
NOTE
_ If you forgot your password, press the STOP
(m) button on the front panel of the product for
more than 5 seconds with no disc inserted.
Internet@TV
UserAcc0w_t:
d_i :
,,,,
ID
Use this menu to create or delete an account and
enter or delete account information.
Password:
You can control your account including the
content site's account information.
This account is only for Intemet@TV.
Create
2.
Enter the user account and password.
Create an account and link it with desired service
applications.
Settings
Create IDs and configure Intemet@TV settings on
this screen.
NOTE
_ The account name must be at least 1
character in length but ne more than 8.
_ You can register up to 10 User Account
Names.
Manager
o Service Site : Register Iogin information for
service sites.
Change Password : Change account
password,
DeJete : Delete the account,
62
English
Service
Manager
Delete and lock applications installed in Internet@
TV.
Using the color buttons
Apps
- RED (A) (Login) : To log in to the Internet
service.
o GREEN (B) (Thumbnail
the view mode.
Lock
Lock the application. Accessing a locked
application requires a password.
with the Samsung
View) : To change
BLUE (D) (Sort By) : To sort the applications
by Featured, Most Downloaded, Most Recent
or Name.
Delete
Delete the application.
Intemet@iV
Services
Available
YouTube/Pandora/Netflix/Blockbuster/USA
Properties
Display information about Intemet@TV. Use the
"Check the speed of your intemet connection"
option to test your network connection.
Samsung
Today News
- Blockbuster
: You can view movies streamed
by Bloxckbuster.
- YouTube : You can view video streamed by
YouTube.
- Netflix : You can view movies streamed by
Netflix.
AppS ........................................................................................................................
- Pandora : You can listen to Intemet radio.
Various applications are available through this
screen, organized into different categories.
Some applications have a download fee.
- USA Today News : You can read news
streamed by USA Today News.
- AccuWeather : You can view weather
information by AccuWeather.
- Google Maps : You can view maps by
Google Maps and search for locations.
NOTE
_ The available Intemet contents services may
be added or deleted.
My Application
Displays the application list.
Help
If you questions about Intemet@TV, check this
section first. If none of the tips apply, please visit
the help website.
English
63
NetworkServices
Once the product is connected to the network,
you can enjoy various movie-related service
contents using a BD-LIVE compliant disc.
1.
Check the size of the remaining memory.
The memory device must have at least 1GB
of free space to accommodate the BD-LIVE
services.
2.
Insert a Blu-ray disc that supports BD-LIVE.
3.
Select an item from various BD-LIVE service
AIIShare lets you play music, video and photo
files in your PC using the product.
To use AIIShare, you must connect the product to
your PC via the network (See pages 29-30) and
install the SAMSUNG PC Share Manager on the
PC. To install Share Manager, follow these steps.
1. Visit the Samsung website at www.samsung.
COrn,
2.
contents provided by the disc manufacturer.
NOTE
Download the SAMSUNG PC Share
Manager and install it on the PC.
3.
_ The way you use BD-LIVE and the provided
contents may differ, depending on the disc
manufacturer.
When the installation is completed, you will
see the SAMSUNG PC Share Manager icon
on your desktop.
Double-click the icon to launch the
application.
AIIShare
Program
at a Glance
When connected to the network, the product can
notify you of any new software version with a
popup message.
1. Turn on the product.
2.
In the Software Upgrade menu, set Auto
Upgrade Notification to On. (See page 47)
If there is a new software version available,
the product notifies you with a popup
message.
3. To upgrade the firmware, select Yes on the
pop-up.
The product turns off automatically, then
restarts, and begins the download.
(Never turn it on manually.)
O
Menu Bar
0
Share Folder Enabled icon : Usethis if you
want to select a folder inyour PC to share.
4. The update progress popup appears.
When the update is completed, the product
turns off again automatically.
5.
Share Folder Disabled icon : Use this ifyou
want to setfolder sharingoff.
Pressthe POWER button to turn on the product.
Refresh icon : Use this ifyou want to refresh
listof folders and files inMy Computer
Set Change State icon : You must cJickthe
NOTE
_ Update is complete when the product turns off
after downloading and then restarts. Press the
POWER button to turn on the updated
product for your use.
Never turn the product off or on manually
during the update process.
_ Samsung Electronics shall take no legal
responsibilityfor product malfunction caused by
unstable of intemet connection or consumer
negligence during software upgrade.
64'
English
Set ChangeState icon after you have selected
a folderto shareor your hometheater won't
be able to read the sharedfolder.
O
Server : Displaysthe nameof the sharingserver.
,_,
Shared Folder : Displaysa list of the shared
folders.
_,
My Computer : Displaysa listof the folders
andfiles inthe PC.
To use Share Manager, follow these steps:
_ AIIShare does not support the following
functions.
1. Select a folder to share from the My
computer pane, and click the Share Folder
Enabled icon (_).
(To remove a shared folder : Select a folder
to remove from the shared folders, and click
the Share Folder Disabled icon (_),)
- The Background Music and Background
Music Setting functions.
2.
To apply the updated sharing state to the
server, click the Set Change State icon (_' ),
The Sorting method may differ depending on
the server function.
3.
To enable the product to locate a PC server,
click Share from the menu bar,
Click Set Device Policy and click Accept.
- Sorting files by preference in the Photo,
Music, and Movie folders.
- The Change Group function.
- The Safe Remove function.
_ The search and skip operation may differ
depending on the server function.
_ During video playback, play time is not
displayed,
*_ To use the AIIShare function, please place both
this product and the PC in the same subnet.
4.
Click the Set Change State icon (_i_'i) and
move to the home menu on the product,
5.
To select a device, use the RED (A) or
BLUE (D) button to select a file to play.
(To play back Video, Music, or Photos files,
see pages 48-56.)
NOTE
_ Depending on the performance of the external
modem or router, HD video may net play
properly.
_ If your system uses a firewall, the product may
net locate your PC on the TV screen,
English
65
Otherinbrrn ion
Refer to the chart below when this product does not function properly, If the problem you are
experiencing is not listed below or if the instructions below do not help, turn off the product,
disconnect the power cord, and contact Samsung Electronics at 1-800-SAMSUNG,
cannotejectthe disc.
TheiPodfailsto connect.
• Isthe powercordpluggedsecurelyinto theoutlet?
• Turnoffthe powerandthenturn it backon,
• Checkthe conditionof the iPodconnectorandDock,
• Keepthe iPodS/W versionupto date,
Playbackdoes not start.
• Checkthe regionnumberof the BD/DVD,
BD/DVDdiscspurchasedfrom abroadmaynot beplayable,
• CD-ROMsandDVD-ROMs
cannotbe playedonthis Product,
• Makesurethatthe ratinglevelis correct,
Playbackdoes not start
immediatelywhenthe
Play/Pausebuttonis pressed.
• Areyou usinga deformeddiscor a discwith scratcheson thesurface?
• Wipethedisc clean,
Sound is not produced.
• Nosoundis hearddudngfastplayback,
slowplayback,
andstepmotionplayback,
• Arethespeakersconnected
properly?
Isthespeaker
setupcorrectly
customized?
• Isthe discseverelydamaged?
Soundcanbe heardonlyfroma
fewspeakersandnotall 8.
•
•
•
•
DolbyDigital7.1CHSurround
Soundis not produced.
• Isthere"DolbyDigital7.1OH"markonthedisc?DolbyDigital7.1CHSurround
Soundis
produced
onlyifthediscisrecorded
with7.1channel
sound.
OncertainBD/DVDdiscs,soundis outputfrom the frontspeakersonly,
Checkif the speakersare connectedproperly,
Adjustthe volume,
Whenlisteningto a CD,radioor TV,soundis outputto thefront speakersonly,
Select"PROLOGICII" bypressing[]["] PLII (DolbyProLogicII) onthe remote
controlto use all sixspeakers,
• Isthe audiolanguagecorrectlysetto DolbyDigital7.1-CHinthe information
display?
Theremotecontroldoesnotwork,
• Istheremote
controlbeingoperated
withinitsoperational
angleanddistanceranges?
• Arethe batteriesdrained?
• Haveyouselected
themode
_/BD)functions
oftheremote
control
_ orBD)correctly?
• Discis rotatingbut no
pictureis produced.
• Picturequalityis poorand
pictureisshaking.
•
•
•
•
Isthe TVpoweron?
Arethe videocablesconnectedproperly?
Isthe discdirty or damaged?
A poorlymanufactureddiscmay notbe playable,
Audiolanguage
andsubtitlesdo
notwork.
• Audiolanguageandsubtitleswill notworkif the discdoesnotcontainthem,
Menuscreen does not appear
even when the menufunction is
selected.
• Areyou usinga discthat doesnotcontainmenus?
66
English
Aspect ratio cannot be changed.
• Youcan play16:9 BD/DVDsin 16:9Wide mode,4:3 LetterBoxmode,or 4:3
Pan- Scanmode.but4:3 BD/DVDscan beseen in4:3 ratioonly.Referto the
Blu-rayDiscjacket andthenselectthe appropriatefunction.
, Theproductis not working.
(Example:
Thepowergoesout
or astrangenoiseisheard.)
• Turnoffthe power,and pressand holdthe STOP( [] ) buttononthe product
for longerthan 5 seconds.
• TheProduct
isnotworking
normally.
Theratinglevelpasswordhas
beenforgotten.
- Usingthe RESETfunctionwill eraseall storedsettings.
Donot usethis unlessnecessary.
• With nodisc inthe product,pressand holdthe product'sSTOP( [] ) buttonfor
longerthan 5 seconds.[NITappearsonthe displayandall settingswill return
to the defaultvalues.
Andthenpressthe POWERbutton.
- Usingthe RESETfunctionwill eraseall storedsettings.
Donot usethis unlessnecessary.
Can't receive radio broadcasts.
,, Isthe antennaconnectedproperly?
• If the antenna'sinput signalis weak, installan externalFM antennain anarea
with goodreception.
While listening to TVaudio
through the Product, no sound is
heard,
• If the OPEN/CLOSE
(A) buttonis pressedwhile listeningto TVaudiousingthe
D.INor AUXfunctions,the BD/DVDfunctionsareturnedonandthe TVaudiois
muted.
"Not Available" appears on
screen.
• Thefeaturesor actioncannotbecompletedat this time because:
1. The BD/DVD'ssoftwarerestrictsit.
2. The BD/DVD'ssoftwaredoesn'tsupportthefeature(e.g.,angles)
3. Thefeatureis notavailableat the moment.
4. You'verequested
a titleorchapternumberor searchtimethatisoutof range.
No NDMIoutput.
• Checkthe connectionbetweenthe TVandthe HDMIjackof the Product.
• CheckifyourTVsupports480p/720p/1080i/1080pHDMIinput resolution.
Abnormal HDMIoutput screen.
• If randomnoiseappearson the screen,it meansthatTVdoesnot support
HDCP(High-bandwidth
DigitalContentProtection).
If theHDMIoutput
is settoa resolution
yourTVcannotsuDport
(forexample,
• Pressthe STOP(u) button(onfront panel)for morethan5 secondswith no
discinside.All settingswill revertto thefactorysettings.
1080p),youmaynotseea pictureon
• Whenthe factorydefaultsettingsare restored,all the userdatastoredinthe
BDdatawill be deleted.
yourW.
English
67
Otherinbrrn ion
lean seefolders
shared
through
the
PCShareManager,
butIcannot
see
theflies.
• Sinceit showsonlyfilescorrespondingto the Image,Music,and Movie
categories,filesthat do notcorrespondto thesecategoriesmay notbe
displayed,
Videois playedintermittently,
• Checkif the networkis stable,
• Check if the networkcable is properlyconnectedand if the networkis not
overloaded,
• Wirelessconnectionbetweenthe serverandthe productis unstable,
Checkthe connection,
Alishare€onnectionbetween
andPCis unstable,
• IP address under the same subnetwork should be unique, otherwise IP
collisioncan resultsinsuch a phenomenon,
• Checkif you havea firewallenabled,
If so,disablethe firewallfunction,
cannotconnecttothe BD-LIVE
server,
• Checkwhetherthe networkconnectionis successfulor not byusingNetwork
Testmenu,(Seepage45)
• Checkwhetherthe USBmemorydeviceis connectedwith productor not,
• The memorydevicemust haveat least 1GBof free spaceto accommodatethe
BD-LIVEservice,
Youcan checkthe availablesizeinBD DataManagement,(Seepage40)
• PleasecheckwhethertheBD-LIVEInternetConnectionmenuis setto Allow
(All),
• If all abovefails,contactthe contentsprovideror updatethe latestfirmware,
Whenusingthe BD-LIVE
service
an erroroccurs,
• Thememorydevicemust haveat least1GBoffree spaceto accommodate
the
BD-LIVEservice,
Youcan checkthe availablesizein BDDataManagement,
(Seepage40)
NOTE
_ Whenthe factorydefaultsettingsarerestored,all the userdatastoredinthe BD data will be deleted.
68
English
A
D
P
Accessories
AIIShare
15
64
Digital Output
Disc menu
39
48
Parental Rating
Playlist
46
54
Angle
52
Display
33
Popup menu
49
Anynet+ (HDMI-CEC)
40
DivX(R) Deactivation
41
Power On/Off Sound
46
Audio
37
DivX(R) Registration
41
Progressive Mode
36
Audio Language
51
Dolby Pro Logic II Mode
56
AV Sync
40
DSP
55
Dynamic Range Control
40
B
Background
46
E
BD-Live
BD-LIVE InternetConnection
64
45
EQ Optimizer
BD Data Management
BD Wise
40
34
BeforeStarting (Initialsettings) 31
BONUSVIEW
52
12
18
Remote control sensor
Repeat
Resolution
46
S
G
General
C
Region code
Remote Control
38
F
Front Display
R
16
50, 54
34
Search
Security
49
46
46
Setting the Menu
32
31
55
49
Change Password
Clock
46
41
H
HDMI Audio
38
Setup
SFE
Skip
Connections
20
HDMI Deep Color
36
SLEEP (timer)
18
Speaker
20
HDMI Format
36
Slow motion
50
Wireless receiver module
TV
HDMI
FM Antenna
23
25
25
26
I
Initial Settings
Internet@TV
40
60
Software Upgrade
Speaker Setting
Step motion
Still Mode
47
37
50
36
Component
Composite
27
27
Internet@TV Screen Size
iPod
40
58
Subtitle Language
Support
51
47
Set-Top Box
OPTICAL
AUX
28
28
28
L
System
40
Language
45
T
Network
29
Light Effect
46
3D
33
LAN Cable
Wireless Network
29
30
M
Title menu
Title list
49
49
47
Mono/Stereo
Movie Frame (24 Fs)
Musical Room Calibration
MUTE
TV Aspect
TV Screen Saver
34
32
Contact Samsung
58
36
38
18
N
U
USB Storage
Network Setup
42
Z
Network Settings
Network Status
42
45
Zoom
57
56
English
69
Otherinformation
PowerRequirements
AC120V,60Hz
PowerConsumption
75W
Weight
8.3 Ibs
Dimensions
16.9_) x 2.4 (m)x 13.0(D)inches
Operating
Temperature
Range
+41°Fto +95°F
Operating
HumidityRange
10 % to 75 %
Signal/noise
ratio
70 dB
Usablesensitivity
10 dB
Totalharmonicdistortion
0.5 %
Readij Speed: 4.917m/sec,
DVD
(DigitalVersatileDisc)
BD(Bh-rayDisc)
Dis
CD: 5 inches(COMPACT
DISC)
ReadingSpeed: 3.49 - 4.06m/sec.
Approx,PlayTime(SingleSided,SingleLayerDisc): 135 min.
ReadingSpeed: 4.8 - 5.6m/sec.
MaximumPlayTime:_74_in_
CD: 3 1/2 inches(COMPACF
DISC)
ReadingSpeed: 4.8 _ 5.6m/sec.
MaximumPlayTime: 20 min.
1 channel:1.0Vp-p(75 0 load)
Composite
Video
Blu-rayDisc: 480i
DVD: 480i
Y: 1.0Vp--p(75 0 load)
Videodut_ut
Component
Video
Pr : 0.70Vp-p(75 0 load)
Pb: 0.70Vp--p(750 load)
Bh-rayDisc: 1080i,720p,480p,480i
Video/Audio
HDMI
DVD: 48%, 480i
2D: 108% 1080i,720p,48%
3D: 1080p,72%
PCMmultichannel
audio,Bitstreamaudio,PCMaudio
Frontsoeaker
outou_
165Wx 2 (30)
;enterspeaker
cutout
170W(30)
Surround
soeaker
outou;
165Wx 2 (30)
SurroundBackSpeakeroutoul
165Wx 2 (30)
Subwooter
soeaKer
cutout
Frequency
response
70
English
170W(30)
Analoginput
20Hz_2OkHz
(=±:3d
B)
Digitalinput
20Hz_44kHz(=±:3d
B)
S/NRatio
70dB
Channel
separation
60dB
Inputsensitivity
(AUX)5OOmV
7.1chspeakersystem
b_U_tK_l
_y_Wl]l
Front
Surround/Surround
back Center
Subwoofer
Impedance
30
30
30
Frequencyrange
140Hz~2OkHz
14OHz-2OkHz
140Hz-20kHz40Hz- 160Hz
Outputsoundpressurelevel
87dB/W/M
87dB/W/M
87dB/W/M
Ratedinput
165W
165W
170W
170W
Maximuminput
330W
330W
340W
340W
3_)
88dB/W/M
Front: 3.54x 51.18x 4.69inches(Standbase: 9.84x 9.84inches)
Surround/Surround
back: 3.54x 5.57x2.7 inches
Dimensons(Wx H x Dt
Center: 14.17x2.93x 2.7 inches
Subwoofer
: 6.61x13.78x 11.61inches
Front: 7.21Ibs, Surround/Surround
back: 1.28Ibs
Center: 1.28Ibs, Subwoofer
: 9.92Ibs
Weign[s
*: Nominal specification
- Samsung Electronics Co., Ltd reserves the right to change the specifications without notice.
- Weight and dimensions are approximate.
- Design and specifications are subject to change without prior notice.
--
SWA-5000
Power Requirements
AC 120 ,_60Hz
Power Consumption
50 W
Weight
2.52 Ibs
Dimensions (W x H x D)
Operating Temperature
Operating
3 x 9 x 6 inches
Range
Humidity Range
+41 °F to +95°F
10% ,475%
Output
165Wx2
Frequency range
20Hz,_2OKHz
S/N Ratio
CH
65dB
English
71
This SAMSUNG brand product, as supplied and distributed by Samsung Electronics America, inc. (SAMSUNG) and delivered
new, in the originalcarton to the original consumer purchaser, is warranted by SAMSUNG against manufacturing defects in
materials and workmanship for a limited warranty period of:
One (1) Year Parts and Labor*
(*90 Days Parts and Labor for Commercial
Use)
This limited warranty begins on the original date of purchase, and is valid only on products purchased and used in the United
States. To receive warranty service, the purchaser must contact SAMSUNG for problem determination and service procedures.
Warranty service can only be performed by a SAMSUNG authorized service center. The original dated bill of sale must be
presented upon request as proof of purchase to SAMSUNG or SAMSUNG's authorized service center. Transportation of the
product to and from the service center is the responsibility of the purchaser.
SAMSUNG will repair or replace this product, at our option and at no charge as stipulated herein, with new or reconditioned
parts or products if found to be defective during the limited warranty period specified above. All replaced parts and products
become the property of SAMSUNG and must be returned to SAMSUNG. Replacement parts and products assume the
remaining original warranty, or ninety (90) days, whichever is longer.
SAMSUNG'sobligationswith respectto softwareproducts distributedby SAMSUNGunder the SAMSUNGbrand name are set forth in
the applicableend user licenseagreement.Non-SAMSUNGhardwareand softwareproducts, if provided, areon an"AS IS"basis.
Non-SAMSUNGmanufacturers,suppliers,publishers,and serviceprovidersmay providetheir own warranties.
This limited warranty covers manufacturing defects in materials and workmanship encountered in normal, and except to
the extent otherwise expressly provided for in this statement, noncommercial use of this product, and shall not apply to the
following, including, but not limited to: damage which occurs in shipment; delivery and installation; applications and uses for
which this product was not intended; altered product or serial numbers; cosmetic damage or exterior finish; accidents, abuse,
neglect, fire, water, lightning or other acts of nature; use of products, equipment, systems, utilities, services, parts, supplies,
accessories, applications, installations, repairs, external wiring or connectors not supplied and authorized by SAMSUNG, or
which damage this product or result in service problems; incorrect electrical line voltage, fluctuations and surges; customer
adjustments and failure to fellow operating instructions, cleaning, maintenance and environmental instructions that are covered
and prescribed in the instruction book; product removal or reinstallation; reception problems and distortion related to noise,
echo, interference or other signal transmission and delivery problems. SAMSUNG does not warrant uninterrupted or error-free
operation of the product.
THERE ARE NO EXPRESS WARRANTIES OTHER THAN THOSE LISTED AND DESCRIBED ABOVE, AND NO WARRANTIES
WHETHER EXPRESS OR IMPLIED, INCLUDING, BUT NOT LiMiTED TO, ANY IMPLIED WARRANTIES OF MERCHANTABILITY
OR FITNESS FOR A PARTICULAR PURPOSE, SHALL APPLY AFTER THE EXPRESS WARRANTY PERIODS STATED
ABOVE, AND NO OTHER EXPRESSWARRANTY OR GUARANTY GIVEN BY ANY PERSON, FiRM OR CORPORATION WiTH
RESPECT TO THiS PRODUCT SHALL BE BINDING ON SAMSUNG. SAMSUNG SHALL NOT BE LIABLE FOR LOSS OF
REVENUEOR PROFITS, FAILURE TO REALIZESAVINGS OR OTHER BENEFITS, OR ANY OTHER SPECIAL, iNCIDENTAL
OR CONSEQUENTIAL DAMAGES CAUSED BY THE USE, MISUSE OR INABiLiTY TO USE THIS PRODUCT, REGARDLESS
OF THE LEGAL THEORY ON WHICH THE CLAIM IS BASED, AND EVEN IF SAMSUNG HAS BEEN ADVISED OF THE
POSSIBILITYOF SUCH DAMAGES. NOR SHALL RECOVERYOF ANY KIND AGAINST SAMSUNG BE GREATER IN AMOUNT
THAN THE PURCHASE PRICE OF THE PRODUCT SOLD BY SAMSUNG AND CAUSING THE ALLEGED DAMAGE. WITHOUT
LIMITING THE FOREGOING, PURCHASER ASSUMES ALL RISK AND LiABiLITY FOR LOSS, DAMAGE OR iNJURY TO
PURCHASERAND PURCHASER'S PROPERTY AND TO OTHERS AND THEIR PROPERTY ARISING OUT OF THE USE,
MISUSE OR INABILITY TO USE THIS PRODUCT SOLD BY SAMSUNG NOT CAUSED DIRECTLY BY THE NEGLIGENCE OF
SAMSUNG. THiS LIMITED WARRANTY SHALL NOT EXTEND TO ANYONE OTHER THAN THE ORIGINAL PURCHASER OF
THIS PRODUCT, IS NONTRANSFERABLE AND STATES YOUR EXCLUSIVEREMEDY.
Some states do not allow limitations on how long an implied warranty lasts, or the exclusion or limitafion of inddental or
consequential damages, so the above limitations or exclusions may not apply to you. This warranty gives you specific legal
rights, and you may also have other rights which vary from state to state.
To obtain warranty hardware service, please contact SAMSUNG at:
Samsung Electronics America, Inc.
105 Challenger Road Ridgefield Park, NJ 07660-0511
1-800-SAMSUNG (726-7864) and www.samsung.com/us
Contact
SAMSUNG WORLD WIDE
If you have any questions or comments relating to Sarnsung products, please contact the SAMSUNG
customer care center.
co.
North America
0848- SAMSUNG(7267864,
Canada
1-800-SAMSUNG(726-7864)
_.samsung.com
Mexico
01-800-SAMSUNG(726-7864)
_.samsung.com
U.S.A
1-800-SAMSUNG(726-7864)
_.samsung.com
Switzerland
CHF 0.OS/min)
www.samsung.eom/ch
www.samsung.com/
chit/(French)
Lithuania
8-800-77777
_%_.samsung.com
Latvia
8000-7267
_w.samsung.com
Estonia
800-7267
_w.samsung.com
_/vw.samsung.com
Latin America
Argentine
0800-333-3733
_.samsung.com
DIS
Brazil
0800-124-421
4004-0000
_.samsung.com
Russia
8-800-555-55-55
Chile
800-SAMSUNG(726-7864)
_.samsung.com
Georgia
8-800-555-555
Nicaragua
00-1800-5077267
_.samsung.com
Armenia
0-800-05-555
Honduras
800-7919267
_.samsung.com
Azerbaijan
088-55-55-555
Costa Rica
0-800-507-7267
_.samsung.com
Kazakhstan
8-10-800-500-55-500
Ecuador
1-800-10-7267
_.samsung.com
Uzbekistan
8-10-800-500-55-500
_/vw.samsung.com
El Salvador
800-6225
_.samsung.com
Kyrgyzstan
00-800-500-55-500
_/vw.samsung.com
Guatemala
1-800-299-0013
_.samsung.com
Tadjikistan
8-10-800-500-55-500
_/vw.samsung.com
Jamaica
1-800-234-7267
_.samsung.com
Ukraine
0-800-502-000
Panama
800-7267
_.samsung.com
_vw.samsung.ua
_/vw.samsung.com/
uaru
PuertoRico
1-800-682-3180
_.samsung.com
Belarus
810-800-500-55-500
Rep.Dominica
1-800-751-2676
_.samsung.com
Moldova
00-800-500 -55 -500
Trinidad &
Tobago
1-800-SAMSUNG(726-7864)
_.samsung.com
Venezuela
0-800-100-5303
_.samsung.com
Colombia
01-8000112112
_.samsung.com
, Europe
Austria
Belgium
0810 - SAMSUNG
(7267864, € O.07/min)
02-201-24-18
Asia Pacific
Australia
1300 362 603
_/vw.samsung.com
New Zealand
0800 SAMSUNG
(0800726 78_
_/vw.samsung.com
China
400-810-5858
010-6475 1880
_w.samsung.com
Hong Kong
(852) 3698-4698
_.samsung.com
_%_.samsung.com/
be (Dutch)
www.samsung.com/
be fr (French)
_vw.samsung.com/
hk
_w.samsung.com/
hken/
3030 8282
india
1800 110011
1800 3000 8282
1800 266 8282
_w.samsung.com
indonesia
0800-112-8888
021-5699-7777
_w.samsung.com
Japan
0120-327-527
_w.samsung.com
Malaysia
1800-88-9999
_.samsung.com
Philippines
1-800-10-SAMSUNG
(726-7864)
1-800-3-SAMSUNG
(726-7864)
1-800-8-SAMSUNG
(726-7864)
02-5805777
_w.samsung.com
Czech
800 - SAMSUNG
(800-726786)
_.samsung.com
Denmark
70 70 19 70
_.samsung.com
Finland
030 - 6227 515
_.samsung.com
France
01 48 63 O0O0
_.samsung.com
Germany
01805 - SAMSUNG
(726-7864 € 0,14/Min)
_.samsung.com
Hungary
06-80-SAMSUNG(726-7864)
_.samsung.com
italia
800-SAMSUNG(726-7864)
_.samsung.com
Luxemburg
261 03 710
_.samsung.com
Netherlands
0900-SAMSUNG
(0900-7267864) (6 0,10/Min',
_.samsung.com
Singapore
1800-SAMSUNG(726-7864)
_/vw.samsung.com
Norway
815-56 480
_.samsung.com
Thailand
1800-29-3232
02-689-3232
_/vw.samsung.com
Poland
0 801 1SAMSUNG(172678)
022-607-93-33
_.samsung.com
Taiwan
0800-329-999
_,_'v.samsung.com
Portugal
80820-SAMSUNG(726-7864)
_,_'v.samsung.com
Vietnam
1 800 588 889
_/vw.samsung.com
SIovakia
0800-SAMSUNG(726-7864)
_,_'v.samsung.com
902 - 1 - SAMSUNG
(902 172 678)
Turkey
444 77 11
_/vw.samsung.com
Spain
_,_'v.samsung.com
South Africa
0860-SAMSUNG (726-7864)
_/vw.samsung.com
Sweden
0771 726 7864 (SAMSUNG)
_,_'v.samsung.com
U.A.E
800-SAMSUNG (726-7864)
_/vw.samsung.com
U.K
0845 SAMSUNG(7267864)
_,_'v.samsung.com
Bahrain
8000-4726
Eire
0818 717100
_,_'v.samsung.com
Jordan
800-22273
Middle East & Africa
QUESTIONS OR COMMENTS?
COUNTRY
I
CALL
i
OR VISIT US ONLINE
1-800-SAMSUNG
IN THE US
(7267864)
AT
WRITE
Samsung
www.samsung.com/us
Electronics
America,
105 Challenger Road Ridgefield
NJ 07660-0511
Inc.
Park,
Code No. AH68-02279Y