1
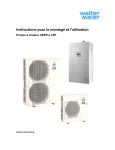
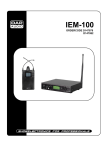
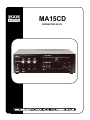
MA15CD
ORDERCODE D6102
Congratulations!
You have bought a great, innovative product from DAP Audio.
The Dap Audio MA15CD brings excitement to any venue. Whether you want simple plug-&-play action or a
sophisticated show, this product provides the effect you need.
You can rely on DAP Audio, for more excellent audio products.
We design and manufacture professional sound equipment for the entertainment industry.
New products are being launched regularly. We work hard to keep you, our customer, satisfied.
For more information: [email protected]
You can get some of the best quality, best priced products on the market from DAP Audio.
So next time, turn to DAP Audio for more great sound equipment.
Always get the best -- with DAP Audio !
Thank you!
Dap Audio
Dap Audio MA15CD ™ Product Guide
Warning..…...................................................................................………………………………………….
Safety-instructions………………………………………………………………………………………….….
Operating Determinations…………………………………………………………………………………….
2
2
3
Description..…..............................................................................……….…………………………………
Features Frontside………………………………………………………………………………….……...….
Backside…….……………………………………………………………………………………….……...….
4
4
4
Installation........................................................……..……………………………….……………………….
5
Set Up and Operation.....................................................................……..…………………………….……
Operations CD Player …….............................................……………………………...................…....…
Set Up Example…….............................................…………………………………...................……...…
5
6
9
Connection Cables..............................….......................................………..………….…….………….…..
10
Maintenance...................................................................................………..………….…….……………...
11
Troubleshooting............................................................................………………….………………….…..
11
Product Specifications.................................................................……………….…….…………………..
12
1
WARNING
CAUTION!
Keep this device away from rain and moisture!
FOR YOUR OWN SAFETY, PLEASE READ THIS USER MANUAL CAREFULLY
BEFORE YOUR INITIAL START-UP!
SAFETY INSTRUCTIONS
Every person involved with the installation, operation and maintenance of this device has to:
be qualified
follow the instructions of this manual
CAUTION! Be careful with your operations.
With a dangerous voltage you can suffer
a dangerous electric shock when touching the wires!
Before your initial start-up, please make sure that there is no damage caused by transportation. Should
there be any, consult your dealer and do not use the device.
To maintain perfect condition and to ensure a safe operation, it is absolutely necessary for the user to follow
the safety instructions and warning notes written in this manual.
Please consider that damages caused by manual modifications to the device are not subject to warranty.
This device contains no user-serviceable parts. Refer servicing to qualified technicians only.
IMPORTANT:
The manufacturer will not accept liability for any resulting damages caused by the non-observance of
this manual or any unauthorized modification to the device.
•
•
•
•
•
•
•
•
•
•
•
•
•
•
•
Never let the power-cord come into contact with other cables! Handle the power-cord and all
connections with the mains with particular caution!
Never remove warning or informative labels from the unit.
Do not open the device and do not modify the device.
Do not insert objects into air vents.
Do not connect this device to a dimmerpack.
Do not switch the device on and off in short intervals, as this would reduce the system’s life.
Only use device indoor, avoid contact with water or other liquids.
Avoid flames and do not put close to flammable liquids or gases.
Always disconnect power from the mains, when device is not used or before cleaning! Only handle
the power-cord by the plug. Never pull out the plug by tugging the power-cord.
Make sure that the available voltage is not higher than stated on the rear panel.
Make sure that the power-cord is never crimped or damaged. Check the device and the power-cord
from time to time.
Never use anything to cover the ground contact.
Make sure that there is sufficient room on all sides of the system for air circulation.
Avoid ground loops! Always be sure to connect the power amps and the mixing console to the same
electrical circuit to ensure the same phase!
Please turn off the power switch, when changing the power cord or signal cable.
2
•
•
•
•
•
•
•
•
•
•
•
•
•
•
•
•
•
•
Make sure that the amplifier is turned down, before turning the power on or off. So you can avoid
supersonic frequencies, which could damage your speakers.
Don't put your equipment next to TV, radio, etc., because of interference or distortion.
If you connect other parts of the system, be careful of ground loops.
The best way to avoid ground loops is connecting the electrical system ground to one central point
("star" system). In this case the mixer can act as a central point.
To prevent humming, please try different combinations of ground-lift or connect all chassis to the
system ground, either by a power cable or frontcover rack screws.
Before changing the ground, always turn off your amplifier.
Please read this manual carefully and keep it for future reference. Remember that the amplifier has a
better value on the market, if you save the carton and all packing materials.
Prevent distortion! Make sure that all components connected to the MA15CD have sufficient power
ratings. Otherwise distortion will be generated because the components are operated at their limits.
Make sure you don’t use the wrong kind of cables or defective cables.
Make sure that signals into the mixer are balanced, otherwise hum could be created.
If device is dropped or struck, disconnect mains power supply immediately. Have a qualified
engineer inspect for safety before operating.
If the device has been exposed to drastic temperature fluctuation (e.g. after transportation), do not
switch it on immediately. The arising condensation water might damage your device. Leave the
device switched off until it has reached room temperature.
If your Dap Audio device fails to work properly, discontinue use immediately. Pack the unit securely
(preferably in the original packing material), and return it to your Dap Audio dealer for service.
Allow time to cool down, before cleaning or servicing.
For replacement use fuses of same type and rating only.
This device falls under protection class I. Therefore it is essential to connect the yellow/green
conductor to earth.
Repairs, servicing and electric connection must be carried out by a qualified technician.
WARRANTY: Till one year after date of purchase.
OPERATING DETERMINATIONS
This device is not designed for permanent operation. Consistent operation breaks will ensure that the device
will serve you for a long time without defects.
If this device is operated in any other way, than the one described in this manual, the product may suffer
damages and the warranty becomes void.
Any other operation may lead to dangers like short-circuit, burns, electric shock, lamp explosion, crash etc.
You endanger your own safety and the safety of others!
Improper installation can cause serious damage to people and property !
3
Description of the device
Features
The MA15CD is an amplifier from DAP Audio.
• 2 mic, 1 aux input
• Two unbalanced 6.3 mm jack inputs mic sensivity
• One auxiliary RCA mono input
• Final stages completely protected thermal shut down and short protection.
Dual power supply in alternating current (AC 115V or 230V) power supply in direct current (DC 12V)
• CD player with MP3
Overview
Fig. 1
1) Siren On/Off
2) Mic 1 volume control: Adjust the mic output volume level
3) Mic 2 volume control: Adjust the mic output volume level
4) AUX volume control: Adjust the Aux output volume level
5) CD Player with MP3
6) Power On/Off
7) Power LED
8) Mic 1 Phone Jack: This MIC input jacks is a 6.3mm (1/4") unbalanced jack input, specifically designed for
a dynamic microphone.
9) Mic 2 Phone Jack: This MIC input jacks is a 6.3mm (1/4") unbalanced jack input, specifically designed for
a dynamic microphone.
10) TAPE / AUX Phone Jack: The AUX input jack is a 6.3mm (1/4") unbalanced jack. You can connect
audio from HiFi-VCRs, cassette and reel-to-reel tape decks, DAT machines,
CD players, Laser discs, tuners, even synthesizers or other mixing consoles
Fig. 2
4
11) SP Output: connect to the speakers
12) DC Fuse 6,3A
13) Ground (GND) screw
14) DC Input 12V
15) AC Input 230V
16) AC Fuse 0,8A
Installation
MA15CD Installation
Remove all packing materials. Check that all foam and plastic padding has been removed.
Connect all cables.
Always disconnect from electric mains power supply before cleaning or servicing.
Damages caused by non-observance are not subject to warranty.
Set Up and Operation
Before plugging the unit in, always make sure that the power supply matches the product specification
voltage. Do not attempt to operate a 120V specification product on 240V power, or vice versa.
Do not supply power before all components of the system are set up and connected properly.
DC power or battery supply's connection
• The unit will also operate with an external 12V battery or another source with negative (-) as ground.
Power connection is made at the DC terminal strip on the real panel.
• If the AC power supply fails, transfer to DC power is instantaneous, automatic and silent.
• The battery power supply is operated by the primary switch.
• The amplifier is not capable of recharging the connected battery.Thus, it is recommended to have a
suitable device at hand. When the amplifier is on the DC power source, the nominal power handling
capacity operated drops by approximately 20%.
Input Connection
Microphones
The MA15CD is equipped with 3 inputs. They can be used with unbalanced low impedance devices
MIC-1, MIC-2
These two microphone inputs are unbalanced type and are provided with a double pole phone jack.
Balanced LO Z Microphone
May also be connected to the unbalanced input
We advise you to use FL0215, FL023 or FL026 unbalanced mic cables from Dap Audio
Priority paging:
The amplifier features a transistorized circuit, which automatically removes all program material for the
amplifier and allows microphone #1 to talk over for special or emergency announcements. This electronic
switch is operated from the microphone, which must contain a single-pole switch, normally open for
actuating this circuit.
5
Operations
1. Opening and closing of the disc holder
• Turn the unit’s power on. Press the OPEN/CLOSE-button to open the disc holder.
• The disc holder cannot be opened during playback, to prevent playback from being interrupted if the
OPEN/CLOSE button is pressed accidentally. Stop the playback first, then press the OPEN/CLOSE button.
2. Loading CD’s
• Hold the disc by the edges and place it in the disc holder, then press the OPEN/CLOSE button to close the
holder.
CAUTION:
• Do not place any foreign objects in the disc holder and do not place more than one disc in the disc holder
at a time.
• Do not push the disc holder in manually when the power is off, as this may result in malfunction and
damages the player.
3. Selecting Tracks
• Press the SKIP-button to move to next higher or lower track.
• Hold the SKIP button to change tracks continuously at a higher speed.
• When a new track is selected during playback, playback begins as soon as the skip search operation is
completed.
is pressed while at the last track, the first track is selected. In the same way,
• If the Skip-button
If the Skip- button
is pressed while at the first track, the last track is selected.
4. Starting Playback
• Press the PLAY/PAUSE button to start playback when you’ve just loaded a new CD or press the
PLAY/PAUSE during the pause condition to restart playback.
5. Playback stoppen
There are two ways to stop playback:
1). Press the PLAY/PAUSE button during playback to pause at that point.
2). Press the STOP button during playback.
6. Pausing
• Press the PLAY/PAUSE button to switch between play and pause.
7. Program Play
1. Press the PROGRAM button, the player will enter the program mode.
2. Select the desired track by pressing the SKIP button, then press the PROGRAM button again. The
selected track will be added to the program sequence.
3. Repeat step 2 operation. A maximum of 20 tracks can be programmed at one time.
4. Press the PLAY/PAUSE button to start the program play from the first selection.
5. Press the program button again during program play to stop playing.
6. Press and hold the program button more than 2 seconds to cancel the program mode and erase all
the current program contents.
8. Repeat
1. Press the REPEAT button, the player will repeat the song, which is playing at the moment.
6
Before switching off the power
When you have finished using the CD player, before switching off the power, be sure that the disc holder
has been closed with the OPEN/CLOSE button.
CAUTION: Do not forcibly close the disc holder when the power is off.
CD’s
1. Precautions on handling compact discs
• Do not allow fingerprints, oil or dust to get on the surface of the disc. If the disc is dirty, wipe it off with a soft
dry cloth.
• Do not use benzene, thinner, water, record spray, electrostatic-proof chemicals, or silicone-treated cloths
to clean discs.
• Always handle discs carefully to prevent damaging the surface; in particular when removing a disc from its
case or returning it.
• Do not bend the disc.
• Do not put the CD near heating sources.
• Do not enlarge the hole in the center of the disc.
• Do not write on the label (printed side) with a hard-tipped implement such as a pencil or ball point pen.
• Condensation will form if a disc is brought into a warm area from a colder one, such as outdoors in winter.
Do not attempt to dry the disc with a hair dryer, etc.
2. Precaution on storage
• After playing a disc, always unload it from the player.
• Always store the disc in the jewel case to protect from dirt or damage.
• Do not place discs in the following areas:
1. Areas exposed to face sunlight for a considerable time.
2. Areas subject to accumulation of dust or high humidity.
3. Areas are affected by heat from indoor heaters, etc.
7
CD function buttons
CD power switch with two-position for ON-OFF mode, before p r ess it, please turn off the volume knob.
OPEN/CLOSE: press to open/close the disc holder
PLAY/PAUSE: when press the button, the CD player will start playing; press the same button again
and the CD player will pause.
LEVEL: this control allows you to adjust the CD volume.
STOP: the CD player will stop playing.
B.SKIP/REW: the CD player will Skip backwards.
F.SKIP/FF: the CD player will Skip forwards.
"REPEAT": the CD player will keep repeating the same song. Press the button again and the CD player will
repeat the entire CD; if you press it again, the CD player will return to its normal condition of
playing.
"PROG": the CD player can setup in accordance with you favoured selections.
NOTE: Before you press the ON button, be sure to that the volume control is set to its minimum.
Low Impedance Speaker Output: 4
The low impedance 4 terminal is for connecting of a few large-output speakers, when constant-voltage
speaker systems are unnecessary or the distance between the amplifier and the speakers is below 50m.
The total speaker load impedance must be matched to the output impedance (4) of the amplifier for the
most efficient power-transfer.
Be sure that total impedance of speakers is above 4 however; do not raise the amplifier’s output power
above the allowable input power of the speaker. If the amplifier’s output power should be raised above the
maximum, the speakers could be damaged.
Fig. 3
Connection Input
The balanced phone jack inputs have a nominal impedance of 20 K (10K with unbalanced wiring) and
will accept the line level output of most devices. The correct input depends on 2 factors: (1) whether the
input signals are balanced or unbalanced, and (2) whether the signal source floats or has ground reference.
Figures provide examples of recommended connection techniques for each type of signal source. The
optional connector is shown.
8
Set Up Example
Fig. 4
9
Connection Cables
Take care of the connector cables, always holding them by the connectors and avoiding knots and twists
when coiling them: This gives the advantage of increasing their life and reliability, which is always to your
advantage.
Periodically check that your cables are in good condition, that they are correctly wired and that all their
contacts are perfectly efficient: a great number of problems (faulty contacts, ground hum, discharges, etc.)
are caused entirely by using unsuitable or faulty cables.
Headphones
Unbalanced mono 1/4” jack plug
Balanced mono 1/4” jack plug
Compensation of interference with balanced connections
10
Maintenance
The Dap Audio MA15CD requires almost no maintenance. However, you should keep the unit clean.
Disconnect the mains power supply, and then wipe the cover with a damp cloth. Do not immerse in liquid.
Do not use alcohol or solvents.
Keep connections clean. Disconnect electric power, and then wipe the audio connections with a damp cloth.
Make sure connections are thoroughly dry before linking equipment or supplying electric power.
Troubleshooting
DAP Audio MA15CD
This troubleshooting guide is meant to help solve simple problems.
If a problem occurs, carry out the steps below in sequence until a solution is found. Once the unit operates
properly, do not carry out following steps.
1. If you experience low output or no output at all, unplug the amplifier immediately.
2. Check power from the wall, all cables, the fuse, etc.
3. If all of the above appears to be O.K., plug the unit in again.
4. If nothing happens after 30 seconds, turn off the amplifier and unplug the device.
5. Return the machine to your DAP Audio dealer.
11
Product Specifications
Model: DAP Audio MA15CD
Power consumption: 110W
DC Power consumption: 30W
Power Supply: AC or DC 12~18V
Power Output: 30W RMS
Power Output at 12V is 13W and at 18V is 17W RMS
Frequency Response: 30Hz-25KHz
Harmonic distortion: <1%
Signal-to-Noise ratio: Microphone >55dB rated power
AUX >63 dB rated power
Inputs: MIC-1, MIC-2 (-45dB) 10 K
AUX (-20dB) 10 K / 50 K
Controls: 4 volume controls, 3x 6.3mm jack and 1 power switch
Indicator: Power LED, Digital Display for CD player
Dimensions : 280 x 285 x 92 mm (LxWxH)
Weight : 5,55 kg
Design and product specifications are subject to change without prior notice.
12
2005 Dap Audio.