1
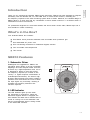
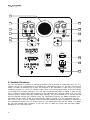
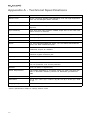
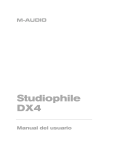
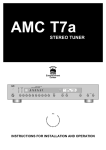
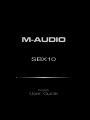
M-AUDIO SBX10 English User Guide ! CAUTION RISK OF ELECTRIC SHOCK DO NOT OPEN CAUTION: TO REDUCE THE RISK OF ELECTRIC SHOCK, DO NOT REMOVE COVER (OR BACK). NO USERSERVICABLE PARTS INSIDE. REFER SERVICING TO QUALIFIED SERVICE PERSONNEL ! ATTENTION: RISQUE DE CHOC ELECTRIQUE N’OUVRIR PAS AFIN DEVITER UN CHOC ELECTRIQUE ET LES CONSEQUENCES GRAVES QUI POURRAIENT ENRESULTER, TENTEZ PAS D’OUVRIR L’APPAREIL ET DE TOUCHER AUX COMPOSANTS INTERNES SANS LA PRESENCE D’UNE PERSONNE QUALIFIEE. ! PRECAUCION: RIESGO DE ELECTROCHOQUE NO ABRIR LA TAPA PARA REDUCIREL RIESGO DE SACUDIDAS ELECTRICAS, NO DEBERA QUITARSE LA TAPA (NI PARTE POSTERIOR). CONSULTESE AL PERSONAL CAPACITADO PARA LAS REPARACIONES INTERNAS. WARNING: TO PREVENT FIRE OR ELECTRIC SHOCK, DO NOT EXPOSE THIS APPLIANCE TO RAIN OR MOISTURE. ADVERTENICIA: PARA EVITAR EL RIESGO DE INCENDIO O SACUDIDA ELECTRICA, NO DEBERA EXPONERSE ESTE APARATO A LA LLUVIA O HUMEDAD. CAUTION: TO PREVENT ELECTRIC SHOCK DO NOT USE THIS (POLARIZED) PLUG WITH AN EXTENSION CORD, RECEPTACLE OR OTHER OUTLET UNLESS THE BLADES CAN BE FULLY INSERTED TO PREVENT BLADE EXPOSURE. ATTENTION: POUR PREVENIR LES CHOCS ELECTRIQUES NE PAS UTILISER CETTE FICHE POLARISEE AVEC UN PROLONGATEUR. UNE PRISE DE COURANT OU UNE AUTRE SORTIE DE COURANT, SAUF SILES LAMES PEUVENT ETRE INSEREES A FOND SANS EN LAISSER AUCUNE PARTIE FOND SANS EN LAISSERAUCUNE PARTIE A DECOUVERT. PRECAUCION: PARA EVITAR SACUDIDAS ELECTRICAS, NO DEBERA UTILIZARSE ESTA CLAVIJA POLARIZADA CON UN CORDON DE PROLONGACION, RECEPTACULO U OTRO TIPO DE SALIDA A MENOS QUE SE HAYAN INSERTASO COMPLETAMENTE LAS LENGÜETAS PARA EVITAR SU EXPOSICION. NOTE: Some products are equipped with dual or multi-voltage transformers (which is indicated on the back panel). If you wish to change the voltage, please bring your unit to an authorized service technician for internal conversion. ATTENTION: Quelques piéces sont munies de transformateurs á double ou á multi-voltage (indiqué au panneau arriére). Si vous voulez changer le voltage, veuillez apporter votre appareil au fournisseur de pour le transformer. ZUR BEACHTUNG: Einige Geräte sind mit Umschaltern für unterschiedliche Netzspannungen ausgerüstet (ein Vermerk auf der Rückseite weist darauf hin). Die Anpassung, wenn notwendig, muß von einem qualifizieren Techniker in einer Servicestation vorgenommen werden. NOTA: Ciertos componentes de están dotados de transformadores de doble tensión o de varias tensiones (Io que se indica en el panel posterior). Si se desea cambiar la tensión, sírvanse llevar el aparato a un técnico autorizado por para su conversión interna. NOTE TO CATV SYSTEMS INSTALLER: This reminder is provided to call the CATV system installer’s attention to Article 820-22 of the NEC that provides guidelines for proper grounding and, in particular, specifies that the cable ground shall be connected to the grounding system of the building, as close to the point of cable entry as practical. NOTA PARA EL INSTALADOR DE ANTENAS DE TELEVISION COLECTIVAS: La presente advertencia se provee para llamar la atención del instalador al Artículo 820-22 de NEC (Córdigo Eléctrico Nacional) donde se facilitan las directrices para la pertinente puesta a tierra y que especifica en particular que el condutor a tierra del cable debe connectarse al sistema de conexión a tierra del edificio, lo más proximo posible al punto de entrada del cable. The lightning flash with arrowhead, within an equilateral triangle, is intended to alert the user of the presence of uninsulated “dangerous voltage” within the product’s enclosure; that may be of sufficient magnitude to constitute a risk of electric shock to persons. ! The exclamation point within an equilateral triangle is intended to alert the user of the presence of important operating and maintenance (servicing) instructions in the literature accompanying the appliance. Warning: This speaker shall not be placed in a closed area during operation so that the main switch can be easily accessed by the user. IMPORTANT SAFETY INSTRUCTION 1. READ INSTRUCTIONS All the safety and operating instructions should be read before the appliance is operated. 2. RETAIN INSTRUCTIONS The safety and operating instructions should be retained for future reference. 3. HEED WARNINGS All warning on the appliance and in the operating instructions should be adhered to. 4. FOLLOW INSTRUCTIONS All operating and use instructions should be followed. 5. 6. 12. POWER CORD PROTECTION Power-supply cord should be routed so that they are not likely to be walked on or pinched by items placed upon or against them, playing particular attention to cords at plugs, convenience receptacles, and the point where they exit from the appliance. 13. WATER AND MOISTURE The appliance should not be used near water – for example, near a bathtub, washbowl, kitchen sink, laundry tub, in a wet basement, or near a swimming pool, etc. POLARIZED PLUG Do not defeat the safety purpose of the polarized or grounding-type plug. A polarized plug has two blades with one wider than the other. A grounding type plug has two blades and a third grounding prong. The wide blade or the third prong are provided for your safety. When the provided plug does not fit into your outlet, consult an electrician for replacement of the obsolete outlet. 14. CARTS AND STANDS The appliance should be used only with a cart or stand that is recommended by the manufacturer. UNPLUG POWER CORD Unplug this apparatus during lightning storms or when unused for long periods of time. 15. OBJECT AND LIQUID ENTRY No object filled with liquids, such as vases, etc. shall be placed on the apparatus. 16. ACCESSORIES Only use attachments/accessories specified by the manufacturer. 17. SERVICING The user should not attempt to service the appliance beyond that described in the operating instructions. All other servicing should be referred to qualified service personnel. 18. DAMAGE REQUIRING SERVICE The appliance should be serviced by qualified service personnel when: 6A. An appliance and cart combination should be moved with care. Quick stops, excessive force, and uneven sTurfaces may cause the appliance and cart combination to overturn. 7. WALL OR CEILING MOUNTING This equipment is not designed for use mounted on a wall or a ceiling. 8. VENTILATION The appliance should be situated so that its location or position does not interfere with its proper ventilation. For example, the appliance should not be situated on a bed, sofa, rug, or similar surface that may block the ventilation openings, or places in a built-in installation, such as bookcase or cabinet that may impede the flow of air through the ventilation openings. At least 30 cm free space around the unit for normal ventilation is required. 9. HEAT Do not install near any heat sources such as radiators, heat registers, stoves, or other apparatus (including amplifiers) that produce heat. 10. CLEANING The appliance should be cleaned only with dry cloth. 11. POWER SOURCES The appliance should be connected to a power supply only of the type described in the operating instructions or as marked on the appliance. a) The power-supply cord or the plug has been damaged; or b) Objects have fallen, or liquid has been spilled into the appliance; or c) The appliance has been exposed to rain; or d) The appliance does not appear to operate normally or exhibits a marked change in performance; or e) The appliance has been dropped, or the enclosure is damaged. Table of Contents Introduction . . . . . . . . . . . . . . . . . . . . . . . . . . . . . . . . . . 5 What’s in the Box? . . . . . . . . . . . . . . . . . . . . . . . . . . . . . . 5 SBX10 Features . . . . . . . . . . . . . . . . . . . . . . . . . . . . . . . . 5 1. Subwoofer Driver . . . . . . . . 2. LED Indicator . . . . . . . . . . 3. Variable Crossover . . . . . . . 4. Phase Select . . . . . . . . . . . 5. Unbalanced RCA Inputs . . . . 6. TRS Inputs . . . . . . . . . . . . 7. XLR Inputs . . . . . . . . . . . . 8. Bass Reflex Port . . . . . . . . 9. XLR Outputs . . . . . . . . . . . 10. TRS Outputs . . . . . . . . . . 11. Subwoofer Bypass/Defeat . . 12. Volume Control. . . . . . . . . 13. Power Switch. . . . . . . . . . 14. Power Socket . . . . . . . . . 15. AC Voltage Select Switch . . Power Amplifier (not pictured) . . Enclosure (not pictured) . . . . . . Thermal Protection (not pictured) . . . . . . . . . . . . . . . . . . . . . . . . . . . . . . . . . . . . . . . . . . . . . . . . . . . . . . . . . . . . . . . . . . . . . . . . . . . . . . . . . . . . . . . . . . . . . . . . . . . . . . . . . . . . . . . . . . . . . . . . . . . . . . . . . . . . . . . . . . . . . . . . . . . . . . . . . . . . . . . . . . . . . . . . . . . . . . . . . . . . . . . . . . . . . . . . . . . . . . . . . . . . . . . . . . . . . . . . . . . . . . . . . . . . . . . . . . . . . . . . . . . . . . . . . . . . . . . . . . . . . . . . . . . . . . . . . . . . . . . . . . . . . . . . . . . . . . . . . . . . . . . . . . . . . . . . . . . . . . . . . . . . 5 5 6 7 7 7 7 7 8 8 8 8 8 8 8 8 9 9 Setting Up the SBX10 Subwoofer . . . . . . . . . . . . . . . . . . . . . 10 Connecting the Power . . . . . . . . . . . . . . . . . . . . . . . . . 10 Connecting Audio . . . . . . . . . . . . . . . . . . . . . . . . . . . . 10 Adjusting the Back Panel Controls . . . . . . . . . . . . . . . . . 11 Placing the SBX10 Subwoofer . . . . . . . . . . . . . . . . . . . . . . . 13 Where to Start . . . . . . . . . . . . . . . . . . . . . . . . . . . . . 13 Appendix A - Technical Specifications . . . . . . . . . . . . . . . . . . 14 Appendix B - Block Diagram . . . . . . . . . . . . . . . . . . . . . . . . 15 Your SBX10 Warranty . . . . . . . . . . . . . . . . . . . . . . . . . . . . 16 Warranty Terms . . . . . . . . . . . . . . . . . . . . . . . . . . . . . 16 Warranty Registration . . . . . . . . . . . . . . . . . . . . . . . . . 16 Studiophile BX10s Deluxe Subwoofer Introduction Thank you for choosing the M-Audio SBX10 active subwoofer. SBX10 has been designed to integrate seamlessly with the M-Audio BX, CX, and DSM lines of active studio monitors, extending the low-frequency response of the total monitoring system down to 20Hz. Moreover, the versatile design of SBX10 allows it to work well with any combination of active studio monitors in a 2-channel stereo or multichannel surround environment. For professional engineers at commercial studios and home studio owners alike, SBX10 helps set a new standard in studio monitoring. What’s in the Box? Your M-Audio SBX10 box contains: One SBX10 active powered subwoofer with removable driver protection grill One detachable AC power cord One non-latching footswitch for Subwoofer Bypass function Four removable cone-shaped feet This manual SBX10 Features 1. Subwoofer Driver Redesigned and upgraded for SBX10, the transducer driver utilizes a 10-inch composite diaphragm and well damped rubber surround, all driven by a high-temperature voice coil. It is designed to deliver a tight and punchy low-frequency response (in contrast to the "boomy" or hyped response characteristic of underdamped subwoofers). The driver's high Bl factor (electromagnet force factor) creates a powerful motor that allows the cone to follow the input signal very accurately, resulting in excellent low-frequency extension and transient response. 2 1 2. LED Indicator The LED Indicator lights up blue when the subwoofer is powered on. When the Subwoofer Bypass feature is engaged, the LED Indicator will flash red to indicate that no sound is coming out of the subwoofer and that the full-bandwidth signal is being routed to the direct-field monitors. Studiophile BX10s Deluxe Subwoofer5 d 5 English SBX10 8 7 9 6 10 5 11 Unbalanc ed 4 12 3 13 14 FUSE A065484 15 3. Variable Crossover You can use SBX10 in a variety of monitoring contexts, from 2-channel to multichannel (e.g., 5.1, 7.1) systems, and as an accompaniment to practically any direct-field monitors. To this end, we have provided a versatile yet efficient way to tailor the response of the subwoofer to work well in any typical monitoring system. For use in a 2-channel system, there is an in-line low-pass filter control that allows you to adjust the crossover frequency. You can set it anywhere from 50Hz to 200Hz. It splits the signal by routing everything below that frequency to the subwoofer and everything above it to your main monitors. And by using a 4th-order Linkwitz-Riley topology, the circuit enables you to achieve the flattest net response through the crossover point. For multichannel systems, the SBX10 subwoofer can reproduce just the output of the LFE (low-frequency effects) channel, or it can reproduce the bass from some or all of the main channels using conventional multichannel bass management schemes. In this multichannel context, you can simply "open up" the SBX10 subwoofer fully by setting it to 200Hz (for use with external bass managers), or you can set it to 120Hz (to comply with the Dolby Digital standard for the LFE band limit). 6 Studiophile BX10s Deluxe Subwoofer 4. Phase Select Because low-frequency signals have long wavelengths compared to the dimensions of most rooms, subwoofers often tend to cause room modes and cancellations that can be quite dramatic. For this reason, we have included a phase inversion switch, which causes a 180° phase shift in the subwoofer's output. This allows you a greater degree of freedom in choosing where to locate the SBX10 unit (and consequently, the crossover frequency phase alignment) in your monitoring environment. Note that the Phase Select function only affects the signal going to the subwoofer amplifier, and does not affect the signal going to your direct-field monitors. 5. Unbalanced RCA Inputs These jacks accept unbalanced RCA connections. 6. TRS Inputs These jacks accept 1/4” connections with either balanced or unbalanced wiring. For balanced wiring, a three-conductor TRS plug is necessary. The wiring of a TRS connector should be as follows: TRS TIP . . . . . . . . . . signal positive (+) TRS RING . . . . . . . . . signal negative (–) TRS SLEEVE . . . . . . . signal ground (shield) Unbalanced 1/4” wiring can be done with either a twoor three-conductor (TS or TRS) plug. A two-conductor (TS) plug automatically grounds the signal negative input, whereas a three-conductor (TRS) plug, wired unbalanced, provides the option of leaving the negative input open or grounded. We recommend that you ground the unused negative input (this can be done by wiring the ring and sleeve of the TRS plug together). Note: If the TRS and XLR Inputs are connected at the same time, the TRS Inputs will take priority, and the XLR Inputs will be muted. If the RCA Inputs are used at the same time as either of the TRS or XLR Input pairs, audio will be heard from both. However, it is recommended that you do not play audio through both connectors simultaneously as this may overload the inputs and result in clipping (distortion) at the inputs. 7. XLR Inputs These jacks accept XLR connections with either balanced or unbalanced wiring. The wiring of an XLR connector should be as follows: XLR PIN 1 . . . . . . . . . signal ground (shield) XLR PIN 2 . . . . . . . . . signal positive (+) XLR PIN 3 . . . . . . . . . signal negative (–) 8. Bass Reflex Port The SBX10 subwoofer has a vented enclosure containing a custom bass-reflex port tube with a circular cross section on the rear of the enclosure. The port effectively gives the subwoofer a smooth response down to 20Hz, and since its low-frequency contribution complements that of the front-firing woofer driver, the woofer stays linear and distortion-free throughout the passband. The port has also been designed using Failure Mode and Effects Analysis (FMEA) software in order to maximize output and minimize audible port air turbulence noise. Studiophile BX10s Deluxe Subwoofer7 d 7 English SBX10 9. XLR Outputs These jacks accept XLR connections with either balanced or unbalanced wiring, and are used for sending audio signal to your stereo direct-field monitors. The wiring of an XLR connector used with the XLR Outputs should be the same as what is listed for the XLR Inputs (7). 10. TRS Outputs These jacks accept 1/4” connections with either balanced or unbalanced wiring, and are used for sending signal to your stereo direct-field monitors. For balanced wiring, a three-conductor TRS plug is necessary. The wiring of a TRS connector used with the TRS Outputs should be the same as what is listed for the TRS Inputs (6). 11. Subwoofer Bypass/Defeat If you connect the enclosed footswitch to the Subwoofer Bypass jack on the back of the SBX10 subwoofer, you can use it selectively to bypass the low frequencies generated by the SBX10 subwoofer (including the amp, driver, and crossover), and send the full-bandwidth signal directly to your main monitors. This way you can audition mixes with and without the low-frequency extension the SBX10 subwoofer provides–all from the convenience of your mix position. As a visual indicator, the LED Indicator (2) on the front baffle of the subwoofer flashes red when in bypass mode. (Note: You can use any binary footswitch, such as an electronic keyboard sustain pedal, but we have provided one for your convenience.) 12. Volume Control Use the volume control to set the output sound pressure from the SBX10 subwoofer to proper levels as required. 13. Power Switch This switch turns the subwoofer on and off. 14. Power Socket Connect the included 3-conductor AC cable to this jack, and plug the other end into an active AC outlet. 15. AC Voltage Select Switch Provides two selections, 115V AC and 230V AC, and should be set to match the “house supply” (receptacle) voltage of the country or location in which the speaker is used. The 115V setting is correct for the USA and Japan, while the 230V setting is correct for most of the UK and Europe. Make sure this switch is in the proper position for your area before attaching the power cord. Power Amplifier (not pictured) In order to generate a powerful, tight bass response, SBX10 uses a 240 watt amplifier, featuring a custom discrete transistor architecture. The amplifier has a carefully designed damping factor which, in conjunction with the mechanical and electromechanical systems built into the driver, helps eliminate the natural tendency of the driver to "ring" after input signal has ceased. This results in an extremely accurate and controlled bass response. You will notice that kick drums and staccato bass notes reproduced by the SBX10 subwoofer are tight and solid, as though coming from a large acoustic suspension system. 8 Studiophile BX10s Deluxe Subwoofer Enclosure (not pictured) Like the other components, the enclosure has an important role in shaping the overall sonic response. In order to provide more stable performance, the SBX10 subwoofer employs a special high acoustic efficiency medium density fiberboard (MDF) and unique interior reinforcement bracing designed to reduce sonic coloration and absorb vibration and impact generated as the subwoofer reproduces high SPL signals and transients. Additionally, the cabinet uses carefully placed acoustic foam to absorb internal reflections and dampen standing waves. This effectively makes the enclosure behave as though it were larger, resulting in a system more capable of reproducing very low frequency signals naturally and evenly. Thermal Protection (not pictured) SBX10 includes thermal protection in its design, protecting it from overheating. If a critical temperature is reached, the SBX10 amplifier will temporarily shut off until the internal temperature returns to a lower level. While the subwoofer is in Thermal Protect mode, the LED Indicator (2) will illuminate solid red, and no audio will be heard from the subwoofer. Once the internal temperature has dropped sufficiently, audio output will resume automatically, and the LED Indicator (2) will illuminate blue again. Studiophile BX10s Deluxe Subwoofer9 d 9 English SBX10 Setting Up the SBX10 Subwoofer Connecting the Power AC Voltage Select: Since the SBX10 subwoofer contains its own amplifier, it must be connected to a power outlet using the detachable AC cable provided. Note that the AC Voltage Select switch (located below the IEC socket for the mains power cord) is user-selectable for 100-120V~50/60 Hz or 220-240V~50/60Hz operation. Before you do anything, make sure the AC Voltage Select switch is set to the appropriate position for your location. Then connect the included AC cable. Warning: Use of improper voltage/selector switch combinations may result in hazardous conditions and/or damage to speaker components not covered by speaker warranty. Connecting Audio 2-Channel Stereo Operation: Connect the main left and right outputs of your mixing console, audio interface, or sound card to the XLR or TRS balanced inputs or RCA unbalanced inputs on the back of the SBX10 subwoofer; then route the subwoofer’s left and right XLR or TRS balanced outputs to your direct-field, full-range monitors. (While the TRS inputs and outputs will work with unbalanced cables, we strongly recommend you use balanced cables. In doing so, you will have better immunity to inductively coupled noise from power cables, etc.) XLR PIN 1 and TRS sleeve = signal ground (shield) XLR PIN 2 and TRS tip = signal positive (+) XLR PIN 3 and TRS ring = signal negative (–) 5LJKW 2XWSXW /HIW 2XWSXW 5 / ,QSXWV 5 / 2XWSXWV /HIW 5LJKW 10 Studiophile BX10s Deluxe Subwoofer Multichannel (e.g., 5.1, 7.1-channel surround) Operation: If you're mixing or monitoring a multichannel source, you undoubtedly have an external bass management system and/or you may be sending the LFE (low-frequency effects) channel directly to the subwoofer with no additional signal redirection. In this scenario, you can route your subwoofer audio signal to either the left or right input on the SBX10 subwoofer. Further, you should bypass the subwoofer’s internal crossover by setting the crossover control to the 200Hz position (fully open). Adjusting the Back Panel Controls Crossover Control (3) We have touched on this topic already, but here are a few more points to keep in mind: • The crossovers of most A/V home theater systems are set to 80Hz (assuming they are being used with a subwoofer). So if you are mixing multichannel material using the SBX10 subwoofer, we recommend you start with the 80Hz setting as a reference to approximate a typical end-user listening environment. • For easy compliance with Dolby Digital, DTS, and THX recommendations, we have provided calibrated markings on the crossover dial for 80Hz,100Hz, and 120Hz positions (in addition to 50 Hz and 200 Hz). • If you are using the SBX10 subwoofer with direct-field monitors with 5” drivers (such as M-Audio's BX5a Deluxe or CX5) in a 2-channel setup, we recommend you start with 80Hz as your crossover point and adjust it to suit your particular acoustic environment. The documentation for your direct-field monitors may also include a recommended subwoofer crossover frequency. • If you are using the SBX10 subwoofer with direct-field monitors with 8” drivers (such as M-Audio's BX8a Deluxe or CX8) in a 2-channel setup, we recommend you start with 50Hz as your crossover point and adjust it to suit your particular acoustic environment. The documentation for your direct-field monitors may also include a recommended subwoofer crossover frequency. Studiophile BX10s Deluxe Subwoofer11 d 11 English SBX10 Phase Select (4) As we mentioned before, this switch inverts the signal (the phase angle from 0° to 180°) that goes to the subwoofer amplifier. The Phase Select function does not affect the signal going to your direct-field monitors. You can select the appropriate position of this switch by listening to the way the sound from the SBX10 subwoofer blends with the rest of your system. There is no "right" or "wrong" position, per se–but logically you want the subwoofer to be "phase coherent" with your direct-field monitors at the crossover frequency, and not have any audible energy cancellation. One way to determine this phase coherence is by playing a sine wave signal at the crossover frequency you have selected and put the phase switch in the position that gives you the strongest output. Volume (12) You should always send a line-level signal to the SBX10 inputs. When the volume control is all the way up, 85mV of pink noise at the input will produce 100dBA output SPL at one meter from the front baffle. The volume control affects the level going to the SBX10 amplifier and does not affect the level of the SBX10 outputs that feed your direct-field monitors. Generally, we recommend that you try to get the flattest, most even system response between your subwoofer and your direct-field monitors–so depending on the acoustics of your environment and how you have set up your signal path and levels, you should spend a few minutes calibrating the respective levels of the subwoofer and each of your main monitors. If you have access to pink noise signals and/or swept sine waves (linear and logarithmic), they can be of great help for ensuring your system has the smoothest tonal balance from top to bottom. Subwoofer Bypass (11) This is a 1/4" mono jack for connecting a non-latching footswitch like the M-Audio SP-1 (or any similar sustain pedal for a keyboard controller). In 2-channel situations, toggling the footswitch triggers a relay circuit that mutes the subwoofer output and reroutes the full-bandwidth audio signal directly to your direct-field monitors. In essence, it takes the subwoofer (with its crossover) completely out of the signal path so you can easily audition your mixes both with and without the presence of the SBX10 subwoofer's low frequency extension–all from your mixing position. This function can also be useful for multichannel operation. Note that when SBX10 is in bypass mode, the LED Indicator on its front face flashes red. More information on using a subwoofer for multichannel applications may be found at www.dolby.com, www.dts.com, or www.thx.com. The web sites mentioned above are examples only and are in no way associated or affiliated with M-Audio or Avid Technology, Inc. M-Audio does not guarantee the performance or availability of these services. M-Audio SBX10 is not endorsed, sponsored, or approved by these companies. 12 Studiophile BX10s Deluxe Subwoofer Placing the SBX10 Subwoofer The "location location location" cliché doesn't only apply to the real estate market. It is equally (if not more) applicable to the subject of loudspeakers and room acoustics. As you can imagine, where you place the SBX10 subwoofer in your room can have a huge impact on how it will sound. In fact, any well-designed, powerful subwoofer can sound like a complete dud in your monitoring setup if you have placed it poorly. (This applies for any loudspeaker, but it is especially true for low-frequency reproducers like subwoofers.) There are many opinions on the best method to determine the optimal location for your subwoofer. In fact, if you ask three different studio engineers, they will probably give you six different answers. But we cannot emphasize enough how important this issue is, so please take a little time to think about subwoofer placement; keeping in mind that the shape of your room, its dimensions (including ceiling height), the wall construction, and any acoustic treatment you have can affect the subwoofer's apparent performance. Remember, also, that the frequency of any given signal is inversely proportional to its wavelength. For example: At 40Hz, one wavelength is about 8.5 meters or 28 feet; at 80Hz one wavelength is a little over 4 meters, or 14 feet; etc. Where to Start First of all, you should always place the subwoofer on the floor when you are using it–never on a table or speaker stand. One theory suggests that the best position for a subwoofer in a 2-channel system is on the floor half-way between your left and right direct-field monitors, with its front facing forward and in the same plane as the direct-field speakers. From there, you can adjust the subwoofer's position until it is most "correct." Another theory dictates that you should start with the subwoofer in a corner of the room's floor, where the adjacent walls can help the subwoofer maximize the amount of sound it radiates; and then you can adjust the position to suit your specific monitoring setup. Both of these methods are valid, but there is yet another method that many mix engineers have employed with great success: exploiting the law of bilateral symmetry. With this method, you would place the SBX10 subwoofer in the chair in your listening position. (Presumably, this is at the apex of an isosceles triangle between your left and right direct-field monitors.) Play some music with substantial bass frequencies into the subwoofer at a comfortable listening level. (Pink noise works great for this too.) Crawl around the floor of your room and listen for a place where the sound is "fullest" but also "tight" sounding. Wherever that is–bingo!–that's where your SBX10 subwoofer will go. If you want to be more precise, you can use a 1/12th-octave real-time (spectrum) analyzer instead of your ears and perform the same exercise. (If you do this, make sure you play pink noise as the test signal and observe where the spectral response is smoothest and has the greatest low-frequency extension.) Please note that because low-frequency signals radiate omnidirectionally, you may find that the best location sonically for the SBX10 is quite inconvenient (like in an area of your studio with a lot of foot traffic). If this is the case, you can flip the Phase Select switch on the subwoofer’s back panel and repeat the exercise, hoping for a more convenient outcome. Finally, once you have placed the SBX10 subwoofer where you believe it will sound best, play some material along with direct-field monitors, listening from your standard mix position. (Make sure the SBX10 volume level, phase, and crossover are set appropriately.) If something is askew, try out some new subwoofer locations. As always, feel free to experiment with different locations (and different directions for facing the driver). You may inadvertently find a better way to place the subwoofer, even if you think its current location already sounds good. Studiophile BX10s Deluxe Subwoofer13 d 13 English SBX10 Appendix A - Technical Specifications Type Bass-reflex active powered subwoofer Woofer Driver 10-inch composite (treated paper/fiberglass) cone with high-temperature voice coil and damped rubber surround Frequency Response 20Hz - 200Hz Crossover HP/LP linked filter sweepable from 50-200Hz; 24dB/octave 4th-order alignment Input Sensitivity 85mV pink noise input produces 100dBA output SPL at one meter with volume control at maximum Amplifier 240W average power into 4 ohms, discrete transistor design S/N Ratio 86dB (A-weighted) THD at rated power 0.019% Inputs Two XLR balanced/unbalanced inputs; two TRS balanced/unbalanced inputs, two RCA unbalanced inputs Outputs Two XLR balanced/unbalanced outputs for satellites; two TRS balanced/ unbalanced outputs for satellites Controls Volume/Gain control, phase inverse switch, variable crossover control, subwoofer bypass footswitch jack Input Impedance 20k ohms balanced, 10k ohms unbalanced Maximum input level +20dBu Protection Over temperature, turn-on/off transient, subsonic filter, external mains fuse, DC protection, over current protection Indicator Power On (blue) or Bypass (red) Power Requirements Dual-voltage (selectable by rear-panel switch) for either 100-120V/~50/ 60Hz or 220-240V/~50/60Hz; powered via detachable grounded IEC cable Cabinet Vinyl-laminated MDF Dimensions 15.5 in. (h) x 13 in. (w) x 17.25 in. (d); 39.4 cm (h) x 33 cm (w) x 43.8 cm (d) Shipping Weight 54.6 lbs, 24.75 kg * Above specifications subject to change without notice 14 Studiophile BX10s Deluxe Subwoofer SBX10 Studiophile BX10s Deluxe Subwoofer15 English Appendix B - Block Diagram d 15 Your SBX10 Warranty Warranty Terms M-Audio warrants products to be free from defects in materials and workmanship, under normal use and provided that the product is owned by the original, registered user. Visit www.m-audio.com/warranty for terms and limitations applying to your specific product. Warranty Registration Thank you for registering your new M-Audio product. Doing so immediately both entitles you to full warranty coverage and helps M-Audio develop and manufacture the finest quality products available. Register online at www.m-audio.com/register for the chance to win M-Audio giveaways. Documentation Feedback At M-Audio, we are always looking for ways to improve our documentation. If you have comments, corrections, or suggestions regarding our documentation, email us at [email protected]. SBX10 Tested to comply with FCC standards FOR HOME OR STUDIO USE WARNING: This product contains chemicals, including lead, known to the State of California to cause cancer, and birth defects or other reproductive harm. Wash hands after handling. © 2009 Avid Technology, Inc. All rights reserved. Product features, specifications, system requirements and availability are subject to change without notice. Avid, M-Audio, BX, CX, DSM, and SBX10 are either trademarks or registered trademarks of Avid Technology, Inc. All other trademarks contained herein are the property of their respective owners. 16 Studiophile BX10s Deluxe Subwoofer www.m-audio.com M-AUDIO 5795 Martin Road Irwindale, CA 91706, USA TECHNICAL SUPPORT Visit the M-Audio Online Support Center at www.m-audio.com/support PRODUCT INFORMATION For company and product information visit us on the web at www.m-audio.com