1
----
----
-
-
-
---
-
--
~ TM
THE OFFICIAL PUBLICATION OF THE YAMAHA USERS GROUP
DECEMBER 1985
---
OYAMAHA®
--
---
Editor
Tom Darter
Operations
Sibyl Darter
Editorial Board
John Gatts
Bill Hinely
Mark Koenig
Paul Meisenzahl
Phil Moon
Jim Smerdel
Production
Leslie Bartz
Ray Betts
Pat Gates
Paul Haggard
Chris Ledgerwood
Cheryl Matthews
-
--
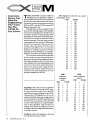
Volume 1, Number 3
December 1985
4
--
John Chowning
Part II of an exclusive interview with the father of digital FM
synthesis. By Tom Darter.
5
VICSRHODES
A DX7 voice created by Manny Fernandez.
6
Blank DX7 Voice Charts
Two blank voicing charts that you can copy and use to
record DX7 voice data following the format used in
AFTERTOUCH.
8
DX7 to CX5M Voice Conversion
Learn how to convert DX7 voices into patches for the
CXSM's internal FM digital tone generator. By Ken Leivers.
11
CX5M System
Information of all the new products for use with the CXSM
Music Computer System.
12
CP60M
The CP60M electro/acoustic piano and MIDI.
13
MIDI Basics
Understanding the four basic MIDI modes. By Tom Darter.
14
CX5M RX Editor
The new YRM302 RX Editor program turns the CXSM into
a sophisticated PATTERN and SONG programmer for the
percussion sounds in the RXll and RXlS. By David Lourik.
A product of
GPI Editorial Services
Tom Darter, Director
P.O. Box 2338, Northridge, CA 91323-2338
AFTERTOUCH is published monthly. Third class
postage paid at Long
Prairie, MN and additional
points of entry. SUBSCRIPTIONS: Free.
Address subscription correspondence to AFTERTOUCH, P.O. Box 2338,
Northridge, CA 913232338. POSllMU\S11E~
Send form 3579 to P.O.
Box 2338, Northridge, CA
91323-2338.
2
16 REV7
The REV7 Digital Reverb, user programmability, and MIDI.
By Tom Darter.
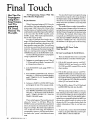
18 Final Touch
Hot tips on preprogramming RXll song tempos, and
programming RX drum patterns via the QX 1.
© 1986 Yamaha International Corporation. No part of this publication may be reproduced, stored in a retrieval system, or transmitted in any
form or by any means, electronically, mechanically, photocopying, recording, or otherwise, without the prior written permission of Yamaha
International Corporation.
AFTERTOUCH/Vol. 1 No.3
Fron1 The Editor
M
ANY NEW THINGS for this third issue
of AFrERTOUCH! First of all, we have
our first contributions from readers. From
Manny Fernandez, we have a Rhodes,like voice
he programmed for keyboardist/ percussionist
Victor Feldman. You will find Manny's voice,
called VICSRHODES, on page 5.
We also have our first article from a reader:
Beginning on page 8, you will find a detailed
discussion of ways in which DX7 voices can be
"translated" for use with the internal tone
generator of the CXSM music computer. The
article, by Ken Leivers, comes complete with a
set of conversion tables for the different
parameter value ranges of the two programming
systems.
Back on page 18, you will find our first
collection ofhottips, "Final Touch." Another
reader, Jim Mancuso, has supplied us with a
great method for preprogramming tempos on
the RX 11. In addition, Gary Leuenberger and
David Bristow tell us how to use the QX 1 to
program RX11 drum patterns.
Also, due to popular demand, we are pro,
viding you with a set of blank DX7 voice charts,
which you are free to copy and use to document
your DX7 voices. These charts, on pages 6 and
7, follow the AFrERTOUCH format first used
and explained by Gary Leuenberger in the first
issue. Using these charts, you will be able to see
the shape of the algorithm as part of your voice
data. Happy programming!
As you can see, your input is already having
a strong effect on the contents of AFTER,
TOUCH. Let's keep the flow of information
going. If you want to belong to or start a Users
Group in your area, please send us a letter:
Include your address and (if you wish) your
telephone number. We'll print it, and others in
your area will be able to contact you to set up
meetings, information swap meets, or other
gatherings.
Keep the questions coming, too. Your input
will help us to give you the kind of information
you need. We look forward to hearing from
you!
-TD
AFTER~
TOUCH is a
new monthly
informational
publication
from Yamaha.
Receive AFTERTOUCH Free Every Month!
Y
OU HAVE RECEIVED THIS ISSUE of AFTERTOUCH because we know
that you have purchased a Yamaha professional musical product, or that you
frequent a store in which Yamaha products are sold. You can continue to receive
AFTERTOUCH for an entire year, absolutely free, just by sending in the postcard
that is bound into this issue.
If the address on the mailing label (on the back of the magazine) is correct, just
peel off the label and affix it to the postcard. If it is not current, or has some error in
it, put the label on the postcard and write in the necessary corrections. If the address
is completely wrong, or if you picked this copy up in a music store, just write in your
name and address.
After you have signed the card and indicated your correct name and address, put
a stamp on the postcard and mail it to us. We'll put you on our permanent mailing
list, and you will receive twelve issues of AFTERTOUCH absolutely free! There is
absolutely no obligation, and no other strings are attached. We just need the
postcard to make sure that we have your correct address, and to make sure that you
want to receive AFTERTOUCH every month.
Also, don't limit yourself to just sending in the card. Let us know what kind of
articles you want to read. The more input we receive, the more we will be able to
tailor the information in AFTERTOUCH to suit your musical needs.
(By the way, if you sent us a postcard after receiving the first issue of AFTERTOUCH in the mail, you are already assured of receiving twelve issues, so you don't
need to send us another card. If you sent us a card after picking up the first issue in a
store, you will also be added to our permanent mailing list.)
To receive
AFTER~
TOUCH every
month, abso~
lutely free, just
put your name
and address on
the enclosed
card and mail
it to us.
Vol. 1 No.3/AFfERTOUCH
3
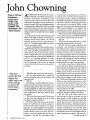
John Chowning
Part 2 Of An
Exclusive
Interview
With The
Father Of
Digital FM
Synthesis. By
Tom Darter.
A S DIRECTOR OF the Center for Compu_n ter Research and Musical Acoustics at
Stanford University [CCRMA], John
Chowning has long been an articulate and
enthusiastic spokesman for music produced by
electronic means. While still a graduate student
in composition at Stanford in 1964, he became
interested in electronic music. Since the school
had no analog synthesis equipment but did have
a large computer, he jumped directly into digital
synthesis.
In the '70s, the results of his research in the
field of FM digital synthesis were licensed to
Yamaha, and the rest is history. As you will
discover from this exclusive, two-part interview, Dr. Chowning's keen insights are important for any student of FM.
In part 1 [published in last month's issue of
AFTER TOUCH], Chowning explained his
early work with FM, and described the convoluted pathway that connected his original
theory of digital FM to its current pinnacle of
commercial success. In this month's installment
[part 2 ], Dr. Chowning discusses his recent
work with the DX7, and outlines ways in which
the DX instruments can be used as teaching
tools in the fields of acoustics and psychoacoustics.
*
((This year
marks the first
chance I've
really had to sit
down and get
to know the
DX7 rather
intimately."
4
*
* *
TD: When did you first work with the DX7?
JC: You mean the first time I actually sat
down and worked with it for more than a few
random hours?
TD: Yes.
JC: In January of 1985, at IRCAM in Paris. I
had seen prototypes in Japan, but that was more
listening, talking about what was being done,
and giving suggestions, rather than sitting down
and working with it myself. And in fact they
were at that time far away from what the DX7
has become.
TD: So for all this time since the DX7 has come
out, your work has continued to be on the large
mainframe computer at Stanford?
JC: That's right. This year marks the first
chance I've really had to sit down and get to
know the DX7 rather intirnately.l'm writing a
piece for two virtuoso pianists, each playing a
KX88 controlling a TX816, with computer
control between voices. Ever since the GS 1,
which is much less flexible than the later instruments, I felt that the technology at least
AFfERTOUCHNol. 1 No. 3
coupled basic musical gestures in effective
musical ways-velocity did something now
beyond just making it louder; it affected the
bandwidth, the spectrum. I felt that the instruments were ready for at least a few pieces to be
done with them. Now with the TX816, I think
there are a lot of pieces that could be done with
MIDI control keyboards. It is a different but
complementary medium to that which we use
here at Stanford. I plan to finish the piece soon.
TD: Is your SLAPCONGAS patch [presented
in the October '85 issue of AFTERTOUCH] the
very first DX7 sound you ever came up with?
JC: Yes.
TD: Were you aiming specifically at a drum
patch when you began work on the sound?
JC: Yes. That was rather purposeful and
successful. I was interested in that because of
David Wessel. He is a kind of musician/scientist/mathematician at IRCAM, and he is also a
drummer. In fact, he was my student when he
was doing his graduate work here at Stanford.
We were talking about flams in the context of
synthesis, and I thought it would be possible to
do that with the DX7, because you have independent sections in many of the algorithms.
So I tried to make flams, I think, and then
got into the idea of doing a conga, which sometimes uses flams for fortissimo sounds. I did it in
about a day and a half-l'm still not nearly as
skilled as some of those who've been working
with the DX7 for years, but I guess my theoretical understanding was quite a bit of help. So I sat
down and put together a drum which is congalike. On all drums, pianissimo sounds are very
different than a whacked fortissimo, and I
wanted to build those differences into the
sound. That was a lot of fun. I really enjoyed it.
So that was my first sound on the DX7, completed in February of 1985.
TD: Have you been doing a lot of programming
recently for your piece, working on the TX816?
JC: Yes. One of the central ideas for the
piece was that I would try to get the very best
piano sounds I could, because for one brief
instant in the piece, the pianists will be playing
sounds that are more or less within their own
domain. But I took it as a challenge, because the
best way to learn a system is to start by trying to
simulate something. So, after the FM conga
sound, I started working on piano tones. Then
David Bristow came over from England, and we
started working on it together. That was a very
Continued on page 20
---- - -
7
~
---- ----
VIes..
14
0
0
53
OFF
0
SPEED
DELAY
PMD
AIID
SYNC
PMS
TR1
WAVE
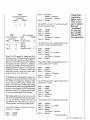
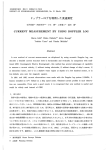
RHODES. A
DX7Voice
By Manny
Fernandez.
LFO
R1
L1
L2
99
99
99
L3
50
50
I C2
[ON]
R4
R3
R2
99
KEY TRANSPOSE
L4
50
50
OSCSYNC
PITCH ENVELOPE
FUNCTIONS
POLY
2
POI..YIMONO
0
RANGE
SYEP
PITCH BEND
FREQUENCY
OFF
0
MODE
GLISSANDO
TIME
R1
PORTAMENTO
L1
CONTROLLER
RANG£
NA
NA
NA
NA
MOO WHEEL
FOOT CONTROL
BREATH CONTROL
AFTERTOUCH
FREQUENCY
DETUNE
229.1Hz
R1
85
L1
IR2
85
95 IL2
L
...R
o
I +E
.....
L3
0
G2
AMPLJTUOE
NA
NA
NA
NA
R1
.. o
L1
L
I
o
I -E
R I 52
IOUTPUT '""' •• VELOCITY
5
93
3
OFF
OFF
R
OFF
OFF
L3
0
D
N
G2
IL2
90
94
IR241
L1
99
IL272
40J
R3
0
.. o
0
I
6
AR
R
I
DEPTH
L
144
R
R I 0
I -L
IU~LCHOLIVELO~ITY
"""
C3
2
FREQUENCY
lAMS 0
.. o
R4a IRS
30
L3
R
R1
IR2
R3
L1
IL2
L3
89
I
99
1
+5
20
90
20
0
R4_
52
.. o
IRS
4
I
NT
I +L
R
I -E
C3
0
L
I
R
I 17
[u ~'""' L IVEL~ITY
L
I +L
R
I -E
OPit
1
t
ALGORITHM #11
A2
L I 54
R I 60
LEVEL IVELOC61TY
ID~
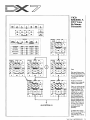
Notes:
Basic sound of piano is produced lry Ops f/6 and #4· Op
#4 is set to fixed frequency of
1.778 to create a slow chorusing effect.
Op #5 is set to fixed fre·
quency of 229. I to create the
"thump" of the hammer.
1.....
OETUN£
1.00
20 1""-52 IRS 4
L3
o
I -E
L IVEL~
..
I"""
L
NE
-4
KEY
L
R3
L
'II
I""
L
4
4
NE
+4
R1
AVE
sol
93
R189 I~20
99
R
1
D
L 1 19
82
D••
E
INT
1.778Hz
"""
I
lu" ""' '""'
•-uUENCT
L1
r·
.. o
INT
14.00
R3
18 ...36
o
IN
'~
FREQUENCY
1
I
R 1 11
I OUTPUT LEVEL CLOCITY
67
3
3
~-~
I -E
6
l +L
J,
IDETUNE
-5
96 IL289
R
0
R
R
L I -L
OPit
IRS
.. o
ARD
OFF
86 1""25
u...
KEY
OFF
R
R
L I +E
I 51
99 IL285
L3
OFF
1.00
R4a IRS
EGBIAS
0
..R3s
~
R3
27
OFF
IFREQUENCY
0
-4
R3
17
PITCH
IR2
23
64
lAMS
DETU;E
20.72
NA
Ops #I, #2, and #3 aTe used
to create the sound of the tine
sound of the Rhodes. The
"stuff' romes from 0p #3=
Although the I4: I Tatio of
Ops #I and #2 creates a
good approximation of the
tine, the overall haTmOnic
sr:ructure is much moTe complex and includes some non·
haTmOnic ( clangOTOUS) components. Thus, Op #3 is set
to a Tatio of 20.72 (start at
I4.00, and mooe up using
the FTequency Fine
paTameteT).
Try setting Ops #2 and #3
EG Level 4 to 95 and Rate 4
to Bo, to create a harpsichoTd-like effect in the tine
sound.
Vol. 1 No. 3/AFTERTOUCH
5
Blank Voic..
ing Charts In
TheAFfER..
TOUCH
Format.
WAVE
DELAY
SPEED
PMD
LFO
SYNC
AMD
1:: 1: 1: 1:
PMS
KEY TRANSPOSE
i
I
PITCH ENVELOPE
OSC SYNC
FUNCTIONS
FREQUENCY
j
STEP
RANGE
PITCH BEND
POLY/MONO
RANGE
CONTROLLER
MODE
PITCH
I
I
GLISSANDO
PORTAMENTO
TIME
AMPLITUDE
EG BIAS
R1
R2
L1
L2
DETUNE
lAMS
EN' /ELOPE DATA
R4
R3
RS
L4
l3
KEY OARDSCA lNG
INT
MOD WHEEL
DEPTH
FOOT CONTROL
BREATH CONTROL
OPfl
AFTERTOUCH
OUTPUT LEVEL rELOCITY
1
FREQUENCY
R1
R2
L1
L2
6
AFrERTOUCHNol. 1 No. 3
ENVELOPE DATA
R4
R3
L3
RS
L4
I
OPO
OUTPUT LEVEL
FREQUENCY
FREQUENCY
lAMS
KEYB ARD SCALING
B AKP INl"
RYE
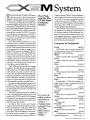
The chart on
this page can
be used to
record voices
programmed
using the fol,
lowing alga,
rithms: 1, 11,
14,19, and 28.
Connect the
relevant opera,
tor boxes, add
the feedback
loop in the
proper place,
and fill in the
blanks. Ignore
the operator
boxes that are
not needed for
the algorithm
you are using.
DETUNE
R1
R2
L1
L2
VELOCITY
ENVEL PE DATA
R4
R3
L3
OUTPUT LEVEL
FREQUENCY
DETUNE
DETUNE
R2
R3
AT
R4
L1
L2
L3
L4
N
y
RS
DEPTH
IOUTPUT LEVEL IVELOCITY
FREQUENCY
R2
L1
L2
cs
DETUNE
EN
R1
R2
L1
L2
I
T
OPo
R1
L
R3
/li.A
R4
L3
L4
I
VELOCITY
ENVELOPE DATA
R4
R3
L3
FREQUENCY
L1
L2
L4
OPfl
OUTPUT LEVEL
I
lOUTPUT LEVEL
DETUNE
R2
R3
1"4
L1
L2
L3
L4
VELOCITY
OPfl
OUTPUT..... L
RS
I
VELOCITY
R2
R3
TA
R4
L1
L2
L3
L4
VELOCITY
RS
~
I
OPfl
I
OUTPUT LEVEL VELOCITY
FREQUENCY
DETUNE
R1
R2
R3
DATA
R4
L1
L2
l3
L4
URVE
I
I
R1
T
R1
DEPTH
DETUNE
lAMS
lAMS
RS
RS
L4
l3
DEPTH
URYE
I
PE DATA
NV
R4
R3
I SCALING
I T
y
OPfl
lAMS
rMS
IOUTPUT LEVEL IVELOCITY
OPO
R2
FREQUENCY
RS
K YBOARD
ALIN
BREAKP INT
::ILRVE
R1
DETUNE
D PTH
lAMS
(liS
R1
RS
L4
I
OPfl
FREQUENCY
lAMS
K YB AR ISC LING
INT
DEPTH
I
DETUNE
OPfl
AI
T
RS
PTH
IOUTPUT LEVEL IVELOCITY
L2
L1
•
u
AMS
I
RS
IOUTPUT LEVEr:ITY
L3
R3
DET\INE
I=
I
PMD
LFO
I=
I
L2
L1
OPO
L1
A1
L2
A2
FREQUENCY
OPO
A2
A1
A
I
L4
I
L4
AS
PTH
OSCSYNC
lAMS
AS
PTH
VELOCITY
I
DATA
A4
I
IOUTPUT LEVEL IVELOCITY
y
L3
ENV
A3
DETUNE
OUTPUT LEVEL
I
y
L3
PMS
I
I
L2
A2
OPO
L1
A1
L2
R2
FREQUENCY
OPO
L1
A1
FREQUENCY
I
I
KEY TRANSPOSE
I
I
lAMS
SYNC
OETUNE
I
I
ENV L PE DATA
A3
A4
AMD
FREQUENCY
PITCH ENVELOPE
DELAY
1:
I
L3
L4
L3
A3
L4
-.J
.
~
~
s 0~e;
~ ~
~ Q ::r_f6
\
0...~
~~~ ~
~ \ !f.B..~
~ §
AS
lAMS
PTH
VELOCITY
I
AS
I
RANGE
VELOCITY
I
lAMS
A
A4
OUTPUT LEVEL
I
N
DET\INE
8 §.~B:g-~~~·~g-~~~ 9-~~i~s ~.8 ~ ~
@ ~
~
A4
OUTPUT LEVEL
I
y
I
NV
A3
jDETUNE
AFTEATOUCH
BREATH CONTROL
FOOT CONTROL
MOO WHEEL
CONTROLLER
2g-~ ~g-~~a g-g-~ ~~~~~~·a~~~~
OPt
R2
R1
SPEED
1:
I
RANGE
STEP
PITCH BEND
~::1 @f~ ~~ ~~-a~-[n ~ ?~iS.l a.b g-
~
~....
WAVE
!FREQUENCY
I
POLY/MONO
L2
A2
GPO
L1
A1
L2
A2
FREQUENCY
OPO
L1
A1
FREQUENCY
PITCH
MODE
FUNCTIONS
L3
~
L4
A4
lAMS
AS
EG BIAS
TIME
L4
R4
OUTPUT LEVEL
I
L3
A3
DET\INE
AS
VELOCITY
I
I"MS
IOUTPUT LEVEL IVELOCITY
y
NV
A3
DETUNE
AMPLITUDE
GLISSANDO
PORTAMENTO
I
l
I
IL2
r2
L2
A2
A1
OPO
L1
L2
A2
FREQUENCY
OPO
L1
A1
FREQUENCY
OPO
L1
R1
FREQUENCY
L4
R4
R4
L4
R4
~
L
L4
OUTPUT LEVEL
I
y
L3
NV
A3
DETUNE
OUTPUT""'
I
L3
A3
DET\INE
OUTPUT LEVEL
I
L3
R3
DET\INE
RS
AS
AS
VELOCITY
I
lAMS
VELOCITY
l
lAMS
VELOCITY
I
lAMS
OPt
L1
R1
I
I
IL2
IA2
FREQUENCY
L4
IR4
OUTPUT LEVEL
I
L3
A3
DET\INE
VELocm
I
I
I
I
r·
~-·
Conversion
Factors And
Hints For
Programming
DX7 Voices
Into The
CX5M.By
Ken Leivers.
T
HERE ARE NOW A number of different
FM digital operator/algorithm configura~
tions available, from the 6~operator system of
the DX7 and related instruments to the various
4~operator systems such as those found in the
DX9, the DX21, and the CX5M's internal FM
digital tone generator unit.
Although many voices are available for all of
these systems, the large majority of the available
voices have been designed for the DX7 ~based
six~operator systems. To take advantage of this
large library of voices, I have developed a way to
convert DX7 voices for use with the CX5M's
internal synthesizer. Obviously, there are some
compromises involved, since the CX5M system
has only four operators. Beyond that, the
number values for almost all of the other
parameters are different. To overcome that
problem, you will find a number of conversion
tables below. These will help you to "translate"
parameter values from one system to the other.
The conversion values were derived largely
by ear; a number of types of graph paper were
also used to plot the various ranges and values.
Although one might be able to be a little more
exact using electronic measuring equipment, the
conversion values in the charts below have
proven to be quite accurate. Using the tech~
niques and charts below, CX5M owners can
now have access to the large library of voices
developed originally for the DX7.
LFO. Speed-for sawtooth, sine, square
and triangular waves:
DX7
CX5M
I
115
2
140
3
145
4
151
5
156
6
161
7
166
8
168
9
10
12
14
15
17
20
23
25
30
Feedback-Values for feedback are the same
for both the DX7 and the CX5M.
8
AFrERTOUCHNol. 1 No. 3
60
70
80
90
99
182
185
189
193
195
40
50
205
211
60
216
227
235
243
255
90
99
30
40
50
181
198
203
AMD
(amplitude
modulation
depth)
Algorithm-Since the DX7 has 6 operators
and the CX5M only 4, choose the 4 DX7 opera~
tors that provide the major part of the DX7
sound that you want to program on the CX5M.
Then pick the CX5M algorithm to use in your
programming that has the same configuration as
(or is most similar to) the DX7 algorithm minus
the DX7's two extra operators. Since the DX7
and the CX5M operators are numbered differ~
ently in their algorithms, make sure that you
program each operator according to its corres~
ponding position in the algorithm rather than to
its operator number.
173
177
35
70
80
DX7
10
20
171
CX5M
2
4
6
8
10
12
14
16
18
20
PMD
(pitch modulation
depth)
DX7
1
CX5M
1
2
5
3
4
10
15
20
5
7
30
10
40
15
50
20
60
25
30
35
40
45
50
80
90
100
110
55
70
120
127
Rate 3 =
AMS
DX7
CXSM
1
1
2
2
3
3
On the DX7, if Level 1 = Level 2 and Level 3
does not equal zero, then:
DX7
PMS
DX7
1
CXSM
3
2&3
4
5&6
4
5
6
7
7
DX7
CXSM
Saw up
(or Saw down)
Square
Sine or
Triangle
Sample & Hold
= 0
= 1
= 2
= 3
F (frequency of operator)-Values for
frequency are the same for both the DX7 and
the CXSM. If an inharmonic frequency (fine
tune) is used in a DX7 operator, find its exact
match in the table in the CXSM's FM Voicing
Program manual or else use just the fundamental
frequency value. Example: If a DX7 operator has
a frequency value of 5.12, then use just the value
of 5 in the corresponding CXSM operator.
Envelope generator-Depending on the
DX7's EG rate and level values for each opera~
tor, use the relevant formula given below in
determining the correct EG to use for each
CXSM operator. (Conversion tables follow)
On the DX7, ifRate 2 = 99, Levell= Level2,
and Level 3 = 0, then:
CXSM
Rate 1 = Attack
2nd~Decay
= 0 (always)
Using these
conversion
tables, many
DX7 voices
can be simpli,
fied and
utranslated"
for use with
the CX5M's
internal FM
tone generator.
Rate 4 = Release
Note: The LFO speeds for Sample and Hold
waveform on the CXSM are about half as fast as
those of the other waveforms on the CXSM. To
figure the correct LFO speed on the CXSM for
the Sample and Hold, subtract an additional
120 from the CXSM LFO speed given above.
Example: IfDX7 LFO speed= 10 and thus the
CXSM LFO speed = 173, then for Sample and
Hold (only) on the CXSM, the correct value
would be 53 (or, 173- 120 =53).
DX7
CXSM
Rate 1 = Attack
Rate 3 = lst~Decay
Level 3 = Sustain
Wf (waveform)
{pitch modulation
sensitivity)
lst~Decay
Sustain = 0 (always)
2nd~Decay = 0 (always)
Rate 4 = Release
(amplitude modulation
sensitivity)
On the DX7, if Levell is greater than Level2
and Level 3 does not equal zero, then:
DX7
CXSM
Rate 1 = Attack
Rate 2 + Rate 3 + 2 = 1st Decay
Level 3 = Sustain
2nd~Decay = 0 (always)
Rate 4 = Release
On the DX7, if Rate 2 is less than 99, Levell =
Level 2, and Level3 = 0, then:
DX7
CXSM
Rate 1 = Attack
Rate 2 = lst~Decay
Sustain= 15 (always)
Rate 3 = 2nd~Decay
Rate 4 = Release
On the DX7, if Level 1 is greater than Level 2
and Level3 = 0, then:
DX7
Rate 1
Rate 2
Level 2
Rate 3
Rate 4
CXSM
= Attack
= lst~Decay
= Sustain
= 2nd~Decay
= Release
On the DX7, if Levell is less than Level2, then:
DX7
CXSM
Rate 1 + Rate 2 + 2 = Attack
Rate 3 = lst~Decay
Level 3 = Sustain
2nd~Decay = 0 (always)
Rate 4 = Release
Continued on page w
Vol. 1 No.3/AFTERTOUCH
9
;-~~M
EG conversion tables-For use with EO
formulas given earlier:
CX5M
1
2
3
4
5
6
7
8
9
10
11
12
13
14
15
16
17
18
19
20
21
22
23
24
25
26
27
28
29
30
31
1st-Decay&
2nd-Decay Rate
DX7
CX5M
1
10
2
13
16
3
19
4
21
5
6
24
27
7
8
30
33
9
36
10
11
39
12
42
13
45
48
14
51
15
16
54
57
17
60
18
19
63
66
20
21
69
22
72
23
75
24
78
25
81
26
84
87
27
28
90
29
93
%
30
31
99
Sustain Level
DX7
CX5M
35
1
39
2
3
44
48
4
53
5
6
57
62
7
66
8
9
71
10
75
80
11
84
12
89
13
Release Rate
DX7
CX5M
21
1
2
27
32
3
38
4
5
43
49
6
54
7
60
8
65
9
10
71
11
76
82
12
87
13
Attack rate
DX7
15
18
21
24
27
32
34
38
40
44
47
50
54
57
60
64
67
70
74
77
80
83
85
87
89
91
93
95
96
98
99
10
AFrERTOUCH/Vol. 1 No.3
Continued
93
99
14
15
94
99
14
15
Output level of operator-Add 28 to the
output level of each DX7 operator to get the
output level for each CX5M operator. Example:
If the DX7 operator #1 has an output (volume)
level of 50, then the correct value for the opera,
tor with the same position (but not necessarily
the same number) in the CX5M algorithm is 78.
Detune
DX7
CX5M
+1
+1
+2
+2
+3 to +7 =
+3
-1
-2
-3 to -7
-1
-2
-3
Kd
Ks
(key scaling)
(key scaling down)
CX5M
DX7
CX5M DX7
Right&
1&2
1
-LIN
0
Left&
-LIN
1
3,4,&5 =
2
6&7 =
3
Rk (rate key scaling depth)-CX5M key,
board scaling depths left and right are figured for
a DX7 breakpoint of C3 (Middle C). For DX7
break points higher or lower than C 3, adjust
CX5M keyboard scaling depth by ear.
LEFT
(key scaling)
DX7
CX5M
20
1
30
2
38
3
44
4
48
5
52
6
55
7
58
8
60
9
62
10
11
64
66
12
67
13
68
14
15
70
RIGHT
(key scaling down)
DX7
CX5M
10
1
12
2
3
14
16
4
18
5
21
6
23
7
25
8
27
9
30
10
32
11
12
34
36
13
39
14
41
15
T
HE CX5M MUSIC COMPUTER System
now has a number of new components,
designed to answer the needs of users who have
asked for more flexibility and more capability.
One of the most important new items is the
SFG05 FM digital tone generator unit. This new
tone generator plugs into the computer's slide
slot, replacing the original tone generator, the
SFGO 1. The SFG05 is fully MIDI compatible,
meaning that (unlike the SFGO 1) it can be
controlled from an external source via MIDI.
With the SFG05, the CX5M Music Computer
can function as an inexpensive, multi-timbral
MIDI expander module.
If you are already a CX5M user, it is also
possible to have your SFGO 1 tone generator
unit upgraded to meet the specifications of the
SFG05. Eddy Reynolds Keyboard Service has
been authorized by Yamaha to update or exchange SFGO 1 units from existing CX5M customers, so that they can have the SFG05 functions without having to purchase the unit
outright. This service will cost $55.00, including shipping and owner's manual. (For further
information, write to: Eddy Reynolds Keyboard Service, 424 7 Kraft Ave., Studio City,
CA 91604; or call818-508-7983).
The CX5M now also has disk drive storage
capability. Two disk drives are now available,
both of which use 3.5" disks. The FD03 singlesided disk drive comes complete with controller, while the FD05 double-sided disk drive
must be purchased in conjunction with the
FD051 disk drive controller. All CX5M programs in the 300 series and the 500 series are
fully compatible with these new disk drives.
For ease in programming and operator, the
CX5M may also be equipped with the new
MU01 Mouse. Many of the CX5M programs in
the 300 and 500 series are fully compatible with
Mouse operation.
New music programs include the YRM305
DX21 Voicing program (which can be used
with the DX21, DX2 7, and DX 100 FM digital
synthesizers), and updated versions of earlier
programs (which will function with the new
disk drives and the Mouse).
In addition, there are now some Yamaha
programs that go beyond the sphere of music.
These are designed to make the CX5M more
useful as a general-purpose work station. The
new STCO 1 T eleword package (word processor/phone modem module) is an expansion
device that plugs into the computer's slide slot.
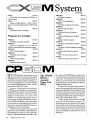
New Prod..
ucts For The
CX5MMusic
Computer
System.
Together with the TWE01 Teleword Enhancement program, the T eleword module opens up
the world of word processing and modem
communication to the CX5M user. There is
also the new GARO 1 Graphic Artists program,
which gives the CX5M increased power to
produce graphics and illustrations.
Many of these new products are pictured on
this month's cover. Below you will find a list of
all currently-available CX5M peripherals, programs, and accessories, complete with the current suggested retail price. As you can see, the
power and flexibility of the CX5M Music Computer System is growing rapidly!
Computer & Peripherals
For more de,
tailed product
information,
write to
Yamaha Inter,
national Corp.,
P.O. Box
6600,Buena
Park, CA
90622.
CXSM
$469.00
MSX based music computer; internal FM
tone generating system with 4 operators, 8
algorithms, 8-note polyphonic.
SFG05
$120.00
MIDI-compatible FM tone generator unit.
STC01
$345.00
T eleword Word Processor /Phone Modem
module.
YK01
$100.00
44-note mini-keyboard for use with the
CX5M.
YK10
$200.00
49-note standard-size keyboard for use with
theCX5M.
FD03
$345.00
Single-sided 3.5" disk drive with controller.
FD05
$345.00
Double-sided 3.5" disk drive without controller. Must be used in conjunction with the
FD051 disk drive controller.
FD051
$150.00
Disk drive controller for use with the FD05
disk drive.
MU01
$65.00
Mouse input/controller device.
PN101
$345.00
Dot impact printer for use with the CX5M.
CB01
$30.00
Printer cable.
PN101PF
$30.00
Pin-feed adapter for the PNlOl.
PN101RB
$10.00
Printer ribbon for the PNlOl.
RF02
$50.00
RF adapter for connecting the CX5M to a
Continued on page 1 z
standard television set.
Vol. 1 No. 3/AFfERTOUCH
11
VC02
YRM302
$10.00
Video cable for connecting the CX5M to a
CRT monitor.
CAOl
$25.00
Single cartridge adapter, to allow connec~
tion of a second cartridge via the CXSM's back
port.
UDCOl
$75.00
Blank data memory cartridge.
$55.00
RX Editor program.
YRM305
$55.00
DX21 Voicing program.
YRM501
$55.00
FM Music Composer II program.
YRM502
$55.00
FM Voicing II program.
YRM504
$55.00
FM Music Macro II program.
TWEOl
Programs & Cartridges
GAROl
YRMlOl
$55.00
Teleword Enhancement program.
$50.00
$50.00
Graphic Artists program.
FM Music Composer program.
CMW31
YRM102
$50.00
FM Voicing program, for use with the
CX5M's internal FM tone generating system.
YRM103
$50.00
DX7 Voicing program.
$50.00
YRM104
FM Music Macro program.
$50.00
YRM105
DX9 Voicing program.
$55.00
YRM301
MIDI Recorder program.
$50.00
Keyboard Chord Master program.
$50.00
Keyboard Chord Progression program.
CMW33
$50.00
Guitar Chord Master program.
FVDOl
$20.00
FM Voice data cassette tape #1.
FVD02
$20.00
FM Voice data cassette tape #2.
CMW32
CP~CQJM
T
HE CP60M electro/acoustic piano is one
of a new series of instruments equipped
with MIDI. Since the sound of the instrument is
generated acoustically and then amplified, it is
of course impossible to control the CP60M
from another MIDI keyboard-that is why the
unit only has a MIDI OUT port.
However, it is precisely the fact that the
CP60M is acoustic that gives it a unique place
among MIDI instruments. Instead of approxi~
mating the action of an acoustic piano with
weighted, wooden keys, the action of the
CP60M is an acoustic piano action. For ex~
perienced piano players, the difference will be
obvious: With the CP60M, you have the respon~
siveness and tactile feedback of an acoustic
piano action, connected (via MIDI) to the tone~
generating circuitry of a synthesizer.
The basic setup is simple: Just connect the
MIDI OUT of the CP60M to the MIDI IN of
the synthesizer you wish to control, and begin
playing. To get the full feeling of the effect, tum
12
AFrERTOUCH!Vol. 1 No.3
TheCP60M
Electro/
Acoustic
Piano And
MIDI.
the volume of the CP60M down, so that you are
only listening to the sounds coming from the
synthesizer. You should notice an immediate
difference in the kind of responsiveness the
keyboard gives you (as compared to a plastic or
weighted~wooden action).
To take full advantage of the keyboard's
nuance, choose patches in which velocity sensi~
tivity plays a large part. After working with your
synthesizer sounds for a while, you may find
yourself adjusting some of the velocity sensitiv~
ity settings to maximize the response character~
istics of the acoustic piano action.
Unlike the other pianos in the CP~MIDI
series, the CP60M comes in one piece. The
keyboard folds up into the body of the instru~
ment, and the entire unit is on casters for easy
transportation. If you are interested in playing
your synthesizers the way you play acoustic
piano, the CP60M could be just what you're
looking for.
MIDI
Understand..
ingThe Four
Basic MIDI
Modes. By
Tom Darter.
AS INFORMATION travels down a MIDI
.n. cable, it may be sent to (or through) a
number of instruments; but each instrument
may respond to this information differently,
depending on how it has been set to operate. In
other words, MIDI instruments have a number
of different modes of operation, and these
modes determine how the instrument will react
to MIDI information. Along with MIDI channels [explained in last month's MIDI article],
the MIDI modes are the most important elements that contribute to MIDI's ability to perform musical sleight-of-hand.
Most basic MIDI information (such as a
"note-on" or "note-off'') comes complete with
an informational "flag" that assigns it to one of
the 16 MIDI channels. For instruments receiving this information, there are two possibilities-either the instrument will be assigned to
recognize and respond to information on one
specific MIDI channel, or it will be assigned to
respond to all MIDI information, regardless of
channel. This second condition is called
"OMNI."
When an instrument is not set up in OMNI,
it responds only to information on the MIDI
channel to which it is assigned. In addition, it
may respond to this channel information in
different ways, depending on whether it is set up
to act like a POLYphonic instrument or a
MONOphonic instrument.
All in all, there are four MIDI Modes-four
different ways that an instrument may respond
to incoming MIDI information. These four
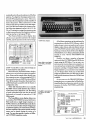
Here is a basic setup using MIDI
Mode 3 with the TX8r6. Each
module of the TX8r6 should be
sec (in Mode 3) so that its MIDI
channel matches the MIDI
channel of the QXI MIDI OUT
rerminal to which it is a>rmectaL
modes are specified by different combinations
of the three MIDI mode messages outlined
above: OMNI, POLY, and MONO. The combinations are pretty obvious, based on two
simple conditions: An instrument can be in
OMNI or not, and it may be either POLYphonic or MONOphonic. With these conditions in mind, the four MIDI modes are easy to
understand. Here they are:
Mode 1: OMNI ON, POLY. An instrument
in Mode 1 will respond to MIDI information
sent over any of the 16 MIDI channels. This
mode is sometimes called OMNI mode.
Mode 2: OMNI ON, MONO. This mode
assigns MIDI information sent over any of the
16 MIDI channels to one voice. When set in this
mode, an instrument will always play monophonically (one note at a time}, no matter how
much information is being sent over the various
MIDI channels.
Mode 3: OMNI OFF, POLY. In this mode,
an instrument will only respond to the MIDI
information being sent on the channel to which
it is assigned. Mode 3 is also known as POLY
mode.
Mode 4: OMNI OFF, MONO. In this
mode, an instrument will only respond to MIDI
information being sent on the channel to which
it is assigned, and it will respond to that information monophonically. Mode 4, also known
as MONO mode, is most often used in multitimbral instruments, where each voice can be
assigned to a separate MIDI channel.
Since most synthesizers today are polyphonic, Mode 2 (OMNI ON, MONO) is the
least common of the four. Mode 3 ( 0 MNI
OFF, POLY)isthemostcommon, especially
when a number of instruments are being used
with a sequencer. The basic operation of the
TX816 with the QX 1, for example, will most
often involve Mode 3.
In the early days of MIDI, many instruments
were programmed so that they were in OMNI
mode when turned on. This basic "default"
setting is still quite common, though not as
much as it was at the beginning of MIDI. The
DX7, for instance, functions in POLY mode
(MODE 3 }, and, when turned on, is initially
assigned to MIDI channell.
As mentioned above, Mode 4 (ONMI OFF,
MONO) is usually reserved for use with multitimbral instruments such as the Oberheirn
X pander. Each of the X pander's six voices
operate like a complete monophonic synthesizer. By assigning each voice to a different MIDI
channel, it is possible create multi-timbral
polyphony by controlling the X pander with a
multi-channel MIDI sequencer.
So, there is the story of the four MIDI
Modes. They determine how any given MIDI
instrument will respond to information sent on
the 16MIDichannels.
Vol. 1 No.3/AFfERTOUCH
13
T
HE RXll IS A VERY sophisticated
rhythm programming device; it can also be
difficult to program. There are many variable
functions, many more than can be easily dis~
played through the instrument's front panel.
The YRM302 RX Editor program for the
CXSM gives you the full power and conveni~
ence of the CXSM Music Computer and its
associated peripherals, all dedicated to the task
of programming rhythm patterns and song
chains for the drum and percussion sounds that
reside in the RX11 and RX15.
In other words, the RX Editor program and
the CXSM replace the RXll's internal PAT~
TERN and SONG program functions. Al~
though the basic approach to programming
with the RX Editor is the same as that of the
RX11's internal programmer, you will find that
the CXSM/RX Editor package will give you
more programming flexibility, in addition to
providing you with all the operational advan~
tages of the monitor display screens and the
various CXSM peripheral devices.
There are two basic operational setups,
which are referred to in the RX Editor owner's
manual as System 1 and System 2. System 1 uses
just the RX unit and the CXSM, and is straight~
forward: Connect the MIDI OUT of the CXSM
to the MIDI IN of the RX, and connect the
MIDI OUT of the RX to the MIDI IN of the
CXSM (see the accompanying diagram). Sys~
=
I
[J
DO DDDDDDDD D
S'dStem Set Up
MIDI Connection
RX11<->CX
Ot1NI ON EX. ch=01
Sync.Mode Metro.Vol
INT.SynSTP
31
CH NOTE
01 E2
01 F2
01 D2
01 A1
01 B2
01 D3
01 62
01 Gll2
ll
08
09
10
11
12
13
14
15
I NST
CH NOTE
SD2
01 Cll2
TOM3
01 C2
TOM4
01 B1
BD2
01 Gll1
HH-CLSD 01 A2
CRASH
01 C3
RIM
01 Dll2
CLAPS
01 Fll2
Printer
MSX
A
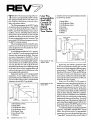
System Set Up screen display
of the YRM3o2 RX Editor
fJrowam.
-=RXll
[J [J [J [J [J [J [J [J [J [J
System Set Up display, and F7 selects the Filer
display. Other function keys select options such
as Real Time Write mode (F4 ), Play mode (FS ),
and Print mode (FlO). All of these options can
also be selected by moving the cursor to the
appropriate icon (on any of the screen displays)
and then pressing the RETURN key.
The real core of the RX Editor can be seen
most easily by looking at the major screen
displays. They can give you a quick idea of the
options available, and can also show you the
advantages of programming drum patterns and
songs via the CXSM.
ll INST
00 SD1
01 T0~11
02 TOM2
03 BD1
04 HH-OPEN
05 RIDE
06 COWBELL
07 SHAKER
Basic MIDI connections far
using the RX Editor
prowam.
~uti
m--,
Use The
CX5MAsA
Sophisticated
PATTERN
And SONG
Programmer
For The Per..
cussion
Sounds In
TheRXll
AndRX15.
By David
Lourik.
Basic MIDI connections far
using the RX Editor prowam
with a MIDI keyboard as an
input device.
The System Set Up display allows you to tell
the computer which system configuration you
are using (System 1 or System 2 ), and which RX
unit you are using (RX11 or RX15). You also
make a number of other basic operational
choices using this screen, such as the MIDI
transmission channels for each percussion
instrument sound, the MIDI key number for
each instrument sound, performance clock
selection, metronome volume, and so on.
The Pattern Editor screen gives you access
to the functions of Pattern Editor mode. This
- o u tI
mil
tern 2 allows you to input data using a MIDI
keyboard such as the DX7: Connect the MIDI
OUT of the DX7 (or other MIDI keyboard) to
the MIDI IN of the CXSM, and connect the
MIDI OUT of the CXSM to the MIDI IN of the
RX unit (see the accompanying diagram).
The function keys F 1, F2, F6 (SHIFT plus
F1), and F7 (SHIFT plus F2) are used to select
each of the four main display screens, as fol~
lows: F 1 selects the Pattern Editor display, F2
selects the Song Editor display, F6 selects the
14
AFTERTOUCH/Vol. 1 No.3
=
-=RX15
mode allows for the sectional input of rhythm
patterns. You begin by choosing a pattern num~
her (00~99) and giving it a name. Then you
determine the time signature and the number of
bars in the pattern. There can be from 1 to 99
beats per bar (the top number in the time signa~
ture ), and the beat duration (the bottom num~
her in the time signature) can be 4, 6, 8, 12, 16,
24, or 32, giving you a range from quarter~notes
to thirty~second~notes. Each pattern can be as
short as one bar, or as long as 95 bars.
The Pattern Editor screen display also
allows you to specify (and see) the output
LEVEL and the position in the stereo image
Pattern Editor
HH-<:LSD
SD1
BD1
Beat
•
PHH 00 J 3BEAT1
. . .
IL~lo ~~,q~g Quant
SET FIL£ FIJNC PRN 1/16
'
• F.• F9 ' " FlO F5
~@.~~Tempo
RTWIPLAY
120
•
'I::EVEL'
-=:J
-=:J
-=:J
c=:::J
c=:::J
c=:::J
c=:::J
c=:::J
c=:::J
4/4
Pos • t1 on
Beat' 01/4
I
J..
I ~~~ ' g~;g~1
.
0/ "
~
CXsM music computer.
\\
i
I
I
GDTI CIIill ___)
Pattern Editor screen display
of the YRM3o2 RX Editor
program.
(PAN-fortheRX11 only). these settings can
be memorized for each pattern.
Most obviously, the Pattern Editor display
allows you to see your drum pattern in graphic
form. Notes can be entered either directly onto
the computer screen, or by pressing the RX 11
instrument buttons or a MIDI keyboard (Real
Time Write mode). Remember that input from
a MIDI keyboard is possible with the System 2
configuration only.
Other Edit functions allow you to specify
the MIDI velocity (and therefore the volume)
of each note over a range from 1~. The timing
of each individual note can also be moved
backward or forward in intervals of 1/96
(96th~notes ).
The Song Editor screen display allows you
to combine PATTERNS (created in Pattern
Edit mode) into a single longer sequence, or
SONG. However, the SONG Edit mode allows
you to do much more than simply string groups
of patterns together: The instrument LEVELS,
the tone variation of the various sounds, and the
tempo can be altered during the course of a
song. You may also specify a number of differ~
ent PATTERN repetition modes.
All of these operations can be performed in
conjunction with the MU01 Mouse, which
makes it easy to move around on each screen
display, make choices, and enter data in various
ways. The PN 101 printer can be used to make
hard copy versions of any of the screen displays
(which allows you to keep a permanent printed
record of your various PATTERNS and
SONGS) .
Finally, you have a number of storage
options for the PATTERNS and SONGS you
create using the RX Editor. You can use a cas~
sette recorder to store data onto a cassette, or
you can load your creations into a UDC01 data
memory cartridge. Using the FD05 or FD03
floppy disk drive, you can store your material
on 3.5"' floppy disks. And you can also load
songs and patterns into your RX unit, for play~
back in those situations where the CX5M is not
available.
As you can see, the YRM302 RX Editor
program gives you a great deal of flexibility,
visual feedback, and precise control over the
nuances of rhythm PATTERN and SONG
programming.
Song Editor screen display of
the YRM3o2 RX Editor
program.
Song Editor
SfiG [ 00 J ROCK01
001 I::II§I]IT]
002 ~~J<>Bt:HT2J
r1 ~
r2 ~
003 JT=+~eo JJV=-<'b I~ J>:<Bt:RT~J
~~.2'002!>01
004 ~ !:I!'§I@
005 ~ ~02
006 ~ .2'001~03
007
~lSJ~~~
•
SET
riL~ ~UNC
"
PRN
~
PL-R
Tempo
120
Position
Beato 0L-4
Bar ' 01/01
PTNo 00/03.
PRTo 001/00
TBRo 000
~
Vol. 1 No. 31AFfERTOUCH
15
REV7
T
HE REV7 Professional Digital Reverberator is a programmable, MIDI-controllable signal-processing device with stereo output. It offers a wide variety of reverb, echo,
delay, and ambient effects.
The 30 preset programs in the REV7 can be
divided into the following basic types: REV
(reverb), E/R (Early Reflection), DELAY,
ECHO, and MOD (Modulation Type, including Phase, Chorus, and Flange effects). Each of
these presets can be edited by the user, and the
resultant new effect can be stored in one of the
60 user-programmable memory locations. This
gives a total of90 different programs stored in
the REV7's internal memory.
All user programs must be created by starting from one of the 30 presets. Each type of
preset program has its own specific set of programmable parameters.
As with instruments like the DX7, "parameters" in the REV7 are the separate, individual
elements that make up each effect. There are
two types of parameters in the REV7-"invisible" parameters (non-programmable, fixedvalue parameters) and programmable parameters (ones that you can modify). Because of this,
you may find that you can set all of the programmable parameters of two different presets
to the same value, and the resulting effects will
still not be the same, due to differences in the
non-programmable parameters.
Each preset type has up to 7 programmable
parameters. As you might expect, these programmable parameters differ from one preset
type to another. Here are the 7 programmable
parameters for the REV Type presets:
User Programmability
And MIDI
Control Of
TheREV7
Digital
Reverb. By
Tom Darter.
1) Reverberation Time
2) Initial Delay
3) 1st Reflection Delay
4) 1st Reflection Level
5) Hi Reverb Time
6) Low Reverb Time
7) Diffusion
16
AFTERTOUCH!Vol. 1 No.3
1) Initial Delay
2) 1st Reflection Delay
3) 1st Reflection Level
4) Liveness
5) Room Size
6) Diffusion
7) Mode
DIRECT SIGNAL
EARLY REFLECTIONS
1ST REF.!:
DELAY
.I
.I
INITIAL
DELAY
r nntr~
(TIME)
---1---4---ROOM SIZE
(TIME)
Basic parameters far "early
reflection" effects.
Basic parameters far rewrberation effects.
1ST RE'cF.+---t-+--------~---'----tTIMEI
DELAY
And here are the 7 programmable parameters
for E/R Type presets:
By the way, the "Mode" parameter in the
E/R Type of preset is a special case, one that
allows you to choose between 6 different operational modes: 1) Small Hall; 2) Large Hall; 3)
Random; 4) Reverse; 5) Plate; and 6) Spring.
The name of each mode indicates a typical
environment or effect, but only the early reflections typical of that environment or effect are
created in this type of preset.
Each one of the REV7's 30 presets is
designed to create a specific kind of effect; in
most cases, a number of "invisible" (non-programmable) parameters are involved in the
creation of these specific effects. By keeping
many of these values fixed, the effect will always
retain its basic character, while the 7 programmable parameters will allow you to adjust the
effect to suit your needs without altering the
fundamental character of the effect. You could
think of each one of the presets as being a dedicated, stand-alone signal processor with up to 7
front panel controls. The REV7 gives you 30 of
these, each with its own set of controls.
To understand this more clearly, let's look at
preset #1, "Large Hall," which is a REV Type of
effect. For each one of the 7 programmable
parameters, here are the settings that create
"Large Hall," followed by the overall range of
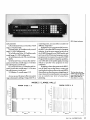
REV7 digital reverberator.
a starting point, you can define a number of
different "large halls."
In addition to its programmable features,
the REV7 also offers MIDI control of program
selection. It can be set to respond to any one of
the 16 MIDI channels (or to OMNI mode), and
each one of the 90 internal programs can be
programmed to respond to a specific MIDI
Program Select number. Using this capability,
you will be able to tie specific signal processing
effects to specific voice programs in your
synthesizer.
By getting to know the presets in the REV7,
you can learn how to alter them to create your
own kinds of ambient effects; through MIDI,
these effects can then become an integral part of
one or more of your synthesizer voices, giving
you an entirely new level of sound pro~
gramrning.
each parameter:
1) Reverberation Time, 2.6 seconds; overall
range, 0.3~ 10.0 seconds.
2) Initial Delay, 30.0 milliseconds; overall
range, 0.1~ 100.0 milliseconds.
3) 1stReflectionDelay, lO.Omilliseconds;
overall range, 0.1 ~ 100.0 milliseconds.
4) 1st Reflection Level, 0%; overall range,
0%~100%.
5) Hi Reverb Time, 0.3 times the mid~fre~
quency reverb time; overall range, 0.1~ 1.0 times
the mid~frequency reverb time.
6) Low Reverb Time, 1.2 times the mid~fre~
quency reverb time; overall range, 0.1~2.4 times
the mid~frequency reverb time.
7) Diffusion, 5; overall range, 0~ 10.
As you can see, this preset offers you a great
range of parameters settings. Using preset #1 as
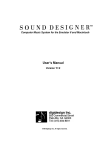
This chart shows the exact
number of type of early reflections created by the REV7 in
Mode 2 (large Hall), for
Room Sizes of z.o and 4.0.
MODE 2 (LARGE HALL)
ROOM SIZE:l.O
0
-10
-10
~
OJ
-20
~
-20
~ -30
~
.:,
-30
z
ROOM SIZE:4.0
0
z
.:,
-40
-40
•. L___
~
0
100
200
300
400
500
200
300
0
100
200
300
--~-'------
--
400
500
-10
-10
OJ
-20
~
~ -30
ci:
a:
z
100
0
0
~
0
-20
z
;;;:
9 -30
-40
-40
-
0
100
200
300
TIME(ms)
400
--
- -
500
_______ __._____ ____
400
-
-~
500
TIME(ms)
Vol. 1 No.3/AFfERTOUCH
17
Final Touch
Hot Tips On
Preprogram..
mingRXll
Song Tempos,
And Programming
RXDrum
Patterns Via
TheQXl.
Pre-Programming Tempos With The
RXll Rhythm Programmer.
By Jim Mancuso.
When I first started using my RX 11live, the
only problem I had was setting the tempos between songs. I didn't have a lot of time to fine
tune the tempos, so I needed a system by which I
could somehow preset the tempo so that all I had
to do was select the SONG number, push
START, and go. After much experimentation,
here is what I came up with:
Let's say, for example, that I need to play a
song at 125 bpm [beats-per-minute]. First of all,
make sure that the machine is always set at 100
bpm using the coarse tune slider. You only have
to do this once each time the unit is set up and
turned on. All tempos are then preset (using 100
bpm as a starting point) using the TEMPO
CHANGE function in the SONG EDIT mode.
Use the following procedure to preprogram
a song to playback at 125 bpm:
1. Designate an unused pattern to read 1 bar of
1/32 time and leave it blank. I use pattern 99
so I always know where it is.
2. In the SONG EDIT mode, assign PART 1 to
PTRN99.
3. Enter TEMPO CHANGE mode. Advance
using the+ 1 /YES button until the display
reads: ''TEMPO UP+ 25.'' Exit the TEMPO
CHANGE mode.
4. Advance to PART 2 in SONG EDIT mode
and program the rest of the song as normal.
5. After the last pattern at the end of the song,
enter TEMPO CHANGE mode and advance
using the -1 /NO button until the display
reads: "TEMPO DOWN -25." Exit the
TEMPO CHANGE mode.
This is what happens: The machine should
always be "preset" to 100 bpm. When the
START button is pressed for the song entered
above, the machine is commanded to raise the
tempo to 125 bpm. The entire song is played at
125. At the end of the song, the machine is
commanded to return to 100 bpm and is therefore back to the "preset" value before the next
song.
18
AFrERTOUCH/Vol. 1 No.3
You may find it easier to program the song
first and then program in the tempo change at
the beginning by using the INSERT function.
This saves you the time of having to reset the
tempo every time you listen to your song while
programming.
This method does not make it impossible to
program tempo changes within the song; you
just take them into account when programming
the final Tempo Change back to the preset value
of 100 bpm. For example, if the tempo of the
song ends up at 60 bpm becvause of a ritard,
then the final TEMPO CHANGE command
should be "TEMPO UP +40," which returns
the machine to 100 bpm prior to the next song.
* * * *
Building Up RX Drum Tracks
With The QXl.
By Gary Leuenberger & David Bristow.
There are basically three ways to control the
RX Series rhythmn controllers with the QX1:
1. Fill the RX internal memory with PATTERNS/SONGS and simply use MIDI
CLOCK from QX 1 terminal #8 to run the
drum machine.
2. Fill the RX internal memory with PATTERNS/SONGS and record that data onto a
track of the QX 1. Do this by taking the QX 1
OUT #8 into the RX; assign the RX to MIDI
CLOCK; take the OUT of the RX into the IN
of the QX1 and record the data.
3. Play the RX live from a OX or KX keyboard
and RECORD that info into the QXl.
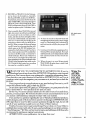
We find method 3 most effective. Here is a
basic technique that works well for us, and gives
us a nice way of building up drum tracks step by
step. (Of course, when you play the RX instruments from an external keyboard via MIDI you
also get the added benefit of velocity on the
drums; the QX 1 records and plays back this
velocity information.) Here is our basic pro-.
cedure:
1. To start with, connect the DX/KX MIDI
OUT to the QX1 MIDI IN, and the QX1
MIDI THRU to the RX MIDI IN.
2. RECORD on TRACK 8. On this first pass,
we lay down the foundation-basically
KICK and SNARE, maybe a few HI HATs.
For playback, diisconnect the RX from the
QXl's MIDI THRU, and connecttheQXl's
MIDI OUT #8 to the RX MIDI IN . Then
PLAY and determine if any QUANTIZE is
needed to tighten up this "foundation" part.
3. Now to overdub. Since TRACK 8 is nice and
tight, why screw it up with bad overdubbing?
It is much safer to do overdubs on other
tracks, and then mix them all together when
you are sure. Unfortunately, you cannot hear
what you've done and play the RX at the
same time, as there is only one MIDI IN on
the RX. What you must do (short of having
two RX units) is to become familiar with
which notes on the DXIKX keyboard cor~
respond to which drum sounds. If you have
time, create sounds on your TX modules that
are close to the RX sounds. or at least have
similar envelopes. Then as you overdub on a
new track you can trigger the module and
hear something in the correct ballpark while
TRACK #8 is playing the basic track on the
RX . Withallofthiis in mind, try recording
the notes for a cowbell on track #7.
QX1 digital sequence
recorder.
4. To hear the results on the RX while still
maintaining separate tracks, simply assign
track 7 to Terminal #8 [] ob Command 03]
and both tracks will play the proper RX
voices.
5. Continue to build tracks, assigning each to
Terminal #8 for proper playback. Now each
individual track can be independently edited
and quantized until the final results are
achieved.
6. When the part is to your liking, simply
TRACK MIX all tracks down to track 8 and
the drums are done!
' ' 7E INVITE YOU TO CONTRIBUTE TO AFTER TOUCH. If you've
VV developed a novel use of one of the AFTERTOUCH products, write it up and
send it to us. Don't worry about your writing style-just get the information down.
If we decide to use your idea as a full article in AFTER TOUCH, we'll try it
ourselves, write it up in the magazine, put your name on it, and send you a check for
$100.00.
If you've got a hot tip on applications or use, send it along. If we use it, you'll
receive full editorial credit, plus a check for $25.00.
Do you have a great new DX7 patch, a CX5M program, or a great pattern for the
RXll? Send them in-we'll pay $25.00 for each one used.
By the way, we cannot assume liability for the safe return of unused ideas,
patches, or manuscripts. We will only be able to return unused material to you if
you enclose a self,addressed, stamped envelope with your material.
If you just have a question regarding the use of Yamaha professional products,
send it along too, and we'll do our best to answer it in the pages of AFTERTOUCH.
(We regret that we won't be able to answer questions through the mail, but we will
use all of your questions to guide us in our choice of future topics.)
Finally, if you just want to get something off your chest, or if you'd like to
establish direct contact with other X users, send something in to our letters column,
!!Touch Response." We'll do our best to print names and addresses of all those who
are interested in starting up regional users groups.
AFTERTOUCH is your publication. Let us hear from you!
Write To:
AFfER..
TOUCH,
P.O. Box
2338, North..
ridge, CA
91323 .. 2338.
Vol. 1 No. 3/AFTERTOUCH
19
AFTERTOUCH
Bulk Rate
U.S. Postage
P.O. Box 2338
Northridge, CA 91323-2338
PAID
Lang Prairie, MN
Permit No. 56
John Chowning
rich interaction. I think we worked out some
ways using the TX816 to create some very good
piano sounds. It's not a question of trying to
replicate exactly, but to produce a sound where
the feeling for the player and the listener both is
piano-like. And I think we succeeded.
TD: Did you find yourself using the full resources of the 8 I 6?
JC: Right. For example, the various modules
were assigned to different parts of the keyboard.
That is a nice way to get around the 16-voice
polyphonic limit in the OX series, because as
you know in typical piano music low tones
sustain for a long time but they're also played
less often. By assigning a small number of bass
notes to the first module, a few more to the
second, a few more to the third, etc., you build
up a system where there are beating effects,
which helps the pianolike-ness of the sound.
You can create a sonic form in which most of the
piano literature will work, at least, and some of
it quite well. The bass tones don't go away
prematurely.
TD: Is it easier to get bass piano tones because
there is only one string down there?
JC: I don't think so. The inherent richness
of the tones is so great that we don't hear it in
such a subtle way. I think that is probably the
biggest reason. It's easier to make the ear think
it's hearing a low piano sound. Even though
there is only one string, the complexity of vibration is probably greater than in the midrange.
TD: Is that because of the wrapping and the size
of the string?
JC: Yes. It's pretty mysterious. Piano's a
20
AFTERTOUCH/Vol. 1 No.3
ConUnuedfrmnpage4
hard instrument. The sound is so well known,
probably second only to the human voice.
TD: What is your feeling about the potential
use of the DX7 as a teaching tool, not only for FM
theory, but for things like acoustics?
JC: I think there is a great potential. Many
basic acoustic phenomena can be demonstrated
quite easily using the DX7. It could become an
incredibly powerful tool for learning acoustics
and psycho-acoustics at a very simple level.
Beating is one whole area. Using for instance
algorithm # 1, turn off all the operators except
the two carriers. Listen to 1, now listen to 2,
now detune 1 a little bit and hear beats; and if
you increase the amount of detuning, it stops
being amplitude modulation and becomes kind
of a rough sound.
Residual frequencies is another area. Most
people who work with synthesizers think that if
they hear a pitch, then there has to be energy
there. There's a nice experiment you can do
with algorithm #32 where you generate harmonics 1, 3, 4, 5, 6, and 7; maybe with output
levels that peak above the fundamental, so that
99 is at 6 or something. You listen to them all,
and you hear a pitch at whatever key you're
sounding. Now if you turn off operator 1
(which is supplying the 1st harmonic-the
fundamental), then there is no more energy
there, but if you sound the same key you still
hear that pitch. There is no energy at the pitch at
which one hears it. It has to do with the harmonics and the largest common denominator, I
guess. That can be very nicely explained using
algorithm #32.