1
&KIKVCN6GNGRJQPG
7UGTŎU)WKFG
%1064+$76145
9TKVVGPD[2COGNC#TCMK8KTIKPKC%$GGEJGTCPF%JCPPKPI*WIJGU
+NNWUVTCVGFD['RKE5VWFKQ
l8GTVKECN0GVYQTMU+PEŌ#NN4KIJVU4GUGTXGF
6JKUFQEWOGPVEQPVCKPURTQRTKGVCT[CPFEQPHKFGPVKCNKPHQTOCVKQPQH
8GTVKECN0GVYQTMU+PE6JGEQPVGPVUQHVJKUFQEWOGPVOC[PQVDG
FKUENQUGFVQVJKTFRCTVKGUEQRKGFQTFWRNKECVGFKPCP[HQTOKPYJQNG
QTKPRCTVYKVJQWVVJGRTKQTYTKVVGPRGTOKUUKQPQH8GTVKECN0GVYQTMU
+PE
4'564+%6'&4+)*65.')'0&
7UGFWRNKECVKQPQTFKUENQUWTGQHVJGVGEJPKECNFCVCEQPVCKPGFKPVJKU
FQEWOGPVKUUWDLGEVVQTGUVTKEVKQPUD[VJG)QXGTPOGPVCUUGVHQTVJKP
UWDFKXKUKQP
E
KKQHVJG4KIJVUKP6GEJPKECN&CVCCPF%QORWVGT
5QHVYCTGENCWUGCV&(#45CPFQTKPUKOKNCTQT
UWEEGUUQTENCWUGUKPVJG(#4QTKPVJG&1&QT0#5#(#4
5WRRNGOGPV7PRWDNKUJGFTKIJVUTGUGTXGFWPFGTVJG%QR[TKIJV.CYUQH
VJG7PKVGF5VCVGU%QPVTCEVQTOCPWHCEVWTGTKU8GTVKECN0GVYQTMU+PE
'CUV#TSWGU#XGPWG5WPP[XCNG%#
8GTVKECN0GVYQTMUVJG8GTVKECN0GVYQTMUNQIQ+PUVCPV1HHKEG
1HHKEG#VVGPFCPVCPF1HHKEG%QOOWPKECVQTCTGVTCFGOCTMUQH8GTVKECN
0GVYQTMU+PE#NNQVJGTVTCFGOCTMUWUGFJGTGKPCTGVJGRTQRGTV[QH
VJGKTTGURGEVKXGQYPGTU
%QPVGPVU
+PVTQFWEVKQP .KPG-G[U &KURNC[ +PUVCNNCVKQP %QPPGEVKPIVJGJCPFUGVEQTF %QPPGEVKPIVJGNKPGEQTF +PUVCNNKPIVJG*GCFUGV #FLWUVKPIVJGFKURNC[ 9CNN/QWPVKPI $CUKE1RGTCVKQP /CMKPICECNN #PUYGTKPICECNN 'PFKPICECNN 5YKVEJKPIDGVYGGPCEVKXGECNNU ,QKPKPICECNN $NQEMKPIECNNGT+&KPVGTPCNN[ 7UKPICWVJQTK\CVKQPEQFGU 6GNGRJQPG5GVVKPIU /QFKH[KPIVJGFKURNC[EQPVTCUV 5GVVKPIVJGTKPIOGNQF[CPFXQNWOG #FLWUVKPIVJGJCPFUGVCPFURGCMGTXQNWOG 6GNGRJQPG(GCVWTGU #WVQ&KCN %CNN2CTM %CNN2KEMWR %CNN4GEQTF %CNN4GVWTP %CNN9CKVKPI %CORQP
%CNNDCEM %GPVTGZ(NCUJ %QPHGTGPEG &KTGEV5VCVKQP5GNGEV$WU[.COR(KGNF &Q0QV&KUVWTD (NCUJ (QTYCTF *GCFUGV
80&&5CPF80&&5QPN[ *QNF KKK
%QPVGPVU
/GUUCIG9CKVKPI
0KIJV#PUYGT
2CIG 2TQITCO 4GFKCN 4GNGCUG 5KNGPV/QPKVQT 5RGCMGT/WVG 5[UVGO5RGGF&KCN 6TCPUHGT 6TCPUHGTVQ8QKEG/CKN
8QKEGECNN (GCVWTG%QFG3WKEM4GHGTGPEG 1WVUKFG.KPG5WRRQTVGF(GCVWTGU 1PKFNGQWVUKFGNKPGU
1PEQPPGEVGFECNNU %QORNKCPEG5VCVGOGPVU (GFGTCN%QOOWPKECVKQP%QOOKUUKQP 7PFGTYTKVGTŎU.CDQTCVQT[
+PFWUVT[%CPCFC KX
+PVTQFWEVKQP
Thank you for purchasing the Vertical Networks digital telephone, a
multifunctional digital telephone specifically designed for use with the Vertical
Networks InstantOffice system. This manual describes the features and
operation of the Vertical Networks digital telephones.
%&"'(
The VN08D telephone includes eight programmable feature keys and a
speaker for receiving pages and voice calls.
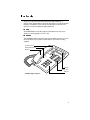
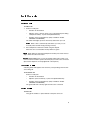
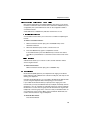
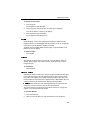
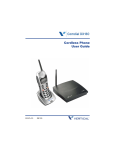
%&"'((
The VN08DDS telephone includes eight programmable feature keys, a 2x16
character display, and a speaker and microphone for hands-free calling
capability.
Plus/minus keys
Speaker/Microphone
Handset
Display
Feature keys
Dial pad
VN08DDS digital telephone
1
Introduction
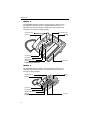
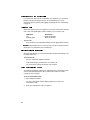
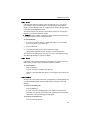
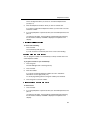
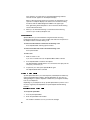
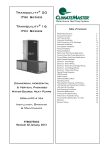
%&((
The VN12DDS telephone includes 4 fixed feature keys (Hold, Transfer,
Speaker/Mute, and Release) and 12 programmable feature keys, an
adjustable 2x24 character display, a headset jack, and a speaker and
microphone for hands-free calling capability.
Fixed feature keys
Display
Plus/minus keys
Handset
+
Re
le
–
4
2
C
I
5
JK
3
DE
F
L
RS
*
r
AB
GH
7
e
sfe
1
PQ
as
Ho
ld
Tra
n
8
TU
MN
O
V
0
6
9
WX
YZ
#
Arrow keys
Program key
Speaker/Microphone
Dial pad
VN12DDS digital telephone
Feature keys
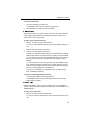
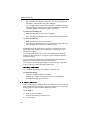
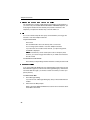
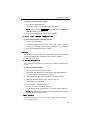
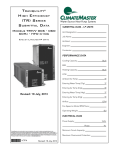
%&)((
The VN16DDS telephone includes 16 programmable feature keys, an
adjustable 2x24 character display, and a speaker and microphone for
hands-free calling capability.
Display
Plus/minus keys
Handset
Arrow keys
Program key
Speaker/Microphone
Dial pad
VN16DDS digital telephone
2
08007
Feature keys
Introduction
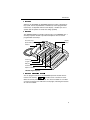
%&*((
Similar to the VN12DDS, the VN24DDS telephone includes 4 fixed feature
keys (Hold, Transfer, Speaker/Mute, and Release) and 24 programmable
feature keys, an adjustable 2x24 character display, a headset jack, and a
speaker and microphone for hands-free calling capability.
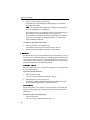
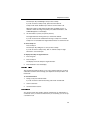
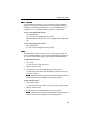
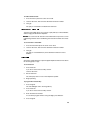
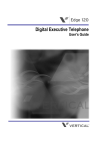
%&)*((
The VN64DDS telephone includes all the features of the VN16DDS, plus a
2x24-key expansion module to provide this telephone with a total of 64
programmable feature keys.
Plus/minus keys
Speaker/Microphone
Display
Shift key
Handset
Arrow keys
Program key
Dial pad
Feature keys
Expansion module
VN64DDS digital telephone
%&)*((+,-
You can program each key on the VN64DDS expansion module with two
features. The shift key,
, provides access to features 41 to 64.
When the shift key LED is off, features 17 to 40 are available for use. When
you press the shift key, the LED next to the key lights, indicating that features
41 to 64 are enabled.
3
Introduction
.KPG-G[U
All telephones have a primary line key. Your telephone might also include one
or more secondary line keys and outside line keys. Line keys are idle when
there is no LED lit beside them. Lines with a red LED are in use and you cannot
join the call. Lines with a green LED indicate calls connected to your
telephone. Lines with a flashing green LED indicate calls connected to other
telephones that allow you to join the call.
.$//
Your primary extension number is assigned to one of the programmable
feature keys on your telephone. Your extension number is printed on the label
strip next to your primary line key. If your telephone has a display, your
extension number appears on the display.
//
You might have one or more secondary lines assigned to your telephone.
These additional lines might be primary lines that appear on other telephones.
You can use these additional lines to make or receive telephone calls.
/
You might have one or more outside lines assigned to your telephone. These
lines allow you to make and receive external calls without entering an external
access code. See “Outside Line Supported Features,” on page 31 for
information about features available on these lines.
&KURNC[
The VN08DDS, VN12DDS, VN16DDS, VN24DDS, and VN64DDS telephones
provide a back-lit, two-line display to give you additional call information.
When you are not using your telephone, line one of the display shows the date
and time, and line two of the display shows your primary extension number.
While you are dialing, line one of the display shows your extension number
and line two displays the digits as they are dialed. During an active call on your
primary line, line one displays the other party’s name or the trunk group your
call is using, and line two lists the other party’s telephone number.
The display does not show caller ID information on an inbound call if that
information is blocked by the other party, or if your telephone service provider
does not send caller ID. The display shows “Private” or inbound trunk group
information instead. A call timer displays the length of time your call is
connected.
4
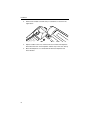
%QPPGEVKPIVJGJCPFUGVEQTF
Attach one end of the handset cord to the handset and the other end to the
handset jack in the telephone base. The handset jack is labeled with a picture
of the handset on most telephones.
%QPPGEVKPIVJGNKPGEQTF
%&"'(0%&"'((0%&)((
Attach one end of the line cord to the line jack (center) in the telephone base
and the other end of the line cord to the wall jack.
0QVGDo not plug a digital telephone into a wall jack configured for an analog
telephone.
5
Installation
%&((%&*((
Attach one end of the line cord to the jack labeled Line on the back of the
telephone base, and attach the other end to the wall jack.
%&)*((
Attach one end of the line cord to the left line jack on the expansion module
and the other end to the wall jack.
+PUVCNNKPIVJG*GCFUGV
You can attach a headset to the headset jack on the back of the VN12DDS and
VN24DDS telephones. A Headset feature key is required for operating the
headset. See “Headset (VN12DDS and VN24DDS only)” on page 22 for more
information.
6
#FLWUVKPIVJGFKURNC[
On the VN12DDS, VN16DDS, VN24DDS, and VN64DDS models, the back-lit,
two-line display tilts for optimal viewing. Adjust the display angle by lifting the
display from the back.
9CNN/QWPVKPI
You can mount the VN08, VN08DDS, VN16DDS, and VN64DDS telephones
to the wall using the mounting instructions and template folded into this
manual.
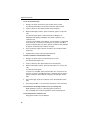
To mount the VN12DDS and VN24DDS telephones to the wall:
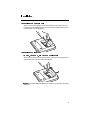
1.
Remove the support from the telephone base by sliding the support
toward you, as shown in the figure below.
2.
Rotate the support 180 degrees, so the narrow end lines up with the top
of the telephone base, and slide it back into place.
7
Installation
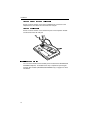
3.
Remove the handset catch with a key or screwdriver, as shown in the
figure below.
+
Re
lea
s
8
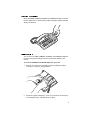
4.
Flip the handset catch over, and insert the short end into the telephone.
Note where the notch in the telephone and the stop on the catch line up.
5.
Mount the telephone on a standard North American telephone wall
mount bracket.
/CMKPICECNN
To make a call:
1.
Select an audio path.
•
Handset—lift the handset.
•
Speaker—press a line key, press a key on the dial pad (start dialing
a telephone number), or press the Speaker/Mute key.
•
Headset—press the Headset key. (Only available on models
VN12DDS and VN24DDS)
The amber LED lights up next to the line key selected for your call.
0QVGWhen a line is automatically selected for your call, you can
manually select another line by pressing a line key.
2.
Dial a telephone or extension number using the dial pad.
When the call is connected the line key LED turns green.
*KPVWhen dialing an international telephone number, press # after the last
digit to make the call connect faster.
0QVGModel VN08D users can use the speaker audio path to make a call,
but must use the handset to speak to the other party once the call is connected
(because the telephone is not equipped with a microphone).
#PUYGTKPICECNN
A flashing amber LED appears next to the key corresponding to the line with
an incoming call.
To answer the call:
Select an audio path.
•
Handset—lift the handset.
•
Speaker—press the line key, or press the Speaker/Mute key.
•
Headset—press the Headset key. (Only available on models
VN12DDS and VN24DDS)
The green LED next to the key lights and the call is connected.
'PFKPICECNN
To end a call:
Hang up the handset, or press Release to drop the active call.
9
5YKVEJKPIDGVYGGPCEVKXGECNNU
If you have more than one call connected to your telephone, you can switch
between calls by pressing the line keys associated with each call. For
information about connecting and toggling call waiting calls see “Call Waiting”
on page 15.
,QKPKPICECNN
When a line appearance on your telephone is in use by another party, the LED
next to the corresponding key indicates whether you can join that call.
LED State
red
flashing green
Permission
Break-in blocked
Break-in allowed
To join a call:
Press the line key corresponding with the call if the green LED is flashing.
0QVGSome outside lines can carry more than one call at one time. Break-in
permission is not allowed on those outside lines.
$NQEMKPIECNNGT+&KPVGTPCNN[
Blocking caller ID keeps your caller ID information private when making a call
to another extension.
To block caller ID:
Dial *67, and dial the telephone number.
Caller ID Blocking is canceled when you end the call.
You cannot block caller ID to external calls using *67.
7UKPICWVJQTK\CVKQPEQFGU
You might be assigned an authorization code that gives you the ability to make
calls on restricted telephone line keys. Authorization codes are used to
override access restrictions.
To use an authorization code:
1.
Dial a telephone number.
You hear a long beep, and the display prompts you to enter your
authorization code.
2.
10
Enter your authorization code, and press #.
Telephone Settings
/QFKH[KPIVJGFKURNC[EQPVTCUV
To modify the display contrast:
1.
Hold the minus (–) key and press 1.
You will hear a short ring.
2.
Press the + or – key to modify the display contrast.
3.
Press # to save the change, or press * to cancel the change.
5GVVKPIVJGTKPIOGNQF[CPFXQNWOG
To adjust the ring volume:
1.
Hold the minus (–) key and press 2.
You will hear a short ring.
2.
Press the + or – key to adjust the ring volume.
3.
Press # to save the change, or press * to cancel the change.
To set the ring melody:
1.
Hold the minus (–) key and press 3.
You will hear a short ring.
2.
Press the + or – key to select a ring melody.
3.
Press # to save the change, or press * to cancel the change.
#FLWUVKPIVJGJCPFUGVCPFURGCMGTXQNWOG
During a call it may be necessary to increase or decrease the volume.
To adjust the volume:
Press the + or – key while the other party is speaking.
This volume level will be retained for future calls.
0QVGOn models VN12DDS and VN24DDS the volume on your handset
has five levels, but only the first three levels are in the range of acceptable
volume levels approved by the FCC. The two highest levels are included
to accommodate the hearing impaired. If you increase the volume on your
handset to one of the highest two levels during a call, the volume will be
reset to the first level when you release the call, per FCC regulations.
11
Telephone Features
Your system administrator assigns the features described in this section to
feature keys on your telephone. Many of these features are also available by
pressing the star key (*) and a two-digit feature code. Refer to “Feature Code
Quick Reference” on page 30 for a list of feature codes.
#WVQ&KCN
Auto Dial allows you to dial frequently used telephone numbers with one
button. You can also use your Auto Dial keys to dial digits while a call is
connected.
To program an Auto Dial key:
1.
Press Program.
The red LED lights next to the Program key.
2.
Press Auto Dial.
3.
Enter the number.
If you are programming an external telephone number, enter the full
telephone number including the external access digit(s).
To cancel the program without saving the digits, press Release.
4.
Press Program to save the number.
To use Auto Dial:
Press Auto Dial.
%CNN2CTM
Use Call Park to put a call on hold for retrieval from any telephone on the
system. There are three types of Call Park: Self Park, Directed Park, and
System Park.
.
Self Park places a call in a parked state on your primary line for retrieval from
other telephones.
To park a call at your primary line:
1.
While on an active call, press Self Park.
If you do not have a Self Park key, press Flash and dial *54 to park a call.
2.
Listen for two short beeps, and hang up.
If you leave a call parked for a long period of time, your phone rings
back, and PARK is displayed.
12
Telephone Features
To retrieve a parked call:
1.
From any telephone press Self Park.
If the telephone does not have a Self Park key, dial *55.
2.
Dial the extension on which the call was parked.
(.
Directed Park allows you to park a call on another line. A specific extension
number might be programmed on your Directed Park key to allow you to
always park a call on a specific line.
To park a call at a specific extension:
1.
While on an active call, press Directed Park.
If you do not have a Directed Park key, press Flash and dial *56 to park a
call.
2.
Enter an extension number, if necessary.
3.
Listen for two short beeps, and hang up.
If the key is configured to display the status of the parked call, the green
LED will flash until the call is unparked. If the call does not get answered,
you can retrieve the call by pressing the Directed Park key. You can use
the key to park another call on another line even if the green LED is
flashing.
You can only park one call on any given line. Any other telephones that
have a Directed Park key targeted at the same line where the call was
parked, and are configured to show status, will flash red, indicating that
there is a call already parked on the target line.
If you leave a call parked for a long period of time, your phone rings
back, and PARK is displayed.
To retrieve a call directed parked on your line:
From the target telephone press Directed Park.
If the telephone does not have a Directed Park key, dial *55 and the
target extension number.
/$.
System Park places a call in one of ten parking slots on the InstantOffice
system for retrieval from other telephones. This feature is not available on the
VN08D telephone.
To park a call on the system:
1.
While on an active call, press System Park.
If you do not have a System Park key, press Flash and dial *52 to park a
call.
13
Telephone Features
2.
Listen for two short beeps, and hang up.
The display shows the parking slot number where the call is parked.
Remember this number!
*KPVPress Program, then System Park, to display the parking slot of
the last call parked from your telephone.
The number will remain on the display until the call is disconnected, you
place another call, or another call rings on your primary line.
The System Park red LED remains lit until the parked call is retrieved.
If you leave a call parked for a long period of time, your phone rings
back, and PARK is displayed.
To retrieve a call parked on the system:
1.
From any extension, press System Park.
If the telephone does not have a System Park key, dial *53.
2.
Dial the parking slot number on which the call was parked.
%CNN2KEMWR
Call Pickup allows you to answer inbound calls on other extensions. You can
pick up a call on any extension within your call pickup group. If the line key you
use to pick up a call is not part of a call pickup group you can pick up other
calls on lines that do not belong to a call pickup group. There are two types of
Call Pickup: Extension Pickup and Group Pickup.
+,.
Extension Pickup allows you to answer any ringing primary or secondary line
in your call pickup group.
To answer a specific extension:
1.
Press Extension Pickup.
If you do not have an Extension Pickup key, dial *75.
2.
Dial the extension number, if necessary.
An extension number might be programmed on the Extension Pickup
key to provide directed pickup for a specific extension.
1.
Group Pickup allows you to answer a call on any primary or secondary line
within your call pickup group. Pickup groups are configured by the system
administrator.
To answer a call in your pickup group:
Press Group Pickup.
If you do not have a Group Pickup key, dial *74.
14
Telephone Features
%CNN4GEQTF
Call Record records the currently active call and saves it as a .wav file to a
Voice Mailbox. The maximum length of a recording equals the maximum
length of a Voice Mail message, as configured in the General Settings applet
in the Remote Management Console.
This feature requires a license key, which will be issued at no charge upon
request to your Vertical Networks reseller.
9CTPKPI In many localities, it is illegal to record a telephone call without first
notifying the person or persons being recorded.
To use Call Record:
1.
If necessary, notify the person or people with whom you are speaking
that you are about to record the call.
2.
Press Call Record.
3.
To end the recording session, press Call Record again.
Using another telephone feature will end a call recording session.
You access the recording in the same way you access Voice Mail messages.
See “Message Waiting” on page 22 for details.
%CNN4GVWTP
Call Return calls back the last extension that rang on your primary line. Call
Return does not return calls from external telephone numbers.
To use Call Return:
Press Call Return.
If you do not have a Call Return key, dial *69.
There is a 3-second delay that allows you to hang up and cancel the call
return.
%CNN9CKVKPI
During a call on your primary extension, you might hear a call waiting beep and
see the Call Waiting amber LED flash indicating an incoming call on Call
Waiting.
To accept a call waiting call:
Press Call Waiting.
If you do not have a Call Waiting key, press Flash to answer the call.
The initial call is placed on temporary hold, and the primary line key red
LED flickers. The Call Waiting green LED lights.
To reconnect to the initial call:
Press your primary line key.
15
Telephone Features
The call waiting call is placed on temporary hold. The Call Waiting red
LED flickers, and the primary line green LED lights.
You can toggle back and forth between the initial call and the call waiting
call by pressing the primary line key and the Call Waiting key. The LEDs
and display update to reflect which caller is connected.
To release the call waiting call:
While the call waiting call is active, press Release.
The call waiting call is dropped and you are reconnected to the initial call.
To release the initial call:
While the initial call is active, press Release.
The initial call is dropped and you are reconnected to the call waiting call.
The call waiting call is rolled onto the primary line key.
Call Waiting will not be active during a transfer or conference, if both the
primary line and an appearance for another line are connected, or if the
primary line is ringing.
You can add a call waiting call to a call on your primary line by pressing
Conference. See “Conference” on page 17 for more information about the
Conference feature.
You can transfer a call waiting call to another extension. See “Transfer” on
page 27 for more information about the Transfer feature.
You can park a call waiting call for pickup on another extension. See “Call
Park” on page 12 for information about parking calls.
(23
You can disable Call Waiting for the duration of a specific call.
To disable Call Waiting:
Press *45, and dial the telephone number.
Call Waiting is disabled for the duration of the call. Call Waiting is
re-enabled when the call is terminated.
'
*+ ,
Camp-on (also known as Callback) allows your telephone to automatically call
back an extension that is busy, does not answer, or forwards you to Voice Mail.
Camp-on does not work on external telephone numbers.
To use Camp-on:
1.
Place a call to an extension.
The other party does not answer the call.
2.
16
Press Camp-on.
Telephone Features
The Camp-on key red LED lights and you hear a beep.
If you do not have a Camp-on key, press Flash and dial *76.
Camp-on will remain enabled if you make or answer another call.
When the Camp-on target extension becomes available you hear a
callback of three short rings, the primary line amber LED flashes, and
CAMP-ON appears on the display.
3.
Lift the handset, or press your primary line key.
The target extension will ring when you answer the callback.
If you do not answer the callback in three rings, Camp-on is canceled.
Camp-on is not canceled if the target extension does not answer the call.
To cancel Camp-on:
Press Camp-on.
The Camp-on key LED goes out, and you hear a beep.
If you do not have a Camp-on key, dial *77 and the Camp-on target
extension to cancel Camp-on.
To display the Camp-on target extension:
1.
Press Program.
2.
Press Camp-on.
The display shows the Camp-on target extension.
3.
Press Release to clear the display.
-.
The Centrex Flash feature allows you to access Centrex features. You must
subscribe to Centrex service through your telephone service provider to use
this feature.
To use Centrex Flash:
1.
During a call, press Centrex Flash.
If you do not have a Centrex Flash key, press Flash and dial *80.
2.
Listen for dial tone.
3.
Use the Centrex features.
&
You and up to three other parties, internal and external, can participate in a
conference call. If you have a Conference key or a Flash key, you can set up
a conference call.
17
Telephone Features
To use the Conference key:
1.
During a call, press Conference to put the other party on hold.
Your line key LED flashes red, and the Conference LED is yellow.
2.
Listen for dial tone, then dial the number of the third party.
3.
When the third party answers, press Conference again to connect the
calls.
Your line key LED is green, and the Conference LED goes out.
Telephones with displays will display the number of parties in your
conference call.
If a party is not available, press Release, or press the key corresponding
to the initial call, to reconnect to the first party. If a party’s Voice Mail
answers or the party does not want to join the conference, press Release
to drop the call and reconnect with the first party.
4.
Press Conference again to put the conference call on hold and add a
fourth party.
5.
Complete the conference by pressing Conference.
To make a conference call with feature codes:
1.
During a call, press Flash to put the other party on hold.
Your line key LED flashes red.
2.
Listen for dial tone, then dial the extension of the third party.
3.
When the third party answers, press Flash and dial *71 to connect the
calls.
Your line key LED is green.
If a party is not available, press Flash and dial *72 to reconnect to the
first party. If a party’s Voice Mail answers, or the party does not want to
join the conference, press Release to drop the call and rejoin the first
party.
4.
Press Flash again to put the conference call on hold and add a fourth
party.
5.
Press Flash and Dial *71 to connect the fourth party to the conference.
To conference a call waiting call with a call on your primary line:
While speaking to a party on call waiting, press Conference.
The call waiting call is conferenced with the call on the primary line.
To disconnect from a conference call:
Hang up the handset, or press Release.
18
Telephone Features
/#'
.
Direct Station Select/Busy Lamp Field (DSS/BLF) keys allow you to monitor
the status of extensions and to transfer calls to extensions. DSS/BLF keys are
configured by the system administrator and can be configured for blind or
consultation transfer.
A red LED next to a DSS/BLF key indicates that the line is in use.
A consultation transfer allows you to announce a call before completing the
transfer.
To make a consultation transfer:
1.
While connected to another party, press the DSS/BLF key for the
destination extension.
2.
When the destination party answers, announce the call.
3.
Press the DSS/BLF key again to complete the transfer.
If Voice Mail answers, press the DSS/BLF key to transfer the caller to
Voice Mail, or press Release to cancel the transfer and reconnect to the
call.
A blind transfer allows you to transfer a call to another extension without
announcing the transfer.
To make a blind transfer:
While connected to another party, press a DSS/BLF key.
0
Do Not Disturb (DND) prevents your telephone from ringing. It also blocks
pages and voice calls. Callbacks from calls left on hold, park, and camp-on will
still ring your telephone.
Using the Do Not Disturb key, you can enable or disable Do Not Disturb while
you are using the telephone without interrupting your conversation.
If you enable Do Not Disturb while your primary line is ringing, the call is
transferred to your busy forward destination (for example, Voice Mail), with two
exceptions. If you are a member of a Ring-All hunt group, and you enable Do
Not Disturb for a call to the hunt group, the call will continue to ring the other
telephones in the hunt group. Also, if there is no busy-forward destination for
your primary line (such as Voice Mail), and you enable Do Not Disturb, the
current call will continue to ring your telephone.
To enable Do Not Disturb:
Press Do Not Disturb.
19
Telephone Features
The Do Not Disturb red LED lights, and DND is displayed on telephones
with displays.
If you do not have a Do Not Disturb key, dial *41.
To cancel Do Not Disturb:
Press Do Not Disturb.
The Do Not Disturb LED goes out.
If you do not have a Do Not Disturb key, dial *42.
.
If you do not have feature keys for Call Park, Call Waiting, Centrex Flash,
Conference, or Transfer, a Flash key is required to use these features. The
Call Park, Centrex Flash, and Conference features require you to enter a
feature code after pressing Flash. A feature code reference is available on
page 30.
The flash hook does not have the same effect as the Flash key.
Pressing the flash hook will disconnect your active call.
.
Use Forward to redirect your calls to another extension or telephone number.
The Forward key applies only to calls received on your primary line. You can
activate only one Forward key on your telephone at any given time.
The Forward feature will behave differently depending on whether or not your
Forward key is programmed with a target telephone number.
44$$56/
To forward calls to internal extensions:
1.
Press Forward.
Listen for dial tone.
2.
Enter the extension number to which you want to forward calls.
The Forward key red LED flashes indicating that Forward is enabled, and
FWD is displayed on telephones with displays.
If you do not have a Forward key, dial *43 plus the extension number to
which you want to forward calls.
To forward calls to external telephone numbers:
1.
Press Forward
If you do not have a Forward key, dial *43.
Listen for dial tone.
2.
20
Enter the external access digit(s).
Telephone Features
This is the digit that allows you access to an external telephone line
(usually a 9).
3.
Enter the telephone number to which you want to forward calls.
If you enter an international telephone number, you must enter a # at the
end of the number.
4.
If you are prompted for a password, enter your Voice Mail password, and
press #.
You will hear two beeps, the Forward key red LED will flash (indicating
that Forward is enabled), and FWD is displayed on telephones with
displays.
5
To cancel call forwarding:
Press Forward.
The Forward key LED goes off.
If you do not have a Forward key, dial *44 to cancel call forwarding.
.$$56/
You can program a number on a Forward key to always forward calls to the
same telephone number.
To program a number on your Forward key:
1.
Press Program.
The red LED lights next to the Program key.
2.
Press Forward.
3.
Enter the number.
If you enter an external telephone number, be sure to include the
external line access digit (usually a 9).
To cancel programming without saving the number, press Release.
4.
Press Program to save the number.
4.$$56/
To forward calls:
1.
Press Forward.
2.
If you are prompted for a password, enter your Voice Mail password, and
press #.
You will hear two beeps, the Forward key red LED will flash (indicating
that Forward is enabled), and FWD is displayed on telephones with
displays.
21
Telephone Features
+10231034,
The Headset key is used to toggle between the headset and the handset. If
you want to use your headset with the VN12DDS or VN24DDS telephone, you
must plug the headset into the headset jack (located on the back of the
telephone), and press the Headset key so that the LED is on.
Put a call on hold to keep the other party connected while you hang up the
handset or use other telephone features.
To put a call on hold:
Press Hold.
The red LED flashes next to the line key with a call on hold.
You can hang up the handset or use other telephone features.
If you leave the call on hold for three minutes, your phone rings back,
and HELD is displayed.
The Flash key can be used to place calls on temporary hold;
however, you cannot hang up the handset or you will be reconnected to
the call on hold.
To reconnect to a call on hold:
Press the key corresponding to the line where the call was placed on hold.
If you have a Message Waiting key, the red LED flashes when there are new
Voice Mail messages. If you do not have a Message Waiting key, and there are
new Voice Mail messages, you will hear a stutter tone when you select your
primary line key.
To retrieve Voice Mail:
1.
Press Message Waiting.
If you do not have a Message Waiting key, dial your Voice Mail extension
number.
2.
Follow the Voice Mail prompts.
Refer to the Voice Mail Quick Reference Card for more information about
InstantOffice Voice Mail.
22
Telephone Features
0
Using the Night Answer feature, you can manually place an InstantOffice
system into a mode where all inbound calls to the InstantOffice system are
redirected to a predetermined destination. Your system administrator can
configure any on- or off-premise telephone number as the destination.
To turn on the Night Answer Service:
Press Night Answer.
If you do not have a Night Answer key, dial *85.
When the Night Answer Service is active, the Night Service LED flashes
red.
To turn off the Night Answer Service:
Press Night Answer.
If you do not have a Night Answer key, dial *86.
(
The Page feature can operate in one of two ways: the Page key gives you
access to the public address system and all the digital telephone speakers on
your system, or the Page key pages a specific group of digital telephones.
To page the whole system:
1.
Press Page.
If you do not have a Page key, dial *11.
2.
Make an announcement.
3.
Hang up when you are finished making your announcement.
You will remain connected to the public address system until you hang
up or press Release.
Telephones receiving a page on the telephone speaker can press
Release to disconnect the telephone from the paging service.
To page a specific group:
1.
Press Page <Group>.
If you do not have a Page <Group> key, dial *12 and the group number.
2.
Make an announcement.
3.
Hang up when you are finished making your announcement.
Telephones receiving a page on the telephone speaker can press
Release to disconnect the telephone from the paging service.
23
Telephone Features
('
You can program your Auto Dial, Forward, and Voicecall keys to dial specific
digits.
You must have a Program key, or the
key, on your telephone to
program feature keys. See each feature section for instructions about
programming feature keys.
If your telephone has a display, you can use Program to display information
about the feature keys, or to display call information for active or ringing calls
on secondary line appearances.
To program a feature key:
1.
Press Program.
The Program key red LED lights.
2.
Press the key you wish to program.
3.
Enter the digits.
You can also enter the * and # keys in the program.
To cancel the program without saving the digits, press Release.
4.
Press Program to save the digits.
The Program key LED goes out.
To clear a programmed feature key:
1.
Press Program.
The Program key red LED lights.
2.
Press the key to be cleared.
3.
Press Program to clear the key.
The Program key LED goes out.
To display feature information:
1.
Press Program.
The Program key red LED lights.
2.
Press a feature or line key.
The feature key information is shown on the display including the feature
name, key number, and extension number, target number, or
programmed number if applicable.
3.
Press Release to clear the display.
The Program key red LED goes out.
24
Telephone Features
To display call information:
1.
Press Program.
The Program key red LED lights.
2.
Press a key that corresponds with an active call or ringing line.
The call information is shown on the display.
3.
Press Release to clear the display.
The Program key red LED goes out.
)
Redial will place a call to the last telephone number you dialed from the
telephone. Even if you dialed digits while connected to a call, the system will
only keep track of the telephone number you dialed.
To display the last number dialed, press Program, and press Redial. Press
Release to clear the display.
To redial a number:
Press Redial.
)
The Release key disconnects an active call, clears the display, mutes the
speaker during a page, and cancels transfers, conference calls, and the
Program feature.
To use Release:
Press Release.
Silent Monitor allows a supervisor to monitor an agent call with either the agent
or the caller knowing that the call is being monitored. The supervisor hears
both sides of the call but cannot speak to either the agent or the caller. This
feature requires that the supervisor’s telephone have a Silent Monitor key and
that the extension to be monitored has Silent Monitoring enabled.
Most states have laws requiring businesses to inform both their
employees and their customers that calls may be monitored.
This feature requires a license key, which will be issued at no charge upon
request to your Vertical Networks reseller.
To use Silent Monitor:
1.
Press Silent Monitor.
2.
When you hear the dial tone, enter the extension to be monitored.
25
If the extension you enter does not have Silent Monitoring enabled,
“Feature Unavail” appears on the telephone display.
When a silent monitoring session is in progress, the information on the
supervisor’s telephone display is the same as that of extension being
monitored, with the added designation “MON” in the upper right.
If the agent being monitored places a call on hard hold, the monitoring
session will be terminated.
3.
When you are finished monitoring a call, terminate the monitoring
session as you would any telephone call.
/
Speaker/Mute lets you switch between using the handset and using
hands-free mode during a call. It also enables and mutes the microphone on
the telephone base or handset during a call.
To switch from the handset to hands-free mode during a call:
Press Speaker/Mute and hang up the handset.
To switch from hands-free mode to the handset during a call:
Pick up the handset.
To mute a call:
1.
Make or answer a call.
If you are on a hands-free call, the Speaker/Mute LED is solid red.
2.
Press Speaker/Mute to mute the microphone.
The Speaker/Mute red LED flashes. You can hear the other party, but the
other party cannot hear you.
3.
To speak to your caller, press Speaker/Mute again.
The Speaker/Mute LED is solid red.
'
System Speed Dial allows you to dial frequently used telephone numbers by
entering speed dial index numbers. System Speed Dial can also give you
dialing privileges for specific telephone numbers that you might not normally
have on your telephone.
Depending on your telephone set-up, System Speed Dial may work in one of
two ways: regular System Speed Dial or System Speed Dial with Dialing
Preview.
/$(
To use System Speed Dial:
1.
Press System Speed Dial.
2.
Enter the speed dial index number.
The number is dialed as soon as you enter the last digit.
26
Telephone Features
To browse System Speed Dial numbers:
1.
Press System Speed Dial twice.
2.
Use the arrow keys on your telephone to browse the list.
The arrow keys
only appear on the VN16DDS and
VN64DDS telephone models.
3.
Press System Speed Dial to dial a number in the list.
/$(5(.75
To use System Speed Dial with Dialing Preview:
1.
Press System Speed Dial.
2.
Enter the full speed dial index number, enter a digit to jump to a place in
the list, or scroll through the list using the arrow keys on your telephone.
3.
Press System Speed Dial to dial a number.
5&
Transfer places a call on hold while you dial the destination extension number.
Your system administrator configures the Transfer keys as blind or
consultation transfer keys.
A consultation transfer allows you to announce a call before completing the
transfer.
To make a consultation transfer:
1.
Press Transfer to place the caller on hold.
The line key red LED flashes, and the Transfer key amber LED lights.
If you do not have a Transfer key, press Flash.
2.
Listen for dial tone, then enter the destination extension number.
3.
When the destination party answers, announce the call.
The Transfer green LED lights.
4.
Press Transfer to complete the transfer.
If you do not have a Transfer key, hang up.
To cancel the Transfer, press Release to reconnect to the calling party.
A Transfer can become a Conference by pressing the Conference
key after the second party answers.
A blind transfer allows you to transfer a call to another extension without
announcing the transfer.
27
To make a blind transfer:
1.
Press Transfer to place the active call on hold.
2.
Listen for dial tone, then enter the destination extension number.
3.
Hang up.
The party is transferred to the destination extension.
5&1
Transfer to Voice Mail allows you to transfer a party directly to a Voice Mailbox,
without ringing the destination telephone.
You cannot use the Transfer to Voice Mail feature if you have a call on
Call Waiting. End the call on Call Waiting, then transfer the initial call to Voice
Mail.
To use Transfer to Voice Mail:
1.
Press Transfer VM to place the active call on hold.
2.
Listen for dial tone, then enter the destination extension number.
3.
Hang up.
The party is transferred directly to the destination extension’s Voice
Mailbox.
1
Voicecall is a page directed to a specific digital telephone extension that allows
the receiving party to reply.
To use Voicecall:
1.
Press Voicecall.
If you do not have a Voicecall key, dial *82.
Listen for dial tone.
2.
Dial an extension.
The other party hears a tone on the telephone speaker.
3.
Begin speaking.
To program the Voicecall key:
1.
Press Program.
The red LED lights next to the Program key.
2.
Press Voicecall.
If you do not have a Voicecall key, dial *82.
3.
Enter the extension number.
To cancel the program without saving the digits, press Release.
4.
Press Program.
28
7%
Your telephone may be configured for one-way (auto mute) or two-way voice
communication. If your telephone is two-way, your speaker is automatically
enabled during a voice call, and you can speak back to the other party through
the speaker without pressing any keys.
If your telephone is configured for one-way communication, the Speaker/Mute
red LED flashes during a voice call, and you can lift the handset or press the
Speaker/Mute key to speak to the calling party.
29
Call Park
Directed . . Flash + *56 + ext.
Retrieval . . . . .*55 + ext.
Conference . . . . . . . . Flash + *71
Connect Party . . . . . . . . . *71
Reconnect to Conference *72
Self . . . . . . . . . . . Flash + *54
Retrieval . . . . .*55 + ext.
System . . . . . . . . Flash + *52
Retrieval . . . . . *53 + slot
Call Pickup
In Group . . . . . . . . . . . . . .*74
Do Not Disturb . . . . . . . . . . . *41
Cancel . . . . . . . . . . . . . . . *42
Forward . . . . . . . . . . . *43 + dest.
Cancel . . . . . . . . . . . . . . . *44
Hold . . . . . . . . . . . . . . . . . . Flash
Specific Ext. . . . . . .*75 + ext.
Night Answer
Call Return . . . . . . . . . . . . . . .*69
Activate . . . . . . . . . . . . . . *85
Call Waiting . . . . . . . . . . . . Flash
Deactivate . . . . . . . . . . . . *86
Disable . . . . . . . . . . . . . . .*45
Page . . . . . . . . . . . . . . . . . . . . *11
Caller ID Blocking . . . . . . . . .*67
Page Group . . . *12 + group num.
Camp-on (Callback) . . . . . . . .*76
System Speed Dial . . *89 + code
Cancel . . . . . . . . . .*77 + ext.
Centrex . . . . . Flash + *80 + code
Toggle . . . . . . . . . . . . . . . . . . *73
Transfer . . . . . . . . . . Flash + ext.
Voicecall . . . . . . . . . . . *82 + ext.
30
6
When an outside line is idle, the following features are supported on outside
line keys:
•
Do Not Disturb
•
Flash (to restart dialing)
•
Program/Display (to display call information)
•
Release
•
Speaker/Mute
No other features are supported on idle outside line keys. Star codes are
ignored while dialing on an outside line.
6
When you are connected to a call on an outside line, you can use the following
telephone keys:
•
Primary, secondary, and other outside line keys (press to toggle between
calls)
•
Keypad digits, Auto dial, Redial, Message Waiting (sends digits)
•
Transfer, DSS/BLF Transfer, Conference
31
.''''
The following statements are provided in accordance with the Federal
Communications Commission (FCC) regulations. Please read these
statements carefully before installing your telephone.
.
This device complies with part 15 of the FCC Rules. Operation is subject to the
following two conditions: (1) This device may not cause harmful interference,
and (2) this device must accept any interference received, including
interference that may cause undesired operation.
Changes or modifications not expressly approved by Vertical Networks, Inc.
could void your authority to operate the equipment.
NOTE: This equipment has been tested and found to comply with the limits for
a Class A digital device, pursuant to part 15 of the FCC Rules. These limits are
designed to provide reasonable protection against harmful interference when
the equipment is operated in a commercial environment. This equipment
generates, uses, and can radiate radio frequency energy and, if not installed
and used in accordance with the instruction manual, may cause harmful
interference to radio communications. Operation of this equipment in a
residential area is likely to cause harmful interference in which case the user
will be required to correct the interference at his own expense.
.)'
This equipment complies with Part 68 of the FCC rules including Hearing Aid
Compatibility (HAC). Located on the telephone is a label that contains, among
other information, the FCC registration number.
$7 This equipment complies with UL 1950 for the US (UL) and Canada (CUL).
To reduce the risk of fire: use 26 AWG line cords that have been evaluated as
Communication Circuit Accessories, UL 1863, for all telephone connections.
This statement applies to all cards and modules that connect to telephones or
the Public Switched Telephone Network (PSTN).
32
Compliance Statements
This equipment complies with Industry Canada CS-03.
The Industry Canada label identifies certified equipment. This certification
means that the equipment meets certain telecommunications network
protective, operational, and safety requirements as prescribed in the
appropriate Terminal Equipment Technical Requirements document(s). The
Department does not guarantee the equipment will operate to the user’s
satisfaction.
Before installing this equipment, users should ensure that it is permissible to
be connected to the facilities of the local telecommunications company. The
equipment must also be installed using an acceptable method of connection.
The customer should be aware that compliance with the above conditions may
not prevent degradation of service in some situations.
Repairs to certified equipment should be coordinated by a representative
designated by the supplier. Any repairs or alterations made by the user to this
equipment, or equipment malfunctions, may give the telecommunications
company cause to request the user to disconnect the equipment.
Users should ensure for their own protection that the electrical ground
connections of the power utility, telephone lines, and internal metallic water
pipe system, if present, are connected together. This precaution may be
particularly important in rural areas.
Users should not attempt to make such connections themselves,
but should contact the appropriate electric inspection authority, or electrician,
as appropriate.
The standard connecting arrangement (telephone jack type) for this
equipment is RJ-11.
33