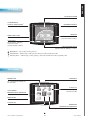
1
INTERNET TELEPHONE PERSONALISED INFORMATION ONSCREEN H^da2^aS[Tbb6PcTfPhc^8]cTa]TcCT[T_W^]hP]S?Tab^]P[XbTS8]U^a\PcX^] User Manual P/N 95103107 version 3.1 en glish CONTENTS WELCOME............................................................................................................................................. 6 ■ About this User Manual............................................................................................................. 6 at a glance........................................................................................................................................ 7 ■ ■ Handset – Front View................................................................................................................. 7 ■ Handset – Side View................................................................................................................... 8 ■ Handset Charger – Front View.................................................................................................. 9 ■ Handset Charger – Rear View................................................................................................... 9 ■ Idle Mode..................................................................................................................................... 10 ■ Main Menu.................................................................................................................................. 10 ■ Gateway – Rear View................................................................................................................. 11 ■ Gateway – Front View................................................................................................................ 11 INSTALLING THE DUALPHONE....................................................................................................... 12 ■ Prerequisites................................................................................................................................ 12 ■ Installing the Gateway and Registering the Handset.............................................................. 13 How to install the Gateway............................................................................................................13 How to install and register the handset. ......................................................................................... 14 GETTING STARTED.............................................................................................................................16 ■ Using the Menus and Typing Text and Numbers..................................................................... 16 How to enter the Main Menu.......................................................................................................... 16 Typing text and numbers.................................................................................................................16 How to insert a symbol................................................................................................................... 16 How to change the Text Format...................................................................................................... 16 How to Lock and Unlock the Keypad. ............................................................................................16 ■ Configuring the DUALphone..................................................................................................... 17 How to configure the dualphone online....................................................................................... 17 How to configure the DUALphone using the handset...................................................................... 17 How to configure the dualphone using the internal webserver..................................................... 18 How to change the pin code........................................................................................................... 18 How to change access code............................................................................................................ 18 ■ Specifying Basic Settings............................................................................................................ 19 How to specify the handset language.............................................................................................. 19 How to specify a country selection. ................................................................................................ 19 How to change the time zone.......................................................................................................... 20 How to change emergency line settings..........................................................................................20 How to specify the primary line for outgoing calls. ........................................................................ 20 How to specify call groups............................................................................................................. 20 ■ l a n cordless dualphone contents MAKING AND ANSWERING CALLS................................................................................................22 ■ Internet Calls............................................................................................................................... 22 How to make an internet call. ........................................................................................................ 22 How to end a call........................................................................................................................... 22 How to make an internet call using contacts. ................................................................................. 22 How to make an internet call using the call log.............................................................................. 22 How to make an internet call using redial...................................................................................... 22 How to make an internet call using speed dials.............................................................................. 22 How to make an emergency call..................................................................................................... 23 ■ Landline Calls.............................................................................................................................. 23 How to make a landline call...........................................................................................................23 How to make a landline call using contacts....................................................................................23 How to make a landline call using the call log............................................................................... 23 How to make a landline call using redial. ...................................................................................... 24 How to make a landline call using speed dials. .............................................................................. 24 ■ Answering Calls.......................................................................................................................... 24 How to answer a call. ....................................................................................................................24 Caller ID. ...................................................................................................................................... 24 CALL LOG ............................................................................................................................................. 25 How to view numbers in the call log. ............................................................................................. 25 How to change shared/private call log mode.................................................................................. 25 DURING CALLS.................................................................................................................................... 26 How to place a call on hold. ..........................................................................................................26 How to retrieve a call from hold.....................................................................................................26 How to adjust the handset volume.................................................................................................. 26 How to use the speakerphone......................................................................................................... 26 How to transfer a call. ................................................................................................................... 26 How to mute a call.........................................................................................................................26 ■ Call Waiting................................................................................................................................. 26 How to answer an internet call during an ongoing landline call.....................................................27 How to answer a landline call during an ongoing internet call....................................................... 27 How to answer a landline call during an ongoing landline call......................................................27 How to answer an internal call during an ongoing internet or landline call................................... 27 HANDLING CONTACTS...................................................................................................................... 28 Common/Private contacts............................................................................................................... 28 How to add a contact..................................................................................................................... 28 How to delete a contact.................................................................................................................. 28 How to find a contact..................................................................................................................... 28 How to edit a contact..................................................................................................................... 28 How to change the ringer tone for a contact. .................................................................................28 How to change the default number for a contact. ...........................................................................29 How to specify a speed dial number for a contact. ......................................................................... 29 How to add a call log number to contacts. .....................................................................................29 ■ l a n cordless dualphone contents en glish ■ Updating the Firmware...................................................................................................................... 21 How to update the firmware........................................................................................................... 21 How to add a call log number to an existing contact......................................................................29 How to create a group.................................................................................................................... 29 How to edit a group. ...................................................................................................................... 30 How to add a contact to a group....................................................................................................30 How to delete a group.................................................................................................................... 30 How to remove a contact from a group........................................................................................... 30 How to change a ringer tone for a group. ...................................................................................... 30 How to change shared/private contact list mode............................................................................. 30 RECEIVING MESSAGES..................................................................................................................... 31 ■ Using Voice Mail.......................................................................................................................... 31 How to view message status...........................................................................................................31 How to listen to messages. ............................................................................................................. 31 USING ON-SCREEN INFORMATION SERVICES..........................................................................32 How to view on-screen information services................................................................................... 32 How to view the most recently updated on-screen information services. ......................................... 32 How to use input fields................................................................................................................... 32 DUALPHONE.NET................................................................................................................................33 USING intercom............................................................................................................................... 34 How to register an additional handset with the gateway................................................................. 34 How to deregister a handset with the gateway................................................................................ 34 How to view all handsets registered with the gateway. ................................................................... 34 How to give your handset a name................................................................................................... 34 How to call another handset...........................................................................................................35 How to call all handsets ................................................................................................................ 35 How to transfer a call to another handset. ..................................................................................... 35 Using Least Cost Routing (LCR).................................................................................................... 35 How to configure Least Cost Routing (LCR)................................................................................... 35 Bridging......................................................................................................................................... 35 How to configure bridging. ............................................................................................................35 MAKING CONFERENCE CALLS....................................................................................................... 36 How to make a conference call with one external party and two internal parties............................ 36 How to make a conference call with two external parties. .............................................................. 36 How to join a call. ......................................................................................................................... 37 SPECIFYING SETTINGS..................................................................................................................... 38 ■ Audio Settings.............................................................................................................................. 38 How to change the ringer melody................................................................................................... 38 How to change the ringer volume................................................................................................... 38 How to change the message tone....................................................................................................38 How to change the keypad sound. .................................................................................................. 38 How to use advisory tones.............................................................................................................. 39 How to activate silent mode. .......................................................................................................... 39 ■ Telephony Settings...................................................................................................................... 39 How to activate call forwarding..................................................................................................... 39 ■ l a n cordless dualphone contents en glish How to deactivate call forwarding.................................................................................................. 40 How to specify a landline voicemail number. .................................................................................40 How to specify a VoIP voicemail number........................................................................................ 40 How to set auto answer.................................................................................................................. 40 How to set any key answer............................................................................................................. 40 How to set landline dial mode........................................................................................................ 40 How to configure Least Cost Routing (LCR)................................................................................... 40 How to specify an emergency line. .................................................................................................40 How to specify the primary line for outgoing calls............................................................................. 41 How to specify a voip line for outgoing calls.................................................................................. 41 Information Push Settings.......................................................................................................... 41 How to set auto show on-screen information services.....................................................................41 System Settings............................................................................................................................ 42 How to disable automatic time setting............................................................................................ 42 How to change the time format....................................................................................................... 42 How to set time manually............................................................................................................... 42 How to set the date manually. ........................................................................................................ 42 How to change the date format....................................................................................................... 42 How to change the time zone.......................................................................................................... 42 How to enable or disable daylight saving time. .............................................................................. 42 How to set handset language.......................................................................................................... 43 How to change the display contrast................................................................................................ 43 How to update the firmware........................................................................................................... 43 How to revert to an older firmware version....................................................................................43 How to find out which firmware version is currently installed. ....................................................... 44 How to restore configuration settings............................................................................................. 44 How to specify a country................................................................................................................ 44 VoIP Settings................................................................................................................................44 How to access the voip settings...................................................................................................... 44 Internet Settings.......................................................................................................................... 45 How to change nat configuration. .................................................................................................. 46 How to change the ip mode............................................................................................................ 46 How to disable stun........................................................................................................................ 47 How to change the stun keep alive interval..................................................................................... 47 How to enable dns-srv................................................................................................................ 47 TROUBLESHOOTING..........................................................................................................................48 ■ l a n cordless dualphone contents en glish ■ ■ ■ ■ aBOUTTHISUSERMaNUaL This.user.manual.consists.of.a.number.of.sections.to.guide.you.through.the.process.of.installing,.configurin.g,. and.setting.up.your.phone.for.first.use..These.sections.are.best.read.from.beginning.to.end..The.remainin.g. sections.of.this.user.manual.serve.as.a.reference.guide.for.all.the.features.of.the.DUALphone.. In.this.manual.we.have.used.the.following.abbreviations: DHCP.–.Dynamic.Host.Configuration.Protocol IP. –.Internet.Protocol LAN. –.Local-Area.Network NAT. –.Network.Address.Translation SIP. –.Session.Initiation.Protocol STUN.–.Simple.Traversal.of.UDP.through.NAT URL. –.Uniform.Resource.Locator WAN. –.Wide-Area.Network For.more.information,.see.the.glossary.on.our.website..On.the.website.you.can.also.find.additional.informati.on. about.the.DUALphone.such.as.troubleshooting,.frequently.asked.questions.and.support.contact.information. www.dualphone.net Have.your.serial.number.and.MAC.address.ready.when.contacting.support..You.fi.nd.the.numbers.on.the.bottom.of.the.gateway..For.inquiries.concerning. telephony.services,.contact.your.Internet.Telephony.Service.Provider..For.inquiries.concerning.your.broadband.connection,.contact.your.Internet.Servic.e. Provider.(ISP),.and.for.inquiries.concerning.on-screen.information.services,.contact.your.information.services.provider. For.the.EU:.The.telephone’s.conformity.with.EU.directives.is.confi.rmed.by.the.CE.symbol..We.hereby.declare.that.the.LAN.Cordless.DUALphone.and/or. LAN.Cordless.DUALhandset.are.in.compliance.with.the.essential.requirements.and.other.relevant.provisions.of.Directive.1999/5/EC.. For.the.US:.This.equipment.complies.with.Part.15.of.the.FCC.rules.and.Part.68.of.the.FCC.rules,.and.the.requirements.adopted.by.the.Administrative. Council.for.Terminal.Attachments.(ACTA).Located.on.the.equipment.is.a.label.that.contains,.among.other.information,.the.FCC.registration.number,.and. the.ringer.equivalence.number.(REN)..If.requested,.this.information.must.be.provided.to.the.telephone.company. The.REN.is.used.to.determine.the.number.of.devices.which.may.be.connected.to.the.telephone.line..Excessive.RENs.on.the.telephone.line.may.result.in. devices.not.ringing.in.response.to.an.incoming.call..In.most,.but.not.all.areas,.the.sum.of.the.RENs.should.not.exceed.fi.ve.(5.0)..To.ascertain.the.number. of.devices.that.may.be.connected.to.the.line,.as.determined.by.the.total.RENs,.contact.the.telephone.company.to.determine.the.maximum.REN.for.the. calling.area. This.equipment.cannot.be.used.on.the.telephone.company-provided.coin.service..Connection.to.Party.Line.Service.is.subject.to.State.Tariffs. If.this.equipment.causes.harm.to.the.telephone.network,.the.telephone.company.will.notify.you.in.advance.that.temporary.discontinuance.of.service.may. be.required..If.such.advance.notice.is.not.practicable,.the.telephone.company.will.notify.the.customer.as.soon.as.possible..Also,.you.will.be.advise.d.of. your.right.to.fi.le.a.complaint.with.the.FCC.if.you.believe.this.is.necessary. The.telephone.company.may.make.changes.in.its.facilities,.equipment,.operations,.or.procedures.that.could.affect.the.operation.of.the.equipment..If.this. happens,.the.telephone.company.will.provide.advance.notice.to.enable.you.to.make.the.necessary.modifi.cations.in.order.to.maintain.uninterrupted.service.. If.the.trouble.is.causing.harm.to.the.telephone.network,.the.telephone.company.may.request.you.to.disconnect.the.equipment.from.the.network.until.the. problem.is.resolved. This.equipment.uses.the.following.USOC.jacks:.RJ11C. It. is. recommended. that. the. customer. install. an.AC. surge. arrester. in. the.AC. outlet. to. which. this. device. is. connected..This. is. to. avoid. damage. to. the. equipmen.t.caused.by.local.strikes.of.lightening.and.other.electrical.surges. This.product.is.manufactured.for.RTX.Products.A/S..Copyright©.2005..All.rights.reserved..Any.copying.or.reproduction.of.the.product.or.its.associated. user.manual.is.strictly.prohibited..The.content.of.this.document.is.subject.to.change.without.prior.notice. For.further.information,.see.“FCC.and.other.information”.on.the.Safety.Information.sheet.for.the.US. ■ l a n cordless dualphone 6 Welcome E Ng L I S H WELCOME Thank.you.for.purchasing.the.LAN.Cordless.DUALphone..This.user.manual.describes.how.to.install,.configure,. and. use. the. LAN. Cordless. DUALphone,. enabling. you. to. make. Internet. calls,. landline. calls,. and. receive. on-scre..en. information. services.. Note. that. throughout. this. user. manual,. we. refer. to. the. LAN. Cordless. DUALphone.as.DUALphone. E Ng L I S H aT a g L a N C E HaNDSET–FRONTVIEW MESSAGE.INDICATOR. message.indicator.in.antenna.–.used.for. voice.mail,.missed.calls,.notifi.cations,.etc. EARPIECE . OK.KEY.. used.to.enter.the.main.menu. and.select.and.confi.rm.options COLOR.DISPLAY. /.. SOFT.KEYS. used.for.various.functions GREEN.PHONE.KEY used.to.make.calls.on.primary. line.or.answer.calls. RED.PHONE.KEY used.to.hang.up.or.leave.a. menu.and.to.turn.the. handset.on.or.off. NAVIGATIONAL.KEYS. used.to.navigate.through.menus. and.services KEYPAD.. used.to.enter.numbers.and.letters R.KEY.. STAR.KEY.. used.to.send.fl.ash.signal.for. landline.calls.and.enter.special. characters used.in.the.name.editor.to.capitalize. letters,.type.numbers.and.enter.a. star.symbol MICROPHONE ■ l a n cordless dualphone 7 at a G l a n c e E Ng L I S H HaNDSET–SIDEVIEW HEADSET.JACK. CONNECTOR.(2.5MM). LOUDSPEAKER. VOLUME.UP.KEY for.speakerphone.. VOLUME.DOWN.KEY SPEAKERPHONE. activation.and.deactivation.key.. ■ l a n cordless dualphone 8 at a G l a n c e E Ng L I S H HaNDSETCHaRgER–FRONTVIEW HANDSET.CHARGER HaNDSETCHaRgER–REaRVIEW POWER.SUPPLY.CONNECTOR. ON.HANDSET.CHARGER ■ l a n cordless dualphone 9 at a G l a n c e E Ng L I S H IDLEMODE HANDSET.NAME CONNECTION. STATUS.INDICATORS.1) BATTERY.STATUS. and.charging.indicator. OPTIONS TIME.AND.DATE. for.redial.and.active.calls. (activated.with.soft.key) CALL.LOG for.incoming,.outgoing. and.missed.calls. (activated.with.soft.key) OK.KEY.INDICATOR. signifies.that.the.OK.key.is.active. 1) Black/black.-.out.of.range.of.the.gateway Yellow/black.-.within.range.of.the.gateway,.but.not.ready.for.Internet.calls Yellow/yellow.–.within.range.of.the.gateway,.and.ready.for.Internet.calls.on.primary.line MaINMENU INTERCOM. . SETTINGS for.communication.between. two.handsets CALL.LOG. for.incoming,.outgoing. and.missed.calls. ON-SCREEN. INFORMATION.SERVICES. MESSAGES CONTACTS INTERNET. TELEPHONY.SERVICES. provided.by.your.service.provider ■ l a n cordless dualphone 10 at a G l a n c e E Ng L I S H gaTEWaY–REaRVIEW LANDLINE. CONNECTION.PORT POWER.CONNECTION. (POTS/PSTN). WAN.CONNECTION.PORT. RESET.BUTTON for.Ethernet.cable for.activating.configuration.changes. and.enabling.handset.registration gaTEWaY–FRONTVIEW I-NET.INDICATOR. POWER.INDICATOR. I-net.indicator.is.flashing.during. boot..It.indicates.that.the.gateway. has.received.an.IP.address. indicates.power.on. CALL.INDICATOR. Call.indicator.is.flashing.during.firmware. update..Constant.light.indicates.landline.or. Internet.call.in.progress VOIP.INDICATOR. indicates.that.the.gateway.is. connected.to.the.Internet. Telephony.Service.Provider ■ l a n cordless dualphone 11 at a G l a n c e E Ng L I S H INSTaLLINg T H E D U a L P H O N E This.section.guides.you.through.the.process.of.installing.your.DUALphone. PREREQUISITES In.order.to.take.full.advantage.of.the.features.of.the.DUALphone,.you.need.to.have.the.following.in.place: ■ Broadband.Internet.connection.–.cable,.DSL,.or.equivalent ■ Internet.Telephony.Service.Provider.subscription.–.to.make.Internet.calls ■ Landline.telephone.subscription.–.to.make.ordinary.phone.calls.(optional) Furthermore,.before.you.start.the.installation.process,.make.sure.that.you.have.the.following.close.to.the. gateway: ■ Wired.Ethernet.router.or..broadband.modem ■ Power.outlet.for.the.gateway. ■ Telephone.wall.outlet.used.for.landline.telephony.(optional) NOTE:.The.gateway.can.either.be.placed.on.a.tabletop.or.mounted.on.the.wall..If.longer.cables.are.required,. you.can.use.ordinary.cable.extensions..The.handset.has.an.indoor.signal.range.of.up.to.50.meters.(150.feet). from.the.gateway,.and.you.must.place.your.handset.charger.within.the.signal.range..Concrete.and.metal. objects.might.affect.the.signal.range. ■ l a n cordless dualphone 12 I n s ta l l I n G t h e d u a l p h o n e E Ng L I S H INSTaLLINgTHEgaTEWaYaNDREgISTERINgTHEHaNDSET HOWTOINSTaLLTHEgaTEWaY 1 Gateway./.WAN To.prepare.the.gateway.for.Internet.telephony,. connect.the.Ethernet.cable.to.the.WAN.port.on.the. gateway.and.then.to.a.LAN.port.on.your.broadband. modem.or.router. Router./.LAN Gateway 2 To.prepare.the.gateway.for.landline.telephony,. connect.the.telephone.cord.to.the.Line.port.on. the.gateway.and.then.to.a.telephone.wall.outlet.. Phone.socket Gateway 3 Connect.the.appropriate.power.adapter.to.the. gateway.and.to.an.active.power.outlet.(preferably. a.continuous.power.outlet.without.a.switch.to. interrupt.its.power). AC.110/220.V ■ l a n cordless dualphone 13 I n s ta l l I n G t h e d u a l p h o n e 1 Push in and down on the two holes in the back of the handset to release the battery cover. 1) 2) 2 Insert the two batteries in the handset, making sure that their plus and minus ends are facing as shown in the illustration, and then slide the battery cover shut. 3 3 Connect the appropriate power adapter to the charger and the other end to an active power outlet (preferably a continuous outlet without a switch to interrupt its power). ■ l a n cordless dualphone 14 INSTALLI N G THE DUALPHONE en glish How to Install and Register the Handset E Ng L I S H 4 Place.the.handset.in.the.charger,.and.charge.the.batteries..We.recommend. that. you. charge. the. batteries. fully. before. first. use.. This. takes. approximately.10.hours..When.you.place.the.handset.in.the.charger,.the.handset. automaticall.y.registers.with.the.gateway.provided.you.have.just.reset.the. gateway. NOTE:.After. registration. of. the. first. handset,. there. is. a. 5-minute. period. during. which. you. can. register. any. additional. handsets.. If. you. want. to. registe.r.additional.handsets.after.the.5-minute.period.has.expired,.press.the. Reset button.on.the.rear.of.the.gateway.to.start.a.new.5-minute.registration. period. ■ l a n cordless dualphone 15 I n s ta l l I n G t h e d u a l p h o n e E Ng L I S H gETTIN g S Ta RT E D USINgTHEMENUSaNDTYPINgTExTaNDNUMBERS The.DUALphone.has.7.menus.all.of.which.you.access.from.the.Main.menu. HOWTOENTERTHEMaINMENU 1). In.Idle mode,.press.the.OK.key..The.Main.menu.opens. TYPINgTExTaNDNUMBERS When.you.are.in.a.number.editor.or.text.editor.there.are.a.number.of.ways.in.which.you.can.edit.text..The. Erase.soft.key.enables.you.to.erase.text.that.is.already.in.the.editor,.or.to.erase.text.that.you.have.just.typed.. The.Options.soft.key.provides.you.with.the.following.two.options: Insert symbol.and.Input mode. HOWTOINSERTaSYMBOL 1). In.a.text.editor,.press.the.Options.soft.key,.choose.Insert symbol,.and.then.press.the.OK.key. 2). Use.the.navigation.keys.to.choose.the.preferred.symbol,.and.then.press.the.OK.key..The.symbol.is.inserted. in.the.text. HOWTOCHaNgETHETExTFORMaT When.you.are.in.a.text.editor,.the.upper.right.corner.of.the.display.shows.which.text.input.mode.option.is. currently.selected..You.can.change.the.input.mode.of.the.text.editor.at.any.time.during.editing.. 1). In.a.text.editor,.press.the.Options.soft.key,.choose.Input mode,.and.then.press.the.OK.key. 2). Choose.the.preferred.input.mode,.and.then.press.the.OK.key..You.can.choose.among.the.following. . options. OPTION WHaTITDOES ABC . Types.all.upper.case.letters. Abc . Types.fi.rst.letter.in.a.sentence.in.upper.case.and.remaining.letters.in.lower.case. abc.. Types.all.lower.case.letters. 123.. Types.numbers.only. You.can.also.change.the.case.of.letters.on.the.fl.y,.or.type.a.number.in.the.middle.of.a.text.. ■ Press.the.Star.key.once.to.change.the.case,.or.press.the.Star.key.twice.to.type.numbers. HOWTOLOCKaNDUNLOCKTHEKEYPaD If.you.are.carrying.the.handset.around,.you.can.lock.the.keypad.so.that.you.do.not.use.it.accidentally. 1). In.Idle.mode,.press.the.Star.key,.and.then.press.the.Lock.soft.key.. 2). To.unlock,.press.the.Star.key,.and.then.press.the.Unlock.soft.key. NOTE:.The.keypad.unlocks.automatically.when.you.answer.an.incoming.call.or.if.you.make.an.emergenc.y. call..For.more.information.about.emergency.calls,.see.page.23.of.this.manual. ■ l a n cordless dualphone 16 G e t t I n G s ta rt e d The.following.sections.describe.how.to.configure.and.set.up.your.DUALphone.for.first.use..If.your.DUALphon.e. has.been.pre-configured.by.the.Internet.Telephony.Service.Provider.you.purchased.it.from,.the.phone.is.ready. for.use.once.you.have.plugged.in.all.cables.and.connected.the.power,.and.you.can.continue.with.the.Specifying. Basic.Settings.section,.on.page.19.of.this.manual. In.many.ways,.the.DUALphone.functions.like.an.ordinary.analog.telephone..However,.because.it.is.connected. to.the.Internet,.you.have.to.configure.your.phone.before.it.is.ready.for.first.use..You.will.need.the.account. information.that.you.received.from.your.Internet.Telephony.Service.Provider.to.complete.the.configuration.of. your.DUALphone..If.you.have.not.registered.with.your.Internet.Telephony.Service.Provider.yet,.you.need.to. do.so.before.you.can.continue.with.the.configuration. HOWTOCONFIgURETHEDUaLPHONEONLINE 1). Open.a.browser.on.your.PC,.go.to.www.dualphone.net,.and.then.click.the.LAN.DUALPhone.link. 2). In.the.Configuration and FAQ menu,.choose.Configuration. 3). Enter. your. MAC. address. found. on. the. back. of. the. gateway. or. by. pressing. the. volume. up. key. on. the. handse.t.in.Idle.mode,.and.then.the.default.password,.which.is.1234.. 4.. Fill.in.the.SIP.user.name.field.on.the.Simple.tab..This.is.usually.your.phone.number..Click.Save.and.update. DUALphone..The.phone.is.reset.automatically. NOTE:.If.your.DUALphone.does.not.register.automatically,.then.enter.menu,.system.settings,.restore.settings,.press.OK.and.your.system.will.restart. After.a.few.seconds,.both.status.indicators.in.the.upper.left.corner.of.the.display.will.turn.yellow,.indicating. that.you.have.successfully.configured.your.DUALphone. NOTE:. If. your. DUALphone. account. has. not. been. pre-configured. by. your. Internet.Telephony. Service. Provid.er,. you. have. to. fill. in. the. information. on. Basic. tab.. For. more. detailed. information. on. how. to. configur.e.your.account,.refer.to.your.Internet.Telephony.Service.Provider’s.configuration.instructions. If.you.do.not.configure.your.DUALphone.on.installation,.you.can.only.make.landline.calls..However,. you.can.always.complete.the.configuration.at.www.dualphone.net.or.use.the.configuration.menu.on.the. handset.at.a.later.time. HOWTOCONFIgURETHEDUaLPHONEUSINgTHEHaNDSET You.can.configure.your.DUALphone.using.the.handset..You.will.need.the.account.information.that.you.receiv.ed. from.your.Internet.Telephony.Service.Provider.to.complete.the.configuration.of.your.DUALphone. 1). In.Idle.mode,.press.the.OK.key,.choose.Settings,.and.then.press.the.OK.key. 2). Choose.VoIP settings,.and.then.press.the.OK.key.. 3). When.prompted.for.a.PIN.code,.type.the.default.PIN.code.1234,.and.then.press.the.OK.key. You.then.specify.the.Domain.and.the.SIP.proxy. 1). Choose Server,.press.the.OK.key,.and.then.choose.Domain. 2). Press.the.OK.key,.and.then.enter.the.domain.name..Press.the.OK.key. 3). Choose.SIP proxy,.press.the.OK.key,.and.then.key.in.domain.name.or.IP.address.of.the.SIP.proxy,.if.it. is.different.from.the.Domain..If.you.have.more.than.one.VoIP.account,.you.then.need.to.specify.account. setting.s.for.each.account. ■ l a n cordless dualphone 17 G e t t I n G s ta rt e d E Ng L I S H CONFIgURINgTHEDUaLPHONE HOWTOCONFIgURETHEDUaLPHONEUSINgTHEINTERNaLWEBSERVER You.can.confi.gure.the.DUALphone.using.a.PC.with.a.WEB-browser..This.can.be.useful.in.case.the.phone. cannot.access.the.Internet. 1). Press.the.Volume.Up.key.on.the.handset.to.enter.the.system.status.menu.where.the.IP.address.of.the.phone. is.shown. 2). On.the.WEB-browser.type.in.the.IP-address.of.the.phone.in.the.address.fi.eld:.ex..10.10.106.235.. 3). Login.with.username.=.admin,.password.=.admin.. 4). Follow.the.instructions.shown.on.the.opened.WEB-page. HOWTOCHaNgETHEPINCODE Make.sure.to.change.the.PIN.code.after.fi.rst.login.to.prevent.unauthorized.access.to.your.VoIP.settings. 1). 2). 3). 4). 5). 6). 7). In.Idle.mode,.press.the.OK.key,.choose.Settings,.and.then.press.the.OK.key. Choose.VoIP settings,.and.then.press.the.OK.key.. When.prompted.for.a.PIN.code,.enter.the.default.PIN.code.1234,.and.then.press.the.OK.key. Choose.Change PIN code.and.then.press.the.OK.key.. Enter.a.new.PIN.code,.and.then.press.the.OK.key.. Press.the.Yes.soft.key.when.prompted.to.save.the.PIN.code. For.future.reference,.write.your.new.PIN.code.here: NOTE: The. handset. PIN. code. and. the. online. confi.guration. password. are. independent. of. each. other.. Changing.the.handset.PIN.code.will.not.affect.the.online.confi.guration.password. HOWTOCHaNgEaCCESSCODE The.access.code.is.used.for.calculating.encryption.keys.during.the.intitial.pairing.of.handsets.to.the.gateway.. To.ensure.privacy,.the.access.code.must.be.changed..Handset.and.gateway.access.codes.must.be.equal.. When.registering.a.new.handset,.ensure.that.its.access.code.is.modifi.ed.to.the.same.value.as.the.access.code. of.the.gateway..For.information.on.how.to.register.handset,.see.page.34.of.this.manual. 1). Enter.settings,.system.settings. 2) . Choose.Access Code. 3).. Press.OK. 4).. Press.Gateway. 5).. Type.in.the.new.access.code..(display.shows.‘*’.only)..Press.OK.and.press.Yes.to.save. ■ l a n cordless dualphone 18 G e t t I n G s ta rt e d E Ng L I S H 1.. Choose.Accounts,.press.the.OK.key,.select.an.account,.and.then.press.the.OK.key. 2). Choose.the.listed.parameters.one.by.one,.press.the.OK.key,.and.then.key.in.the.relevant.information.based. on.the.account.information.you.received.from.your.Internet.Telephony.Service.Provider. ■ Display.name.(optional).–.Caller.ID.that.the.called.party.sees ■ Nick.name.–.name.of.the.account.used.in.Call.Groups.and.VoIP.line.settings ■ SIP.User.name.–.usually.the.phone.number.you.received.from.your.service.provider ■ Authentication.Name.–.usually.the.same.as.SIP.User.name ■ SIP.Password.–.the.password.you.received.from.your.service.provider 3). After.each.change,.press.the.OK.key,.and.then.the.Yes.soft.key.when.prompted.to.save.changes. 4). Press.the.Reset.button.on.the.rear.of.the.gateway.when.you.have.completed.all.changes. E Ng L I S H 1). Enter.settings,.system.settings. 2) . Choose.Access Code. 3).. Press.OK. 4).. Press.Handset. 5).. Type.in.the.new.access.code..(display.shows.‘*’.only..Press.OK.and.press.Yes.to.save.. 6).. Press.red.hook.key.. SPECIFYINgBaSICSETTINgS Before. you. start. using. your. phone,. we. strongly. recommend. that. you. specify. handset. language,. country. selectio.n,.time.zone,.and.routing.of.emergency.dials.to.ensure.that.your.DUALphone.functions.properly. HOWTOSPECIFYTHEHaNDSETLaNgUagE The.individual.handset.language.settings.determines.in.which.language.the.text.on.the.display.is.presented. 1). In.the.Main menu,.choose.Settings,.and.then.press.the.OK.key. 2). Choose.System settings,.press.the.OK.key,.and.then.choose.Language..Press.the.OK.key. 3). Choose.the.preferred.language,.and.then.press.the.OK.key. HOWTOSPECIFYaCOUNTRYSELECTION Setting.the.country.selection.properly.ensures,.among.other.things,.that.you.can.make.and.receive.landline. calls.and.receive.Caller.ID.information.on.your.DUALphone.if.supported.by.your.telephony.provider..It.is. therefore.important.that.you.specify.in.which.country.you.are.using.the.DUALphone.. 1). In.the.Main menu,.choose.Settings,.and.then.press.the.OK.key. 2). Choose.System settings,.press.the.OK.key,.and.then.choose.Country selection..Press.the.OK.key. 3). Select.the.country.that.you.are.in,.and.then.press.the.OK.key. NOTE:.The.handset.language.and.country.settings.are.independent.of.each.other..You.can.change.the. handset.language.whenever.you.want,.but.we.recommend.that.you.only.change.the.country.settings.if.you. bring.your.DUALphone.to.another.country.and.want.to.make.landline.calls..Also.note.that.you.cannot. change.the.country.selection.in.the.US.version.of.the.DUALphone. ■ l a n cordless dualphone 19 u s e G e t t I n G s ta rt e d 1). In.the.Main.menu,.choose.Settings,.and.then.press.the.OK.key. 2). Choose.System settings,.press.the.OK.key,.and.then.choose.Time and date..Press.the.OK.key. 3). Choose.Time zone,.press.the.OK.key,.and.then.select.the.appropriate.time.zone..Press.the.OK.key. You.should.also.verify.that.the.time.format.and.the.daylight.saving.settings.are.correct..For.more.information. see.page.42.of.this.manual..Date.and.time.are.automatically.synchronized.with.a.time.server.on.the.Internet. to.ensure.that.the.time.and.date.displayed.on.the.DUALphone.is.always.correct..For.information.on.how.to. disable.automatic.time.setting,.see.page.42.of.this.manual. HOWTOCHaNgEEMERgENCYLINESETTINgS The.default.setting.of.emergency.calls.is.VoIP.(Internet.call)..However,.we.recommend.that.you.check.which. way.emergency.calls.are.routed.on.your.DUALphone..For.more.information.on.emergency.calls,.see.page.23 of.this.manual. 1). 2). 3). 4). In.the.Main menu,.choose.Settings,.and.then.press.the.OK.key. Choose.Telephony settings,.and.then.press.the.OK.key. Choose.Emergency line,.and.then.choose.VoIP.or.Landline. Press.OK.to.reset.your.DUALphone.for.the.changes.to.take.affect. IMPORTANT:.You.must.check.with.you.Internet.Telephony.Service.Provider.whether.they.have.a.service. that.makes.it.possible.for.your.call.to.reach.the.appropriate.emergency.call.center.and.for.the.emergency. call.center.to.locate.from.where.you.are.calling..If.not,.you.must.use.landline.settings.for.emergency.calls.. This.requires.a.functioning.landline.connection. HOWTOSPECIFYTHEPRIMaRYLINEFOROUTgOINgCaLLS You.must.specify.a.primary.line.for.each.handset,.which.is.used.for.outgoing.calls.when.you.press.the.Green. phone.key..You.can.choose.landline.or.VoIPline. 1). In.the.Main.menu,.choose.Settings,.and.then.press.the.OK.key. 2). Choose.Telephony settings,.press.the.OK.key,.and.then.choose.Primary line..Press.the.OK.key. 3). Select.Landline.or.VoIP line,.and.then.press.the OK.key. HOWTOSPECIFYCaLLgROUPS If.you.have.more.than.one.handset,.you.must.specify.from.which.account.or.accounts.you.want.each.handset. to.receive.calls..To.do.this.you.use.Call.Groups. 1.. In.the.Main.menu,.choose.Settings,.and.then.press.the.OK.key. 2.. Choose.Telephony settings,.press.the.OK.key,.and.then.enter.your.PIN.Code.(the.default.PIN.code. is.1234).and.then.choose.Call Groups..Press.the.OK.key..All.nicknam.es.for.the.VoIP.accounts.you. subscrib.e.to.are.listed,.and.so.is.the.landline.account. Clear.any.accounts.for.which.you.do.not.want.the.current.handset.to.receive.calls,.and.then.press.the.OK.key. ■ l a n cordless dualphone 20 G e t t I n G s ta rt e d E Ng L I S H HOWTOCHaNgETHETIMEZONE Setting.the.time.zone.properly.ensures.that.the.time.displayed.in.the.Idle.mode.screen.corresponds.to.the.time. zone.that.you.are.in. To.ensure.that.your.DUALphone.has.the.latest.features.installed,.we.recommend.that.you.update.the.firmware. once.you.have.configured.and.set.up.the.phone.. HOWTOUPDaTETHEFIRMWaRE When.new.software.is.available.the.display.reads,.“New firmware available”. 1). Press.the.OK.key..The.Firmware.update.menu.appears. 2). To.update.to.the.latest.version,.choose.the.update.listed.on.the.Simple.tab,.press.the.OK key,.and.then. press.the.Yes.soft.key.when.prompted.if.you.want.to.update.the.system..If.you.press.the.View.soft.key. before.you.start.installation,.you.can.find.out.about.the.software.version.number.and.the.date.and.time.it. was.released. 3).. Select.language.and.press.OK. The.update.time.varies.depending.on.the.size.of.the.update.and.the.speed.of.your.Internet.connection..During. the.update.process.the.following.steps.are.listed.in.the.display: ■ ■ ■ ■ Getting.gateway Updating.gateway Getting.handset Updating.handset Once. a. step. is. complete,. a. green. checkmark. appears. next. to. the. step.. When. the. entire. update. has. been. successfull.y.completed,.the.display.reads.“Upgraded to <version number>”.. NOTE:.While.the.update.is.in.progress.you.cannot.receive.incoming.calls.or.make.calls,.including.emergen.cy. calls,.on.the.DUALphone..Also.note.that.we.recommend.that.you.do.not.reset.the.gateway.during.the. installa.tion.process. ■ l a n cordless dualphone 21 G e t t I n G s ta rt e d E Ng L I S H UPDaTINgTHEFIRMWaRE With.the.DUALphone.you.can.make.both.Internet.and.landline.calls..All.outgoing.calls.are.by.default.Internet. calls. unless. you. specify. otherwise..The. following. sections. describe. how. to. make. and. answer. Internet. and. landline.calls.with.the.DUALphone. INTERNETCaLLS When.you.make.and.receive.Internet.calls,.the.following.icons.are.displayed: ■ Calling.. ■ Ongoing.call.. HOWTOMaKEaNINTERNETCaLL If.your.primary.line.is.Internet,.you.do.the.following.to.make.an.Internet.call. ■ In.Idle mode,.type.the.number.you.want.to.dial,.and.then.press.the.Green phone.key. If.your.primary.line.is.Landline,.you.do.the.following.to.make.an.Internet.call. ■ In.Idle mode,.type.the.number.you.want.to.dial,.press.the Options.soft.key,.and.then.choose Internet.. Press.the.OK.key. HOWTOENDaCaLL ■ Press.the.Red phone.key,.or.place.the.handset.in.the.charger. HOWTOMaKEaNINTERNETCaLLUSINgCONTaCTS 1). In.the.Main.menu,.choose.Contacts,.and.then.press.the.OK.key. 2). Choose.the.contact.you.want.to.call,.and.then.press.the.Green phone.key..The.default.number.is.dialed. If.you.want.to.call.a.contact,.and.use.another.number.than.the.default.number,.do.the.following: 1). In.the.Main menu,.choose.Contacts,.and.then.press.the.OK.key. 2). Choose.the.contact.you.want.to.call,.and.then.press.the.OK.key. 3). Choose.a.number.from.the.list,.and.then.press.the.Green phone.key. For.more.information.about.default.numbers,.see.page.29.of.this.manual. HOWTOMaKEaNINTERNETCaLLUSINgTHECaLLLOg 1). In.Idle mode,.press.the.Call log.soft.key,.or.choose.Call log.from.the.Main menu,.and.then.press.the.OK. key... 2). Choose.the.number.you.want.to.call,.and.then.press.the.Green phone.key. For.more.information.about.the.call.log,.see.page.29.of.this.manual. HOWTOMaKEaNINTERNETCaLLUSINgREDIaL 1). Press.the.Options.soft.key,.choose.Redial,.and.then.press.the.OK.key..The.most.recently.dialed.number. is.displayed.. 2). Press.the.Green phone.key.to.call.the.number. HOWTOMaKEaNINTERNETCaLLUSINgSPEEDDIaLS ■ In.Idle mode,.type.the.speed.dial.number.assigned.to.the.contact.you.want.to.call,.and.then.press.the.. Green phone.key. For.information.on.how.to.set.up.speed.dials,.see.page.29.of.this.manual. ■ 22 l a n cordless dualphone makInG and ansWerInG calls E Ng L I S H MaKINg aND a N S W E R I N g C a L L S E Ng L I S H HOWTOMaKEaNEMERgENCYCaLL ■ Enter.the.emergency.number.for.your.country,.and.then.press.the.Green phone.key. When.you.make.emergency.calls,.always.press.the.Green.phone.key.regardless.of.whether.your.emergency. calls.are.routed.through.the.Internet.or.via.landline.. You.cannot.make.emergency.calls.in.the.following.situations: ■ ■ ■ ■ Firmware.update.is.in.progress Handset.batteries.are.drained Power.failure Handset.is.out.of.range.of.the.gateway For.more.information.about.emergency.calls,.see.page.40.of.this.manual. LaNDLINECaLLS When.you.make.and.receive.landline.calls,.the.following.icons.are.displayed: ■ Calling.. ■ Ongoing.call.. HOWTOMaKEaLaNDLINECaLL If.your.primary.line.is.Internet,.you.do.the.following.to.make.a.landline.call. ■ In.Idle.mode,.type.the.number.you.want.to.dial,.press.the. Options.soft.key,.and.then.choose.Call on landline..Press.the.OK.key. If.your.primary.line.is.Landline,.you.do.the.following.to.make.a.landline.call. ■ In.Idle.mode,.type.the.number.you.want.to.dial,.and.then.press.the.Green phone.key. HOWTOMaKEaLaNDLINECaLLUSINgCONTaCTS 1). In.the.Main menu,.choose.Contacts,.and.then.press.the.OK.key. 2). Choose.the.contact.you.want.to.call,.press.the.Options.soft.key,.and.then.choose.Call on landline..Press. the.OK.key..The.default.number.is.dialed. If.you.want.to.call.a.contact,.and.use.another.number.than.the.default.number,.do.the.following. 1). In.the.Main menu,.choose.Contacts,.and.then.press.the.OK.key. 2). Choose.the.contact.you.want.to.call,.press.the.OK.key,.and.then.choose.a.number.from.the.list. 3). Press.the.Options.soft.key,.and.then.choose.Call on landline. For.more.information.about.default.numbers,.see.page.29.of.this.manual. HOWTOMaKEaLaNDLINECaLLUSINgTHECaLLLOg 1). In.Idle mode,.press.the.Call log.soft.key,.or.choose.Call log.from.the.Main menu,.and.then.press.the.OK.key.. 2). Choose.the.number.you.want.to.call,.press.the.Options.soft.key,.and.then.choose.Edit for call..Press.the. OK.key 3). Press.the.Options.soft.key,.choose.Call on landline,.and.then.press.the.OK.key. For.more.information.about.the.call.log,.see.page.25.of.this.manual. ■ l a n cordless dualphone 23 makInG and ansWerInG calls HOWTOMaKEaLaNDLINECaLLUSINgSPEEDDIaLS 1). In.Idle.mode,.type.the.speed.dial.number.assigned.to.the.contact.you.want.to.call. 2). Press.the.Options.soft.key,.choose.Call on landline,.and.then.press.the.OK.key. For.information.on.how.to.set.up.speed.dials,.see.page.29.of.this.manual. aNSWERINgCaLLS HOWTOaNSWERaCaLLaNSWERaCaLL ■ Pick.up.the.handset,.and.then.press.the.Green phone.key. You.can.also.set.the.DUALphone.to.auto.answer.so.that.when.you.pick.up.the.handset.from.the.charger,.you. have.automatically.answered.the.call..For.more.information,.see.page.40.of.this.manual. CaLLERID When. you. receive. an. incoming. Internet. call,. the. Caller. ID. is. always. displayed.. Usually. Caller. ID. is. also. displaye.d.on.incoming.landline.calls,.but.some.telephony.providers.may.require.that.you.subscribe.to.a.Caller. ID.service..If.the.caller.is.stored.as.a.contact,.the.contact.name.is.displayed.instead.of.the.Caller.ID..If.the.caller. has.blocked.display.of.the.number,.no.Caller.ID.is.displayed.. ■ l a n cordless dualphone 24 makInG and ansWerInG calls E Ng L I S H HOWTOMaKEaLaNDLINECaLLUSINgREDIaL 1). Press.the.Options.soft.key,.choose.Redial,.and.then.press.the.OK.key..The.most.recently.dialed.number. is.displayed.. 2). Press.the.Options.soft.key,.choose.Call on landline,.and.then.press.the.OK.key. The.call.log.keeps.track.of.all.your.incoming.and.outgoing.calls..It.consists.of.4.tabs.that.you.can.scroll.through. using.the.navigation.keys.on.the.handset..The.tabs.display.the.following.information: ■ All.calls ■ Missed.calls.. ■ Incoming.calls.. ■ Outgoing.calls.. The.call.log.stores.up.to.30.numbers..For.each.call,.the.call.log.keeps.track.of.the.number,.the.date.and.time. of.the.call,.and.the.type.of.call:.incoming,.outgoing,.or.missed..If.the.caller’s.name.and.number.is.stored.in. Contacts,.the.caller’s.name.is.displayed..A.number.or.name.is.only.listed.once,.but.all.missed.calls.are.counted. so.you.can.always.see.how.many.times.the.same.caller.has.tried.to.reach.you. The.phone.can.be.configured.for.either.shared.or.private.call-log..In.shared.mode.(default).all.calls.made.on.the. system.will.be.shown.on.all.handsets..In.private.mode.only.calls.made.on.the.particular.handset.are.shown. HOWTOVIEWNUMBERSINTHECaLLLOg ■ In.Idle.mode,.press.the.Call log.soft.key,.or.choose.Call log.from.the.Main.menu,.and.then.press.the.OK key..Use.the.navigation.keys.to.page.through.the.tabs.and.scroll.through.the.names.and.numbers. When.you.select.a.number.in.the.call.log.and.press.the.Options.soft.key,.you.have.the.following.options: OPTION WHaTITDOES Add as contact. . Opens.a.text.editor.so.that.you.can.add.the.selected.number.as.a.contact.. For.more.information.see,.page.28.of.this.manual. Append as . contact. Opens.Contacts.so.that.you.can.add.the.selected.number.to.an.already.existing.contact... For.more.information.see,.page.29.of.this.manual. Edit for call. Opens.the.number.editor.so.that.you.can.edit.the.number.before.calling. Delete. Deletes.the.selected.number.from.the.call.log. Delete list. Deletes.all.numbers.in.the.call.log.list. For.information.on.how.to.make.a.call.from.the.call.log,.see.page.23.of.this.manual. HOWTOCHaNgESHaRED/PRIVaTECaLLLOgMODE 1).. Go.to.www.dualphone.net. 2).. Choose.configuration. 3) . Click.advanced. 4) . Find.the.call handling.tab.and.from.here.phonebook.confguration. ■ l a n cordless dualphone 25 call loG E Ng L I S H Ca L L L O g E Ng L I S H DURI N g C a L L S HOWTOPLaCEaCaLLONHOLD ■ During.a.call.press.the.Hold.key. HOWTORETRIEVEaCaLLFROMHOLD ■ Press.the.Options.soft.key,.and.then.choose.Retrieve call. HOWTOaDjUSTTHEHaNDSETVOLUME ■ During.a.call.press.the.volume up.or.volume down.buttons.on.the.side.of.the.phone.to.adjust.the.volume. up.or.down..The.volume.setting.is.automatically.saved.when.you.end.the.call. HOWTOUSETHESPEaKERPHONE The.speakerphone.allows.you.to.make.and.answer.calls.without.picking.up.the.handset. ■ During.a.call,.press.the.speakerphone.button.on.the.side.of.the.phone..To.deactivate.the.speakerphone,. press.the.speakerphone.button.again. NOTE:.To.enjoy.the.best.sound.quality,.place.the.handset.in.a.horizontal.position.rather.than.a.vertical. position. HOWTOTRaNSFERaCaLL Call.transfer.is.for.Internet.calls.only..To.be.able.to.use.call.transfer.you.need.to.contact.your.Internet.Telephon.y. Service.Provider.to.find.out.if.they.support.this.service. 1). During.a.call.press.the.Hold.key,.then.press.the.Options.soft.key,.and.then.choose.Transfer call. 2). Press.the.Options.soft.key,.choose.Contacts,.and.then.press.the.OK.key. 3). Choose.the.contact.to.which.you.want.to.transfer.the.call,.and.then.press.the.OK.key. Alternatively,.you.can.type.the.number.to.which.you.want.to.transfer.the.call. 1). During.a.call.press.the.Hold.key,.then.press.the.Options.soft.key,.and.then.choose.Transfer call. 2). Enter.the.number.to.which.you.want.to.transfer.the.call,.and.then.press.the.OK.key NOTE:.Not.all.Telephone.Providers.supports.call.transfer. HOWTOMUTEaCaLL During.a.call,.you.can.switch.off.the.microphone.so.that.the.person.on.the.line.cannot.hear.what.you.are.sayin.g. ■ Press.the.Mute.soft.key..To.turn.the.microphone.on.again,.press.the.Mute off.soft.key.. CaLLWaITINg Call.waiting.notifies.you.about.an.incoming.call.during.an.ongoing.call..You.can.put.the.current.call.on.hold,. and.then.answer.the.incoming.call..If.you.do.not.answer.a.waiting.call,.the.call.is.added.to.the.call.log.as.a. missed.call..Call.waiting.works.for.both.Internet.and.landline.calls,.but.it.works.in.different.ways.as.described. in.the.following..When.you.receive.an.incoming.call.during.an.ongoing.call,.you.can.also.choose.to.start.a. conference.between.all.three.parties..For.more.information,.see.page.36.of.this.manual. ■ l a n cordless dualphone 26 durInG calls E Ng L I S H HOWTOaNSWERaNINTERNETCaLLDURINgaNONgOINgLaNDLINECaLL 1). Press.the.Green phone.key..The.current.call.is.automatically.put.on.hold. 2). Press.the.Options.soft.key,.and.then.choose.Swap calls.to.switch.between.the.two.calls. 3). Press.the.Red phone.key.to.end.the.ongoing.call. NOTE:.The.DUALphone.does.not.currently.support.call.waiting.if.you.have.an.ongoing.Internet.call.and. receive.an.incoming.Internet.call. HOWTOaNSWERaLaNDLINECaLLDURINgaNONgOINgINTERNETCaLL 1). Press.the.Green phone.key..The.current.call.is.automatically.put.on.hold. 2). Press.the.Options.soft.key,.and.then.choose.Swap calls.to.switch.between.the.two.calls. 3). Press.the.Red phone.key.to.end.the.ongoing.call. HOWTOaNSWERaLaNDLINECaLLDURINgaNONgOINgLaNDLINECaLL 1). Press.the.Green phone.key.or.long-press.the.R.key.until.an.R.is.displayed..The.current.call.is.automatically.put.on.hold. 2). Long-press.the.R.key.until.an.R.is.displayed.to.switch.between.the.two.calls. 3). Press.the.Red phone.key.to.end.both.calls. NOTE:.The.procedure.for.answering.an.incoming.landline.call.during.an.ongoing.landline.call.may.vary. depending.on.your.telephone.company..Contact.your.telephony.provider.for.more.information. HOWTOaNSWERaNINTERNaLCaLLDURINgaNONgOINgINTERNETORLaNDLINECaLL If.you.have.more. than. one. handset. registered. with. the. gateway,. you. can. receive. an. incoming. internal. call. durin.g.an.ongoing.call. 1). Press.the.Green phone.key..The.current.call.is.automatically.put.on.hold. 2). Press.the.Options.soft.key,.and.then.choose.Swap calls to.switch.between.the.two.calls. 3). Press.the.Red phone.key.to.end.the.ongoing.call. ■ l a n cordless dualphone 27 durInG calls Contacts are used for storing names and numbers so that you can easily find the person or company you want to call. The Contacts menu consists of one or more tabs that you can scroll through using the navigation keys on the handset. The number of tabs depends on how many groups you have created. The names and numbers are listed in alphabetical order on the tabs. You can store up to 200 contacts, and you can add 4 numbers to each contact. Contact entries are shared between all handsets registered with the gateway. Common/Private Contacts The phone can be configured for either shared or private contacts. In shared mode (default) all contacts of the system will be shown on all handsets.In private mode only contacts created on the particular handset are shown. How to add a contact 1) In the Main menu, choose Contacts, and then press the OK key. 2) Press the Options soft key, choose Add contact, and then press the OK key. 3) Press the Edit soft key to enter the name editor, type the name of the contact, and then press the OK key. 4) Scroll down and choose a number field, press the OK key, and then type a number, 5) Press the Options soft key, choose Number type, and then press the OK key. 6) Choose the preferred number type, press the OK key to confirm, and then press the Red phone key to return to the number editor. Do the same for all the numbers you want to add to the contact. 7) Press the Save soft key, and then the Yes soft key, when prompted to save. You need to type both a name and a number for a contact before you can save the information How to delete a contact 1) In the Main menu, choose Contacts, press the OK key, and then choose the contact you want to delete. 2) Press the Options soft key, choose Delete contact, and then press the Yes soft key when prompted to delete the contact. 3) To delete all contacts, choose Delete all contacts, and then press the Yes soft key, when prompted to delete the list. When you delete a contact, it is automatically deleted from any related groups. How to find a contact n In the Main menu, choose Contacts and then press the OK key. Use the navigation keys to navigate through the tabs and to scroll up and down. You can also search for a contact by entering the first letter of the name. n In the Main menu, choose Contacts and then press the OK key. Enter the first letter of the name of the contact you are looking for. The first name starting with that letter is highlighted. How to edit a contact 1) In the Main menu, choose Contacts, press the OK key, and then choose the contact you want to edit. 2) Press the Options soft key, choose Edit contact, and then choose the field that you want to edit. 3) Press the Edit soft key, and make your edits. 4) Press the OK key, press the Save soft key, and then press the Yes soft key when prompted to save. How to change the ringer tone for a contact 1) In the Main menu, choose Contacts, and then press the OK key. 2) Choose the contact for which you want to specify a ringer melody, and then press the Options soft key. 3) Choose Edit contact, scroll down and choose Ringer melody, and then press the OK key. ■ l a n cordless dualphone 28 H a n d lin g c o n ta c t s en glish HANDLIN G C O N TA C T S You can listen to the various melodies, before you decide which one to use. n Press the Play soft key, and use the arrow keys to scroll through all the tones. To stop, press the Stop soft key. How to change the default number for a contact The first number you save for a contact is automatically the default number. If you use speed dial, for example, it is always the default number that is dialed. You can always change the default number for a contact. 1) 2) 3) 4) 5) 6) In the Main menu, choose Contacts, press the OK key, and then choose a contact. Press the Options soft key, choose Edit contact, and then press the OK key. Choose the number you want as default number, and then press the Edit soft key. Press the Options soft key, choose Default, and then press the OK key. Press the Yes soft key when prompted to save the number as default number. Press the Red phone key to return to the contact, press the Save soft key, and then press the Yes soft key when prompted to save changes. How to specify a speed dial number for a contact 1) In the Main menu, choose Contacts, and then press the OK key. 2) Choose the contact to which you want to add a speed dial number, and then press the Options soft key. 3) Scroll down, choose Speed dial, and then press the OK key. 4) Select an empty speed dial number, and then press the Add soft key. 5) To replace an existing entry select the speed dial entry you want to replace, and then press the Replace soft key. 6) Press the Red phone key to return to contacts. How to add a call log number to contacts 1) In Idle mode, press the Call log soft key, and then choose the number you want to add to contacts. 2) Press the Options soft key, choose Add as contact, and then press the OK key. The number is automatically added to the new contact. 3) Press the Edit soft key to enter the name editor, write the name of the contact, and then press the OK key. If Caller ID is used, the name is entered automatically. 4) Press the Save soft key, and then the Yes soft key, when prompted to save. How to add a call log number to an existing contact 1) In Idle mode, press the Call log soft key, and then choose the number you want to append to an existing contact. 2) Press the Options soft key, choose Append to contact, and then press the OK key. 3) Choose the contact to which you want to add the number, and then press the Append soft key. The contact opens, and the number is added automatically. 4) Press the Save soft key, and then the Yes soft key, when prompted to save. How to create a group You can organize your contacts into appropriate groups to gain an easier overview of all your contacts, and you can specify a different ringer melody for each group. When you create a group, a new tab named after the group is automatically added to the Contacts menu. The tab contains all the members of the group. 1) In the Main menu, choose Contacts, and then press the OK key. 2) Press the Options soft key, scroll down and choose Groups, and then press the OK key. ■ l a n cordless dualphone 29 H a n d lin g c o n ta c t s en glish 4) Select a melody, press the OK key, and then press the Red phone key to return to the contact. 5) Press the Save soft key, and then press the Yes soft key, when prompted to save. How to edit a group 1) In the Main menu, choose Contacts, and then press the OK key. 2) Press the Options soft key, choose Groups, and then press the OK key. 3) Choose the group you want to edit, press the Options soft key, and then choose Edit group. Press the OK key. 4) Make your edits, press the OK key, and then press the Yes soft key when prompted to save. How to add a contact to a group 1) In the Main menu, choose Contacts, and then press the OK key. 2) Choose the contact you want to add to a group, press the Options soft key, scroll down, and then choose Edit contact. Press the OK key. 3) Scroll down and choose Groups, and then press the OK key. 4) Choose the group or groups to which you want to add the contact. 5) Press the Red phone key to return to the contact, press the Save soft key, and then press the Yes soft key when prompted to save changes. How to delete a group When you delete a group, the individual entries remain in the common Contacts list. 1) In the Main menu, choose Contacts, and then press the OK key. 2) Press the Options soft key, scroll down and choose Groups, and then press the OK key. 3) Choose the group you want to delete, press the Options soft key, and then choose Delete group. Press the OK key. 4) Press the Yes soft key when prompted to delete the group. How to remove a contact from a group 1) In the Main menu, choose Contacts, press the OK key, and then choose the contact that you want to remove from a group. 2) Press the Options soft key, choose Edit contact, and then scroll down and select Groups. 3) Choose the group from which you want to remove the contact, and then press the OK key. 4) Press the Red phone key, press the Save soft key, and then press the Yes soft key when prompted to save. How to change a ringer tone for a group You can specify a different ringer tone for each group you create. 1) 2) 3) 4) In the Main menu, choose Contacts, and then press the OK key. Press the Options soft key, choose Groups, and then press the OK key. Choose the preferred group, press the Options soft key, and then choose Ringer tone. Press the OK key. Select a tone, and then press the Red phone key to return to the group. You can listen to the various melodies, before you decide which one to use. n Press the Play soft key, and use the arrow keys to scroll through all the tones. To stop, press the Stop soft key. How to change shared/private contact list mode 1) Go to www.dualphone.net. 2) Choose configuration. 3) Click advanced. 4) Find the ‘call handling’ tab and from here phonebook confguration. ■ l a n cordless dualphone 30 H a n d lin g c o n ta c t s en glish 3) Press the Options soft key, choose Add group, and then press the OK key 4) Write a name for the group, press the OK key, and then press the Yes soft key when prompted to save. E Ng L I S H RECEIVIN g M E S S a g E S USINgVOICEMaIL To.use.voice.mail.you.need.to.subscribe.to.a.voice.mail.service..Contact.your.Internet.Telephony.Service.Provid.er. for.more.information..When.you.have.set.up.a.voice.mail.account,.you.can.access.your.voice.mail.through.the. DUALphone..For.information.on.how.to.set.up.your.voice.mail.URL,.see.page.44 of.this.manual. HOWTOVIEWMESSagESTaTUS ■ In.the.Main.menu,.choose.Messages,.press.the.OK.key,.choose.message,.Voice Mail,.select.your.account. and.then.press.OK. . You. can. now. see. how. many. new. messages. you. have,. and. the. total. number. of. messages. in. your. voice. mailbo.x. HOWTOLISTENTOMESSagES 1). In.the.main.menu,.choose.Messages,.Voice Mail,.select.Landline.or.VoIP,.and.then.press.the.Play.key. 2). Choose.Message status,.and.then.choose.New.or Total. 3). Press.the.Play.soft.key.to.listen.to.messages. NOTE:.Your.Internet.Telephony.Service.Provider.can.send.notifications.such.as.e-mail.notifications.and. billing.information.to.your.phone..The.notification.may.contain.both.text.and.graphics..When.you.receive. a.message,.the.message.indicator.is.lit.up,.and.if.enabled.you’ll.hear.a.message.tone. ■ l a n cordless dualphone 31 receIVInG messaGes On-screen.information.services.enable.you.to.view.information.such.as.the.latest.news.and.the.local.weather. report.on.your.DUALphone. On.www.dualphone.net,.you.can.fi.nd.a.number.of.on-screen.information.services.that.you.can.subscribe.to. on.your.DUALphone..However,.if.you.want.information.that.fi.ts.your.specifi.c.needs,.you.need.to.subscribe.to. an.on-screen.information.services.provider.to.have.the.information.sent.to.your.DUALphone..For.information. on.how.to.confi.gure.on-screen.information.services,.see.page.19 .of.this.manual. HOWTOVIEWON-SCREENINFORMaTIONSERVICES 1). In.the.Main.menu,.choose.Info services,.and.then.press.the.OK.key.. 2). Choose.the.service.you.want.to.view,.and.then.press.the.OK.key. To.navigate.through.the.content.of.an.on-screen.information.service,.you.typically.have.the.following.options,. but.they.may.vary.depending.on.the.on-screen.information.services.provider: OPTION WHaTITDOES Menu.. Takes.you.back.to.the.list.of.available.on-screen.information.services. Skip. Takes.you.to.the.fi.rst.page.in.a.series.of.related.pages.. Next. Takes.you.to.the.next.page.in.a.series.of.related.pages. Previous. Takes.you.to.the.previous.page.in.a.series.of.related.pages. Options. . Provides.you.with.a.number.of.choices.that.are.dependent.on.the.on-screen. information.service.you.are.viewing. Red-hook key. . A.short.keypress.always.takes.you.one.step.back.and.a.long.press.takes.you.to.the. Idle.screen. HOWTOVIEWTHEMOSTRECENTLYUPDaTEDON-SCREENINFORMaTIONSERVICES 1). In.the.Main.menu,.choose.Info Services. HOWTOUSEINPUTFIELDS Some.information.services.may.provide.input.fi.elds..Input.fi.elds.are.similar.to.text.boxes.on.the.Internet,.and. are.used,.for.example,.for.Internet.search,.chat.or.the.yellow.pages..One.screen.may.contain.several.input. fi.elds,.and.you.use.the.arrow.keys.to.navigate.the.fi.elds. 1). 2). 3). 4). 5). In.the.Main.menu,.choose.Info services,.and.then.press.the.OK.key. If.there.is.more.than.one.fi.eld,.use.the.arrow.keys.to.navigate.to.the.preferred.fi.eld. Press.OK.to.activate.the.fi.eld..A.text.editor.opens. Enter.in.the.text,.and.then.press.the.OK.key.. Press.the.relevant.soft.key.to.send.the.information. ■ l a n cordless dualphone 32 u s I n G o n - s c r e e n I n f o r m at I o n s e rV I c e s E Ng L I S H USINgON-SCREEN I N F O R M aT I O N S E RV I C E S en glish DU ALP H O N E . N E T n In the Main menu, choose DUALphone.net, and then press the OK key. The information available in the DUALphone.net menu depends on your provider. It often activates a link to an on-screen information service. ■ l a n cordless dualphone 33 DUALPHONE. NET You can register up to 8 handsets with the same gateway, and you can have up to 8 different VoIP accounts provided they belong to the same Internet Telephony Service Provider. However, you can only have 4 active calls at a time: 3 Internet calls and 1 landline call. If you use Call Groups, you should only include up to 6 handsets in a Call Group, because only 6 handsets at a time can receive incoming calls. If you have more than one handset, you can make intercom calls, and you can transfer calls to other handsets. You can answer incoming calls on any of the registered handsets, and if you reject a call on one handset, you can still answer the call on the other registered handsets. Contact entries are automatically shared between all handsets. How to register an additional handset with the gateway 1) Press the Reset button on the rear of the gateway to enable registration mode. 2) If the handset is not already turned off, press the Red phone key to turn it off. 3) Place the handset in the charger. The left status indicator in the upper left corner of the display will turn yellow, indicating that you have successfully registered the handset. You can also register a handset by means of the handset. 1) Press the Reset button on the rear of the gateway to enable registration mode. 2) In the Main menu, choose Settings, and then press the OK key. 3) Choose System settings, press the OK key, and then choose Handset settings. Press the OK key. 4) Choose Register handset, press the OK key, and then press the Yes soft key when prompted to register handset. If the handset you want to register is already registered with another gateway, you need to deregister the handset from that gateway before you can register it with a new gateway. How to deregister a handset with the gateway 1) In the Main menu, choose Settings, and then press the OK key. 2) Choose System settings, press the OK key, and then choose Handset settings. Press the OK key. 3) Choose Deregister handset, press the OK key, and then press the Yes soft key when prompted to deregister the handset. How to view all handsets registered with the gateway 1) In the Main menu, choose Settings, and then press the OK key. 2) Choose System settings, press the OK key, and then choose Handset settings. Press the OK key. 3) Choose Handsets, and a list of all handsets is displayed. How to give your handset a name Naming your handsets can be useful when you register extra handsets with the gateway. This way you can easily identify the various handsets when you make internal calls. When the phone is in Idle mode, the name of the handset is displayed. If you do not name your handsets, they are numbered consecutively starting with Handset 1, which is the handset first registered with the gateway. 1) 2) 3) 4) In the Main menu, choose Settings, and then press the OK key. Choose System settings, press the OK key, and then choose Handset settings. Press the OK key. Choose Handset name, write a name for the handset, and then press the OK key. Press the Yes soft key when prompted to save. ■ l a n cordless dualphone 34 US IN G ADDI TI ONAL HANDSETS en glish USIN G intercom E Ng L I S H HOWTOCaLLaNOTHERHaNDSET You.can.make.calls.between.all.handsets.registered.to.the.same.gateway. 1). In.the.Main.menu,.choose.Settings,.and.then.press.the.OK.key. 2). Choose.Intercom,.press.the.OK.key,.and.then.choose.the.handset.you.want.to.call..Press.the.OK.key. HOWTOCaLLaLLHaNDSETS 1). In.the.Main.menu,.choose.Settings,.and.then.press.the.OK.key. 2). Choose.Intercom,.press.the.OK.key,.and.then.choose.All handsets..Press.the.OK.key..The.first.handset. to.answer.the.call,.receives.the.call. HOWTOTRaNSFERaCaLLTOaNOTHERHaNDSET 1). During.a.call,.press.the.Hold.key. 2). Press.the.Options.soft.key,.choose.Intercom,.and.then.press.the.OK.key. 3). Choose.the.handset.to.which.you.want.to.transfer.the.call,.and.then.press.the.OK.key. 4). When.the.other.handset.has.answered.the.call,.press.the.Options.soft.key.and.transfer call. USINgLEaSTCOSTROUTINg(LCR) LCR.allows.automatic.selection.of.the.preferred.interface.(landline/VoIP).based.on.recognition.of.the.dialed. phone.number.. HOWTOCONFIgURELEaSTCOSTROUTINg(LCR) 1). Go.to.dualphone.net.and.and.login.under.configuration. 2). Choose.Advanced + LCR.and.follow.instruction.there. NOTE:.Emergency.line.has.first.priority. BRIDgINg Bridging.converts.the.phone.into.a.bridge.between.landline.and.VoIP,.enabling.wordwide.low-cost.calls.at. local.rates.. As.an.example,.you.could.setup.your.DUALphone.to.automatically.accept.landline.calls.from.your.cellphone. and.redirect.these.calls.to.the.VoIP.interface..Then.you.can.dial.the.destination.VoIP.number.and.the.DUALphone. will.connect.your.cellphone.call.to.worldwide.destinations.at.local.rates. An.incoming.call.on.the.landline.interface.can.be.bridged.onto.the.VoIP.interface.and.vice-versa.. Optional.caller.authorization.secured.by.caller-id.validation.or.pin-code.protection.prevents.abuse. Optional.destination.number.can.be.preconfigured,.e.g..for.redirecting.all.landline.calls.to.you.when.you.are. travelling. HOWTOCONFIgUREBRIDgINg 1). Go.to.dualphone.net.and.login.under.configuration. 2). Choose.Advanced + Bridging.and.follow.instruction.there. ■ l a n cordless dualphone 35 usInG addItIonal handsets You.can.make.3-way.conference.calls.that.allow.you.and.two.other.parties.to.participate.in.the.same.conversation.. HOWTOMaKEaCONFERENCECaLLWITHONEExTERNaLPaRTY aNDTWOINTERNaLPaRTIES. You.can.make.a.3-way.conference.call.that.includes.two.handsets.registered.with.the.same.gateway.and.either. an.Internet.call.or.a.landline.call. 1). Type.the.phone.number.you.want.to.call,.and.then.press.the.Green phone.or.press.the.Options.soft.key. and.choose.Call on landline.if.you.want.to.make.a.landline.call. 2). When.the.called.party.has.answered,.press.the.Hold.key. 3). Press.the.Options.soft.key,.choose.Intercom,.and.then.press.the.OK.key 4). Choose.the.preferred.handset,.and.then.press.the.OK.key. 5). When.the.other.handset.has.answered.the.call,.press.the.Options.soft.key,.choose.Conference,.and.then. press.the.OK.key..All.three.parties.are.now.in.conference. 6). Press.the.Red phone.key.to.end.the.conference.and.to.end.both.calls.. HOWTOMaKEaCONFERENCECaLLWITHTWOExTERNaLPaRTIES You.can.make.a.3-way.conference.call.where.one.external.call.is.an.Internet.call.and.the.other.external.call.a. landline.call. 1). Type.the.phone.number.you.want.to.call,.press.the.Options.soft.key,.and.then.choose.Call on landline.. Press.the.OK.key. 2). When.the.called.party.has.answered.the.call,.and.then.press.the.Hold.soft.key. 3). Press.the.Options.soft.key,.choose.Contacts,.and.then.press.the.OK.key 4). Choose.the.preferred.contact,.and.then.press.the.OK.key.. 5). When.the.other.handset.has.answered.the.call,.press.the.Options.soft.key,.choose.Conference,.and.then. press.the.OK.key..All.three.parties.are.now.in.conference. 6). Press.the.Red phone.key.to.end.the.conference.and.to.end.both.calls.. You.can.also.choose.to.make.the.first.number.you.dial.the.Internet.call,.and.the.second.number.you.dial.the. landline.call.. 1). 2). 3). 4). 5). Type.the.phone.number.you.want.to.call,.and.then.press.the.Green phone.key. When.the.called.party.has.answered.the.call,.press.the.Hold key. Press.the.Options.soft.key,.choose.Contacts,.and.then.press.the.OK.key Press.the.Select.soft.key,.Press.the.Options.soft.key,.and.then.choose.Call on landline..Press.the.OK.key.. When.the.other.handset.has.answered.the.call,.press.the.Options.soft.key,.choose.Conference,.and.then. press.the OK.key..All.three.parties.are.now.in.conference.. Press.the.Red phone.key.to.end.the.conference.and.to.end.both.calls.. NOTE:.If.you.want.to.make.a.3-way.conference.where.the.two.external.calls.are.landline.calls,.you.need. to.contact.your.telephony.provider.to.find.out.if.they.support.this.feature. ■ l a n cordless dualphone 36 makInG conference calls E Ng L I S H MaKINgCON F E R E N C E C a L L S en glish How to join a call You can join an ongoing call from another handset. 1) In Idle mode, press the Options soft key, and then choose Active calls. Press the OK key. The phone number of the party in call is displayed. If the party in call is in Contacts, the name is also displayed. 2) Choose the call you want to join and press the Join soft key. An advisory tone is emitted informing the caller on the other handset that you are joining the call. 3) Press the Red phone key to leave the call. An advisory tone is emitted informing the caller on the other handset that you are leaving the call. ■ l a n cordless dualphone 37 m a ki n g c o n f e r e n c e c a l l s E Ng L I S H SPECIFYI N g S E T T I N g S aUDIOSETTINgS HOWTOCHaNgETHERINgERMELODY You. can. specify. a. ringer. melody. for. each. type. of. call. that. you. receive,. so. that. you. can. easily. distinguish. betwee.n.Internet,.landline,.and.internal.calls. 1). 2). 3). 4). In.the.Main.menu,.choose.Settings,.and.then.press.the.OK.key. Choose.Audio settings,.press.the.OK.key,.and.then.choose.Ringer Melody..Press.the.OK.key. Choose.the.type.of.call.for.which.you.want.to.specify.a.ringer.melody,.and.then.press.the.OK.key. Select.a.ringer.melody.from.the.list,.press.the.OK.key,.and.then.press.the.Red phone.key. You.can.listen.to.the.various.melodies,.before.you.decide.which.one.to.use. ■ Press.the.Play.soft.key,.and.use.the.arrow.keys.to.scroll.through.all.the.melodies..To.stop,.press.the.Stop. soft.key. HOWTOCHaNgETHERINgERVOLUME You.can.increase.or.decrease.the.ringer.volume.of.a.handset. 1). In.the.Main.menu,.choose.Settings,.and.then.press.the.OK.key. 2). Choose.Audio settings,.press.the OK.key,.and.then.choose.Ringer volume..Press.the.OK.key. 3). Use.the.navigation.keys.to.adjust.the.volume,.and.then.press.the.OK.key. HOWTOCHaNgETHEMESSagETONE You.can.specify.a.tone.that.lets.you.know.that.you.have.a.message.waiting.for.you. 1). In.the.Main.menu,.choose.Settings,.and.then.press.the.OK.key. 2). Choose.Audio settings,.press.the.OK.key,.and.then.choose.Message tone..Press.the.OK.key. 3). Choose.a.tone.from.the.list,.and.then.press.the.OK.key..Select.Silent.if.you.do.not.want.a.message.tone. You.can.listen.to.the.various.tones.before.you.decide.which.one.to.use. ■ Press.the.Play.soft.key,.and.use.the.arrow.keys.to.scroll.through.all.the.tones..To.stop,.press.the.Stop.soft. key. HOWTOCHaNgETHEKEYPaDSOUND You.can.specify.a.sound.that.you.will.hear.when.you.press.a.key.on.the.handset. 1). In.the.Main.menu,.choose.Settings,.and.then.press.the.OK.key.. 2). Choose.Audio settings,.and.then.choose.Keypad sound.. 3). Choose.a.sound.from.the.list.and.then.press.the.OK.key..Choose.disabled.if.you.do.not.want.a.keypad. sound. ■ l a n cordless dualphone 38 specIfYInG settInGs aDVISORYTONE WHaTITMEaNS Battery alert. The.batteries.must.be.charged. Range tone. The.handset.is.out.of.reach.of.the.gateway. Confirmation . You.have.saved.or.deleted.an.entry,.or.made.a.selection. By.default.all.advisory.tones.are.activated,.however,.you.can.activate.or.deactivate.them.individually. 1). In.the.Main.menu,.choose.Settings and.then.press.the.OK.key. 2). Choose.Audio Settings,.and.then.press.the.OK.key. 3). Choose.Advisory tones,.press.the OK.key,.and.then.select.the.type.of.tone.you.want.to.disable.or.enable. by.pressing.the.OK.key..Press.the.Red phone.key. HOWTOaCTIVaTESILENTMODE You.can.activate.silent.mode.to.disable.all.ringer.melodies.and.confirmation.sounds. 1). In.the.Main.menu,.choose.Settings,.and.then.press.the.OK.key.. 2). Choose.Silence,.press.the.OK.key,.and.then.choose.Silent.on..Press.the.OK.key. Alternatively,.you.can.activate.silent.mode.from.the.idle.menu.by.pressing.the.#.key.and.then.the.Silence.off. soft.key.. TELEPHONYSETTINgS HOWTOaCTIVaTECaLLFORWaRDINg You.use.call.forwarding. to. specify. a. number. to. which. your. calls. are. forwarded,. when. you. are. not. able. to. answe.r.your.calls..To.be.able.to.use.call.forwarding,.you.will.have.to.configure.your.call.forwarding.settings.. Contact.you.Internet.Telephony.Service.Provider.for.more.information. 1). In.the.Main.menu,.choose.Settings,.and.then.press.the.OK.key. 2). Choose Telephone settings,.choose.Call forward,.Landline.or.account 1-8.and.then.press.the.OK.key.. The.following.call.forward.options.are.displayed.(if.your.Internet.Telephony.Service.Provider.does.not. support.call.forwarding,.the.options.are.disabled): OPTION WHaTITDOES On busy. Forwards.the.call.to.a.dedicated.number.when.you.are.talking.on.the.phone. On no answer. Forwards.the.call.to.a.dedicated.number.when.you.do.not.answer.the.phone. Unconditionally. Forwards.all.incoming.calls.to.a.dedicated.number.. 3). Choose.the.preferred.option,.and.then.choose.Activate. 4). Type.the.number.to.which.you.want.to.forward.your.calls,.or.press.the.Options.soft.key,.choose.Contacts,. and.then.choose.the.preferred.contact..Press.the.OK.key..The.call.forwarding.option.is.now.enabled. ■ l a n cordless dualphone 39 specIfYInG settInGs E Ng L I S H HOWTOUSEaDVISORYTONES Advisory.tones.let.you.know.that.something.is.about.to.happen.or.is.happening..The.DUALphone.has.the. followin.g.advisory.tones: How to specify a landline voicemail number 1) In the Main menu, choose Settings, and then press the OK key. 2) Choose Telephony settings, choose Voicemail, and then press the OK key. 3) Choose Landline, enter the preferred number, and then press the OK key. 4) Press the Yes soft key to save. 5) Press OK to reset. How to specify a VoIP voicemail number You can specify a VoIP voicemail number for each VoIP account selected in Call Groups. For more information on Call Groups, see page 20 1) 2) 3) 4) 5) In the Main menu, choose Settings, and then press the OK key. Choose Telephony settings, choose Voicemail, and then press the OK key. Choose the preferred account, and then choose Voicemail. Enter the voicemail number, press the OK key, and then the Yes soft key to save. Choose Subscription, and then enter the SIP address of the subscription service. (Contact your Internet Telephony Service Provider for more information on this feature.) 6) Press the OK key, and then the Yes soft key to save. 7) Press OK to reset. How to set auto answer Auto answer allows you to answer incoming calls automatically when you pick up the handset from the charger. 1) In the Main menu, choose Settings, and then press the OK key. 2) Choose Telephony settings, press the OK key, and then choose Answer mode. Press the OK key. 3) Choose Auto answer, press the OK key, and then select Enabled. Press the Red phone key. How to set any key answer Any key answer allows you to answer incoming calls by pressing any key on the keypad. 1) In the Main menu, choose Settings and then press the OK key. 2) Choose Telephony settings, press the OK key, and then choose Answer mode. Press the OK key. 3) Choose Any key answer, press the OK key, and then select Enabled. Press the Red phone key. How to set landline dial mode 1) In the Main menu, choose Settings, and then press the OK key. 2) Choose Telephony settings, press the OK key, and then choose Landline dial mode. Press the OK key. 3) Select Pulse or Tone, press the OK key, and then press the Yes soft key when prompted to save. HOw to configure Least Cost Routing (LCR) 1) Go to www.dualphone.net and login under configuration. 2) Choose Advanced + LCR and follow instruction there. How to specify an emergency line The default setting for emergency dialing is VoIP. However, you can always change which way you want your emergency calls routed. ■ l a n cordless dualphone 40 SPECI F Y IN G SETT I NG S en glish How to deactivate call forwarding 1) In the Main menu, choose Settings, and then press the OK key. 2) Choose Telephony settings, choose Call forward, Landline or account 1-8, and then press the OK key. 3) Choose the call forward option you want to deactivate, and then press the OK key. 4) Choose Deactivate, and then press the OK key. In.the.Main.menu,.choose.Settings,.and.then.press.the.OK.key. Choose.Telephony settings,.press.the.OK.key,.and.then.choose.Emergency line..Press.the.OK.key. Select Landline.or.VoIP line account 1-8. Press.OK.to.reset. IMPORTANT:.If.your.emergency.line.is.set.to.VoIP,.we.strongly.recommend.that.you.check.with.your. Intern.et.Telephony.Service.Provider.whether.they.have.a.service.that.makes.it.possible.for.your.call.to. reach.the.appropriate.emergency.call.center.and.for.the.emergency.call.center.to.locate.where.you.are. callin.g.from..If.you.set.emergency.line.to.landline,.check.that.you.have.a.working.landline.connection. HOWTOSPECIFYTHEPRIMaRYLINEFOROUTgOINgCaLLS For.each.handset,.the.primary.line.setting.determines.which.line.is.used.for.outgoing.calls.when.you.press. the.Green.phone.key..You.can.choose.landline.or.VoIPline. 1). In.the.Main.menu,.choose.Settings,.and.then.press.the.OK.key. 2). Choose.Telephony settings,.press.the.OK.key,.and.then.choose.Primary line..Press.the.OK.key. 3). Select.Landline.or.VoIP line,.and.then.press.the.OK.key. HOWTOSPECIFYaVOIPLINEFOROUTgOINgCaLLS For.each.handset.the.VoIP.line.settings.determines.which.VoIP.account.is.used.for.outgoing.VoIP.calls. 1). In.the.Main.menu,.choose.Settings,.and.then.press.the.OK.key. 2). Choose.Telephony settings,.press.the.OK key,.and.then.choose.VoIP line..Press.the.OK.key,.and.then. enter.the.PIN.code..The.PIN.code.is.1234. 3). Select.the.VoIP.account.you.want.to.use.for.outgoing.VoIP.calls..All.nicknames.for.the.VoIP.accounts. you.subscribe.to.are.listed..If.you.only.have.one.account,.only.one.nickname.is.listed. INFORMaTIONPUSHSETTINgS HOWTOSETaUTOSHOWON-SCREENINFORMaTIONSERVICES With.this.feature.you.specify.when.you.want.the.DUALphone.to.display.on-screen.information.services. 1). In.the.Main.menu,.choose.Settings,.and.then.press.the.OK.key. 2). Choose.Information push,.and.then.press.the.OK.key. 3). Select.the.relevant.option,.and.then.press.the.OK.key..You.can.choose.one.of.the.following.options: OPTION WHaTITDOES Never. . Displays.on-screen.information.services.only.when.you.are.using.the.Info. services.menu. When cradled. Displays.on-screen.information.services.when.the.handset.is.in.the.charging.cradle. Always. . Displays.on-screen.information.services.at.all.times.when.you.are.not.making. phone.calls..(This.option.decreases.the.standby.time.) ■ l a n cordless dualphone 41 specIfYInG settInGs E Ng L I S H 1). 2). 3). 4). HOWTODISaBLEaUTOMaTICTIMESETTINg By.default,.date.and.time.are.automatically.synchronized.with.a.time.server.on.the.Internet.to.ensure.that.the.time. and.date.displayed.on.the.DUALphone.is.always.correct..However,.you.can.always.disable.automatic.time.setting. 1). 2). 3). 4). In.the.Main.menu,.choose.Settings,.and.then.press.the.OK.key. Choose.System settings,.press.the.OK.key,.and.then.choose.Time and date..Press.the.OK.key. Choose.Auto set time,.press.the.OK.key,.and.then.select.Auto set time off..Press.the.OK.key. Press.the.Reset button.on.the.rear.of.the.gateway.for.the.changes.to.take.effect. HOWTOCHaNgETHETIMEFORMaT 1). In.the.Main.menu,.choose.Settings,.and.then.press.the.OK.key. 2). Choose.System settings,.press.the.OK.key,.and.then.choose.Time and date..Press.the OK.key. 3). Choose.Time format,.press.the OK.key,.and.then.select.AM/PM.or.24 hour..Press.the.OK.key. HOWTOSETTIMEMaNUaLLY If.you.disable.automatic.time.setting,.you.can.set.the.time.manually. 1). In.the.Main.menu,.choose.Settings.and.then.press.the.OK.key. 2). Choose.System settings,.press.the.OK.key,.and.then.choose.Time and date..Press.the.OK.key. 3). Choose.Set time,.press.the.OK.key,.and.then.use.the.key.pad.to.type.the.correct.time..Press.the.OK.key. HOWTOSETTHEDaTEMaNUaLLY If.you.disable.automatic.time.and.date.setting,.you.can.set.the.date.manually. 1). In.the.Main.menu,.choose.Settings,.and.then.press.the.OK.key. 2). Choose.System settings,.press.the.OK.key,.and.then.choose.Time and date..Press.the OK.key. 3). Choose.Set date,.press.the.OK.key,.and.then.use.the.key.pad.to.type.the.correct.date..Press.the.OK.key. HOWTOCHaNgETHEDaTEFORMaT 1). In.the.Main.menu,.choose.Settings,.and.then.press.the.OK.key. 2). Choose.System settings,.press.the.OK.key,.and.then.choose.Time and date..Press.the.OK.key. 3). Choose.Date format,.press.the.OK.key,.and.then.select.US format.or.European format..Press.the.OK.key. HOWTOCHaNgETHETIMEZONE Setting.the.time.zone.properly.ensures.that.the.time.displayed.on.the.Idle.mode.screen.corresponds.to.the.time. zone.that.you.are.in..For.automatic.time.setting.to.function.properly,.it.is.important.that.you.have.specified.the. correct.time.zone. 1). In.the.Main.menu,.choose.Settings,.and.then.press.the.OK.key. 2). Choose.System settings,.press.the.OK.key,.and.then.choose.Time and date..Press.the.OK.key. 3). Choose.Time zone,.press.the.OK.key,.and.then.select.the.appropriate.time.zone..Press.the.OK.key. Date.and.time.are.automatically.synchronized.with.a.time.server.on.the.Internet.to.ensure.that.the.time.and.date. displayed.on.the.DUALphone.is.always.correct. HOWTOENaBLEORDISaBLEDaYLIgHTSaVINgTIME 1). In.the.Main.menu,.choose.Settings,.and.then.press.the.OK.key. 2). Choose.System settings,.press.the.OK.key,.and.then.choose.Time and date..Press.the.OK.key. 3). Choose.Daylight saving,.press.the.OK.key,.and.then.select.1 hour DST.or.No DST..Press.the OK.key. ■ l a n cordless dualphone 42 specIfYInG settInGs E Ng L I S H SYSTEMSETTINgS E Ng L I S H HOWTOSETHaNDSETLaNgUagE You.can.choose.which.language.to.be.used.in.the.handset.display. 1). In.the.Main.menu,.choose.Settings,.and.then.press.the OK.key. 2). Choose.System settings,.press.the OK.key,.and.then.choose.Language..Press.the.OK.key. 3). Select.the.preferred.language,.and.then.press.the.OK.key. Downloadable.language.packets.are.found.by.selecting.‘all’. NOTE:.We.recommend.that.you.do.not.reset.the.gateway.during.the.update.process. If.you.have.selected.a.language.you.do.not.understand,.and.you.cannot.find.the.language.menu.again,.do.the. following: ■In.Idle.mode,.press.the.OK.key.to.enter.the.main.menu,.and.then.type.888..The.language.list.is.displayed.. HOWTOCHaNgETHEDISPLaYCONTRaST 1). In.the.Main.menu,.choose.Settings.and.then.press.the.OK.key. 2). Choose.System settings,.press.the.OK.key,.and.then.choose.Handset settings..Press.the.OK.key. 3). Choose.Display Contrast,.press.the.OK.key,.and.then.use.the.navigation.keys.to.select.the.preferred.contras.t. You.can.always.restore.the.default.contrast.settings. 1). In.the.Main.menu,.choose.Settings.and.then.press.the.OK.key. 2). Choose.System settings,.press.the.OK.key,.and.then.choose.Handset settings..Press.the.OK.key. 3). Choose.Display Contrast,.press.the.OK.key,.and.then.press.the.Restore soft.key. -orA)..In.the.Main.menu,.press.555,.and.then.press.the.Yes.soft.key,.when.prompted.to.restore.the.contrast. HOWTOUPDaTETHEFIRMWaRE When.new.firmware.is.available.the.displays.reads,.“New firmware available”. 1). Press.the.OK.key..The.Firmware update.menu.appears. 2). To.update.to.the.latest.version,.choose.the.update.listed.on.the.Simple.tab,.press.the.OK.key,.and.then.press. the.Yes.soft.key.when.prompted.if.you.want.to.update.the.system..If.you.press.the.View.soft.key.before.you. start.installation,.you.can.find.out.about.the.software.version.number.and.the.date.and.time.it.was.released. 3).. Select.language.and.press.OK. The.update.time.varies.depending.on.the.size.of.the.update.and.the.speed.of.your.Internet.connection..During. the.update.process.the.following.steps.are.listed.in.the.display: ■ ■ ■ ■ Getting.gateway Updating.gateway Getting.handset Updating.handset When.a.step.has.been.completed.successfully,.a.green.checkmark.appears.after.the.message..While.the.update. is.in.progress.you.cannot.make.calls.on.the.DUALphone..If.you.have.more.than.one.handset.registered.with. the.gateway,.all.handsets.will.be.updated.when.you.press.the.OK.key,.but.not.necessarily.at.the.same.time. NOTE:.We.recommend.that.you.do.not.reset.the.gateway.during.the.update.process. ■ l a n cordless dualphone 43 specIfYInG settInGs HOWTOFINDOUTWHICHFIRMWaREVERSIONISCURRENTLYINSTaLLED If.you.are.uncertain.whether.you.have.updated.to.the.latest.firmware.version,.you.can.check.which.version. number.is.currently.installed,.and.compare.with.the.version.number.listed.on.the.Simple.tab. ■ In.Idle.mode,.press.the.volume up.key,.on.the.side.of.the.DUALphone.and.scroll.down. HOWTORESTORECONFIgURaTIONSETTINgS When.you.restore.the.DUALphone’s.configuration.settings,.the.settings.revert.to.the.online.settings..That.is,.if. you.have.made.changes.to.the.VoIP.settings.on.the.handset,.they.are.overwritten.by.the.online.settings. 1). In.the.Main.menu,.choose.Settings,.and.then.press.the.OK.key. 2). Choose.System settings,.press.the.OK.key,.and.then.choose Restore settings..Press.the.OK.key. 3). Press.the.Yes.soft.key.when.prompted.to.save,.and.then.press.the.Reset.button.on.the.rear.of.the.gateway. for.the.changes.to.take.effect. NOTE:..If.you.have.not.configured.your.DUALphone.online,.you.cannot.restore.the.settings. HOWTOSPECIFYaCOUNTRY Specifying.the.correct.country.ensures.that.your.landline.connection.functions.properly.and.that.you.can,.for. example,.receive.Caller.ID. information.on.your.DUALphone..It.is.therefore.important.that.you. specify.in. which.country.you.are.using.the.DUALphone.. 1). In.the.Main.menu,.choose.Settings,.and.then.press.the.OK.key. 2). Choose.System settings,.press.the.OK.key,.and.then.choose.Country selection..Press.the.OK.key. 3). Select.the.country.that.you.are.in,.and.then.press.the.OK.key. 4).. Press.OK.to.reset. NOTE:.The.handset.language.and.country.settings.are.independent.of.each.other..You.can.change.the. handset.language.whenever.you.want,.but.we.recommend.that.you.only.change.the.country.settings.if.you. bring.your.DUALphone.to.another.country.and.want.to.make.landline.calls..Also.note.that.you.cannot. change.the.country.selection.in.the.US.version.of.the.DUALphone. VOIPSETTINgS You.use.VoIP.settings.to.configure.your.DUALphone..Typically,.you.configure.your.VoIP.settings.on.the.Inter.net;. however,.in.some.situations.you.may.want.to.do.it.using.the.handset. HOWTOaCCESSTHEVOIPSETTINgS 1). In.the.Main.menu,.choose.Settings,.and.then.press.the OK.key. 2). Choose.VoIP settings,.press.the.OK.key,.and.then.enter.your.PIN.code.(the.default.PIN.code.is.1234).. Press.the.OK.key..You.can.now.change.your.Server.and.Account.settings. ■ l a n cordless dualphone 44 specIfYInG settInGs E Ng L I S H HOWTOREVERTTOaNOLDERFIRMWaREVERSION 1). In.the.Main.menu,.choose.Settings,.and.then.press.the.OK.key. 2). Choose.System settings,.press.the.OK.key,.and.then.choose.Firmware update. 3). Use.the.arrow.keys.to.navigate.to.the.Advanced.tab,.choose.the.preferred.update,.press.the.OK.key,.and. then.press.the.Yes.soft.key.when.prompted.to.update.the.system. 4).. If.promted,.select.language.and.press.OK. E Ng L I S H The.VoIP.settings.menu.contains.the.following.settings: SERVERSETTINg WHaTITMEaNS Domain Domain.name SIP proxy Usually.the.same.as.DomainaCCOUNTSSETTINg WHaTITMEaNS aCCOUNTSSETTINg WHaTITMEaNS Display name Caller.ID.that.the.called.party.sees.(optional) Nickname Name.of.the.account SIP User name Usually.the.phone.number.you.received.from.your.service.provider Authentication Name Usually.the.same.as.SIP.User.name SIP Password SIP.Password.–.the.password.you.received.from.your.service.provider For.more.information.on.configuring.your.VoIP.settings.either.using.the.handset.or.online,.see.page.17.of.this. manual. NOTE: If.you.change.any.of.the.settings,.you.will.be.asked.to.reset.your.DUALphone.for.the.changes.to. take.affect. INTERNETSETTINgS OPTION WHaTITMEaNS NAT configuration. . . Allows.confi.guration.of.features.for.resolving.of.the.NAT.-.Network.Address.. Translation.(fi.rewall.settings.on.your.router)..These.features.enable.interoperability.. with.most.types.of.routers;.see.section.“NAT.settings”.for.further.description. IP Mode. Specifi.es.whether.to.use.dynamic.or.static.IP. IP address. . Displays.the.Internet.address.of.your.DUALphone..Only.enabled.when.you. use.static.IP. Subnet mask. . Displays.the.subnet.mask.used.by.your.DUALphone..Only.enabled.when.you. use.static.IP. DNS server. . Displays.the.name.of.the.DNS.server.used.by.your.DUALphone.. Only.enabled.when.you.use.static.IP. Default gateway. . Displays.the.name.gateway.used.by.your.DUALphone..Only.enabled.when. you.use.static.IP. Most.Internet.connection-points.make.use.of.a.router..The.functionality.of.the.router.is.to.let.multiple.devices. share.a.common.global.IP-address. ■ l a n cordless dualphone 45 specIfYInG settInGs This.phone.provides.a.set.of.predefi.ned.confi.guration.templates,.namely: STUN Rport ● ●. Used.when.the.SIP.phone.is.located. behind.a.symmetric.router. . ●. 3. . .. . Used.when.the.SIP.phone.has.a.public. IP.address.or.it.is.located.behind.a SIP.aware.router.and.you.wish.to.utilize. the.routers.SIP.aware.capabilities.. . . 4. . . . Used.when.the.SIP.phone.is.located. behind.a.SIP.aware.router.and.you.wish.. to.circumvent.the.routers.SIP.aware. capabilities.. ● ● . . . . . . . 1. . Used.when.the.SIP.phone.is.located. behind.a.router.. . . 2. . . . . . . . . . . Manual. Used.in.case.profi.le.1-4.are.not.suffi.cient. . SIP-aLg PREVENTION . ● . HOWTOCHaNgENaTCONFIgURaTION NAT.configuration.can.be.changed.to.one.of.the.predefined.configurations.(recommended) 1). In.settings.menu.select.Internet setting. 2).. Select.NAT configuration. 3).. Select.profile.1, 2, 3.or 4. 4).. Press.OK.to.reset. Alternatively,.the.NAT.configuration.can.be.carried.out.manually.by.selecting.Manual.in.the.NAT.configuration. menu. NOTE:.If.manual.settings.are.equal.to.any.of.the.4.profi.les,.then.the.profi.le.will.be.highlighted. OPTION WHaTITMEaNS STUN mode. Enables/disables.STUN.feature. STUN keep alive. Sets.STUN.refresh.timing.in.seconds. RPORT mode. Enables/disables.RPORT SIP Port. . Selects.the.source.port.on.SIP.traffi.c.sent.to.the.ITSP..By.selecting.a.non-standard. SIP.port.(different.from.5060),.SIP.ALG.in.some.routers.can.be.circumvented. ■ l a n cordless dualphone 46 specIfYInG settInGs E Ng L I S H If.the.phone.is.located.behind.a.router,.some.features.must.be.used.in.order.to.let.the.ITSP.know.how.to.reach. the.phone.(to.know.the.private.IP.address.and.port.number.of.the.phone)..This.phone.includes.the.following. three.features:.STUN,.RPORT.and.SIP-ALG.circumvention..Which.combination.of.these.features.to.select. depends.on.the.router.used.and.the.network.strategy.chosen.by.the.ITSP. 1). 2). 3). 4). In.the.Settings menu,.choose.Internet settings,.and.then.press.the.OK.key. Choose.IP mode,.and.then.press.the.OK.key. Select.Static,.and.then.press.the.Yes.soft.key.when.prompted.to.save.changes. Press.the.Reset.button.on.the.rear.of.the.gateway.for.the.changes.to.take.effect. When.you.have.changed.the.IP.mode.to.static,.you.must.enter.information.about.IP.address,.Subnet.mask,. DNS.server.and.Default.gateway.fi.elds..This.information.is.part.of.the.account.information.you.received.from. your.Internet.Telephony.Service.Provider. NOTE:.On.some.routers.port.forwarding.must.be.enabled.for.the.DUALphone.to.work.properly..If.you. use.port.forwarding,.all.incoming.traffi.c.is.forwarded.to.an.internal.IP.address.that.you.specify,.and.you. must.ensure.that.the.router.always.assigns.the.same.IP.address.to.the.DUALphone..For.more.information,. refer.to.your.router’s.user.manual. HOWTODISaBLESTUN STUN. is. enabled. by. default.. However,. some. routers. have. a. built-in. method. (SIP-aware). that. prevents. the. router.from.using.STUN..Therefore,.if.you.experience.router.problems,.disabling.STUN.might.help.you.solve. your.problem..For.more.information,.see.your.router’s.user.manual. 1). 2). 3). 4). In.the.Settings.menu,.choose.Internet settings,.and.then.press.the.OK.key. Choose.STUN mode,.and.then.press.the.OK.key. Select.Disabled,.and.then.press.the.Yes.soft.key.when.prompted.to.save.changes. Press.the.Reset.button.on.the.rear.of.the.gateway.for.the.changes.to.take.effect. HOWTOCHaNgETHESTUNKEEPaLIVEINTERVaL The.default.STUN.keep.alive.count.is.90..However,.if.you.experience.router.problems,.decreasing.the.interval. might.help.you.solve.your.problem. 1). In.the.Settings.menu,.choose.Internet settings,.and.then.press.the.OK.key. 2). Choose.STUN keep alive,.and.then.press.the.OK.key. 3). Press.the.Erase.soft.key.to.delete.the.current.settings,.write.a.new.interval,.and.then.press.the.Yes.soft.key. when.prompted.to.save.changes. 4). Press.the.Reset.button.on.the.rear.of.the.gateway.for.the.changes.to.take.effect. HOWTOENaBLEDNS-SRV If.your.telephone.provider.requires.DNS-SRV,.then: 1). Go.to.www.Dualphone.net and.login.under configuration. 2). Choose.advanced.and.Voice.server.page. 3). Set.‘Proxy.Port’.to.0. ■ l a n cordless dualphone 47 specIfYInG settInGs E Ng L I S H HOWTOCHaNgETHEIPMODE Because.most.networks.use.dynamic.IP.(or.Dynamic.Host.Confi.guration.Protocol.-.DHCP),.the.default.IP. setting.is.dynamic.IP..This.means.that.your.broadband.modem.or.router.assigns.a.new.IP.address.to.the.DUALpho.ne.each.time.you.turn.on.the.phone..However.if.you.use.static.IP.on.your.network,.the.DUALphone.must. also.use.static.IP. The.following.is.a.list.of.solutions.to.the.most.common.issues.that.you.may.experience.when.you.use.the. DUALpho.ne..Most.of.the.problems.you.can.easily.solve.yourself,.whereas.others.require.that.you.contact.your. service.provider..To.view.the.most.recently.updated.troubleshooting.information,.go.to.www.dualphone.net. PROBLEM POSSIBLECaUSES POSSIBLESOLUTIONS The.handset.display. is.black. 1). Handset.is.in.power.saving. mode. 2). Batteries.are.drained. 3). Power.is.not.turned.on. 1). Press.any.key. 2). Charge.the.batteries. 3). Check.that.the.batteries.are.inserted. with.the.plus.and.minus.ends.facing. the.correct.way..Long-press.the.Red phone.key. The.handset.does. not.charge. The.handset.registration.failed,.and.the. status.indicator.on. the.display.is.black. The.display.reads,. “Searching for Gateway”. The.POWER. indicator.on.the. gateway.is.not.lit. The.I-NET.indicator. on.the.gateway.is.not. lit. 2). Batteries.are.not.inserted. . correctly. 1). Check.that.the.power.cord.is. . connected.properly.to.the.charger,. and.that.power.is.turned.on. 2). Check.that.the.batteries.are.inserted. with.the.plus.and.minus.ends.facing. the.correct.way.. 1). Handset.is.out.of.range.of.the. gateway. 1). Move.the.handset.closer.to.the. . gateway,.place.it.in.the.charger,.and. reset.the.gateway. 1). Handset.is.out.of.range.of.the. gateway. 2). Gateway.is.not.powered. 1). Move.the.handset.closer.to.the. . gateway. 2). Plug.gateway.into.a.power.outlet..(If. possible,.a.continuous.power.outlet.) 1). The.charger.is.not.powered. 1). Check.that.the.gateway.power.cord. is.connected.properly,.and.that.the. adapter.is.plugged.into.a.power. . outlet..(If.possible,.a.continuous. power.outlet.) 1). Gateway.is.not.powered. 1). The.Ethernet.cable.is.not. . connected. 2). The.router.or.modem.is.not. . powered. 3). The.gateway.cannot.retrieve.an. IP.address. There.is.no.audio. when.I.make.Internet. calls. 1). Check.that.the.Ethernet.cable.between. the.WAN.port.on.the.gateway.and. the.LAN.port.on.your.modem.or. router.is.connected.properly. 2). Turn.on.the.power.to.the.modem.or. router. 3). In.Internet settings,.check.that.the. IP.mode.corresponds.to.the.IP.mode. of.your.Internet.connection. 1). Use.port.forwarding..Check.your. router’s.user.manual.to.see.how.to. confi.gure.port.forwarding. 1). The.router.blocks.audio. ■ l a n cordless dualphone 48 trouBleshootInG E Ng L I S H TROUBL E S H O O T I N g POSSIBLECaUSES POSSIBLESOLUTIONS I.cannot.make. landline.calls. 1). The.landline.cable.is.not. . connected. 1). Check.that.the.landline.cable. . between.the Line.port.on.the. gateway.and.the.telephone.wall. outlet.is.connected.properly. 2). Contact.your.landline.provider. 2). The.landline.is.out.of.order. I.cannot.receive. landline.calls. 1). The.country.setting.is.wrong. 1). Check.that.you.have.chosen.the. country.that.you.are.in..Open.the. System settings.menu,.choose. Country selection,.and.then.choose. the.country.that.you.are.in. I.cannot.make. Internet.calls,.the. VoIP.indicator.on. the.gateway.is.not.lit,. and.the.right.status. indicator.in.the.upper. left.corner.of.the. display.is.black. 1). The.confi.guration.of.the. . DUALphone.is.not.complete. 1). Check.that.you.have.confi.gured. your.DUALphone.properly..Go.to. www.dualphone.net.and.then.click. Configuration..For.more.information,.contact.your.Internet.Telephony. Service.Provider. 2). Reset.the.gateway.and.allow.the. gateway.2.minutes.to.log.in.at.your. Internet.Telephony.Service.Provider. 3). Check.that.you.have.confi.gured. your.router.so.that.it.always.assigns. the.same.IP.address.to.your.DUALphone’s.MAC.address.when.using. port.forwarding..Otherwise.incoming. traffi.c.is.probably.not.forwarded.to. your.DUALphone..For.more. information,.check.your.router’s. manual. 4). a) Try.disabling.STUN..Open.. . the.Internet.settings.menu,.. . choose.STUN mode,.and.select.. . Disabled..Reset.the.gateway... . For.more.information,.contact.. . your.Internet.Telephony.Service. . . Provider...... . b). Use.port.forwarding..The.default.. . SIP.port.is.5060,.and.the.default. . . RTP.port.is.5004..Ensure.that.. . your.router.always.assigns.the.. . same.IP.address.to.your.DUAL. . phone.when.using.port.forward.-. . ing..For.more.information,... . check.your.router’s.manual. 5). Check.your.router’s.user.manual.to. see.how.to.update.the.fi.rmware. 2). The.gateway.has.not.been. . reset.after.you.saved.the. . confi.guration. 3). The.router.uses.port.forwarding. 4). The.router.blocks.Internet. . telephony. 5). The.router.fi.rmware.needs. . updating. ■ l a n cordless dualphone 49 trouBleshootInG E Ng L I S H PROBLEM POSSIBLECaUSES POSSIBLESOLUTIONS When.I.make. Internet.calls,.the. sound.quality.is.poor. 1). There.is.too.much.simultaneous. data.traffi.c.on.your.broadband. connection. 1). a). Reduce.the.amount.of.traffi.c.on.. . your.broadband.connection. . b). Sign.up.for.a.Quality.of.Service.. . agreement.with.your.broadband.. . provider. . c) Order.a.connection.with.higher.. . speed.from.your.broadband.. . provider.. 2). Contact.your.Internet.Telephony. Service.Provider.regarding.ensured. voice.prioritization.across.the. . network. 2). Your.Internet.Telephony.Service. Provider’s.Quality.of.Service.is. based.on.a.“best.efforts”.rather. than.a.guaranteed.voice.priority. method. I.cannot.make. Internet.calls,.but.it. worked.yesterday. 1). The.gateway.is.not.logged.in.at. the.Internet.Telephony.Service. Provider. 2). The.router.is.turned.off. 3). The.SIP.server.is.down. 4). The.Internet.connection.is.down. 1). Check.that.all.cables.are.connected. properly,.and.check.that.power.is. turned.on,.and.then.reset.the.gateway. 2). Turn.on.the.router. 3). Contact.your.Internet.Telephony. Service.Provider. 4). Contact.your.broadband.provider. ■ l a n cordless dualphone 50 trouBleshootInG E Ng L I S H PROBLEM