1
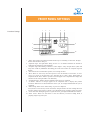
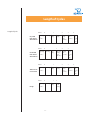
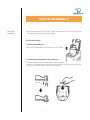
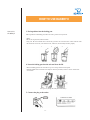
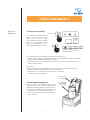
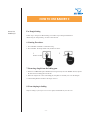
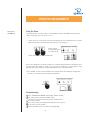
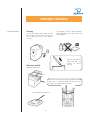
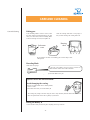
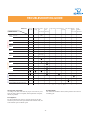
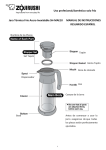
How to Enjoy Zojirushi Bakery II
Operating Instructions
BBCC – M15
CONTENTS
Important Safeguards
Save These Instructions
Machine Specifications
Major Parts Names
Front Panel Settings
Length of Cycles
How to Use the Bakery II
Bread Settings
• Dough Settings
• Using the Timer
Care and Cleaning
Trouble Shooting Guide
Questions & Answers
2
3
3
4
5
6
7~10
11
12
13~14
15
16~17
IMPORTANT SAFEGUARDS
Important
Safeguards
WHEN USING ELECTRICAL APPLIANCES, BASIC SAFETY PRECAUTIONS SHOULD ALWAYS
BE FOLLOWED, INCLUDING THE FOLLOWING:
Operation Instructions & Recipes
1. Read all instructions carefully.
2. Do not touch hot surfaces. Use handles or knobs. Do not close or clog the steam vent opening under
any circumstances.
3. To protect against electrical shock, do not immerse cord, plug, Home Bakery, lid, or baking pan
bottom in water or other liquid.
4. Close supervision is necessary when the appliance is used by or near children.
5. Unplug the power supply cord when the appliance is not in use, or before cleaning. Allow to cool
before putting on or taking off any parts, and before cleaning the appliance.
6. Do not use or operate the appliance with a damaged cord or plug, or after the appliance has been
damaged in any manner. Return the appliance to the nearest authorized service facility or dealer for
examination, repair, or adjustment.
7. The use of accessory attachments not recommended or sold by the appliance manufacturer may cause
injuries.
8. Do not use outdoors.
9. Do not let the power supply cord hang over the edge of a table or counter, or touch hot surfaces.
10. Do not place the appliance on or near heat sources such as gas or electric stoves, ovens, or burners.
11. Extreme caution must be given when moving the appliance containing hot contents or liquids.
12. To disconnect, press RESET and turn all controls to "off", then remove plug from wall outlet. Never
pull on cord.
13. Do not use the appliance for other than intended or specified purposes.
-2-
SAVE THESE INSTRUCTIONS/
MACHINE SPECIFICATIONS
Save
These Instructions
Machine
Specifications
THIS APPLIANCE IS FOR HOUSEHOLD USE ONLY.
Operation Instructions & Recipes
Note:
A. A short power supply cord is provided to reduce the risk resulting from becoming entangled in or
tripping over a longer cord.
B. Extension cords are available and may be used if care is exercised in their use.
C. When an extension cord is used:
(1) the marked electrical rating of the extension cord should be at least as great as the electrical
rating of the appliance, and
(2) the longer cord should be arranged so that it will not drape over the countertop or tabletop
where it can be pulled on by children or tripped over unintentionally.
Specifications
Capacity:
Power:
Consumption:
Voltage:
Dimensions:
Weight:
Timer:
Power Cord:
Bread – 1 loaf approximately
1 to 1-1/2 lbs. (6" to 8" in height)
Main Heater – 500W
Kneading Motor – 91W
120V, 60Hz
8 "x 14" x 14"
16.5 lbs.
White Bread Setting 4.5 hr. ~ 13.0 hr.
Approx. 3 ft.
-3-
MAJOR PARTS NAME
Major Parts Name
Kneading Blade
Handle
Handle
Lid: Detachable
Rotating Shaft
Front Panel
Power Supply Cord
Main Body
Attachment Plug
Accessories
Measuring Spoon: The large cup measures. 1 tablespoon; the small
cup measures 1 teaspoon.
You can also measure to the halfway mark,
which equals half tablespoon and half teaspoon
respectively.
SMALL: The small spoon equals about 1 teaspoon.
LARGE: The large spoon equals about 1 tablespoon.
-4-
Half
teaspoon
Half
tablespoon
FRONT PANEL SETTINGS
1
Front Panel Settings
2
7
3
4
5
8
6
9
10
1
"Timer" light: Lights green when the machine has been pre-set for baking at a later time. The light
flashes when the timer is being set.
2 "Operation" light: The light flashes during the first 5 to 30 minutes indication the machine is
monitoring the temperature of the ingredients.
3 "Complete" light: When baking is finished or when dough is ready, the light flashes yellow and
beeps, then it will stay illuminated. The baking pan can be removed after the "Complete" light has
flashed.
4 "Start" button: Press for immediate operation, or for starting the timer.
5 "Reset" button: A "cancel" key that can be pressed to reset the machine, reset the timer, or reset a
process. To cancel out all operations, press and hold the key until it beeps. When baking is
completed and the "Reset" button is pressed an "H" will appear in the completion timer display. The
machine can’t be used again until it cools sufficiently.
6 "Completion Timer": Displays the time remaining until a process is completed.
7 "30 minute" indicator: A red light appears in the completion timer to display thirty minute
increments. When there are fifteen minutes left in the cycle, the red light will flash until the cycle is
completed.
8 "Timer Setting" button: Press "Timer Setting" to preset the completion
time (increases or decreases by 30 min. increments). triangle advances the timer. Triangle decreases
the timer. Settings range from 4 hr. 30 min. to 13 hr. Red light appears to display 30 min. increments.
9 "Course Selection": Red light appears for regular selections, green light for Mixed Bread selections.
10 "Select Course" button: Use this button to select the function you need for baking bread, or
preparing dough. Length of Cycles
-5-
Length of Cycles
Length of Cycles
Hours
Dry Milk
Basic Bread
Mixed Bread
Second
rising
1
0
0
1
Preheating Kneading First
rising
(5~
30 min.)
-6-
3
Third
rising
(40~
60 min.)
2
2
Second
rising
2
Second
rising
4
Baking
(44~
52 min.)
Cooling
(Completion)
3
Baking
(44~
52 min.)
Second
rising
(45~
65 min.)
1
Preheating Kneading First
(5~
rising
30 min.)
Hours
Dough
0
2
Preheating Kneading First
(5~
rising
30 min.)
Hours
Whole Grain
Sweet Bread
1
Preheating Kneading First
rising
(5~
30 min.)
Hours
Fresh Milk
Basic Bread
Mixed Bread
0
Cooling
(Completion)
3
Third
rising
(35~
55 min.)
4
Baking
(44~
52 min.)
Cooling
(Completion)
HOW TO USE BAKERY II
How to Use
the Bakery II
The Recipe Book includes recipes for many varieties of breads, and doughs. Choose the recipe and the
setting you will need, and follow the steps listed below.
For Bread Settings.
1. Remove the baking pan.
Open the lid and pull the baking pan, by the handle, up out of the unit.
2. Attach the kneading blade to the baking pan.
As shown in the figure, insert the kneading blade onto the rotating shaft.
* Be sure to set the kneading blade securely, otherwise the blade may come off during operation, which
may affect the kneading, mixing, or cause leakage from the pan.
Firmly insert
-7-
HOW TO USE BAKERY II
How to Use
the Bakery II
3. Put ingredients into the baking pan.
Place ingredients in the baking pan, follow the order given in the recipe book.
1 Water
2 Flour, salt, sugar, butter, milk as needed.
3 Dry yeast. Be sure to add this last so that the dry yeast does not come into direct contact with the water.
* Be careful not to mix the yeast with the water, otherwise, the bread may not bake properly.
1
2
3
4. Insert the baking pan into the unit and close the lid.
• Insert the baking pan into the unit with two grooves facing toward the front panel.
• Fold the handle down toward the front and press down on pan until you hear a "click" sound. Then
close the lid.
Two grooves (facing the front panel of the body)
5. Connect the plug to the outlet.
Firmly
COMPLETION TIMER
DRY MILK
FRESH MILK
WHOLE GRAIN/ DOUGH
•BASIC BREAD •BASIC BREAD SWEET BREAD
•MIXED BREAD •MIXED BREAD
-8-
HOW TO USE BAKERY II
How to Use
the Bakery II
6. Starting an operation.
TIMER OPERATION COMPLETE
SELECT COURSE
Press "SELECT COURSE" button to
desired course. Press "Start". The
Bakery starts each course selection
with a preheating function, and during
this cycle, the "Operation Light"
flashes for approximately 5 to 30
minutes when preheating is occurring.
Press
COMPLETION TIMER
START
Press
DRY MILK
FRESH MILK WHOLE GRAIN/ DOUGH
•BASIC BREAD •BASIC BREAD SWEET BREAD
•MIXED BREAD •MIXED BREAD
• The unit will preheat automatically if the ingredients in the pan are not
at proper cooking temperature. The "Operation Light" stops flashing and the completion time will be
displayed when the kneading and baking process begins.
• The main body can get very hot during the baking process, be careful not to get burned by hot air
coming from the machine.
Some advice
When the "Completion" light is blinking, you can remove the baking pan and take the bread out.
1. Press the "Reset" button and pull the baking pan out of the unit.
2. With hot pads or oven mittens turn the bread out onto a cooling rack.
Allow the bread to cool completely.
Remove with
oven mitten
7. Removing the baking pan.
After the machine stops beeping, press the "Reset"
button open the lid and remove the baking pan by
grasping the handle and pulling the pan from the unit.
• Do not place the baking pan or any other object on the
top of the unit. To avoid damaging the machine’s
surface, do not put any object or the hot baking pan
on top of the unit.
-9-
The baking pan
and its inside
are very hot
HOW TO USE BAKERY II
How to Use
the Bakery II
8. Removing the bread from the baking pan.
Use hot pads or oven mittens and turn the baking pan upside
down, and shake to loosen the bread. Place the bread on a rack
to cool. If the kneading blade comes out stuck to the bread, it
may still be very hot. Carefully remove it with a pair of tongs.
9. After use.
Disconnect the attachment plug from the outlet.
-10 -
HOW TO USE BAKERY II
How to Use
the Bakery II
For Dough Setting
Follow steps 1 through 5 for Bread Settings, then follow steps 6 through 8 listed below.
•When using the "Dough Setting", the timer cannot be used.
6. Starting Procedure.
1. Press "SELECT COURSE" to "DOUGH" setting.
2. Press "START" The dough will be ready in about two hours.
1
2
SELECT COURSE
START
Press
Press
7. Removing dough from the baking pan.
1. When the "COMPLETE" light is illuminated, the dough is ready. Press the "RESET" button, open the
lid, and remove the baking pan from the unit.
2. Gather the dough in the center of the baking pan, and pull it out carefully so it won’t be damaged.
• If the kneading blade is attached to the dough, remove it.
8. From shaping to baking.
Shape according to your recipe. Let it rise once again, and then bake in your own oven.
- 11 -
HOW TO USE BAKERY II
How to Use
the Bakery II
Using the Timer
• The "Timer Setting" can only be used for the Dry Milk basic bread or Dry Milk mixed bread settings.
• Timer settings range from 4 hr. 30 min. to 13 hr.
1. • Using the arrows, set the timer for the desired completion time, the time indication moves in thirty
minute increments. The green timer light will flash as the timer is being set.
TIMER OPERATION COMPLETE
Press
Setting example:
To complete the bread
6 hr. 30 min ahead
Press
• Set the timer for the desired completion time.
COMPLETION TIMER
Note: If the red light above the 30 min. symbol is lit, it indicated that thirty minutes is included as part of
the timer setting. For example, a setting of 6 hr. and 30 min. will display a 6 and a red light, which
indicated thirty minutes. When the red light is illuminated, it stays on for thirty minutes.
2. Press "START" once the desired completion time is entered and the timer will begin counting down.
The timer is set when the green timer light stays illuminated.
TIMER OPERATION COMPLETE
START
Press
COMPLETION TIMER
Troubleshooting
If the "COMPLETION TIMER" on the display continues to blink.
Check that you have pressed the "START" button.
(The timer does not operate until you press the "START" button).
If you made a mistake.
If you want to change the completion time during the timer operation.
If you want to stop the operation.
Press the "RESET" button. Set it again from the beginning.
- 12 -
CARE AND CLEANING
Care and Cleaning
Warning
• To prevent electrical shock, unplug the unit
before cleaning. After the unit has cooled, pull
out the plug and the cord, clean them if
necessary.
• For cleaning, only use a mild, nonabrasive
dish washing liquid so the unit's surface will
not be damaged.
Open the lid about 45
degrees and pull it up
towards the arrow's
direction.
Main body and lid
• Wipe with a damp cloth.
After the unit has cooled. wipe out the crumbs using a damp
cloth. Dust or crumbs left inside the unit may cause
scorching or even baking with the next use.
Do not immerse the lid in water.
- 13 -
CARE AND CLEANING
Care and Cleaning
Baking pan
If the kneading blade is hard to remove, hold
the main shaft located underneath the pan and
with your other hand, turn the kneading blade
to the left and right to loosen, then pull it out.
Clean the rotating shaft with a soft sponge so
that you don’t damage the rotating shaft seal.
Rotating
shaft
Lukewarm
water
Do not immerse the base of the baking pan in water. Wipe it with
a damp cloth.
Kneading Blade
Clean with soft sponge.
If the hole of the blade is clogged, soak it in water for a
while and then clean it with a soft tooth brush.
After cleaning, securely attach the blade to the pan.
Special care for the non-stick finish.
Avoid damaging the coating.
• Do not use hard utensils such as metal spatulas,
knives or forks.
• Clean them each time you use the Bakery II.
The coating may change color after long use; this is only caused by moisture and steam and will not
affect the performance of the unit or quality of your bread.
Storing the Bakery II
• Close the lid securely. Dot Do not place anything on the top of the lid.
- 14 -
WHOLE
GRAIN(BASIC, WHEAT,
TROUBLESHOOTING
GUIDE QUICK WHEAT)
RESULTS:
CORRECTIONS:
MECHANICAL
Increase
Water
or Milk
Salt
Liquid
INGREDIENT
2 Tbs.
2 Tbs.
Increase
1/4 tsp.
1/4 tsp.
Decrease
Decrease
Yeast
Flour
Yeast
2 Tbs.
Decrease
Sugar or Increase
Honey
Flour
Loaf rises Loaf rises Loaf does
Loaf is
Light crust. Uncooked. Over
Not mixed. Smoke
High
then falls. too high. not
short
cooked.
appears
altitude
rise enough. and heavy.
from vent. adjustment.
2 Tbs.
1/4 tsp.
1/2 Tbs.
1/2 tsp.
1/2 tsp.
1/2 tsp.
1/2 tsp.
Increase
Decrease
2 Tbs.
Increase
Decrease
1/8~1/4 tsp.
1/8~1/4 tsp.
1/8~1/4 tsp. 1/8~1/4 tsp.
Liquid used was too hot.
Old flour was used.
Wrong type of flour was used.
No yeast was added.
Yeast may not me fresh.
Used wrong type at wrong setting.
MEASUREMENT
Unplugged or electric failure.
Ingredient supplied on heating element.
Pan not properly into unit.
Kneading blade installed incorrectly.
Incorrect Menu selections was used.
Measurement Adjustment:
According to the chart, first make the proper corrections for yeast;
and if the loaf is still not acceptable, make adjustments to liquids,
then dry ingredients.
Kneading Blade:
The wider side should face down, and be pushed to the bottom of
the baking pan.
Pan Alignment:
The pan should be level when it is properly placed into the unit.
Check the space between the pan and the front and back walls, the
front and back spaces should be equal.
- 15 -
QUESTIONS & ANSWERS
Questions &
Answers
ABOUT THE PERFORMANCE
Q1. Why does the height and shape of my bread loaves differ?
Operation Instructions & Recipes
A1. Both the room temperature and setting time of the timer can affect the final outcome of your bread.
Also, if the ingredients were measured incorrectly, your bread can be affected.
Q2. Why didn’t my bread rise completely?
A2. Check to see that the yeast was added and that the blade was firmly attached to the baking pan. If it
was missing or not installed properly, the bread wouldn’t rise properly.
IMPORTANT: Always be sure to use fresh yeast for best results.
Q3. Why does my bread smell bad?
A3. Too much yeast, old flour, or poor water can affect your bread. Measure ingredients carefully, and be
sure to use fresh ingredients.
Q4. Why is my bread rough-grained?
A4. This bread, unlike a cubic loaf on the market, is a round loaf (like British bread) which is stretched
upward during baking. Thus, your bread can become more rough-grained than commercial bread.
Q5. What should I do if the kneading blade comes out with the bread?
A5. Remove it with a pair of tongs before slicing the bread. Since the blade can be disconnected from the
pan, it is not really a malfunction if it comes out in your bread.
Q6. Why does my bread sometimes have some flour on the side crust?
A6. In some cases, the flour mix may remain on the corners of the baking pan. When this happens,
simply trim off that portion of the outer crust with a sharp knife.
-16 -
QUESTIONS & ANSWERS
Questions &
Answers
About the Timer
Q7. Why can’t I set the timer for less than 4 hr. 30 min. or more than 13 hr?
Operation Instructions & Recipes
A7. It takes at least 4 hr. to make bread, therefore you can’t set the timer for less than 4 hr. Also, if you
set for more than 13 hr. the dough may change consistency or the bread may not bake properly.
Q8. Why can’t I use the timer for the "Dough Setting"?
A8. Using the timer for dough may cause too much rising or changes in the quality of the dough.
Q9. When setting the timer for morning, why does the machine make sounds late at night?
A9. To bake bread in the mornings, using the timer, the machine must start operation several hours
before the bread will be ready. These sounds are made by the motor when kneading the dough. It is a
normal operation, not a malfunction.
Others
Q10. What should I do if I accidentally unplugged the machine?
A10. The plug should be reconnected within 20 seconds, so the machine can continue to operate
according to your recipe. Do not press the start or reset button, or the current process will be stopped or
returned to the beginning stage.
Q11. What will happen if I leave the finished bread in the baking pan?
A11. The steam inside the bread can’t escape, so the surface of the bread may lose its shape.
-17 -