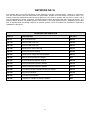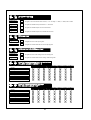
1
DAS NETWORX NX-16
Control/Communicator
Installation Manual
General Description...................................................................................................2
Ordering Information .................................................................................................2
Option Definitions...................................................................................................3-4
Programming the LED Code Pads......................................................................... 5-8
Programming the NX-16 .......................................................................................9-10
Types of Programming Data.................................................................................9-10
Loading Factory Defaults.........................................................................................10
Enrolling the Modules & Code Pads.........................................................................10
Programming Examples ..........................................................................................11
Terminal Descriptions..............................................................................................12
Wiring Diagram .......................................................................................................13
System Codes.........................................................................................................14
Dialer Options .........................................................................................................15
Download Options ...................................................................................................17
Area One (1) Options .............................................................................................18
Zones 1 – 16 Configurations....................................................................................20
Default Zone Configuration Table ............................................................................21
System Options.......................................................................................................23
Siren and Communicator Counter............................................................................24
Code Pad Sounder Control......................................................................................24
System Timers ........................................................................................................26
Auxiliary Outputs .....................................................................................................27
Auxiliary Output Event Table ...................................................................................28
Auto Test Control ...................................................................................................29
Auto Arming / Open and Close Times......................................................................29
Arm Only After Close Window .................................................................................29
Area Two (2) to Area Eight (8) Options ....................................................................30
Zones 17 to 48 Configurations.................................................................................34
Configurations Groups 1 to 20 .................................................................................36
Programming Work-Sheets .....................................................................................40
Appendixes ............................................................................................................54
Specifications.............................................................................................Back Page
Warranty ....................................................................................................Back Page
DIRECT ALARM SUPPLIES CONDELL PARK NSW
SERVICE / TECHNICAL (02) 97092811 OR 1 800 252213
SALES
NSW
VIC.
QLD.
SA
WA
TAS
(02) 96472099
(02) 96989698
(03) 95624155
(03) 93832066
(07) 32525512
(08) 83711683
(08) 92494420
(03) 62349455
1
NETWORX NX-16
The NetworX NX-16 from DAS represents a new approach to security systems design. Drawing on experience
from the world market, DAS has developed the most flexible, durable, and user-friendly control ever seen in our
industry. Featuring sophisticated software which allows up to 99 users to interface with 48 zones, 8 areas, and a
host of integrated fire, access, verification, and input/output modules, all reported with the Contact I.D formats. The
NetworX design allows a fully loaded system to be housed in one single metal enclosure, establishing for the first
time, a logical solution and design response to modular systems. Up to 32 modules can be added to expand the
capabilities of the NX-16.
ORDERING INFORMATION
PART #
DESCRIPTION
DAS FS #
NX-16
NX-16 Control Only
FS4133
NX-116
16 Zone LED Code Pad
FS4132
NX-124
24 Zone LED Code Pad
FS4131
NX-148
Alphanumeric LCD Code Pad
FS4130
NX-216
16 Zone Expander Module
FS4129
NX-320
Smart Power Supply and Buss Extender
FS4137
NX-402
Remote Arming Expansion Module
TBA
NX-408
8 Zone Wireless Expansion Module
FS4135
NX-416
16 Zone Wireless Expansion Module
FS4135
NX-448
48 Zone Wireless Expansion Module
FS4136
NX-248
Long Range 48 Zone Wireless Expansion Module
FS4138
NX-508
Eight Output Module
FS4128
NX-535
Two-Way Voice Module
TBA
NX-540
"Operator II" Telephone Interface Module
TBA
2
MAIN OPTIONS
Areas The NX-16 can have up to a maximum of eight separate systems (Areas) with distinct reporting codes, user codes, and
operating options for each system. (See Features 16-21 and 37-58)
Arm / Disarm Codes The NX-16 can have 99 four-digit codes or 66 six-digit codes to arm/disarm the control. All codes must have the same number
of digits. User codes are programmed and viewed from the code pad functions [*] 5 and [*] 6. The factory default for User #1 is
[1]-[2]-[3]-[4] when using a 4-digit code, or [1]-[2]-[3]-[4]-[5]-[6] for a 6-digit code. This code can then be used to enter the new
arm/disarm codes. (See Feature 0)
Auto Arm in Partial The NX-16 can be armed automatically in the partial mode. This option can only be used for area one. If Auto Arm in Partial is
enabled, area one cannot have full mode Auto Arming selected. (See Feature 22)
Automatic Arming If programmed, the NX-16 will Auto Arm at a specified time. At this time, the code pad will beep for 50 seconds before the panel
arms. The auto arming process can be stopped by a valid code entry. The Auto Arming of an area can be programmed to be
silent. If closing reports are sent, the user code will be 97. (See Features 16, and 33-36)
Auxiliary Outputs The NX-16 has two programmable relay outputs that can be used to activate a strobe and two internal sirens. (See the terminal
description Features 26-29)
Auxiliary Power Over current The NX-16 will illuminate the "Service" LED on the code pad whenever too much current is drawn from any device powered by
the system. This condition can be reported to the central station. (See Features 9 and 22)
Box TamperThe NX-16 has an input for a normally closed tamper switch (see terminal drawing). The Box Tamper can be programmed to
report and/or sound the siren and/or the Code Pad. These terminals can be enabled or disabled in programming. (See
Features 22 and 23)
Code Pad Zone Start The NX-16 LED Code Pads can be programmed with a start zone form 1 to 48. The starting zone programmed into the LED
Code Pad via function [*] [9][2] will tie the system zone to zone one (1) of the Code Pad. I.E. If you wish to start displaying zone
25 as the zone one (1) on a LED Code Pad, program a 25 as the start zone into the Code Pad that will function in this manner.
When system zone 25 is faulted, zone LED one (1) will illuminate on the programmed Code Pads. Zone bypasses will be tied to
the Code Pad LED number, however reporting will follow the system zone number.
Configuration GroupsThe NX-16 has 20 programmable and 10 fixed zone configuration groups that determine how each zone will function and report.
The first 20 groups can be user definable.
Dual End of Line All NX-16 zones can be enabled for Tamper monitoring if the Dual End of Line option is enabled. Zone Doubling cannot be used
if the option is enabled. (See Feature 22)
Dynamic Battery Test The NX-16 can be programmed to perform a Dynamic Battery Test for a selected duration the first time the panel is armed or
disarmed every day. The NX-16 can also be programmed to perform a missing battery test every 12 seconds. (See Features 22
and 25)
3
Exit Error If enabled, the NX-16 will send an "Exit Error Report" if an entry/exit zone is faulted at the instant the exit delay expires. This
report will be sent along with the user number that armed the system, if the panel is not disarmed before the entry delay expires.
The alarm report will also be sent. Even if this option is not enabled, the siren will sound if any entry/exit zone is faulted at the
instant the exit delay expires. (See Feature 9 and 16)
Expander TroubleThe NX-16 will report expander trouble to the central station if enabled. This condition will illuminate the "Service" LED on the
Code Pad even if not reported. NOTE: The Code Pads are considered expanders. The number of the expansion devices
reported can be found below. (See Feature 9 and 22)
Fire Alarm Verification When enabled, the NX-16 will verify a Fire alarm by requiring more than one trip on a smoke detector within a specified time
before creating an alarm. To interrupt the smoke detector power (when in the disarmed state) each time the [*] 7 keys are
pressed, the corresponding LED(s) for zones designated as "Fire" must be on steady for alarm or blinking for trouble. When the
"Fire Alarm Verification" option is enabled, a smoke detector will be powered down and reset automatically after the first trip,
waiting for a second trip within a specified time before creating an alarm. The communicator will delay for a specified time
before reporting the alarm, if a valid code is entered, the report will be aborted, and the smoke alarm verification option will be
reset if enabled. If no valid code is entered the alarm report will be reported to the base station. (See Zone configuration Group
Table and Feature 25)
Group Bypass A designated group of zones can be programmed to bypass by pressing [Bypass]- [0]-[0]- [Bypass] prior to arming. (See Zone
Configuration Group Table)
Internal Event Log Up to 185 events can be stored in memory along with the date and time of the event. These events can later be viewed through
downloading or the LCD Code Pad. All reportable events report to the log.
Number of Calls and Rings to Answer The NX-16 can count the number of calls and rings that are made before it will count the number of rings that must be met for
automatic download answering. (See Feature 13)
On Board Zone DisableThe eight zones on the NX-16 panel can be disabled in order to have a completely wireless alarm system. (See Feature 22)
Partial Mode This unique arming mode has been developed to reduce the most common source of false alarms. When armed in the "Partial"
mode, the opening of any zones designated as "Partial Mode zone" will initiate the Code Pad sounder and start the Partial Mode
entry delay before creating an alarm. All other zones will function as normal. This arming mode will encourage system owners
to use their system more frequently when the premise is occupied. (See Zone configuration Group Table and Features 16 and
25)
Siren Supervision The NX-16 has a Siren Supervision circuit that will constantly monitor the siren on the NX-16 and can be programmed to report if
the wires are cut. (See Feature 22)
Telephone Line Monitor The NX-16 has a Telephone Line Monitor that monitors the voltage and current of the telephone line for detection of a faulted
phone line. This condition can also be reported to the central station once the line is restored.
Twin Trip This option requires two or more trips on a zone or zones programmed as "Twin Trip" within a specified time before reporting an
alarm. During the time between trips, the NX-16 can be programmed to sound the Code Pad and/or the siren. The NX-16 will
also see as an alarm activation any Twin Trip zone that is continuously faulted for longer than 10 seconds. (See Zone
configuration Group Table and Features 22, 24, and 25)
4
PROGRAMMING THE NX-16 LED CODE PADS
This section describes how to program the address and area of each code pad as well as the options that are
available. The address of the code pad is important because this is how the panel supervises the code pads. The
factory default for the Master code is [1]-[2]-[3]-[4] when using a 4-digit code or [1]-[2]-[3]-[4]-[5]-[6] for a 6-digit
code. The factory default for the "Go To Program" code is [9]-[7]-[1]-[3] for a 4-digit code or [9]-[7]-[1]-[3]-[0]-[0] for
a 6-digit code.
SETTING THE LED CODE STARTING ZONE - Function [9][2]
Step 1
Your system must be in the Disarmed state to program the code pad settings.
Step 2
Press the [r][9]-[2] key.
Step 3
Enter the [program code]
Step 4
Enter the STARTING zone number from 1 to 48.
Step 5
Press [r] - Press [r] to save changes and exit this function.
SETTING THE LED CODE PAD OPTIONS- Function [9][3]
Step 1
Your system must be in the Disarmed state to program the code pad settings.
Step 2
Press the [r] [9]-[3] key
Step 3
Enter the [program code]- The "Service" LED will flash.
LEDs 1-8 can now be toggled on/off to enable/disable the functions listed in the table below:
Step 4
LED
Press [r] - After enabling/disabling the desired functions press [r] to save changes and exit this function.
Code Pad Option Enabled
1
Enable Code Pad tamper switch
2
Enable Silent Code Pad option
3
Enable Ding Dong sound for Chime - If off, chime will be a single tone.
4
Enable Key-press Silence option (silences the pulsing code pad sounder for 5 seconds when a key is pressed)
5
Enable Armed Status Suppression (will not allow the code pad to display faulted or bypassed zones when the
system is armed)
6
Enable Panic, Fire, Medical Beep-tone (will sound a short beep to verify that the key-press was accepted)
7
Suppresses the "Service" LED (will not allow the "Service" LED to illuminate for any reason. If there is a system
trouble, pressing [r]-[2] will still show the service menu.)
8
Enable multi-area viewing (enables temporary viewing of all areas by pressing [r]-[1]-[area number])
5
SETTING THE LED CODE PAD NUMBER AND AREA OPTIONS- Function [9][4]
Step 1
Your system must be in the Disarmed state to program the code pad settings.
Step 2
Press the [r] key.
Step 3
Press the [9]-[4] key.
Step 4
Enter the [program code]- The "Service" LED will flash.
Step 5
Enter the code pad number (1-8)
Step 6
Press [r]- The "Instant" LED will illuminate steady and the "Service" LED will remain flashing
Step 7
Enter the area number for the code pad (The code pad will automatically exit this mode at this time)
SET ELAPSED HOURS SINCE LAST AUTOTEST - Function [9][5]
Step 1
Your system must be in the Disarmed state to program the code pad settings.
Step 2
Press the [r] key.
Step 3
Press the [9]-[5] key.
Step 4
Enter the [program code]- The "Service" LED will flash.
Step 5
Enter [100's digit] -[10's digit]-[1's digit] for the elapsed hours.
Example, if you have programmed the Auto-Test intervals to report every 72 hours, the value in this function will
determine the first time the autotest report is made, so to have the first test occur in 12 hours and then every 72
hours, simply subtract the 12 from 72 which gives you a value of 60 hours. The value in this function would be [6][0].
Step 6
Press the [#] key to exit this function..
SET SYSTEM DATE - Function [9][6]
Step 1
Press the [r]-[9]-[6].
Step 2
Enter the “Master Code”.
Step 3
Enter the “Day of Week”.
1 = Sunday
2 = Monday
Step 4
5 = Thursday
6 = Friday
Enter the “Month Code”. This must always be two (2) digits.
01 = January
02 = February
03 = March
04 = April
Step 5
3 = Tuesday
4 = Wednesday
05 = May
06 = June
07 = July
08 = August
09 = September
10 = October
11 = November
12 = December
Enter the “Day Code”. This must always be two (2) digits.
Example: The 5th would be entered as [0][5].
Step 6
Enter the last two digits of the “Year Code”. Example: For 2000 enter [0][0].
6
7 = Saturday
SETTING THE SYSTEM CLOCK - Function [9][7]
Step 1
Press the [r] key .
Step 2
Press the [9]-[7] keys.
Step 3
Enter the “Master Code”.
Step 4
Enter the “hour code” which must be two (2) digits. Note: The clock is a 24 hour clock.
Example: 12.00 am would be entered as [0]-[0], 7.00 AM would be entered as [0]-[7], and 5.00 PM would be entered as [1]-[7].
Step 5
Enter the “minutes code” which must be two (2) digits.
Example: 7 minutes after would be entered [0] [7].
CHANGING USER CODES - Function [5]
Step 1
Your system must be in the Disarmed state to change user codes.
Step 2
Press the [r] key.
Step 3
Press the [5] key.
Step 4
Enter a “Master Arm/Disarm Code”.
NOTE: For multi area systems, someone changing the code of another person must have access to all or more areas than the
user being changed.
Step 5
The ready light will flash.
Step 6
Enter the 2 digit “user number” (always enter 2 digit such as [0]-[3] for user 3, or [5]-[2] for user 52).
Step 7
Enter the new four (4) or six (6) digit “user code”. Note: To delete a user code, enter [Chime]-[Chime]-[Chime][Chime] for a 4-digit code, or [Chime]-[Chime]-[Chime]-[Chime]-[Chime]-[Chime] for a 6-digit code.
Step 8
The ready light will flash indicating you are back at Step 5 above. If the code is rejected, the sounder will beep 3
times.
Step 9
If another “user code” needs to be programmed, return to Step 6
Step 10
Press the [#] key while the ready light is flashing to exit the User Code Programming Mode.
ASSIGNING USER CODE AUTHORITY LEVELS - Function [6]
Step 1
Assign user codes before assigning authority levels.
Press the [*] key.
Step 2
Press the [6] key.
Step 3
Enter a “Master Arm/Disarm Code”.
NOTE: a user changing the authority of another user can only add or remove area authorization for areas to which they have
access.
Step 4
The ready light will flash.
Step 5
Enter the 2 digit “user number” to be assigned authority. (The ready light is constant and the partial light will flash).
Step 6
Lights illuminated indicate the authority levels assigned to this code. An explanation of the lights is listed below. You
may toggle (turn on/off) the authority level by pressing the number for that authority level
7
LED
ATTRIBUTES IF LED 8 IS OFF
LED
ATTRIBUTES IF LED 8 IS ON
1
Reserved
1
Activate output #1
2
Arm Only
2
Activate output # 2
3
Arm Only After Close Window
3
Activate output # 3
4
Master arm/disarm (can program other codes)
4
Activate output # 4
5
Arm/disarm code
5
Arm/disarm
6
Allowed to bypass zones (see Feature 23)
6
Bypass Zones
7
Code will send open / close reports
7
Open / Close Reporting
8
If this LED is on, LEDs 1-7 will use the chart to the right
8
If this LED is off, LEDs 1-7 use the chart to the left
Step 7
Press the [*] key. The ready light will flash. This moves you to the area enable. (The user has access in areas that
are illuminated.)
Step 8
The illuminated numbers indicate each area where the user has access. To change any of the areas where the user
has access, press numbers corresponding to areas where you want to give the user access or deny access.
(Example: If zone light #2 is lit, then the user is assigned access to area #2. By pressing the [2] key, the light will go
off, denying access to area #2. Refer to chart shown below.
LIGHT
AREAS ASSIGNED
LIGHT
AREAS ASSIGNED
1
Area 1
5
Area 5
2
Area 2
6
Area 6
3
Area 3
7
Area 7
4
Area 4
8
Area 8
Step 9
When the areas are assigned, press the [*] key. This returns you to Step 4. At this point you may enter another
user number to assign authority level. Repeat Continue Steps 4 - 8 until you have assigned authority levels to all
user numbers.
Step 10
Press the [#] key to exit the Assigning Authority Level Program.
WALK TEST MODE - Function [*] [chime]
Step 1
Press the [*] key.
Step 2
Press the [Chime] key.
Step 3
Enter a “Master Arm/Disarm Code”.
Now all zones become 24 hour, silent and local (non reporting zones). By faulting any zone, that zone will latch its zone light on
the LED code pad, and sound the Chime. The Chime will continue to sound each time a zone is faulted. Once all zone are test
(zone lights lit on the LED code pad) go to step 4.
Step 4
Enter a “Master Arm/Disarm Code”.
FUNCTION [rr]-[9]-[8] Pressing [rr]-[9]-[8] while the system is disarmed will cause the control to do a callback for a download.
NOTE: A VALID USER CODE MAY BE REQUIRED AFTER [r]-[9]-[8] IF ENABLED IN FEATURE 0.
FUNCTION [rr]-[9]-[9] Pressing [rr]-[9]-[9] while the system is disarmed will cause the control panel to seize the phone line for
a download. NOTE: A VALID USER CODE MAY BE REQUIRED AFTER [r]-[9]-[9] IF ENABLED IN 0.
NOTE: Any master arm/disarm code can add or change a user code if the master code has access to the same areas as the
code being added/changed. Consequently, when programming the user codes for such a system, leave at least one code (can
be "go to program code" if enabled in Feature 2) access to all areas or you will not be able to add new users. If you desire the
end user to be able to add new codes, you must remove the area authority from all blank codes.
8
PROGRAMMING THE NX-16 CONTROL
The NX-16 programming structure consists of Features, Segments, and Options.
FEATURES: or Feature Numbers are used to locate an Option or Group of Options. E.G. Feature 6 contains the
communicator format selection and Feature 16 contains Area one Options.
SEGMENTS: are contained within each Feature, there are two types of segments. The first segment type is
referred to as an Option select segment. This segment type contains up to eight Options which can be toggled On
or Off. The second segment type is referred to as a Numeric segment. This segment type requires a value from “0”
to “255” to be entered to set the Option.
OPTIONS: are contained within segments. An Option select segment can have up to eight Options. A numeric
segment can have a value of “0” to “255”. E.G. Feature 6 contains the communicator format which has one
segment with one Option; and Feature 16 contains Area one Options which has three segments with 24 Options.
ENTERING THE PROGRAM MODE: To enter the Program Mode, press [r]-[8]. At this time, the five function LEDs
(On, Partial, Exit, Bypass, & Chime) will begin to flash. Next, enter the "Go To Program Code" (FACTORY
DEFAULT IS [9]-[7]-[1]-[3]). If the "Go To Program Code" is valid, the "Service" LED will flash and the five function
LEDs will illuminate steady. You are now in the Program Mode and ready to select the module to program.
SELECTING THE MODULE TO PROGRAM: Since all modules connected to the NX-16 are programmed through
the code pad, the module you are programming should be the first entry. To program the NX-16 Control Panel,
enter [0]-[#]. The [0] is the module number of the control and the [#] is the entry key. Other module entry numbers
can be found in their corresponding manuals.
PROGRAMMING A FEATURE: Once the number of the module to be programmed has been entered, the "Armed"
LED will illuminate, indicating it is waiting for a programming feature to be entered. Any feature can be accessed by
directly entering the desired programming feature followed by the pound [#] key. If the feature entered is a valid
feature, the "Armed" LED will extinguish, the "Ready" LED will illuminate and the binary data for the first segment of
this feature will be shown by the zone LED's. While entering new data, the "Ready" LED will begin flashing to
indicate a data change in process. The flashing will continue until the new data is stored by pressing the [r] key.
Upon pressing the [r] key, the code pad will advance to the next segment and display its data. This procedure is
repeated until the last segment is reached. Pressing the [#] key will exit from this feature, and the "Armed" LED will
illuminate again waiting for a new programming feature to be entered. If the desired feature is the next sequential
feature, press the [POLICE] key. If the previous feature is desired press the [FIRE] key. If the same feature is
desired press the [MEDIC] key. To review the data in a feature, repeat the above procedure, pressing the [r] key
without any numeric data entry. Each time the [r] key is pressed, the programming data of the next segment will be
displayed for review.
EXITING A FEATURE: After the last segment of a feature is programmed, pressing the [r] key will exit that feature,
turn the "Ready" LED off and the "Armed" LED on. As before, you are now ready to enter another programming
feature. If an attempt is made to program an invalid entry for a particular segment, the code pad sounder will emit a
triple error beep (beep, beep, beep), and remain in that segment awaiting a valid entry.
EXITING THE PROGRAM MODE : When all the desired changes in programming have been made, it is time to
exit the program mode. Pressing the [Exit] key will exit this programming level, and go to the "Select a Module to
Program" level. If no additional modules are to be programmed, pressing the [Exit] key again will exit the program
mode. If there is a module to be programmed, it may be selected by entering its address followed by the [#] key
(see "Selecting the Module To Program" above). The procedure for programming these devices is the same as for
the control panel, except the features will be for the module selected.
PROGRAMMING DATA : Programming data is always one of two types. One type of data is numerical and can
take on values from 0-15 or 0-255 depending on the feature's segment. The other type of data is a option selection
type. Option selection data is used to turn options on or off. Use the following procedures when working with these
two data types:
9
PROGRAMMING THE NX-16 CONTROL
NUMERICAL DATA: Numerical data is programmed by entering a number from 0-255 on the numeric keys of the
system code pad. To view the data in a feature, a binary process is used. With this process, the LED’s for zones 1
through 8 are utilized, and the numeric equivalents of their illuminated LED’s are added together to determine the
data in a programming feature. The numeric equivalents of these LED’s are as follows:
Zone 1 LED = 1
Zone 5 LED = 16
Zone 2 LED = 2
Zone 6 LED = 32
Zone 3 LED = 4
Zone 7 LED = 64
Zone 4 LED = 8
Zone 8 LED = 128
Example: If the numerical data to be programmed in a feature is "66", press [6]-[6] on the code pad. The LED’s for
Zone 2 and Zone 7 will become illuminated indicating 66 is in that feature (2 + 64 = 66). See this example on page
10.
Once the data is programmed, press the [r] key to enter the data and advance to the next segment of that feature.
After the last segment of a feature is programmed, pressing the [r] key will exit that feature, turn the "Ready" LED
off and the "Armed" LED on. As before, you are now ready to enter another programming feature. If an attempt is
made to program a number too large for a particular segment, the code pad sounder will emit a triple beep,
indicating an error, and remain in that segment awaiting a valid entry.
OPTION SELECTION DATA: Option selection data will display the current condition (on or off) of eight options
associated with the programming feature and segment selected. Pressing a button on the touch-pad (1 thru 8) that
corresponds to the "option number" within a segment, will toggle (on/off) that option. Pressing any numeric key
between [1] and [8] for selection of a option, will make the corresponding LED illuminate (option ON). Press the
number again, and the LED will extinguish (option OFF). You will see that numerous options can be selected from
within one segment. For instance, if all eight options of a segment are desired, pressing [1]-[2]-[3]-[4]-[5]-[6]-[7]-[8]
will turn on LED's 1 thru 8 as you press the keys, indicating that those options are enabled. After the desired setting
of options is selected for this segment, press the [r] key. This will enter the data and automatically advance to the
next segment of the feature. When you are in the last segment of a feature and press the [r] to enter the data, you
will exit that feature. This will now turn the "Ready" LED off and the "Armed" LED on. As before, you are now
ready to enter another programming feature.
LOADING FACTORY DEFAULTS: There are two ways to load the factory defaults. The first is to enter the
program mode using the procedure on page 9, then type [9]-[1]-[0]-[#]. The code pad will beep 3 times indicating
that the loading is in progress. The loading takes about 6 seconds. The second is to type [9][7][1][3][0][0] within 10
seconds of power up at any code pad, which is not programmed for master mode. The procedure will default the
NX-16 even if it is armed.
ENROLLING MODULES AND CODE PADS : For supervision purposes, the NX-16 has the ability to automatically
find and store in its memory, the presence of all code pads, zone expanders, wireless receivers, and any other
module connected to the data terminal whenever exiting the program mode. The enrolling process takes about 12
seconds, during which time the "Service" LED will illuminate. Once a module is enrolled, if it is not detected by the
control, the "Service" LED will illuminate.
10
(Programming Example)
11
TERMINAL DESCRIPTION TABLE
TERMINAL
DESCRIPTION
EARTH
Earth Ground. Connect to a cold water pipe or a 1 to 3 metre driven rod.
AC
AC input. Connect to a 16.5V 25, 40 or 50 VA approved transformer.
BELL + &
BELL -
If used as a siren output(default), the speaker rating should be 15 watt at 8 or 16 ohm, or 30/40
watt at 4, 8, or 16 ohms. If voltage output is selected in Feature 37, this output becomes voltage
output, 12VDC, 1 Amp maximum load. NOTE: A 3.3KΩ
Ω resistor may be required across the
bell terminals when a 12 VDC siren is used . If no resistor is used, you may experience
voltage leakage into the siren which will cause these devices to output a small signal.
KP DATA
Connect to the data terminal on the code pads and the expanders. Maximum total wire run is 800
metres using 14/020 cable. These numbers are for one code pad at the end of the wire. When
connecting more than one code pad to the end of the wire, a higher gauge wire or a reduction in
total wire distance will be required.
KP COM
Connect to the Common terminal on the code pads and the expanders.
KP POS
Connect to the Positive terminal on the code pads and the expanders. This terminal and AUX
PWR + are limited to 1 amp total current when added together.
SMOKE+
Smoke detector power 12VDC, 500 ma maximum.
COM
Connect negative wire of powered devices such as motion detectors and smoke detectors.
AUX PWR+
Connect positive wire of all powered devices accept smoke detectors and code pads. This terminal
and KP POS are limited to 1 amp total current when added together.
ZONE 8
Connect to one side of zone 8 loop. Connect the other side to com terminal. Open or short causes
alarm. Zone 8 may be used for a two wire smoke detector using a 680W E.O.L. resistor. W3
must be set for two wire smoke detector loop. For normal zone operation, W2 must be set.
COM
Common (-) terminal for zones 7 & 8. (See the wiring diagram for examples.)
ZONE 7
Connect to one side of zone 7 loop. Connect the other side to COM terminal. Open or short causes
alarm.
ZONE 6 ZONE 1
Connect as described for zones 7 & 8. Only zone 8 can be a two wire zone. (See the wiring
diagram for examples.)
AUX
RELAY
OUT 1-2
Relays one and two switch a 12 volts output on their N/C and N/O terminals. This means that you
connect the positive lead of you device to these terminals, and connect the negative lead to the
“Com” terminals.
12
13
FEATURE 0
CODE REQUIREMENTS
Feature 0, segment 1 is used to enable the 6 digit user code option. If 6-digit option is enabled, all arm/disarm
codes, the "Go To Program Code" and duress code are 6 digits. If this option is enabled, the default user 1 code
is [1]-[2]-[3]-[4]-[5]-[6]. The NX-16 has 99 four (4) digit user codes or 66 six (6) digit user codes. Segment 2 is used
to enable user code requirement for functions [r]-[9]-[8] (perform call back download) and [r]-[9]-[9] (answer
incoming call for download).
SEGMENT 1
1
2
3 –8
FEATURE 1
SEGMENTS 1-6
On enables the 6-digit code option. Its original off state is a 4-digit code.
On requires code entry for [rr]-[9]-[8] and [rr]-[9]-[9] functions
RESERVED
GO TO PROGRAM CODE
9
7
1
3
0
0
Feature 1 contains the "Go To Program Code". This feature contains either a 4 or 6-digit code. If the 6-digit code
option is enabled in Feature 0, THIS CODE MUST CONTAIN SIX (6) DIGITS. If this option is not enabled in
Feature 0, the last 2 segments (digits) will be ignored. With the NX-16 disarmed, the "Go To Program Code" can
be used to enter the Program Mode.
FEATURE 2
GO TO PROGRAM CODE AREA AND AUTHORISATION
The "Go To Program Code" can be used as a standard arm/disarm code. When using the code to arm or disarm,
the user I.D is 255. (This code may not be changed in the Run Mode.)
SEGMENT 1
1
2
3
(4)
5
6
7
8
SEGMENT 2
(1)
(2)
(3)
(4)
(5)
(6)
(7)
(8)
FEATURE 3
Reserved.
On enables "Go To Program Code" as an arm only code.
On enables "Go To Program Code" as an arm only after closing.
On enables "Go To Program Code" as a master code (can change user codes)
On enables "Go To Program Code" as an arm/disarm code.
On enables "Go To Program Code" to bypass zones.
On enables "Go To Program Code" opening and closing reports.
Reserved
On enables the "Go To Program Code" for Area #1
On enables the "Go To Program Code" for Area #2
On enables the "Go To Program Code" for Area #3
On enables the "Go To Program Code" for Area #4
On enables the "Go To Program Code" for Area #5
On enables the "Go To Program Code" for Area #6
On enables the "Go To Program Code" for Area #7
On enables the "Go To Program Code" for Area #8
DURESS CODE
SEGMENTS 1-6
15
15
15
15
15
15
Feature 3 contains the "Duress" code. This feature contains either 4 or 6 digits. If the 6-digit code option is
enabled in Feature 0, THIS CODE MUST CONTAIN SIX (6) DIGITS. If the 6-digit option is not enabled in Feature
0, the last 2 digits will be ignored. If the duress code is programmed, it will work for all areas.
14
FEATURE 4
SEGMENTS 1-20
PHONE NUMBER 0NE (1)
14
14
14
14
14
14
14
14
14
14
14
14
14
14
14
14
14
14
14
14
The first telephone number is programmed in Feature 4. A "14" indicates the end of the phone number. Delays of
four seconds can be programmed at any point in the phone number by programming a "13" in the appropriate
segment. If pulse dialing is desired, program a "15" in the segment where pulse dialing should begin. Program an
“11" for a “r” and a “12" for a “#”.
FEATURE 5
SYSTEM ACCOUNT CODE
SEGMENTS 1-4
10
10
10
10
This is the account code sent for any area event (open/close and zone related alarms) that does not have its
account code programmed. System events (siren / box tampers, expander troubles etc..) will use the system
account unless area one account is programmed.
FEATURE 6
COMMUNICATOR FORMAT
SEGMENT 1
0
Feature 6 contains the communicator format used. Select a format from the format selection table. If this feature
contains a "0", the built-in communicator will be disabled, and the NX-16 will function as a local only control.
FORMAT SELECTION TABLE
DATA
FORMAT
DESCRIPTION
0
LOCAL
COMMUNICATOR IS DISABLED
1
CONTACT I.D
DTMF FORMAT
2
PAGER
REPORTS IN 4 + 2 DTMF FORMAT. PHONE NUMBERS CAN BE
PROGRAMMED VIA CODE PAD IN THE RUN MODE.
3
DOMESTIC SIREN
DOMESTIC DIALLING VIA A SIREN TONE FORMAT. CALL CAN BE KISSED
OFF VIA THE STAR (*) KEY ON A DTMF PHONE. PHONE NUMBERS CAN
BE PROGRAMMED VIA CODE PAD IN THE RUN MODE.
FEATURE 7
SEGMENTS 1-20
PHONE NUMBER TWO (2)
14
14
14
14
14
14
14
14
14
14
14
14
14
14
14
14
14
14
14
14
The second telephone number is programmed in Feature 7. A "14" indicates the end of the phone number. Delays
of four seconds can be programmed at any point in the phone number by programming a "13" in the appropriate
segment. If pulse dialing is desired, program a "15" in the segment where pulse dialing should begin. Program an
“11" for a “r” and a “12" for a “#”.
15
FEATURE 8
PHONE NUMBER THREE (3)
SEGMENTS 1-20
14
14
14
14
14
14
14
14
14
14
14
14
14
14
14
14
14
14
14
14
The third telephone number is programmed in Feature 8. A "14" indicates the end of the phone number. Delays of
four seconds can be programmed at any point in the phone number by programming a "13" in the appropriate
segment. If pulse dialing is desired, program a "15" in the segment where pulse dialing should begin. Program an
“11" for a “r” and a “12" for a “#”.
FEATURE 9
EVENT REPORT SUMMARY
Feature 9 is a summary of event reporting codes found in the Area and System Features. Most Area and System
report event are enabled, but will also need to be enabled in this feature. This approach is used to simplify event
selection programming.
SEGMENT 1
(1)
(2)
3
(4)
5
(6)
7
(8)
SEGMENT 2
(1)
(2)
(3)
4
(5)
6
7
8
FEATURE 10
SEGMENTS 1-2
Alarms
Restores
Open / Close
Bypass
Zone Trouble
Power Trouble (AC Failure or Low Battery)
Tampers
Test Reports
System Trouble (siren / phone / expander / short circuit)
Failure to Communicate
Sensor Lost / Sensor Low Battery
Program, Download, & Full Log (Full Log must also be enabled in system options)
Cancel Code (Cancel reporting must also be enabled in area options)
Recent Closing / Exit Error
Reserved
Reserved
DIAL ATTEMPTS
6
RESERVED
Feature 10, Segment 1 is used to enter the number of dial attempts (1 to 15 Attempts) the communicator will make
to Phone #1 before ending the notification process. Factory default is "6" and the communicator will make 6
attempts to the first number.
FEATURE 11
PHONE LINE CUT DELAY
SEGMENT 1
0
Feature 11 contains the number of second increments in the Telephone line monitor delay before phone line fault
is activated. The Telephone line monitor delay can be programmed in 1 second increments from 1 to 255 seconds.
Note. The NX-16 internal phone line monitoring circuit requires approximately 5 seconds to discharge before the
NX-16 will sense a missing phone line, you must add this time to the value in this feature when testing this option.
A “0” = disabled.
16
FEATURE 12
DOWNLOAD ACCESS CODE
SEGMENTS 1-8
1
6
0
0
0
0
0
0
Feature 12 contains the eight digit access code the NX-16 must receive from the downloading software before the
panel will permit downloading to occur.
FEATURE 13
NUMBER OF RINGS (SEG 1) / NUMBER OF CALLS TO ANSWER (SEG 2)
SEGMENTS 1-2
0
0
Feature 13, segment 1 contains the number of rings the NX-16 must detect before answering the telephone line
when initiating a download session. A value of 1 to 15 can be entered in this segment. Segment 2 contains the
number of calls the NX-16 must detect before accepting the number of rings in segment 1. A value of 1 to 15 can
be entered in this segment. A call is satisfied by one (1) or more rings, and then an eight (8) second period of no
ring. The next call must then be made within 45 seconds. The total number of calls must be reached before the
NX-16 will count for the number of rings (in segment 1) during the necessary subsequent call . A “0” = disabled.
FEATURE 14
DOWNLOAD CONTROL
Feature 14 contains the option selections for the controlling of download sessions. The following options can be
enabled or disabled using this feature.
SEGMENT 1
1
On enables two call answering machine defeat. (see “Option Definitions” for a full explanation of
this option).
2
RESERVED
3
4
On requires call back before download session. (Refer to Feature 15).
5
On locks all local programming. (Can only be viewed from the code pad, must be changed
through downloading).
6
On locks programming of all features associated with the communicator. (Can only be viewed
from the code pad, must be changed through downloading).
7
On locks out download section. (If "On", Features 12-15 cannot be viewed from the code pad.
Note: This segment can only be changed through the download software.
8
On enables call back at auto test interval to perform download software automatic functions.
(Refer to your download software help for a full explanation of this option).
On enables Control Panel Shutdown. (Can only be viewed from the code pad, must be
changed through downloading).
FEATURE 15
SEGMENTS 1-20
CALL BACK NUMBER
14
14
14
14
14
14
14
14
14
14
14
14
14
14
14
14
14
14
14
14
If a telephone number is programmed into this feature, and "Require Callback" is enabled in feature 14, the control
panel will hang up for approximately 10 seconds and then call back. If pulse dialing is desired, program an "15" in
the segment where pulse dialing should begin. If the entire number should be pulse dialing, program a “15" in the
first segment. Four-second delays can be obtained anywhere in the sequence by programming a "13" in the
appropriate delay feature. WARNING: THE CALLBACK PHONE NUMBER SHOULD ALWAYS BE REVIEWED
FOR ACCURACY BEFORE DISCONNECTING.
17
FEATURE 16
AREA 1 - OPTIONS
Feature 16 is used to enable certain options that can be accessed or are visible to the user from the code pad of
the system. In addition, certain communicator reports are enabled in Feature 16. Each of these options can be
enabled by area. For additional area information see Features 37-58 on pages 19-21. If the option selection
feature for any area is left blank, that area will use this feature for the option selection. This feature contains
3 segments of 8 options each.
SEGMENT 1
(1)
(2)
3
4
(5)
(6)
(7)
8
SEGMENT 2
1
2
3
(4)
(5)
6
7
8
SEGMENT 3
(1)
(2)
(3)
(4)
(5)
6
(7)
(8)
FEATURE 17
SEGMENTS 1-4
On enables the Quick Arm option
On enables the Re-exit option
On enables the Force Arm option
On enables the Silent Code Pad Panic option
On enables the Audible Code Pad Panic option
On enables the Code Pad Fire option
On enables the Code Pad Medical option
On enables the Code Pad Multiple Code Attempt Tamper option
On enables the LED Extinguish option.
On enables the Require Code for Bypassing option
On enables the Zone Bypassed Sounder Alert option
On enables the AC Power/Low Battery Sounder Alert option
On enables Bypass toggle
On enables Silent Auto Arm
On enables the Universal Arming option
On enables the One Key Partial Mode Disarm
On enables Opening and Closing reports
On enables Zone Bypass reporting
On enables Zone Restore reporting
On enables Zone Trouble reporting
On enables Zone Tamper reporting
On enables the Cancel option
On enables Recent Closing option
On enables Exit Error option
AREA 1 - ENTRY / EXIT TIMERS
ENTRY TIME 1 - 30
EXIT TIME 1 - 60
ENTRY TIME 2 - 30
EXIT TIME 2 - 60
Feature 17 sets the primary and secondary entry / exit times for area 1. Valid entries are 10-255 seconds
AREA OPTIONS TABLE
AC Power / Low Battery Sounder Alert
If enabled, the NX-16 will beep the Code Pad sounder upon arming or disarming if the AC power is missing or a low battery
has been detected.
Bypass Code
If enabled, the NX-16 will require a valid user code to be entered during the zone bypass function.
Cancel
If enabled, the NX-16 will send a "Cancel" report when the system is disarmed by a valid user after an alarm activation. The
cancel code followed by the user number.
Code Pad Activated Panics
The NX-16 has three Code Pad activated panics that will send reports to the central station: Fire, Medical, and Code Pad
Panic. The Fire key will activate the steady (Fire) siren, the Medical key will sound the Code Pad ( the Medical key can be set
for silent activation in system options), and the Code Pad Panic can be programmed to be silent or audible (sound siren
18
AREA OPTIONS TABLE
Code Pad Tamper
If enabled, the NX-16 will disable the Code Pad for 60 seconds and communicate a tamper signal to the central station if 30
key-presses are entered without producing a valid code. The Code Pad sounder will remain functional.
Exit Error
If enabled, the NX-16 will send an "Exit Error Report" if an entry/exit zone is faulted at the instant the exit delay expires. This
report will be sent along with the user number that armed the system, if the panel is not disarmed before the entry delay
expires. The alarm report will also be sent. Even if this option is not enabled, the siren will sound if any entry/exit zone is
faulted at the instant the exit delay expires. This option is enabled by default, but needs to be set to report in Feature 9 for
proper operations.
Force Arming
When enabled, the NX-16 can be Force Armed with zones violated. Under this condition, if a force arm zone is not secure, the
"Ready" LED will flash. At the end of the exit delay, these zones will become bypassed. If these zones become secured any
time during the arming cycle, they will be un-bypassed and active in the system. If "Bypass Report" is enabled, the force
arming zones can be programmed to report bypass when they are Force Armed (default), or to not report bypass even if
"Bypass Report" is enabled (refer to system options).
Group Bypass
A designated group of zones can be programmed to bypass by pressing [Bypass]- [0]-[0]- [Bypass] prior to arming.
Group Toggle
If enabled, the NX-16 can toggle the Group Bypass zone in and out of bypass mode by pressing the [Bypass] key. This option
if active when ever the NX-16 is in either Partial or Full arm mode.
LED Extinguish
This option will extinguish all LED s on the Code Pad, except the "Power" LED, after 60 seconds without a key-press. Pressing
any numeric key will illuminate all LED s.
Partial Mode
This unique arming mode has been developed to reduce the most common source of false alarms. When armed in the "Partial"
mode, the opening of any zones designated as "Partial Mode Zone" will initiate the Code Pad sounder and start the Partial
Mode entry delay before creating an alarm. All other zones will be bypassed during Partial mode. To arm this area in Partial
Mode, press the [Partial] key on the code pad. This arming mode will encourage system owners to use their system more
frequently when the premise is occupied.
Partial Mode Security
If enabled the NX-16 will require a full code to disarm it from the Partial Mode.
Quick Arm Option
The NX-16 has a one button "Quick Arm" option which can be used to arm the system by pressing the [ON] key on the Code
Pad. If closing reports are sent, the user code will be 98.
Recent Closing
If enabled, the NX-16 will send a "Recent Closing Report" to the central station if an alarm occurs within 5 minutes after the
panel is armed. The user number that armed the system will also be sent. This option is enabled by default, but needs to be
set to report in Feature 9 for proper operations.
Re-exit
The NX-16 has the ability to restart the exit delay if required without disarming the system by pressing the [Exit] key while the
system is running the exit delay. This option can only be used once per arming cycle.
Silent Automatic Arming
If enabled, the NX-16 will Auto Arming this area and not set the 50 seconds code pad sounder on. This option is used when
you don’t want to alert any other area of your Auto Arm time.
Universal Arming (Uni Arm)
When enabled, using the quick arm function or entering a valid user code can automatically arm in the NX-16 in the preset
Partial mode if an exit zone fault is not detected during the exit delay time.
Zone Bypassed Sounder Alert
If this option is enabled, the NX-16 will beep the Code Pad sounder upon arming if a zone is bypassed.
19
FEATURE 18
SEGMENTS 1-8
ZONES 1-8 CONFIGURATION GROUP
1
3
16
16
16
16
16
16
Feature 18 contains the Configuration Group (Zone type) for zones 1-8. Segment 1 is for zone 1, and Segment 8
is for zone 8. Refer to the “Default Zone Configuration” table in this section for zone type selections.
FEATURE 19
ZONE AREA SELECT - ZONES 1-8
Feature 19 is used to select the area(s) that zones 1 - 8 reside in. A zone may reside in any combination of the
eight areas. If a burglary zone resides in more than one area, it will only be active when all areas it resides in are
armed. A zone that resides in more than one area will be reported to its lowest area number. Feature 19 has 8
segments. Segment 1 corresponds to zone 1, and Segment 8 corresponds to zone 8.
AREA 1
AREA 2
AREA 3
AREA 4
AREA 5
AREA 6
AREA 7
AREA 8
SEGMENT 1 – ZONE 1
(1)
2
3
4
5
6
7
8
SEGMENT 2 – ZONE 2
(1)
2
3
4
5
6
7
8
SEGMENT 3 – ZONE 3
(1)
2
3
4
5
6
7
8
SEGMENT 4 – ZONE 4
(1)
2
3
4
5
6
7
8
SEGMENT 5 – ZONE 5
(1)
2
3
4
5
6
7
8
SEGMENT 6 – ZONE 6
(1)
2
3
4
5
6
7
8
SEGMENT 7 – ZONE 7
(1)
2
3
4
5
6
7
8
SEGMENT 8 – ZONE 8
(1)
2
3
4
5
6
7
8
FEATURE 20
SEGMENTS 1-8
ZONES 9-16 CONFIGURATION GROUP
16
16
16
16
16
16
16
16
Feature 20 contains the Configuration Group (Zone type) for zones 1-8. Segment 1 is for zone 9, and Segment 8
is for zone 16. Refer to the “Default Zone Configuration” table in this section for zone type selections.
FEATURE 21
ZONE AREA SELECT - ZONES 9-16
Feature 21 is used to select the area(s) that zones 9-16 reside in. A zone may reside in any combination of the
eight areas. If a burglary zone resides in more than one area, it will only be active when all areas are armed. A
zone that resides in more than one area will be reported to its lowest area. Feature 21 has 8 segments. Segment 1
corresponds to zone 9 and Segment 8 corresponds to zone 16.
AREA 1
AREA 2
AREA 3
AREA 4
AREA 5
AREA 6
AREA 7
AREA 8
SEGMENT 1 – ZONE 9
(1)
2
3
4
5
6
7
8
SEGMENT 2 – ZONE 10
(1)
2
3
4
5
6
7
8
SEGMENT 3 – ZONE 11
(1)
2
3
4
5
6
7
8
SEGMENT 4 – ZONE 12
(1)
2
3
4
5
6
7
8
SEGMENT 5 – ZONE 13
(1)
2
3
4
5
6
7
8
SEGMENT 6 – ZONE 14
(1)
2
3
4
5
6
7
8
SEGMENT 7 – ZONE 15
(1)
2
3
4
5
6
7
8
SEGMENT 8 – ZONE 16
(1)
2
3
4
5
6
7
8
20
DEFAULT ZONE CONFIGURATIONS TABLE
Zones can be programmed to be one of thirty different zone configurations (Zone Types). Configurations 1 to 20
can be modified in the configuration group section of this manual. Configuration groups 21 to 30 are factory set
and cannot be altered. Choose one of the 30 default zone configurations to program into each of the zone
configuration segments in Features 18, 20 59 61 63 and 65. Study this table for the appropriate zone configuration
group for each zone.
DATA
"1"
"2"
"3"
"4"
"5"
"6"
"7"
"8"
"9"
"10"
DEFAULT ZONE CONFIGURATION TABLE
ENTRY / EXIT DELAY 1: Partial - Forced Arming – A trip will start entry delay 1. This zone will be
active in partial mode. This zone type may be faulted while arming if forced arming is enabled in the area
options.
ENTRY / EXIT DELAY 1: Chime - Forced Arming – A trip will start entry delay 1. This zone will be
bypassed in partial mode. This zone type will set the code pad chime if set via the code pad [Chime] key.
ENTRY / EXIT DELAY 1: Partial - Chime - Forced Arming – A trip will start entry delay 1. This zone will
be active in partial mode. This zone type may be faulted while arming if forced arming is enabled in the
area options. This zone type will set the code pad chime if set via the code pad [Chime] key.
ENTRY / EXIT DELAY 2: Partial - Forced Arming – A trip will start entry delay 2. This zone will be
active in partial mode. This zone type may be faulted while arming if forced arming is enabled in the area
options.
ENTRY / EXIT DELAY 2: Partial - Chime - Forced Arming - A trip will start entry delay 2. This zone will
be active in partial mode. This zone type may be faulted while arming if forced arming is enabled in the
area options. This zone type will set the code pad chime if set via the code pad [Chime] key.
HANDOVER: Forced Arming - Interior zone that follows the entry delay zones. Instant alarm type
unless an entry zone if faulted first. This zone will be bypassed in partial mode. This zone type may be
faulted while arming if forced arming is enabled in the area options.
HANDOVER: Partial - Forced Arming - Interior zone that follows the entry delay zones. Instant alarm
type unless an entry zone if faulted first. This zone will be active in partial mode. This zone type may be
faulted while arming if forced arming is enabled in the area options.
HANDOVER: Twin Trip - Forced Arming - Interior zone that follows the entry delay zones. Instant
alarm type unless an entry zone if faulted first. This zone will be bypassed in partial mode. This zone
type may be faulted while arming if forced arming is enabled in the area options. This zone type will
require two triggers or another zone would have to have been trigged before it will activate an alarm.
HANDOVER: Group Isolate - Forced Arming - Interior zone that follows the entry delay zones. Instant
alarm type unless an entry zone if faulted first. This zone will be bypassed in partial mode. This zone
type may be faulted while arming if forced arming is enabled in the area options. This zone type will be
part of the group bypass zones.
HANDOVER: Twin Trip - Chime - Forced Arming - Interior zone that follows the entry delay zones.
Instant alarm type unless an entry zone if faulted first. This zone will be bypassed in partial mode. This
zone type may be faulted while arming if forced arming is enabled in the area options. This zone type will
require two triggers or another zone would have to have been trigged before it will activate an alarm. This
zone type will set the code pad chime if set via the code pad [Chime] key.
"11"
HANDOVER: Partial - Twin Trip - Forced Arming - Interior zone that follows the entry delay zones.
Instant alarm type unless an entry zone if faulted first. This zone will be active in partial mode. This zone
type may be faulted while arming if forced arming is enabled in the area options. This zone type will
require two triggers or another zone would have to have been trigged before it will activate an alarm.
"12"
HANDOVER: Partial - Group Bypass - Forced Arming - Interior zone that follows the entry delay
zones. Instant alarm type unless an entry zone if faulted first. This zone will be active in partial mode.
This zone type may be faulted while arming if forced arming is enabled in the area options. This zone
type will be part of the group bypass zones.
"13"
HANDOVER: Twin Trip - Group Bypass - Forced Arming - Interior zone that follows the entry delay
zones. Instant alarm type unless an entry zone if faulted first. This zone will be bypassed in partial mode.
This zone type may be faulted while arming if forced arming is enabled in the area options. This zone
type will require two triggers or another zone would have to have been trigged before it will activate an
alarm. This zone type will be part of the group bypass zones.
21
DATA
DEFAULT ZONE CONFIGURATION ZONE
"14"
HANDOVER: Partial - Twin Trip - Group Isolate - Forced Arming - Interior zone that follows the entry
delay zones. Instant alarm type unless an entry zone if faulted first. This zone will be active in partial
mode. This zone type may be faulted while arming if forced arming is enabled in the area options. This
zone type will require two triggers or another zone would have to have been trigged before it will activate
an alarm. This zone type will be part of the group bypass zones.
"15"
INSTANT: - Produces an instant alarm if tripped when armed. Ignored when disarmed. This zone will be
bypassed in partial mode.
"16"
INSTANT: Partial - Produces an instant alarm if tripped when armed. Ignored when disarmed. This
zone will be active in partial mode.
"17"
"18"
"19"
"20"
"21"
"22"
"23"
"24"
"25"
"26"
"27"
"28"
"29"
"30"
INSTANT: Partial (NO DEOL) - Produces an instant alarm if tripped when armed. Ignored when
disarmed. This zone will be active in partial mode. This zone type will not be enabled for dual end of line
monitoring if enabled in the system options.
INSTANT: Twin Trip - Forced Arming - Produces an instant alarm if tripped when armed. Ignored when
disarmed. This zone will be bypassed in partial mode. This zone type may be faulted while arming if
forced arming is enabled in the area options. This zone type will require two triggers or another zone
would have to have been trigged before it will activate an alarm.
INSTANT: Group Bypass - Produces an instant alarm if tripped when armed. Ignored when disarmed.
This zone will be bypassed in partial mode. This zone type will be part of the group bypass zones.
INSTANT: Partial – Chime - Produces an instant alarm if tripped when armed. Ignored when disarmed.
This zone will be active in partial mode. This zone type will set the code pad chime if set via the code pad
[Chime] key.
INSTANT: Partial - Twin Trip - Produces an instant alarm if tripped when armed. Ignored when
disarmed. This zone will be bypassed in partial mode. This zone type will require two triggers or another
zone would have to have been trigged before it will activate an alarm.
INSTANT: Partial - Group Bypass - Produces an instant alarm if tripped when armed. Ignored when
disarmed. This zone will be active in partial mode. This zone type will be part of the group bypass zones.
INSTANT: Twin Trip - Group Bypass - Produces an instant alarm if tripped when armed. Ignored when
disarmed. This zone will be bypassed in partial mode. This zone type will require two triggers or another
zone would have to have been trigged before it will activate an alarm. This zone type will be part of the
group bypass zones.
INSTANT: Partial - Twin Trip - Group Bypass - Produces an instant alarm if tripped when armed.
Ignored when disarmed. This zone will be active in partial mode. This zone type will require two triggers
or another zone would have to have been trigged before it will activate an alarm. This zone type will be
part of the group bypass zones.
INSTANT: Local - Produces an instant alarm if tripped when armed. Ignored when disarmed. This zone
will be bypassed in partial mode. This zone will to activate to communicator.
24 HOUR: Audible - A trip on a 24 Hour zone produces an instant alarm when armed or disarmed. This
zone type will set sirens.
24 HOUR: Silent - A trip on a 24 Hour zone produces an instant alarm when armed or disarmed. This
zone type will not set sirens.
FIRE: - A short on a FIRE zone will create an alarm condition when the system is armed or disarmed. An
open will create a Trouble condition. The code pad zone LED is steady for a fire condition and flashing
for a trouble condition. After a fire activation the * [7] function must be pressed on the code pad to clear
the condition and reset the fire zone.
DAY ZONE: – When armed, a trip produces an instant alarm. When disarmed, a trip activates the code
pad sounder.
KEY-SWITCH: - A zone attached to a momentary key switch will cause the NX-16 to arm or disarm when
the zone is momentarily shorted from a sealed condition I.E. a 3.3K resister must be used to seal the
zone for the option to work. Note. If dual end of line monitoring is enabled in system options, this zone
type must have its EOL configuration as all other DEOL zones. I.E. Two 3.3K resistors must be used,
which allow full line monitoring for this zone type.
22
FEATURE 22
SYSTEM OPTIONS
Feature 22 is used to enable various system option and reporting options.
SEGMENT 1
(1)
2
3
4
5
(6)
7
(8)
SEGMENT 2
1
2
3
4
5
(6)
7
(8)
SEGMENT 3
(1)
(2)
(3)
(4)
(5)
(6)
7
(8)
SEGMENT 4
(1)
(2)
(3)
(4)
(5)
(6)
(7)
8
SEGMENT 5
(1)
2
3
4
5
6
7
8
On if siren sounds for "Telephone Line Cut" when armed
On if siren sounds for "Telephone Line Cut" when disarmed
On if siren blast at arming – ( A siren chirp when any area is armed.)
On if siren blast at exit expiration - ( A siren chirp when any area exit delay expires.)
On if siren blast at closing kiss-off - ( A siren chirp when any area sends a closing report.)
On if siren limited to once per zone
On if siren sounds for a Zone or Box Tamper
On if siren blasts 1 time for key-switch and wireless arming; 2 times for disarming
On if siren driver should be a voltage output. Off if on board siren driver enabled
On if sirens should sound on expander trouble
On if Communicator limited to once per zone
On if First to Open Last to Close Reports
On if Battery Missing Test is performed every 12 seconds
On if Strobe flashes for 3 seconds for Key-switch Arming and 6 seconds for disarming
On if Manual Communicator Test performed during [r]- [44] test function
On if Box Tamper Pins on the control panel are enabled
On if Box Tamper report enabled
On if AC Fail reporting enabled
On if Low Battery reporting enabled
On if Aux. Power Over-current report enabled
On if Siren Supervision report enabled
On if Telephone Line Cut report enabled
RESERVED
On if Expander Trouble reporting enabled
On if Fail To Communicate report enabled
On if Log Full report enabled
On if Auto-test report enabled
On if Start/End programming report enabled
On if End Download report enabled
On if Sensor Low Battery report enabled
On if Sensor Missing report enabled
On if Expanded Contact I.D report enabled
On enable Lost Clock service light
On enables Zone Doubling
On disables all hardwired zones on the NX-16
On will enable all Dual End of Line resistors on all zones (DEOL)
On will not allow zones that are force armed to report bypass
On enables Silent Exit option
On will disable 50 Hz synchronization
On will Auto Partial Arm Area 1
23
FEATURE 23
SIREN / COMMUNICATOR ATTEMPT COUNTER
SEGMENT 1
0
Feature 23 is used to set the burglary zone siren / communicator attempt counter. The number programmed in
segment 1 will determine the number of alarm activations the NX-16 will allow before bypassing all burglary zones
(1-48) which have tripped during the arming cycle. The bypassed zones will not report trips to a base station, and
the local siren or bell will not sound for these zones. A zone trip will not be added to the number count until the
zone has tripped more than once. For this option to be valid, sirens and or the communicator must be set to
unlimited in system options.
FEATURE 24
CODE PAD SOUNDER CONTROL
The NX-16 can set the code pad sounder for most alarm conditions. Feature 24 provides 8 system alarms that can
be enabled to set the code pad sounder. A code pad sounder activation can be silenced by entering a valid user
code. Note. The A.C power fail and low battery code pad sounder activations will occur the instant these condition
are present. All options in this feature are global to all code pads.
SEGMENT 1
(1)
(2)
3
4
5
(6)
7
8
On if code pad sounds for Telephone Line Cut when the system is armed
On if code pad sounds for Telephone Line Cut when disarmed
On if code pad sounds upon AC Power Failure
On if code pad sounds when a Low Battery is detected
On if code pad sounds during Twin Trip time
On if code pad sounds for Zone and Box Tampers
On if code pad sounds for Medical Alarm
On if code pad sounds for Expander Trouble
SYSTEM OPTIONS TABLE
50 Hz Ac Synchronization
The NX-16 synchronizes its internal clock to the 50 HZ it receives from the AC input. If enabled, the NX-16 can generate its
own internal clock synchronization if you are installing the NX-16 where there is no AC power and battery is used.
Auto Partial Arm Area One
If enabled, area one will auto partial arm at the auto arm time. If this option is enabled, area one cannot be auto armed in the
full mode.
Battery Testing
The NX-16 will test the battery at disarm once per 24 hour cycle, if programmed in system timers. The NX-16 can test for
battery presence every 12 seconds. The battery missing test is enabled in this section.
Box Tamper
If enabled, the NX-16 will use the N/C Box Tamper pins provided on the main board.
Dual End Of Line (Zone Tamper)
If enabled, the NX-16 will monitor all zones except types 17 and 28 for Dual End Of Line. A short or open circuit on a DEOL will
set zone tamper alarms. Refer to the terminal wiring diagram for more detail.
Expanded Contact I.D.
The NX-16 can report all system device alarms with their individual point number if the expanded contact I.D. reporting is
enabled.
24
SYSTEM OPTIONS TABLE
First To Open / Last To Close
If enabled, the NX-16 will only send a closing report when the last area is armed. NOTE: the last area to arm must have
open/close reports enabled. The NX-16 will only send an opening report when the first area is disarmed. NOTE: The first area
to disarm must have open/close reports enabled.
Force Arm Bypass Reports
If enabled, the NX-16 restricts bypass reports when zones are forced armed. Otherwise, when a zone is forced armed (and
bypass reports are enabled), bypass reports are sent at the end of exit time. If forced armed zones re-seal during the armed
period, bypass restores are sent.
Limited Sirens / Communicator
If enabled, the NX-16 will only set one siren activation per zone and/or one alarm report per zone. This option must be disabled
if the siren and communicator attempt counter option is used. If limited communicator is enabled, restore reports (if enabled)
will be sent at disarm, otherwise restore reports will be sent as they occur.
Lost Clock
If enabled, the NX-16 will illuminate the service LED whenever the internal clock is interrupted.
On-Board Zone Disable
If enabled, the NX-16 can disable the 8 on-board zone. This is used when the NX-16 is used as a totally wireless system.
Radio Remote Arm
If enabled, the NX-16 will activate the sirens every time the system is armed or disarmed with a key-switch zone or integrated
wireless keyfob. The sirens will chirp once for arming and twice for disarming. The strobe will flash for 3 seconds for arming
and 6 seconds for disarming.
Silent Exit Option
The exit delay can be silenced by pressing [r]-[Exit] before arming the control panel, or when using the re-exit option. The exit
delay can also be silenced permanently in all partitions.
Tamper Siren
If enabled, all zone tampers and module tampers will set the system sirens.
Telephone Line Cut Siren
If enabled, it will set the siren for the siren time when ever the phone line monitor is activated. The phone line siren can be
reset to be the entry of a valid code. The options set phone line cut sirens in either armed and or disarmed mode. In a multiarea system, “a system armed state” would be represented by any area that is armed.
Voltage Output
If enabled, the on-board siren output will become a 1 AMP 12V DC output to drive 12V sirens.
Zone Doubling
If enabled, the 8 on-board zones will be doubled to 16 zones. Zone 1 will represent zones 1 and 9, and zone 8 will represent
zone 8 and 16. This option cannot be selected for zones other than the 8 zones on the main panel. This option cannot be used
in conjunction with the DEOL option. To disable this option, first de-select it, and then power down the system.
25
FEATURE 25
SYSTEM TIMERS
Feature 25 contains the duration of various system timing functions. Example: If you desire the duration of the
Strobe time to be 48 hours, you should program [4] [8] [r] in segment 2 of this feature. The [4] [8] is the number of
hours, and the [r] stores the data and moves to the next segment of this feature.
SEGMENTS 1-10
SEGMENT 1
SEGMENT 2
SEGMENT 3
SEGMENT 4
SEGMENT 5
SEGMENT 6
SEGMENT 7
SEGMENT 8
SEGMENT 9
SEGMENT 10
30
0
2
30
5
Partial Arm Entry Time (0 - 255 SEC)
Strobe Time (0 - 255 HOURS).
Dynamic Battery Test Duration (0 – 255 MIN).
AC Failure Report Delay (0 -255 MIN).
Siren Time (1 - 255 MIN).
Twin Trip Time (0 - 255 MIN).
Chime Time in 50 ms increments (0 - 255).
Dialer Delay Time (0 - 255 SEC)
Fire Alarm Verification Time (120 – 255 SEC)
Listen - In Time (0 - 255 SEC)
5
3
0
120
0
SYSTEM TIMER OPTIONS TABLE
Partial Arm Entry Time
The Partial Arm Entry time is the delay time that will be allocated to all active zones in Partial Arm Mode. Fire and 24 hour zone
will not be affected in Partial Arm Mode. The valid time selection in this segment is 0 to 255 seconds.
Strobe Time
The Strobe time is the duration that output programmed to follow the strobe time will activate. The valid time selection in this
segment is 0 to 255 hours, where “0” = Latching.
Dynamic Battery Test
The NX-16 can perform a Dynamic Battery Test for the duration in this segment at the disarming of the first area after 0:00
hours once each 24 hour cycle. This option is enabled by programming a test duration in this segment. The valid time
selection in this segment is 0 to 255 minutes, where “0” = disable.
AC Fail Report
The number programmed in this segment represents the number of 1 minute increments the AC power is lost before a
communication is initiated, from 1 to 255 minutes. The AC power restore will also delay reporting until after the number of
minutes programmed in this feature has elapsed.
Siren Time
The Siren Time is the duration that the siren output and auxiliary outputs programmed to follow the siren time will activate. The
valid time selection in this segment is 1 to 255 minutes.
Twin Trip Time
This segment contains the number of one (1) minute increments in the Twin Trip Zone Time Period. The Twin Trip Zone Time
Period can be programmed in one (1) minute increments from 1 to 255. The time programmed in this feature will set the time
period whereby two or more zones must trip before an alarm condition will be registered or the one zone must trigger twice
within this time period, or a continues trip longer exceeding 10 seconds.
Chime Time
The NX-16 code pad Chime is a true chime sound, which can be set to chime once, follow the input status or latch until a valid
code is entered. The duration options programmable in this segment are:“0” = Follow, “3” = Chime once or “255” = Latch.
Dialer Delay Time
The NX-16 can delay the dialing of all non (24) hour zones by the duration programmed in this feature. This option can be used
as a false alarm reduction method. The valid time selection in this segment is 0 to 255 seconds.
Fire Alarm Verification Time
When enabled, the NX-16 will verify a Fire alarm by requiring more than one trip on a smoke detector within the time
programmed in this segment before creating an alarm. The valid time selection in this segment is 120 to 255 seconds.
Listen - In Time
This option is not currently supported.
26
FEATURE 26
AUXILIARY OUTPUT 1-4 AREA SELECTION
Feature 26 is used to select which area(s) the events must occur in before the output will activate. Feature 26 has
4 segments. Segment 1 corresponds to output 1, and Segment 4 corresponds to output 4.
AREA 1
AREA 2
AREA 3
AREA 4
AREA 5
AREA 6
AREA 7
AREA 8
SEGMENT 1 – OUTPUT 1
(1)
(2)
(3)
(4)
(5)
(6)
(7)
(8)
SEGMENT 2 – OUTPUT 2
(1)
(2)
(3)
(4)
(5)
(6)
(7)
(8)
SEGMENT 3 – OUTPUT 3
(1)
(2)
(3)
(4)
(5)
(6)
(7)
(8)
SEGMENT 4 – OUTPUT 4
(1)
(2)
(3)
(4)
(5)
(6)
(7)
(8)
FEATURE 27
AUXILIARY OUTPUT 1-4 SPECIAL TIMING
Feature 27 contains special timing option activation for the four auxiliary outputs. Segment 1 corresponds to output
1, Segment 4 corresponds to output 4.
OUTPUTS 1 - 4
SEGMENTS 1 – 4
1
On if output should be timed in minutes; Off if timed in seconds
2
On if output should latch; Off if output should be timed
(3)
On if output should stop timing upon code entry; Off if the output should follow timer
4
On if output should only activate between the closing and opening time in Features 33 and 34
5
On if output should only activate between the opening and closing time in Features 33 and 34
6
On if output should be inverted (0 volts going to 12 volts when activated)
7
RESERVED
8
RESERVED
FEATURE 28
SEGMENTS 1-2
AUXILIARY OUTPUT 1 - EVENT AND TIME
OUTPUT EVENT - 51
OUTPUT TIME - 0
Feature 28 sets the output event and output active time for auxiliary output one (1). Use the chart in this section to
select the event in segment 1, that will activate Auxiliary Output 1. Program the timing in segment 2, from 0-255
(minutes or seconds, depending on data programmed in Segment 1, Feature 27). Programming a "0" makes the
output follow the event.
FEATURE 29
SEGMENTS 1-2
AUXILIARY OUTPUT 2 - EVENT AND TIME
OUTPUT EVENT - 7
OUTPUT TIME - 0
Feature 29 sets the output event and output active time for auxiliary output two (2). Use the chart in this section to
select the event in segment 1, that will activate Auxiliary Output 2. Program the timing in segment 2, from 0-255
(minutes or seconds, depending on data programmed in Segment 1, Feature 27). Programming a "0" makes the
output follow the event.
FEATURE 30
AUXILIARY OUTPUT 3 - EVENT AND TIME
SEGMENTS 1-2
OUTPUT EVENT - 23
OUTPUT TIME - 0
Feature 30 sets the output event and output active time for auxiliary output three (3). Use the chart in this section
to select the event in segment 1, that will activate Auxiliary Output 3. Program the timing in segment 2, from 0-255
(minutes or seconds, depending on data programmed in Segment 1, Feature 27). Programming a "0" makes the
output follow the event.
27
FEATURE 31
AUXILIARY OUTPUT 4 - EVENT AND TIME
SEGMENTS 1-2
OUTPUT EVENT - 21
OUTPUT TIME - 0
Feature 31 sets the output event and output active time for auxiliary output four (4). Use the chart in this section to
select the event in segment 1, that will activate Auxiliary Output 4. Program the timing in segment 2, from 0-255
(minutes or seconds, depending on data programmed in Segment 1, Feature 27). Programming a "0" makes the
output follow the event.
AUXILIARY OUTPUT EVENT SELECTION
DATA
EVENT
DATA
EVENT
0
Burglary Alarm
26
Fire Trouble
1
Fire Alarm
27
Chime
2
24 Hour Alarm
28
Expander Trouble
3
Trouble Alarm
29
Dynamic Battery Test Time
4
Tamper Alarm
30
Open Period
5
Yelping Siren
31
Closed Period
6
Steady Siren
32
Listen-In
7
Any Siren
33
Line Seizure
8
Any Bypass
34
Reserved
9
AC Fail
35
Fail To Communicate
10
Low Battery
36
Telephone Line Fault
11
Duress
37
Program Mode
12
Aux 1 Code Pad Zone
38
Download In Process
13
Aux 2 Code Pad Zone
39
Reserved
14
Panic Code Pad Zone
40
Short Circuit
15
Code Pad Tamper
41
Box Tamper
16
Auto-test
42
Siren Tamper
17
Alarm Memory
43
Any Open
18
Entry
44
Any Short
19
Exit
45
Any Fault (Open/ Short on Non-Fire Zone)
20
Entry or Exit
46
Any Alarm
21
Armed State
47
Beeping Code pad
22
Disarmed State
48
Code Entry (See note below)
23
Ready
49
ITI Keyfob Light Key (function 1)
24
Not Ready
50
ITI Keyfob * Key (function 2)
25
Fire
51
Strobe
Note : When event 48 is programmed, it is possible to program a user code's authorization to select which
output(s) a particular code will activate. When LED 8 is on for an authorization, then LEDs 1- 4 correspond to that
code activating outputs 1 - 4 respectively. Refer to the code pad programming section in this manual.
28
FEATURE 32
SEGMENTS 1-4
SEGMENT 1
SEGMENT 2
SEGMENT 3
SEGMENT 4
AUTO-TEST CONTROL
7
168
03
00
Program a 0" if the intervals are in hours. “1 - 8" if in days.
1 = SUN, 2=MON, 3=TUE, 4=WED, 5=THU, 6=FRI 7 = SAT and 8 = DAILY
Program the Auto-test hourly interval from 1-255 hours
Program the Auto-test report hour in 24 hour format (if segment 1 is set to hourly intervals, this segment
is ignored)
Program the Auto-test report time, number of minutes after the hour
FEATURE 33
SEGMENTS 1-2
OPENING TIME
HOURS - 06
MINUTES - 00
Feature 33 contains the time (in 24 hour format) the NX-16 enables codes designated as “Arm Only after Closing”. This time is
only valid on those days programmed in Feature 35. Note: Opening time must be earlier than closing time for Aux.
Outputs, or Code Authorization to function properly.
FEATURE 34
SEGMENTS 1-2
CLOSING TIME / AUTO ARMING TIME
HOURS - 20
MINUTES - 00
Feature 34 contains the time in 24 hour format the NX-16 disables the disarm capability for codes designated as arm only after
closing. This is also the Automatic Arming time. If enabled in Feature 36 NX-16 will Auto Arm the specified area(s). At this time,
the Code Pad will beep for 50 seconds before the panel arms. The arming process can be stopped by entering a valid code on
the Code Pad. Note: Opening time must be earlier than closing time for Aux. Outputs, or Code Authorization to
function properly.
FEATURE 35
“ARM ONLY AFTER CLOSE” WINDOW
Feature 35 selects which days of the week each area is open. On these days, “arm only after close window codes will be
able to arm and disarm during open window. On days not selected here, “arm only after close window codes will not disarm.
Segment 1 is for area 1, and segment 8 is for area 8. (See Features 33 and 34 for the opening and closing times for the open
days.
AREAS 1 - 8
SEGMENTS 1 – 8
1
"Arm only after close window" will arm/disarm on Sunday
2
"Arm only after close window" will arm/disarm on Monday
3
"Arm only after close window" will arm/disarm on Tuesday
4
"Arm only after close window" will arm/disarm on Wednesday
5
"Arm only after close window" will arm/disarm on Thursday
6
"Arm only after close window" will arm/disarm on Friday
"Arm only after close window" will arm/disarm on Saturday
7
8
RESERVED
FEATURE 36
DAYS OF THE WEEK FOR AUTO ARMING IN AREAS 1 - 8
Feature 36 selects which days each area will auto arm. Segment 1 is for area 1, and segment 8 is for area 8. If a zone is
faulted when the panel tries to auto arm, the zone will be bypassed.
AREAS 1 - 8
SEGMENTS 1 – 8
Auto Arming on Sunday.
1
2
Auto Arming on Monday
3
Auto Arming on Tuesday
4
Auto Arming on Wednesday
5
Auto Arming on Thursday
6
Auto Arming on Friday
Auto Arming on Saturday
7
8
RESERVED
29
FEATURE 37
SEGMENTS 1-4
AREA 1 ACCOUNT CODE
10
10
10
10
Feature 37 contains the account code sent when area 1 is reported. If Feature 37 is left un-programmed (all
“10"s), then the system account code (Feature 5) will be used.
FEATURE 38
SEGMENTS 1-4
AREA 2 ACCOUNT CODE
10
10
10
10
Feature 38 contains the account code sent when area 2 is reported. If Feature 38 is left un-programmed (all
“10"s), then the system account code (Feature 5) will be used.
FEATURE 39
AREA 2 - OPTION AND REPORT SELECTIONS
Feature 39 is used to enable certain options that can be accessed or are visible to the user from the code pad of
the system. In addition, certain communicator reports are enabled in Feature 16. Each of these options can be
enabled by area. If the option selection feature for any area is left blank, that area will use feature 16 for
the option selection.
SEGMENT 1
1
2
3
4
5
6
7
8
SEGMENT 2
1
2
3
4
5
6
7
8
SEGMENT 3
1
2
3
4
5
6
7
8
FEATURE 40
On enables the Quick Arm option
On enables the Re-exit option
On enables the Force Arm option
On enables the Silent Code Pad Panic option
On enables the Audible Code Pad Panic option
On enables the Code Pad Fire option
On enables the Code Pad Medical option
On enables the Code Pad Multiple Code Attempt Tamper option
On enables the LED Extinguish option.
On enables the Require Code for Bypassing option
On enables the Zone Bypassed Sounder Alert option
On enables the AC Power/Low Battery Sounder Alert option
On enables Bypass toggle
On enables Silent Auto Arm
On enables the Universal Arming option
On enables the One Key Partial Mode Disarm
On enables Opening and Closing reports
On enables Zone Bypass reporting
On enables Zone Restore reporting
On enables Zone Trouble reporting
On enables Zone Tamper reporting
On enables the Cancel option
On enables Recent Closing option
On enables Exit Error option
AREA 2 - ENTRY / EXIT TIMERS
SEGMENTS 1-4
ENTRY TIME 1 - 0
EXIT TIME 1 - 0
ENTRY TIME 2 - 0
EXIT TIME 2 - 0
Feature 40 sets the primary and secondary entry / exit times for area 2. If all segments in this feature are set to
“0”, the entry / exit time for this area will follow area 1 (Feature 17). Valid entries are 10-255 seconds
30
FEATURE 41
SEGMENTS 1-4
AREA 3 ACCOUNT CODE
10
10
10
10
Feature 41 contains the account code sent when area 3 is reported. If Feature 41 is left un-programmed (all
“10"s), then the system account code (Feature 5) will be used.
FEATURE 42
AREA 3 - OPTION AND REPORT SELECTIONS
Feature 42 is used to enable certain options that can be accessed or are visible to the user from the code pad of
the system. In addition, certain communicator reports are enabled in Feature 16. Each of these options can be
enabled by area. If the option selection feature for any area is left blank, that area will use feature 16 for
the option selection. REFER TO FEATURE 39 IN THIS SECTION FOR OPTIONS TABLE.
FEATURE 43
AREA 3 - ENTRY / EXIT TIMERS
SEGMENTS 1-4
ENTRY TIME 1 - 0
EXIT TIME 1 - 0
ENTRY TIME 2 - 0
EXIT TIME 2 - 0
Feature 43 sets the primary and secondary entry / exit times for area 3. If all segments in this feature are set to
“0”, the entry / exit time for this area will follow area 1 (Feature 17). Valid entries are 10-255 seconds
FEATURE 44
SEGMENTS 1-4
AREA 4 ACCOUNT CODE
10
10
10
10
Feature 44 contains the account code sent when area 4 is reported. If Feature 44 is left un-programmed (all
“10"s), then the system account code (Feature 5) will be used.
FEATURE 45
AREA 4 - OPTION AND REPORT SELECTIONS
Feature 45 is used to enable certain options that can be accessed or are visible to the user from the code pad of
the system. In addition, certain communicator reports are enabled in Feature 16. Each of these options can be
enabled by area. If the option selection feature for any area is left blank, that area will use Feature 16 for
the option selection. REFER TO FEATURE 39 IN THIS SECTION FOR OPTIONS TABLE.
FEATURE 46
AREA 4 - ENTRY / EXIT TIMERS
SEGMENTS 1-4
ENTRY TIME 1 - 0
EXIT TIME 1 - 0
ENTRY TIME 2 - 0
EXIT TIME 2 - 0
Feature 46 sets the primary and secondary entry / exit times for area 4. If all segments in this feature are set to
“0”, the entry / exit time for this area will follow area 1 (Feature 17). Valid entries are 10-255 seconds
FEATURE 47
SEGMENTS 1-4
AREA 5 ACCOUNT CODE
10
10
10
10
Feature 47 contains the account code sent when area 5 is reported. If Feature 47 is left un-programmed (all
“10"s), then the system account code (Feature 5) will be used.
31
FEATURE 48
AREA 5 - OPTION AND REPORT SELECTIONS
Feature 48 is used to enable certain options that can be accessed or are visible to the user from the code pad of
the system. In addition, certain communicator reports are enabled in Feature 16. Each of these options can be
enabled by area. If the option selection feature for any area is left blank, that area will use Feature 16 for
the option selection. REFER TO FEATURE 39 IN THIS SECTION FOR OPTIONS TABLE.
FEATURE 49
AREA 5 - ENTRY / EXIT TIMERS
SEGMENTS 1-4
ENTRY TIME 1 - 0
EXIT TIME 1 - 0
ENTRY TIME 2 - 0
EXIT TIME 2 - 0
Feature 49 sets the primary and secondary entry / exit times for area 5. If all segments in this feature are set to
“0”, the entry / exit time for this area will follow area 1 (Feature 17). Valid entries are 10-255 seconds
FEATURE 50
AREA 6 ACCOUNT CODE
SEGMENTS 1-4
10
10
10
10
Feature 50 contains the account code sent when area 6 is reported. If Feature 50 is left un-programmed (all
“10"s), then the system account code (Feature 5) will be used.
FEATURE 51
AREA 6 - OPTION AND REPORT SELECTIONS
Feature 51 is used to enable certain options that can be accessed or are visible to the user from the code pad of
the system. In addition, certain communicator reports are enabled in Feature 16. Each of these options can be
enabled by area. If the option selection feature for any area is left blank, that area will use Feature 16 for
the option selection. REFER TO FEATURE 39 IN THIS SECTION FOR OPTIONS TABLE.
FEATURE 52
AREA 6 - ENTRY / EXIT TIMERS
SEGMENTS 1-4
ENTRY TIME 1 - 0
EXIT TIME 1 - 0
ENTRY TIME 2 - 0
EXIT TIME 2 - 0
Feature 52 sets the primary and secondary entry / exit times for area 6. If all segments in this feature are set to
“0”, the entry / exit time for this area will follow area 1 (Feature 17). Valid entries are 10-255 seconds
FEATURE 53
AREA 7 ACCOUNT CODE
SEGMENTS 1-4
10
10
10
10
Feature 53 contains the account code sent when area 7 is reported. If Feature 53 is left un-programmed (all
“10"s), then the system account code (Feature 5) will be used.
FEATURE 54
AREA 7- OPTION AND REPORT SELECTIONS
Feature 54 is used to enable certain options that can be accessed or are visible to the user from the code pad of
the system. In addition, certain communicator reports are enabled in Feature 16. Each of these options can be
enabled by area. If the option selection feature for any area is left blank, that area will use Feature 16 for
the option selection. REFER TO FEATURE 39 IN THIS SECTION FOR OPTIONS TABLE.
32
FEATURE 55
AREA 7 - ENTRY / EXIT TIMERS
SEGMENTS 1-4
ENTRY TIME 1 - 0
EXIT TIME 1 - 0
ENTRY TIME 2 - 0
EXIT TIME 2 - 0
Feature 55 sets the primary and secondary entry / exit times for area 7. If all segments in this Feature are set to
“0”, the entry / exit time for this area will follow area 1 (Feature 17). Valid entries are 10-255 seconds
FEATURE 56
SEGMENTS 1-4
AREA 8 ACCOUNT CODE
10
10
10
10
Feature 56 contains the account code sent when area 8 is reported. If Feature 56 is left un-programmed (all
“10"s), then the account code corresponding to the Phone number dialed will be used.
FEATURE 57
AREA 8- OPTION AND REPORT SELECTIONS
Feature 57 is used to enable certain options that can be accessed or are visible to the user from the code pad of
the system. In addition, certain communicator reports are enabled in Feature 16. Each of these options can be
enabled by area. If the option selection feature for any area is left blank, that area will use Feature 16 for
the option selection. REFER TO FEATURE 39 IN THIS SECTION FOR OPTIONS TABLE.
FEATURE 58
AREA 8 - ENTRY / EXIT TIMERS
SEGMENTS 1-4
ENTRY TIME 1 - 0
EXIT TIME 1 - 0
ENTRY TIME 2 - 0
EXIT TIME 2 - 0
Feature 58 sets the primary and secondary entry / exit times for area 8. If all segments in this Feature are set to
“0”, the entry / exit time for this area will follow area 1 (Feature 17). Valid entries are 10-255 seconds
33
FEATURE 59
ZONES 17-24 CONFIGURATION GROUP
SEGMENTS 1-8
16
16
16
16
16
16
16
16
Feature 59 contains the Configuration Group (Zone type) for zones 1-8. Segment 1 is for zone 17, and Segment 8
is for zone 24.
FEATURE 60
ZONE AREA SELECT - ZONES 17-24
Feature 60 is used to select the area(s) that zones 17-24 reside in. A zone may reside in any combination of the
eight areas. If a burglary zone resides in more than one area, it will only be active when all areas are armed. A
zone that resides in more than one area will be reported to its lowest area. Feature 60 has 8 segments. Segment
1 corresponds to zone 17 and Segment 8 corresponds to zone 24.
AREA 1
AREA 2
AREA 3
AREA 4
AREA 5
AREA 6
AREA 7
AREA 8
SEGMENT 1 – ZONE 17
(1)
2
3
4
5
6
7
8
SEGMENT 2 – ZONE 18
(1)
2
3
4
5
6
7
8
SEGMENT 3 – ZONE 19
(1)
2
3
4
5
6
7
8
SEGMENT 4 – ZONE 20
(1)
2
3
4
5
6
7
8
SEGMENT 5 – ZONE 21
(1)
2
3
4
5
6
7
8
SEGMENT 6 – ZONE 22
(1)
2
3
4
5
6
7
8
SEGMENT 7 – ZONE 23
(1)
2
3
4
5
6
7
8
SEGMENT 8 – ZONE 24
(1)
2
3
4
5
6
7
8
FEATURE 61
ZONES 25-32 CONFIGURATION GROUP
SEGMENTS 1-8
16
16
16
16
16
16
16
16
Feature 61 contains the Configuration Group (Zone type) for zones 1-8. Segment 1 is for zone 25, and Segment 8
is for zone 32.
FEATURE 62
ZONE AREA SELECT - ZONES 25-32
Feature 62 is used to select the area(s) that zones 25-32 reside in. A zone may reside in any combination of the
eight areas. If a burglary zone resides in more than one area, it will only be active when all areas are armed. A
zone that resides in more than one area will be reported to its lowest area. Feature 62 has 8 segments. Segment 1
corresponds to zone 25 and Segment 8 corresponds to zone 32. REFER TO FEATURE 60 IN THIS SECTION
FOR THE ZONE AREA SELECT TABLE.
FEATURE 63
SEGMENTS 1-8
ZONES 33-40 CONFIGURATION GROUP
16
16
16
16
16
16
16
16
Feature 63 contains the Configuration Group (Zone type) for zones 1-8. Segment 1 is for zone 33, and Segment 8
is for zone 40.
34
FEATURE 64
ZONE AREA SELECT - ZONES 33-40
Feature 64 is used to select the area(s) that zones 33-40 reside in. A zone may reside in any combination of the
eight areas. If a burglary zone resides in more than one area, it will only be active when all areas are armed. A
zone that resides in more than one area will be reported to its lowest area. Feature 64 has 8 segments. Segment 1
corresponds to zone 33 and Segment 8 corresponds to zone 40. REFER TO FEATURE 60 IN THIS SECTION
FOR THE ZONE AREA SELECT TABLE.
FEATURE 65
SEGMENTS 1-8
ZONES 41-48 CONFIGURATION GROUP
16
16
16
16
16
16
16
16
Feature 65 contains the Configuration Group (Zone type) for zones 1-8. Segment 1 is for zone 41, and Segment 8
is for zone 48.
FEATURE 66
ZONE AREA SELECT - ZONES 41-48
Feature 66 is used to select the area(s) that zones 41-48 reside in. A zone may reside in any combination of the
eight areas. If a burglary zone resides in more than one area, it will only be active when all areas are armed. A
zone that resides in more than one area will be reported to its lowest area. Feature 66 has 8 segments. Segment 1
corresponds to zone 41 and Segment 8 corresponds to zone 48. REFER TO FEATURE 60 IN THIS SECTION
FOR THE ZONE AREA SELECT TABLE.
35
Features 67-106 are used to change the zone configurations as listed in the Default Zone Configuration Table in
Zones 1 to 16 configuration section. These features are considered advanced programming and should only be
changed with a thorough understanding of the operation of each bit.
FEATURE 67
CONFIGURATION GROUP 1 ALARM EVENT CODE
SEGMENT 1
3
Feature 67 contains the Contact I.D event code sent for zone configuration group 1 alarm reports. The desired event code
should be chosen from the Contact I.D Configuration Group Event Table in the Appendix section.
FEATURE 68
SEGMENT 1
1
2
3
4
(5)
6
7
8
SEGMENT 2
1
(2)
3
4
(5)
6
(7)
(8)
SEGMENT 3
1
(2)
3
4
(5)
(6)
(7)
(8)
CONFIGURATION GROUP 1 CHARACTERISTIC SELECT
Fire (turn on if this is a fire zone)
24 hour (turn on for non-fire 24 hour zones)
Key-switch zone (normally open switch)
Follower (turn on for burglary zones that are Instant during non-entry times)
Delay 1 zone (follows timer 1 entry and exit times)
Delay 2 zone (follows timer 2 entry and exit times)
RESERVED
Local only (turn on if this zone should not be reported)
On if configuration group will beep the code pad for alarm
On if configuration group will sound the yelping siren for alarm
On if configuration group will sound the steady siren for alarm
On if configuration group will chime
On if configuration group can be bypassed
On if configuration group is included in the Group Bypass
On if configuration group is Force Arm
On if configuration group is Active in Partial Mode
On enables Fast Loop Response. (50mS)- off = 500mS
On enables Double End Of Line Tamper zone
On enables Trouble Reporting zone. (Day zone and Fire zones)
On if configuration group is a Twin Trip Zone
On enables Dialer Delay zone
On if configuration group will siren / communicator attempt count
On enables Restore reporting
On enables Listen-In
FEATURE 69
CONFIGURATION GROUP 2 ALARM EVENT CODE
SEGMENT 1
3
Feature 69 contains the Contact I.D event code sent for zone configuration group 2 alarm reports. The desired event code should be chosen
from the Contact I.D Configuration Group Event Table in the Appendix section.
FEATURE 70
SEGMENT 1
CONFIGURATION GROUP 2 CHARACTERISTIC SELECT
5
SEGMENT 2
2457
SEGMENT 3
25678
Use "Configuration Group Characteristic table" described in Feature 68, of this section.
FEATURE 71
CONFIGURATION GROUP 3 ALARM EVENT CODE
SEGMENT 1
3
Feature 71 contains the Contact I.D event code sent for zone configuration group 3 alarm reports. The desired event code should be chosen
from the Contact I.D Configuration Group Event Table in the Appendix section.
FEATURE 72
SEGMENT 1
CONFIGURATION GROUP 3 CHARACTERISTIC SELECT
5
SEGMENT 2
24578
Use "Configuration Group Characteristic table" described in Feature 68, of this section.
36
SEGMENT 3
25678
FEATURE 73
CONFIGURATION GROUP 4 ALARM EVENT CODE
SEGMENT 1
3
Feature 73 contains the Contact I.D event code sent for zone configuration group 4 alarm reports. The desired event code should be chosen
from the Contact I.D Configuration Group Event Table in the Appendix section.
FEATURE 74
CONFIGURATION GROUP 4 CHARACTERISTIC SELECT
SEGMENT 1
6
SEGMENT 2
2578
SEGMENT 3
25678
Use "Configuration Group Characteristic table" described in Feature 68, of this section.
FEATURE 75
CONFIGURATION GROUP 5 ALARM EVENT CODE
SEGMENT 1
3
Feature 75 contains the Contact I.D event code sent for zone configuration group 5 alarm reports. The desired event code should be chosen
from the Contact I.D Configuration Group Event Table in the Appendix section.
FEATURE 76
SEGMENT 1
CONFIGURATION GROUP 5 CHARACTERISTIC SELECT
6
SEGMENT 2
24578
SEGMENT 3
25678
Use "Configuration Group Characteristic table" described in Feature 68, of this section.
FEATURE 77
CONFIGURATION GROUP 6 ALARM EVENT CODE
SEGMENT 1
3
Feature 77 contains the Contact I.D event code sent for zone configuration group 6 alarm reports. The desired event code should be chosen
from the Contact I.D Configuration Group Event Table in the Appendix section.
FEATURE 78
SEGMENT 1
CONFIGURATION GROUP 6 CHARACTERISTIC SELECT
4
SEGMENT 2
257
SEGMENT 3
25678
Use "Configuration Group Characteristic table" described in Feature 68, of this section.
FEATURE 79
CONFIGURATION GROUP 7 ALARM EVENT CODE
SEGMENT 1
3
Feature 79 contains the Contact I.D event code sent for zone configuration group 7 alarm reports. The desired event code should be chosen
from the Contact I.D Configuration Group Event Table in the Appendix section.
FEATURE 80
SEGMENT 1
CONFIGURATION GROUP 7 CHARACTERISTIC SELECT
4
SEGMENT 2
2578
SEGMENT 3
25678
Use "Configuration Group Characteristic table" described in Feature 68, of this section.
FEATURE 81
CONFIGURATION GROUP 8 ALARM EVENT CODE
SEGMENT 1
3
Feature 82 contains the Contact I.D event code sent for zone configuration group 8 alarm reports. The desired event code should be chosen
from the Contact I.D Configuration Group Event Table in the Appendix section.
FEATURE 82
SEGMENT 1
CONFIGURATION GROUP 8 CHARACTERISTIC SELECT
4
SEGMENT 2
257
SEGMENT 3
245678
Use "Configuration Group Characteristic table" described in Feature 68, of this section.
FEATURE 83
CONFIGURATION GROUP 9 ALARM EVENT CODE
SEGMENT 1
3
Feature 82 contains the Contact I.D event code sent for zone configuration group 9 alarm reports. The desired event code should be chosen
from the Contact I.D Configuration Group Event Table in the Appendix section.
FEATURE 84
SEGMENT 1
CONFIGURATION GROUP 9 CHARACTERISTIC SELECT
4
SEGMENT 2
2567
Use "Configuration Group Characteristic table" described in Feature 68, of this section.
37
SEGMENT 3
25678
FEATURE 85
CONFIGURATION GROUP 10 ALARM EVENT CODE
SEGMENT 1
3
Feature 85 contains the Contact I.D event code sent for zone configuration group 10 alarm reports. The desired event code should be chosen
from the Contact I.D Configuration Group Event Table in the Appendix section.
FEATURE 86
CONFIGURATION GROUP 10 CHARACTERISTIC SELECT
SEGMENT 1
4
SEGMENT 2
2457
SEGMENT 3
245678
Use "Configuration Group Characteristic table" described in Feature 68, of this section.
FEATURE 87
CONFIGURATION GROUP 11 ALARM EVENT CODE
SEGMENT 1
3
Feature 82 contains the Contact I.D event code sent for zone configuration group 11 alarm reports. The desired event code should be chosen
from the Contact I.D Configuration Group Event Table in the Appendix section.
FEATURE 88
SEGMENT 1
CONFIGURATION GROUP 11 CHARACTERISTIC SELECT
4
SEGMENT 2
2578
SEGMENT 3
245678
Use "Configuration Group Characteristic table" described in Feature 68, of this section.
FEATURE 89
CONFIGURATION GROUP 12 ALARM EVENT CODE
SEGMENT 1
3
Feature 89ontains the Contact I.D event code sent for zone configuration group 12 alarm reports. The desired event code should be chosen
from the Contact I.D Configuration Group Event Table in the Appendix section.
FEATURE 90
SEGMENT 1
CONFIGURATION GROUP 12 CHARACTERISTIC SELECT
4
SEGMENT 2
25678
SEGMENT 3
25678
Use "Configuration Group Characteristic table" described in Feature 68, of this section.
FEATURE 91
CONFIGURATION GROUP 13 ALARM EVENT CODE
SEGMENT 1
3
Feature 82 contains the Contact I.D event code sent for zone configuration group 13 alarm reports. The desired event code should be chosen
from the Contact I.D Configuration Group Event Table in the Appendix section.
FEATURE 92
SEGMENT 1
CONFIGURATION GROUP 13 CHARACTERISTIC SELECT
4
SEGMENT 2
2567
SEGMENT 3
245678
Use "Configuration Group Characteristic table" described in Feature 68, of this section.
FEATURE 93
CONFIGURATION GROUP 14 ALARM EVENT CODE
SEGMENT 1
3
Feature 93 contains the Contact I.D event code sent for zone configuration group 14 alarm reports. The desired event code should be chosen
from the Contact I.D Configuration Group Event Table in the Appendix section.
FEATURE 94
SEGMENT 1
CONFIGURATION GROUP 14 CHARACTERISTIC SELECT
4
SEGMENT 2
25678
SEGMENT 3
245678
Use "Configuration Group Characteristic table" described in Feature 68, of this section.
FEATURE 95
CONFIGURATION GROUP 15 ALARM EVENT CODE
SEGMENT 1
3
Feature 95 contains the Contact I.D event code sent for zone configuration group 15 alarm reports. The desired event code should be chosen
from the Contact I.D Configuration Group Event Table in the Appendix section.
FEATURE 96
SEGMENT 1
CONFIGURATION GROUP 15 CHARACTERISTIC SELECT
SEGMENT 2
25
Use "Configuration Group Characteristic table" described in Feature 68, of this section.
38
SEGMENT 3
25678
FEATURE 97
CONFIGURATION GROUP 16 ALARM EVENT CODE
SEGMENT 1
3
Feature 97 contains the Contact I.D event code sent for zone configuration group 16 alarm reports. The desired event code should be chosen
from the Contact I.D Configuration Group Event Table in the Appendix section.
FEATURE 98
SEGMENT 1
CONFIGURATION GROUP 16 CHARACTERISTIC SELECT
SEGMENT 2
258
SEGMENT 3
25678
Use "Configuration Group Characteristic table" described in Feature 68, of this section.
FEATURE 99
CONFIGURATION GROUP 17 ALARM EVENT CODE
SEGMENT 1
3
Feature 99 contains the Contact I.D event code sent for zone configuration group 17 alarm reports. The desired event code should be chosen
from the Contact I.D Configuration Group Event Table in the Appendix section.
FEATURE 100
SEGMENT 1
CONFIGURATION GROUP 17 CHARACTERISTIC SELECT
SEGMENT 2
258
SEGMENT 3
5678
Use "Configuration Group Characteristic table" described in Feature 68, of this section.
FEATURE 101
CONFIGURATION GROUP 18 ALARM EVENT CODE
SEGMENT 1
3
Feature 101 contains the Contact I.D event code sent for zone configuration group 18 alarm reports. The desired event code should be
chosen from the Contact I.D Configuration Group Event Table in the Appendix section.
FEATURE 102
SEGMENT 1
CONFIGURATION GROUP 18 CHARACTERISTIC SELECT
SEGMENT 2
25
SEGMENT 3
245678
Use "Configuration Group Characteristic table" described in Feature 68, of this section.
FEATURE 103
CONFIGURATION GROUP 19 ALARM EVENT CODE
SEGMENT 1
3
Feature 103 contains the Contact I.D event code sent for zone configuration group 19 alarm reports. The desired event code should be
chosen from the Contact I.D Configuration Group Event Table in the Appendix section.
FEATURE 104
SEGMENT 1
CONFIGURATION GROUP 19 CHARACTERISTIC SELECT
SEGMENT 2
256
SEGMENT 3
25678
Use "Configuration Group Characteristic table" described in Feature 68, of this section.
FEATURE 105
CONFIGURATION GROUP 20 ALARM EVENT CODE
SEGMENT 1
3
Feature 105 contains the Contact I.D event code sent for zone configuration group 20 alarm reports. The desired event code should be
chosen from the Contact I.D Configuration Group Event Table in the Appendix section.
FEATURE 106
SEGMENT 1
CONFIGURATION GROUP 20 CHARACTERISTIC SELECT
SEGMENT 2
2458
Use "Configuration Group Characteristic table" described in Feature 68, of this section.
39
SEGMENT 3
25678
Segment 1
1
2
3
9
Enables six digit code option. All arm/disarm/Go To Program codes require six digits.
Requires valid user code entry for [*][9][8] and [*][9][9] functions to work.
to
8
7
Reserved
1
3
0
0
Segment 1
1
2
3
4
5
6
7
8
Reserved
Enables "Go To Program Code" as an Arm Only code
Enables "Go To Program Code" as an Arm Only After Closing
Enables "Go To Program Code" as a master arm/disarm code
Enables "Go To Program Code" as an Arm/Disarm code
Enables "Go To Program Code" to bypass zones
Enables "Go To Program Code" opening & closing reports
Reserved
Segment 2
1
2
3
4
5
6
7
8
Enables "Go To Program Code" for area #8
15
15
Enables "Go To Program Code" for area #1
Enables "Go To Program Code" for area #2
Enables "Go To Program Code" for area #3
Enables "Go To Program Code" for area #4
Enables "Go To Program Code" for area #5
Enables "Go To Program Code" for area #6
Enables "Go To Program Code" for area #7
15
15
15
15
40
14
14
14
14
14
14
14
14
14
14
14
14
14
14
14
14
14
14
14
14
10
10
10
10
14
14
14
14
14
14
14
14
14
14
14
14
14
14
14
14
14
14
14
14
14
14
14
14
14
14
14
14
14
14
14
14
14
14
14
14
14
14
14
14
0
Segment 1
Segment 2
1
2
3
4
5
6
7
8
1
2
3
4
5
6
7
8
Alarms
Restores
Open / Close
Bypass
Zone Trouble
Power Trouble (AC Failure or Low Battery)
Tampers
Test Reports
System Trouble (siren / phone / expander / short circuit / earth fault)
Failure to Communicate
Sensor Lost / Sensor Low Battery
Program, Download, & Full Log
Cancel Code
Recent Closing / Exit Error
Reserved
Reserved
41
6
Segment 1
Dial attempts
0
Segment 2
1
6
0
Reserved
0
0
0
0
0
0
Segment 1
Segment 2
Number of rings
0
Number of calls to answer
Segment 1
1
2
3
4
5
6
7
8
Enables two call answering machine defeat
RESERVED
Requires callback before downloading
Shutdown control panel
Lock out local programming
Lock out communicator programming
Lock out download section
Enables callback at autotest interval
14
14
14
14
14
14
14
14
14
14
14
14
14
14
14
14
14
14
14
14
42
Segment 1
Segment 2
Segment 3
1
2
3
4
5
6
7
8
1
2
3
4
5
6
7
8
1
2
3
4
5
6
7
8
Quick-Arm
Re-Exit
Force Arm
Silent Panic
Audible Panic
Fire
Medical
Multi Code Attempt Tamper
LED extinguish enable
Require user code for bypassing zones
Bypass sounder alert
AC power/low battery sounder alert
Enables bypass toggle
Enables silent auto arm
Enables universal arming
Enables one key partial mode disarming
Open/Close
Bypass
Restore
Trouble
Tamper
Cancel
Recent Closing
Exit Error
30
Segment 1
(Entry Time #1)
60
Segment 2
(Exit Time #1)
30
Segment 3
(Entry Time #2)
60
Segment 4
3
7
16
(Exit Time #2)
16
16
16
16
16
SEGMENT 1 SEGMENT 2 SEGMENT 3 SEGMENT 4 SEGMENT 5 SEGMENT 6 SEGMENT 7 SEGMENT 8
ZONE 1
ZONE 2
ZONE 3
ZONE 4
ZONE 5
ZONE 6
ZONE 7
ZONE 8
AREA 1
AREA 2
AREA 3
AREA 4
AREA 5
AREA 6
AREA 7
AREA 8
1
2
3
4
5
6
7
8
1
2
3
4
5
6
7
8
1
2
3
4
5
6
7
8
43
1
2
3
4
5
6
7
8
1
2
3
4
5
6
7
8
1
2
3
4
5
6
7
8
1
2
3
4
5
6
7
8
1
2
3
4
5
6
7
8
44
0
Segment 1
1
2
3
4
5
6
7
8
Code Pad sounds for Telephone Line Cut when in the Armed state
Code Pad sounds for Telephone Line Cut when in the Disarmed state
Code Pad sounds upon AC Power Failure
Code Pad sounds upon Low Battery Detection
Code Pad sounds during Twin Trip
Code Pad sounds for Tamper Alarm
Code Pad sounds for Medical Alarm
Code Pad sounds for Expander Trouble
20
Segment 1
Partial Arm Entry Time (0 - 255 seconds)
0
Segment 2
Strobe Time (0 - 255 hours)
2
Segment 3
Dynamic Battery Test Duration (0 - 255 minutes)
30
Segment 4
AC Failure Report Delay (0 - 255 minutes)
5
Segment 5
Segment 6
Siren Time (1 - 255 minutes)
5
Twin Trip Time (0 - 255 minutes)
3
Segment 7
Chime Time in 50mS increments (0 - 255)
0
Segment 8
Dialer Delay Time (0 - 255 seconds)
120
Segment 9
Fire Alarm Verification Time (120 - 255 seconds)
0
Segment 10
Listen-In Time (0 - 255 seconds)
45
SEGMENT 1 SEGMENT 2 SEGMENT 3 SEGMENT 4
1
2
3
4
5
6
7
8
AREA 1
AREA 2
AREA 3
AREA 4
AREA 5
AREA 6
AREA 7
AREA 8
1
2
3
4
5
6
7
8
1
2
3
4
5
6
7
8
1
2
3
4
5
6
7
8
SEGMENT 1 SEGMENT 2 SEGMENT 3 SEGMENT 4
Auxiliary output timed in minutes
Auxiliary output to latch
Auxiliary output to stop timing upon user code entry
Auxiliary output to activate only between closing and opening time
Auxiliary output to activate only between opening and closing time
Invert auxiliary output (0 volts going to 12 volts when activated)
Reserved
Reserved
Segment 1
Segment 2
1
2
3
4
5
6
7
8
1
2
3
4
5
6
7
8
1
2
3
4
5
6
7
8
51 = Strobe
Program the event number for output #1 here
0 = Follow
Program the timing for output #1 here
7 = Any Siren
Segment 1
Program the event number for output #2 here
0 = Follow
Segment 2
Segment 1
Segment 2
Program the timing for output #2 here
23 = Ready
Program the event number for output #3 here
0 = Follow
Program the timing for output #3 here
21 = Armed State
Segment 1
Program the event number for output #4 here
0 = Follow
Segment 2
Program the timing for output #4 here
46
1
2
3
4
5
6
7
8
1
Segment 1
Program a "0" if the intervals are in hours, a "1 - 8" if in days. 1 = SUN, 7 = SAT, and 8 = DAILY.
168
Segment 2
Program the autotest hourly interval from 1 - 255 hours
3
Segment 3
Program the autotest report in 24 hour time format
0
Segment 4
Program the autotest report time, minutes after the hour
8
Segment 1
Program the hour of the opening time
0
Segment 2
Program the minutes after the hour of the opening time
20
Segment 1
Program the hour of the closing time / auto arming time
0
Segment 2
Program the minutes after hour of closing / auto arming time
SEGMENT 1 SEGMENT 2 SEGMENT 3 SEGMENT 4 SEGMENT 5 SEGMENT 6 SEGMENT 7 SEGMENT 8
Sunday
Monday
Tuesday
Wednesday
Thursday
Friday
Saturday
Reserved
AREA 1
AREA 2
AREA 3
AREA 4
AREA 5
AREA 6
AREA 7
AREA 8
1
2
3
4
5
6
7
8
1
2
3
4
5
6
7
8
1
2
3
4
5
6
7
8
1
2
3
4
5
6
7
8
1
2
3
4
5
6
7
8
1
2
3
4
5
6
7
8
1
2
3
4
5
6
7
8
1
2
3
4
5
6
7
8
SEGMENT 1 SEGMENT 2 SEGMENT 3 SEGMENT 4 SEGMENT 5 SEGMENT 6 SEGMENT 7 SEGMENT 8
AREA 1
Sunday
Monday
Tuesday
Wednesday
Thursday
Friday
Saturday
Reserved
1
2
3
4
5
6
7
8
AREA 2
1
2
3
4
5
6
7
8
AREA 3
1
2
3
4
5
6
7
8
47
AREA 4
AREA 5
AREA 6
AREA 7
AREA 8
1
2
3
4
5
6
7
8
1
2
3
4
5
6
7
8
1
2
3
4
5
6
7
8
1
2
3
4
5
6
7
8
1
2
3
4
5
6
7
8
10
10
10
10
10
10
10
10
Segment 1
Segment 2
Segment 3
1
2
3
4
5
6
7
8
1
2
3
4
5
6
7
8
1
2
3
4
5
6
7
8
Quick-Arm
Re-Exit
Force Arm
Silent Panic
Audible Panic
Code Pad Fire
Code Pad Medical
Multi Code Attempt Tamper
LED extinguish enable
Require user code for bypassing zones
Bypass sounder alert
AC power/low battery sounder alert
Enables bypass toggle
Enables silent auto arm
Enables universal arming
Enables one key partial mode disarming
0
Segment 1
10
10
10
Bypass
Restore
Trouble
Tamper
Cancel
Recent Closing
Exit Error
0
Entry Time #1
Segment 2
Entry Time #2
Segment 4
0
Segment 3
Open/Close
Exit Time #1
0
Exit Time #2
10
Segment 1
Segment 2
Segment 3
1
2
3
4
5
6
7
8
1
2
3
4
5
6
7
8
1
2
3
4
5
6
7
8
Quick-Arm
Re-Exit
Force Arm
Silent Panic
Audible Panic
Code Pad Fire
Code Pad Medical
Multi Code Attempt Tamper
LED extinguish enable
Require user code for bypassing zones
Bypass sounder alert
AC power/low battery sounder alert
Enables bypass toggle
Enables silent auto arm
Enables universal arming
Enables one key partial mode disarming
0
Segment 1
Segment 3
0
Entry Time #1
Segment 2
Entry Time #2
Segment 4
0
Exit Time #1
0
48
Exit Time #2
Open/Close
Bypass
Restore
Trouble
Tamper
Cancel
Recent Closing
Exit Error
10
10
10
10
Segment 1
Segment 2
Segment 3
1
2
3
4
5
6
7
8
1
2
3
4
5
6
7
8
1
2
3
4
5
6
7
8
Quick-Arm
Re-Exit
Force Arm
Silent Panic
Audible Panic
Code Pad Fire
Code Pad Medical
Multi Code Attempt Tamper
LED extinguish enable
Require user code for bypassing zones
Bypass sounder alert
AC power/low battery sounder alert
Enables bypass toggle
Enables silent auto arm
Enables universal arming
Enables one key partial mode disarming
0
Segment 1
10
10
10
Restore
Trouble
Tamper
Cancel
Recent Closing
Exit Error
0
Entry Time #1
Segment 2
Entry Time #2
Segment 4
0
Segment 3
Open/Close
Bypass
Exit Time #1
0
Exit Time #2
10
Segment 1
Segment 2
Segment 3
1
2
3
4
5
6
7
8
1
2
3
4
5
6
7
8
1
2
3
4
5
6
7
8
Quick-Arm
Re-Exit
Force Arm
Silent Panic
Audible Panic
Code Pad Fire
Code Pad Medical
Multi Code Attempt Tamper
LED extinguish enable
Require user code for bypassing zones
Bypass sounder alert
AC power/low battery sounder alert
Enables bypass toggle
Enables silent auto arm
Enables universal arming
Enables one key partial mode disarming
0
Segment 1
0
Entry Time #1
Segment 2
0
Segment 3
Exit Time #1
0
Entry Time #2
Segment 4
49
Exit Time #2
Open/Close
Bypass
Restore
Trouble
Tamper
Cancel
Recent Closing
Exit Error
10
10
10
10
Segment 1
Segment 2
Segment 3
1
2
3
4
5
6
7
8
1
2
3
4
5
6
7
8
1
2
3
4
5
6
7
8
Quick-Arm
Re-Exit
Force Arm
Silent Panic
Audible Panic
Code Pad Fire
Code Pad Medical
Multi Code Attempt Tamper
LED extinguish enable
Require user code for bypassing zones
Bypass sounder alert
AC power/low battery sounder alert
Enables bypass toggle
Enables silent auto arm
Enables universal arming
Enables one key partial mode disarming
0
Segment 1
10
10
10
Restore
Trouble
Tamper
Cancel
Recent Closing
Exit Error
0
Entry Time #1
Segment 2
Entry Time #2
Segment 4
0
Segment 3
Open/Close
Bypass
Exit Time #1
0
Exit Time #2
10
Segment 1
Segment 2
Segment 3
1
2
3
4
5
6
7
8
1
2
3
4
5
6
7
8
1
2
3
4
5
6
7
8
Quick-Arm
Re-Exit
Force Arm
Silent Panic
Audible Panic
Code Pad Fire
Code Pad Medical
Multi Code Attempt Tamper
LED extinguish enable
Require user code for bypassing zones
Bypass sounder alert
AC power/low battery sounder alert
Enables bypass toggle
Enables silent auto arm
Enables universal arming
Enables one key partial mode disarming
0
Segment 1
0
Entry Time #1
Segment 2
0
Segment 3
Exit Time #1
0
Entry Time #2
Segment 4
50
Exit Time #2
Open/Close
Bypass
Restore
Trouble
Tamper
Cancel
Recent Closing
Exit Error
10
10
10
10
Segment 1
Segment 2
Segment 3
1
2
3
4
5
6
7
8
1
2
3
4
5
6
7
8
1
2
3
4
5
6
7
8
Quick-Arm
Re-Exit
Force Arm
Silent Panic
Audible Panic
Code Pad Fire
Code Pad Medical
Multi Code Attempt Tamper
LED extinguish enable
Require user code for bypassing zones
Bypass sounder alert
AC power/low battery sounder alert
Enables bypass toggle
Enables silent auto arm
Enables universal arming
Enables one key partial mode disarming
0
Entry Time #1
Segment 2
A R E A
1
A R E A
2
A R E A
3
A R E A
4
A R E A
5
A R E A
6
A R E A
7
A R E A
8
16
Trouble
Tamper
Cancel
Recent Closing
Exit Error
Entry Time #2
Segment 4
0
Segment 3
16
Restore
Exit Time #1
0
16
Bypass
0
Segment 1
16
Open/Close
16
16
16
Exit Time #2
16
SEGMENT 1
ZONE 17
SEGMENT 2
ZONE 18
SEGMENT 3
ZONE 19
SEGMENT 4
ZONE 20
SEGMENT 5
ZONE 21
SEGMENT 6
ZONE 22
SEGMENT 7
ZONE 23
SEGMENT 8
ZONE 24
1
2
3
4
5
6
7
8
1
2
3
4
5
6
7
8
1
2
3
4
5
6
7
8
1
2
3
4
5
6
7
8
1
2
3
4
5
6
7
8
1
2
3
4
5
6
7
8
1
2
3
4
5
6
7
8
1
2
3
4
5
6
7
8
51
16
16
16
16
16
16
16
16
SEGMENT 1
ZONE 25
A R E A
1
A R E A
2
A R E A
3
A R E A
4
A R E A
5
A R E A
6
A R E A
7
A R E A
8
16
16
16
A R E A
1
A R E A
2
A R E A
3
A R E A
4
A R E A
5
A R E A
6
A R E A
7
A R E A
8
16
1
2
3
4
5
6
7
8
16
16
A R E A
1
A R E A
2
A R E A
3
A R E A
4
A R E A
5
A R E A
6
A R E A
7
A R E A
8
16
16
16
16
16
16
SEGMENT 2 SEGMENT 3
ZONE 26
ZONE 27
SEGMENT 4
ZONE 28
SEGMENT 5
ZONE 29
SEGMENT 6
ZONE 30
SEGMENT 7
ZONE 31
SEGMENT 8
ZONE 32
1
2
3
4
5
6
7
8
1
2
3
4
5
6
7
8
1
2
3
4
5
6
7
8
1
2
3
4
5
6
7
8
1
2
3
4
5
6
7
8
1
2
3
4
5
6
7
8
1
2
3
4
5
6
7
8
SEGMENT 1
ZONE 33
SEGMENT 2
ZONE 34
SEGMENT 3
ZONE 35
SEGMENT 4
ZONE 36
SEGMENT 5
ZONE 37
SEGMENT 6
ZONE 38
SEGMENT 7
ZONE 39
SEGMENT 8
ZONE 40
1
2
3
4
5
6
7
8
1
2
3
4
5
6
7
8
1
2
3
4
5
6
7
8
1
2
3
4
5
6
7
8
1
2
3
4
5
6
7
8
1
2
3
4
5
6
7
8
1
2
3
4
5
6
7
8
1
2
3
4
5
6
7
8
SEGMENT 1
ZONE 41
SEGMENT 2
ZONE 42
SEGMENT 3
ZONE 43
SEGMENT 4
ZONE 44
SEGMENT 5
ZONE 45
SEGMENT 6
ZONE 46
SEGMENT 7
ZONE 47
SEGMENT 8
ZONE 48
1
2
3
4
5
6
7
8
1
2
3
4
5
6
7
8
1
2
3
4
5
6
7
8
1
2
3
4
5
6
7
8
1
2
3
4
5
6
7
8
1
2
3
4
5
6
7
8
1
2
3
4
5
6
7
8
1
2
3
4
5
6
7
8
16
16
16
16
52
3
Segment 1
Segment 2
Segment 3
1
2
3
4
5
6
7
8
1
2
3
4
5
6
7
8
1
2
3
4
5
6
7
8
Fire (enable for fire zone)
24 Hour
Keyswitch zone
Handover
Delay 1 zone
Delay 2 zone
Interior
Local Only
Code Pad audible on alarm
Yelping siren on alarm
Steady siren on alarm
Chime
Bypassable
Group Shunt
Force armable
Entry Guard
53
Fast Loop Response
Double end of line tamper zone
Trouble zone (Day zone)
Twin Trip
Dialer delay zone
Swinger zone
Restore reporting
Listen-In
APPENDIX 1 REPORTING ZONE CODES IN CONTACT I.D
The NX-16 has the ability to report Ademco Contact I.D transmissions. Each report in Contact I.D consists of an
Event Code and a Zone I.D. The zone I.D is the zone that created the alarm. The event code will come from the
chart below and be programmed in the configuration group event code.
Programmed Event Code
Contact I.D Code
0
1
2
3
4
5
6
7
8
9
10
11
12
13
14
15
16
17
18
19
20
122
110
120
130
131
132
133
134
135
150
121
100
123
137
602
151
158
154
140
140
159
Description
Silent Panic
Fire Alarm
Panic alarm
Burglary Alarm
Perimeter Alarm
Interior Alarm
24 Hour Burglary
Entry Alarm
Day/Night Alarm
Non Burglary 24 Hour
Duress Alarm
Medical Alarm
Audible Panic Alarm
Tamper Alarm
Periodic Test
Gas Detected
High Temp
Water Leakage
General Alarm
General Alarm
Low Temp
54
APPENDIX 2 REPORTING FIXED CODES IN CONTACT I.D
The table below list the event codes sent for the following reports (if enabled) when using CONTACT I.D. The
number in parentheses following the event is the number that will be reported as the zone number if extended
Contact I.D is enabled in the system options. Otherwise the zone will always be zero “0”. If there are no parentheses,
the zone will also be zero “0”.
REPORT
CONTACT I.D EVENT
601
602
401
406
412
627
628
310
310
401
457
605
354
333
333
351
351
321
321
312
312
309
309
301
301
137
137
137
120
121
110
100
381
381
384
384
380
380
137
137
570
570
MANUAL TEST
AUTOTEST OPEN (user number)
CLOSE (user number)
CANCEL (user number)
DOWNLOAD COMPLETE
START PROGRAM
END PROGRAM
GROUND FAULT
GROUND FAULT RESTORE
RECENT CLOSE (user number)
EXIT ERROR (user number)
EVENT LOG FULL
FAIL TO COMMUNICATE
EXPANDER TROUBLE
EXPANDER RESTORE
TELEPHONE FAULT
TELEPHONE RESTORE
SIREN TAMPER
SIREN RESTORE
AUX POWER OVER CURRENT
AUX POWER RESTORE
LOW BATTERY
LOW BATTERY RESTORE
AC FAIL
AC RESTORE
BOX TAMPER
BOX TAMPER RESTORE
CODE PAD TAMPER
CODE PAD PANIC
DURESS
CODE PAD FIRE
CODE PAD MEDICAL
RF SENSOR LOST (zone number)
RF SENSOR RESTORE (zone number)
SENSOR LOW BATTERY (zone number)
SENSOR BATTERY RESTORE (zone number)
ZONE TROUBLE (zone number)
ZONE TROUBLE RESTORE (zone number)
ZONE TAMPER (zone number)
ZONE TAMPER RESTORE (zone number)
ZONE BYPASS (zone number)
BYPASS RESTORE (zone number)
55
APPENDIX 3 EXPANDER NUMBERS FOR REPORTING EXPANDER TROUBLE
The tables below list the device numbers that will be reported for each expander/code pad that has a trouble
condition if expanded Contact I.D is enabled system options
CODE PADS ADDRESS TABLE
CODE PAD
PART 1
PART 2
PART 3
PART 4
PART 5
PART 6
PART 7
PART 8
1
192
193
194
195
196
197
198
199
2
200
201
202
203
204
205
206
207
3
208
209
210
211
212
213
214
215
4
216
217
218
219
220
221
222
223
5
224
225
226
227
228
229
230
231
6
232
233
234
235
236
237
238
239
7
240
241
242
243
244
245
246
247
8
248
249
250
251
252
253
254
255
HARDWIRED EXPANDER
Starting zone number
Expander number reported
Zone 9 (Switch 1 on)
23
Zone 17 (Switch 2 on)
16
Zone 25 (Switch 1 & 2 on)
17
Zone 33 (Switch 3 on)
18
Zone 41 (Switch 1 & 3 on)
19
WIRELESS RECEIVER
Switch 1
Switch 2
Expander number reported
off
off
35
on
off
32
off
on
33
on
on
34
56
SPECIFICATIONS
OPERATING POWER
16.5 VAC 25, 40, or 50 VA Transformer
AUXILIARY POWER
W/25 VA Transformer
W/40 or 50 VA Transformer
W/NX-320 Power Supply
12 VDC Regulated 500 mA
12 VDC Regulated 1 AMP
12 VDC Regulated 3.5 AMPS
LOOP RESISTANCE
Standard Loop
2-Wire Smokes
300 Ohms Maximum
30 Ohms Maximum
BUILT-IN SIREN DRIVER
2-tone (Steady and Yelp)
LOOP RESPONSE
Selectable 50mS or 500mS
OPERATING TEMPERATURE
32 to 120 degrees F
LED CODE PAD DIMENSIONS
16.25cm Wide
10.15cm High
2.8cm Deep
LCD CODE PAD DIMENSIONS
16.25cm Wide
13.45cm High
2.50cm Deep
METAL ENCLOSURE DIMENSION
28.60cm Wide
28.60cm High
8.90cm Deep
SHIPPING WEIGHT
4 kg
WARRANTY STATEMENT
DIRECT ALARM SUPPLIES GUARANTEES THIS PRODUCT AGAINST DEFECTIVE PARTS AND
WORKMANSHIP FOR TWENTY-FOUR (24) MONTHS FROM DATE OF PURCHASE. IF ANY DEFECT
APPEARS DURING THE WARRANTY PERIOD RETURN IT TO DAS, POSTAGE PREPAID. THE UNIT WILL
BE REPAIRED AND RETURNED. DAS ASSUMES NO LIABILITY FOR CONSEQUENTIAL OR INDIRECT
DAMAGE AND ACCEPTS NO RESPONSIBILITY FOR REPAIRING DAMAGE TO THE PRODUCT CAUSED BY
MISUSE, CARELESS HANDLING, OR WHERE REPAIRS HAVE BEEN MADE BY OTHERS.
NO OTHER GUARANTEE, WRITTEN OR VERBAL, IS AUTHORIZED BY OR ON BEHALF OF DIRECT ALARM
SUPPLIES 9 NOWILL STREET CONDELL PARK NSW.
DIRECT ALARM SUPPLIES
9 NOWILL STREET CONDELL PARK
NSW 2200 AUSTRALIA
PHONE (02) 9707 4311
FAX (02) 9790 3424
NX-16 INSTALLATION MANUAL
NX16IB98
REV. B (10-15-98)