1
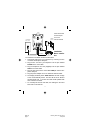
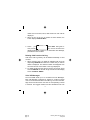
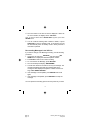
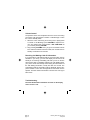
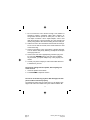
50 Memory Name and Number
Voice Caller ID With Call Waiting
Model: Voice 6090
Owner’s Manual
Features:
• 50 Name and Number Memory
• Announces Caller’s Number or one of up to 15 Custom
•
•
•
•
•
Recorded Messages
Multi-Function LED Indicator
Programmable Options
English, Spanish and French Languages
Large Three-Line High Resolution LCD Display
Desk or Wall Mountable
Please read this Instruction Manual carefully
© Copyright 1999 Aastra Telecom. All rights reserved
6090 eng
page 1
CC 1801 Rev 1.0
Thursday, March 02, 2000 22:50
Composite
Table of Contents
Features
Introduction
Important Safety Instructions
Battery Cautionary Instructions
Installation
Basic Installation
Battery Installation
Optional Wall Mount
Setting the Time and Date
Incoming Calls
Audio Identification
Visual Identification
Out of Area Calls
Line Error
Private Calls
Repeat Calls
Low Battery Indication
Reviewing Caller ID Information in the Call Log
Audio Review
Visual Review
Deleting Calls from the Call Log
Voice VIP Messages
Recording a New Voice VIP Message
Reviewing Messages in the VIP List
Deleting Messages in the VIP List
Re-recording Messages in the VIP List
Volume Control
Receiving Call Waiting Caller-ID Information
Troubleshooting
Care and Maintenance
FCC Requirements
2
3
4
6
8
8
9
10
11
11
11
12
12
13
13
13
13
14
14
14
15
15
16
17
17
18
19
19
20
21
22
1
6090 eng
page 2
Thursday, March 02, 2000 22:50
Composite
Features
• Audio Announcement of Incoming Calls.
• Audio Announcement of Voice VIP Messages.
• Volume Control.
• Speaker On/Off.
• Extra large three-line high resolution LCD display.
• Multi-Function LED.
• Stores a maximum of 50 calls.
• Display indicates private calls, when no data is sent and when
•
•
•
•
•
•
line errors occur.
Low battery symbol.
Total and New call counters.
Repeat call indicator.
Dual call review buttons.
Erase button.
Requires two AAA batteries (not included).
2
6090 eng
page 3
Thursday, March 02, 2000 22:50
Composite
Introduction
Congratulations on the purchase of your new Voice 6090 CallerID. The Voice 6090 is a device that works with your local telephone company’s Caller ID service.
Important: Your Caller ID unit will not function unless you
have Caller ID Name and Number Service installed.
The Voice 6090 displays Caller ID information when it is received
and also stores it in the Call Log for later review. The Voice 6090
can be used to screen unwanted calls, eliminate harassment from
annoying calls, or to get prepared before answering a call. When
used with Caller-ID service, after the first ring, the Voice 6090 displays the name (if available) and the telephone number of the person calling, along with the date and time of the call before you
pick up your telephone.
In addition, the unit’s voice capability enables it to announce the
number of the incoming call, allowing you to hear who is calling
even when you can not see the display. The unit suppresses ringing on the attached phone during this announcement.
The Voice 6090 retains a record of the above information up to a
maximum of 50 calls received, including those received while you
were away. The Voice 6090 allows you to record a “VIP Message”
and assign it to a phone number so that this message is played
out when the corresponding number is received.
3
6090 eng
page 4
Thursday, March 02, 2000 22:50
Composite
Important Safety Instructions
When using your telephone equipment, these basic safety precautions should always be followed to reduce the risk of fire, electrical
shock and injury to persons;
1. Read and understand all instructions.
2. Follow all warnings and instructions marked on the product.
3. Unplug this product from the wall outlet before cleaning. Do
not use liquid cleaners, or aerosol cleaners. Use a damp cloth
for cleaning. If necessary, use a mild soap.
4. Do not use this product near water, for example near a bathtub, wash bowl, kitchen sink or laundry tub, in a wet basement,
or near a swimming pool.
5. Do not place this product on an unstable cart, stand or table.
The product may fall, causing serious damage to the unit.
6. Slots and openings in the cabinet and the back or bottom are
provided for ventilation. To protect the product from overheating, these openings must not be blocked or covered. This
product should never be placed near or over a radiator or heat
register. This product should not be placed in a built-in installation unless proper ventilation is provided.
7. This product should be operated only from the type of power
source indicated on the marking label. If you are not sure of
the type of power supply to your home, consult your dealer or
local power company.
8. Do not allow anything to rest on the power cord. Do not locate
this product where the cord can be damaged by people walking on it.
9. Do not overload wall outlets and extension cords, as this can
result in the risk of fire of electrical shock.
4
6090 eng
page 5
Thursday, March 02, 2000 22:50
Composite
10. Never push objects of any kind into this product through cabinet slots, as they may touch dangerous voltage points or short
out parts that could result in a risk of fire or electrical shock.
Never spill liquid of any kind on the product.
11. To reduce the risk of electric shock, do not disassemble this
product. Take it to qualified service personnel when service or
repair work is required. Opening or removing covers may expose you to dangerous voltages or other risks. Incorrect reassembly can cause electric shock when the appliance is subsequently used.
12. Unplug this product form the wall outlet and refer servicing to
qualified service personnel under the following conditions;
A. When the power cord or plug is damaged or frayed.
B. If liquid has been spilled into the product.
C. If the product has been exposed to rain or water.
D. If the product does not operate normally by following the
operating instructions. Adjust only those controls that are
covered by the operating instructions because improper
adjustment of other controls may result in damage and will
often require extensive work by a qualified technician to
restore the product to normal operation.
E. If the product has been dropped or the cabinet has been
damaged.
F. If the product exhibits a distinct change in performance.
13. Avoid using a telephone (other than a cordless type) during an
electrical storm. There may be a remote risk of electrical shock
from lightning.
14. Do not overload wall outlets and extension cords as this can
result in the risk of fire or electrical shock.
15. Do not use the telephone to report a gas leak in the vicinity of
the leak.
5
6090 eng
page 6
Thursday, March 02, 2000 22:50
Composite
Battery Cautionary Instructions
BATTERIES: CAUTION
1. Use only two AAA batteries, preferably alkaline. (battery not
included.)
2. Do not dispose of the batteries in a fire. The cells may explode. Check with local codes for possible special disposal
instructions.
3. Do not open or mutilate the batteries. Released electrolyte is
corrosive and may cause damage to the eyes or skin. It may
be toxic if swallowed.
4. Exercise care in handling batteries in order not to short the
battery with conducting materials such as rings, bracelets, and
keys. The battery or conductor may overheat and cause
burns.
5. Do not attempt to recharge the batteries identified for use with
this product. The batteries may leak corrosive electrolyte or
explode.
6. Do not attempt to rejuvenate the batteries identified for use
with this product by heating them. Sudden release of the battery electrolyte may occur causing burns or irritation to eyes or
skin.
7. When replacing batteries, all batteries should be replaced at
the same time. Mixing fresh and discharged batteries could
increase internal cell pressure and rupture the discharged batteries.
8. When inserting batteries into this product, the proper polarity
or direction must be observed. Reverse insertion of batteries
can cause charging, and that may result in leakage or explosion.
9. Remove the batteries from this product if the product will not
be used for a long period of time (several months or more)
6
6090 eng
page 7
Thursday, March 02, 2000 22:50
Composite
since during this time the battery could leak in the product.
10. Discard “dead” batteries as soon as possible since “dead” batteries are more likely to leak in a product.
11. Do not store this product, or the batteries identified for use
with this product, in high temperature areas. Batteries that are
stored in a freezer or refrigerator for the purpose of extending
shelf life should be protected from condensation during storage and defrosting. Batteries should be stabilized at room
temperature prior to use after cold storage.
Check the contents of the package
•Voice 6090 Unit
7
6090 eng
page 8
Thursday, March 02, 2000 22:50
Composite
6090
POWER
OUTLET
TELEPHONE
WALL JACK
•Desk Mount Plate
•Power Adapter
•Line Cord
•Owner’s Manual
Installation
Basic Installation
TO PHONE
To install the Voice 6090, follow these directions.
1. Temporarily disconnect your telephone by removing the line
cord from the telephone wall jack.
2. Plug the line cord from your telephone into the jack marked
PHONE on the Voice 6090.
3. Plug the telephone line cord (supplied) into the jack marked
LINE on the Voice 6090.
4. Plug the line cord from the Voice 6090 LINE jack into the telephone wall jack.
5. Plug the power adapter into a non-switched electrical outlet.
6. The display will briefly show “6090 VER.1.0” and then change
to the normal standby screen. The time will be 12:01 AM and
the date will be Jan. 1. The time and date will be updated with
each call that is received.
7. To manually set the time and date, see “Setting the Time and
Date” later in this manual.
8
6090 eng
page 9
Thursday, March 02, 2000 22:50
Composite
Note: This Caller ID device must be directly connected to the telephone
line. Do not connect it to the line through a Fax, Modem, or Telephone
Answering Machine, sometimes called daisy chaining. Although these
devices provide an extra jack, it is often not a true duplex connection. Use
a duplex adapter, sold in most retail phone stores, to split a wall jack so it
can feed this unit directly along with the other device sharing the same
wall jack.
Battery Installation
The Voice 6090 requires two AAA batteries (not included). The
battery provides back up for the call log memory in case of a
power failure. An alkaline battery will last longer under normal
use. Follow these directions to install or change the battery.
WARNING: ALWAYS DISCONNECT THE TELEPHONE LINE
FROM THE WALL OUTLET BEFORE SERVICING, DISASSEMBLING THIS EQUIPMENT, OR REPLACING BATTERIES.
1. Use a small Philips head screwdriver to remove the battery
safety cover screw.
2. Place your finger under the battery door latch to open the battery compartment.
3. Lift the battery door up and away from the unit in the direction
of the arrow.
4. When replacing a discharged battery, install a fresh battery
within 15 seconds. Taking more time will result in the loss of
Caller-ID information and Voice VIP Messages that are stored
in memory.
5. Be sure to observe proper battery polarity when installing a
fresh battery.
6. Replace the battery cover door and tighten the safety cover
9
6090 eng
page 10
Thursday, March 02, 2000 22:50
Composite
screw.
Optional Wall Mounting
Your Voice 6090 can be wall mounted to any wall surface using
two Pan head type self-tapping screws (not supplied).
1. Install two self tapping screws at a distance of 3 7/64 inches
(79.0 mm) from each other and located on a horizontal center
line.
2. If you are mounting to a plaster board wall surface, it may be
necessary to first drill two holes and install two expanding
plastic anchors (not supplied) into the wall.
WALL
Pan Head Type
3. Press
an Expansion
expansion
anAnchor
Self Tapping Screw
chor
into
each of the two
holes.
4. Tap the anchor into the wall with a hammer
until the anchor is completely seated.
5. Insert a screw into each mounting hole and
tighten each screw with a screwdriver.
6. Tighten each screw just enough to allow the
keyhole slots on the 6090 unit enough clearance to slip snugly over each screw head.
7. Slide the unit on to the screw heads and
press downward until firmly seated.
Setting the Time and Date
10
6090 eng
page 11
Thursday, March 02, 2000 22:50
Composite
The Time and Date can be changed at any time after the initial set
up of your Voice 6090.
1. Press and hold the right REVIEW q button and the left REVIEW p button at the same time for about six seconds until the
display flashes the HOUR segment, requesting the correct
time and date to be entered.
Note: This step changes the unit to Programming Mode. The first option is
for language selection. Once a language is selected by pressing DELETE,
the Time and Date may be set.
2. Use either REVIEW button to change the hour and press DELETE to set it.
3. Use the same procedure to set the minute, day, and month.
4. The display will change to the normal standby screen and the
unit will be ready to receive calls.
Incoming Calls
After the first ring of an incoming call, the display screen of your
Voice 6090 will show all of the available information about the incoming call and announce the number of the incoming caller or a
recorded Voice VIP message if one was recorded for that number.
Audio Identification of Incoming Calls
When a call comes in, your Voice 6090 will announce one of the
following messages twice after the first ring:
1. Phone Number of the Caller.
2. Voice VIP message (see section on Recording a New Voice
VIP message).
11
6090 eng
page 12
Thursday, March 02, 2000 22:50
Composite
Note: When the unit is announcing one of the above messages, if a phone
is connected to the unit, its ring will be suppressed during the announcement.
Visual Identification of Incoming Calls
When a new call is received, the caller’s name and phone number
as well as the time and date of the call will be displayed.
Previous call information may appear moTHOMAS JOHNSON
mentarily on the
708-468-2476 display prior to new call
4/09
information. New
call information will be dis0 4 I I0:4 5
played for approximately one minute. After
one minute, the display will return to its normal screen. The total
number of calls received, total number of new calls, current time,
and date will be displayed. Other messages that may appear on
the display include:
CALL#
NEW
RPT #
AM
OUT OF AREA CALLS
When a call is received from an area that is not yet providing
Caller ID delivery to your area via the long distance network,
“UNAVAILABLE” will be indicated on the display. The message
“CALLER UNKNOWN” will also be announced.
LINE ERROR
When a call is received that has an error in the transmission or
12
6090 eng
page 13
Thursday, March 02, 2000 22:50
Composite
reception, “ERROR” will be indicated on the display.
PRIVATE CALLS
When callers, for privacy reasons, block their number, “PRIVATE
CALL” will be indicated on the display. The message “PRIVATE
CALL” will also be announced.
REPEAT CALLS
New calls received more than once from same number are indicated with the “RPT#” symbol displayed above the counter. The
counter indicates how many times that caller attempted to reach
you. Repeat calls do not cause the total number of calls received
or total new calls to increase in the normal call summary screen.
LOW BATTERY INDICATION
The Low Battery symbol is displayed when the battery voltage is
too low for the Voice 6090 to operate reliably.
0
CAL L
0
NEW
Replace the battery as soon as possible
I0:45
4/09
to assure retention of the Call Log memory and the Voice
VIP message list in the
event of a power failure. Refer to the Battery Installation instructions in the Installation Section.
AM
LOW
-
Reviewing Caller ID Information in the Call Log
The VOICE 6090 stores the number, name, date and time of each
13
6090 eng
page 14
Thursday, March 02, 2000 22:50
Composite
call in the Call Log. It can store 50 calls in the Log. If the Call Log
is full when a new call is received, the oldest call is automatically
removed from the Call Log to make room for the new call. You
can review the Call Log at any time, with or without audio playback of the number.
Audio Review
To automatically play back all the new calls in the Call Log follow
these directions.
1 Press PLAY when the unit is in standby mode. The unit will
announce all the new numbers in the Call Log, starting with
the newest call. If a number in the Call Log matches one in the
Voice VIP List, the associated VIP Message will be announced
instead of the telephone number.
2 During playback, you can press PLAY to pause the unit.
Pressing PLAY again resumes the audio review.
3 After the last new number is announced, the screen will display “END OF LIST“.
4 If there are no keys pressed, the unit will return to standby
mode after twenty seconds.
Visually Reviewing the Call Log
To review the Call Log without audio playback, follow these directions.
1 Press either REVIEW button when the unit is in standby mode
(when Date and Time is displayed).
2 Press REVIEW q to move through the Call Log starting at the
newest call.
3 Press REVIEW p to move through the Call Log starting at the
14
6090 eng
page 15
Thursday, March 02, 2000 22:50
Composite
4
oldest call. The number, name, date and time of each call are
displayed.
When the end of the Log is reached in either direction, the
screen displays "END OF RCV".
END OF RCV
press PLAY during this re5. When
you
view process,
the unit will announce the
displayed telephone number or its associated VIP Message,
provided one was recorded.
Deleting Calls from the Call Log
Calls in the Call Log memory can be deleted individually or all at
one time.
1. When reviewing calls, you delete an individual call record by
depressing DELETE twice while the number that you want to
delete is displayed. The deleted number will disappear from
the screen and the next number in the Log is displayed.
2. To delete all calls from the Call Log memory at one time, press
and hold DELETE for at least six (6) seconds until the display
shows “TOTAL:0 NEW:0”.
Voice VIP Messages
The Voice 6090 stores up to 15 recorded Voice VIP Messages.
Each VIP Message is assigned or “tagged” to a caller’s number
once it is received and stored in the Call Log. The Voice VIP Message will be announced the next time the corresponding number
is received. The tagged numbers and the associated Voice VIP
15
6090 eng
page 16
Thursday, March 02, 2000 22:50
Composite
Messages are kept in the VIP List. To review the VIP List, press
VIP and REVIEW buttons.
Recording a New Voice VIP Message
The procedure for recording a Voice VIP Message starts with the
unit in standby mode showing the date and time, the total number
of calls, and the number of new calls.
Tip: To get to this screen quickly, press VIP twice.
1. Press either REVIEW button to locate the telephone number in
the Call Log that you wish to tag.
2. Press RECORD.
3. If the VIP List is not full, the unit will beep once and the display
will indicate “RECORDING”. You will have about two seconds
to record your message. The unit will immediately play back
the message after the recording and then display the telephone number and the message “OK? PRESS RECORD”.
4. If the message is unacceptable, press DELETE to repeat the
recording process.
5. If the message is acceptable, press RECORD to accept the
message. The telephone number and VIP Message will be
placed in the VIP List and the unit will return to standby mode.
Note: If the number is already in the VIP List, the unit will beep twice and
the display will show “ALREADY EXISTS” and the unit will return to
standby.
6. If the VIP List is full, the unit beeps twice, displays “MEMORY
FULL” and returns to standby. To free up a location in the VIP
List, you must delete a VIP Message. See “Deleting Messages
16
6090 eng
page 17
Thursday, March 02, 2000 22:50
Composite
in the Voice VIP List”.
Reviewing Messages in the Voice VIP List
You can play back, delete or re-record tag messages in the Voice
VIP Message List at any time.
1. To access the VIP List, press VOICE VIP. The display will
show “VIP LIST”.
2. Press either REVIEW button to display the selected tagged
telephone number. Press PLAY to play back the associated
VIP Message.
3. You can continue to review other recordings in the VIP List
using the REVIEW buttons.
4. To stop reviewing the VIP List, press VIP. The unit will automatically go to standby mode if no key is pressed within
twenty seconds.
Deleting Messages in the Voice VIP List
Voice VIP Messages can be deleted when no longer required, or
when you need to free up a memory location when the VIP list is
full.
1. To delete a telephone number and its associated VIP Message from the VIP List, first access the VIP List using VOICE
VIP and then use either REVIEW button to display the telephone number that you want to delete.
2. Press DELETE. The unit will show “DELETE MSG?”.
3. Press DELETE again to confirm the deletion. The unit will
beep twice and display “MSG DELETED”.
17
6090 eng
page 18
Thursday, March 02, 2000 22:50
Composite
4. The next number in the VIP List is then displayed. If there are
no more numbers, the display shows “VIP LIST”.
Note: To abort the deletion when “DELETE MSG?” appears, press either
REVIEW button.
5. You can continue selecting other numbers to delete, or press
VOICE VIP to return to standby mode, or do nothing. The unit
will automatically return to standby mode in twenty seconds if
not button is pressed.
Re-recording Messages in the VIP List
If you want to change a VIP Message recording, use the following
procedure.
1. Access the VIP List using VOICE VIP and press either REVIEW button to display the desired telephone number.
2. Press PLAY to listen to the current recording.
3. To re-record the VIP Message, press RECORD.
4. The unit will beep and display “RECORDING”.
5. You will have about two seconds to record your message. The
unit will immediately play back the message after the recording and then display the telephone number and the message “OK? PRESS RECORD”.
6. If the message is unacceptable, press DELETE and record
again.
7. If the message is acceptable, press RECORD to accept the
message.
You can repeat the recording process as many times as you wish.
18
6090 eng
page 19
Thursday, March 02, 2000 22:50
Composite
Volume Control
The speaker volume can be adjusted when the unit is announcing
an incoming call, playing back a number or VIP Message, or when
the unit is in standby mode.
1. When the unit is announcing an incoming call, or playing back
a number or VIP Message, press VOLUME to adjust the volume. The volume level cycles between “OFF LOW HIGH” as
you continue pressing VOLUME.
2. Stop pressing VOLUME when you get to the desired volume
level. After the selection has been made, the unit will return to
standby mode after a few seconds.
Receiving Call Waiting Caller ID Information
If you subscribe to Call Waiting Caller ID (a service which may be
available in your area), your unit will display and announce the
identity of an incoming Call Waiting call while you are on the line
with another caller. Immediately following the Call Waiting Beep,
your phone will be momentarily muted during the transmission of
the Call Waiting information, usually less than one second. The
Call Waiting Caller ID information will be displayed and the telephone number or Voice VIP message will be announced over the
speaker. The New Caller’s information is stored in the Call Log for
later review.
Troubleshooting
No Caller Identification information is shown on the display
when I receive a call.
19
6090 eng
page 20
Thursday, March 02, 2000 22:50
Composite
1. Do not connect the unit to the line through a Fax, Modem or
2.
3.
4.
5.
answering machine, sometimes called daisy chaining. Although these devices provide an extra jack, it is often not a
true duplex connection. Use a duplex adapter, sold in most
retail phone stores, to split a wall jack so it can feed this unit
directly along with the other device sharing the same wall jack.
Caller ID is sent to the unit between the first and second rings.
To be sure the data is received, don't answer before the start
of the second ring.
Check to see that the unit is connected to a working wall jack.
You can test the wall jack by attaching a telephone to this jack
and trying to dial out.
Check to see if the unit is appropriately powered up by pushing one of the REVIEW buttons. If the unit does not display
any characters, your power adapter may not be properly connected.
Contact your phone company to ensure that Caller ID service
is activated on your line.
No sound is coming from the speaker, but everything else
seems to work.
1. Check the speaker on/off switch.
2. Press VOLUME to adjust the volume.
The unit is not announcing my Voice VIP messages, but telephone numbers announce properly.
The telephone number that you enter when you are tagging messages must match the number sent by the Caller ID service. Be
20
6090 eng
page 21
Thursday, March 02, 2000 22:50
Composite
sure that both numbers match, including the area code if delivered. Check your VIP List to be sure the number is included, and
play back the recorded VIP Message to be sure it is working. Rerecord the message if necessary.
Care and Maintenance
1. Please read the following instructions.
2. Keep the unit away from high temperatures that can distort or
melt plastic parts.
3. If the unit gets wet, wipe it dry immediately. Liquids can contain minerals that can corrode electronic circuits.
4. Dropping the unit may damage the plastic cabinet or circuitry,
which can cause it to malfunction.
5. Do not use any type of chemical or any abrasive powder to
clean the cabinet. Wipe it with a soft, clean cloth.
6. It is the responsibility of users requiring service to report the
need for service to our Service Department. They will make
the necessary arrangements for repair or replacement.
FCC Requirements
This equipment complies with Part 68 of the FCC Rules. On the
bottom or back of this equipment is a label that contains, among
other information, the FCC Registration Number and Ringer
21
6090 eng
page 22
Thursday, March 02, 2000 22:50
Composite
Equivalence Number (REN) for this equipment. Upon request, you
must provide this information to your telephone company.
The REN is useful to determine the quantity of devices you may
connect to your telephone line and still have all devices ring when
your telephone number is called. In most, but not all areas, the
sum of the RENs of all devices connected to one line should not
exceed five (5).
If your telephone equipment causes harm to the telephone network, the telephone company may discontinue your service temporarily. If possible, they will notify you in advance. If advanced
notice isn't practical, you will be notified as soon as possible. You
will be informed of your right to file a complaint with the FCC.
Your telephone company may make changes in its facilities,
equipment, operations or procedures that could affect the proper
functioning of your equipment. If they do, you will be notified in
advance to give you an opportunity to maintain uninterrupted telephone service.
If you experience trouble with this telephone equipment, disconnect this
equipment from the network until the problem has been corrected or
until you are sure the equipment is not malfunctioning.
• This equipment may not be used on coin service provided by
the Telephone Company.
• Connection to party lines is subject to state tariffs.
This equipment generates and uses radio frequency energy and if
not installed and used properly in strict accordance with the manufacturer's instructions, may cause interference to radio and television reception. It has been tested and found to comply with the
limits for a Class B computing device in accordance with the
specifications in Part 15 of the FCC Rules, which are designed to
provide reasonable protection against such interference in a residential installation.
However, there is no guarantee that interference will not occur in
22
6090 eng
page 23
Thursday, March 02, 2000 22:50
Composite
a particular installation. If this equipment does cause interference
to radio or television reception, which can be determined by turning the equipment off and on, the user is encouraged to try to correct the interference by one or more of the following measures:
• Reorient the radio or TV receiving antenna. Relocate this device
with respect to the receiver. Move this device away from the
receiver.
• If necessary, the user should consult the dealer or an experienced radio/television technician for additional suggestions.
• The user may find the following booklet, prepared by the Federal Communications Commission, helpful:
"How to Identify and Resolve Radio-TV Interference Problems"
This booklet is available from the U.S. Government printing Office,
Washington, DC 20402, Stock Number. 00-0000-00354-4. There
may be a charge for this booklet.
23
6090 eng
page 24
Thursday, March 02, 2000 22:50
Composite