1
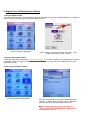
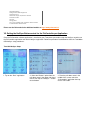
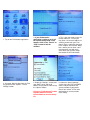
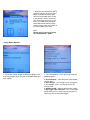
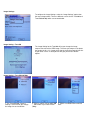
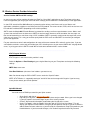
PixController.prc software manual for the
Palm Treo 600, 650, 680, and 700p Cellular Smart Phones
Introduction:
The PixController.prc software is a very powerful application which installs on your Palm Treo Smart Phone, and
is triggered by your CellularEye controller upon a motion event. This software interface looks similar to the
commonly used PC email program Outlook Express. Within the PixController software you will setup your POP3
protocol, Outgoing SMTP, and Incoming POP servers. All of the necessary service provider POP3 setting
information is located at the end of this manual.
The PixController.prc software application includes a setting for multi-photo mode, which allows you to send
multiple photos for each motion trigger event. There is also an advance scheduler setting which allows you to set
time constraints as to when photos are taken. This option is useful for security setups when you may not want to
take photos say between 7AM to 4PM Mon-Fri in a jobsite setting.
You may setup as many outgoing email addresses as you would like to send photos to. Within each email sent,
you have the option to create the subject of the email and add a text body message that may include items such
as the location of the CellularEye or GPS information.
Typical email transfer times are around 30 seconds to 1 minute from when the photo is taken upon a motion event
until it reaches your email server (depending on image size). However, poor signal strength and/or interruption to
your cellular transmission can greatly affect this time.
Contents:
I.
II.
III.
IV.
V.
VI.
VII.
Install the PixController.prc Software on your Treo Phone
Register Your PixController.prc Software
Treo 600 Phone Overview
Treo 600 Phone Specifications
Treo 650/700p Phone Overview
Treo 650/700p Phone Specifications
Setting the HotSync Button control for the PixController.prc Application
• Treo 600 HotSync Setup
• Treo 650/680/700p HotSync Setup
VIII. Setting up your Email and Image settings
• POP3 Email Settings
• Config Button Settings
• Use Scheduler
• Multi Shot Photo Mode
• SD Memory Card use
IX. Wireless Service Provider Information
• Cellular Service Provider SMTP and POP settings
• Relaying Denied Errors
X. Sending CellularEye photos to your “other” cellular phone
XI. Sending CellularEye photos to a website
I. Install the PixController.prc Software on your Treo Phone
Your computer needs to have all its resources available to install the software.
Follow these guidelines for a successful installation:
1. Exit any applications that are currently running on your computer, including those running in the background. Next
connect your Treo phone to your PC via the USB interface cable and run the “HotSync” application on your Treo phone.
Tap on the HotSync Application.
HotSync Application screen
2. Insert the Software Installation CD that came with your CellularEye. Double-Click on the PixController.prc application
on the CD. This will start the HotSync software on your PC.
3. Follow the onscreen instructions of the installation program. During the installation process, you will be prompted to
synchronize for the first time.
Note:
II. Register Your PixController.prc Software
1. Get your HotSync name.
If you don't know your device's exact HotSync name, tap the HotSync icon on the handheld computer. Your HotSync
name is shown in the upper right corner of the HotSync Screen.
Tap on the HotSync Application.
Get the HotSync name from the upper right corner. In this
example the HotSync name is “mark”
2. Get your registration number.
To get your registration number email [email protected] with your “HotSync” name and they will send you a
“registration number” in response. You can also call PixController, Inc. directly at 724-733-0970 to receive your
registration number.
3. Enter your registration number.
Tap on the PixController Application.
Press the “menu button” on your phone keypad and select
“Options” -> “About”. Within this menu you can “Register”
your software. Enter your registration number here.
Note: It may be necessary to press the “Stop” or
“Cancel” button if the PixController.prc application is
configured and running
III. Treo 600 Phone Overview
1 Antenna
2 Infrared Port
For 'beaming' information and
software between devices.
3 Ringer On/Off Switch
4 Expansion Card Slot
For SD/MMC media cards.
5 SIM Tray
6 Digital Camera
For on-the-spot photos.
7 Writing Stylus
8 Volume Control Buttons
9 Power Button
10 Phone Speaker
11 Color Touch-Screen Display
12 Phone Button
Access a full-featured and easyto-use mobile phone.
13 Calendar Button
Check your day's schedule at a
glance.
14 5-Way Navigation Button
For one-handed navigation.
15 Email/SMS Button
Get and send email and text
messages instantly.2
16 Screen Off/Key Guard Button
17 Built-in QWERTY Keyboard
For fast and easy data entry.
18 Dialing Pad
For quick number dialing.
19 Applications Button
Including To Do List, Memo Pad,
Calculator and more.
20 Headset Jack
21 Charger and Accessory
Connection
IV. Treo 600 Phone Specifications
wireless radio
software
• GSM/GPRS Model: 850/900/1800/1900 MHz
world phone used by Cingular Wireless, and TMobile
• CDMA Model: 800/1900 MHz nationwide
coverage used by Sprint
Built-in Software
• Phone
• POP3 Email Client for CDMA & GSM/GPRS
models, PCS Business Connection for CDMA
model only
• Contact List
• Calendar
• SMS Text Messaging
• Camera with Photo Viewer
• MMS/Picture Mail
• Blazer™ Web Browser
• To Do List
• Memo Pad
• Advanced Calculator
• CityTime World Clock
• Desktop Synchronization: Palm™ Desktop 4.1
for Windows and Macintosh, PalmSource
HotSync® Manager, Link to Microsoft Outlook
(Windows only)
processor
• 144MHz ARM processor
memory
• 32MB RAM (24MB available storage capacity)
battery
• Integrated rechargeable lithium ion
• GSM/GPRS Model: Up to 6 hours talk time and
up to 240 hours (10 days) standby time
• CDMA Model: Up to 4 hours talk time and up
to 240 hours (10 days) standby time
operating system
• Palm OS® 5.2.1H
size
• 4.4 x 2.4 x 0.9 inches
• 11.2 x 6.0 x 2.2 cm
weight
Included Software by Others
• Documents To Go (viewer edition)
• SplashID
• SplashMoney
• SplashShopper
• Klondike
• Zap! 2016
• GSM/GPRS Model: 5.9 oz. / 168 grams
• CDMA Model: 6.2 oz. / 175 grams
Visit Software Connection for additional
compatible software applications, sold
separately.
colors
in the box
• Silver: available for Cingular Wireless and TMobile
• Carbon: available for Sprint
• Treo 600 smartphone
• AC charger
• USB HotSync® cable
• Hands-free headset
• Slip case
• User manual
• Synchronization software CD-ROM (Windows &
Macintosh compatible)
display
• Bright CSTN backlit display
expansion
• Accepts SD (Secure Digital) and MMC
(MultiMediaCard) expansion cards
• SD I/O (Secure Digital Input/Output) ready
audio
• MP3 capable with third-party software, sold
separately - requires SD memory card, sold
separately
• Stereo audio headset compatible - requires a
stereo headset adapter, sold separately, for use
with standard stereo headphones
digital camera
• VGA with 640x480 (0.3 megapixels) resolution
and automatic light balancing
additional features
network locking
• Models with mobile service provided by Sprint
or T-Mobile are locked to work only with that
specific mobile service provider
system requirements
Windows
• Windows 98, Me, 2000 or XP (later versions
may also be supported) with USB port (USB
HotSync® cable included) OR Windows NT 4.0
with serial port (serial HotSync cable sold
separately)
• CD-ROM drive
Macintosh
• Mac OS 10.1 to 10.3.x (later versions may also
be supported) with USB port (USB HotSync
•
•
•
•
•
•
•
•
Infrared communications port
Touch-screen with stylus
Backlit keyboard with phone dial layout
Speakerphone
Vibrate mode for ringtones and alarms
16-channel MIDI polyphonic ring tones
External volume buttons
External ringer silence switch
cable included)
• CD-ROM drive
V. Treo 650 Phone Overview
1 Antenna
2 Infrared Port
For 'beaming' information and
software between devices.
3 Ringer On/Off Switch
4 Expansion Card Slot
For SD/MultiMediaCards.
5 SIM Tray
GSM/GPRS model only.
6 Digital Camera
7 Stylus
8 Removable Battery
9 Volume Button
10 Customizable Button
Set your own functionality.
11 Phone Speaker
12 320x320 Color Display
13 Applications Button
Quick access to all applications.
14 Phone/Send Button
15 Calendar Button
Quick access to today's appt's.
16 Menu Button
Quick access to software menus.
17 Power/End Button
18 Email/Messaging Button
19 5-Way Navigator
For one-handed navigation.
20 QWERTY Keyboard
21 Phone Dial Pad
22 Headset Jack
23 Multi-Connector
For charger and accessories.
24 Microphone
25 Status Indicator
26 Speaker
VI. Treo 650 Phone Specifications
wireless radio
software
• GSM/GPRS model: 850/900/1800/1900 MHz
world phone
• CDMA model: 800/1900 MHz nationwide digital
phone
Software Included on Device or CD-ROM
• Phone
• Contacts
• Calendar
• VersaMail
• Messaging
• Media
• Camera
• Camcorder
• Web browser
• RealPlayer
• Tasks
• Memos
• Calculator
• World Clock
• HotSync® Manager
• PalmOne™ Installation Software
• link to Microsoft Outlook (Windows only)
• DataViz® Documents To Go® 7
• AudiblePlayer
• Palm™ eReader
• Handmark PocketExpress (trial version)
• Zap! 2016
• Handmark Solitaire
processor
• Intel™ PXA270 312 MHz processor
memory
• 23MB user-available stored non-volatile
memory (22MB multi-lingual)
learn more... about NVFS memory
battery
• Removable rechargeable lithium ion battery
• GSM/GPRS model: Up to 6 hours talk time and
up to 300 hours standby time
• CDMA model: Up to 5 hours talk time and up
to 2 weeks standby time
operating system
• Palm OS® 5.4
size
• 4.4 x 2.3 x 0.9 inches
• 11.3 x 5.9 x 2.3 cm
Visit Software Connection for additional
compatible software applications, sold
separately.
weight
• 6.3 oz. / 178 grams
in the box
display
• Color TFT touch-screen
• 320 x 320 resolution
• 16-bit color (displays over 65,000 colors)
expansion
• Supports SD, SDIO and MultiMediaCards
audio
• RealPlayer included – requires SD memory
card, sold separately
• Stereo audio headset compatible – requires a
stereo headset adapter, sold separately, for use
with standard stereo headphones
digital camera2
• VGA with 640x480 (0.3 megapixels) resolution
and automatic light balancing
• 2x zoom
• Self-portrait mirror
• Captures video
additional features
• Full backlit QWERTY keyboard with number
pad
• 5-way navigation button
•
•
•
•
•
•
•
Treo 650 smartphone
Lithium-ion battery
AC charger
USB HotSync® cable
Headset
Software Installation CD
User guide
system requirements
Windows
•Windows 2000 or XP (later versions may also
be supported) with USB port (USB HotSync®
cable included)
• CD-ROM drive
Macintosh
• Mac OS 10.2-10.3 (later versions may also be
supported) with USB port (USB HotSync® cable
included)
• CD-ROM drive
•
•
•
•
•
•
•
•
•
Speakerphone
Polyphonic MIDI ringtones
Infrared port
External ringer on/silence switch
Vibrate mode
Stylus
Keyguard
2.5 mm headset jack supports stereo audio
customizable side button
Please see the Palm website for additional models at: http://www.palm.com/us/
VII. Setting the HotSync Button control for the PixController.prc Application
Once the PixController software application is installed on your Treo phone you need to setup the HotSync control to run
the PixController application and not the HotSync application. Follow the procedure listed below for either the Treo 600 or
650 HotSync setup procedures.
Treo 600 HotSync Setup
1. Tap on the “Prefs” application.
2. Select the “Buttons” option from the
pull down menu in the upper right hand
corner, then tap the “HotSync…” button
on the bottom.
3. From the pull down menu in the
middle of the screen select the
“PixController” application then tap
on the “OK” button.
Treo 650/680/700p HotSync Setup
1. Tap on the “Prefs” application.
2. Tap on the “Buttons” option under
the Personal selection.
3. Tap the “HotSync..” button on
the bottom.
4. From the pull down menu in the
middle of the screen select the
“PixController” application then tap on
the “OK” button.
VIII. Setting up your Email Client and Image settings
POP3 Email Settings
The PixController software works exactly the same way as your desktop email program (such as Outlook Express) - it
connects directly to your mail server and sends your email with the attached photo. The PixController software supports
nearly all of the popular mail services via a POP3 protocol. Follow the procedure below to setup your Outgoing SMTP and
Incoming POP mail servers. For more information on your SMTP and POP servers please see section IX, “Wireless Service
Provider Information”.
1. Tap on the PixController application.
4. Using the “Menu” button from the Treo
key pad select the “Options -> Email
Settings” button.
2. If your PixController
application is setup to run it will
be in photo taking mode. If this
happens click on the “Cancel” or
“Stop” button to halt the
software.
3. This is the main setup screen. At
the top under the “To:” box you
may enter a list of email address to
send the photos from your Treo
phone. Enter a subject for the email
in the “Subject” box, and the “Body”
box is where you can enter a text
message to be sent with each
email. Here you can enter things
like location or GPS information.
5. Under the “Settings” screen enter
your SMPT server and email
address for the phone, and then tap
the “Special” button.
6. Under the “Special Settings”
screen enter your POP and SMTP
names and passwords for the
service provider of your phone.
Please see section “IX” for more
information on service provider
email setting.
Check the “Radio Control” button
to power down the internal
Cellular Radio to save on battery
life.
7. After you have entered the SMTP
and POP settings tap on the “Done”
button, and tap the “Start” button
from the PixController main screen.
If your phone’s radio is not turned
on it will ask you to turn it on at this
point. The software will now go to
count down mode to warm up the
camera, take a photo, and send it to
the email address you setup.
Note:
Do this only if you are not using
the “Radio Control” option.
Config Button Options
1. Tap on the “Config” button to setup more options such
and saving photos to the SD card, multi photo mode, and
other options.
2. The “Configuration” screen will let you setup the
following options:
a) Use Scheduler – setup daily times when photos
may be taken.
b) Save Images – save images on the Treo phone.
c) Use Memory Card – save images on the SD
memory card.
d) Shutter Sound - make the photo shutter sound.
e) On Trigger Take n Pictures – this is multi photo
mode where you can select how many photos are
taken and sent on one motion trigger.
Use Scheduler Check Box Option
This option is useful for security
setups when you may not want to
take photos say between 7AM to
4PM Mon-Fri in a jobsite setting.
You can have up to 4 pre-set
schedules by selecting the A-D
buttons at the bottom and save a
“Memo” for each.
When done select the “OK” button.
1. To use the Scheduler check the
“Use Scheduler” box and click on the
“Set Schedules” button.
2. Under the “Scheduler” screen you
can setup any day of the week to
limit when photos are taken on that
day.
Simply select the box of the
week/hours in which you want to limit
when photos are taken.
Multi Photo Shot Mode
1. To setup Multi Photo mode select the number of
photos you wish to take upon each motion trigger
event in the pull down menu under the “On Trigger
Take” menu. If you select to take 2 photos, the first
photo will be taken and sent before the second photo
is taken.
Use Memory Card
1. If you select the “Use Memory Card” box please be sure
to insert a SD memory card into the slot shown above.
Image Settings
To configure the Image Settings select the “Image Settings” option from
the menu shown above. There are different screens for the Treo 600 and
Treo 650/680/700p which are covered below.
Image Setting – Treo 600
The Image Setting for the Treo 600 will let you change the image
compression ratio of the JPEG image. The more you compress the photo
the greater the loss is in image clarity, but the faster the photo will transfer
to your email server. A setting of 50% will give you the best of both
options.
Image Setting – Treo 650/680/700p
1. The Treo 650/700p “Camera
Settings” screen will let you change
the image size and resolution.
2. Select a capture size of 320 X 200
… 640 X 480 – up to 1280 X 1024
(700p).
3. Select a resolution from Lowest to
Best.
Turning off the LCD Display (Treo 680/700P Only)
On the Treo 680 and 700P phone models you can
turn off the LCD display to save on phone battery
power by going into the Prefs application from the
main application icon page.
Select “Power” option. Here you can turn down the
LCD brightness until it is almost off.
Note, you can turn this back on to change settings
at any time.
IX. Wireless Service Provider Information
Service Provider SMTP and POP settings
In most cases your cellular provider will setup the “Email” or “Versa Mail” application on your Treo phone at the store.
From this application you can get your POP and SMTP settings you will need for the PixController.prc Palm application.
In short POP stands for Post Office Protocol, a protocol used to retrieve e-mail from a mail server. Most e-mail
applications (sometimes called an e-mail client) use the POP protocol. The newer version, POP3, which we use here can
be used with or without SMTP (depending on the cellular provider).
SMTP stands for Simple Mail Transfer Protocol, a protocol for sending e-mail messages between servers. Most e-mail
systems that send mail over the Internet use SMTP to send messages from one server to another; the messages can
then be retrieved with an e-mail client using a POP. In addition, SMTP is generally used to send messages from a mail
client to a mail server. This is why you need to specify both the POP server and the SMTP server when you configure
your e-mail application.
For your convenience we've listed configurations for some of the more common ISPs and mail services here. If you are
subscribed to a wireless carrier and you find that your ISP is blocking access to your normal SMTP with "relaying denied
errors," try using your carrier's SMTP instead. We've listed some common wireless carriers below:
AT&T/Cingular Wireless
AT&T/Cingular is one of the easiest provider’s setup.
Select the Options -> Email Settings by pressing the Menu key on your Treo phone and setup the following
settings:
SMTP Host: cwmx.com
Your Email Address: (what ever ‘from’ address you want to use)
Note: You do not setup the POP or SMTP servers under the “Special” button.
NOTE: AT&T Wireless is supposedly coming to "end of life" due to the merger with Cingular. If you have any
issues please contact your cellular provider.
SprintPCS/Nextell
You need to set an EMAIL password for your Sprint account:
o
o
o
o
Go to Sprint's web site at www.sprintpcs.com.
Log onto your "My PCS" using your SprintPCS phone and password. Unless you have changed
it, your password is the last four digits of your social security number.
Click on "My Personal Information" located along the left side of the screen.
Under "Passwords", click the "Modify" link to the right of "PCS Vision User Name". This will
display your SprintPCS email address, and give you the option to change it if you wish. Write this
address down for future reference, as you will need this information to setup PixController on your
handheld device. If you have made changes, click "Submit" to get back to the "My Personal
o
o
Information" screen. If no changes were made, click "Cancel" to get back to the "My Personal
Information" screen.
Click on the "Modify" link to the right of "PCS Vision Password", just under "PCS Vision User
Name".
Follow the on-screen prompts to enter a new password. Note that you will need to have your
phone on and in a coverage area for the password to be reset on your phone. Write down your
new password for future reference, as you will need this information to setup PixController on
your handheld device.
Select the Options -> Email Settings by pressing the Menu key on your Treo phone and setup the following
settings:
SMTP Host: smtp.sprintpcs.com
Your Email Address: [email protected] †
Next, select the Special button under the Email Settings Screen to setup the POP/SMTP settings:
(Check) Use POP Connect
POP Host: pop.sprintpcs.com
POP Login: SprintUserName
(Password): SprintUserName Password (see above) Note: Be sure to delete the ‘-Not Set-‘ or ‘Assigned’
text when adding or changing the password setting
(Check) Use SMTP Auth
SMTP Login: SprintUserName
(Password): SprintUserName Password (see above) Note: Be sure to delete the ‘-Not Set-‘ or
‘Assigned’ text when adding or changing the password setting
† - Enter the portion of your SprintPCS Vision email address before the "@" here. So, if your address is
[email protected], your username would be myname. Some users have reported that entering only the
username part does not work. If it does not work for you, please try entering your entire SprintPCS Vision email
address.
Alternate information: Sprint complicates things by having three passwords - the account management password,
the Vision password, and the e-mail password. This may help you: On the Sprint PCS web site, there is a
'Preferences' link by the compose msg function. Under the preferences, you can set up an e-mail password. THIS
is the password that is assigned to the SMTP and POP servers in PixController.
Alltel CARRIER SMTP
To configure PixController.prc to send email using the Alltel SMTP server, go to your Server Account settings
(Accounts | Edit Accounts | Server). Enter the POP3 settings into the Incoming Server block as per your ISP's
instructions, and enter the following for the Outgoing Mail Server:
SMTP Server: mail.alltel.net
Username: [leave blank]
Password: [leave blank]
T-Mobile (USA) CARRIER SMTP
To configure PixController.prc to send email using T-Mobile's SMTP server account, go to your Server Account
settings (Options -> Email Settings). Enter the POP3 setting as per your ISP's instructions and enter the following
for the Outgoing Mail Server:
SMTP Server: myemail.t-mobile.com
Username: [your T-Mobile phone number followed by :1]
Password: [your T-Mobile password (same as you use for web access to your T-Mobile account)]
If the information above does not work for you, first try leaving the password field blank. Also, an issue may be
caused by recent changes to T-Mobile's services (reported by some users). It appears they may be requiring you
to register with their mail server via their web site. This is not an issue, but it also has to mirror the server that you
POP to in order to get mail. The process is roughly to register with T-mobile, which includes entering your POP
(incoming mail) server and password. Once this is done, you can then use their SMTP server, because you get
an ID and password to enter in for the myemail.t-mobile.com server. Rather than entering the username and
password fields in PixController as it says above, the ID and password received from the registration process
should be used. When a person configures their Treo in this manner, he/she needs to turn off the Alerts option on
the T-mobile web site. If that is not done, text messages which are the same as the email notes are also sent to
the device.
Verizon CARRIER SMTP
Verizon sometimes assigns you a temporary password in certain circumstances. Some people have reported that
they can suddenly, without changing anything, no longer send Email messages using Verizon's SMTP server. A
possible cause for this is that the temporary password has expired. You should go to the www.vtext.com web site
to attempt resetting the password. If that fails, then you will need to contact Verizon support directly.
Also note: Sometimes it can take a few hours (as many as six in a few cases) for the account and password to get
set up and become active in Verizon's systems. If your attempts to use their servers don't work right away, wait a
few hours and try again.
Select the Options -> Email Settings by pressing the Menu key on your Treo phone and setup the following
settings:
SMTP Host: smtp.vzwmail.net
Your Email Address: [your 10-digit cellphone number followed by @vzwmail.net]
Next, select the Special button under the Email Settings Screen to setup the POP/SMTP settings:
(Un-Check) Use POP Connect
POP Host: Not Used
POP Login: Not Used
(Password): Not Used
(Check) Use SMTP Auth
SMTP Login: [your 10-digit cellphone number followed by @vzwmail.net]
(Password): [your password that you set up on the vtext.com webpage] Note: Be sure to delete the ‘Not Set-‘ or ‘Assigned’ text when adding or changing the password setting
Relaying Denied Errors
I get relaying denied errors whenever I try to send mail. What's wrong?
To send email, just like your desktop email client, PixController talks to a SMTP server. A SMTP server’s sole function is
to relay your messages on to their intended recipients. The SMTP server that PixController attempts to use is the one you
configure in the Server section of your account settings.
On a desktop you typically connect to your ISP and then use your ISP's SMTP server to send messages. However when
you use PixController, more commonly you are connecting to the Internet not via your ISP but through a wireless carrier.
When this happens, your ISP recognizes that you are not connected to their network, instead it identifies you as an
outsider - hence their SMTP server will shut you out with the "relaying denied" error.
To make PixController.prc send mail in this situation you have the following options:
•
•
•
•
See if your ISP's SMTP server supports authentication. If it does, simply fill in the SMTP username and password in
your account settings. This will log you into the SMTP server allowing you to send email. We've got a list of common
settings in our ISP configuration area.
Before SMTP authentication became popular, some ISPs required you to log into your POP server before letting you
send. If this is the case for your ISP, you can try checking the "POP before send" option in the server settings.
If your wireless carrier offers a SMTP server, configure all of your accounts in PixController to use your wireless
carrier's SMTP. We've got a list of SMTP servers for some common wireless carriers on our ISP configuration area.
Sign up to a third party mail service which will give you access to a SMTP server that supports authentication. You
can then configure all of your mail accounts to use this SMTP server. We recommend FastMail, their service is fast
and reliable.
X. Sending CellularEye photos to your “other” cellular phone
It is possible to send photos from your CellularEye to your personal/work cellular phone. Your personal/work
cellular phone must be configured to receive photos, which may or may not be an extra expense. Please check
with your cellular provider.
First you need to put in the email address of your personal/work cellular phone in the “To:” line in the
PixController.prc application. Contact your cellular provider if you do no know the email address of your
personal/work cellular phone.
Common cellular provider phone email address formats:
SprintPCS uses the following format: [10-digit cell phone number]@pm.sprint.com
Verizon uses the following format: [10-digit cell phone number]@vzwpix.com
XI. Sending CellularEye photos to a website
There may be times when you would like to share the photos coming from your CellularEye with others, or store
the photos on a website. In this case you can setup your CellularEye to send the photos to free photo sites such
as PhotoBucket (http://photobucket.com/). PhotoBucket is one of the only websites we’ve found that will accept
incoming photos from a cellular phone.
Once you sign up for your free PhotoBucket account setup your PixController.prc software with the (To:) Email
address in the format of [email protected]. In the (Subject:) line you can put the folder
you want the photos to appear in under your PhotoBucket account such at “FieldPhotos”.
Live photos from the PixController, Inc. CellularEye systems can be viewed at:
http://s21.photobucket.com/albums/b275/PixController/
Copyright ©, PixController, All Rights Reserved.
http://www.PixController.com