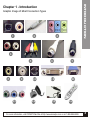
1
Media Center PC
User’s Manual
No part of this manual may be reproduced, transmitted, transcribed, stored in a retrieval system, or
translated into any language (natural or computer), in any form or by any means, electronic or mechanical,
including photocopying and recording, for any purpose without the prior written permission of CISNET
Technology, INC. Information in this manual is subject to change without notice and does not represent a
commitment on the part of CISNET Technology, INC. CISNET Technology, INC. may make
improvements and/or changes in this manual at any time. CISNET is registered trademarks of CISNET
Technology, INC. Throughout this manual are commercial names of products made by other
manufacturers or developers. Many of these product names are either registered or unregistered
trademarks of their manufacturers or developers. The owners of these trademarks have never expressed
any approval or disapproval of CISNET Technology, INC.
Copyright© 2004 CISNET Technology, Inc. All Rights Reserved.
CISNET is a registered trademark of ZT Group International Inc.
Acknowledgement
ACKNOWLEDGMENT
Copyright© 2004 CISNET Technology, INC. All Rights Reserved.
Intel and Pentium are registered trademarks of Intel Corporation.
AMD and Athlon are registered trademarks of Advanced Micro Devices, Inc.
nVidia is a registered trademark of nVidia Corporation.
ATI is a registered trademark of ATI Technology, Inc.
ASUS, MSI and Seagate are registered trademark Corporations.
Microsoft, Windows, and the Windows logo are registered trademarks of Microsoft Corporation.
All other products are trademarks or registered trademarks of their respective owners.
Limitation of remedies
In no event will CISNET Technology, Inc. or its distributors be liable to you for any damages, including but
not limited to lost profits, lost savings, or other incidental or consequential damages arising from the use or
the inability to use such programs, even if CISNET Technology, Inc. or its distributors or CISNET Dealer
that has been advised of the possibility of such damages or for any claim by any other party.
For more information, visit CISNET Web Site at http://www.cisnetpc.com or cal 1-888-984-8899
1
Chapter 1
Introduction Page 3 - Page 10
Chapter 2
Using System Page 11 - Page 16
For more information, visit CISNET Web Site at http://www.cisnetpc.com or cal 1-888-984-8899
CATEGORY
Category
2
The following portion of the User Guide is intended for Computer Systems
that come with Windows Media Center only.
Connecting The Media Center To Your TV / Monitor
First Identify What Connections you have. (Connectors Available Will Vary Depending On System Model)
Note: If connecting to a standard television with S-Video or Composite, a Media Center Extender device
is recommended to allow standard TV connections / signals.
INTRODUCTION
Media Center Manual
Examine the following pictures and read their descriptions to determine which type
of connector is best for you.
Connect the Media Center's video output to your Audio / Video
Receiver or to your TV / Monitor device.
This will output the picture onto the TV/Monitor device. Use either a DVI, RCA Yellow, SVGA,
S-Video or component.
Connect the Media Center's audio output to your Audio /Video
Receiver or to your TV / Monitor Device.
This will output the audio from the Media Center. Use either an RCA, Mini Jack, Optical or
Digital Coaxial cable.Connect the Satellite, Cable set top box or an air Antenna wire to the
Media Center via an S-Video, RCA, or RF cable.
This will provide the Media Center with the analog video / audio signal to be recorded.
Note:
* It is recommended to connect everything out of the Media Center to an Audio / Video Receiver (AVR)
if your connecting to home theater equipment. If you are connecting to an LCD Monitor and using PC Speakers
that are 5.1, 3.1, 2.1 or even simple monitor speakers then an AV Receiver is not needed.
** If you are connecting High Resolution video to an AVR then you will need to have an AVR that supports HDTV
For more information, visit CISNET Web Site at http://www.cisnetpc.com or cal 1-888-984-8899
3
INTRODUCTION
Chapter 1 - Introduction
Graphic Image of Most Connection Types
1
2
3
4
5
8
9
13
10
14
6
7
11
12
15
16
For more information, visit CISNET Web Site at http://www.cisnetpc.com or cal 1-888-984-8899
4
Connectors / Cables And Their Descriptions
1
Optical Digital Connectors / Connect to Audio Video Receiver
(Not All Media Centers Will Have These Connectors)
2
3
Mini Jack Connector / Connects to Speakers or Microphone.
Speaker Jacks / Can be used as a 6 Channel Setup Configured by the software in Windows Control Panel.
(Configure Speakers)
4
Stereo Left / and Right RCA connectors / Can Connect a Set Top Box to these input audio connectors
5
RCA cables / Red and White are left and right audio Yellow is Video Composite
6
Coaxial cable / Can use this type of media to connect from cable/antenna to the media center coaxial input.
(Provides Audio & Video)
7
S-Video Cable / Can Connect this as an input from set top box to capture card or output picture from Video
Card to Receiver or TV
8
Yellow Composite Video Jack / Used to input video from set top box to capture card.
9
Coaxial Input / Used to connect FM radio antenna and or Cable/Antenna (2 of these jacks supplied for input)
10
S-Video Jack / Used to input video to the capture card from a set top box and or outputting video signal
to a receiver or TV using an S-Video cable.
11
DVI Connection / (not all Media Center Systems will have this kind of video connector) This is used to connect out of the
Media Center's Video Card and connect directly to LCD's, TV, Video Receivers, and Projectors that have
DVI inputs.
12
SVGA / 15 pin connector to output video from the Media Center to the TV/Monitor device Analog High
Resolution High Definition
13
Component / These are component connections to be used as an output video source to the A/V Receiver
or to the TV device.
14
Remote Sensor / This is a USB device that will be used to retrieve remote control commands.
On the back of this sensor you will connect the IR Blaster.
INTRODUCTION
Chapter 1 - Introduction
(Some Media Centers come with the remote sensor built in located on back of machine)
15
IR Blaster / One end connects to the back of the Remote Sensor in port 1 and the Infrared Emitter end will
be stuck to the front of the cable/satellite set top box to send remote control commands.
Place this end directly over the IR area of the set top box.
16
Media Center Remote Control / This is used to control channel changes, volume and power for the Media
Center. (This remote is not a universal remote and will not control TV's, Stereo's or Receivers. Media Center Only)
Note:
Some Media Centers only come with SVGA out. If your configuration requires a different output connection, check back with whom you purchased the system for upgrade options.
You can also purchase SVGA adapter cables to convert to other connector types. Another option is to use a Media Center Extender which will connect to your TV / Monitor Device
and connect wirelessly or through the Ethernet LAN to the Media Center accessing the live TV or Media Content as if your were actually sitting at the Media Center.
For more information, visit CISNET Web Site at http://www.cisnetpc.com or cal 1-888-984-8899
5
Additional information
Things to know about Optical and Digital # 1
If you have a system or a sound card that has Optical or Digital audio out.
You will need to enable digital out in the Audio Control Program.
This will produce a 5.1 surround sound signal.
Note:
Only audio signals encoded in 5.1 will play out all speakers.
Anything encoded in stereo will still result in only 2 speakers.
(Not available with all Media Center Models)
Optical and digital connections may not connect to the Media Center directly
in the same media interface as the receiver or TV. This is when you will need
to purchase a adapter. This basically just changes the interface of the connector.
You can get a digital mono mini plug adapter (refer to # 2) that will convert to
a single RCA connector. This will allow you to connect your Media Center
>>> out of the speaker jack >>> to converter adapter >>> to RCA cable
>>> and then plug into the A/V Receiver's or TV's Digital Coaxial connector.
INTRODUCTION
Chapter 1 - Introduction
The same principle can be used for just about any type of connection interface.
All of these adapters are available online or at your nearest electronic store.
Things to know about Mini Jack Connectors # 2
Mini Jack is a type of jack used to transmit stereo 2 channel audio.
This is the standard type of connection that most computer systems will have.
If you purchase computer speakers in a 5.1, 3.1 or 2-speaker configuration, these
types of connectors can be used. I.E Switching the sound cards speaker configuration
in the Control Panel to 5.1 will allow you to connect a 5.1 surround sound speaker
configuration with these connector types. This type of connector can also be converted
to an RCA interface to connect to A/V Receivers and TV devices.
Things to know about Speaker Jacks # 3
These are the standard PC speaker jacks. You will connect #2 into these jacks.
If you configure the sound channel properties and choose a 5.1 surround and depending
on the sound card, it may turn the Green jack to Front speakers,
the Blue jack may become the Center, and the Pink may become the Rear speakers.
However this will disable microphone and input capability.
Things to know about RCA Audio (red, white). # 4
These are an RCA connector interface. These connectors can be used instead of the standard coaxial
twist on connector to capture the left and right audio channels.
These will be located on the Media Center's Capture Card and will be connecting to the cable/satellite set top box.
Note:
If using the RF Coaxial twist-on cable you will not use these RCA connectors because the RF transmits Audio and Video.
For more information, visit CISNET Web Site at http://www.cisnetpc.com or cal 1-888-984-8899
6
Additional information
Things to know about RCA cables # 5
These RCA cables can be used to transmit input or output video / audio.
Things to know about Coaxial Cable # 6
The coaxial cable will transmit both audio and video signal to the Media Center. When using this type
of cable you will not need to use RCA or any other type of cable to capture audio and video.
Things to know about S-Video Cable # 7
Transmits video signal only in an analog format. It supports a maximum resolution of 320 lines.
Ok for live TV or DVD but not very well for browsing the web or doing computer tasks.
Designed for SDTV (Standard TV) image.
INTRODUCTION
Chapter 1 - Introduction
Things to know about Yellow Composite # 8
Composite is also a SDTV (Standard Definition Television) analog video signal. Will produce nearly
the same quality as S-Video. S-Video is slightly better because it separates the blacks and whites.
Used to import video or export video using a yellow RCA cable.
Things to know about Coaxial Jack # 9
This will be on most TV's Receivers, and Set Top boxes. This will also be found on the Media Center's
Tuner card. One will be for FM Antenna Radio, and one for Antenna / Cable / Satellite set top boxes.
Tip:
You can split the cable coming into the house and connect one into the FM Radio jack to use as an FM antenna.
Then connect the other split to the TV Jack for TV capture.
Things to know about S-Video # 10
S-Video is a SDTV (Standard Definition Television) analog video signal. Most televisions today will
support an S-Video input video connection. Watching SDTV in the Media Center software will be
displayed in the quality it is intended for. However, the computer browsing aspect of the machine may
look blurry due to the low-resolution limitation by S-Video. 320 lines of resolution as apposed to the
PC displaying your Desktop wallpaper at a minimum of 800x600.
Things to know about DVI # 11
DVI is digital high resolution and supports a high definition signal. Designed to transfer uncompressed
real-time digital video, DVI supports PC graphics resolutions beyond 1600x1200 and HDTV
resolutions, including 720p, 1080i, and 1080p. If your Media Center has this video output source,
it is recommended to connect it to an A/V Receiver rather than going directly to the TV. Some TV's
that have DVI will function correctly. However some will not. The screen resolution will be off slightly
or hard to set at all. This is because the TV device is not meant to handle computer signals.
This is where an A/V Receiver comes into play. The Media Center should be connecting into the A/V
Receiver so that the signal can be retransmitted and then sent to the TV device in a signal the TV can
handle.
For more information, visit CISNET Web Site at http://www.cisnetpc.com or cal 1-888-984-8899
7
Additional information
Things to know about SVGA # 12
SVGA is a connection standard that will provide extremely high resolutions (based on Video Card capability)
in an analog signal. SVGA can support beyond 24bit color depths and beyond 1600x resolutions.
SVGA will also support HDTV. SVGA is native to a computer and is the recommended video output
source because it can support a large variety of screen resolutions. Using the VGA connection you
should not have any trouble with picture clarity, quality or screen size.
SVGA also supports adapters (sold separately) that can convert the 15 Pin D connector to several
different types of interfaces. These are: SVGA to S-Video, SVGA to Composite, SVGA to DVI,
SVGA to Component. These adapters will allow the system to be connected to just about any TV.
INTRODUCTION
Chapter 1 - Introduction
Things to know about Component # 13
These are an RCA connector interface. These connectors can be used to transmit High Definition
HDTV as an analog video signal. This will connect from the Media Center VIA an adapter plug
(sold separately) to the A/V Receiver or TV Device. Component is common to A/V Receivers and to
most new TV's. (This option is not available without using an adapter. Not included with most Media Centers)
Things to know about Remote Sensor # 14
The remote sensor is used to accept remote control commands from the Media Center Remote only.
The remote sensor connects to the back of the Media Center via USB. No configuration is required.
Simply connect.
Things to know about IR Blaster # 15
The IR Blaster is a small cable that one end connects to the back of the remote sensor and the LED
end will be stuck to the front of the Satellite or Cable set top box. You will need to place the LED
emitter directly over the set top boxes infrared receptacle.
Things to know about the Media Center Remote # 16
The Media Center Remote will be used to control the Media Center only. It cannot be programmed to
control other home theater equipment such as a A/V Receiver or VCR. However, as new Remote
Control devices are becoming more available, you will be able to use them instead of the current one
being used as long as the new remote supports Media Center 2005.
For more information, visit CISNET Web Site at http://www.cisnetpc.com or cal 1-888-984-8899
8
Starting The Media Center For The First Time
When you start the Media Center Software for the first time, the software is going to ask you to
configure your setup. You will need to have all your connections in place before starting the
Configuration Wizard. Make sure that you have the IR Blaster (#15) connected to the Remote
Sensor (#14) before proceeding.
Press the Green Button
Center Setup.
and the Welcome Menu should appear asking you to start the Media
Click Next and follow the onscreen prompts and the Wizard will guide you through configuring your
Media Center.
INTRODUCTION
Chapter 1 - Introduction
When you are finished with the configuration wizard, you can press the Live TV button and start
watching or recording live TV.
Note:
The Media Center Remote is NOT a
universal remote control and you cannot
program it to control all the devices in your
entertainment center. However, as new
Remote Control devices are becoming more
available, you will be able to use them
instead of the current one being used.
Changing the Tuner Signal Type
Press the Green Button
to return to the main menu and browse the Settings section and select TV.
Next choose Setup TV Signal.
Note: Doing this will disrupt any scheduled recordings you may have previously set.
For more information, visit CISNET Web Site at http://www.cisnetpc.com or cal 1-888-984-8899
9
Navigating with your remote control
Browsing through the Media Center Menus or through the DVD Interface
Menus can be done all with the Media Center Remote Control.
To move through menus press one of the navigational pads on the Media
Center Remote Control.
To select an item or to execute a command press the OK button.
At anytime you can press the Back button to go back one step.
USING SYSTEM
Chapter 2 - Using The Media Center
You can switch between the desktop and the Media Center at anytime by clicking on the
minimize and maximize buttons. The Media Center will continue to run in the background.
You can also resize the window and use as a video / desktop configuration.
You can also set the Media Center to always be on top by editing the Settings Menu.
Click the minimize button to see the PC Desktop.
Click the maximize button to resize or full
screen the media center.
Clicking the Media Center Start button
at
anytime will start the Media Center or bring you
back to the Media Center's Main Menu.
You can also press the task bar button to
resume the Media Center Software whenever it
is minimized.
For more information, visit CISNET Web Site at http://www.cisnetpc.com or cal 1-888-984-8899
10
Recording Live TV
To record live TV, press the record button on the Remote control. This should put a red indicator icon
next to the program info stating that this channel is now recording
You can also browse the TV Listing Guide by
pressing the guide button on the remote. Here
you can select a program and press record on it
even though it is not playing until the future. This
will set the Media Center to automatically change
channels and record the program for you.
USING SYSTEM
Chapter 2 - Using The Media Center
Media Center will also allow you to choose to
record the series if it is a recurring television
show. To do this browse the guide and select the
program you would like to record recurring, then
choose Record Series.
Remember, once the Media Center is recording, you will not be able to change the
channel without disrupting the recording.
To Browse Recorded Programs
You can browse through recorded programs by
pressing the Green Button and then navigating
to the My TV menu. Press the Right arrow and
select Recorded TV. This will display all
recorded programs.
For more information, visit CISNET Web Site at http://www.cisnetpc.com or cal 1-888-984-8899
11
Creating CD / DVD of Recorded Programs
It's recommended to have a blank DVD or CD inserted before you proceed to the
following.
While watching the recorded showing, using your right mouse button or pressing the More Info button
on the remote control, will pop up a Create CD/DVD option menu.
The following screen will ask you what type of
format you would like to burn the recording in.
USING SYSTEM
Chapter 2 - Using The Media Center
You can also choose to create a CD/DVD by
selecting More Programs from the main menu and
choosing Create CD/DVD.
Doing this will prompt you to name the disc title
and choose the media content that you would like
to burn on to a CD/DVD.
Using Video Formats
Creating a Data CD or DVD, the files on the disc will be in a format that only
a Media Center PC will be able to play.
Creating a Video DVD or Video CD will allow you
to convert your video files into a format readable
by a standard DVD player. (Requires 3rd Party
Installed Sonic Encoders. Not All Media Centers
Come Pre-Installed With This)
For more information, visit CISNET Web Site at http://www.cisnetpc.com or cal 1-888-984-8899
12
Using The Guide
The guide displays TV program information including ratings, program times,
categories, program descriptions, and titles. You can scroll through live or future
showings by using the navigational pad on the MCE Remote. When you press the
OK button on a selected program showing, the Media Center will display the
program information with description and ratings.
Use the Program Guide to schedule recordings or view listings.
USING SYSTEM
Chapter 2 - Using The Media Center
To start the guide press the Guide button on the MCE Remote and the guide
will open.
**Tip**
For more information about pay-per-view programming or to learn more about using the Media
Center Program Guide, move the mouse pointer to activate the menu bar and click the ?
For more information, visit CISNET Web Site at http://www.cisnetpc.com or cal 1-888-984-8899
13
Using The Guide
Press the up down left or right navigational pads on the MCE Remote to scroll through the guide.
Or Press the CH/PG + CH/PG - to scroll page by page.
USING SYSTEM
Chapter 2 - Using The Media Center
Pressing OK on a program showing.
If the program you selected is currently playing then it will automatically launch the TV showing.
If the program you selected is for a future showing then another description menu will be
displayed.
For more information, visit CISNET Web Site at http://www.cisnetpc.com or cal 1-888-984-8899
14
1
For Additional Support
Cisnet encourages customers to browse our website for additional help files and step-by-step
walkthroughs. On our support website you will find a number of very helpful links to Microsoft
Recommended websites and tutorials.
Visit our support section on our website at http://www.cisnetpc.com/support.html
Troubleshooting
If your system is not functioning properly or maybe you have a virus, Cisnet has supplied you a
very simple and easy way to recover the system back to the way it was when first purchased.
USING SYSTEM
Chapter 2 - Using The Media Center
Refer to the Cisnet Complete Recovery Guide for step-by-step instructions.
Recover the system using hard drive based F10 recovery function.
Refer to our support section on our website for picture by picture instructions at
Http://www.cisnetpc.com/support.html
Media Center Help
Microsoft has a built-in Troubleshooting and
Help guide. This Help guide will answer
questions on connecting devices,
manipulating the Media Center programming,
recording live TV, playback of recorded TV,
using the guide, running the tuner setup,
using the Online Spotlight, adding movies,
pictures, music and much more.
Move the mouse curser and the Media
Center main menu should appear.
Then click the ? for help.
Cisnet will continue to increase the
support documentation and tutorials on
the support section of our website.
Cisnet Support : www.cisnetpc.com/support.html
Email: [email protected]
24/7 Phone Support 1-888-984-8899
For more information, visit CISNET Web Site at http://www.cisnetpc.com or cal 1-888-984-8899
15
For more information, visit CISNET Web Site at http://www.cisnetpc.com or cal 1-888-984-8899
MEMO
SYSTEM RECOVERY
Memo
16