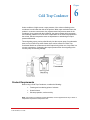
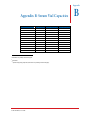
1
SP INDUSTRIES, INC.
Freeze Dryer Operator's Manual
VirTis BenchTop 2K, 4K and 6K
Freeze Dryers
Copyright © 2009 SP Industries, Inc. All marks herein are used under license.
All brand or product names mentioned may be trademarks or registered trademarks of their respective companies.
Part Number 414258
Revision 004, 12/09
SP Industries Inc.
Corporate Headquarters
935 Mearns Road
815 State Route 208
Warminster, PA 18974 USA
Gardiner, NY 12525 USA
3538 Main Street
Stone Ridge, NY 12484 USA
(800) 523-2327
(800) 431-8232
(800) 824-0400
(215) 672-7800
(800) 944-8559
(845) 687-0071
(845) 255-5000
SP Service
(877) 548-4666
SP Service Fax
(215) 672-1702
Website
www.spindustries.com
This Freeze Dryer Operator's Manual contains confidential and proprietary information of SP Industries, Inc. and may be
used only by a recipient designated by and for purposes specified by SP Industries, Inc.
Reproduction of, dissemination of, modifications to, or the creation of derivative works from this Freeze Dryer Operator's
Manual, by any means and in any form or manner, is expressly prohibited, except with the prior written permission of SP
Industries, Inc. Permitted copies of this document must retain all proprietary notices contained in the original.
The information in this document is subject to change without prior notice. Always confirm with SP Industries, Inc. that you are
using the most current version of this document. SP Industries, Inc. is free to modify any of its products and services, in any
manner and at any time, notwithstanding the information contained in this document.
THE CONTENTS OF THIS DOCUMENT SHALL NOT CONSTITUTE ANY WARRANTY OF ANY KIND, EITHER
EXPRESSED OR IMPLIED, INCLUDING BUT NOT LIMITED TO THE IMPLIED WARRANTIES OF MERCHANTABILITY
AND/OR FITNESS FOR A PARTICULAR PURPOSE OR GIVE RISE TO ANY LIABILITY OF SP INDUSTRIES, INC., ITS
AFFILIATES OR ITS SUPPLIERS.
The terms and conditions governing the use of this Freeze Dryer Operator's Manual shall consist of those set forth in written
agreements with SP Industries, Inc.
Committed to Product Excellence
…and Continuous Support
Revision 004, 12/09
© SP Industries, Inc. 2009
i
Important Symbols
Warning! Injury or even death
may result if a recommendation
marked with this symbol is not
heeded.
Crush Hazard. Keep hands clear when
operating door.
Electric Shock Danger! Use
appropriate caution to avoid injury or
death.
Corrosive Chemical. Wear suitable
gloves, safety glasses, and protective
clothing.
Burn Danger! Potentially hot surface.
Use appropriate caution.
Property Caution! To prevent damage to
chamber equipment and/or load, adhere
to procedures marked by this symbol.
Do not store flammable materials in
chamber.
Practical Operating Tip. These
recommendations streamline unit
operation and prevent common operator
errors.
Wear Safety Glasses.
Explosive Materials Hazard! Keep
objects away from heat.
Freeze Dryer Safety Warnings
ii
9
Always assume that shelf, condenser and internal parts may be very cold or very hot. Wear protective equipment to
avoid burns.
9
Always ensure that only an authorized technician services the refrigeration, heat transfer, vacuum and electrical
systems.
9
Always ensure that refrigeration air intake is clear and clean.
9
Always ensure vacuum pump exhaust is properly ventilated and/or contained.
9
Always practice team lifting when moving heavy equipment.
9
Always use a maximum one pound regulator if backfilling from an inert gas source.
9
Always wear safety glasses when using glass flasks.
9
Do carefully read the entire instruction manual before attempting to operate the freeze dryer.
9
Do verify that the electric service and other utilities match the unit’s requirements before connecting to power.
9
Never allow hand or body contact with open vacuum ports.
9
Never clean with solvents. Use mild detergent and water only.
9
Never operate the unit without all covers in place.
9
Never pressurize chambers. Laboratory freeze-drying systems are designed for vacuum only.
9
Never stopper vials unless the chamber door is tightly closed.
9
Never use acrylic closures if they are cracked or crazed.
9
Never use with toxic, corrosive, flammable or organic materials unless special precautions are in place to prevent injury
to personnel or damage to equipment.
Revision 004, 12/09
© SP Industries, Inc. 2009
Warranty Information
VirTis BenchTop 2K, 4K and 6K are warranted by SP Industries to be free of defects in material and workmanship when
operated under normal conditions as specified in the instructions provided in this manual. Please take this opportunity to locate
the serial tag on your new VirTis BenchTop 2K, 4K and 6K and record the information below for future reference. SP Industries
also recommends that you complete and return your unit’s warranty registration card.
Model Number
Serial Number
Part Number
Limited Warranty
SP Industries (the “Company”) warrants each of its products against any defects in material or workmanship, provided that the
product is used in a reasonable manner under appropriate conditions and consistent with the applicable operating instructions,
for a period of 12 months from the date of installation or 15 months from the date of shipment (whichever comes first).
The obligation of the Company shall be, at its option, to repair or replace, without charge any parts that prove to be defective
within the warranty period, if the purchaser notifies the Company promptly in writing of such defect. The Company shall not be
responsible for labor charges payable with respect to persons other than Company employees. Replacement or repair of parts
pursuant to this warranty shall not in any way extend the original warranty period. The Company will not be responsible for any
unauthorized repairs, replacements or product modifications, nor will it be responsible for any product failures resulting from
such unauthorized repairs, replacements or product modifications negligently or otherwise made by persons other than
Company employees or authorized representatives of the Company.
THE COMPANY DOES NOT MAKE AND EXPRESSLY DISCLAIMS ANY WARRANTY OF MERCHANTABILITY OR FITNESS
FOR A PARTICULAR PURPOSE OR ANY OTHER WARRANTY, EXPRESSED OR IMPLIED, WITH RESPECT TO THE
SALE, INSTALLATION, DESIGN OR USE OF ITS PRODUCTS. ADDITIONALLY, THE COMPANY SHALL NOT BE LIABLE
FOR ANY CONSEQUENTIAL DAMAGES RESULTING FROM THE USE OF OR ANY DEFECTS IN ITS PRODUCTS.
The Company’s employees are available to provide general advice to customers concerning the use of the Company’s
products; however, oral representations are not warranties with respect to particular products or their uses and may not be
relied upon if they are inconsistent with the relevant product specifications for the items set forth herein.
Notwithstanding the above, the terms and conditions set forth in the Company’s formal sales contracts shall be controlling and
supersede any inconsistent terms contained herein, and any changes to such contracts must be made in writing and signed by
an authorized executive of the Company.
Revision 004, 12/09
© SP Industries, Inc. 2009
iii
iv
Revision 004, 12/09
© SP Industries, Inc. 2009
Contents
Important Symbols ............................................................................................................................................... ii
Freeze Dryer Safety Warnings............................................................................................................................. ii
Warranty Information .......................................................................................................................................... iii
Introduction............................................................................................................................................ 1
Key Features........................................................................................................................................................1
BenchTop Usage .................................................................................................................................................1
Available Configurations ......................................................................................................................................2
From Freeze Dryer to Condenser Module............................................................................................................2
Cold Trap Condenser Module ..............................................................................................................................2
Installation and Setup ........................................................................................................................... 3
Initial Inspection ...................................................................................................................................................3
Service Connections ............................................................................................................................................3
Vacuum Pump Installation ...................................................................................................................................4
Installing the Vacuum Pump............................................................................................................................4
Oil Mist Eliminators..........................................................................................................................................5
Freeze Dryer Setup..............................................................................................................................................6
Vacuum Baffle Plate ............................................................................................................................................7
Freeze-Drying Concepts ....................................................................................................................... 9
Elements of Freeze-Drying ..................................................................................................................................9
Freeze .............................................................................................................................................................9
Vacuum ...........................................................................................................................................................9
Heat...............................................................................................................................................................10
Condenser.....................................................................................................................................................10
Product Dependencies.......................................................................................................................................10
Sentry 2.0 Controls.............................................................................................................................. 11
LED Wave Display (Qualitative Reference) .......................................................................................................11
Button Functions ................................................................................................................................................12
Up/Down (+/-) Buttons...................................................................................................................................12
MENU Button ................................................................................................................................................12
COND Button ................................................................................................................................................12
VAC Button....................................................................................................................................................12
AUTO Button .................................................................................................................................................12
DEFR Button .................................................................................................................................................12
LCD Display Functions ......................................................................................................................................13
Main Menu .........................................................................................................................................................13
Vacuum Control.............................................................................................................................................14
Purge (Optional) ............................................................................................................................................14
Heat (Optional) ..............................................................................................................................................14
User Options Menu ............................................................................................................................................14
Vacuum Control.............................................................................................................................................14
Temperature Units.........................................................................................................................................15
Vacuum Units ................................................................................................................................................15
Revision 004, 12/09
© SP Industries, Inc. 2009
v
Contents
VirTis BenchTop 2K, 4K and 6K
Relay Test .....................................................................................................................................................15
Vacuum Pump Maintenance .........................................................................................................................15
Alarms Menu......................................................................................................................................................16
Setpoints Menu ..................................................................................................................................................16
Condenser Temperature ...............................................................................................................................16
Vacuum OK ...................................................................................................................................................16
Power Save Deadband .................................................................................................................................16
Maintenance Menu and Factory Options ...........................................................................................................17
Factory Options .............................................................................................................................................17
Interstage Control..........................................................................................................................................18
Calibration .....................................................................................................................................................18
Basic Operation ................................................................................................................................... 21
Getting Started...................................................................................................................................................21
Product Preparation: Flask / Manifold Drying.....................................................................................................21
Product Preparation: Drum Manifold Shelf Drying .............................................................................................21
Product Preparation: Chamber Drying ...............................................................................................................22
Quickseal Valves ...............................................................................................................................................22
Operation Instructions ........................................................................................................................................23
Meltback.............................................................................................................................................................24
Preventing Glassware Breakage........................................................................................................................25
Product Dryness End Point ................................................................................................................................25
Stoppering (Optional) .........................................................................................................................................25
Cold Trap Condenser .......................................................................................................................... 27
Product Requirements .......................................................................................................................................27
Cold Trap Setup.................................................................................................................................................28
Optional Components ......................................................................................................................... 29
Manifolds............................................................................................................................................................29
Shelf Racks........................................................................................................................................................30
Liquid Nitrogen Trap ..........................................................................................................................................31
Filter Trap...........................................................................................................................................................32
BenchTop Cold Plate .........................................................................................................................................33
Initial Setup of the BenchTop Cold Plate .......................................................................................................33
Cold Plate Operation .....................................................................................................................................33
General Maintenance .......................................................................................................................... 35
Vacuum System.................................................................................................................................................35
Vacuum Pump...............................................................................................................................................35
Changing Vacuum Pump Oil .........................................................................................................................35
Vacuum Tubing and Gaskets ........................................................................................................................36
Door Gasket ..................................................................................................................................................36
Vacuum Pump Gas Ballast Valve..................................................................................................................36
Quickseal Valves...........................................................................................................................................37
Refrigeration System .........................................................................................................................................37
The Air-Cooled Condenser............................................................................................................................37
Condenser Chamber .....................................................................................................................................38
Acrylic Parts .......................................................................................................................................................38
Appendix A: Troubleshooting ............................................................................................................ 39
Vacuum Problems..............................................................................................................................................39
Product Melting ..................................................................................................................................................40
Appendix B: Serum Vial Capacities................................................................................................... 41
Appendix C: Stainless Steel Cleaners............................................................................................... 43
vi
Revision 004, 12/09
© SP Industries, Inc. 2009
VirTis BenchTop 2K, 4K and 6K
Contents
Appendix D: Spare Parts List ............................................................................................................. 45
Revision 004, 12/09
© SP Industries, Inc. 2009
vii
Chapter
Introduction
1
VirTis BenchTop 2K, 4K and 6K freeze dryers offer a low-cost solution for laboratories
with space constraints. Featuring condenser temperatures of -55 °C to -105 °C,
BenchTop freeze dryers can handle a wide range of processing requirements.
Key Features
•
Extremely compact design.
•
Direct chamber, flask and/or shelf drying capabilities.
•
Versatile Sentry 2.0 control panel.
•
Three- to nine-liter condenser capacity.
•
Variety of refrigeration system options.
•
Digital display of temperatures and setpoints.
•
Quickseal valves for processing flasks. 1
•
Manual shelf stoppering (optional).
BenchTop Usage
BenchTop units are mechanically refrigerated condenser modules that can be utilized
as freeze dryers or cold traps. These versatile units can also be used for initial product
freezing.
When used in freeze-drying mode, the BenchTop unit can effectively remove up to
99% of product moisture. The cold trap condenser module is capable of trapping
vapors off of a vacuum concentrator or gel dryer.
1
Requires optional manifold.
Revision 004, 12/09
© SP Industries, Inc. 2009
1
Introduction
VirTis BenchTop 2K, 4K and 6K
Available Configurations
Freeze-drying in
the condenser
Flask drying on
drum manifold
Shelf unit in
drum manifold
Flask drying on drum
manifold with stoppered
shelves
Vertical manifold
Fitted for cold
trap application
From Freeze Dryer to Condenser Module
When using your BenchTop as a condenser module, the vacuum cover plate is
replaced with either a ¾-inch stainless steel port for the manifold plate or a plain cover
plate, which must be purchased separately if no manifold is ordered. The manifold
adapter plate is required when any manifold is purchased.
Cold Trap Condenser Module
When using a vacuum concentrator or gel dryer with your BenchTop unit, the
condenser module can be used as a cold trap, which traps vapors driven off of the
product before they reach the vacuum pump. For more information, refer to Chapter 6:
Cold Trap Condenser.
Note: A low temperature condenser is required when trying to trap organic solvents.
2
Revision 004, 12/09
© SP Industries, Inc. 2009
Chapter
Installation and Setup
2
Initial Inspection
Upon receiving your BenchTop series freeze dryer, inspect all contents of your
shipment for damage. Check packing material for small accessory items. Remove all
packing material carefully and inspect the unit for shipping damage. In the event that
shipping damage has occurred, retain all packing material and contact your freight
carrier immediately.
Note: In the event of shipping damage, SP Industries will cooperate in the matter of collecting
your claim, but is not responsible for the collection or free replacement of material. When
possible, replacement parts will be shipped and invoiced to you, making them a part of your
claim.
Service Connections
Make sure that the outlet you intend to use meets the voltage and amperage
requirements listed on the serial tag of your unit.
CAUTION! ONLY A QUALIFIED ELECTRICIAN SHOULD CONNECT THE UNIT TO THE
AVAILABLE ELECTRICAL SUPPLY.
The line cord has three individual conductors inside the outer jacket. 2 To make the
appropriate plug connection:
1. Trim back enough of the jacket to facilitate installation of the plug.
2. The three individual conductors are BROWN, BLUE, and GREEN with a
YELLOW tracer.
3. Connect the BROWN wire to the line (hot) terminal on the plug.
4. Connect the BLUE wire to the neutral terminal.
5. Connect the GREEN/YELLOW wire to the ground terminal.
2
Consult SP Industries and a qualified electrician if electrical configurations vary from standard, specified service requirements.
Revision 004, 12/09
© SP Industries, Inc. 2009
3
Installation and Setup
VirTis BenchTop 2K, 4K and 6K
Vacuum Pump Installation
A remotely mounted vacuum pump is required for operation of your BenchTop freeze
dryer. The vacuum pump must be a two-stage, high-vacuum pump that does not
exceed the maximum allowable amperage listed on the unit’s serial tag and back
panel label.
The following parts are included with your BenchTop unit for connection to the
vacuum pump:
•
Four (4) feet of ¾-inch ID (Inside Diameter) rubber vacuum tubing
•
One (1) 90° rubber elbow
•
One (1) plastic connector
Installing the Vacuum Pump
Notes: If you are installing a previously used vacuum pump, refer to the
vacuum pump manual and the General Maintenance section of this manual.
Ensure that the pump was properly maintained prior to installation.
A vacuum pump inlet port adapter and sufficient tubing are required for
connection to the vacuum pump. If you need assistance, please contact SP
Industries.
1. Position the vacuum pump in a convenient location near the
freeze dryer. Ensure that the pump will be easily accessible
during routine maintenance.
2. Cut the supplied vacuum tubing as short as possible. Allow
enough length between the vacuum pump and the
BenchTop unit.
Note: Clamp and cut the ¾-inch ID vacuum hose. If you do not
wish to cut the hose, it may be used at its full length, but may take
up more space than necessary.
3. Locate the inlet port on your vacuum pump. Refer to the
vacuum pump manual.
4. Remove any material with the exception of the inlet filter
screen and gasket.
5. Place the adapter on the inlet port and secure with a fitting.
If an adapter is not present, contact SP Industries.
6. Remove all objects from the vacuum pump outlet port, but
retain for future use.
7. Connect the BenchTop unit to the vacuum pump using the
Vacuum pump
¾-inch vacuum tubing. If connecting to a vacuum pump
purchased from SP Industries, attach the ¾-inch tubing from
the BenchTop to the vacuum pump intake nipple, add a tubing clamp and
tighten securely.
8. Check the vacuum pump oil level. The oil level should read half way up the
sight glass. Add oil only if necessary. DO NOT OVERFILL!
9. Verify that the power switch on the vacuum is off. The LED next to the VAC
button on the unit’s front panel must be off.
4
Revision 004, 12/09
© SP Industries, Inc. 2009
VirTis BenchTop 2K, 4K and 6K
Installation and Setup
10. Plug the vacuum pump into the receptacle marked VACUUM PUMP on the
back of the unit. The receptacle is an IEC universal outlet. This allows you to
control the pump using the Sentry 2.0. The voltage, phase and frequency of
the vacuum pump must match the voltage, phase and frequency specified on
the rear panel of the freeze dryer.
Note: You can power your vacuum pump from a wall socket if it does not have an IEC
connector, but you will not be able to control the pump from the Sentry 2.0 Controller.
Only a qualified electrician should perform installation of an IEC connector. The pump
used should not exceed the amperage listed on the BenchTop serial tag.
11. Enable power to the vacuum pump by switching the pump’s circuit breaker to
the on position.
Oil Mist Eliminators
To reduce fumes from the vacuum pump and/or vent the vacuum exhaust externally,
SP Industries recommends the installation an Oil Mist Eliminator (OME).
Related Parts
•
Revision 004, 12/09
© SP Industries, Inc. 2009
Oil Mist Eliminator, Plastic for Oerlikon Leybold TRIVAC E D2.5E Vacuum
Pump (P/N 414203).
5
Installation and Setup
VirTis BenchTop 2K, 4K and 6K
Freeze Dryer Setup
To set up your BenchTop unit:
Note: Refer to Basic Operation for complete equipment operation instructions.
1. Install a condenser gasket (black rubber ring with a slit in it) on the top of the
unit. It should have a light film of vacuum grease on the outer surface.
2. Prepare the unit for your intended use.
a.
If the unit is to be used as a standalone freezer, cover the condenser
with a plain cover plate to prevent air circulation from warming the
samples. Skip to step 5.
b.
If the unit is to be used as a manifold dryer, place a manifold adapter
plate (clear acrylic or stainless steel circular disk with a hole) over the
gasket.
c.
If you are using an acrylic drum manifold, place a second condenser
gasket around the bottom lip of the manifold.
d.
If you are using a stainless steel manifold, place the supplied O-ring in
the groove of the manifold adapter plate.
BenchTop with acrylic manifold.
3. If using a manifold, attach Quickseal valves to each port on the manifold and
ensure that each is in the closed position. For more information, refer to the
Quickseal valve section in Chapter 5.
Note: Quickseal valves are siliconized at the factory. Vacuum grease is not required.
4. If using an acrylic drum manifold, apply a thin coating of vacuum grease to the
tapered surface and place the tapered plug in the top center of the manifold.
Slowly turn the plug 360° clockwise and then 360° counterclockwise. This will
ensure a good seal between the surface of the plug and the manifold.
5. Plug the unit into an appropriate outlet and switch on the circuit breaker
located on the rear of the unit. The control panel display will illuminate.
6
Revision 004, 12/09
© SP Industries, Inc. 2009
VirTis BenchTop 2K, 4K and 6K
Installation and Setup
Vacuum Baffle Plate
The BenchTop 2K and 4K models include a two-position vacuum baffle plate.
•
Baffle Plate on Chamber Bottom (Position 1).
By raising the baffle plate handle, the plate can
be dropped to the bottom of the chamber. This
allows you to pre-freeze items on the baffle plate.
In some cases, it may be more convenient to
remove the baffle plate completely and freeze
items directly on the bottom of the chamber.
Note: Freeze-drying cannot be performed with the baffle on the chamber bottom
(position 1) since the vacuum port will be blocked and the product will remain too
cold for water vapor transfer.
•
Revision 004, 12/09
© SP Industries, Inc. 2009
Baffle Plate in Raised Position (Position 2).
Lower the baffle plate handle to raise the baffle
plate when freeze-drying products directly on the
baffle. This allows ice to build up on the
condenser below and provides more room for the
materials to be dried.
7
Installation and Setup
8
VirTis BenchTop 2K, 4K and 6K
Revision 004, 12/09
© SP Industries, Inc. 2009
Chapter
Freeze-Drying Concepts
3
The first step of lyophilization (freeze-drying) is typically to freeze the product to a
minimum of -40 °C. After the product is frozen, moisture can be extracted through
sublimation. The sublimation process takes a solid (i.e., ice) and converts it to a gas
(i.e., vapor), bypassing the liquid stage. The moisture is converted to a gas, while
maintaining the material’s crystalline structure.
The second step involves the migration of moisture from the product. BenchTop
series freeze dryers facilitate the migration of moisture by using a vacuum to extract
non-condensable vapors in the product chamber or container. The freeze dryer
creates a low-pressure zone to allow moisture to flow easily from the product. Since
vapor naturally travels toward cooler surfaces, the condenser chamber is cooled to at
least 15 °C below that of the product to attract product moisture.
Many products require a secondary drying process to remove moisture that did not
convert to vapor during the first process. During secondary drying, BenchTop units
remove the remaining bound moisture by slightly warming the product.
Note: To prevent meltback, the product should not be warmed above its eutectic point until all
free ice has sublimated.
Elements of Freeze-Drying
Freeze
The product must be completely frozen before freeze-drying can begin. Product
freezing can be accomplished directly in the condenser chamber, or through prefreezing methods such as dry-ice baths or a laboratory freezer. The product’s frozen
temperature should be at least -40 °C. To minimize freeze-drying time and protect the
product against meltback, the product should be frozen in the thinnest cross section
possible.
Vacuum
Adding vacuum assists in removing air and other non-condensable vapors from the
chamber to facilitate vapor migration. The vacuum system creates a nearly pressurefree environment to allow the vapor from the frozen product to flow toward the cold
condenser surface easily.
Revision 004, 12/09
© SP Industries, Inc. 2009
9
Freeze-Drying Concepts
VirTis BenchTop 2K, 4K and 6K
Heat
Carefully controlled heat input to the frozen product speeds the drying process. The
BenchTop unit is designed to be used as either a manifold freeze dryer or a tray dryer.
Exposing glassware containing frozen product to ambient room temperature helps
drive the drying process by adding heat. This causes the frozen solvents in the
product to sublimate and then migrate to the colder surface of the condenser wall.
Several heated and unheated racks and stoppering accessories are available for
freeze-drying in drum manifolds.
In its simplest configuration, a BenchTop unit will freeze-dry products on the partially
raised vacuum baffle in the center of the condenser. Heat will be added by radiation
through the acrylic cover.
Condenser
Trapping water vapor molecules in the form of ice on the condenser surface
effectively removes moisture from the product. The refrigeration system cools the
internal condenser at the bottom of the chamber to attract and trap vapors migrating
off the product.
The condenser is located under the manifold to provide the shortest vapor path to
achieve the maximum drying rate. The condenser capacity ranges from 3 to 9 liters,
which indicates the maximum volume that can be condensed from the product before
defrosting is necessary.
Product Dependencies
The freeze-drying process is completely dependent upon (and will change with) each
specific product. In all cases, the condenser temperature must be cold enough to trap
the vapors migrating from the product effectively. If the condenser is not cold enough,
excess vapors may be pulled into the vacuum pump inadvertently. To compensate for
this issue, SP Industries offers optional filter and liquid nitrogen (N2(liq)) traps.
10
Revision 004, 12/09
© SP Industries, Inc. 2009
Chapter
Sentry 2.0 Controls
4
The Sentry 2.0 is the control center for the BenchTop K series. Driven by a powerful
microprocessor, the Sentry 2.0 is extremely versatile while remaining intuitively easy
to use. The controller allows custom programming, includes a detailed LCD display
and offers a wealth of customizable features.
The Sentry 2.0 front panel consists of the following:
•
An LED wave display, which allows you to assess the status of the
system quickly and easily.
•
Tactile buttons located on the membrane, which allow you to activate
specific functions and navigate through the menus within the LCD display.
•
An LCD display, which shows the status of the unit and allows you to
adjust the alarm and control parameters, as well as modify system
configurations.
LED Wave Display (Qualitative Reference)
1. Condenser Temperature
The LEDs on the bottom wave represent the following temperatures:
LED
1
Revision 004, 12/09
© SP Industries, Inc. 2009
Temperature (°C)
Color
10
Red
2
0
Red
3
-10
Red
4
-20
Amber
5
-30
Amber
6
-40
Green
7
≤ -50
Green
11
Sentry 2.0 Controls
VirTis BenchTop 2K, 4K and 6K
2. Vacuum
The LEDs on the top wave represent the following vacuum setpoints:
LED
Vacuum (mTorr)
Color
1
2000
Red
2
1000
Red
3
500
Amber
4
200
Amber
5
100
Green
6
50
Green
7
≤ 20
Green
Button Functions
Up/Down (+/-) Buttons
The Up/Down (+/-) buttons allow you to navigate the menus and increase or decrease
setpoint values displayed on the LCD display.
MENU Button
The MENU button performs a number of functions. During an alarm condition,
pressing the MENU button will temporarily silence (but not clear) the alarm. When
viewing the Synoptic screen, the MENU button will display the Main Menu.
The MENU button also acts as an enter key, activating the selected option. To return
to a previous menu, highlight the carat (∧) at the top left corner of the LCD screen and
press the MENU button.
COND Button
The COND button activates the refrigeration system. This provides system cooling for
vapor condensing.
VAC Button
The VAC button enables the vacuum pump and opens the vacuum brake solenoid
(VBS) valve, allowing the system to be evacuated. Vacuum level control options can
be programmed from the User Options screen.
Note: If your vacuum pump is not connected to the IEC plug on the rear of the BenchTop unit,
the VAC button will not control your pump. See your pump manual for operation instructions.
AUTO Button
The AUTO button will start the refrigeration and vacuum systems in a set sequence.
The condenser will first cool to the condenser setpoint. Once the setpoint is achieved,
the vacuum pump will energize and begin evacuating the system.
DEFR Button
The DEFR button activates the condenser defrost function. Hot gas defrost is directed
toward the condenser walls to quickly loosen ice.
Note: Defrost mode is disabled while any other function is on.
12
Revision 004, 12/09
© SP Industries, Inc. 2009
VirTis BenchTop 2K, 4K and 6K
Sentry 2.0 Controls
LCD Display Functions
By default, the LCD display shows the system Synoptic screen. The Synoptic screen
gives a visual representation of the current operation and status of the unit. Alarm
messages, run time and system status are displayed.
Note: The actual synoptic screen may vary slightly from the illustration above.
Main Menu
Pressing the MENU button while on the Synoptic screen displays the Main Menu. If
the unit goes idle (no input after three minutes), the system will default back to the
Synoptic screen.
∧
Main Menu
User Options
Alarms
Setpoints
Vacuum Control
Purge
Bath
Heat
>
>
>
0000
Off
Off
Off
Note: Temperature and vacuum control functions are disabled except when the Synoptic
screen is displayed. Bath and Heat functions are not available simultaneously.
Navigation within the menu screens is accomplished using the Up/Down (+/-) arrow
buttons in conjunction with the MENU button. The Up/Down (+/-) buttons allow you to
scroll the cursor to the desired function and allows the value of a setpoint to be
changed. The MENU button is used to select the desired item.
Revision 004, 12/09
© SP Industries, Inc. 2009
13
Sentry 2.0 Controls
VirTis BenchTop 2K, 4K and 6K
The ∧ symbol, located in the upper left corner of the screen, returns you to the
previous screen. The > symbol allows you to go to the next screen within a selected
option.
Vacuum Control
The Vacuum Control field displays the current vacuum level control setpoint. To
change the setpoint, use the Up/Down (+/-) buttons and navigate to the Vacuum
Control field. Press and hold the MENU button. When prompted, use the Up/Down
(+/-) buttons to adjust the value. Press MENU to enter the new setpoint.
Purge (Optional)
The Purge function controls a VBS valve located between the vacuum pump and the
suction port of the unit. This allows high vacuum to be pulled within the volume
between the pump and the valve, without submitting the entire unit to high vacuum.
The gas ballast can then be opened and the oil cleansed within the pump.
Heat (Optional)
The Heat function gives the ability to add controlled heat to product shelves for
enhanced drying. If installed, you can set the temperature of the manifold shelves up
to 60 °C.
Note: Optional features will only be displayed if the factory-installed options were purchased
with your unit.
User Options Menu
To access the User Options menu, highlight User Options from the Main Menu and
press the MENU button.
∧
User Options
Vacuum Control
Temperature Units
Vacuum Units
Relay Test
Vacuum Pump Maintenance
VLC
C
Torr
>
>
Vacuum Control
The Vacuum Control field sets the method used for vacuum level control—None, VLC
or Power Save. Setting Vacuum Control to None disables vacuum level control.
Setting Vacuum Control to VLC allows gas to bleed into the system through a control
valve to maintain the vacuum setpoint. Setting Vacuum Control to Power Save
isolates the system and maintains pressure by shutting off power to the vacuum pump
and VBS valve. As the system pressure rises, the vacuum pump is re-energized and
the system is pulled back down. To avoid rapid cycling of the vacuum pump, the
Power Save Deadband should be set to 20 or more.
14
Revision 004, 12/09
© SP Industries, Inc. 2009
VirTis BenchTop 2K, 4K and 6K
Sentry 2.0 Controls
Temperature Units
The Temperature Units field displays the current setting for indicating temperature
values. Temperature can be displayed in either Fahrenheit (°F) or Celsius (°C).
Vacuum Units
The Vacuum Units field displays the current setting for indication of system pressure.
System pressure can be displayed in millitorr (mTorr), microbar (μbar) or Pascal (Pa).
Relay Test
The Relay Test screen can be used to troubleshoot electrical or mechanical problems,
or to observe active outputs during a freeze-drying run.
∧ Solid State Relay Output Test
SSR1
SSR2
-Vacuum
-Purge
-Comp2
-Bath
-Comp1
-Spare
-Defrost
-Heat
∧-SSR1 ∨-SSR2 Menu-Exit
To test a relay bank, simply press the Up or Down (+/-) button and each of the
outputs of the selected relay bank will fire for approximately two seconds each.
Relay positions preceded by a highlighted box indicate the output is active.
Vacuum Pump Maintenance
The Vacuum Pump Maintenance screen is used to adjust vacuum maintenance alarm
parameters and maintenance time durations.
∧
Vacuum Pump Maintenance
Alarm Setpoint: 240
Current Hours: 0000 min: 007
The Alarm Setpoint is the number of hours of continuous operation the vacuum pump
can run before the vacuum pump maintenance alarm will be generated. This can be
used to draw attention to necessary vacuum pump maintenance operations, such as
oil changes. The default factory value is 240 hours, but can be changed by pressing
and holding the MENU button while Alarm Setpoint is highlighted. Once prompted,
use the Up/Down (+/-) buttons to change this value.
The Current Hours field can be reset at any time by pressing and holding the MENU
button while Current Hours is highlighted.
Revision 004, 12/09
© SP Industries, Inc. 2009
15
Sentry 2.0 Controls
VirTis BenchTop 2K, 4K and 6K
Alarms Menu
The Alarms screen displays all active alarms. A shaded box appears in front of
triggered, active alarms. You can also accept and clear triggered alarms from this
screen. To clear an alarm, use the Up/Down (+/-) buttons to highlight the desired
alarm and press the MENU button. Before the alarm will clear, the condition that
caused the alarm must be resolved.
∧
_
_
_
_
Alarms
Power Outage
Condenser Over Temperature
Vacuum Exceeded
Vacuum Pump Maintenance
Menu To Clear
Setpoints Menu
To edit setpoint values, use the Up/Down (+/-) buttons and highlight the desired field.
Press and hold the MENU button until prompted to adjust the value. Adjust the value
with the Up/Down (+/-) buttons and press the MENU button to enter the setpoint.
∧
Setpoints
Condenser Temperature
Vacuum OK
Power Save Deadband
-60
0500
050
PRESS AND HOLD MENU BUTTON TO ADJUST
Condenser Temperature
The Condenser Temperature setpoint is the temperature at which the vacuum will
energize in auto mode. The Condenser Over Temperature alarm is also referenced
from this value. The alarm will be triggered when: (1) the condenser temperature rises
more than 10 °C above the setpoint temperature after obtaining the setpoint at least
once, and (2) the condenser is unable to obtain the setpoint after 30 minutes of
starting an automatic cycle.
Vacuum OK
Vacuum OK is the pressure setpoint at which the Vacuum Exceeded alarm will be
generated. There is a 30-minute delay in the Vacuum Exceeded alarm to allow flasks
to be added to the system without generating this alarm.
Power Save Deadband
The Power Save Deadband is the acceptable amount of pressure rise within the
system before the vacuum pump is re-energized. This value is used when Vacuum
Control is set to Power Save in the User Options screen.
16
Revision 004, 12/09
© SP Industries, Inc. 2009
VirTis BenchTop 2K, 4K and 6K
Sentry 2.0 Controls
Maintenance Menu and Factory Options
The Maintenance menus are used for system configuration, calibration and factory
setup. Use caution when modifying factory settings.
PROPERTY CAUTION! ENABLING FEATURES THAT ARE NOT INSTALLED MAY CAUSE SERIOUS
SYSTEM DAMAGE AND VOID YOUR WARRANTY. ONLY A QUALIFIED SP INDUSTRIES TECHNICIAN
SHOULD EDIT VALUES IN THE FACTORY OPTIONS AND INTERSTAGE CONTROL SCREENS.
To access the Maintenance menu, press and hold the Up/Down (+/-) buttons
simultaneously while on the Main Menu.
∧
Maintenance
>
>
>
Factory Options
Interstage Control
Calibration
Factory Options
The Factory Options screen is used to configure the bath, purge, defrost and heat
options.
∧
Factory options
Bath Option
Purge Option
Hot Gas Defrost
Heat Option
ZL Defrost
YES
YES
YES
No
No
The optional Heat and Purge components are enabled when set to YES. This results
in changes to the Main Menu and Synoptic screens, adding control of these features.
Note: The Heat and Purge options require additional factory-installed components to function.
If either option is purchased, the function will be enabled at the factory. If you are unsure
whether you purchased the Heat or Purge option, contact SP Industries.
The Hot Gas Defrost option uses a hot gas refrigeration loop to reduce defrost time.
Setting the Hot Gas Defrost field to YES enables the hot gas defrost.
Revision 004, 12/09
© SP Industries, Inc. 2009
17
Sentry 2.0 Controls
VirTis BenchTop 2K, 4K and 6K
Interstage Control
If your unit is equipped with a cascade refrigeration system, you can control the
operation of the second compressor from the Interstage Control screen. A cascade
system is a safety feature used to protect the refrigeration system from overloading.
∧
Interstage Control
Interstage
ON –12
ON
DIFF 025
Current Temp
1.3 °C
If the Interstage Control is set to ON, the COND or AUTO buttons will activate the
high-stage compressor. The Interstage Control’s Current Temp is monitored until the
Interstage ON temperature is reached. Once the Interstage ON temperature is
reached, the low-stage compressor is activated.
The DIFF temperature is used to prevent overloading of the high-stage compressor. If
the Current Temp exceeds the sum of the Interstage ON temperature and the DIFF
value, the low-stage compressor is deactivated. It will reactivate when the Current
Temp recovers.
Calibration
The Calibration screen allows modification and control of condenser temperature and
vacuum settings. The following procedures require removal of the electrical box cover
under the unit’s right-side panel.
CAUTION! REMOVAL OF THE ELECTRICAL BOX EXPOSES HIGH-VOLTAGE COMPONENTS.
USE EXTREME CAUTION AND FOLLOW ELECTRICAL SAFETY PRACTICES.
∧
Calibration
Temperature Span
Temperature Zero 14.5C
Vacuum
760 Torr
070
128
128
Condenser Temperature Calibration
To calibrate the condenser temperature, connect a thermocouple temperature
simulator to the condenser temperature input. Set the simulator temperature to 25 °C.
The current temperature is displayed on the Calibration screen. Adjust the numerical
value of the Temperature Zero as appropriate and press MENU to enter the value.
Upon proper adjustment of the Temperature Zero, change the temperature simulator
value to -60 °C. Adjust the Temperature Span value so that the temperature displayed
equals the calibrator set value. Recheck the value at 25 °C and repeat adjustment if
necessary. Check calibration at desired temperature intervals for verification.
18
Revision 004, 12/09
© SP Industries, Inc. 2009
VirTis BenchTop 2K, 4K and 6K
Sentry 2.0 Controls
Vacuum Value
To adjust the Vacuum value, open the condenser door and adjust the trim pot located
on the main Sentry 2.0 module within the electrical box. Set the value to 760 Torr, or
current atmospheric pressure. Turn the trim pot clockwise to increases the pressure or
counter-clockwise to decrease the pressure.
Once the rough vacuum has been set, connect a reference tube. Adjust the Vacuum
value located on the LCD screen up to increase the Vacuum reading. Adjust the
Vacuum value down to decrease the Vacuum reading.
Note: SP Industries recommends the use of a Varian Vacuum Reference Tube for vacuum
calibration.
PRACTICAL OPERATING TIP. ENSURE THAT THE GROUND WIRE IS FIRMLY CONNECTED BEFORE
CALIBRATING ANY VALUES. A LOOSE GROUND WIRE CAN PRODUCE INCONSISTENT AND
UNPREDICTABLE RESULTS.
Revision 004, 12/09
© SP Industries, Inc. 2009
19
Sentry 2.0 Controls
20
VirTis BenchTop 2K, 4K and 6K
Revision 004, 12/09
© SP Industries, Inc. 2009
Chapter
Basic Operation
5
Getting Started
Prior to operating your freeze dryer, ensure that your condenser is clean and dry. If
your unit is equipped with a shelf rack with stoppering, check that the stoppering
mechanism is fully retracted before proceeding.
Product Preparation: Flask / Manifold Drying
BenchTop series units include Quickseal valves for processing samples using flasks
or other glassware. To prepare samples for freeze-drying in glassware:
1. Fill flasks with your product. 3 Do not fill more than half of the flask’s total
capacity. When using Wide Mouth Flasks, ensure that the filter paper and Oring are positioned correctly within the flask cover. Snap the cover securely
onto the flask. 4
2. Pre-freeze product samples in a laboratory freezer, dry ice bath or shell bath
freezer. Freezing to -40 °C is adequate for most products. 5
Product Preparation: Drum Manifold Shelf Drying
As an alternative to using flasks, you may use an optional drum manifold and shelves
to dry vials of product. To prepare samples for shelf drying:
1. Fill vials or other suitable containers with product.3 Do not fill containers to
more than half of their total capacity.
2. Pre-freeze product samples. This can be accomplished directly on the
shelves, or in a laboratory freezer, dry ice bath or shell bath freezer. Freezing
to -40 °C is adequate for most products.5
3. If your unit is equipped with the stoppering option and you are processing
product in vials, partially insert a split rubber stopper into each vial.
4. Load samples onto the shelf (or shelves). If you are using product probes,
connect the probes to the thermocouple jacks provided.
3
Refer to Appendix B for a list of standard serum vial capacities.
4
Wide Mouth Flasks are the most popular glassware type, but other types of flasks, vials and ampoules are available. If you are
not certain how to use glassware accessories, contact SP Industries.
5
Dry ice methods can freeze a product to approximately -78 °C, while liquid nitrogen (N2(liq)) methods can freeze a product to
approximately -190 °C.
Revision 004, 12/09
© SP Industries, Inc. 2009
21
Basic Operation
VirTis BenchTop 2K, 4K and 6K
Product Preparation: Chamber Drying
BenchTop series freeze dryers can process product in vials or trays directly in the
condenser chamber. To process samples in the chamber:
1. Fill tray(s) or vials with your product. 6 Do not exceed more than half of the
container’s total capacity.
2. If using a BenchTop 2K or 4K, ensure that the vacuum baffle plate is in the
desired position (i.e., position 1 for pre-freezing or position 2 for freezedrying).
3. If desired, insert product probes into the product. For accurate temperature
readings, probe ends should be close to, but not in contact with, the bottom of
the container. 7
4. Close and secure the chamber lid.
PRACTICAL OPERATING TIP. TO MINIMIZE DRYING TIME, ALWAYS FREEZE PRODUCTS IN AS
THIN A LAYER AS POSSIBLE. NEVER FILL A CONTAINER TO MORE THAN HALF ITS TOTAL
CAPACITY.
Quickseal Valves
Quickseal valves are utilized in many method of drying. They permit the attachment of
flasks for in vitro freeze-drying. They are also used to break vacuum after a cycle
completes. Quickseal valves operate as follows:
Note: Quickseal valves are an integral part of the freeze-drying process and must be
maintained as such. For information regarding upkeep and service of Quickseal valves, see the
General Maintenance section of this manual.
6
Refer to Appendix B for a list of standard serum vial capacities.
7
For precise positioning of probes in vials, contact SP Industries about optional MVP Probe Holders.
22
Revision 004, 12/09
© SP Industries, Inc. 2009
VirTis BenchTop 2K, 4K and 6K
Basic Operation
Operation Instructions
1. Ensure that the condenser is clean and dry before proceeding. Check the
drain line for residual moisture, which can cause slow vacuum pump-down.
Ensure that the plastic quick-connect drain fitting is not inserted into the drain
fitting receptacle on the front of the unit.
2. Pre-freeze the product to a minimum of -40 °C.
3. If you are freeze-drying product on manifold shelves or directly in the chamber
and your unit’s heat option includes the ability to track product temperature
through a product probe, insert the probes. They should be placed close to
the bottom of the sample, but not touching it.
Note: Temperature probes can only be used with racks and feed-through adapter
plates.
4. Check that all connections and ports are secure. Ensure that Quickseal
valves are closed and that the drain plug is removed from the drain fitting.
5. Press the COND button to begin cooling the condenser. Wait for the
condenser to reach at least -40 °C (i.e., approximately 20 to 30 minutes).
Before proceeding, confirm that the condenser temperature status light is
green on the LED Wave display and the Synoptic screen displays the
condenser temperature at -40 °C or colder.
Alternatively, press the AUTO button and allow the system to proceed
through the freeze-drying process using the defined settings. If using the
AUTO function, skip to step 8.
6. Enable vacuum by pressing VAC. Allow the system to evacuate the system.
Before proceeding, confirm that the vacuum status light is green on the LED
Wave display and that the desired vacuum level is displayed on the Synoptic
screen.
Note: If your vacuum pump is not connected to the BenchTop unit, the Sentry 2.0
controller will not be able to enable it. Switch on the vacuum manually. See your
vacuum pump operator’s manual for more information.
7. Add product as appropriate:
a.
If using a manifold, attach a flask to a Quickseal valve and turn the
valve to the open position to begin the freeze-drying process. Allow the
vacuum to recover to at least 200 millitorr or your vacuum control
setpoint before connecting additional flasks.
b.
If using a vacuum concentrator, add samples and begin spinning.
Note: For more information, refer to Chapter 6: Cold Trap Condenser.
8. Ensure that critical system parameters (i.e., refrigeration and vacuum) stay
within the acceptable ranges. The LED Wave on the control panel provides a
quick reference. Periodically check the condenser for ice build-up and defrost
as needed.
9. Observe the product to determine when drying is complete. For manifold
drying, the process is complete when the outside of the flasks lose
condensation and the product appears dry.
For heated shelf and chamber drying, the process is complete when one or
more of the following are true:
Revision 004, 12/09
© SP Industries, Inc. 2009
23
Basic Operation
VirTis BenchTop 2K, 4K and 6K
a.
The condenser approaches its maximum low temperature.
b.
System vacuum approaches a constant low pressure reading.
c.
Product temperature is steady and close to shelf temperature (requires
use of a product probe).
d.
Appearance of the product indicates the dryness (i.e., uniformly
powdery or fluffy).
e.
The product probe reads near ambient temperature or the temperature
of the heated rack (if equipped with that option).
10. Switch off the vacuum and refrigeration systems. If running an automatic
cycle, press the AUTO button to disable both systems simultaneously.
11. For manifold flask drying, close Quickseal valves and remove flasks. If using
a vacuum concentrator, turn off the unit and close Quickseal valves. If using a
chamber or manifold shelves, break vacuum and remove the product.
12. If your system is still under vacuum, release vacuum by inserting the drain
plug into the drain fitting or by opening a Quickseal valve.
13. After removing all product, press the DEFR button to enable condenser
defrost. The defrost function allows ice to be lifted out of the condenser
without fully melting. A drain line is connected to a plastic quick-connect
fitting, which is then inserted into the drain receptacle on the front of the unit.
To open the drain, push the fitting into the drain receptacle. To close the drain
line, press the small gray release button on the top of the receptacle. The
fitting will pop out.
Note: The quick-connect fitting must be removed prior to freeze-drying, or else the
appropriate vacuum pressure will not be achieved.
14. Once the ice has melted away from the condenser, the ice can be removed.
Thoroughly clean and rinse the condenser with a mild detergent or baking
soda solution (to neutralize acids).
Note: Do not chip away at the ice, as this may damage the condenser.
15. The defrost system turns off automatically after an hour. To disable it
manually, press the DEFR button.
Meltback
Products that have low freezing points are prone to meltback during freeze-drying.
Meltback is a term used to describe when the product melts or defrosts before
sublimation completes. The following suggestions may help to prevent meltback:
•
Decrease the volume and depth of the product.
•
Insulate the product container to slow down sublimation caused by an
ambient heat source.
•
Decrease the amount of product or number of samples connected.
•
Verify that the equipment is functioning properly and ensure that room
temperature is sufficient to assist the air-cooled refrigeration system.
•
Consider diluting the product with water.
For products that dry readily, alternative heat sources such as a heat lamp may be
used to expedite the freeze-drying process.
24
Revision 004, 12/09
© SP Industries, Inc. 2009
VirTis BenchTop 2K, 4K and 6K
Basic Operation
Preventing Glassware Breakage
•
Avoid cleaning glassware with a wire brush as metal-to-glass abrasion
creates microscopic scratches which can cause breakage.
•
Never fill a flask to more than half of its total capacity (e.g., a 600 mL flask
has a working capacity of 300 mL).
•
When pre-freezing samples in a storage freezer, tilt glassware at a 30° to
45° angle to increase surface area and reduce stress on the glass.
•
To prevent glass-to-glass abrasion when placing flasks in glassware
washers, do not allow contact with metal racks or other glassware.
Product Dryness End Point
You can clearly observe drying rates during manifold drying since the glassware and
product are completely visible. However, since the glassware is exposed to room
temperature, environmental moisture may condense and freeze on the cold outer
surface of the flask. This is normal.
As the product ice inside the glassware gradually sublimes, the frost on the outside of
the glassware slowly recedes and eventually disappears. By this point, approximately
98% of product moisture has been removed. You can assume drying is complete
(<1% moisture content) when the exterior of the glassware is at room temperature.
Stoppering (Optional)
The stoppering option applies pressure to partially-inserted stoppers, forcing them into
the vials while sealing the product under system vacuum. Stoppering can be operated
at atmospheric pressure or under vacuum. Stoppering must be performed with evenly
distributed vials of equal height to ensure uniform stoppering force distribution and
prevent vial shifting.
Stopper vials only after:
•
The product is fully dried.
•
The vacuum system is turned off.
•
The shelf heat control is disabled.
Note: SP Industries recommends performing a test run to ensure that you are familiar with the
stoppering process before adding your product.
The optional Stoppering system includes a manual stoppering mechanism, and
comes with either heated or unheated shelves. For more information, see Chapter 7:
Optional Components.
Revision 004, 12/09
© SP Industries, Inc. 2009
25
Basic Operation
26
VirTis BenchTop 2K, 4K and 6K
Revision 004, 12/09
© SP Industries, Inc. 2009
Chapter
Cold Trap Condenser
6
Under conditions of high vacuum, vapor pressure of the solvent collecting on the
condenser is much lower than that of the product. When vapor molecules leave the
product in a vacuum concentrator, they migrate toward low-pressure areas in the
condenser. Upon contact with the condenser, the vapors release their heat energy
and condense. Whether or not ice forms is dependent on the chemical properties of
the solvent. Efficient evaporation rates are dependent on maintaining this vapor
pressure differential.
These migrating vapors can be pulled directly into the vacuum pump if condensation
does not occur. BenchTop series freeze dryers can be utilized as a Cold Trap
Condenser Module to condense and collect vapors being driven out of a product in a
vacuum concentrator. Condensing the vapors prevents them from migrating to the
vacuum pump and causing damage.
Product Requirements
Before using a Cold Trap Condenser, consider the following:
•
Freezing and condensing points of solvents.
•
Overall volume.
•
Solvent properties, such as toxicity.
Note: This process is completely product dependent, so each application will vary in terms of
temperature requirements and process time.
Revision 004, 12/09
© SP Industries, Inc. 2009
27
Cold Trap Condenser
VirTis BenchTop 2K, 4K and 6K
Cold Trap Setup
The following instructions will help you utilize your BenchTop as a cold trap to
condense vapors from a gel dryer or vacuum concentrator:
1. Position the vacuum concentrator, BenchTop and vacuum pump in a
convenient location with sufficient space to easily connect the units.
2. Place the vacuum cover plate (acrylic plate with stainless steel elbow) on the
gasket of the BenchTop unit.
3. Connect the BenchTop unit to the vacuum concentrator using ¾-inch tubing.
4. Estimate the length of tubing required to adequately reach the back of the
vacuum concentrator without any tension.
5. If necessary cut the tubing to the proper length and secure both ends with
tubing clamps.
6. Connect the vacuum pump to your BenchTop unit as described in Chapter 2:
Installation and Setup.
28
Revision 004, 12/09
© SP Industries, Inc. 2009
Chapter
Optional Components
7
The VirTis BenchTop series offers a wide variety of optional components to match a
variety of product or process applications.
Manifolds
Many manifolds are available for BenchTop units. Optional manifolds include VirTis
¾-inch (19 mm) Quickseal valves for attaching a variety of flasks, ampoules or vials.
Stainless steel vertical manifolds are available for flask drying, while stainless steel
and acrylic drum manifolds are available for the versatility of both flask and shelf rack
drying. The top plug on acrylic drum manifolds is removable to allow for installation of
an optional stoppering assembly.
Available manifolds include:
•
Stainless steel vertical manifolds with 4, 8, 12 or 24 ports.
•
Stainless steel drum manifolds with 12 or 18 ports.
•
Acrylic drum manifolds with 0, 8 or 12 ports.
For more information about manifolds and current availability, contact SP Industries.
Revision 004, 12/09
© SP Industries, Inc. 2009
29
Optional Components
VirTis BenchTop 2K, 4K and 6K
Shelf Racks
VirTis BenchTop units have a variety of shelf racks available for use with the optional
stainless steel and acrylic drum manifolds. Racks are available in both heated and
unheated configurations. Stoppering racks are also available.
Available rack assemblies include:
•
Stoppering shelf rack with 1, 2, or 3 shelves available with heated or nonheated shelves (for use with acrylic drum manifolds only).
•
Bulk processing shelf rack with 3, 4, or 5 shelves available with heated
(for use with acrylic drum manifolds only) or non-heated shelves.
For more information about shelf racks and current availability, contact SP Industries.
30
Revision 004, 12/09
© SP Industries, Inc. 2009
VirTis BenchTop 2K, 4K and 6K
Optional Components
Liquid Nitrogen Trap
The optional Liquid Nitrogen (N2(liq)) Trap protects your vacuum pump from the
corrosive properties of acid and alkaline vapors, as well as the low temperatures and
organic solvents associated with the freeze-drying process. The trap is available in
both 2.8- and 5-liter capacities.
To Vacuum
Pump
To
Condenser
Vacuum bypass assembly with
lever-activated ball valves
To operate a liquid nitrogen trap:
1. Enable the condenser and wait for the system to reach operating
temperature.
2. Remove the plastic cover from the stainless steel vessel and add a small
amount of liquid nitrogen to the center well. If adding liquid nitrogen from a
tank, use adequate ventilation to protect from gaseous vapors.
Note: The liquid nitrogen will expand and bubble when it meets the warm center well.
Wear protective eyewear and gloves to avoid contact with skin.
3. Replace cover and wait one minute.
4. Open center well and slowly fill with liquid nitrogen (2.8 or 5 liters, depending
on capacity).
5. Open valves 1 and 2, and close valve 3 (see diagram above).
6. Enable the vacuum and wait until vacuum pressure reaches 100 mT.
7. Trap is now in operation. Liquid Nitrogen evaporates rapidly over time and
solvent is condensed. Check center well often and refill with liquid nitrogen as
needed.
Revision 004, 12/09
© SP Industries, Inc. 2009
31
Optional Components
VirTis BenchTop 2K, 4K and 6K
Filter Trap
VirTis filter traps protect your vacuum pump from damaging and corrosive vapors
released during freeze-drying. If purchased, the filter trap is located on the side of
your freeze dryer, near the vacuum pump.
Disposable Sodasorb and activated charcoal drop-in wire mesh cartridges are
available and must be purchased separately.
To install the filter trap:
1. Connect the vacuum pump to the port marked OUT.
2. Connect the rest of the system to the port marked IN.
3. Turn the handle fully counterclockwise to activate the filter trap. The inlet and
outlet ports will open.
4. To turn off the filter trap, turn the handle fully clockwise. The inlet and outlet
ports will close, breaking vacuum from inside the housing.
Degassing Filter Trap Cartridges
Filter trap cartridges are highly absorbent and may require degassing prior to freezedrying. If you do not degas filter trap cartridges, vacuum pump-down may take
significantly longer. Degassing is also necessary each time you change your filter trap
cartridge. Most filters need to be degassed overnight in order to allow proper vacuum
to be established.
To degas the filter trap cartridge:
1. Unscrew the clear polypropylene housing from the white plastic top.
2. To begin degassing, enable the vacuum pump, open the gas ballast valve
slightly and close all ports.
3. Degassing is complete when vacuum reaches 50 mT, or less. Close the gas
ballast.
Note: Degassing may take between 12 and 24 hours.
Filter trap cartridges are disposable. Their lifespan depends on frequency of use and
the volume of contaminants they absorb. The Sodasorb cartridges contain an
“Absorbent Exhaustion Indicator,” which turns purple to signify the need for
replacement. Full exhaustion is indicated by a deep purple color.
The activated charcoal cartridges contain no absorption limit indicator. Pump oil must
be routinely checked for clarity to assess the charcoal’s absorbing capacity.
Depending on the usage and concentration, changing the charcoal cartridge every
three to six months may be sufficient.
32
Revision 004, 12/09
© SP Industries, Inc. 2009
VirTis BenchTop 2K, 4K and 6K
Optional Components
BenchTop Cold Plate
The optional BenchTop cold plate can be cooled to -40 °C within 30 minutes when
fully insulated and covered. The cold plate will remain lower than -40 °C after the
cover is removed. These specifications are based on SP Industries test data from
similar units operating with no load.
Initial Setup of the BenchTop Cold Plate
Remove all packing materials carefully and inspect for shipping damage. In the event
that shipping damage has occurred, retain all packing material and immediately
contact your freight carrier.
PROPERTY CAUTION! THE COLD PLATE IS CONNECTED TO THE BENCHTOP UNIT BY A FLEXIBLE
HOSE. THE FLEXIBLE HOSE IS CHARGED WITH REFRIGERANT AND THEREFORE SPECIAL CARE
SHOULD BE TAKEN WHEN REMOVING THE COLD PLATE AND BENCHTOP UNIT FROM THE SHIPPING
CONTAINERS. THE FLEXIBLE HOSE MAY BE SHAPED OR FORMED WHEN THE UNIT IS AT ROOM
TEMPERATURE. DO NOT BEND THE HOSE WHILE AT LOW OPERATING TEMPERATURES
1. Position the BenchTop unit on a stable, flat surface. The cold plate must be
fully insulated and have a removable cover (i.e., 1/2-inch thick Styrofoam
board or polyurethane foam). This will ensure that the lowest possible
temperatures will be achieved. The hose between the plate and the unit is
very flexible and can also be inserted into the rear of the unit (approximately
10 inches) so that the length can be adjusted.
2. Verify the outlet you intend to use provides the same voltage and ampacity
listed on the serial tag of your unit (i.e., 100-115 Volts, 15 Amps, 60Hz).
3. Verify the shelf thermocouple probe is inserted into the well at the rear of the
cold plate, and the thermocouple connector is plugged into the shelf probe
receptacle at the rear of the BenchTop cabinet.
Cold Plate Operation
1. Ensure that the power cord is plugged in. Switch the circuit breaker on the
rear of the BenchTop cabinet to the “ON” position.
2. Press the COND button on the front panel of the BenchTop to start the
compressor and begin cooling the cold plate. Wait approximately 30 minutes
for the condenser temperature to reach -40 °C. After about an hour, the unit
will be capable of achieving lower temperatures (i.e., -50 °C).
3. The cold plate is now ready for use.
Note: When the cold plate is in operation and no product is being added, the cold plate
should be covered to prevent frost build-up.
4. When finished, press the COND button to disable the refrigeration system and
disable cooling to the cold plate.
PRACTICAL OPERATING TIP. THE ONLY BUTTON REQUIRED FOR OPERATING THE COLD PLATE IS
THE CONDENSER (COND) BUTTON. THE DEFROST, VACUUM AND AUTO BUTTONS DO NOT HAVE A
FUNCTION FOR THE COLD PLATE APPLICATION.
Revision 004, 12/09
© SP Industries, Inc. 2009
33
Optional Components
34
VirTis BenchTop 2K, 4K and 6K
Revision 004, 12/09
© SP Industries, Inc. 2009
Chapter
General Maintenance
8
Proper routine maintenance is the key to an efficiently operating unit with minimal
downtime. The following section provides instructions on how to maintain your
BenchTop series freeze dryer.
Vacuum System
Vacuum Pump
Clean oil is necessary for the best vacuum and overall efficiency of the system.
Checking and changing the oil on a consistent basis will greatly extend the life of the
vacuum pump.
Check the vacuum pump oil after each freeze-dry cycle by draining a small amount
(~100 mL) from the pump drain line. Use a clear container to capture the sample. Oil
should be changed as needed.
When visually checking the oil, use the following guidelines:
•
Pale yellow or clear vacuum pump oil indicates good condition.
•
Dark vacuum pump oil indicates acid contamination.
•
Cloudy gray vacuum pump oil indicates water contamination.
Changing Vacuum Pump Oil
Change the oil immediately after shutting down the freeze dryer while the oil is still
hot.
1. Protect your hands from the hot oil.
2. Make sure vacuum is released from the system.
3. Remove the top fill plug and open the drain valve located at the bottom of the
pump. Drain the contaminated oil into a suitable container.
4. When the oil has completely drained, close the valve and add new oil to the
pump while visually checking the sight glass to ensure proper level (near the
MAX line). Reinstall the fill plug.
5. If the pump oil is contaminated, operate the vacuum pump for 10 to 15
minutes to flush any residual oil from the system’s interior components.
Repeat steps 3 and 4 to complete the process.
PROPERTY CAUTION! OIL MUST BE CHECKED AND CHANGED MORE FREQUENTLY IF YOUR
PRODUCT CONTAINS CORROSIVE MATERIALS OR ORGANIC SOLVENTS. IN ADDITION, A
FILTER TRAP MAY BE INSTALLED TO PROTECT THE VACUUM PUMP.
Revision 004, 12/09
© SP Industries, Inc. 2009
35
General Maintenance
VirTis BenchTop 2K, 4K and 6K
Scheduling Oil Changes
After clean oil is loaded into the vacuum pump and all necessary connections have
been made between the vacuum pump and the freeze dryer, perform a full capacity
test cycle.
Have a qualified technician check the oil after the test cycle. If the oil appears dirty,
change the oil after every use. If the used oil appears clean, change the oil after the
next two uses or cycles. If the oil remains clean after two cycles, change the oil after
the next four cycles. Continue to monitor the vacuum pump oil after each cycle until a
change of condition is noted or a period of one month has elapsed. If the oil remains
clean after several cycles, changing the oil once per month may be sufficient.
Vacuum Tubing and Gaskets
Inspect tubing and gaskets periodically for signs of wear. Check gaskets by removing
and inspecting interior surfaces for potential problems. A light coating of vacuum
grease on the exterior surfaces will protect gaskets and tubing. Reapply grease as
needed.
Condenser Gasket
The condenser gasket should be removed routinely and inspected for cracks.
To check the condenser gasket:
1. Remove the condenser gasket.
2. Take the gasket in both hands and turn it inside out.
3. Inspect the inside of the gasket. This is where you are most likely to find a
potential problem.
4. If you find the slightest inconsistency in the surface of the material (e.g., cuts,
cracks, dry rot, rippling), replace the gasket as soon as possible.
5. Always install gaskets on a clean, grease-free metal rim. Remove excess
grease from the metal using isopropyl alcohol on a fresh paper towel or clean
cloth. Clean the gasket with isopropyl alcohol.
6. Once the new or cleaned gasket is installed, apply a very thin coating of high
vacuum grease to the outer surface of the gasket only. The gasket should
appear moist.
Vacuum Pump Gas Ballast Valve
The gas ballast valve removes some contaminants from the pump oil. During freezedrying or cold trap use, vapors may bypass the condenser and end up in the vacuum
pump. If this occurs, the vapors will degrade the oil causing excessive wear and poor
vacuum pressure.
When the ballast is open, it allows a controlled amount of air into the second stage
pump cylinder. This reduces the partial pressure, increases the pump’s operating
temperature and releases the vapors.
Note: Refer to the vacuum pump manual for the location of the gas ballast valve.
36
Revision 004, 12/09
© SP Industries, Inc. 2009
VirTis BenchTop 2K, 4K and 6K
General Maintenance
Quickseal Valves
VirTis BenchTop units come equipped with Quickseal valves. These valves should be
serviced at least once a year.
To service the Quickseal valves:
1. Remove the valves from their ports.
2. Twist and pull the white selector until it is dislodged from the black rubber
body.
3. Clean the valves thoroughly with isopropyl alcohol to remove grease and dirt.
4. Inspect each cleaned selector carefully for damage.
Note: Do not use broken flask adaptors, as they can damage the white selector.
5. If scratches or cracks are found, the selector part(s) should be replaced.
6. Apply a thin film of high vacuum grease to acceptable selector(s) and
reassemble.
Refrigeration System
The Air-Cooled Condenser
It is very important to keep the air-cooled condenser clean. This is where highpressure vapor from the compressor is converted to liquid refrigerant by rejecting the
heat gained from the vapor condenser into the ambient air. Reduced airflow over the
condenser can result in severely reduced performance and may shorten the life of the
compressor.
To maintain the air-cooled condenser and compressor:
1. Do not allow any paper products (e.g., paper towels, Kimwipes®) or cloth to
slip underneath the unit. These items will obstruct the airflow.
2. Always maintain at least four inches of clearance on all sides of the unit.
3. Maintain the room temperature at approximately 20 °C. Higher temperatures
may result in reduced performance and shortened compressor life.
4. Clean the fins on the bottom of the unit. Dust buildup may cause the unit to
malfunction.
Keep these fins
clean.
Revision 004, 12/09
© SP Industries, Inc. 2009
37
General Maintenance
VirTis BenchTop 2K, 4K and 6K
Condenser Chamber
The condenser is fabricated from stainless steel. Under normal use, it can be rinsed
and kept clean with a mild detergent. If corrosive materials are being freeze-dried,
thoroughly clean and rinse all parts of the freeze dryer that come in contact with
product vapor. This prevents build-up of corrosive materials, which protects the freeze
dryer and subsequent product loads. Add baking soda or a mild buffering agent to the
rinse water to help neutralize acidic residue. A siphon type squeeze bottle can be
used to direct the rinse spray into difficult to reach areas.
For more information, refer to Appendix C: Stainless Steel Cleaners.
Acrylic Parts
Clean acrylic covers and manifolds with a mild detergent. Use a soft cloth or
Kimwipes® to avoid scratching the acrylic.
The following table may be used as a general guide to acrylic’s chemical resistances.
Chemical
Code
Chemical
Code
Chemical
Code
Acetic Acid (5%)
R
Ethyl Alcohol (50%)
LR
Nitric Acid (10%)
R
Acetic Acid (Glacial)
N
Ethyl Alcohol (95%)
N
Nitric Acid (40%)
LR
Acetic Anhydride
LR
Ethylene Dichloride
N
Nitric Acid (Conc.)
N
Acetone
N
Ethylene Glycol
R
Oleic Acid
R
Acetonitrile
N
2-Ethylhexyl Sebacate
R
Olive Oil
R
Ammonium Chloride (Saturated)
R
Formaldehyde (40%)
R
Phenol Solution (5%)
N
Ammonium Hydroxide (10%)
R
Gasoline (Regular, Leaded)
LR
Soap Solution (Ivory)
R
Ammonium Hydroxide (Conc.)
R
Glycerine
R
Sodium Carbonate (2%)
R
Aniline
N
Heptane
R
Sodium Carbonate (20%)
R
Battery Acid
R
Hexane (Commercial Grade)
R
Sodium Chloride (10%)
R
Benzene
N
Hydrochloric Acid
N
Sodium Hydroxide (1%)
R
Benzyl Alcohol
N
Hydrofluoric Acid (40%)
R
Sodium Hydroxide (10%)
R
Butyl Acetate
N
Hydrogen Peroxide (3%)
R
Sodium Hydroxide (60%)
R
Calcium Chloride (Sat.)
R
Hydrogen Peroxide (28%)
N
Sodium Hypochlorite (5%)
R
Calcium Hypochlorite
R
Isooctane
R
Sulfuric Acid (3%)
R
Carbon Tetrachloride
N
Isopropyl Alcohol
LR
Sulfuric Acid (30%)
R
Chloroform
N
Kerosene
R
Sulfuric Acid (Conc.)
N
Chromic Acid (40%)
N
Lacquer Thinner
N
Toluene
N
Citric Acid (10%)
R
Methyl Alcohol (50%)
LR
Transformer Oil
R
Cottonseed Oil (Edible)
R
Methyl Alcohol (100%)
N
Trichloroethylene
N
Detergent Solution (Heavy Duty)
R
Methyl Ethyl Ketone (MEK)
N
Turpentine
LR
Diesel Oil
R
Methylene Chloride
N
Water (Distilled)
R
Diethyl Ether
N
Mineral Oil
R
Xylene
N
Dimethyl Formamide
N
Naphtha (VM&P)
R
Trifluroacetic Acid
N
Dioctyl Phthalate
N
Codes:
Ethyl Acetate
N
R = Resistant (withstands long periods
of exposure at temperatures up to 50 °C)
LR = Limited Resistance
(withstands short periods of
exposure at room temperature)
N = Not Resistant (immediate
damage may occur upon exposure)
CAUTION! DO NOT USE ORGANIC SOLVENTS OR ABRASIVE CLEANERS.
38
Revision 004, 12/09
© SP Industries, Inc. 2009
Appendix
Appendix A: Troubleshooting
A
Vacuum Problems
Remember that maximum vacuum is only achievable with a clean, dry system. Initial
vacuum will be affected by the amount of product loaded on the unit. For efficient
freeze-drying, vacuum should be below 200 mT. When using Quickseal valves,
product may need to be introduced in stages to keep the vacuum below acceptable
levels.
Consider the following when attempting to pinpoint vacuum-related problems:
•
Was the condenser defrosted and drained after the last run?
•
Is the chamber clean and dry?
•
Is the drain fitting inserted into the drain receptacle? If so, it must be
removed.
•
Are all accessory ports, valves and filters closed tightly? Check all
connections for integrity.
•
Is the door gasket clean and properly greased?
•
Are all Quickseal valves in the closed position?
•
Are the Quickseal valves in good condition? Is a light coating of vacuum
grease visible on the valve plug and on the stainless steel valve port?
•
Is the vacuum pump oil clean and at the proper level? Check sight glass.
•
Is the condenser maintaining the proper temperature? If the temperature
rises due to refrigeration problems, moisture may be leaving the
condenser walls and migrating to the vacuum pump, causing poor
vacuum.
If none of the above applies, try to isolate the problem by removing the manifold or the
vacuum cover plate and placing a stopper in the vacuum intake tube at the bottom of
the condenser. This will seal the vacuum tube. When the vacuum pump is operated,
check the components between the pump and the end of the tube.
If you get a vacuum reading below 500 millitorr within one (1) minute, you can rule out
any problem with the pump, vacuum probe and vacuum tubing connections. Recheck
the manifold and gasket for joint separations and dirty or rough surfaces.
If you do not get a normal vacuum reading on the front panel display or vacuum
gauge within one (1) minute, start checking components individually.
Revision 004, 12/09
© SP Industries, Inc. 2009
39
Appendix A: Troubleshooting
VirTis BenchTop 2K, 4K and 6K
If none of these suggestions eliminate the vacuum problem:
1. Change and flush the oil in vacuum pump.
2. Disassemble all vacuum tubing connections, clean with a mild alcohol (such
as methanol), apply a light coating of vacuum grease and reassemble.
3. Check all threaded and welded connections and seal with vacuum sealant.
If poor vacuum persists, or if testing vacuum with a calibrated gauge indicates a good
vacuum reading, the problem is likely related to the vacuum probe. Replace the
vacuum probe tube and retest.
Note: If this does not resolve your vacuum problem, contact SP Industries for assistance.
Product Melting
The most common reason for product melting is poor vacuum. Adequate vacuum is
required to keep products in a frozen state. Check for a vacuum leak or possible
restrictions in the vacuum hose as described in the previous section.
If the unit is functioning properly but the product is still melting, the product’s freezing
point (eutectic temperature) may be too low to remain in a frozen state. Retest using a
water sample to determine if a mechanical or product-related problem exists.
40
Revision 004, 12/09
© SP Industries, Inc. 2009
Appendix
Appendix B: Serum Vial Capacities
VirTis Part Number
8
Body OD (mm)
Capacity (mL)
9
35
179275
10
85
12
2
179101
9
40
22
6
47
23
5
179077
179085
179143
9
18
2
50
23
10
54
26
10
62
28
20
178830
58
33
20
178897
63
37
30
178921
73
43
50
178954
95
52
100
178988
107
54
125
179135
178855
9
8
Add 8mm for partially inserted stopper.
9
Thin Wall.
10
Height (mm)
B
Special Stoppering Ampoule (add 10mm for partially inserted stopper).
Revision 004, 12/09
© SP Industries, Inc. 2009
41
Appendix B: Serum Vial Capacities
42
VirTis BenchTop 2K, 4K and 6K
Revision 004, 12/09
© SP Industries, Inc. 2009
Appendix
Appendix C: Stainless Steel Cleaners
C
The following table lists possible problem situations and suggests
corrective actions. For additional information, contact SP Industries.
Cleaning Required
HEAT TINT OR HEAVY
DISCOLORATION.
TENACIOUS DEPOSITS,
RUSTY
DISCOLORATIONS,
INDUSTRIAL
ATMOSPHERIC STAINS.
HARD WATER SPOTS
AND SCALE.
Cleaning Agent
11
Application Method
12
Effect on Finish
Penny-Brite or
Copper-Brite
Use in direction of
polish lines on No.4
(polished) finish. Wipe
with dry cloth.
May scratch No.2 (mill) and
Nos.7 and 8 (polished)
finishes.
Paste Nu-Steel, DuBois
Temp, Tarnite, or Kelox
Rub with dry cloth or
stainless steel wool.
Use in direction of polish
lines on No.4 (polished)
finish. May scratch No.2
(mill) and No. 7 and 8
(polished) finishes.
Apply with damp
sponge or cloth.
Use in direction of polish
lines on No.4 (polished)
finish. May scratch No.2
(mill) and Nos.7 and 8
(polished) finishes.
Allen Polish, Steel
Bright, Wyandotte,
Bob-O, Zud, Dubrite, or
Prepare Dex
Rub with a damp cloth.
Use in direction of polish
lines on No.4 (polished)
finish. May scratch No.2
(mill) and Nos.7 and 8
(polished) finishes.
Oakite No.33, Dilac,
Texo 12, Texo N.Y.,
Flash-Klenz, Caddy
Cleaner, Turco Scale
4368, or Permag 57
Swab and soak with
clean cloth. Allow to
stand 15 minutes or
more, per directions on
package. Then rinse
and dry.
Satisfactory for use on all
finishes.
Vinegar
Swab or wipe with cloth.
Rinse with water and
dry.
Satisfactory for use on all
finishes.
Dilac, Oakite No.33,
Texo 12, Texo N.Y
Swab with cloth or soak.
Let stand 10-15
minutes. Always follow
with neutralizer rinse,
and dry.
Satisfactory for use on all
finishes. Effective on
tenacious deposits or
where scale has built up.
Revere Stainless Steel
Cleaner, Take-Off, or
AC-60
11
Use of proprietary names is only intended to indicate a type of cleaner, and does not constitute any endorsement (nor does
omission of any proprietary name imply its inadequacy). All products should be used in strict accordance with instructions and
warnings on the product package.
12
In all applications, a stainless steel wool, sponge, fibrous brush, or pad is recommended. Avoid use of ordinary steel wool or
steel brushes for scouring stainless steel.
Revision 004, 12/09
© SP Industries, Inc. 2009
43
Appendix C: Stainless Steel Cleaners
44
VirTis BenchTop 2K, 4K and 6K
Revision 004, 12/09
© SP Industries, Inc. 2009
Appendix
Appendix D: Spare Parts List
D
Refer to the following list for commonly used parts.
2K
4K
6K
X
X
X
153650
Vacuum probe tube 10324pt.
X
X
154328
12-inch gasket for condenser
X
X
X
171884
½-inch Quickseal valves
X
X
X
171926
¾-inch Quickseal valves
X
X
X
185181
One gallon can of Vacuum Pump Oil
X
X
X
185207
Two gallon can of Vacuum Pump Oil
X
X
X
250365
Sodasorb cartridge for acids
X
X
X
250373
Activated Charcoal Cartridge for organic solvents
X
X
X
253013
Oil Mist Eliminator, for 37 LPM Vacuum Pumps
X
X
X
414203
Oil Mist Eliminator, for 65 LPM Vacuum Pumps
X
X
X
266783
Molecular Sieve Cartridge for water vapor
X
X
X
272310
Free Standing Filter Trap
X
X
X
277228
One liter of synthetic oil
X
X
X
354506
Drain hose - clear tubing - 36 inches recommended
X
X
X
356808
90-degree rubber elbow for vacuum port connection to vacuum pump tubing.
X
X
X
357699
High Vacuum grease (10 each, .5 oz tubes)
X
364604
Circuit breaker 10 Amp (ES)
366658
Oil Separator (XL)
X
X
X
X
X
Description
367424
Plastic vacuum hose connector
372336
Compressor 1/3 HP 115 V 60 Hz (ES)
X
372343
Compressor 1/3 HP 208/230 V 60Hz (ES)
X
374231
Neoprene foot for BenchTop
X
X
Part #
X
385282
9-inch gasket for condenser
X
398701
Fan 7.5-inch diameter
X
X
X
X
401579
Compressor 3/8 HP (EL)
X
X
X
406208
Needle valve for vacuum level control
X
X
X
381567
Acrylic manifold
X
X
X
387811
Manifold tapered plug
Note: Contact SP Industries for pricing and availability.
Revision 004, 12/09
© SP Industries, Inc. 2009
45
SP Industries
3538 Main Street
Stone Ridge, NY 12484 USA
www.SPIndustries.com
(800) 824-0400
(845) 687-0071