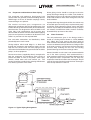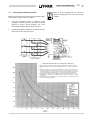
1
YR
ROTARY SCREW LIQUID CHILLER
INSTALLATION, COMMISSIONING,
OPERATION AND MAINTENANCE
STYLE: A
REFRIGERANT: R134a
160.81-ICOM-GB0 (01/02)
GB
160.81-ICOM-GB0 (01/02)
I- i
Table of Contents
1
2
SUPPLIER INFORMATION
4
INSTALLATION
1.1 Introduction
1.1
4.1 Location
4.1
1.2 Warranty
1.1
4.2 Foundation
4.1
1.3 Safety
1.1
4.3 Clearances
4.1
1.4 Responsibility for Safety
1.1
4.4 Rigging Unit to Final Location
4.1
1.5 About this Manual
1.2
4.5 Locating and Installing Isolator Pads
4.1
1.6 Misuse of Equipment
1.2
4.6 Installing Optional Spring Isolators
4.2
1.7 Emergency Shutdown
1.3
4.7 Piping Connections
4.2
1.8 Safety Labels
1.3
4.8 Evaporator and Condenser Water Piping
4.3
1.9 Material Safety Data
1.4
4.9 Water Treatment
4.3
4.10 Glycol Solutions
4.4
4.11 Condenser Water Circuit
4.4
4.12 Stop Valves
4.4
4.13 Flow Switches
4.4
4.14 Drain and Vent Valves
4.4
4.15 Checking Piping Circuits and Venting Air
4.4
4.16 Refrigerant Relief Piping
4.4
4.17 Unit Piping
4.5
4.18 Electrical Connection
4.5
4.19 Power Wiring
4.5
Product Description
2.1 General
2.1
2.2 Compressor
2.1
2.3 Motor
2.2
2.4 Lubrication
2.2
2.5 Oil Separator
2.2
2.6 Oil Filter
2.3
2.7 Oil Eductor Circuit
2.3
2.8 Heat Exchangers
2.3
2.9 Evaporator
2.4
2.10 Condenser
2.4
2.11 Refrigerant Flow Control
2.4
2.12 Capacity Control
2.4
2.13 Water Boxes
2.4
2.14 Control Panel
2.4
2.15 Options and Accessories
2.5
2.16 Nomenclature
2.6
4.19.1 Units with Electro-Mechanical Starter
3
TRANSPORTATION, RIGGING AND
STORAGE
4.19.2 Units with Solid State Starter
4.20 Control Connections
4.7
4.20.1 Remote Start / Stop
4.20.2 Remote / Local Cycling
4.20.3 Chilled Liquid Flow Interlock
4.20.4 Cooling Liquid Flow Interlock (Optional)
4.20.5 Multi Unit Sequence
4.20.6 Auxiliary Safety Shutdown
4.20.7 Remote Leaving Chilled Water Temperature
Setpoint Reset - PWM
4.20.8 Remote Current Limit Setpoint - PWM
4.20.9 Remote Leaving Chilled Water Temperature
Setpoint Reset - Analogue
3.1 General
3.1
3.2 Shipment
3.1
3.3 Inspection, Damage and Shortage
3.2
3.4 Rigging
3.3
4.20.10 Remote Current Limit Setpoint - Analogue
I-ii
4.21
160.81-ICOM-GB0 (01/02)
Status Connections
4.8
7.5
4.21.1 Remote Mode - Ready to Start
7.5.1
4.21.2 Run Contacts
7.6
4.21.3 Anticipatory Alarm
4.22
Checking The Refrigerant Charge
4.21.5 Safety Shutdown
7.6.2
Leak Testing
7.6.3
Vacuum Testing
7.6.4
Refrigerant Charging
4.9
7.7
4.22.2 Cooling Liquid Pump
4.24
5
Refrigerant Charge
7.6.1
Pump Control Connections
Thermal Insulation
Installation Check
4.9
4.9
COMMISSIONING
7.5
Oil charging procedure
4.21.4 Cycling Shutdown
4.22.1 Chilled Liquid Pump
4.23
Oil Charging
Evaporator and Condenser
7.7.1
Chemical Water Treatment
7.7.2
Tube Cleaning
7.7.3
Tube Cleaning Procedures
7.7.4
Tube Leaks
7.7.5
In-Service Inspection
7.5
7.6
5.1
Preparation
5.1
7.8
Electrical Controls
7.8
5.2
First Time Start-up
5.2
7.9
Testing Motor Winding Insulation
7.9
6
8
OPERATION
TROUBLE SHOOTING
6.1
General
6.1
8.1
General Requirements
8.1
6.2
Pre-Startup
6.1
8.2
Trouble Shooting
8.1
6.3
Start-up
6.1
9
6.4
Normal Operation
6.2
6.5
Shutdown
6.2
6.6
Manual Shutdown
6.2
6.7
Prolonged Shutdowns
6.3
6.8
Operating Inspections
6.3
6.9
Operating Log Sheet
6.4
6.10
Maintenance and Service
6.4
6.10.1 Normal and Safety System Shutdowns
7
9.1
Dimensions
9.1
9.2
Solid State Starter Details
9.2
9.3
Weights
9.2
9.4
Process and Instrumentation Diagram
9.3
9.5
Water Box Nozzle Arrangements
9.4
10
SPARE PARTS
11
DE-COMMISSIONING, DISMANTLING AND
DISPOSAL
MAINTENANCE
11.1
7.1
TECHNICAL DATA
Scheduled Maintenance
7.1.1
7.1
Check the oil and refrigerant levels - Weekly
7.2
Special Maintenance Requirements
7.2
7.3
Regular Maintenance Operations
7.3
7.4
Oil Filters and Driers
7.4
7.4.1
Single Oil Filter Replacement
7.4.2
Dual Oil Filters
7.4.3
Filter Drier Replacement
General
11.1
160.81-ICOM-GB0 (01/02)
1
SUPPLIER INFORMATION
1.1
Introduction
York YR chillers are manufactured to the highest design
a nd constr uction standards to ensu r e hi gh
performance, reliability and adaptability to all types of air
conditioning installations.
The units are intended for cooling water or glycol
solutions and are not suitable for purposes other than
those specified in this manual.
This manual and the OptiView Control Panel Operating
Instructions contain all the information required for
correct installation and commissioning of the unit,
together with operating and maintenance instructions.
The manuals should be read thoroughly before
attempting to operate or service the unit.
All procedures detailed in the manuals, including
installation, commissioning and maintenance tasks
must only be performed by suitably trained and qualified
personnel.
The manufacturer will not be liable for any injury or
d amage caused by incorrect insta l l at i on,
commissioning, operation or maintenance resulting
from a failure to follow the procedures and instructions
detailed in the manuals.
1.2
Warranty
1- 1
For warranty purposes, the following conditions must be
satisfied:
The initial start of the unit must be carried out by trained
personnel from an Authorised York Service Centre.
Only genuine York approved spare parts, oils and
refrigerants must be used.
All the scheduled maintenance operations detailed in
this manual must be performed at the specified times by
suitably trained and qualified personnel.
Failure to satisfy any of these conditions will
automatically void the warranty.
1.3
Safety
Standards for Safety
YR chillers are designed and built within an
EN ISO 9001 accredited design and manufacturing
organisation and, within the limits specified in this
manual, are in conformity with the essential health and
safety requirements of the following European Union
Directives:
Machinery Directive (89/392/EEC)
Low Voltage Directive (73/23/EEC, EN 60204)
York International warrants all equipment and materials
against defects in workmanship and materials for one
year from initial start-up, or eighteen months from
delivery (whichever occurs first) unless extended
warranty has been agreed as part of the contract.
EMC Directive (89/336/EEC)
The warranty is limited to free replacement and shipping
of any faulty part, or sub-assembly which has failed due
to poor quality or manufacturing errors. All claims must
be supported by evidence that the failure has occurred
within the warranty period, and that the unit has been
operated within the designed parameters specified.
Every care has been taken in the design and
manufacture of the units to ensure that they meet the
safety requirements listed in the previous paragraph.
However, the individual operating or working on any
machinery is primarily responsible for:
All warranty claims must specify the unit model, serial
number and order number.
The unit warranty will be void if any modification to the
unit is carried out without prior written approval from
York International.
PED 97/23/EC (Vessels only)
1.4
Responsibility for Safety
Personal safety, safety of other personnel, and the
machinery.
Correct utilisation of the machinery in accordance with
the procedures detailed in the manuals.
1- 2
1.5
160.81-ICOM-GB0 (01/02)
About this Manual
The following symbols are used in this document to alert
the reader to areas of potential hazard.
A Warning is given in this document to
identify a hazard which could lead to
personal injury. Usually an instruction will
be given, together with a brief explanation
and the possible result of ignoring the
instruction.
A Caution identifies a hazard which could
lead to damage to the machine, damage to
other equipment and/or environmental
pollution. Usually an instruction will be given,
together with a brief explanation and the
possible result of ignoring the instruction.
A Note is used to highlight additional
information which may be helpful to you but
w here there are no special saf et y
implications.
The contents of this manual include suggested best
working practices and procedures. These are issued for
guidance only, they do not take precedence over the
above stated individual responsibility and/or local safety
regulations.
This manual and any other document supplied with the
unit, are the property of York which reserves all rights.
They may not be reproduced, in whole or in part, without
prior written authorisation from an Authorised York
representative.
1.6
Misuse of Equipment
Suitability for Application
The unit is intended for cooling water or glycol solutions
and is not suitable for purposes other than those
specified in these instructions. Any use of the equipment
other than its intended use, or operation of the
equipment contrary to the relevant procedures may
result in injury to the operator, or damage to the
equipment.
The unit must not be operated outside the design limits
specified in this manual.
Structural Support
Structural support of the unit must be provided as
indicated in these instructions. Failure to provide proper
support may result in injury to the operator, or damage to
the equipment.
Mechanical Strength
The unit is not designed to withstand loads or stresses
from adjacent equipment, pipework or structures.
Additional components must not be mounted on the unit.
Any such extraneous loads may cause structural failure
and may result in injury to the operator, or damage to the
equipment.
General Access
There are a number of areas and features which may be
a hazard and potentially cause injury when working with
the unit unless suitable safety precautions are taken. It is
important to ensure access to the unit is restricted to
suitably qualified persons who are familiar with the
potential hazards and precautions necessary for safe
operation and maintenance of equipment containing
high temperatures, pressures and voltages.
Pressure Systems
The unit contains refrigerant vapour and liquid under
pressure, release of which can be a danger and cause
injury. The user should ensure that care is taken during
installation, operation and maintenance to avoid
damage to the pressure system. No attempt should be
made to gain access to the component parts of the
pressure system other than by suitably trained and
qualified personnel.
Electrical
The unit must be ear thed. No installation or
maintenance work should be attempted on electrical
equipment without first switching off, isolating and
locking-off the power supplies. Work on live equipment
must only be carried-out by suitably trained and qualified
personnel. No attempt should be made to gain access to
inside of the control panel, wiring or other electrical
enclosures during normal operation of the unit.
160.81-ICOM-GB0 (01/02)
1- 3
Refrigerants and Oils
1.8
Refrigerants and oils used in the unit are generally
non-toxic, non-flammable and non-corrosive, and pose
no special safety hazards. Use of gloves and safety
glasses are, however, recommended when working on
the unit. Build up of refrigerant vapour, from a leak for
example, does pose a risk of asphyxiation in confined or
enclosed spaces and attention should be given to good
ventilation. For more comprehensive information on
safety precautions for use of refrigerants and oils, refer
to the Materials Safety Data tables provided.
The following labels are fixed to each unit to give
instruction, or to indicate potential hazards which may
exist.
High Temperature and Pressure Cleaning
High temperature and pressure cleaning methods (e.g.
steam cleaning) should not be used on any part of the
pressure system as this may cause operation of the
pressure relief device(s). Detergents and solvents which
may cause corrosion should also be avoided.
1.7
Safety Labels
White symbol on blue background
F or saf e oper at i on, r e a d t h e
Instructions first
Black symbol on yellow background
Warning: This machine may start
automatically without prior warning
Black symbol on yellow background
Warning: Hot surface
Emergency Shutdown
In case of emergency the fused disconnect switch in the
supply lines to the electro-mechanical starter or the
fused disconnect switch on the solid state starter should
be set to 'OFF'.
Black symbol on yellow background
Warning: Safety relief valve may
discharge gas or liquid without prior
warning
Black symbol on yellow background
Warning: Isolate all electrical sources
of supply before opening or removing
the cover, as lethal voltages may exist
Black symbol on yellow background
General attention symbol
1- 4
1.9
160.81-ICOM-GB0 (01/02)
Material Safety Data
Refrigerant Data:
Safety Data
R134a
Toxicity
Low.
In contact with skin
Liquid splashes or spray may cause freeze burns. Unlikely to be hazardous by skin
absorption. Thaw affected areas with water. Remove contaminated clothing
carefully — may adhere to skin in case of freeze burns. Wash affected areas with
plenty of warm water. If symptoms occur (irritation or blistering) obtain medical
attention.
In contact with eyes
Vapour has no effect. Liquid splashes or spray may cause freeze burns.
Immediately irrigate with eyewash solution or clean water for at least 10 minutes.
Obtain immediate medical attention.
Ingested
Highly unlikely to occur — but should this occur freeze burn will occur. Do not
induce vomiting. Provided patient is conscious, wash mouth with water and give
about 250 ml (0.5 pint) to drink. Obtain immediate medical attention.
Inhalation
High atmospheric concentrations may have an anaesthetic effect, including loss of
consciousness. Very high exposures may cause an abnormal heart rhythm and
prove suddenly fatal.
At higher concentration there is a danger from asphyxiation due to reduced oxygen
content of atmosphere. Remove patient to fresh air, keep warm and at rest.
Administer oxygen if necessary. Apply artificial respiration if breathing has ceased
or shows signs of failing. In event of cardiac arrest apply external cardiac massage.
Obtain immediate medical attention.
Further medical advice
Symptomatic and supportive therapy is indicated. Cardiac sensitisation has been
described which may, in the presence of circulating catecholamines such as
adrenalin, give rise to cardiac arrhythmia’s and subsequent arrest following
exposure to high concentrations.
Long term exposure
A lifetime inhalation study in rats has shown that exposure to 50,000 ppm resulted
in benign tumours of the testis. This is not considered to be of relevance to humans
exposed to concentrations at or below the occupational exposure limit.
Occupational exposure limits
Recommended limit: 1000 ppm v/v - 8 hr TWA.
Stability
Not specified.
Conditions to avoid
Use in presence of naked flames, red hot surfaces and high moisture levels.
Hazardous reactions
May react violently with sodium, potassium, barium and other alkali and alkaline
earth metals. Incompatible materials: Magnesium and alloys containing more then
2% magnesium.
Hazardous decomposition products
Halogen acids by thermal decomposition and hydrolysis.
General precautions
Avoid inhalation of high concentrations of vapours. Atmospheric concentrations
should be minimised and kept as low as reasonably practicable below the
occupational exposure limit. The vapour is heavier than air and collects at low level
and in confined areas. Ventilate by extraction at lowest levels.
Respiratory protection
Where doubt exists on atmospheric concentration, approved breathing apparatus
should be worn. This should be self contained or of the long breather type.
Storage
Keep containers dry and in a cool place away from fire risk, direct sunlight, and all
sources of heat such as radiators. Keep at temperatures not exceeding 45 °C.
Protective clothing
Wear overalls, impervious gloves and goggles/face protection.
160.81-ICOM-GB0 (01/02)
1- 5
Spill/leak procedure
Ensure suitable personal protective clothing and respiratory protection is worn.
Provided it is safe to do so, isolate the source of the leak. Allow small spillage’s to
evaporate provided there is suitable ventilation.
Large spillage’s: Ventilate area. Contain spillage’s with sand, earth or any suitable
absorbent material. Prevent liquid from entering drains, sewers, basements and
work pits since vapour may create a suffocating atmosphere.
Disposal
Best to recover and recycle. If this is not possible, destruction is to be in an
approved facility which is equipped to absorb and neutralise acids and other toxic
processing products.
Fire extinguishing data
Non-flammable at atmospheric conditions.
Containers
Fire exposed containers should be kept cool with water sprays. Containers may
burst if overheated.
Fire fighting protective equipment
Self contained breathing apparatus and protective clothing must be worn in fire
conditions.
Refrigerant Oil Data
Safety Data
York “H” Oil
Classification
Non-hazardous
In contact with skin
Minimally irritating. No first aid necessary. Exercise reasonable personal cleanliness
including cleansing exposed skin areas several times daily with soap and water.
Launder soiled work clothes at least weekly.
In contact with eyes
Flush eyes with eyewash solution or clean water for 15 minutes and consult a
physician.
Ingested
May cause nausea and diahorrhea. Obtain immediate medical attention.
Inhalation
If oil mist is inhaled, remove to fresh air and consult a physician.
Occupational exposure limits
Not determined.
Stability
Stable but hygroscopic - store in sealed containers.
Conditions to avoid
Strong oxidisers, caustic or acid solutions, excessive heat. May degrade some
paints and rubber materials.
Hazardous decomposition
Not fully, Analogous compounds evolve carbon monoxide, carbon dioxide and other
unidentified fragments when burned. Burning may evolve irritating/noxious fumes.
Respiratory protection
Use in well ventilated areas - ventilate locally.
Protective clothing
Goggles or face shield should be worn. Gloves not necessary, but recommended,
especially for prolonged exposure.
Spill / Leak procedure
Wear suitable protective equipment. Especially goggles. Stop source of spill. Use
absorbent materials to soak up fluid (i.e. sand, sawdust and commercially available
materials).
Disposal
Incinerate the oil and all associated wastes in an approved facility in accordance
with local laws and regulations governing oily wastes.
Fire extinguishing data
Flash point over 300°C. Use dry chemical, carbon dioxide or foam. Spraying water
on hot or burning liquid may cause frothing or splashing.
If a leak or spill has not ignited use water spray to disperse the vapours and to
provided protection for persons attempting to stop the leak.
Containers
Fire exposed containers should be kept cool with water sprays.
Fire fighting protective equipment
Self contained breathing apparatus should be worn in fire conditions.
1- 6
160.81-ICOM-GB0 (01/02)
Thermal & Acoustic Materials Data
Health Hazard & First Aid
Toxicity Index <10 to NES713 Issue 3 (1991): Non-hazardous, non-toxic. No first
aid necessary.
Stability / Reactivity
Stable.
Handling / Use / Disposal
No special handling precautions required. Dispose of according to local laws and
regulations governing non-biodegradable non-hazardous solid wastes.
Fire & Explosion
Flammability rating Class 1 to BS 476 pt 7: Non-flammable. If forced to burn,
combustion products are typically over 95% carbon dioxide and carbon
monoxide.
160.81-ICOM-GB0 (01/02)
2
2- 1
Product Description
OPTIVIEW
CONTROL PANEL
SOLID STATE
STARTER
OIL
SEPARATOR
COMPRESSOR
EVAPORATOR
SIGHT GLASS
CONDENSER
VARIABLE ORIFICE
Figure 2.1 YR Rotary Screw Liquid Chiller (Front View)
2.1
General (Figure 2.1)
The York YR Rotary Screw Liquid Chiller is primarily
used for large air conditioning systems, but may be used
on other applications. Each unit is completely
factory-packaged including compressor, evaporator,
condenser, subcooler, oil separator, lubrication system,
isolation valves, drive motor, optional motor starter and
control panel.
Units are shipped as standard with a full charge of
refrigerant and oil. Units can also be shipped in sections
(optional) to accommodate job site requirements. An
optional shipping skid is also available for ease of
handling.
Exterior surfaces are protected with one coat of
Caribbean blue machinery paint.
2.2
Compressor
The rotary screw compressor uses state-of-the-art
technology to provide the most reliable and energy
efficient compressor available at all operating
conditions. The compressor is a positive displacement,
variable volume, direct drive, twin helical rotary screw
compressor. The male rotor is a direct drive by the
motor; the female rotor is an idler that is driven by the
male rotor. The rotors do not touch each other or the
compressor housing. The rotors are separated by a
hydraulic oil seal, which prevents high pressure gas
from leaking into low pressure areas.
The compressor housing is made of cast iron, precision
machined to provide minimal clearance for the rotors.
The rotors are manufactured from forged steel and use
asymmetric profiles. The compressor incorporates a
complete anti-friction bearing design for reduced power
and increased reliability. Four separate cylindrical roller
bearings handle radial loads. Two 4-point angular
contact ball bearings handle axial loads. Together they
maintain accurate rotor positioning at all pressure ratios
thereby minimising blow-by and maintaining efficiency.
2- 2
160.81-ICOM-GB0 (01/02)
Oil is injected into the compressor by differential
pressure to lubricate the bearings, seal the rotors and
remove the heat of compression. The injected oil mixes
with the compressed gas and is separated from the
refrigerant gas in the oil separator.
The compressor has an oil reservoir located at the rotor
bearings to provide lubrication during start-up and
during coast-down even in the event of a power failure.
A check valve is installed in the compressor discharge
housing (suction housing for S4 and S5 compressors) to
prevent reverse running of the rotors due to system
refrigerant pressure gradients during shutdown.
The open-drive compressor shaft seal consists of a
spring-loaded, precision carbon ring, high temperature
elastomer "0" ring static seal, and stress-relieved,
precision lapped collars. The entire shaft seal cavity is at
low pressure, being vented to the oil drain from the
compressor, combining low pressure with direct oil
cooling for long seal life.
Capacity control is achieved by use of a slide valve
providing fully modulating capacity control from 10% to
100% of full load. The slide valve is positioned between
the male and female rotors and moves axially to match
the compressor capacity to that of the evaporator
refrigeration load. As the slide valve moves toward the
unloaded position, less suction gas is pumped through
the compressor.
2.4
Lubrication
An oil pressure transducer is located on the compressor
oil manifold. The differential pressure is measured as
the difference between the oil pressure transducer and
the filter pressure transducer located in the oil separator.
This value is compared to the limits in the control panel
logic. If the oil filter differential reaches 138 kPa
(20 PSID), a warning message is displayed on the
control panel, at 172.5 kPa (25 PSID), a safety shutdown
is initiated.
The oil leaving the oil eductor manifold block flows into
the compressor to lubricate the compressor bearings
and shaft seal. The oil injected into the compressor
mixes with refrigerant gas during compression. The oil
and refrigerant gas is discharged into the oil separator,
where it is separated and returned to the oil sump. A high
discharge temperature safety is located in the discharge
line, between the compressor and oil separator. This
safety will initiate a safety shutdown.
Oil cooling is accomplished by liquid injection into the
suction of the compressor
2.5
Oil Separator
The slide valve is actuated by oil pressure controlled by
external solenoid valves via the control panel. When the
compressor is shut off, a spring returns the slide valve to
unloaded position to ensure that the compressor starts
with the slide valve in the unloaded position.
2.3
Motor
The compressor motor is a 2-pole, continuous-duty,
cage induction type with suction gas cooling
(semi-hermetic design).
Figure 2.2 Oil Separator
The oil separator removes the oil that was injected into
the compressor. The separator is a vertical two stage
design without moving parts.
160.81-ICOM-GB0 (01/02)
In the first stage of oil separation, high velocity oil and
refrigerant gas in the compressor discharge line
undergoes a rapid reduction in velocity as it enters the
large diameter oil separator. Most of the oil drops out of
the refrigerant gas stream due to the reduction in
velocity. The oil falls by gravity into the oil reservoir
located in the bottom of the oil separator.
The second stage of oil separation is achieved in the oil
coalescing element section of the oil separator. The oil
mixed with the refrigerant entering the coalescer
element is a very fine aerosol mist. These small aerosol
mist particles wet the coalescer element media and form
larger oil droplets which fall by gravity to the bottom of
the coalescer element section. The oil collected in the
coalescer section is drained from the oil separator with a
small amount of refrigerant gas. This provides the high
pressure “gas drive” for the eductors to return oil from
the evaporator.
The oil separator has a design working pressure of
16.2 bar. Two sight glasses are provided in the oil
separator for monitoring the oil level and verifying
performance of the coalescer element. Liquid oil should
be visible in the top glass of the oil separator when the
chiller is off. During operation, oil may be higher or lower
due to system load and operating conditions.
An oil drain and charging valve is located on the bottom
of the oil separator. A 5/8 inch male flare connection is
provided for draining and charging. Oil can be added into
the oil reservoir with the chiller in service.
A temperature actuated immersion oil heater is located
in the oil separator reservoir. Power wiring is provided to
the control panel.
2.6
Oil Filter
2- 3
The oil eductor circuit consists of two refrigerant/oil filter
driers, an eductor block and the interconnecting piping.
FILTER
DRIER
OIL
EDUCTOR
BLOCK
FILTER
DRIER
OIL
CHARGING
VALVE
EVAPORATOR
OIL
FILTER
L.I.C.
FILTER DRIER
Figure 2.3 Oil Circuit
The eductors operate using the 'jet pump' principle.
Discharge pressure gas and oil flows through a filter
dryer to a regulating orifice and nozzle located in the
eductor block. The reduced pressure (pumping action)
is created by the velocity of the discharge pressure gas
and oil flowing through the orifice and nozzle. This
creates a reduced pressure area that allows the oil-rich
refrigerant and oil to flow from the evaporator into the
compressor.
Oil-rich refrigerant flows into the eductor block through
the filter drier from the evaporator. The oil-rich
refrigerant mixes with the discharge pressure gas and
flows into the compressor.
2.8
Heat Exchangers
Shells
A dual oil filter housing with isolation valves is optional
on all units. This allows switching between two 3 micron
oil filters and changing of the off line filter during
operation.
Evaporator and condenser shells are fabricated from
rolled carbon steel plates and have fusion welded
seams. Carbon steel tube sheets, dr illed to
accommodate the tubes, are welded to the ends of each
shell. Intermediate tube supports are fabricated of
13 mm thick carbon steel plates. The refrigerant side of
each shell has a design working pressure of 16.2 bar
and is tested at 37.5 barg. Each vessel has a single or
dual refrigerant relief device.
2.7
Tubes
The oil flows from the oil separator through the 3 micron
oil filter. Filtered oil then flows to an oil manifold that is
located at the compressor.
Oil Eductor Circuit
The oil eductor circuit automatically recovers any oil that
may migrate to the evaporator and returns it to the
compressor. The oil eductor circuit manages the amount
of oil in the refrigerant charge. A small amount of oil is
normal in the refrigerant charge and will be found in the
evaporator. If not properly managed the oil will
accumulate and have an adverse affect on unit
performance.
Heat exchanger tubes are 19 mm OD copper alloy with a
high efficiency, internally and externally enhanced
design to provide optimum performance. Each tube is
roller expanded into the tube sheets to provide a
leak-proof seal. Each tube is individually replaceable.
2- 4
2.9
160.81-ICOM-GB0 (01/02)
Evaporator
The evaporator is a shell and tube, flooded type, heat
exchanger with a distributor trough providing uniform
distribution of refrigerant over the entire shell length to
ensure optimum heat transfer. A liquid level sight glass is
located on the side of the shell to aid in determining
proper refrigerant charge. A refrigerant charging valve is
provided.
2.10 Condenser
The condenser is a shell and tube, flooded type, heat
exchanger with a discharge gas baffle to prevent direct
high velocity impingement on the tubes. The baffle
distributes the refrigerant gas flow uniformly over the
entire shell length for optimum heat transfer. A subcooler
section is located in the bottom of the condenser to
provide effective liquid refrigerant subcooling, improving
cycle efficiency. The condenser shell also serves as a
refrigerant receiver to store the system charge during
servicing. Optional manually operated isolation valves
are located at the inlet and outlet of the condenser.
Valves are also provided to facilitate removal of the
refrigerant from the system.
2.11 Refrigerant Flow Control
Sub-cooled liquid refrigerant flows out of the condenser
via the liquid line into the evaporator by differential
pressure. A variable metering orifice controls refrigerant
flow to the evaporator. The orifice is selected based
upon the operating conditions of the unit.
The variable orifice actuator is controlled by the
differential pressure set point that is field programmable
in the control panel.
A liquid level sensor, located in the condenser, detects
the refrigerant level. The refrigerant level in the
condenser is expressed as 0% (minimum) to 100%
(maximum). While the chiller is shut down, an open
signal is applied to the actuator, driving the orifice to the
fully open position. When the chiller is started, a close
signal is applied to the orifice actuator for the duration of
the 'Start Sequence Initiated' period. This positions it to
approximately the 75% closed position prior to starting
the compressor motor. To allow for actuator timing
variances and assure the valve is positioned at the 75%
closed position, the duration of the 'Start Sequence
Initiated' period is programmable.
2.12 Capacity Control
Capacity control is accomplished by using differential
pressure to move the slide valve. As the slide valve is
moved axially between the compressor rotors the
volume of vapour pumped by the compressor is
changed to match the system requirements.
Leaving chilled liquid temperature (LCLT) is
continuously monitored and compared to the LCLT
Setpoint. When the LCLT is outside the range of the
setpoint value a signal is sent to energize the control
block directional solenoid valves.
A slide valve potentiometer is used to provide feedback
to display slide valve position as a percentage of full
load.
2.13 Water Boxes
Removable water boxes fabricated from heavy gauge
sheet steel are fitted to each end of both heat
exchangers, the design working pressure is 10 bar.
Integral steel water baffles are located and welded
within the water boxes to provide required pass
arrangements. Stub-out water nozzle connections with
victaulic grooves are welded to the water boxes. Drain
and vent connections are provided in each evaporator
and condenser water box.
2.14 Control Panel
The York OptiView control panel is a factory mounted,
wired and tested microprocessor based control system.
The panel automatically controls the operation of the
unit in meeting system cooling requirements while
minimising energy usage. For detailed information refer
to the YR OptiView Control Panel Operating
Instructions.
160.81-ICOM-GB0 (01/02)
2- 5
2.15 Options and Accessories
Hot Gas By-pass System
Model 'B' Solid State Starter
A hot gas bypass system can be factory installed to
allow unit operation down to virtually zero load if
required.
The liquid cooled solid state starter is a reduced voltage
soft starter that controls and maintains a constant
current flow to the motor during start-up. It is compact
and mounted on the unit adjacent to the motor terminals.
Power and control wiring is factory supplied. The starter
enclosure is IP33 rated with a hinged access door with
lock and key.
Standard features include: digital readout at the control
panel of 3-phase voltage and current; high and low line
voltage protection; 115 V control transformer; three-leg
sensing overloads; phase rotation and single-phase
failure protection; and momentary power interruption
protection. An integral door interlocked fused
disconnect switch is supplied as standard.
Sequence Control Kits
Sequence control kits for two, three or four units with
series or parallel chilled water arrangement. Kits provide
control and switching based on retur n water
temperature and enable centralised start/stop.
Spring Isolators
25mm deflection level-adjusting/spring-type vibration
isolator assemblies.
Form 3 Shipment - Motor/Compressor Separate
from Shells
Factory Insulation
19 mm or 38 mm flexible closed-cell plastic type
anti-sweat insulation on the evaporator and liquid
refrigerant piping.
Factory Water Flanges
Welded to water nozzles on evaporator and condenser
(companion flanges and connecting parts not included).
Shipped as three major assemblies: Compressor/motor
assembly removed from shells and skidded.
Evaporator/condenser is not skidded. Oil separator is
skidded. All wiring integral with compressor is left on it,
and all conduit is left on shells. All openings on
compressor, oil separator, and shell are closed and
charged with dry nitrogen (0.5 barg). Miscellaneous
packaging of control panel, tubing, water temperature
controls, wiring, oil isolators, solid state starter (option),
etc; R134a charge not included.
Flow Switches
Form 7 Shipment - Split Shells
Paddle-type, vapour-proof water flow switches (10 or 20
bar DWP) for chilled and cooling water circuits.
Pressure Safety Devices
Pressure relief valves etc. for evaporator and condenser.
Dual Oil Filter
Housing with isolation valves to eliminate downtime
during filter changes.
Refrigerant Isolation Valves
Factory installed valves in compressor discharge line
and refrigerant liquid line to enable refrigerant
isolation/storage in unit condenser during servicing.
Shipped as four major assemblies: Compressor/motor
assembly removed from shells and skidded. Oil
separator is skidded. Evaporator and condenser shells
are separated at tube sheets and are not skidded.
Refrigerant lines between shells are flanged and
capped, requiring no welding. Tube sheets will require
welding in field. All wiring integral with compressor is left
on it. All wiring harnesses on shells are removed. All
openings on compressor, oil separator and shells are
closed and charged with dry nitrogen (0.5 barg).
Miscellaneous packaging of control panel, tubing, water
temperature controls, wiring, oil isolators, solid state
starter (option), etc; R134A charge not included.
2- 6
160.81-ICOM-GB0 (01/02)
2.16 Nomenclature
YR TB TB T0
5
50
A
Model
Evaporator Code
TB, TC, TD, VB, VC, VD
Condenser Code
TB, TC, TD, VB, VC, VD
Compressor Code
T0, T1
Design Level
Motor Code
50 = 380/400-3-50 55 = 415-3-50
Power Supply:
5 for 50 Hz
160.81-ICOM-GB0 (01/02)
3
TRANSPORTATION, RIGGING AND STORAGE
3.1
General
3.2
3- 1
Shipment
YR units are shipped as a single factory assembled,
piped, wired package, requiring minimum installation to
make chilled water connections, condenser water
connections, refrigerant atmospheric relief connections,
and electrical power connections.
The unit may be ordered and shipped in any of the
following forms:
Units can also be shipped dismantled when required by
rigging conditions, but generally it is more economical to
enlarge access openings to accommodate the factory
assembled unit. Units shipped dismantled MUST be
field assembled under the supervision of a York
representative.
1.
Form 1 – Factory Assembled Unit (Complete with
motor, refrigerant and oil charges)
An optional Solid State Starter can be factory
mounted and wired.
FIELD ASSEMBLED UNITS ONLY
A York authorised representative must check the
installation, supervise the initial start-up and operation
of all newly installed units.
The York Warranty may be voided if the
following restrictions are not adhered to:
2.
No valves or connections should be opened under
any circumstances because such action will result
in loss of the factory nitrogen charge.
2.
Do not dismantle or open the unit for any reason
except under the supervision of a Yor k
representative.
3.
When units are shipped dismantled, notify the
nearest York office in ample time for a York
representative to supervise rigging the unit to its
operati ng position and the assembl y of
components.
4.
Do not make final power supply connections to the
compressor motor, solid state starter or control
panel.
5.
Do not charge the compressor with oil.
6.
Do not charge the unit with refrigerant.
7.
Do not attempt to start the system.
8.
Do not run hot water (40°C maximum.) or steam
through the evaporator or condenser at any time.
Miscellaneous material – Four (4) vibration
isolation pads (or optional spring isolators and
brackets).
Form 2 – Factory Assembled Unit
(Complete with motor. Refrigerant and oil charges
shipped separately).
1.
1.
The motor/compressor assembly mounted, with all
necessary interconnecting piping assembled.
control panel is mounted on the unit. Complete unit
factory leak tested, evacuated and charged with
R134a.
The motor/compressor assembly mounted, with all
necessary interconnecting piping assembled.
control panel is mounted on the unit. Complete unit
factory leak tested, evacuated and charged with
holding charge of nitrogen.
An optional Solid State Starter can be factory
mounted and wired.
2.
Miscellaneous material – Four (4) vibration
isolation pads (or optional spring isolators and
brackets).
3- 2
160.81-ICOM-GB0 (01/02)
Form 3 – Motor/Compressor Separate From Shells
3.3
Inspection, Damage and Shortage
Shipped as three major assemblies. Unit first
factory assembled, refrigerant piped, wired and
leak tested; then dismantled for shipment.
Compressor/motor assembly removed from shells
and skidded. Evaporator/condenser shells are not
skidded.
The unit shipment should be checked on arrival to see
that all major pieces, boxes and crates are received.
Each unit should be checked before unloading, for any
visible signs of damage. Any damage or signs of
possible damage must be reported to the transportation
company immediately for their inspection.
All compressor wiring attached, and all conduit is
left on shell. All openings on compressor, oil
separator, and shell are closed and charged with
dry nitrogen (0.14 to 0.2 barg).
York will not be responsible for any damage in
shipment or at job site or loss of parts.
Miscellaneous packaging of control panel, tubing,
water temperature controls, wiring, oil, isolators,
solid state starter (option), etc., refrigerant charge
shipped separately.
U ni ts shipped dismantled MUS T be
re-assembled by, or under the supervision of,
a York representative.
(See Form 160.81-N1)
Form 7 – Split Shells
Shipped as four major assemblies. Unit first factory
assembled, refrigerant piped, wired and leak
tested; then dismantled for shipm ent .
Compressor/motor assembly removed from shells
and skidded.
Evaporator and condenser shells are separated at
tube sheets and are not skidded. Refrigerant lines
between shells are flanged and capped, requiring
no welding.
All compressor wiring attached. All wiring
harnesses on shells are removed. All openings on
compressor and shells are closed and charged
with dry nitrogen (0.14 to 0.2 barg).
Miscellaneous packaging of control panel, tubing,
water temperature controls, wiring, oil isolators,
solid state starter (option), etc.; refrigerant charge
shipped separately.
U ni ts shipped dismantled MUS T be
re-assembled by, or under the supervision of,
a York representative.
(See Form 160.81-N1)
When more than one unit is ordered, the major parts of
each unit will be marked to prevent mixing of
assemblies. (Piping and Wiring Drawings will be
furnished by York.)
When received at the job site all containers should be
opened and contents checked against the packing list.
Any material shortage should be reported to York
immediately.
Data Plate
A unit data plate is mounted on the control panel
assembly of each unit, giving unit model number; design
working pressure; water passes; refrigerant charge;
serial numbers; and motor power characteristics and
connection diagrams.
Additional information may be found on the motor data
plate. This information should be included when
contacting the factory on any problem relating to the
motor.
160.81-ICOM-GB0 (01/02)
3.4
Rigging
The complete standard unit is shipped without skids.
(When optional skids are used it may be necessary to
remove the skids so riggers skates can be used under
the unit end sheets to reduce overall height.)
Each unit has four (4) lifting holes (two in each end) in
the end sheets which should be used to lift the unit.
Care should be taken at all times during rigging and
handling of the chiller to avoid damage to the unit and its
external connections. Lift only using holes shown.
Spreader Bars
Figure 3.1 Rigging
Do not lift the unit with slings around
motor/compressor assembly or by means of
eye bolts in the tapped holes of the
compressor motor assembly. Do not turn a
unit on its side for rigging. Do not rig vertically.
The rigging and operating weights and overall
dimensions are given in Section 9 as a guide in
determining the clearances required for rigging. (Add
150 mm to overall height for optional skidded unit.).
3- 3
3- 4
160.81-ICOM-GB0 (01/02)
Page Left Intentionally Blank
160.81-ICOM-GB0 (01/02)
4
INSTALLATION
4.1
Location
4.4
4- 1
Rigging Unit to Final Location
YR units are furnished with vibration isolator mounts for
basement or ground level installations. Units may be
located on upper floor levels providing the floor is
capable of supporting the total unit operating weight and
optional spring isolators are used.
Rig the unit to its final location on the floor or mounting
pad, lift the unit (or shell assembly) by means of an
overhead lift and lower the unit to its mounting position.
(If optional shipping skids are used, remove them before
lowering the chiller to its mounting position.)
Sufficient clearance to facilitate normal service and
maintenance work must be provided all around and
above the unit and particularly space provided at either
end to permit cleaning or replacement of evaporator and
condenser tubes. (See CLEARANCES).
At this point units shipped dismantled should
be assembled under the supervision of a York
representative.
A doorway or other sufficiently large opening properly
located may be used. The chiller should be located in an
indoor location where temperatures range from 4°C to
43°C.
4.2
4.5
Foundation
A level floor, mounting pad or foundation must be
provided by others, capable of supporting the operating
weight of the unit.
4.3
If the evaporator is to be field insulated, the insulation
should be applied to the evaporator before the unit is
placed in position while the unit is in the lift position. Be
sure the unit is properly supported. (See INSULATION).
Locating and Installing Isolator Pads
The isolator pad mounts are to be located as shown in
Figure 4.1
End Sheet
Clearances
Clearances should be adhered to as follows:
Rear and above unit – 610 mm.
Shell
22.2 mm Ø
76.2 mm
28.6 mm
Front of unit – 915 mm.
203.2 mm
Tube Removal – see table below
31.7 mm
SHELL CODE
TB, TC, TD
VB, VC, VD
19 mm
TUBE REMOVAL SPACE (mm)
3075
4270
152.4 mm
139.7 mm
Square
Figure 4.1 Neoprene Isolators
After the isolator pads have been placed into position on
the floor, lower the chiller onto the pads. When the unit is
in place, remove the rigging equipment and check that
the unit is level both longitudinally and transversely. The
unit should be level within 6 mm from one end to the
other end and from front to the rear. If the chiller is not
level within the amount specified, lift it and place shims
between the isolation pad and the chiller tube sheets.
(Shims furnished by the installer.) Lower unit again and
recheck to see that it is level.
4- 2
160.81-ICOM-GB0 (01/02)
Checking the Isolator Pad Deflection
All isolator pads should be checked for the proper
deflection while checking to see if the unit is level. Each
pad should be deflected approximately 4 mm. If an
isolation pad is under-deflected, shims should be placed
between the unit tube sheet and the top of the pad to
equally deflect all pads.
Levelling the Unit
The longitudinal alignment of the unit should be checked
by placing a level on the top centre of the evaporator
shell under the compressor/motor assembly. Transverse
alignment should be checked by placing a level on top of
the shell end sheets at each end of the chiller.
4.6
Installing Optional Spring Isolators
When ordered, 4 spring type isolator assemblies will be
furnished with the unit . The 4 assemblies are identical
and can be placed at any of the 4 corners of the unit.
End
Sheet
Shell
12.7 mm
35 mm
Cap
Screw
Adjusting
Bolt
9.5 mm
177.8 mm
177.8 mm
Figure 4.2 Optional Spring Isolators
While the unit is still suspended by the rigging, the
isolator mounting brackets should be bolted to the unit.
Place the four spring isolators in position. The threaded
adjusting bolts in each isolator should be screwed out of
the isolator until the extended head of the screw fits
snugly into the isolator bracket hole. The unit should be
lowered over the adjusting bolts.
The levelling bolts should now be rotated one (1) turn at
a time, in sequence, until the unit end sheets are clear of
the floor by 22 mm and the unit is level. Check that the
unit is level, both longitudinally and transversely (see
Levelling the Unit). If the levelling bolts are not long
enough to level unit due to an uneven or sloping floor or
foundation, steel shims (grouted, if necessary) must be
added beneath the isolator assemblies as necessary.
After the unit is levelled, wedge and shim under each
corner to solidly support the unit in this position while
piping connections are being made, pipe hangers
adjusted and connections checked for alignment. Then
the unit is filled with water and checked for leaks. The
levelling bolts should now be finally adjusted until the
wedges and shims can be removed. The unit should
now be in correct level position, clear of the floor or
foundation and without any effect from the weight of the
pi pi ng ( spr i ng i sol at or def l ect i on should b e
approximately 25 mm).
4.7
Piping Connections
After the unit is levelled (and wedged in place for
optional spring isolators) the piping connections may be
made; chilled water, condenser water and refrigerant
relief. The piping should be arranged with offsets for
flexibility, and adequately supported and braced
independently of the unit to avoid strain on the unit and
vibration transmission. Hangers must allow for
alignment of pipe. Isolators (by others) in the piping and
hangers are highly desirable, and may be required by
specifications, in order to effectively utilise the vibration
isolation characteristics of the vibration isolation mounts
of the unit.
Check for piping alignment – Upon completion of
piping, a connection in each line as close to the unit as
possible should be opened, by removing the flange bolts
or coupling and checked for piping alignment. If any of
the bolts are bound in their holes, or if the connection
springs are out of alignment, the misalignment must be
corrected by properly supporting the piping or by
applying heat to anneal the pipe.
If the chiller/cooling water piping needs to be
welded directly to the water pipe nozzles, the
temperature sensors should be removed to
prevent heat damage.
If the piping is annealed to relieve stress, the
inside of the pipe must be cleaned of scale
before it is finally bolted in place.
160.81-ICOM-GB0 (01/02)
4.8
Evaporator and Condenser Water Piping
The evaporator and condenser liquid heads have
nozzles which are grooved, suitable for welding 10.6 bar
DWP flanges or the use of Victaulic couplings. Factory
mounted flanges are optional.
The nozzles and water pass arrangements are
delivered in accordance with the job requirements (see
Product Drawings delivered with the job and Section 9).
Standard units are designed for 10.6 bar DWP on the
water side. If job requirements are for greater than
10.6 bar DWP, check the unit Data Plate before applying
pressure to evaporator or condenser to determine if the
chiller has provisions for the required DWP.
Inlet and outlet connections are identified by labels
placed adjacent to each nozzle.
Foreign objects which could lodge in, or block flow
through the evaporator and condenser tubes must be
kept out of the water circuit. All water piping must be
cleaned or flushed before being connected to the chiller
pumps, or other equipment.
Permanent strainers (supplied by others) are required in
both the evaporator and condenser water circuits to
protect the chiller as well as the pumps, tower spray
nozzles, chilled water coils and controls, etc. The
strainer should be installed in the entering chilled water
line, directly upstream of the chiller.
Figure 4.3 Typical Piping Arrangement
4- 3
Water piping circuits should be arranged so that the
pumps discharge through the chiller, and should be
controlled as necessary to maintain essentially constant
chilled and condenser water flows through the unit at all
load conditions.
If pumps discharge through the chiller, the strainer may
be located upstream from pumps to protect both pump
and chiller. (Piping between strainer, pump and chiller
must be very carefully cleaned before start-up.) If pumps
are remotely installed from chiller, strainers should be
located directly upstream of the chiller.
4.9
Water Treatment
The unit performance given in the Design Guide is
based on a fouling factor of 0.044 m² °C/kW (0.00025
ft²hr °F/Btu). Dirt, scale, grease and certain types of
water treatment will adversely affect the heat exchanger
surfaces and therefore unit performance. Foreign matter
in the water system(s) can increase the heat exchanger
pressure drop, reducing the flow rate and causing
potential damage to the heat exchanger tubes.
Aerated, brackish or salt water is not recommended for
use in the water system(s). York recommend that a
water treatment specialist is consulted to determine that
the proposed water composition will not affect the
evaporator materials of carbon steel and copper. The pH
value of the water flowing through the heat exchangers
must be kept between 7 and 8.5.
4- 4
160.81-ICOM-GB0 (01/02)
4.10 Glycol Solutions
4.15 Checking Piping Circuits and Venting Air
For unit operation with chilled liquid temperatures
leaving the evaporator at below 4°C, glycol solutions
should be used to help prevent freezing. Section 9 gives
recommended solution strength with water, as a
percentage by weight, for the most common types of
glycol. It is important to check glycol concentration
regularly to ensure adequate concentration and avoid
possible freeze-up in the evaporator.
After the water piping is completed, but before any water
box insulation is applied. Tighten and torque (to maintain
between 41 and 82 Nm) the nuts on the liquid head
flanges. Gasket shrinkage and handling during transit
may cause the nuts to loosen. If water pressure is
applied before tightening is done, the gaskets may be
damaged and have to be replaced.
When using glycol solutions, pressure drops
are higher than with water. Special care must
be taken not to exceed the maximum pressure
drop allowed.
4.11 Condenser Water Circuit
For proper operation of the unit, condenser refrigerant
pressure must be maintained above evaporator
pressure. If operating conditions will fulfill this
requirement, no attempt should be made to control
condenser water temperature by means of automatic
valves, cycling of the cooling tower fan or other means,
since chillers are designed to function satisfactorily and
efficiently when condenser water is allowed to seek its
own temperature level at reduced loads and off-peak
seasons of the year. However, if entering condenser
water temperature can go below the required minimum,
condenser water temperature must be maintained equal
to or slightly higher than the required minimum. Refer to
Figure 4.3 for a typical water piping schematic.
4.12 Stop Valves
Stop valves may be provided (by others) in the
evaporator and condenser water piping adjacent to the
unit to facilitate maintenance. Thermometer wells and
pressure taps should be provided (by others) in the
piping as close to the unit as possible to facilitate
operating check.
Fill the chilled and condenser water circuits, operate the
pumps manually and carefully check the evaporator and
condenser water heads and piping for leaks. Repair
leaks as necessary.
Before initial operation of the unit both water circuits
should be thoroughly vented of all air at the high points.
4.16 Refrigerant Relief Piping
Each unit is equipped with pressure relief valves located
on the condenser and evaporator for relieving excess
pressure of the refrigerant charge to the atmosphere as
a safety precaution in case of an emergency, such as
fire.
Refrigerant relief vent piping (by others), from the relief
valves to the outside of the building, is required by code
in most areas and should be installed on all chillers. The
vent line should be sized in accordance with the
ANSI/ASHRAE-15, or local code. The vent line must
include a dirt trap in the vertical leg to intercept and
per mit clean out and to trap any vent stack
condensation. The piping MUST be arranged to avoid
strain on the relief valves, using a flexible connection, if
necessary.
4.13 Flow Switches (Field Installed)
A flow switch or pressure differential control in the chilled
water line(s) adjacent to the unit is an accessory
furnished for connection to the control panel. If a flow
switch is used, it must be directly in series with the chiller
and sensing only water flow through the chiller. The
differential switch must sense pressure drop across the
unit.
4.14 Drain and Vent Valves
Drain and vent valves (by others) should be installed in
the connections provided in the evaporator and
condenser liquid heads. These connections may be
piped to drain if desired.
Figure 4.4 Typical Refrigerant Vent Piping from
Relief Valves
160.81-ICOM-GB0 (01/02)
4.17 Unit Piping
Compressor lubricant piping and system external piping
are factory installed on all units shipped assembled. On
units shipped dismantled, the lubricant piping to oil
sump and oil cooler and system oil return connections
should be completed, under the supervision of the York
representative, using material furnished.
4.18 Electrical Connection
The following connection recommendations are
intended to ensure safe and satisfactory operation of the
unit. Failure to follow these recommendations could
cause harm to persons, or damage to the unit, and may
invalidate the warranty.
No additional controls (relays, etc.) should
be mounted in the control panel. Power
and control wiring not connected to the
control panel should not be run through
the control panel. If these precautions are
not followed it could lead to a risk of
electrocution. In addition, electrical noise
could cause malfunctions or damage the
unit and its controls.
4- 5
After connection DO NOT switch on mains
or control system power to the unit. Some
internal components are live as soon as
mains is switched on the unit and this must
only be done by authorised persons.
The three position rocker switch on the control panel
must remain in 'STOP/RESET' position until the unit is
commissioned by authorised personnel. If the switch
has been placed in the 'RUN' or 'START' position before
commissioning, this must be reported to York otherwise
warranty may be invalidated.
4.19 Power Wiring
Units are suitable for 380/400V - 3 Ø - 50 Hz or
415V - 3 Ø - 50 Hz nominal power supplies only. The
correct electrical power supply is given on the unit data
plate, which also details the motor connection diagrams.
4.19.1 Units with Electro-Mechanical Starter
After connection do not switch on mains
power to the unit until it has been
commissioned by York Authorised
personnel. Some internal components are
live when mains is switched on.
On units shipped disassembled, after installation of the
control panel, control wiring must be completed
between unit components and control panel or solid
state starter, when used, using wiring harness
furnished.
No changes in unit wiring from that shown on
drawings delivered shall be made without
prior approval of the York representative.
Figure 4.5 Motor Connections (E/M Starter)
All electrical wiring should be carried out
in accordance with local regulations.
Customer supplied isolators and fuses
may be installed next to the unit, avoiding
locations close to refrigerant and water
lines.
All sources of supply to the unit must be
taken via a common point of isolation (not
supplied by York).
Units supplied without a starter require one three phase
supply to the motor from a remote electro mechanical
starter (field supplied). A 115 Vac - 1Ph - 50 Hz supply of
15 amp capacity is also required for the control panel. An
optional control transformer (1-1/2 KVA required) is
available to meet this requirement.
Electro-Mechanical starters for the unit must
be furnished in accordance with York
Standard R-1079 to provide the features
necessary for the starter to function properly
with the York control system.
4- 6
160.81-ICOM-GB0 (01/02)
Route the cables forming the 3 phase power supply via
the same hole in the motor terminal box gland plate,
using a suitable cable gland, to ensure that no eddy
currents are set up in the metal gland plate. If separate
entries for each cable forming the 3 phase supplies are
used, the metal gland plate must be replaced by a
non-metallic gland plate.
4.19.2 Units with Solid State Starter (Optional)
Solid State
Starter
-QSDF
Fused Disconnect
Switch
U V W
PE
DO NOT cut wires to final length or make final
connections to the motor or starter power input
terminals until approved by a York representative. To
ensure correct motor rotation the starter power input
and starter to motor connections must be checked with a
phase sequence indicator in the presence of the York
representative.
Route the main earth cable via the motor terminal box
gland plate to the main earth connection stud on the side
of the box.
PE
Route the single phase control supply to the control
panel with bare wire ends of maximum cable size 4 mm².
Also connect an earth wire to the earth terminal using
the M4 lug.
DO NOT make final power supply connections to control
panel until approved by a YORK representative.
To ensure proper motor rotation the starter
power input and starter to motor connections
must be checked with a phase sequence
indicator in the presence of the York
representative.
L1 L2 L3
3
50Hz
380/400V
Figure 4.6 Solid State Starter Connections
Units equipped with a solid state starter require a three
phase power supply plus earth to the starter. Power
wiring from the starter to the motor is factory fitted.
Power wiring to the control panel is also factory fitted via
a control transformer supplied with the Solid State
Starter.
Route the cables forming the 3 phase power supply via
the same hole in the solid state starter gland plate /
gland box on top of the starter, using a suitable cable
gland, to ensure that no eddy currents are set up in the
metal gland plate. If separate entries for each cable
forming the 3 phase supplies are used, the metal gland
plate / gland box must be replaced by a non-metallic
version.
DO NOT cut wires to final length or make final
connections to starter input terminals until approved by
a York representative.
To ensure proper motor rotation the starter
power input connections must be checked
with a phase sequence indicator in the
presence of the York representative.
Route the earth cable via the starter gland plate to the
main earth connection stud on the side of the starter.
160.81-ICOM-GB0 (01/02)
4.20 Control Connections
Customer voltage free contacts must be
suitable for device contact rating to be 5 mA at
115 Vac. If the voltage free contacts form part
of a relay or contactor, the coil of the device
MUST be suppressed using a standard R/C
suppressor to avoid electrical noise which
could cause a malfunction or damage to the
unit.
To avoid the possibility of motor failure due to
excessive start cycles, the unit should not
normally be cycled using the remote
connections. Cycling of the unit based on
cool i ng demand is accompl i shed
automatically by the control panel. In addition,
the control panel has a programmable time
clock function as a standard feature with
holiday capability. This offers one preset
automatic Start-Stop per day on a seven day
calendar basis with the ability to program a
single additional holiday start and stop time up
to a week in advance.
4.20.1 Remote Start / Stop
(Start - TB4 terminals 1 & 7)
(Stop - TB4 terminals 1 & 8)
When the control panel is in the 'REMOTE' operating
mode, the 'COMPRESSOR' switch is in the 'RUN'
position and the 'REMOTE READY TO START
CONTACTS' (TB2: terminals 26 & 27) indicate the unit is
ready to start. Holding contacts open across the
'REMOTE STOP' connections and closing contacts
across the 'REMOTE START' connections' will start the
unit. A subsequent closure of the 'REMOTE STOP'
contacts causes the unit to shutdown.
If the 'REMOTE START' and 'REMOTE STOP'
connections are to be used at a remote control station
rather than by an EMS/BAS it is recommended that a
change over contact is used between the terminals.
When the unit is operated in 'REMOTE' mode using the
'RE MOTE START-STO P' connections, an
'EMERGENCY STOP' by an operator or others will
'STOP' the compressor from the control panel and
prevent the unit from restarting. However, the operator
cannot locally star t the compressor using the
'COMPRESSOR' start switch, when the control panel is
in the 'REMOTE' operating mode.
4.20.2 Remote / Local Cycling
(TB4 terminals 1 & 13)
The closure of an automatic reset device across these
terminals will permit the unit to operate in all operating
modes. Conversely, an opening of the device contacts
will inhibit the unit from operating.
4- 7
4.20.3 Chilled Liquid Flow Interlock
(TB4 terminals 1 & 12)
A suitable flow switch which closes on presence of flow
must be installed between these contacts, to give
adequate protection against loss of chilled liquid flow.
4.20.4 Cooling Liquid Flow Interlock (Optional)
(TB4 terminals 1 & 11)
A suitable flow switch which closes on presence of flow
can be installed between these contacts, to provide
protection against loss of cooling liquid flow.
4.20.5 Multi Unit Sequence
(TB4 terminals 1 & 9)
For multiple unit installation applications, 'MULTI UNIT
SEQUENCE' connections are available to start and stop
each unit. The maintained closure of remote contacts
will permit the unit to operate in all operating modes with
the 'COMPRESSOR' switch in the 'RUN' position.
Conversely, an opening of the contacts will inhibit the
unit from operating.
4.20.6 Auxiliary Safety Shutdown
(TB4 terminals 1 & 31)
Momentary or maintained closure of a normally open
switch or relay contacts will cause the unit to shutdown.
The unit will not restart until the contacts open and a
manual reset and restart of the unit is carried out.
4.20.7 Remote Leaving Chilled Water Temperature
Setpoint Reset - PWM (TB4 terminals.1 & 19)
The locally programmed leaving chilled water
temperature setpoint can be reset by a 1 to 11 second
timed closure of remote contacts connected to these
terminals. The signal will only be accepted when the
control panel is in the digital 'REMOTE' operating mode.
An accepted signal will adjust the leaving chilled water
temperature up to 22.2°C upwards from the locally
programmed value. Unit capacity will be adjusted to
achieve the new setting of leaving chilled water
temperature, providing the compressor motor current is
below the current limit setpoint.
A one-second pulse corresponds to no offset and
therefore no adjustment of the preprogrammed leaving
chilled liquid temperature setpoint. An eleven second
pulse corresponds to the locally preprogrammed
maximum allowable offset (5.6°C, 11.1°C, 16.7°C or
22.2°C) above the leaving chilled water temperature
setpoint. The amount of offset varies linearly with
pulse-width.
4- 8
160.81-ICOM-GB0 (01/02)
4.20.8 Remote Current Limit Setpoint - PWM
(TB4 terminals 1 & 20)
4.21 Status Connections
The motor current limit setpoint can be adjusted
remotely by a 1 to 11 second timed closure of remote
contacts connected to these terminals. The input signal
will only be accepted when the control panel is in the
digital 'REMOTE' operating mode.
Wiring to the status volt free contacts requires a supply
provided by the customer. Particular care must be taken
deriving the supplies for the volt free terminals with
regard to a common point of isolation. These circuits
when used must be fed via the common point of isolation
so that the voltage is removed when the common point
of isolation to the unit is opened.
An accepted signal will set the motor current between
100% and 30% of full load amps. Unit capacity control
will remain from the leaving chilled water temperature,
providing the current limit setpoint is satisfied. If the
compressor motor current exceeds the current limit
setpoint, it will override the temperature control system
to reduce unit capacity.
A one-second pulse corresponds to 100% full load
amperes and an eleven-second pulse corresponds to
30% of full load amperes. The current limit setpoint
varies linearly from 100% to 30% as the pulse-width
changes from 1 to 11 seconds.
4.20.9 Remote Leaving Chilled Water Temperature
Setpoint Reset - Analogue
(0-10 Vdc / 2-10 Vdc - J22 pins 3 & 5)
(0-20 mA / 4-20 mA - J22 pins 4 & 5)
This jumper (JP24) configureable input will adjust the
leaving chilled water temperature up to 22.2°C upwards
from the locally programmed value when the control
panel is in the analogue 'REMOTE' operating mode.
Refer to Field Control Modifications for details.
4.20.10 Remote Current Limit Setpoint - Analogue
(0-10 Vdc / 2-10 Vdc - J22 pins 1 & 5)
(0-20 mA / 4-20 mA - J22 pins 2 & 5)
This jumper (JP23) configureable input will set the motor
current between 100% and 30% of full load amps when
the control panel is in the analogue 'REMOTE' operating
mode. Refer to Field Control Modifications for details.
In accordance with EN 60204 it is
recommended that the customer wiring to
these terminals uses orange wires. This
will ensure that circuits not switched off by
the unit supply disconnecting device are
distinguished by colour so that they can
easily be identified as live even when the
unit disconnecting device is off.
Unless otherwise stated the volt-free contacts
are rated at 5 amps resistive at 250 Vac and
30 Vdc, 2 amp inductive (0.4 pf) at 250 Vac
and 30 Vdc. All inductive devices (relays)
switched by the volt-free contacts must have
their coil suppressed using standard R/C
suppressors.
4.21.1 Remote Mode - Ready to Start
(TB2 terminals 26 & 27)
When closed, these contacts signify the control panel is
in the 'REMOTE' operating mode, allowing the energy
management system or the 'REMOTE START/STOP'
contacts to control the unit.
4.21.2 Run Contacts
(TB2 terminals 35 & 36)
When closed these contacts signify that the unit is
operating.
4.21.3 Anticipatory Alarm
(TB2 terminals 55 & 56)
When closed, these contacts signify that a 'WARNING'
condition has occurred.
4.21.4 Cycling Shutdown
(TB2 terminals 40 & 41)
When closed, these contacts signify the unit is not
permitted to start due to one or more cycling conditions.
The cycling shutdown contacts function in all operating
modes.
160.81-ICOM-GB0 (01/02)
4.21.5 Safety Shutdown
(TB2 terminals 42 & 43)
4- 9
4.23 Thermal Insulation
(See Product Drawings Form 160.81-PA1)
When closed, these contacts signify the unit is not
permitted to start due to one or more safety controls. A
closure of the safety shutdown contacts means that the
operator must manually reset and restart the unit. Safety
shutdown contacts function in all operating modes.
4.22 Pump Control Connections
The control panel provides connections to allow
automatic control of both the chilled and cooling liquid
pumps.
4.22.1 Chilled Liquid Pump
(TB2 terminal 45 & TB6 terminal 2)
Connections are provided to allow automatic control of
the chilled water pump motor starter by the control
panel. The pump motor starter holding coil should be
suitable for 115 Vac. The power requirement for the
pump motor starter must be a maximum of 2 amps
inductive. If power requirement exceeds this, a control
relay of suitable rating should be used between the unit
and the pump starter.
4.22.2 Cooling Liquid Pump
(TB2 terminal 151 & TB6 terminal 2)
Connections are provided to allow automatic control of
the cooling water pump motor starter by the control
panel. The pump motor starter holding coil should be
suitable for 115 Vac. The power requirement for the
pump motor starter must be a maximum of 1 amp
holding and 10 amps inrush. If power requirement
exceeds this, a control relay of suitable rating should be
used between the unit and the pump starter.
DO NOT field insulate until the unit has been
leak tested under the supervision of the York
representative.
Insulation of the type specified for the job, or minimum
thickness to prevent sweating of 0°C (30°F) surfaces
should be furnished (by others) and applied to the
evaporator shell, end sheets, liquid feed line to flow
chamber, compressor suction connection, and
evaporator liquid heads and connections. The liquid
head flange insulation must be removable, to allow head
removal for the tube maintenance. Details of areas to be
insulated are given on the Product Drawing.
Units are furnished factory anti-sweat insulated on order
at additional cost. This includes all low temperature
surfaces except the two (2) evaporator liquid heads.
4.24 Installation Check
After the unit is installed, piped and wired the services of
a York representative should be requested to check the
installation and supervise the initial start-up and
operation on all chillers.
4-10
160.81-ICOM-GB0 (01/02)
J22
1
REMOTE CURRENT LIMIT SETPOINT (0-10 Vdc / 2-10 Vdc)
2
REMOTE CURRENT LIMIT SETPOINT (0-20 mA / 4-20 mA)
3
REMOTE LEAVING CHILLED LIQUID TEMPERATURE SETPOINT (0-10 Vdc / 2-10 Vdc)
4
REMOTE LEAVING CHILLED LIQUID TEMPERATURE SETPOINT (0-20 mA / 4-20 mA)
5
COMMON
OPTIVIEW CONTROL PANEL
J22
TB2 45 151
COOLING
LIQUID PUMP
MICROBOARD
Note jumpers (
) should be removed when these contacts are used.
Figure 4.7 Customer Connections
7
1
8
TB2 26 27 35 36 40 41 42 43 55 56
TO EMS
ANTICIPATORY ALARM
1
SAFETY SHUTDOWN
CHILLED
LIQUID
19
CYCLING SHUTDOWN
SF
20 1
CHILLED
LIQUID PUMP
RUN CONTACTS
1
REMOTE MODE
READY TO START
12
REMOTE STOP
1
REMOTE START
13
LEAVING CHILLED LIQUID TEMPERATURE
SETPOINT (PWM SIGNAL)
COOLING
LIQUID
1
CURRENT LIMIT SETPOINT
(PWM SIGNAL)
SF
9
REMOTE/
LOCAL
CYCLING
1
MULTI UNIT
SEQUENCE
31
AUXILIARY SAFETY
SHUTDOWN
1
TB6
TB2
TB4
TB4 11
2
2
TB6
160.81-ICOM-GB0 (01/02)
5
COMMISSIONING
5.1
Preparation
Commissioning of this unit should only be
carried out by York authorised personnel.
5- 1
Supply voltage: Verify that the site voltage supply
corresponds to the unit requirement and is within the
limits given on the unit data plate.
The customers disconnection devices can now be set to
ON.
The Operating Instruction manual must be read in
conjunction with this section.
The machine is now live!
Preparation - Power Off
The following checks should be made with the customer
supply/supplies to the unit switched off.
Oil Heater: Verify the oil heater is energised for at least
24 hours prior to start-up.
Inspection: Inspect unit for installation damage. If found
take action and/or repair as appropriate.
Compressor Motor: Check the phase rotation
sequence of the incoming supply corresponds to the
required rotation for the motor.
Valves: Open the oil separator valve, liquid line service
valve, oil system, unloader and liquid injection service
valves.
Compressor Coupling Alignment: Verify that the
compressor drive coupling is correctly aligned.
Refrigerant Charge: Units are normally shipped as
standard with a full refrigerant operating charge. Check
that refrigerant is present and that no leaks are apparent
(the refrigerant level should be in the middle of the
evaporator sight glass). If no refrigerant is present a leak
test must be undertaken, the leak(s) located and
repaired. Repaired systems and units supplied with a
nitrogen holding charge must be evacuated with a
suitable vacuum pump/recovery unit as appropriate
(refer to Section 7 for details).
Water/Glycol system(s): Verify that the cooling and
chilled water systems have been installed correctly, and
commissioned with the correct direction of water flow
through the condenser and evaporator. Purge air from
the top of the condenser and evaporator using the
plugged air vents.
Flow switch(es): Verify a chilled water flow switch is
correctly fitted in the customer’s pipework on the
evaporator outlet, and wired into the control panel.
Temperature sensor(s): Ensure the temperature
sensors are coated with heat conductive compound
(Part No. 013-00890-000) and inserted into the sensor
pockets.
Oil System: Check the oil system is correctly charged
and the oil level is visible in the upper sight glass on the
oil separator.
Programmed options: Verify that the options factory
programmed into the control panel are in accordance
with the customers order requirements. Refer to the
Operating Instructions for details.
Isolation/Protection: Verify that all sources of electrical
supply to the unit are taken from a single point of
isolation.
Programmed settings: Ensure the system setpoints,
cut-outs and operational settings are in accordance with
the instructions given in the Operating Instructions.
Control Panel, Motor Terminal Box or Solid State
Starter: Check the panels to see that they are free of
foreign materials (wire, metal chips, etc.) and clean out if
required.
Date & time: Programme the date and time (see
Operating Instructions).
Power Connections: Check the customer power
cables are connected correctly.
Earthing: Verify that the units protective terminal(s) are
properly connected to a suitable earthing point. Ensure
that all unit internal earth connections are tight.
Start/Stop schedule: Programme the daily and holiday
start/stop (see Operating Instructions).
5- 2
5.2
160.81-ICOM-GB0 (01/02)
First Time Start-up
During the commissioning period there should
be sufficient heat load to run the unit under
stable full load operation to enable the unit
controls, and system operation to be set up
correctly and a commissioning log taken.
Read the following section in conjunction with
the control panel Operating Instructions and
Section 6.
Interlocks: Verify that water is flowing through the
evaporator and that heat load is present. Ensure that any
remote run interlocks are in the run position and that the
run schedule requires the unit to run or is overridden.
Start-up: Start the unit in accordance with Section 6 and
be ready when the compressor starts to switch the unit
off immediately if any unusual noises or other adverse
conditions develop.
Operation: Check the system operating parameters are
normal by selecting the various readouts of pressure,
temperature, etc on the control panel.
Oil Level: After operation on full load for around half an
hour, recheck the separator oil level. The level should be
visible in the first stage sight glass. Add or drain oil as
necessary to achieve this level. No oil level should be
visible in the second stage sight glass.
Refrigerant Charge: If stable full load operation can be
achieved at design conditions, then the refrigerant
charge should be trimmed to give the correct split
temperatures across the heat exchangers. The level this
charge represents in the evaporator sight glass (after
shutdown and temperature equalisation) should be
recorded for reference.
160.81-ICOM-GB0 (01/02)
6
OPERATION
If the oil heater is de-energised during a
shutdown period, it must be energized for 24
hours prior to starting the compressor.
6.1
6.3
1.
General
YR chillers are designed to work independently, or in
conjunction with other equipment via a York ISN building
management system or other automated control
system. The compressor can be started and loaded as
required using a range or input signals to achieve the
desired cooling effect. This section describes the normal
procedures for operation of the unit and should be read
in conjunction with the control panel Operation
Instruction.
6.2
6- 1
The internal clock, all the control setpoints and any other
required settings, eg., daily schedule, should be
programmed before the unit is started. (Refer to control
panel Operation Instruction).
If the chilled water pump is manually operated, start the
pump, the control panel will not allow the unit to start
unless chilled liquid flow is established through the unit.
If the chilled liquid pump is wired to the control panel the
pump will automatically start.
Figure 6.1 Starting and Shutdown Sequence
To start the chiller, press the compressor START
switch. This switch will automatically spring return
to the RUN position. When the start switch is
energised, the control panel is placed in an
operating mode and any fault will be shown by a
display message.
Any faults which occur during STOP/RESET
are also displayed.
The slide valve is returned to the unload
position automatically when the unit is shut
down to prevent loading the compressor on
start-up.
Pre-Startup
Prior to starting the chiller, observe the control panel.
Make sure the display reads SYSTEM READY TO
START.
Start-up (Refer to Figure 6.1)
When the unit starts, the following automatic sequences
are initiated: (Refer to Figure 6.1 Starting & Shutdown
Sequence).
1.
The control panel display message will read
START SEQUENCE INITIATED for the starting
sequence.
2.
The measured oil and evaporator pressures are
compared during system equalization so that any
offset is stored for use in calculating deferential trip
points during compressor operation.
6- 2
3.
160.81-ICOM-GB0 (01/02)
The chilled liquid pump contacts close starting the
chilled liquid pump to allow liquid flow through the
evaporator. The chilled water flow switch is
bypassed until the last 5 seconds of the start
sequence.
4.
After T seconds of start sequence operation, the
compressor will start.
5.
When the motor reaches full speed and the current
falls below 100% FLA the message will read:
LEAVING CHILLED LIQUID CONTROL.
6.
The anti-recycle timer begins after 30 seconds of
the start sequence initiated time. The timer will run
for 30 minutes after the compressor starts. If the
unit shuts down during this period of time it cannot
be started until the timer completes the 30 minute
cycle.
For display messages and information
pertaining to operation, refer to the control
panel Operating Instruction.
6.5
During normal operation the unit may shut down for a
number of reasons such as low load, scheduled daily
shutdowns and multi unit cycling. In each case the
control panel display will indicate the reason for the
shutdown. For example, if during operation the control
panel has unloaded the compressor completely and
load continues to fall, the unit will be shut down and the
display will read: LEAVING CHILLED LIQUID
CONTROL - LOW TEMPERATURE.
If the unit is shut down because a problem has been
detected by the control panel, a similar type of message
will be displayed indicating the nature of the problem
(see control panel Operation Instruction, for more
information).
When the unit is shutdown, the slide valve will close
automatically to minimise load on the compressor motor
during startup. A minimum of two minutes after
shutdown is required for system pressure equalisation
before the compressor will be allowed to restart.
6.6
6.4
Normal Operation
After the compressor reaches its operating speed the
slide valve will begin to load, under the control of the
control panel, based on the leaving chilled liquid
temperature. The unit capacity will vary to maintain the
leaving chilled liquid temperature at the programmed
setpoint. A drop in chilled liquid temperature will cause
the slide valve to unload to decrease unit capacity. When
the chilled liquid temperature rises, the slide valve loads
the compressor and increases the unit capacity.
The compressor motor current will be limited to a
programmable maximum during the unit operation. The
control panel can be programmed in various ways to
limit the motor current to between 30 and 100% of Full
Load Current as required (see the control panel
Operation Instruction for more details).
While the compressor is running a wide variety of
system parameters are monitored automatically by the
control panel. These can be accessed and displayed as
required via the control panel keypad and display. If any
problems are detected the cause will be shown on the
display and the appropriate action will be taken, eg
reducing slide valve loading, giving a warning message,
or shutting down the unit.
Shutdown
Manual Shutdown
To stop the unit manually:
1.
Press the compressor STOP/RESET switch. The
control panel display will show: SYSTEM
LOCKOUT DELAY. This prevents compressor
restart until system equalization is achieved.
2.
Stop the chilled water pump (if not wired into the
control panel, in which case it will shut off
automatically.)
3.
Open the switch to the cooling tower fan motors, if
used.
T he compr essor sump oi l he a t e r
(thermostatically controlled) is energised
when the unit is stopped.
160.81-ICOM-GB0 (01/02)
6.7
Prolonged Shutdowns
6- 3
2.
Check Oil Pressure Display: The oil and oil filter
transducers are compared during compressor
operation. If the differential filter pressure exceeds
138 kPa for 8 seconds, the message WARNING OIL - DIRTY FILTER is displayed. If the differential
filter pressure exceeds 172.5 kPa for 8 seconds,
the unit shuts down and the displayed message is
OIL - CLOGGED FILTER. A gradual decrease in
bearing pressure of 30 to 60 kPa (with constant
suction and discharge pressures) may be an
indication of a dirty filter. The filter should be
replaced when pressure loss is 30% of the original
pressure.
3.
Check the oil level in the oil separator reservoir:
The correct oil level is half way up the sight glass
but this may vary depending on load. The level
should not disappear from the sight glass.
4.
Check entering and leaving condenser water
temperatures and condenser pressure for
comparison with design conditions.
5.
To return the unit to operation is the reverse of this
procedure, however, after a prolonged shutdown it will
be necessary to replace all of the oil and install a new oil
filter element. This should only by done by suitably
qualified personnel.
Check the entering and leaving chilled liquid
temperatures and evaporator pressure for
comparison with design conditions.
6.
Check the compressor discharge temperature:
During normal operation discharge temperature
should not exceed 100°C.
6.8
7.
Check the compressor motor voltage and
current: At the Electro Mechanical Starter or on the
control panel display for units with a Solid State
Starter.
8.
Check for any signs of dirty or fouled
condenser tubes. The temperature difference
between water leaving the condenser and the
liquid refrigerant leaving the condenser should not
exceed the difference recorded for a new unit by
more than 2.2°C.
9.
Check water treatment is correct.
If the unit is to be shut down for an extended period of
time (for example, over the winter season), the following
procedure should be followed:
1.
If freezing temperatures are likely to be
encountered while the system is idle, carefully
drain the cooling water from the cooling tower,
condenser, condenser pump, and the chilled water
system, chilled water pump and evaporator. Open
the drains on the evaporator and condenser liquid
heads to assure complete drainage. If a Solid State
Starter is fitted drain water from starter cooling
loop.
2.
Move the jumper on the microprocessor board to
the OFF position to conserve the battery (see
control panel Operation Instruction).
3.
Open the main disconnect switches to the
compressor motor, condenser water pump and the
chilled water pump. Open the 115 Vac circuit to the
control panel.
Operating Inspections
By following a regular inspection schedule any potential
problems with the unit can be identified early and
attended to before serious operating difficulties occur.
The following list of inspections and procedures should
be used as a guide. In all cases the inspections should
only be carried out by properly trained personnel. If a
problem is identified, no attempt should be made to
carry out any repairs unless properly qualified and
equipped to do so. Where appropriate, refer to the
control panel Operation Instruction for correct keypad
operation to access data on the control panel display.
Daily
1.
Check the bearing oil pressure: The actual
bearing oil pressure will vary with compressor
suction and discharge pressures. When a new
system is first operated under normal full load
conditions, the bearing oil pressure should be
recorded as a reference point with which to
compare subsequent readings.
10. Read any warning or safety shutdown messages
displayed.
6- 4
6.9
160.81-ICOM-GB0 (01/02)
Operating Log Sheet
An accurate record of system operating conditions
(temperatures and pressures) recorded at regular
intervals throughout each 24 hour operating period
should be kept. An optional status printer is available for
this purpose using automatic data logging.
The record of readings serves as a valuable reference
for operating the system. Readings taken when a
system is newly installed will establish normal
conditions with which to compare later readings. A
sample log sheet is provided in Figure 6.2, listing the
appropriate unit information which should be recorded
regularly.
6.10 Maintenance and Service
Units are not generally user serviceable and no attempt
should be made to rectify any faults found with the unit
unless suitably qualified and equipped to do so. If the
unit is malfunctioning in any manner, or the unit is
stopped by one of the safety controls, consult Section 8.
After repair or adjustment if the compressor cannot be
started or the particular fault continues to affect the
performance of the unit, please call the nearest York
Office. Failure to report recurring problems or continued
operation of a malfunctioning unit may lead to personal
injury or damage to the unit.
6.10.1 Normal and Safety System Shutdowns
Normal and safety system shutdowns have been built
into the unit to protect it from damage during certain
operating conditions. The unit will be stopped
automatically by controls that respond to high
temperatures, low temperatures, and low and high
pressures, etc. These safety shutdowns require the
operator to manually reset the control panel prior to
restarting the unit.
Figure 6.2 Log Sheet
160.81-ICOM-GB0 (01/02)
7
MAINTENANCE
The Safety Section of this manual should
be read carefully before attempting any
maintenance operations on the unit. This
section should be read in conjunction with
the control panel Operation Instruction.
The units have been designed to operate continuously
provided they are regularly maintained and operated
within the limitations given in this manual. Each unit
should be included in a routine schedule of daily
inspection checks by the operator/customer (see
Section 6), backed up by regular service inspection and
maintenance visits by a suitably qualified Service
Engineer.
It is entirely the responsibility of the owner to provide for
these regular maintenance requirements and/or enter
into a maintenance agreement with York International to
protect the operation of the unit. If damage or a system
failure occurs due to improper maintenance during the
warranty period, York shall not be liable for costs
incurred to return the unit to satisfactory condition.
This maintenance section applies only to the basic YR
unit and may, on individual contracts, be supplemented
by additional requirements to cover any modifications or
ancillary equipment as applicable.
7.1
Scheduled Maintenance
The table on the following page lists the regular
maintenance operations which should be carried out by
a suitably qualified Service Engineer.
The interval necessary between each 'minor' and 'major'
ser vice can var y depending on, for example,
application, site conditions and expected operating
schedule. Normally a 'minor' service should be carried
out every three to six months and a 'major' service at
least once a year. It is recommended, however, that York
Service is contacted for recommendations for individual
sites.
7.1.1
7- 1
Check the oil and refrigerant levels - Weekly
The refrigerant charge level is correct when the
measured evaporator approach and discharge
refrigerant gas superheat are within the values listed in
the table below.
COMFORT COOLING APPLICATIONS
Evaporator Approach
0.6 to 2.8°C
Discharge Superheat
6.7 to 10.0°C
GLYCOL (ICE MAKING) APPLICATIONS
Evaporator Approach
2.2 to 4.4°C
Discharge Superheat
13.3 to 20.0°C
The chiller must be at design operating
conditions and full load operation before the
correct refrigerant charge level can be
properly determined.
Liquid refrigerant will be visible in the evaporator sight
glass. The refrigerant level cannot be properly
determined by viewing the liquid refrigerant level in the
evaporator sight glass.
All YR Chillers shipped in Form 1 are charged with the
correct amount of refrigerant. Under some operating
conditions the chiller may appear to be overcharged or
undercharged with refrigerant. Consult with the YORK
Factory prior to removing or adding refrigerant. The
liquid line isolation valve may have to be partially
throttled to prevent overfeeding the evaporator in some
applications and under certain operating conditions.
Definitions:
Evaporator Approach = (S.E.T) - (L.E.L.T)
Discharge Superheat = (C.D.G.T) - (S.C.T)
Where:
S.E.T. = Saturated Evaporator Temperature
L.E.L.T. = Leaving Evaporator Liquid Temperature
C.D.G.T. = Compressor Discharge Gas Temperature
S.C.T. = Saturated Condensing Temperature
These values can be obtained from the OptiView control
panel. Refer to the Operating Instructions, 160.81-OI.
A visual check is sufficient to verify the oil level. Two sight
glasses are part of the oil separator and should be used
to determine the proper operating oil level.
The upper sight glass should have liquid oil visible in the
sight glass with the chiller off and the oil at 40 to 46°C.
When the chiller is in operation, the oil level may be
different from the standby condition, due to the
turbulence created by the discharge gas in the oil
separator.
7- 2
7.2
160.81-ICOM-GB0 (01/02)
Special Maintenance Requirements
In addition to the regular maintenance schedule, there
are some further special requirements for maintenance
of the unit based on the number of operating hours from
initial start-up:
At 200 hours of operation:
n
n
n
n
n
n
n
Check operating temperatures / pressures
Check chemical condition of oil
Change oil filter elements
Change oil return strainers
Check drive coupling
Check compressor / motor alignment
Check vibration levels
At 1000 hours of operation:
n
Check operating temperatures / pressures
At 5000 hours of operation:
n
n
n
n
n
n
n
Check operating temperatures / pressures
Check chemical condition of oil
Change oil filter elements
Change oil return strainers
Change oil
Check drive coupling
Check compressor / motor alignment
At 50,000 hours of operation:
n
Compressor internal inspection
For practical reasons it is not necessary to carry out
these maintenance operations at the exact operating
hours specified. The work should, however, be carried
out slightly before rather than after the specified hours.
The calendar time taken to reach the number of
operating hours specified above will vary significantly
depending on operating schedule. If a maintenance
operation given above closely coincides with, or has
been recently been completed as, part of the regular
scheduled maintenance then the operation need not be
repeated.
160.81-ICOM-GB0 (01/02)
7.3
7- 3
Regular Maintenance Operations
Service Schedule
MINOR SERVICE
( 3 - 6 monthly ) *
MAJOR SERVICE ( 6 - 12 monthly ) *
All items under Minor Service plus:
General
Check thermal insulation
Check vibration isolators
Check main structure
Check paint-work
Check vibration levels
Refrigerant Systems
Check relief valves
Check for pipework damage
Check for leaks
Check operating temps./press.
Check suction superheat
Check liquid subcooling
Pressure test complete system
Check chemical condition of system
Oil System
Check oil level
Check oil pressure
Check oil differential pressure
Change oil filter element
Check eductor nozzles
Change oil return strainers
Check oil heater
Check chemical condition of oil
Change oil
Check solenoid valves
Compressor
Check unloader operation
Check drive coupling
Check compressor / motor alignment
Drive Motor
Check mounting bolts
Clean air passages
Clean windings
Megger test
Lubricate bearings
Evaporator & Condenser
Clean water strainers
Check tubes
Check end sheets
Mechanically brush condenser tubes.
Verify evaporator and condenser water
flow rates against design conditions.
Power & Control System
Check panel condition
Check mains and control wiring
Check sensors
Check mechanical HP cut-outs
Check emergency stop
Check 3-phase voltage and current
balance
Check all connections
Check compressor contactors / SSS
Check sensor / transducer calibration
Check motor protectors
Microcomputer
Check fault history
Check program settings
Check HP / LP cut-out functions
Check load / unload function
Check ambient cut-out function
Check low oil pressure function
* Service interval depends on operational requirements - please contact York for individual site recommendations .
7- 4
7.4
160.81-ICOM-GB0 (01/02)
Connect a refrigeration pressure hose to the
pressure access port and drain the oil and
refrigerant into a suitable refrigerant recovery
container.
Oil Filters and Driers
3.
Position a container to collect the oil (less than 1.9
litres). Loosen and remove the drain nut at the
bottom of the oil filter housing; drain the oil into the
container.
4.
Unscrew the oil filter bowl locking nut.
5.
Remove the oil filter element.
6.
Install a new element.
7.
Install a new O-ring on the top of the oil filter bowl.
8.
Tighten the oil filter bowl locking nut.
Figure 7.1 Filters and Filter Driers
9.
Evacuate the air from the oil filter to 500 microns
PSIG.
A single oil filter is provided as standard equipment and
dual oil filter arrangements are available as optional
equipment. The oil filter(s) are a replaceable 3 micron
cartridge type oil filter. Use only YORK approved oil filter
elements.
10. Open the hand isolation valves.
The oil filter element should be changed after the first
200 hours of operation and then as necessary
thereafter. Change the oil filter element before the
differential pressure reaches 1 bar. Always replace the
oil filter element and O-ring on a yearly maintenance
schedule.
The dual oil filter option allows one oil filter to be isolated
and changed with the chiller in operation.
OIL FILTER
FILTER
DRIER
OIL
EDUCTOR
BLOCK
FILTER
DRIER
FILTER DRIER
The YORK control panel will automatically display the
message WARNING - OIL - DIRTY FILTER when the
differential pressure reaches 138 kPa across the oil
filter. A safety shutdown will be initiated if the oil pressure
differential pressure reaches 172.5 kPa. The control
panel will display the message OIL - CLOGGED
FILTER.
11. The chiller is ready to be restarted.
7.4.2
Dual Oil Filters
1.
Open the hand isolation valves on the idle filter.
2.
Close the hand isolation valves on the filter to be
changed.
3.
Follow the instructions for changing the single oil
filter beginning at step 2.
4.
This can now be the idle filter and the chiller can be
operated with the current oil filter.
7.4.3
Filter Drier Replacement
The filter driers should be changed annually or when
excessive amount of oil is indicated in the refrigerant
charge.
When the filter driers require changing the chiller must
be shut off.
7.4.1
1.
The chiller must be OFF. Turn the rocker switch to the
OFF position; turn the circuit breaker to the off position to
prevent the chiller from being accidentally started.
Close the service isolation valves identified in
schematic drawing, see Figure 2.2.
2.
Carefully remove the insulation on the filter driers
located on the eductor block.
1.
Close the hand isolation valves on the inlet and
outlet oil lines going to and from the oil filter.
3.
2.
Relieve the refrigerant pressure and oil in the oil
filter and the oil lines through the pressure access
port fitting, located on the top of the filter housing.
Relieve the pressure from the circuit using the
pressure access fitting located on the side of the
eductor block. Connect a refrigeration pressure
hose to the pressure access port and drain the oil
and refrigerant into a suitable refrigerant recovery
container.
Single Oil Filter Replacement
160.81-ICOM-GB0 (01/02)
®
4.
Loosen the Rota-Lock Nuts at each end of the filter
driers. Remove the filter driers.
5.
Teflon® seal washers are used to seal the filter drier
connections. These washers must be replaced
when the filter driers are replaced.
6.
Tighten the Rota-Lock® Nuts at each end of the
three filter driers to a torque of 60 ft.-lb.
7.
Evacuate the air from the oil filter to 500 microns
PSIG.
8.
Open the five hand isolation valves. The chiller is
now ready to be placed back into service.
7.5
7- 5
2.
Immerse the suction connection of the oil charging
pump in a clean container of new oil and connect
the pump discharge connection to the oil charging
valve. Do not tighten the connection at the charging
valve until after the air is forced out by pumping a
few strokes of the oil pump. This fills the lines with
oil and prevents air from being pumped into the
system.
3.
Open the oil charging valve and pump oil into the
system until oil level in the oil separator is about
midway in the upper sight glass. Then, close the
charging valve and disconnect the hand oil pump.
4.
The immersion oil heater will maintain the oil
temperature between 40°C and 46°C.
Oil Charging
Draining the oil
T0 and T1 compressors require approximately 41 litres
of oil. The actual amount of oil required depends on the
compressor/ separator combination and the condition of
the refrigerant. The actual operating level in the
separator should be kept from exceeding the top of the
highest sight port. All units use York Grade 'H' oil.
7.5.1
Oil charging procedure
1.
If the oil draining is to restore the correct oil level the
unit may be kept in operation. If the oil charge is
being replaced the unit must be shut down and the
supply switched off to prevent operation of the oil
heater.
2.
If possible run the unit at full load for a short period
to recover most of the oil in the system to the oil
separator.
3.
Drain the oil into a suitable container from the oil
charging valve on the bottom of the oil separator.
4.
Dispose of old oil according to local regulations for
the disposal of oily wastes.
7.6
Refrigerant Charge
The refrigerant system is pressure tested and
evacuated at the factory.
7.6.1
Checking The Refrigerant Charge
See para. 7.1.1.
Figure 7.2 Charging Oil
The oil should be charged into the oil separator using the
York Oil Charging Pump (Part No. 070- 10654).
To charge oil proceed as follows:
1.
If the oil charging is to restore the correct oil level
the unit may be kept in operation. If the oil charge is
being replaced the unit must be shut down and the
supply switched off to prevent operation of the oil
heater.
7.6.2
Leak Testing
After the system has been charged, the system should
be carefully leak tested with a R134a compatible leak
detector to ensure all joints are tight.
If any leaks are indicated, they must be repaired
immediately. Usually, leaks can be stopped by tightening
flare nuts or flange bolts. However, for any major repair,
the refrigerant charge must be removed.
7- 6
7.6.3
160.81-ICOM-GB0 (01/02)
Vacuum Testing
7.6.4
Vacuum testing should be conducted as follows:
1.
Connect a high capacity vacuum pump, with
indicator, to the system charging valve and start the
pump.
2.
Open wide all system valves. Be sure all valves to
the atmosphere are closed.
3.
Operate the vacuum pump until a wet bulb
temperature of 0°C or a pressure of 5 mm Hg
(absolute) is reached.
4.
To improve evacuation circulate warm water (not to
exceed 50°C) through the evaporator and
condenser tubes to thoroughly dehydrate the
shells. If a source of hot water is not readily
available, a portable water heater should be
employed. DO NOT USE STEAM. A suggested
method is to connect a hose between the source of
hot water under pressure and the evaporator head
drain connection, out the evaporator vent
connection, into the condenser head drain and out
the condenser vent. To avoid the possibility of
causing leaks, the temperature should be brought
up slowly so that the tubes and shell are heated
evenly.
5.
6.
Close the system charging valve and the stop valve
between the vacuum indicator and the vacuum
pump. Then disconnect the vacuum pump leaving
the vacuum indicator in place.
Hold the vacuum in the system for 8 hours; the
slightest rise in pressure indicates a leak or the
presence of moisture, or both. If, after 8 hours the
wet bulb temperature in the vacuum indicator has
not risen above 4.4°C or a pressure of 6.3 mm Hg,
the system may be considered tight.
Be sure the vacuum indicator is valved off while holding
the system vacuum and be sure to open the valve
between the vacuum indicator and the system when
checking the vacuum after the 8 hour period.
7.
Refrigerant Charging
When opening any part of the refrigerant
system for repairs, the refrigerant charge
must be removed. If the chiller is equipped
with optional valves, the refrigerant can be
isolated in either the condenser or evaporator
/ compressor while making repairs.
To prevent liquid freezing within the evaporator tubes
when charging an evacuated system, only refrigerant
vapour must be added to the system until the system
pressure is raised above the point corresponding to the
freezing point of the evaporator liquid. For water, the
pressure corresponding to the freezing point is 58.9 kPa
for R134a (at sea level).
While charging, care must be taken to prevent
moisture laden air from entering the system.
Make up a suitable charging connection from new
copper tubing to fit between the system charging valve
and the fitting on the charging drum. This connection
should be as short as possible but long enough to permit
sufficient flexibility for changing drums. The charging
connection should be purged each time a new container
of refrigerant is connected and changing containers
should be done as quickly as possible to minimise the
loss of refrigerant.
7.7
Evaporator and Condenser
Maintenance of condenser and evaporator shells is
important to provide trouble free operation of the chiller.
The water side of the tubes in the shell must be kept
cl ean and f r ee f r om scal e. T he fol l owin g
recommendation should be followed in determining the
condition of the water side of the condenser and
evaporator tubes.
1.
The condenser tubes should be cleaned annually
or earlier if conditions warrant. If the temperature
difference between the water off the condenser
and the condenser liquid temperature is more than
4° greater than the difference recorded on a new
unit, it is a good indication that the condenser tubes
require cleaning.
2.
The evaporator tubes under normal circumstances
will not require cleaning. If however the
temperature difference between the refrigerant
and the chilled water increases slowly over the
operating season, it is an indication that the
evaporator tubes may be fouling or that there may
be a water by-pass in the water box requiring
gasket replacement or refrigerant may have leaked
from the chiller.
If the vacuum does not hold for 8 hours within the
limits specified, the leak must be found and
repaired.
160.81-ICOM-GB0 (01/02)
7.7.1
Chemical Water Treatment
Since the mineral content of the water circulated through
the evaporator and condenser varies with almost every
source of supply, it is possible that the water being used
may corrode the tubes or deposit heat resistant scale in
them. Reliable water treatment will greatly reduce the
corrosive and scale forming properties of almost any
type of water.
2.
7.7.3
7- 7
Scale - due to mineral deposits. These deposits,
even though very thin and scarcely detectable
upon physical inspection, are highly resistant to
heat transfer. They can be removed most
effectively by circulating an acid solution through
the tubes.
Tube Cleaning Procedures
Brush Cleaning of Tubes
As a preventive measure against scale and corrosion
and to prolong the life of evaporator and condenser
tubes, a chemical analysis of the water should be made
preferably before the system is installed. A water
treatment expert should be consulted to determine
whether water treatment is necessary, and if so, to
furnish the proper treatment for the particular water
condition.
7.7.2
Tube Cleaning
Evaporator
It is difficult to determine by any particular test whether
possible lack of performance of the water evaporator is
due to fouled tubes alone or due to a combination of
troubles. Trouble which may be due to fouled tubes is
indicated when, over a period of time, the cooling
capacity decreases and the split (temperature
difference between water leaving the evaporator and the
refrigerant temperature in the evaporator) increases. A
gradual drop-off in cooling capacity can also be caused
by a gradual leak of refrigerant from the system or by a
combination of fouled tubes and shortage of refrigerant
charge. An excessive quantity of oil in the evaporator
can also contribute to erratic performance.
Condenser
Condenser trouble due to fouled tubes is usually
indicated by a steady rise in head pressure, over a
period of time, accompanied by a steady rise in
condensing temperature, and noisy operation. These
symptoms may also be due to foul gas build-up. Purging
will remove the foul gas revealing the effect of fouling.
Tube Fouling
Fouling of the tubes can be due to deposits of two types
as follows:
1.
Rust or sludge - which finds its way into the tubes
and accumulates there. This material usually does
not build up on the inner tube surfaces as scale, but
does interfere with the heat transfer. Rust or sludge
can generally be removed from the tubes by a
thorough brushing process.
If the tube consists of dirt and sludge, it can usually be
removed by means of the brushing process. Drain the
water sides of the circuit to be cleaned (cooling water or
chilled water) remove the heads and thoroughly clean
each tube with a soft bristle bronze or nylon brush. DO
NOT USE A STEEL BRISTLE BRUSH. A steel brush
may damage the tubes.
Improved results can be obtained by admitting water
into the tube during the cleaning process. This can be
done by mounting the brush on a suitable length of 1/8"
pipe with a few small holes at the brush end and
connecting the other end by means of a hose to the
water supply.
The tubes should always be brush cleaned
before acid cleaning.
Acid Cleaning of Tubes
If the tubes are fouled with a hard scale deposit, they
may require acid cleaning. It is important that before acid
cleaning, the tubes be cleaned by the brushing process
described above. If the relatively loose foreign material
is removed before the acid cleaning, the acid solution
will have less material to dissolve and flush from the
tubes with the result that a more satisfactory cleaning
job will be accomplished with a probable saving of time.
Acid cleaning should only be performed by an expert.
Pl ease consul t your l ocal wat er t r e a t m e n t
representative for assistance in removing scale build-up
and preventative maintenance programs to eliminate
future problems.
7- 8
7.7.4
160.81-ICOM-GB0 (01/02)
Tube Leaks
4.
After the tubes have been corked for 12 to 24
hours, it is recommended that two men working at
both ends of the evaporator carefully test each tube
– one man removing corks at one end and the other
at the opposite end to remove corks and handle the
leak detector. Start with the top row of tubes in the
section being investigated. Remove the corks at
the ends of one tube simultaneously and insert the
exploring tube for 5 seconds – this should be long
enough to draw into the detector any refrigerant
gas that might have leaked through the tube walls.
A fan placed at the end of the evaporator opposite
the detector will assure that any leakage will travel
through the tube to the detector.
5.
Mark any leaking tubes for later identification.
6.
If any of the tube sheet joints are leaking, the leak
should be indicated by the detector. If a tube sheet
leak is suspected, its exact location may be found
by using a soap solution. A continuous buildup of
bubbles around a tube indicates a tube sheet leak.
Evaporator and condenser tube leaks may result in
refrigerant leaking into the water circuit, or water leaking
into the shell depending on the pressure levels. If
refrigerant is leaking into the water, it can be detected at
the liquid head vents after a period of shutdown. If water
is leaking into the refrigerant, system capacity and
efficiency will drop off sharply.
If a tube is leaking and water has entered the system,
the evaporator and condenser should be valved off from
the rest of the water circuit and drained immediately to
prevent severe rusting and corrosion. The refrigerant
system should then be drained and purged with dry
nitrogen to prevent severe rusting and corrosion. If a
tube leak is indicated, the exact location of the leak may
be determined as follows:
1.
2.
3.
Remove the heads and listen at each section of
tubes for a hissing sound that would indicate gas
leakage. This will assist in locating the section of
tubes to be further investigated. If the probable
location of the leaky tubes has been determined,
treat that section in the following manner (if the
location is not definite, all the tubes will require
investigation).
Wash off both tube heads and the ends of all tubes
with water.
With nitrogen or dry air, blow out the tubes to clear
them of traces of refrigerant laden moisture from
the circulation water. As soon as the tubes are
clear, a cork should be driven into each end of the
tube. Pressurise the dry system with 3.5 to 6.9 barg
of nitrogen. Repeat this with all of the other tubes in
the suspected section or, if necessary, with all the
tubes in the evaporator or condenser. Allow the
evaporator or condenser to remain corked up to 12
to 24 hours before proceeding. Depending upon
the amount of leakage, the corks may blow from the
end of a tube, indicating the location of the leakage.
If not, it will be necessary to make a very thorough
test with the leak detector.
7.7.5
In-Service Inspection
There is no corrosion on the refrigerant side therefore
in-service inspection on the refrigerant side is not
necessary.
For the water side, if the water used is treated in
accordance with the recommendations given in this
manual, in-service inspection is not necessary.
York International believes that periodic in service proof
testing (e.g.; hydro tests) is not required. However, York
International recognises that national regulations may
require such testing to be conducted.
7.8
Electrical Controls
1.
All electrical controls should be inspected for
obvious malfunctions.
2.
It is important that the factory settings of controls
(operation and safety) are not changed. If the
settings are changed without York approval, the
warranty will be invalidated.
160.81-ICOM-GB0 (01/02)
7.9
Testing Motor Winding Insulation
With the main disconnect switch and compressor motor
starter open, test the motor as follows:
1.
Test the insulation, using a megohm meter
(megger), between phases and each phase and
ground as shown; these readings are to be
interpreted using the graph shown in below.
2.
If readings fall below shaded area, remove external
leads from motor and repeat test.
7- 9
Motor is to be megged with the starter at
ambient temperature after 24 hours of idle
standby.
Minimum Insulation Resistance vs. Temperature (per IEEE Std 43)
48.9°C
43.3°C
°C
37.8°C
32.2°C
26.7°C
21.1°C
15.6°C
10.0°C
4.4°C
1. Megohm readings should be taken after Megohm voltage has been applied one minute.
2. If insulation resistance lies to the right of the applicable curve, the motor is acceptable for
use.
3. If insulation resistance lies to the left of the applicable curve, the motor should not be run.
The motor should be heated to 250°F in an effort to remove moisture and obtain an
acceptable reading at room ambient.This can be done either by baking in a forced hot air
oven or, if proper voltage is available, apply 5 - 10% of rated voltage to motor windings.
4. Any gradual or abrupt decrease in Megohm readings over an extended period of time is
an indication of deterioration of insulation and/or moisture absorption or oil/dirt
contamination.
5. Megohm readings of individual phase coils of 200 - 600V motors should be made with
coils not under test being grounded.
7-10
160.81-ICOM-GB0 (01/02)
Page Left Intentionally Blank
160.81-ICOM-GB0 (01/02)
8
TROUBLE SHOOTING
8.1
General Requirements
Units are not generally user serviceable and no attempt
should be made to rectify any faults found with the unit
unless suitably qualified and equipped to do so. If in any
doubt, contact your local York Agent. To avoid personal
injury or possible damage to the unit, the trouble
shooting information given in the following section must
only be used by competent service personnel using
correct procedures and equipment.
8.2
Trouble Shooting
In any case where the control panel detects conditions
or control functions requiring the unit to stop, it will shut
down the unit and display the reason for the shutdown.
Most shutdowns will be due to normal cycling of the unit
due to lack of load, scheduled off cycles etc., but others
may be caused by an internal or external fault detected
by the control panel. For a full description of the
operation of each of these shutdown functions refer to
the control panel Operation Instruction.
Fault
8- 1
In the case of shutdowns caused by cycling contacts, or
by other conditions unlikely to cause an ongoing
problem, the control panel will automatically restart the
unit as soon as the contacts or conditions allow the unit
to run. If, however, this type shutdown occurs
unexpectedly or repeatedly, a problem may exist which
requires attention.
For shutdowns caused by conditions which may lead to
damage to the unit, the control panel will require a
manual reset before allowing a restart. In this situation it
is essential to determine the exact cause of the
shutdown and rectify the problem before putting the unit
back into service.
Some operating conditions are not monitored by the
control panel such as compressor wear, oil condition,
water treatment levels, etc. Detection of any potential
problems caused by these conditions relies on daily
monitoring of the unit and by regular service inspections
- see Sections 6 & 7.
The possible causes and recommended actions listed in
these tables should be used for guidance only and
should not be considered exhaustive.
Possible Cause
Remedy
Temperature difference between
condensing temperature and
condenser leaving liquid temperature
higher than normal.
Air in condenser.
Bleed cooling water circuit.
High discharge pressure.
Condenser tubes dirty or scaled.
Clean condenser tubes. Check water
treatment.
High condenser water temperature.
Reduce condenser water inlet
temperature. (Check cooling tower
and water circulation.)
Insufficient condensing water flow.
Increase the water flow through the
condenser to correct value.
Temperature difference between
leaving chilled water and refrigerant in
evaporator greater than normal with
high discharge temperature.
Insufficient charge of refrigerant.
Check for leaks and charge
refrigerant into system.
Variable orifice problem.
Remove obstruction.
Temperature difference between
leaving chilled water and refrigerant in
the evaporator greater than normal
with normal discharge temperature.
Evaporator tubes dirty or restricted.
Clean evaporator tubes.
Abnormally High Discharge Pressure
Temperature difference between
condenser entering liquid and
condenser leaving liquid higher than
normal, with normal evaporator
pressure.
Abnormally Low Suction Pressure
8- 2
160.81-ICOM-GB0 (01/02)
Fault
Possible Cause
Remedy
Temperature of chilled water too low
with low motor current.
Insufficient load for system capacity.
Check slide valve operation and
setting of low water temperature
cut-out.
Slide valves fail to open.
Check the slide valve solenoid valve.
System overload.
Be sure that the slide valve is fully
open (without overloading the motor)
until the load decreases.
High Evaporator Pressure
High chilled water temperature.
Compressor Starts, Normal Oil Pressure Develops, Fluctuates for Short While, then Compressor Stops on Oil
Pressure Cut-out
Oil pressure normal, fluctuates then
compressor stops on Oil Pressure
Cut-out. Display reading: LOW OIL
PRESSURE
Unusual starting conditions exist, i.e.,
oil foaming in reservoir and piping due
to lowered system pressure.
Drain the oil from the compressor and
charge new oil into the compressor.
(Refer to “Oil Charging Procedure).
Burned out oil heater.
Replace oil heater.
Oil Pressure Gradually Decreases (Noted by Observation of Daily Log Sheets)
Oil pressure drops to 70% of oil
pressure when compressor was
originally started.
Oil filter is dirty.
Change oil filter.
Extreme bearing wear.
Inspect compressor.
Oil Pressure System Ceases to return an Oil/Refrigerant Sample
Oil refrigerant return not functioning.
Filter-drier in oil return system dirty.
Replace old filter-drier with new.
Jet or orifice of oil return jet clogged.
Remove jet, inspect for dirt. Remove
dirt using solvent and replace.
Faulty oil pressure transducer. Faulty
wiring/connectors.
Replace oil pressure transducer.
System Fails to deliver Oil Pressure
No oil pressure registers.
160.81-ICOM-GB0 (01/02)
9
TECHNICAL DATA
9.1
Dimensions
9- 1
Overall Dimensions - T0 and T1 Compressor
T0 and T1 COMPRESSOR
SHELL CODES - (Evaporator-Condenser)
DIM.
T-T
V-V
A
3,048
4,267
B
2,445
2,445
C
1,550
1,550
D
762
762
E
787
787
F
381
381
G
394
394
L
70
190
Dimensions in mm
EVAPORATOR CODES T & V
CONDENSER CODES T & V
DIM.
1 PASS
2 PASS
3 PASS
1 PASS
2 PASS
3 PASS
H
375
343
343
—
—
—
J
—
—
—
REAR HEAD 2 PASS
375
318
318
REAR HEAD 2 PASS
K
222
194
Dimensions based on Victaulic connection. Add 6 mm to each compact
water box with optional flanged nozzles.
Notes
1. Unit height includes steel mounting plates under tube sheets. To determine overall installed height,
add 22 mm for neoprene isolators (25 mm for optional spring isolators).
2. Determine overall unit length by adding water box depth to tube sheet length.
3. All dimensions are approximate. Certified dimensions are available on request.
9- 2
9.2
160.81-ICOM-GB0 (01/02)
Solid State Starter Details (Optional)
POWER WIRING ENTRANCE COVER WITH
22 mm Ø KNOCKOUTS USED AS LEAD
HOLES FOR POWER WIRING CONDUIT
CONNECTIONS
MOTOR/COMPRESSOR
OPTIVIEW
CONTROL
PANEL
B
SOLID STATE
STARTER
c
F
E
A
D
C
L OF POWER
FRONT VIEW
Model/Dim.
A
7LK & 14LK 864
26LK & 33LK 889
9.3
TOP VIEW
CONNECTION
LOCATION
B
543
645
C
D
E
280 1397 168
305 1397 140
F
138
151
Weight (kg)
200
200
Weights
SHELL CODE
SHIPPING
OPERATING REFRIGERANT LOADING PER
EVAPORATOR-CONDENSER WEIGHT (KG) WEIGHT (KG) CHARGE (KG) ISOLATOR (KG)
TB-TB
TB-TC
TB-TD
TC-TB
TC-TC
TC-TD
TD-TB
TC-TC
TD-TD
VB-VB
VB-VC
VB-VD
VC-VB
VC-VC
VC-VD
VD-VB
VD-VC
VD-VD
5,380
5,400
5,450
5,425
5,450
5,495
5,475
5,500
5,540
5,750
5,785
5,845
5,815
5,850
5,910
5,890
5,930
5,990
5,925
5,965
6,030
5,990
6,030
6,100
6,060
6,100
6,170
6,495
6,555
6,649
6,586
6,645
6,735
6,690
6,755
6,845
272
272
272
272
272
272
272
272
272
408
408
408
408
408
408
408
408
408
1,480
1,490
1,510
1,495
1,510
1,525
1,515
1,525
1,540
1,625
1,640
1,665
1,645
1,665
1,685
1,675
1,690
1,710
160.81-ICOM-GB0 (01/02)
9.4
Process and Instrumentation Diagram
9- 3
9- 4
9.5
160.81-ICOM-GB0 (01/02)
Water Box Nozzle Arrangements
A
A
CC
CC
EVAPORATOR
EVAPORATOR
GG
25.4 mm
MOTOR END
FLOOR
LINE
GG
25.4 mm
COMPRESSOR END
J
B
K
C
DD
DD
BB
BB
GG
FLOOR
LINE
25.4 mm
COMPRESSOR END
N
F
P
G
DD
DD
BB
BB
EVAPORATOR
EVAPORATOR
GG
25.4 mm
MOTOR END
Evaporator
Shell Code
T
V
2-PASS
Nozzle Arrangements
No. of
Evaporator
In
Out
Passes
C
B
2
K
J
NOTE: Water must enter through bottom
connection to achieve rated performance
EVAPORATOR
EVAPORATOR
GG
25.4 mm
MOTOR END
1-PASS
Nozzle Arrangements
No. of
Evaporator
In
Out
Passes
A
H
1
H
A
FLOOR
LINE
3-PASS
Nozzle Arrangements
No. of
Evaporator
In
Out
Passes
G
N
3
P
F
NOTE: Water must enter through bottom
connection to achieve rated performance
GG
25.4 mm
COMPRESSOR END
Nozzle Pipe Size
No. of Passes
1
2
3
8"
6"
4"
8"
6"
4"
1-PASS
CC2
GG
578
343
578
343
Evaporator Nozzle Dimensions
2-PASS
3-PASS
DD2
BB2
BB2
GG
DD
330
775
343
330
775
330
775
343
330
775
GG
394
394
Dimensions in mm
NOTES:
1. Standard water nozzles are furnished as welding stub-outs with Victaulic grooves, allowing the option of welding, flanges, or use of Victaulic
couplings. Factory installed, class 150 (ANSI B16.5, round slip-on, forged carbon steel with 1.59mm raised face), water flanged nozzles are
optional (add 12.7 mm to nozzle length). Companion flanges, nuts, bolts and gaskets are not furnished.
2. Add 25.4 mm for isolators as shown.
3 One-, two- and three-pass nozzle arrangements are available only in pairs shown and for all shell codes. Any pair of evaporator nozzles may
be used in combination with any pair of condenser nozzles.
4. Connected piping should allow for removal of compact water boxes for tube access and cleaning.
160.81-ICOM-GB0 (01/02)
FRONT
OF
UNIT
FRONT
OF
UNIT
P
Q
CC
CC
1-PASS
Nozzle Arrangements
No. of
Condenser
In
Out
Passes
P
Q
1
Q
P
CONDENSER
CONDENSER
GG
25.4 mm
COMPRESSOR END
9- 5
GG
FLOOR
LINE
25.4 mm
MOTOR END
FRONT
OF
UNIT
FRONT
OF
UNIT
S
U
R
T
DD
DD
BB
BB
GG
25.4 mm
COMPRESSOR END
NOTE: Water must enter through bottom
connection to achieve rated performance
CONDENSER
CONDENSER
2-PASS
Nozzle Arrangements
No. of
Condenser
In
Out
Passes
R
S
2
T
U
GG
25.4 mm
MOTOR END
FLOOR
LINE
FRONT
OF
UNIT
FRONT
OF
UNIT
W
Y
V
X
DD
DD
BB
BB
CONDENSER
CONDENSER
GG
25.4 mm
COMPRESSOR END
Condenser
Shell Code
T
V
GG
FLOOR
LINE
Nozzle Pipe Size
No. of Passes
1
2
3
10"
6"
6"
10"
6"
6"
25.4 mm
MOTOR END
1-PASS
CC2
GG
730.2
381
730.2
381
3-PASS
Nozzle Arrangements
No. of
Condenser
In
Out
Passes
V
Y
3
X
W
NOTE: Water must enter through bottom
connection to achieve rated performance
Condenser Nozzle Dimensions
2-PASS
3-PASS
DD2
BB2
BB2
GG
DD
552.5
908.1
381
552.5
908.1
552.5
908.1
381
552.5
908.1
GG
381
381
Dimensions in mm
NOTES:
1. Standard water nozzles are furnished as welding stub-outs with Victaulic grooves, allowing the option of welding, flanges, or use of Victaulic
couplings. Factory installed, class 150 (ANSI B16.5, round slip-on, forged carbon steel with 1.59mm raised face), water flanged nozzles are
optional (add 12.7 mm to nozzle length). Companion flanges, nuts, bolts and gaskets are not furnished.
2. Add 25.4 mm for isolators as shown.
3 One-, two- and three-pass nozzle arrangements are available only in pairs shown and for all shell codes. Any pair of evaporator nozzles may
be used in combination with any pair of condenser nozzles.
4. Connected piping should allow for removal of compact water boxes for tube access and cleaning.
9- 6
160.81-ICOM-GB0 (01/02)
Page left intentionally blank
160.81-ICOM-GB0 (01/02)
10
SPARE PARTS
It is recommended that the following common spare
par ts are held for preventative of corrective
maintenance operations.
Part
Qty.
Information
Required
Other spare parts vary depending on the unit model.
Contact your local York Sales and Service Centre for
information and please quote the unit model number
and serial number.
When ordering spare parts, we will require the following
information to ensure the correct parts are supplied:
Full unit model number, serial number, application and
details of the parts required.
All requests for parts should be made to your local York
Sales and Service Centre.
Part No.
10-1
10-2
160.81-ICOM-GB0 (01/02)
Page left intentionally blank
160.81-ICOM-GB0 (01/02)
11
11-1
DE-COMMISSIONING, DISMANTLING AND DISPOSAL
N ever release refrigerant t o t h e
atm osphere w hen emptyin g t h e
refrigerating circuits. Suitable retrieval
equipment must be used. If reclaimed
refrigerant cannot be re-used. It must be
returned to the manufacturer.
Never discard used compressor oil, as it
contains refrigerant in solution. Return
used oil to the oil manufacturer.
Unless otherwise indicated the operations described
below can be performed by any properly trained
maintenance technician.
11.1 General
Isolate all sources of electrical supply to the unit
including any control system supplies switched by the
unit. Ensure that all points of isolation are secured in the
‘OFF’ position. The supply cables may then be
disconnected and removed. For connection points refer
to Section 4.
Remove all refrigerant from the unit into a suitable
container using a refrigerant reclaim or recovery unit.
This refrigerant may then be re-used, if appropriate, or
returned to the manufacturer for disposal. Under NO
circumstances should refrigerant be vented to
atmosphere. Drain the oil from the unit into a suitable
container and dispose of according to local laws and
regulations governing the disposal of oily wastes. Any
spilt oil should be mopped up and similarly disposed of.
Isolate the unit heat exchangers from all external water
systems and drain the heat exchanger sections of the
system. If no isolation valves are installed it may be
necessary to drain the complete systems.
If glycol or similar solutions have been
used in the water system(s), or Chemical
additives are contained, the solution
MUST be disposed of in a suitable and safe
manner. Under NO circumstances should
any system containing glycol or similar
solutions be drained directly into domestic
waste or natural water systems.
After draining, the water pipework can be disconnected
and removed.
Packaged units can generally be removed in one piece
after disconnection as above. Any fixing down bolts
should be removed and then the unit should be lifted
from position using the points provided and equipment
of adequate lifting capacity.
Reference should be made to Section 4 for unit
installation instructions, Section 9 for unit weights and
Section 3 for handling.
Units which cannot be removed in one piece, after
disconnection as above, must be dismantled in position.
Special care should be taken regarding the weight and
handling of each component. Where possible units
should be dismantled in the reverse order of installation.
Residual solution, refrigerant, oil and glycol or
similar fluids may remain in some parts of the
system. These should be mopped up and
disposed of as described above.
It is important to ensure that whilst components are
being removed the remaining parts are supported in a
safe manner.
Only use lifting equipment of adequate
capacity.
After removal from position the unit parts may be
disposed of according to local laws and regulations.
11-2
160.81-ICOM-GB0 (01/02)
Page left intentionally blank
Italy
YORK International
20051 Limbiate (Milan)
Via Manara 2
Italia
Tel: ++39/0299450.1
Fax: ++39/0299450.860
Kazakhstan
YORK International
Representation Office
92 Maulenov Str. office 329,327
KZ-480012 Almaty
Kazakhstan
Tel: ++732 72/ 62 97 77
Fax: ++732 72/ 63 37 19
YORK International ZAO
Alexeevskaya St. 26, Office 208
N. Novgorod,
CIS
Tel/Fax: ++7 8312/35 19 03
Serbia
YORK International
YU Business Center
Bulevar Lenjina 10/D/I/127
YU-11070 Belgrade
Serbia
Tel: ++381 11 311 41 43
++381 11 311 91 19
Fax: ++381 11 137 694
Slovak Republic
Latvia
YORK Latvia
YORK International S.I.A.
Krustpils iela 1
LV-1073 Riga
Latvia
Tel: ++371/7113068
Fax: ++371/7113067
YORK Slovensko
YORK International spol.sr.o.
Pekna cesta 6b
SK-83105 Bratislava
Slovak Republic
Tel/Fax: ++421/7/44880952,
0953, 0954, 0955
South Africa
Lithuania
YORK International GmbH
Representation Office
Fabijoniskiu 96
2029Vilnius/Lithuania
Tel: ++3702 - 388337,
388339
Fax: ++3702 388112
Nederland
YORK International
Tinstraat 15
Postbus 3453
4800 DL Breda
Nederland
Tel: ++31 765486800
Fax: ++31 765421800
Poland
YORK Polska
YORK INT.Sp.z.o.o.
Al.Slowianska 10
PL-01-695 Warszawa
Poland
Tel: ++4822/83 22 220
Fax: ++4822/8330303
Portugal
Roca/YORK
Estrada Outeiro de Polima
Lote 9 3 A/D
Abübada Cascais
2785 518,
S. Domingos de Rana
Portugal
Tel: ++351 21 445 0601
Fax: ++351 21 445 0598
Romania
YORK Romania
YORK International S.R.L.
6 Londra St.
1 District
RO-712171 Bucharest
Romania
Tel: ++401/2304516/2315319
2315320/2315321
Fax: ++401/2304406
Russia
YORK International
Johannesburg Head Office.
60 B Electron Ave.
Isando. 1600
Johannesburg
Tel: +27 11 921 7100
Fax: +27 11 921 7200
Roca/YORK
Av. Valdelaparra 47
28100 Alcobendas
Madrid
Spain
Tel: ++34 916 624 101
Fax: ++34 91 662 41 57
Roca/YORK
Juventud 8
Parque Ind. PISA
41927 Mairena de Aljarafe
Seville
Spain
Tel: ++34 954 183 012
Fax: ++34 95 418 30 68
Roca/YORK
Senyera s/n
Pol. Ind. Mediterráneo Parc 28 Nave 3
46560 Massalfassar
Valencia
Spain
Tel: ++34 961 400 711
Fax: ++34 96 140 22 53
Switzerland
YORK International
Grindelstrasse 19
CH-8303 Bassersdorf
Switzerland
Tel: ++41/1/83844-11
Fax: ++41/1/8369780
Supremeair (YORK Service)
th
'43 11 Rd.
Kew
Johannesburg
Tel: +27 11 786 0868
Fax: +27 11 786 0876
YORK International
4, Chemin des I'Esparcette
CH-1023 Crissier
Switzerland
Tel: ++41/21/6328011
Fax: ++41/21/6328013
YORK International
35 Haulage Rd.
Carletonville 2500
Tel: +27 18 786 1062/3
Fax: +27 18 787 3213
Ukraine
YORK International
2 Cassiafield Grove
Springfield Park 4091
Durban
Tel: +27 31 579 4646
Fax: +27 31 579 1030
YORK International
5 Stepmar Building
27 Stells Rd.
Montague Gardens 7441
Cape Town
Tel: +27 21 551 3012
Fax: +27 21 551 4176
Supremair (YORK Service)
9 Henri van Rooijen St.
Eastend 9300
Bloemfontein
Tel: +27 51 432 7828
Fax: +27 51 432 2450
YORK International
118D Constantia St.
Welkom 9459
Tel: +27 57 352 3240
Fax: +27 57 352 8982
Spain
YORK International ZAO
Poklonnaya, 14a
CIS-121170 Moscow
Russia
Tel: ++7095/232-2075
Fax: ++7095/232-6661
Roca/YORK
Industria 94-96
08908 Hospitalet de Llobregat
Barcelona
Spain
Tel: ++34 93 422 90 90
Fax: ++34 93 332 16 14
YORK International ZAO
28 Zagorodny prospect
CIS-191002
St. Petersburg
Russia
Tel: ++7812/325 4700
Fax: ++7812/325 4701
Roca/YORK
Hurtado de Amézaga 20, 4°
48008 Bilbao
Spain
Tel: ++34 944 162 833
Fax: ++34 94 415 49 69
YORK Ukraine
YORK International GmbH
36, Degterevskaya street
floor 7, room 723-725
Kiev/Ukraine
Tel: ++38044/219 32 89,
461 91 77, 211 09 91
Fax: ++38044/213 36 95
United Kingdom
York International
72 Buckingham Avenue
Slough
Berkshire
SL1 4PN
England
Tel: ++44 1753 693919
Fax: ++44 1753 692405
York International
14-16 St Martins Avenue
Fieldhead Business Centre
Bradford
BD7 1LG
England
Tel: ++44 1274 765300
Fax: ++44 1274 765301
York International
Unit 17
Garanor Way
Royal Portbury
Bristol
BS920 7XE
England
Tel: ++44 1275 375713
Fax: ++44 1275 375714
York International
Unit 5
Swift Business Centre
Keen Road
Cardiff
CF1 5JR
Wales
Tel: ++44 292 0470619
Fax: ++44 292 0470624
York International
Unit 4
Zealley Estate
Greenhill Way
Kingsteignton
Newton Abbott
Devon
England
TQ12 3TD
Tel: ++44 1626 333734
Fax: ++44 1626 335220
York International
Gardiners Lane South
Basildon
Essex
SS14 3HE
England
Tel: ++44 1268 246000
Fax: ++44 1268 246001
York International
Unit 10
Hadrians Court
Seventh Avenue
Team Valley Trading Estate
Gateshead
Tyne & Wear NE11 0XW
England
Tel: ++44 (0) 191 491 0598
Fax: ++44 (0) 191 482 6167
York International
1 Donaldson Crescent,
Southbank Business Park
Kirkintillock
Glasgow
G66 1XF
Scotland
Tel: ++44 (0) 141 776 7576
Fax: ++44 (0) 141 777 7425
York International
Unit 1
Western Access
Guinness Road
Trafford Park
Manchester M17 1SY
England
Tel: ++44 (0) 161 848 0202
Fax: ++44 (0) 161 848 7196
York International
Unit 25
Portsmouth Enterprise Centre
Quartremaine Road
The Airport
Portsmouth
PO3 5QT
England
Tel: ++44 2392 650149
Fax: ++44 2392 650225
York International
Arden House
Marsh Lane
Hampton-In-Arden
Solihull
West Midlands
B92 0AJ
England
Tel: ++44 1675 443341
Fax: ++44 1675 442402
Uzbekistan
YORK International
Representation Office
C4, Place 35
UZ - 700017 Tashkent
Uzbekistan
Tel: ++998 71 137 5770
++998 71 137 5062
Fax: ++998 71 137 5055
European Parts Centre
Gardiners Lane South
Basildon
Essex
SS14 3HE
England
Tel: ++44 1268 246000
Fax: ++44 1268 246001
YORK Service and Parts Contact Addresses
Austria
YORK Austria
Central & Eastern Europe Headquarters
Zetschegasse 3
A 1232 Wien
Austria
Tel: ++43 1 66 136 195
Fax: ++43 1 66 136 86
Azerbaijan
YORK International AO
90 M.Mansurov Str.
AZ-370004 Baku
Republic of Azerbaijan
Tel.: ++99 412/ 97 10 35
Fax: ++99 412/ 97 10 36
Belarus
YORK International AO
Leningradskaya str, 18
Minsk
Belarus
Tel/Fax: ++375/172/06 63 80
Tel/Fax: ++375/172/10 43 35
Belgium
YORK International
Prins Boudewijnlaan 1
2550 Kontich
Belgium
Tel: ++32 34510600
Fax:++32 34582444
Bulgaria
YORK Bulgaria
YORK International EOOD
10, Marko Balabanov Str.
BG-1303 Sofia
Bulgaria
Tel: ++3592/9803040,
9815780, 9817578
Fax: ++3592/9818386
Croatia
YORK International
Vrlicka 24
HR-10000 Zagreb
Croatia
Tel.: ++385/1/3843 444
++385/1/3843 851
++385/1/3840 352
Fax: ++385/1/3840 398
Czech Republic
YORK Ceska Republika
YORK International spol. sr.o.
Edisonova 27
CZ-10900 Praha 10 -Petrovice
Tel: ++420/2/721 21 111
Fax: ++420/2/721 21 100
France
YORK International
Innolac n°7
Rue du Professeur G.Jeanneney
33300 Bordeaux
France
Tel: ++33 5.57.19.06.30
Fax: ++33 5.56.69.04.96
YORK International
14 rue de Bel Air
B.P.309
44473 Carquefou Cedex
France
Tel: ++33 2.40.30.62.93
Fax: ++33 2.40.30.22.66
YORK International
114-126 Avenue d'Alfortville
94607 Choisy-le-Roi Cedex
France
Tel: ++33 1.45.12.10.30
Fax: ++33 1.48.52.59.34
YORK International
31 rue Wilson
69150 Decines- Charpieu
France
Tel: ++33 4.72.02.62.50
Fax: ++33 4.72.05.30.01
YORK International
15 rue des Combattants d'Extrême Orient
13700 Marignane
France
Tel: ++33 4.42.77.04.60
Fax: ++33 4.42.15.08.99
YORK International
Rue A.Fruchard - Z.I. Jean Prouvé
54320 Maxeville
France
Tel: ++33 3.83.32.49.83
Fax: ++33 3.83.32.43.16
YORK International
14 rue de Constantine
62200 Boulogne Sur-Mer
France
Tel: ++33 3.21.83.17.70
Fax: ++33 3.21.83.11.02
YORK International
102 Bd de Strasbourg
49300 Cholet
France
Tel: ++33 2.41.29.13.73
Fax: ++33 2.41.29.13.80
YORK International
3 rue du Moros
29900 Concarneau
France
Tel: ++33 2.98.60.52.10
Fax: ++33 2.98.60.52.11
YORK International
Parc du Talou - 7 rue A.Legras
76200 Dieppe
France
Tel: ++33 2.32.14.41.50
Fax: ++33 2.32.14.41.51
YORK International
44 rue Gambetta
17260 Gemozac
France
Tel: ++33 5.46.95.87.80
Fax: ++33 5.46.94.56.41
YORK International
Z.I. du Vern
29230 Landivisiau
France
Tel: ++33 2.98.68.21.52
Fax: ++33 2.98.68.90.91
YORK International
4 rue du Grand Fief
85150 Vaire
France
Tel: ++33 2.51.33.70.83
Fax: ++33 2.51.33.70.85
YORK International
6 Bis rue Chalutier-La-Tanche
56100 Lorient
France
Tel: ++33 3.20.87.61.62
Fax: ++33 2.97.83.83.80
YORK International
Rue de la Longuerais
ZA des Landelles
35520 Melesse
France
Tel: ++33 2.99.66.01.87
Fax: ++33 2.99.66.92.73
YORK International
78 Avenue de Laon
02200 Soissons
France
Tel: ++33 3.23.59.65.55
Fax: ++33 3.23.59.65.56
YORK International
8 rue de l'Artisanat
67120 Dupigheim
France
Tel: ++33 3.88.48.22.50
Fax: ++33 3.88.48.22.51
YORK International
Z.A. du Prieuré
37530 Poce Sur Cisse
France
Tel: ++33 2.47.23.29.23
Fax: ++33 2.47.23.25.50
YORK International
Avenue Lavoisier
Z.I. de Villemilan
91320 Wissous
France
Tel: ++33 1.60.11.88.76
Fax: ++33 1.60.11.90.16
Germany
YORK International
Paradiesstraße 210
12526 Berlin
Germany
Tel: ++49/30/6797190
Fax: ++49/30/67971944
YORK International
Hafenstraße 100
45356 Essen
Germany
Tel: ++49/201/364000
Fax: ++49/201/3640041
YORK International
Wächtersbacher Straße 83
60386 Frankfurt
Germany
Tel: ++49/69/941402-0
Fax: ++49/69/94140244
YORK International
Sperberhorst 8
22459 Hamburg
Germany
Tel: ++49/40/5714410
Fax: ++49/40/57144133
YORK International
Alter Flughafen 18a
30179 Hannover
Germany
Tel: ++49/511/678040
Fax: ++49/511/6780433
YORK International
Leipziger Straße 35 37
34125 Kassel
Germany
Tel: ++49/561/507210
Fax: ++49/561/5072122
YORK International
Widdersdorfer Straße 215
50825 Köln
Germany
Tel: ++49/221/498750
Fax: ++49/221/4987539
YORK International
Fuggerstraße 1
04448 Leipzig
Germany
Tel: ++49/341/566630
Fax: ++49/341/5666333
YORK International
Gottlieb-Daimler-Strasse 6
68165 Mannheim
Germany
Tel: ++49/621/468-532
Fax: ++49/621/468-680
YORK International
Geisenhausener Straße 6
81379 München
Germany
Tel: ++49/89/78048Fax: ++49/89/7804844
YORK International
Edisonstraße 60
90431 Nürnberg
Germany
Tel: ++49/911/961750
Fax: ++49/911/9617544
YORK International
Mainzer Straße 29
66111 Saarbrücken
Germany
Tel: ++49/681/67494
Fax: ++49/681/66243
YORK International
Fabrikstraße 17
70794 Filderstadt
Germany
Tel: ++49/711/7709422
Fax: ++49/711/7709433
Greece
YORK International
62 , Kifisias Ave
zip code: 115 26
Athens - Greece
Tel: ++301- 69 11 888
Fax:++301- 69 10 764
Hungary
YORK Magyaroszag
YORK International Kft.
Váci út 206
H-1138 Budapest
Hungary
Tel: ++361/4657060
Fax: ++361/4657069
Ireland
YORK ACR Ltd
Unit 2004/3
City West Business Campus
Naas Road
Dublin 22
Ireland
Tel: ++ 353 1466 0177
Fax: ++ 353 1466 0198
York International
Unit 19
Sarsfield Road
University Hale Industrial Estate
Wilton
Cork
Ireland
Tel: ++353 2 134 6580
Europe
YORK
YORK INTERNATIONAL
Z.I. 14 rue de Bel Air, B.P.44473 Carquefou, Cedex, France
Part No. 160.81-ICOM-GB0 (01/02)
Subject to change without notice
ALL RIGHTS RESERVED