1
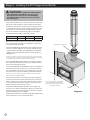
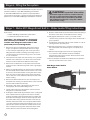
Wood Fire Installation & Owner’s Operation Manual
M1120 10/14 © PIONEER MANUFACTURING LTD
ECO Mega Smart Built-In
Installation Important information...........2
Where to install a Metro in your home.....8
Preparing the wall/opening cavity..........3
Getting to know your Metro.....................8
Installing your Metro.................................4
Operating your Metro...............................8
Floor protector requirements....................5
Cleaning and maintenance ..............9-10
Flue and wetback Installation.................6
Troubleshooting......................................11
Operation Important information............7
Metro warranty.......................................12
PO Box 11, Inglewood 4347, New Zealand
Ph (06) 756 6520 • Fax (06) 756 6540
[email protected] • www.metrofires.co.nz
WARNING! Important Information
• WE HIGHLY RECOMMEND YOU READ THIS ENTIRE
MANUAL AS INCORRECT OPERATION, MISUSE AND/OR
LACK OF MAINTENANCE WILL VOID THE WARRANTY
• The appliance and flue-system shall be installed in
accordance with AS/NZS2918 and the appropriate
requirements of the relevant building code or codes
• Any modification of the appliance that has not
been approved in writing by the testing authority is
considered to be in breach of the approval granted for
compliance with AS/NZS4013 and will void the warranty
• The appliance must be installed correctly. We recommend
a competent and suitably qualified NZHHA installer
This Metro wood fire has been tested to and complies with
AS/NZS 2918:2001 when installed in accordance with this
manual. Please ensure you are fully conversant with this
relevant standard and the contents of this manual. Correct
installation is critical to the safe operation and performance of
this wood fire.
CAUTION! Important Information
•A minimum length of 4.0 metres of 150mm diameter
flue pipe is required. The total length of the 150mm
flue pipe must be fully encased from top to bottom
with a 200mm diameter inner casing and a 250mm
diameter outer casing.
CAUTION! Important Information
•Mixing of appliance or flue-system components
from different sources or modifying the dimensional
specification or components may result in hazardous
conditions. Where such action is considered, the
manufacturer should be consulted in the first instance
•Do not install a Metro fire if there is any sign of visible
damage to the product
• This appliance must be regularly maintained.
• Use authorised Metro replacement parts only. The use of
unauthorised parts may void the warranty
• This manual must be left with the home owner
Please take particular note of the following:
• All flue joints must be sealed and riveted; the bottom of
the flue in particular MUST be fully sealed into the flue
spigot of the Metro wood fire and bolted through the hole
in the spigot.
• In New Zealand, the Metro fire must be bolted securely to
the floor to comply with the seismic restraint provisions of
AS/NZS 2918:2001.
• The Metro fascia is coated in vitreous enamel or silver high
temperature paint, take care during assembly and when
lifting or fitting the fascia that you do not damage this
coating. Do not lift the Metro fascia with your fingers under
the louvres.
Stage 1 – Unpacking and familiarisation
The function of the Metro ECO Mega Smart Built-In is to enable
the fire to be installed into a timber framed wall replacing a
masonry chimney at a fraction of the cost.
• Installation must be strictly in accordance with this manual
to comply with the test approvals to AS/NZS 2918:2001 held
by Pioneer Manufacturing Limited.
• Certain points within this manual are critical to the safe
operation of the Metro ECO Mega Smart Built-In. These
points are highlighted by being shaded within a grey panel.
• Refer to Stage 4 in relation to floor protector requirements
prior to commencing installation.
The Metro ECO Mega Smart Built In
Having read the three critical bullet points above, unpack and
familiarise yourself with the various components of the Metro
ECO Mega Smart Built-In;
2
Supplied with the Metro ECO Mega Smart Built-In:
• 1 x 200mm/250mm liner spigot
• 1 x Airslide
• 1 x Bag of assembly screws, bolts and nuts
• 1 x Installation manual
• 2 x Bricks
Not supplied but also required:
• 2 x Restraint fixtures (masonry anchors or wood screws)
• 1 x Metro ECO Built-In Flue System
• 1x Mega Smart Fascia
Stage 2 – Preparing the wall opening/cavity
9mm Promina board or equivalent
non-combustible material. Please note: fire rated
gib board is not an acceptable material
CAUTION! Important Information
•The timber frame opening must be a minimum of
845mm high and 915mm wide. A 1000mm x 1200mm
sheet of 9mm promina board or equivalent noncombustible material is required around the fascia
with a maximum opening to fit around the ECO Mega
Smart Built-In firebox of 818mm high and 1000mm
wide as illustrated in Diagrams 1 & 2.
1200
mm
1000mm
•Please note: Fire rated Gib board is not an
acceptable material.
818mm
Prepare an opening in the wall as illustrated in Diagram 1.
• If the enclosure is constructed to the full height of the
room and is fully open/vented into the ceiling cavity of
the home, then the venting requirements as detailed in
Diagram 2 of this page are not required.
915m
m-
• If the ECO Mega Smart Built-In is built into an enclosure
that is not open/vented to the ceiling cavity, the
enclosure must be vented as illustrated in Diagram 2
and specified in the grey panel below.
1000
mm
Diagram 1
• Insulation is not required under the ECO Mega Smart BuiltIn, it may sit directly onto a timber or particle board floor.
Note: Raise the fire box to suit any floor protector height.
9mm Promina board or equivalent
non-combustible material. Please note: fire rated
gib board is not an acceptable material
• The distance from the front edge of the enclosure,
including wall lining (directly behind the fascia) to the
centre of the flue is 445mm as shown.
Note: If a brick front is to be built you need to allow for the
thickness of the bricks.
1000mm
flue centreline
•An air vent or vents are required on the rear of the
enclosure. The bottom edge of this vent/vents must
be no more than 100mm above the floor and have a
minimum surface area of 32000sq mm. I.E a vent of
400mm x 80mm on the rear of the cavity.
•If the enclosure is through an external wall, suitable
precautions will be necessary to prevent rodents
and debris from entering or restricting the air vents.
If grills are used ensure the minimum vent area is
maintained through the grill itself.
Vent(s)
845mm
CAUTION! Important Information
818mm
445mm
670mm min
Diagram 2
3
Stage 3 – Installing the ECO Mega Smart Built-In
CAUTION! Important Information
•If the ECO Mega Smart Built-In is to have a raised
floor protector, the base on which the ECO Mega
Smart Built-In will be installed needs to be raised to
the same height.
• Pay particular attention to making sure the floor where the
fire will sit is level and flat as any discrepancies will make
it difficult to slide the fire into place and to align the fascia
correctly. Also be precise when cutting the opening as the
fascia will only cover the top of the opening by 7 or 8mm.
• Be sure to maintain a minimum air gap to combustible
material inside the cavity as set out as follows:
Air Gap
Top
Sides
Rear
30mm
27mm
50mm
• Remove from within the firebox the plastic bag containing
the component kit, two firebricks wrapped in cardboard
and the top baffle assembly.
200/250mm Liner Spigot
• Position the ECO Mega Smart Built-In into the wall opening
you have created (Diagram 1), slide the cabinet into the
cavity until the front edge of the ECO Mega Smart Built-In
cabinet is 3-4mm behind the front face of the wall lining
(Diagram 3).
Note: if you intend constructing a brick fascia in front of the wall
lining then the front edge of the ECO Mega Smart Built-In cabinet
should be 3-4mm behind the front face of the bricks.
• Check the ECO Mega Smart Built-In is central by ensuring
the clearance between each side of the cabinet and the
sides of the opening are equal.
• Secure the ECO Mega Smart Built-In to the floor through the
two restraint holes provided in each corner at the front of
the cabinet. Masonry anchors are required for a concrete
floor and wood screws for a timber or particle board floor.
Note: this must be secured rigidly to meet the seismic restraint
requirements of AS/NZS2918:2001
• Using a 10mm spanner, remove the two bolts holding the
air slide spacers which are located at the top, front of the
firebox, ensuring the control arm of the air slide is located
on the right side of the firebox. Attach the air slide to the
firebox using the two bolts and spacers.
• Position the 200mm/250mm diameter “liner spigot” into
the top of the cabinet centralising it with the centre of the
flue spigot. Secure the “liner spigot” into position using the
twelve self tapping screws supplied.
• Unwrap the two firebricks from the cardboard wrapper and
fit the side bricks to each side of the firebox.
4
9mm Promina board or equivalent
non-combustible material. Please
note: fire rated gib board is not an
acceptable material
3-4mm
Diagram 3
Stage 4 – Building / installing the floor protector
661mm
The Metro ECO Mega Smart Built-In requires an insulating floor
protector, minimum requirement is 18mm thick Promina board
or equivalent, finished with a non combustible tile or similar.
30mm
Height
Width
30mm
822mm
1057mm
Depth
Height
Width
Firebox
631mm
814mm
860mm
822mm
Depth
Fascia
814mm
This floor protector must be a minimum width of 1057mm and a
minimum overall depth of 505mm. Minimum overall depth is the
distance from the front of the wall lining (behind the fascia) to
the front non-combustible point of the Floor Protector.
505mm
ECO Mega Smart Built-In
Stage 5 – Fitting the ECO Mega Smart Built-In fascia
• Remove the four speed clips from the plastic bag and fit
them to the holes provided in the four tabs located in the
front of the cabinet.
On a flat surface (a floor) open the fascia carton and remove
the door. Taking the door in both hands, with the spindle end
in your right hand and the outer face of the door facing you,
attach the door to the firebox as follows;
• With the door in a 45 degrees open position, allow the lower
hinge pin on the bottom left hand side of the firebox to pass
into the hole provided in the bottom of the door frame.
• Lift the door until the top of the door frame passes over the
top of the hinge pin, align the hole provided on the top face
of the door frame and lower it down over the top hinge pin.
• Take the door handle from the plastic bag and screw it onto
the door spindle by turning it clockwise.
• Attach the fascia with the four longer screws that are
supplied in the plastic bag, taking care that the air control
lever passes through the slot provided in the fascia.
Centralise and level the fascia on the fire box insert door
and secure the four screws.
Note: If there is to be a timber or combustible mantelshelf above
the Built-In, it shall be a minimum of 500mm above the top of the
ECO Mega Smart Built-In fascia. If less than the above minimum
specified dimension, a deflector will be required under the
mantelshelf in accordance with AS/NZS2918:2001.
Hinge pin
Fascia
Diagram 4
Air control
knob
Inbuilt
cabinet
Seismic restraint
fixing points
Door
Handle
5
Stage 6 – Fitting the flue system
It is recommended a “Metro ECO Built-In Flue System” be used
with the installation of your Metro ECO Mega Smart BuiltIn. The Metro ECO Built-In Flue System incorporates Metro’s
unique vertical discharge cowl which improves flue draft and
performance of the Metro ECO Mega Smart Built-In wood fire.
CAUTION! Important Information
•A minimum length of 4.0 metres of 150mm diameter
flue pipe is required. The total length of the 150mm
flue pipe must be fully encased from top to bottom
with a 200mm diameter inner casing and a 250mm
diameter outer casing.
Stage 7 – Metro ECO Mega Smart Built In – Water heater fitting instructions
Box Contents:
• 1 x Metro ECO Mega Smart Built-In water heater
• 1 x 70 ml tube of Pioneer fire cement
Installation - This water heater is designed to
bolt externally to the firebox, it can be fitted
to either side, fitting the water heater is best
performed prior to installing the fire.
1. Remove the Fascia (if fitted) then remove the vertical
angle cover plate located just behind the door hinge
or door latch pin depending on which side you intend
fitting the water heater to. If fitting to the hinge side it is
recommended you remove the hinge also to assist with
access clearance.
2. Fold open the side return of the inner wrap so it is parallel
with the outer cabinet, this is to allow room for the water
heater to slide in between the firebox and the wrap.
3. Remove the 5 x 50mm knock out plates from the 2 inner
wraps and outer cabinet through which the copper pipes
will exit.
4. With a long handled 10mm set spanner reach in between
the inner wrap and the firebox and loosen the nuts on the
2 rear and 1 front water heater securing Pozi drive screws,
then unscrew from the inside and discard 2 of the 6mm
nuts as the rear screws will thread directly into the water
heater casting.
5. Remove the water heater from it’s box and inspect the
threaded holes making sure the Pozi drive screws removed
from the firebox will thread in easily.
6. Thoroughly clean the 2 copper pipe ends with a file or
emery paper, this will make brazing easier.
7. Smear a liberal amount of Pioneer fire cement over the
flanged face of the water heater.
8. Holding the water heater by the bottom of the casting and
the 2 x 25mm tubes facing the rear of the fire carefully
position the water heater in between the inner wrap and
the firebox until the pipes enter the inner wrap then slide
the water heater along until the front Pozi screw lines up
with the slotted hole. Take care to keep the water heater
close to the wrap and away from the firebox so as to not
wipe the fire cement off. Position the water heater so the
front screw passes through the slotted hole in the water
heater, fit a 6mm nut and washer and hand tighten.
6
9. Pivot the water heater around this bolt to fit the remaining 2
Pozi drive screws which are threaded into the casting.
10.Fully tighten all Pozi drive screws, you should see fire
cement oozing out around the edges which will indicate a
good square fit.
11. Insulate pipes where they exit the outer cabinet as cold air
is being drawn in past this point.
12.Bend the side return back so it folds around the front of
the water heater and refit the angled cover plate, this is
critical.
13.Braze the required pipe work to the 2 x copper pipes
in accordance with standard wet back installation
requirements and inspect for leaks. Both side bricks must
be fitted inside the firebox.
14.Ensure all firebox and wetback installation and operation
manuals are left for the home owner.
ECO Mega Smart Built-In
Water Heater
WARNING! Important Information
CAUTION! Important Information
• WE HIGHLY RECOMMEND YOU READ THIS ENTIRE
MANUAL AS INCORRECT OPERATION, MISUSE AND/OR
LACK OF MAINTENANCE WILL VOID THE WARRANTY
•This appliance should be maintained & operated at all
times in accordance with this instruction manual
• Any modification of the appliance that has not been
approved in writing by the testing authority is considered
as breaching AS/NZS 4013 and will void the warranty
• Do not use flammable liquids or aerosols in the vicinity
of this appliance when it is operating
• This appliance should not be operated with cracked door
glass, over worn, faulty or missing door seals
• Do not use driftwood, treated or unseasoned (wet) fuel,
the use of most types of preservative treated wood as
fuel can be hazardous and will damage your appliance
• Do not use flammable liquids or aerosols to start or
rekindle the fire OR store fuel within the Metro’s specified
installation clearances
•Burning unseasoned (wet) fuel or incorrect operation on
extended low burn cycles will cause excessive creosote
to form. Creosote is very corrosive and excessive
buildups will result in the flue pipe, flue spigot and upper
burn chamber failing. Failure of the applicance and/
or flue system due to creosote damage is not covered
under warranty. The formation of such is not an appliance
issue it is a fuel and operational issue
• Never operate your Metro with the door ajar, except on
initial start up
• This appliance must be regularly maintained and
replacement parts must be authorised Metro parts only
• Open the air control fully before opening the Metro’s door
• Do not empty ash into a combustible container
•Never operate your Metro with the top grill removed
• Do not dry clothes on or near this appliance
Congratulations on the purchase of your Metro wood fire
This low-emission, slow combustion appliance is designed to
give you many years of warmth and service, subject to the
following key factors. These key factors, if not adhered to are
the major causes of unsafe installation, poor performance
and flue blockages and potential product failure.
1. Your Metro wood fire must be installed correctly. Metro
recommend a competent and suitably qualified NZHHA
installer.
2. The only fuel to be used in this appliance shall be wood
that meets the following criteria.
– Less than 25% moisture content
– Has not been treated with preservatives or
impregnated with chemicals or glue,
– Is not chipboard, particle board, or laminated board,
– Is not painted, stained or oiled
– Is not driftwood or other salt impregnated wood
3. The appliance shall be operated at all times in
accordance with the “Installation and Operating
Instructions” supplied with each appliance.
4. It is preferable that Metro wood fires should be installed with
a Metro ECO Flue System.
5. Coal must not be used as a fuel.
Please also note the following important points:
• In New Zealand a building consent is required from your
local building authority. The homeowner is responsible for
obtaining this consent.
• As correct installation is critical to the performance and safe
operation of your Metro, it is recommended your Metro be
installed by a NZHHA registered installer or a person suitably
qualified in the installation of wood fires. Your Metro retailer
will be able to arrange professional installation for you.
• During the very first fire your Metro will give off an odour
and fumes as the firebox paint cures. Do not be alarmed;
open all windows and externally opening doors in that
room and close any internally opening doors. This curing
process will last for approximately one hour and is likely to
happen this one time.
• Properly seasoned (dry) timber is necessary for the Metro
to operate efficiently; firewood that contains a high
moisture content will result in flue pipe blockages, reduce
heat output and create other issues.
Note: Once split, Softwood usually takes 12 months to season - Hardwood
can take up to 24 months to season - Wood must be stored in a location
that enables air circulation. Unseasoned wood stored in a closed
woodshed without air circulation will still be unseasoned 12 months later.
•
It is critical that the fire not be operated with over worn,
faulty or missing door seals. Door seals will harden over
time and become over-worn (3-4 year’s) this will cause air
to leak into the fire, causing the appliance to ‘over fire’.
• It is critical that the fire not be operated with over worn,
faulty or missing bricks, baffle plate, baffle extension
(white board on the baffle plate)
• It is critical that the fire not be operated with cracked, or
broken door glass.
Please note, the above 3 points require regular inspection/
maintenance (every time the ash bed is cleaned out, generally
3-5 times a season) and if not maintained will void the firebox
warranty. A glowing firebox or lower fluepipe is just one sign
you are over firing your appliance. Please ensure you keep your
proof of purchase/receipt on any parts you purchase.
• For optimum performance fuel must be loaded so the logs
lay “front to rear” in preference to laying across the width
of the firebox. Spaces should be left between the logs to
enable oxygen to get to as much of the surface of the fuel
as possible.
• A small hot fire loaded frequently is more efficient than a
large fire burning on a low setting.
• Your Metro is covered by a full unconditional 12 month
warranty on replacement parts, and a 10 year firebox
warranty.
7
Where to install a Metro wood fire in your home
Wood fires are usually installed in the main living area, which is
the section of the home that is usually kept the warmest, being
the area in the home most frequently occupied. However,
before deciding on the best location for your Metro wood fire
you may wish to consider:
• Split level homes are best heated when the wood fire is
installed on the lower level, as the heated air will rise to the
higher levels.
• Building construction is another consideration. Specified
clearances from walls, curtains etc must be maintained and
you need to ensure no structural beams or internal gutters
etc are directly above your preferred site. If you have a two
storey dwelling you need to consider the second storey to
ensure you don’t have the flue directly outside a second
storey window.
Getting to know your Metro wood fire
Operating your Metro wood fire is simple and you will quickly
learn how to get the best from it. First take a minute to
familiarise yourself with your new Metro:• Raise the door handle anticlockwise until the latch releases,
then slowly pull the door open. Load fuel and then close the
door ensuring the latch is secure. Never operate with the door
open or not latched securely, except on start up – see below.
• There is a single air control
making your Metro easy to
adjust. This control moves
from left to right, which is
“low to high”.
ECO Mega Smart Built-In air control
Operating your Metro wood fire
If your Metro has only been installed within the past few
days, the fire cement seal at the base of the flue will not be
fully cured. To ensure the cement sets without blistering it
is recommended you burn 2-3 sheets of loosely crumpled
newspaper at a time, approximately once every hour over a
6-8 hour period.
During the very first fire your Metro will give off an odour and
fumes as the firebox paint cures. Do not be alarmed. Open all
windows and externally opening doors in that room and close
any internally opening doors. This curing process will last for
approximately one hour and is likely to happen this one time.
Start up
Place a quantity of loosely crumpled newspaper on the base
of the firebox until it is approximately 50% full of paper, or
place firelighters on the base of the firebox. Add dry kindling
and move the air control knob fully to the right, being the “full
open” position.
Light the paper at two or three locations across the front of
the door opening and leave the door slightly ajar resting
on the latch pin if necessary for a few minutes while the
fire establishes. Once the kindling is burning well, open the
door and add 2-3 small logs at a time until you have a wellestablished fire. Usually this will take approximately 30 minutes,
during which time the air control should be set on “high” and
the door should be closed, except for the initial few minutes
and when fuel is being added.
8
Normal operation
Once the fire is well established, regulate the air control to
achieve the desired burn rate and heat output. As you move
the air control to the right, burn rate, firebox temperature and
heat output will increase, if you move the control to the left
they will decrease.
Please note:
• Always open the air control fully prior to opening the door,
then open the door slowly.
• When loading logs, place them end-on, “front to back”; air
spaces should be left between the logs to enable oxygen
to get to as much of the surface of the fuel as possible.
• Every time you refuel, leave the air control on “high” for a
minimum of 20-25 minutes.
• Never use the door to force wood into the firebox, as this is
likely to break the glass.
Cleaning and maintenance for your Metro wood fire
The front panelling of your Metro ECO Mega Smart Built-In
will be coated with one of two coating systems, both can be
cleaned with a damp cloth when the Metro is not operating.
The two coating systems used on the ECO Metro Built-In fascia
are:• Vitreous enamel; this is a permanent coating designed to
last the life of the appliance. As vitreous enamel is glass,
if a solid or heavy object is dropped or banged against a
panel it could chip the enamel.
• Silver high temperature aluminised paint.
To remove the excess ash your Metro should not be operating.
• Open the door, and using a hearth shovel or similar, empty
the excess ash directly into a steel or non-combustible
container.
• If the ash is not disposed of immediately, be careful where
you store it, as the ash can retain heat for many days and
become a fire hazard.
• You must leave a bed of ash in the base of the firebox
approximately 10mm deep; this insulates the base of the
firebox and improves combustion.
• Never use abrasive cleaners
• This appliance must be regularly maintained and
replacement parts must be authorised Metro parts only.
Door glass
Providing your fuel is properly seasoned, under normal
operating conditions the air-wash design of the Metro’s firebox
will keep the door glass clear. If the glass requires cleaning
you may use either a razor blade scraper or an oven cleaner.
If your door glass breaks it must be replaced with 5mm thick
ceramic glass which is available from your local Metro retailer.
Top baffle
This is a ‘sacrificial’ wear part of the firebox and should be
checked monthly. Usually only the “Promet” (white board)
front/underneath section needs to be replaced when it starts
to disintegrate.
Note: Cracks in the promet are not uncommon and have no adverse
effect on the operation of your Metro. These cracks are the result of
intense heat coupled with expansion and contraction. Burning wood
which is not properly seasoned, i.e. 25% moisture content or more, will
over time cause the promet to disintegrate and require replacement.
Door seals
Over time, usually 3-4 years, the door and glass seals will
become hard and cause air to leak into the firebox, causing
the appliance to ‘over fire’. Your Metro retailer stocks
replacement woven fibreglass door and glass seals, which
need replacing when they become hard and over worn.
Front top baffle
Rear top baffle
The door of your Metro is easily removed. Hold it in both hands
and lift the hinge end of the door up and over the top hinge
pin, then lower the door from the bottom hinge pin.
Side bricks
Hair-line cracks are not uncommon and are a result of
the intense heat within the Metro’s firebox, coupled with
mechanical damage caused by accidental impact when fuel
is being loaded. However if the side bricks become cracked to
the extent that they start to break up, they must be replaced.
Door adjustment
Provision is available on both sides of the door for adjustment.
To adjust the hinge end of the door, open the door fully, loosen
the top hinge nut and slightly lift the latch end of the door;
you will see the hinge assembly move back 1-2mm which
will usually be sufficient. Retighten, then repeat by loosening
the lower hinge nut, this time applying a slight downwards
pressure onto the door to move the lower hinge assembly
back a similar distance, then retighten.
The door latch is also adjustable, as the latch pin on the right
side of the firebox is fitted through a slot which enables the
latch pin to be loosened, moved back and re-tightened.
Ash removal
Over a period of time ash will build up in the base of the
Metro’s firebox and require removal. The time this build-up
takes depends on the density and cleanliness of your fuel.
Side Brick
To remove and replace your Metro’s top baffle, proceed as
follows: • Open the Metro’s door fully, reach inside with the palm
of your hand face up and extended, lift the front baffle
approximately 20mm, then lift it forward out through the
door opening placing it on a sheet of newspaper you have
placed on the front of the hearth. Now lift the rear baffle
section up off it’s pins and remove out through the door
opening.
• To refit the baffles. Proceed in the reverse order and note,
the rear baffle must be fitted so its back-edge is touching
the back of the firebox.
9
Cleaning and maintenance for your Metro wood fire
• Close the door and slide the air control to the left.
Flue systems
Should be checked annually, particularly the bottom end
of the lower flue section at its rear lock formed joint. If
deterioration is noticed contact your Metro retailer or installer.
The flue pipe should also be swept a minimum of once a year,
or as required during the winter season. If smoke enters the
room when you open the Metro’s door this usually indicates
the flue pipe is becoming restricted and needs cleaning. The
frequency of flue pipe cleans depends on many factors, with
the main variables being:
• The seasoning of the wood. If not properly seasoned you
will require frequent flue pipe cleans.
• Once on the roof, remove the cowl from the top of flue
system and sweep the flue pipe using a 150mm-diameter
flue pipe brush as detailed in the instructions provided with
the fluebrush.
• Once the flue pipe is clear, clean and refit the cowl.
Remove the excess soot which has fallen into the firebox,
leaving a layer of ash 10mm deep on the base of the
firebox, then refit the top baffle.
Note: The baffle must be fitted so its rear is touching the back of the
firebox; if uncertain refer to previous page 9 in the installation section of
this manual, which shows illustrations of the baffle location.
• The density of the wood. Softwoods generally result in more
deposits building up in the flue pipe.
To clean the flue pipe of your Metro, proceed as follows:• Open the Metro’s door fully, reach inside with the palm
of your hand face-up and extended, lift the top baffle
approximately 20mm, then lift it forward out through the
door opening, placing it on a sheet of newspaper you
have placed on the front of the floor protector.
Note: Some appliances have a two piece top baffle.
Parts guide for your Metro – Baffle, promet and wetback
Listed below are the parts and product codes for your Metro
wood fire. The promet/baffle should be regularly checked and
must always be in place during the operation of your fire.
Note: Cracks in the promet are not uncommon and have no adverse
effect on the operation of your Metro. These cracks are the result of
intense heat coupled with expansion and contraction and is normal
wear & tear.
Your Metro wood fire must be regularly maintained and we
recommended it is also serviced annually. If a wood fire is
not regularly maintained and serviced, the life span will be
reduced. If your Metro wood fire has been neglected, by not
being regularly maintained and serviced, with authorised Metro
parts replaced as required, your warranty may be declined.
Type of promet required / Type of steel baffle(s) required
Clean air model
ECO Mega Smart Front
500-1895
m
5m
ECO Mega Smart Ctr-Rear Set
500-1900
12
ECO Mega Smart Front 500-2450
m
0m
70
50
50
0m
0m
m
m
50
50
0m
0m
m
mm
7
24
10
ECO Mega Smart/Ambie Plus
Rear 500-2500
13
85
• Mega Smart
Water heating options
m
ECO Mega Smart Booster
450-0400
Troubleshooting your Metro wood fire
If your Metro is installed correctly, your fuel is dry and you
operate your fire correctly, you will find it to be a pleasure to
use. Metro’s many years of experience within the wood heating
industry has shown that dissatisfaction is mainly due to:
• unseasoned fuel
• faulty installation
• operational error
• or a combination of the above 3 points.
The following may be of assistance if you are experiencing any
of these problems.
SMOKE ENTERS THE ROOM WHEN THE METRO’S
DOOR IS AJAR (Possible reasons and solutions)
Check flue pipe joins:
If the flue pipe joins are not sealed correctly, the flue pipe will
not draw as well as it should. The flue pipe join connecting into
the flue spigot on top of the Metro is most critical, if this is not
sealed correctly, smoke will enter the room when the door is
ajar. To check this join is sealed correctly, run a match or lighter
flame around the join. If the flame is sucked into the spigot then
it is not sealed correctly. This check needs to be done when
the fire is not going. Ensure you check the rear of the flue pipe/
spigot join, as due to the seam in the flue pipe, this is the most
common area for not being sealed correctly.
Ensure the fuel you are using is correctly seasoned:
If you are burning unseasoned fuel (wet), the fire will cause
nothing but problems. The Metro won’t deliver much heat, it
will be lazy, smoke will enter the room when the door is ajar,
and the door glass will run black. Unseasoned fuel is the main
contributor to excessive creosote deposits which can be
corrosive to your appliance and flue system.
Flue pipe length is too short:
Add more flue pipe as the longer the flue system, the better the
draw of the flue pipe. Please note, if you did not purchase the
Metro ECO Flue System, you will not have the ECO Cowl which
increases draw. We highly recommend the Metro ECO Cowl is
fitted as this will increase the draw. If you already have an ECO
Cowl and smoke is still entering the room, please add another
600mm length of flue pipe.
Downdraft:
If you have checked all of the above and the fire is still smoking
into the room, it’s possible there may be a down draft issue.
Down draft is environmental and can be caused by many
variables, and it is purely trial and error to ascertain the cause.
Solutions may be:
• ‘H’ Cowl, designed purely for downdraft issues, but if you
have an ECO Cowl fitted as standard, you will also need to
add another 600mm of flue pipe to compensate as the H
Cowl is shorter in length.
• Directional Cowl, designed for high wind areas.
Air control setting:
Ensure the air control setting is on high before opening the
door to reload, as this increases the draw up the flue pipe.
Open the door slowly.
If your Metro did not smoke, but its starting too and
is getting worse:
The flue pipe is in need of a clean. It is recommended that the
flue pipe be cleaned every season, however if you are burning
the fire on low a lot, or are using unseasoned fuel, flue pipe
cleans will be required more frequently.
Correct operation:
Modern day wood fires need to be operated hard and fast,
more so than low and lazy to ensure the firebox and flue
pipe runs hot and efficiently. If the fire and flue pipe is up to
temperature it will perform extremely well, the smoke will draw
up the flue pipe with ease, and the fire will produce good
amounts of heat.
If the fire is operated on low a lot of the time, the door glass will
run black, the flue pipe will tend to block up more frequently
and the fire will end up smoking into the room when reloading.
It’s better to have a small fire running hard and fast, rather than
a big fire running low and lazy.
OTHER ISSUES YOU MAY EXPERIENCE
I can smell smoke in the room after a low burn cycle:
The smell is creosote that will be seeping through the flue
pipe join or out of the flue spigot onto an external surface,
thus creating the smell in your room. The cause will be either
unseasoned fuel, fuel mass too large, incorrect operation on
low burn cycles or a combination. Creosote is very corrosive
and excessive buildups will result in the flue pipe and potentially
the flue spigot and upper burn chamber failing. The formation
of excessive creosote is not an appliance issue, it is a fuel and
operational issue. Failure of flue pipe or firebox due to creosote
build up is not covered under warranty as excessive creosote
build up is only possible from either unseasoned fuel or incorrect
operation.
The Metro won’t turn down as much as it did
The door itself may need readjusting, the hinge and latch is
slotted and allows for movement. Loosening the hinge and
moving it back a few mm will make the door seal tighter and
stop air leaking into the fire. The door and glass seals may be in
need of replacing, which is generally required every 3-4 years.
Familiarise yourself with the instructions on page 11 before
proceeding with this maintenance.
11
Warranty details for your Metro wood fire
Metro wood fires are manufactured in New Zealand, using
the highest quality of materials, workmanship and the latest
manufacturing techniques, which is why we offer a full 10 year
firebox warranty and 1 year parts warranty for peace of mind.
METRO WARRANTY
(NZ Consumer laws apply to this warranty)
Pioneer Manufacturing Limited (Pioneer) warrants the steel
firebox against defective materials and workmanship which
would render it unfit for normal domestic use, from the date of
purchase by the original consumer, for a period of 10 years.
Components including panel coating, door retainers, door
seals, glass, trim, baffle & bricks are warranted for a period of
1 year from the date of original purchase for normal domestic
use against defective materials and workmanship.
All associated accessories including, but not limited to, fans,
flue systems, flue shields, wetbacks, tool sets, ash pots etc, are
covered by a 1 year warranty against defective materials and
workmanship.
It is recommended, but not a condition of this warranty, that a
full service/inspection of the Metro wood fire be carried out at
the end of each winter season.
Warranty Conditions:
• The Metro wood fire must be installed, operated and
maintained strictly in accordance with the building code
and this installation and operation manual.
• The Metro wood fire must be installed and used in a
domestic application.
• This warranty covers appliance like for like replacement or
repair at the manufacturer’s discretion but excludes freight,
travel, installation, labour and/or any other associated costs.
• Pioneer or their agents are not liable for any loss or expense
direct or indirect arising from the failure of any part or
operation of the appliance.
• Operation of this appliance in violation of the warnings in this
operation and installation manual will void this warranty.
• Your Metro wood fire must be regularly maintained and we
recommended it is also serviced annually. Proof of servicing
may be required. If a wood fire is not regularly maintained
and serviced, the life span will be reduced. If your Metro
wood fire has been neglected, by not being regularly
maintained and serviced, warranty may be declined.
•
It is critical that the fire not be operated with over worn, faulty
or missing door seals. Door seals will harden over time and
become over-worn (3-4 year’s) this will cause air to leak into
the fire, causing the appliance to ‘over fire’.
• It is critical that the fire not be operated with over worn,
faulty or missing bricks, baffle plate or baffle extension (white
board on or under the baffle plate)
• It is critical that the fire not be operated with cracked, or
broken door glass.
IMPORTANT INFORMATION
Note: The above 3 points require regular inspection/
maintenance (every time the ash bed is cleaned out,
generally 3-5 times a season) and if not maintained will
void the firebox warranty. Please ensure you keep your
proof of purchase/receipt on any parts you buy.
• A claim under this warranty should be directed to the retailer
who supplied the Metro wood fire. If this is not possible write
directly to the manufacturer stating details of fault, model
and serial number of your Metro, date and proof of purchase
and name of retailer where the Metro was purchased.
Warranty Exclusions:
This manufacturer’s warranty does not cover:
• Service calls which are not related to any defect in the
product (i.e. operational, installation or fuel issues). The
cost of a service call will be charged if the problem is not
found to be a product fault.
• Defects caused by factors other than normal domestic use
or use in accordance with the product’s operation manual.
• Defects caused through the product being operated in
an “over-fired” manner resulting in sections of the firebox
operating excessively hot to the point that sections glow
red. (Note – This will result in distortion of the firebox)
• Defects to the product caused by accident, neglect, misuse
or act of God.
• The cost of repairs carried out by non-authorised repairers
or the cost of correcting such unauthorised repairs.
• Required maintenance as set out in this manual.
Service under this manufacturer’s warranty must be provided
by a repairer authorised by Pioneer Manufacturing Ltd. Such
service shall be provided during normal business hours.
WARNING! Complete and retain these details at time of purchase:
Purchase Date
Serial Number
Model
Colour
Retailer
12