1
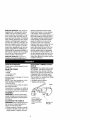
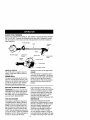
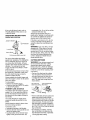
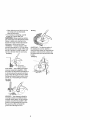
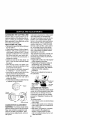
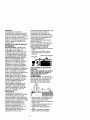
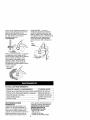
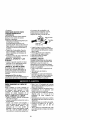
Operator's
Manual
CRRFTSMRN_
1.3 cu. in./21cc 2-Cycle
17 Inch Cutting Path / .065 In. Line
GASOLINE
WEEDWAOKER
®
Model No.
358,798560
A
WARNING:
Read and follow all Safety Rules and Operating
Instructions before first use of this product.
For answers to your questions about this product:
Call 7 am-7 pm, Mon-Sat; Sun, 10 am-7 pm
1-800-235-5878
Sears, Roebuck
530-084265
04/24/97
and Co., Hoffman
Estates, IL 60179 USA
0
0
0
Warranty Statement
Safety Rules
Assembly
Operation
Maintenance
Service & Adjustments
2
2
4
5
9
10
Storage
Troubleshooting Chart
Illustrated Parts List
Spanish
Parts and Ordering
FULL ONE YEAR WARRANTY ON CRAFTSMAN
WEEDWACKER ® LINE TRIMMER
11
12
13
16
Back
GAS POWERED
For one year from the date of purchase, when this Craftsman Gas Powered
Weedwacker® Line Trimmer is maintained, lubricated, and tuned up according to
the operating and maintenance instructions in the Operator's Manual, Sears will
repair, free of charge, any defect in materials or workmanship.
This warranty excludes nylon line, spark plug, and air filter, which are expendable
parts and become worn during normal use.
If this Weedwacker® Line Trimmer is used for commercial purposes, this warranty applies for only 90 days from the date of purchase. If this Weedwacker® Line
Trimmer is used for rental purposes, this warranty applies for only 30 days from
the date of purchase. This warranty applies only while this product is in use in the
United States.
WARRANTY SERVICE IS AVAILABLE BY RETURNING THE WEEDWACKER® LINE
TRIMMER TO THE NEAREST SEARS SERVICE CENTER IN THE UNITED STATES.
This warranty gives you specific legal rights, and you may also have other rights
which vary from state to state.
Sears, Roebuck and Co,, D/817 WA Hoffman Estates, IL 60179
WARNING:
When using gardening
appliances, basic safety precautions
must always be followed to reduce the
risk of fire and serious injury. Read and
follow all instructions.
_ety
information on the unit
DANGER: Never use blades or flailing devices. This unit is designed for
line trimmer use only. Use of any other
accessories or attachments will increase the risk of injury.
This power unit can be dangerous!
Operator is responsible for following
instructions and warnings on unit and
in manual. Read entire Operator's
Manual before using unit! Be thoroughly familiar with the controls and the
proper use of the unit. Restrict the use
of this unit to persons who have read,
understand, and will follow the instructions and warnings on the unit and in
the manual. Never allow children to
operate this unit.
@QO
WARNING: Trimmer line throws objects violently. You and others can be
blinded/injured. Wear eye and leg
protection. Keep body parts clear of
rotating line. Keep children, bystanders, and animals 50 feet (!5 meters)
2
away.Ifapproached
stopunitimmediately.
• Keep others away when making carburetor adjustments.
• Use only recommended Craftsman
accessories and replacement parts.
otect,on
FUEL SAFETY
• Mix and pour fuel outdoors.
• Keep away from sparks or flames.
• Use a container approved for fuel.
• Do not smoke or allow smoking near
fuel or the unit.
• Wipe up all fuel spills.
• Move at least 10 feet (3 meters)
away from fueling site before starting
engine.
• Stop engine and allow to cool before
removing fuel cap.
mm
Boots
If situations occur which are not
covered in this manual, use care and
good judgement. If you need
assistance, contact your Authorized
Service Dealer or call 1-800-235-5878.
OPERATOR
SAFETY
• Always wear safety eye protection.
• Always wear long pants, long
sleeves, boots, and gloves. Wearing
safety leg guards is recommended.
Do not go barefoot or wear sandals.
Stay clear of spinning line.
• Secure hair above shoulder length.
Secure or remove loose clothing or
clothing with loosely hanging ties,
straps, tassels, etc. They can be
caught in moving parts.
• Do not operate when you are tired,
ill, or under the influence of alcohol,
drugs, or medication.
• Wear hearing protection if you use
unit for more than 1-1/2 hours per
day.
• Never start or run inside a closed
room or building. Breathing exhaust
fumes can kill.
• Keep handles free of oil and fuel.
CUTTING SAFETY
• Use only for trimming, mowing, edging, and sweeping. Do not use for
pruning or hedge trimming.
• Inspect the area before each use.
Remove objects (rocks, broken
glass, nails, wire, etc.) which can be
thrown by or become entangled in
line. Hard objects can damage the
trimmer head and be thrown causing
serious injury.
• Keep firm footing and balance. De
not overreach.
• Keep all parts of your body away
from muffler and spinning line. Keep
engine below waist level. A hot muffler can cause serious burns.
• Cutting on left side of the shield will
throw debris away from the operator.
TRANSPORTING
AND STORAGE
• Allow engine to cool; secure unit before storing or transporting in vehicle.
• Empty the fuel tank before storing or
transporting the unit. Use up fuel left
in the carburetor by starting the engine and letting it run until it stops.
• Store unit and fuel in area where fuel
vapors cannot reach sparks or open
flames from water heaters, electric
motors or switches, furnaces, etc.
• Store unit so line limiter cannot accidentally cause injury. The unit can be
hung by the tube.
• Store unit out of reach of children.
• If situations occur which are not covered in this manual, use care and
good judgment. If you need assistance, call 1-800-235-5878.
UNIT / MAINTENANCE
SAFETY
• Disconnect the spark plug before
performing maintenance except carburetor adjustments.
• Look for and replace damaged or
loose parts before each use. Look
for and repair fuel leaks before use.
Keep in good working condition.
• Replace trimmer head parts that are
chipped, cracked, broken, or damaged in any other way before using
the unit.
• Make sure unit is assembled correctly as shown in this manual.
• Make carburetor adjustments with
lower end supported to prevent line
from contacting any object.
3
SPECIAL NOTICE: This unit is not
equipped with a temperature limiting
muffler and spark arresting screen
which meets the requirements of California Codes 4442 and 4443. All U.S.
forest land and the states of California,
Idaho, Maine, Minnesota, New Jersey,
Oregon, and Washington require by
law that many internal combustion engines be equipped with a spark arrestor screen. If you operate in a locale
where such regulations exist, you are
legally responsible for installing and
maintaining the operating condition of
these parts. Failure to do so is a violation of the law. Refer to the MAINTENANCE section in this manual.
SPECIAL
NOTICE: Exposure to
vibrations through prolonged use of
CARTON
CONTENTS
Check carton contents against the following list.
Model 358.798560
• Trimmer
• Shield
• Container of Oil
• Extra Spool
Examine parts for damage. Do not use
damaged parts.
NOTE: If you need assistance or find
parts missing or damaged, call
1-800-235-5878.
It is normal for the fuel filter to rattle in
the empty fuel tank.
Finding fuel or oil residue on muffler is
normal due to carburetor adjustments
and testing done by the manufacturer.
ASSEMBLY
WARNING:
If received assembled,
repeat all steps to ensure your unit is
properly assembled and all fasteners
are secure.
ADJUSTING
THE HANDLE
WARNING:
When adjusting the handle, be sure it remains between the
trigger and the safety label.
• Loosen wing nut or knob on handle.
• Rotate the handle on the tube to an
upright position; retighten wing nut.
gasoline powered hand tools could
cause blood vessel or nerve damage
in the fingers, hands, and joints of
people prone to circulation disorders or
abnormal swellings. Prolonged use in
cold weather has been linked to blood
vessel damage in otherwise healthy
people. If symptoms occur such as
numbness, pain, loss of strength,
change in skin color or texture, or loss
of feeling in the fingers, hands, or
joints, discontinue the use of this tool
and seek medical attention. An antivibration system does not guarantee
the avoidance of these problems, Users who operate power tools on a continual and regular basis must monitor
closely their physical condition and the
condition of this tool.
ATTACHING
SHIELD
TRIMMER
HEAD
&
WARNING:
The shield must be properly installed. The shield provides partial protection from the risk of thrown
objects to the operator and others and
is equipped with a line timiter which
cuts excess line to the proper length.
The line limiter (on underside of shield)
is sharp and can cut you.
• Assemble parts as shown.
• Tighten parts securely.
Sield
and use washer and
NOTE: Remove
wing nut from this
bolt for assembling
shield.
Washer,and
Wing Nut
KNOW YOUR TRIMMER
READ THIS OPERATOR'S MANUAL AND SAFETY RULES BEFORE OPERATING YOUR UNIT. Compare the illustrations with your unit to familiarize yourself
with the location of the various controls and adjustments. Save this manual for
future reference.
Assist Handle
Tube
Trimmer
l
Head
Shield
Throttle Trigger
ON/STOP
Switch
Spark Plug
Starter
Rope
_
Line Limiter
Blade
Choke Lever
r
_
Primer Bulb
Fuet Mix Fitl Cap
ON/STOP SWITCH
The STOP switch is used to stop the
engine. Press and hold the switch to
stop the unit.
PRIMER BULB
The primer butb removes air from the
fuel lines and fills them with fuel. This
allows you to start the engine with fewer pulls on the starter rope. Activate
the primer bulb by pressing it and
allowing it to return to its original form.
CHOKE
The choke helps to supply fuel to the
carburetor during starting. This allows
you to start a cold engine. Activate the
choke by moving the choke lever to
the Full position. After the engine has
started, move the choke to the Off
position.
BEFORE STARTING ENGINE
engine damage. When mixing fuel,
follow instructions printed on container.
Once oil is added to gasoline, shake
container momentarily to assure that
the fuel is thoroughly mixed. Always
read and follow the safety rules
relating to fuel before fueling your unit.
IMPORTANT
WARNING:
Be sure to read the fuel
information in the safety rules before
you begin. If you do not understand
the safety rules, do not attempt to fuel
your unit. Call 1-800-235-5878.
FUELING
ENGINE
Experience indicates that alcohol
blended fuels (called gasohol or using
ethanol or methanol) can attract moisture which leads to separation and
formation of acids during storage.
Acidic gas can damage the fuel system of an engine while in storage.
To avoid engine problems, empty the
fuel system before storage for 30 days
or longer. Drain the gas tank, start the
This engine is certified to operate on
unleaded gasoline. Before operation,
gasoline must be mixed with a good
quality 2-cycle air-cooled engine oil.
We recommend Craftsman brand oil.
Mix gasoline and oil at a ratio of 40:1
(A 40:1 ratio is obtained by mixing 3.2
ounces of oil with 1 gallon of unleaded
gasoline). DO NOT USE automotive oil
or boat oil. These oils will cause
5
engine
andletitrununtilthefuellines
andcarburetor
areempty.
Usefresh
fuelnextseason.
Neveruseengine
orcarburetor
cleanerproducts
inthefueltankorpermanentdamage
mayoccur.
SeetheSTORAGE
section
foradditionalinformation.
STOPPING
YOUR ENGINE
• Press and hold the ON/STOP switch
in the STOP position.
• If engine does not stop, move choke
lever to full position.
Choke Lever
Engine
Stop
Switch
STARTING
YOUR ENGINE
COLD ENGINE OR WARM ENGINE
AFTER RUNNING OUT OF FUEL
WARNING:
The trimmer head will
turn while starting the engine.
Avoid any contact with the muffler. A
hot muffler can cause serious burns.
• Rest engine and shield on ground,
supporting trimmer head off ground.
• Move the choke lever to the Full
Choke position.
• Slowly press the primer bulb 6 times.
• Squeeze and hold the throttle trigger.
Keep throttle trigger fully squeezed
until the engine runs smoothly.
Choke
Lever
rimer
Bulb
• Pull starter rope sharply 5 times.
NOTE: If the engine sounds as if it is
trying to start before the 5th pull, go to
the next step.
• Move the choke lever to the Half
Choke position.
• Pull starter rope sharply until engine
runs, but no more than 6 pulls.
NOTE: If the engine has not started
after 6 pulls (at half choke), check to
make sure the choke lever is in the
proper position. Then, move the choke
lever to the Full Choke position and
press the primer bulb 6 times; squeeze
and hold the throttle trigger and pull
the starter rope 2 more times. Move
the choke lever to Half Choke and pull
the starter rope until the engine runs,
but no more than 6 more pulls. If the
engine still has not started, it is prob*
ably flooded. Proceed to "Starting a
Flooded Engine."
• Allow the engine to run 10 seconds,
then move the choke lever to Off
Choke. Allow the unit to run for 30
more seconds at Off Choke before
releasing the throttle trigger.
NOTE: If engine dies with the choke
lever at the Off Choke position, move
the choke lever to Half Choke and pull
the rope until engine runs.
STARTING A WARM ENGINE
• Move the choke lever to the Half
Choke position.
• Squeeze and hold the throttle trigger.
Keep throttle trigger fully squeezed
until the engine runs smoothly.
• Pull starter rope sharply until engine
runs, but no more than 5 pulls.
• Allow engine to run 15 seconds,
then move the choke lever to Off
Choke.
NOTE: If engine has not started, pull
starter rope 5 more pulls. If engine still
does not run, it is probably flooded.
DIFFICULT
STARTING
STARTING
OR
A FLOODED ENGINE
Flooded engines can be started by
placing the choke lever in the Off
Choke position; then, pull the rope to
clear the engine of excess fuel. This
could require pulling the starter handle
many times depending on how badly
the unit is flooded.
Iftheunitstilldoesn't
start,referto
TROUBLESHOOTING
chartorcall
1-800-235-5878.
OPERATING
INSTRUCTIONS
OPERATING
POSITION
ALWAYS WEAR:
Eye Protection
Lone
Heavy Shoes
Cut from your right to your left.
Do not run the engine at a higher
speed than necessary. The cutting line
will cut efficiently when the engine is
run at less than full throttle. At lower
speeds, there is less engine noise and
vibration. The cutting line will last
longer and will be less likely to "weld"
onto the spool.
If the trimmer head does not turn when
the engine is in operation, make sure
the drive shaft housing is properly
seated in engine shroud.
Always release the throttle trigger and
allow the engine to return to idle speed
when not cutting.
To stop engine:
• Release the throttle trigger.
• Press and hold the ON/STOP switch
in the STOP position.
TRIMMER
LINE ADVANCE
The trimmer line will advance approximately 2 in. (5 cm) each time the bottom of the trimmer head is tapped on
the ground with the engine running at
full throttle.
The most efficient line length is the
maximum length allowed by the line
limiter.
Always keep the shield in place when
the tool is being operated.
To Advance Line:
• Operate the engine at full throttle.
• Hold the trimmer head parallel to and
above the grassy area.
• Tap the bottom of the trimmer head
lightly on the ground one time. Ap-
proximately 2 in. (5 cm) of line will be
advanced with each tap.
Always tap the trimmer head on a
grassy area. Tapping on surfaces such
as concrete or asphalt can cause excessive wear to the trimmer head.
If the line is worn down to 2 in. (5 cm)
or less, more than one tap will be required to obtain the most efficient line
length.
WARNING:
Use only .065" (1.6 mm)
diameter line. Other sizes of line will
not advance properly and can cause
serious injury. Do not use other materials such as wire, string, rope, etc. Wire
can break off during cutting and become a dangerous missile that can
cause serious injury.
CUTTING
METHODS
WARNING:
Use minimum speed and
do not crowd the line when cutting
around hard objects (rock, gravel,
fence posts, etc.), which can damage
the trimmer head, become entangled
in the line, or be thrown causing a serious hazard.
• The tip of the line does the cutting.
You will achieve the best performance and minimum line wear by not
crowding the line into the cutting
area. The right and wrong ways are
shown below.
Tip of the Line
Right
_ _l
I LiwnceC/_r°_'ded
Into
Wrong
....
• The line will easily remove grass and
weeds from around walls, fences,
trees and flower beds, but it also can
cut the tender bark of trees or shrubs
and scar fences. To help avoid damage especially to delicate vegetation
or trees with tender bark, shorten line
to 4-5 in. (10-13 cm) and use at less
than full throttle.
• For trimming or scalping, use less
than full throttle to increase line life
and decrease head wear, especially:
• During light duty cutting.
• Nearobjects
around
whichtheline
canwrapsuchassmallposts,
treesorfencewire.
° Formowing
orsweeping,
usefull
throttleforagoodcleanjob.
WARNING:
Always
weareyeprotection.Neverleanoverthetrimmer
head.
Rocks
ordebriscanricochet
orbe
thrown
intoeyesandfaceandcause
blindness
orotherserious
injury.
TRIMMING - Hold the bottom of the
trimmer head about 3 in. (8 cm) above
the ground and at an angle. Allow only
the tip of the line to make contact. Do
not force trimmer line into work area.
Trimming
%
(8 cm)
Above Ground
SCALPING - The scalping technique
removes unwanted vegetation. Hold
the bottom of the trimmer head about 3
in. (8 cm) above the ground and at an
angle. Allow the tip of the line to strike
the ground around trees, posts, monuments, etc. This technique increases
line wear.
Scalping
MOWING - Your trimmer is ideal for
mowing in places conventional lawn
mowers cannot reach. In the mowing
position, keep the line parallel to the
ground. Avoid pressing the head into
the ground as this can scalp the
ground and damage the tool.
Mowing
SWEEPING - The fanning action of
the rotating line can be used for a
quick and easy clean up. Keep the line
parallel to and above the surfaces being swept and move the tool from side
to side.
Sweeping
//
MAINTENANCE
SCHEDULE
CARE & MAINTENANCE TASK
-Check for Loose fasteners and parts
Check for damaged or worn parts
Clean unit and labels
Clean air filter
_Replace spark plug
GENERALRECOMMENDATIONS
The warranty on this unit does not cover items that have been subjected to
operator abuse or negligence. To receive full value from the warranty, the
operator must maintain unit as instructed in this manual. Various adjustments
will need to be made periodically to
properly maintain your unit.
CHECK FOR LOOSE
FASTENERS
AND PARTS
• Spark Plug Boot
• Air Filter
• Housing Screws
• Assist Handle Screws
• Shield
CHECK FOR DAMAGED
OR
WORN PARTS
Refer replacement of damaged/worn
parts to your Sears Service Center.
• On/Stop Switch - Ensure On/Stop
switch functions properly by pressing
the switch to the "Stop" position.
Make sure engine stops; then restart
engine and continue.
• Fuel Tank - Discontinue use of unit if
fuel tank shows signs of damage or
leaks.
• Shield - Discontinue use of unit if
shield is damaged.
CLEAN UNIT & LABELS
• Clean the unit using a damp cloth
with a mild detergent.
• Wipe off unit with a clean dry cloth.
CLEAN AIR FILTER
Do not clean filter in gasoline or other
flammable solvent to avoid creating a
fire hazard or producing harmful evaporative emissions.
A dirty air filter decreases engine performance and increases fuel consump-
WHEN TO PERFORM
Before each use
Before each use
After each use
Every 5 hours of operation
Yearly._
tion and harmful emissions. Always
clean after every 5 hours of operation.
• Clean the cover and the area around
it to keep dirt from falling into the
carburetor chamber when the cover
is removed.
• Remove parts as illustrated.
• Wash the filter in soap and water.
• Allow filter to dry.
• Replace parts.
(_
_Filt._..__rews
Cover
REPLACE
SPARK PLUG
Replace the spark plug each year to
ensure the engine starts easier and
runs better. Set spark plug gap at
.025 in. Ignition timing is fixed and
nonadjustable.
• Twist, then pull off spark plug boot.
• Remove spark plug from cylinder
and discard.
• Replace with Champion RCJ-8Y
spark plug and tighten with a 3/4 in.
socket wrench (10-12 ft.-Ibs).
• Reinstall the spark plug boot.
ADVANCING
THE CUTTING
LINE
Advance line by tapping bottom of cutting head lightly on the ground while engine is running at full speed. A metal
blade attached to the shield will cut the
line to the proper length.
REPLACING
THE LINE
• Remove the spool by firmly pulling on
the tap button.
• Clean entire surface of hub and spool.
• Replace with a pre-wound spool, or
cut a length of 30 feet of _065"(1.6 mm)
diameter Craftsman ® Pro Trimmmer
line. Never use wire, rope, string, etc.,
which can break off and become a
dangerous missile.
• Insert one end of the line about 1/2
inch (1 cm) into the small hole inside
the spool.
• Wind the line evenly and tightly onto
the spool. Wind in the direction of the
arrow found on the spool.
• Push the line into the notch, leaving 3
to 5 inches (7 - 12 cm) unwound.
• Insert the line into the exit hole in the
hub as shown in the illustration.
• Align the notch with the line exit hole.
• Push the spool into the hub until it
snaps into place.
• Pull the line extending outside the hub
to release it from the notch.
.,t-__ Spool
N'nt
Hub
Line exit hole
CARBURETOR
ADJUSTMENT
WARNING:
The trimmer head will be
spinning during most of this procedure.
Wear your protective equipment and
observe all safety precautions. After
making mixture adjustments, recheck
idle speed.
Carburetor adjustment is critical and if
done improperly can permanently
damage the engine as well as the carburetor. If you require further assistance or are unsure about performing
this procedure, call our customer assistance help line at 1-800-235-5878.
Old fuel, a dirty air filter, a dirty fuel filter, or flooding may give the impression of an improperly adjusted carburetor. Check these conditions before
adjusting the carburetor.
The carburetor has been carefully set
at the factory. Adjustments may be
necessary if you notice any of the following conditions:
• Engine will not idle. See "Idle Speed"
under adjusting procedure.
• Engine dies or hesitates instead of
accelerating. See "Acceleration
Check" under adjusting procedure.
• Loss of cutting power. See "Mixture
Adjustment" under adjusting
procedure.
There are two adjustment screws on
the carburetor.
_leSpeed
Screw
Mixture
(with Limiter
Cap)
CARBURETOR
Air Filter
PRESETS
When making carburetor preset adjustments, do not force plastic limiter caps
beyond stops or damage will occur.
If carburetor presets are not needed,
proceed to "Adjusting Procedure, Idle
Speed."
To adjust presets:
• Turn mixture screw counterclockwise
until it stops.
• Turn the idle speed screw clockwise
until it stops. Now turn counterclockwise 4-1/2 turn&
• Start motor, cut grass for 3 minutes,
and proceed to the adjustment
section. If engine does not start,
refer to troubleshooting chart or call
1-800-235-5878.
10
* Ifengine
performance
isacceptable
atthepresetpositions,
nofurther
adjustment
isnecessary.
ADJUSTING
PROCEDURE
IdleSpeed
Allowengine
toidle.Adjustspeeduntil
enginerunswithout
stalling.
• Turnclockwise
toincrease
engine
speedifengine
stallsordies.
• Turncounterclockwise
todecrease
speed.
Nofurtheradjustments
arenecessary
ifperformance
issatisfactory.
Mixture Adjustment
"H"
DO NOT operate engine at full throttle
for prolonged periods while making adjustments. Damage to the engine can
occur. Extend line to the length allow
by the line limiter and cut some grass.
Based on performance while cutting,
Prepare unit for storage at end of season or if it will not be used for 30 days
or more.
WARNING:
• Allow engine to cool, and secure the
unit before storing or transporting.
• Store unit and fuel in a well ventilated area where fuel vapors cannot
reach sparks or open flames from
water heaters, electric motors or
switches, furnaces, etc.
• Store unit with all guards in place.
Position unit so that any sharp object
cannot accidentally cause injury.
• Store unit and fuel well out of the
reach of children.
EXTERNAL
SURFACES
If your unit is to be stored for a period
of time, clean it thoroughly before storage. Store in a clean dry area.
• Lightly oil external metal surfaces.
FUEL
SYSTEM
Under Fueling Engine in the Operating
Section of this manual, see message
labeled IMPORTANT regarding the use
of gasohol in your engine.
Fuel stabilizer is an acceptable alternative in minimizing the formation of
fuel gum deposits during storage. Add
turn the mixture adjustment in
1/16-turn increments as follows:
• Clockwise until the engine has good
power while cutting with no hesitation.
Do not adjust by sound or speed, but
judge by how well the engine performs while cutting.
• Counterclockwise if the engine has
speed but dies or lacks power while
cutting.
After completing adjustments, check
for acceleration. Reset if necessary.
Acceleration
Check
If engine dies or hesitates instead of
accelerating, turn mixture adjustment
counterclockwise until you have
smooth acceleration. Recheck and adjust as necessary for acceptable performance.
stabilizer to the gasoline in the fuel
tank or fuel storage container. Follow
the mix instructions found on stabilizer
container, Run engine at least 5 minutes after adding stabilizer.
CRAFTSMAN 40:1,2-cycle engine oil
(air cooled) is already blended with
fuel stabilizer. If you do not use this
Sears oil, you can add a fuel stabilizer
to your fuel tank.
INTERNAL
ENGINE
• Remove spark plug and pour 1 teaspoon of 40:1,2-cycle engine oil (air
cooled) through the spark plug opening. Slowly pul! the starter rope 8 to
10 times to distribute oil.
• Replace spark plug with new one of
recommended type and heat range.
• Clean air filter.
• Check entire unit for loose screws,
nuts, and bolts. Replace any damaged, broken, or worn parts.
• At the beginning of the next season,
use only fresh fuel having the proper
gasoline to oil ratio.
OTHER
• Do not store gasoline from one season to another.
• Replace your gasoline can if it starts
to rust.
11
TROUBLESHOOTING
TROUBLE
Engine will not
start.
CHART
CAUSE
REMEDY
Engine flooded.
Fuel tank empty.
Spark plug not firing.
Fuel not reaching
carburetor.
Compression
See "Starting Instructions."
Fill tank with correct fuel mixture.
Install new spark plug.
Check for dirty fuel filter; replace.
Check for kinked or split fuel line;
repair or replace.
Contact your Service Dealer.
low.
i
Engine will not
idle properly.
Engine will not
accelerate,
i lacks power,
or dies under
a load.
Engine smokes
excessively,
Engine runs hot.
- Adjust idle speed screw
clockwise to increase speed.
Idle speed set too high.
Adjust idle speed screw counterclockwise to reduce speed.
See "Carburetor Adjustments."
adjustment,
Carburetor
requires
i
Crankshaft seals worn.
Contact your Service Dealer.
Compression low.
I" C°nta_.[Y_£u.[ S._e_.w!c._.e
._al_e_._...........
Air filter dirty.
]• Clean or replace air filter,
Clean or replace spark plug
Spark plug fouled.
and re-gap.
Carburetor requires
See "Carburetor Adjustments."
adjustment.
Contact your Service Dealer.
Carbon build up.
Contact your Service Dealer.
Compression low,
Choke partially on.
Adjust choke.
Fuel mixture incorrect,
Empty fuel tank and refill with
correct fuel mixture.
Air filter dirty.
Clean or replace air filter.
Carburetor requires
See "Carburetor Adjustments."
adjustment.
Fuel mixture incorrect. !, See "Fueling Your Unit."
Replace with correct spark plug.
Spark plug requires
incorrect.
Ii: See "Carburetor Adjustments."
Carburetor
adjustment
.........................
l, Contact your Service Dealer; ................
Idle speed set too low.
12
Declaraci6n de Garantfa Limitada
2
Servicio y Ajuste
10
Reglas de Seguridad
Montaje
Uso
2
4
5
Almacenamiento
12
Mantenimiento
9
Repuestos y Encargos
Tabla Diagn6stica
13
Contratapa
GARANTIA LIMITADA DE UN AI_IO PARA EL GASOLINA CRAFTSMAN
WEEDWACKER _
Por un a5o desde la fecha de compra cuando esta unidad a gasolina Craftsman
Weedwacker ® es mantenida, lubricada y puesta a puesta a punto de acuerdo
con las instruccienes de operaci6n y mantenimiento en el manual del operario,
Sears reprepararA libre de consto cualquier defecto de material o de mano de
obra.
Esta garantfa excluye la cuerda de nylon, bujla y filtro de aire, las cuales son
partes descarteables que se desgastan durante el uso normal.
Si este Weedwacker ® se usa para fines comerciales, esta garantia se aplica
durante 90 dias solamente a partir de la fecha de compra. Si este Weedwacker ®
se usa para fines de alquiler, esta garantfa se aplica durante 30 dias solamente a
partir de la fecha de compra. Esta garantfa se aplica s61omentras este producto se
uso en los Estados Unidos
EL SERVICIO DE GTARANTIA ESTA DISPONIBLE DEVOLVIENDO EL
WEEDWACKER ® AL CENTRO O DEPARTAMENTO DE SRVICIO DE SEARS
MAS CERCANO EN LOS ESTADOS UNIDOS.
Esta garantfa le otorga derechos legales especificos y usted puede tambi6n
tener otros derechos que varian de Estado a Estado.
SEARS, ROEBUCK AND CO, DEPT. D/817WA HOFFMAN ESTATES, IL 60179
ADVERTENCIA:
AI usar aparatos
de jardineria, es necesario siempre
observar precauciones bAsicas de
seguridad para reducir el riesgo de
incendio y de graves heridas. Lea y
siga todas las instrucciones, iEste
aparato de fuerza puede ser peligroso!
El usuario tiene la responsabilidad de
cumplir con las advertencias e
instrucciones de seguridad que se
encuentran en el aparato yen el
manual.iLea el Manual del Usuario en
su totalidad antes de hacer use del
aparato! Est6 totalmenta familiarizado
con los contrles yes uso correcto del
aparato. Limite el uso de este aparato
a aquellas personas que hayan leido y
comprendido las advertencias e
instrucciones en el aparato y en el
manual y que las vayan a cumplir.
Nunca permita que los ni5os usen
este aparato.
Informaci6n de Seguridad en el
aparato
PELIGRO:
Nunca use cuchillas ni
dispositivos
desgranadores.
Este
aparato fue diseSado exclusivamente
para ser usado come cortador a linea. El
uso de cualquier otro accesorio o pieza
adicional incrementar& el peligro de
heridas.
0-00
ADVERTENClA:
La Ifnea de corte
arroja objetos violentamente, pudiendo
herir al usuario o a terceros. Use gafas
de seguridad y protecci6n de piernas.
2
Mantenga
todoelcuerpoalejado
dela
Nnea
girante.
Mantenga
a losniSos,
espectadores
y
animales
a unadistancia
mfnima
de
15metros
(50pies)Pareelaparato
inmediatamente
sialguien
sele
acerca.
Protecci6n
delosojos
• Cambie todas las piezas del cabezal
que esten descantilladas,
resquebrajadas, quebradas o
daSadas de cualquier otro modo,
antes de usar el aparato.
• AsegSrese que el aparato est6
correctamente armado como se
muestra en el manual.
• Haga los ajustes al carburador con
el cabezal apoyado de modo que la
Ifnea no pueda tocar nada.
• Mantenga alejadas a las dem&s
personas siempre que haga ajustes
al carburador.
• Use exclusivamente los accesorios y
repuestos WEED EATER
recomendados.
SEGURIDAD
CON EL
COMBUSTIBLE
• Mezcle y vierta el combustible al aire
libre.
• Mant6ngase alejado de las chispas y
de las llamas.
• Use recipiente aprobado para e!
combustible.
• No fume ni permita que se fume
cerca del combustible ni del aparato
ni mientras _ste este en uso.
• Limpie todo el combustible
derramado.
• AI6jese a por Io menos 3 metros (10
pies) del lugar de abastecimiento
antes de poner en marcha el motor.
• Pare el motor y permita que se enfrfe
el aparato antes de retirar la tapa del
tanque.
SEGURIDAD
AL CORTAR
• Use el aparato exclusivamente para
recortar, para cortar c_sped, para
cortar bordes y para barrer. No Io
use para podar ni para recortar seto.
• Inspeccione el Area antes de cada
uso. Retire los objetos (piedras,
vidrio roto, clavos, alambre, etc.) que
se puedan enredar en la Ifnea o que
_sta pueda arrojar. Los objetos
duros pueden dafiar al cabezal y
6ste los puede arrojar, causando
graves heridas.
° Mantenga el equilibrio, con los pies
en una superficie estable. No se
extienda demasiado.
• Mantenga todas las partes del
cuerpo alejadas de la Ifnea girante y
del silenciador. Mantenga el motor
por debajo del nivel de la cintura. El
silenciador puede causar graves
quemaduras cuando esta caliente.
• Si se corta con la Ifnea del lado
izquierdo del protector, los
escombros volaran en sentido
opuesto al usuario.
Siacontecen
situaciones
noprevistas
eneste
manual,
tenga
cuidado
yusebuen
criterio.
Si
necesita
ayuda>
entreencontacto
conel
Concesionario de Servicio Sears o Ilame al
t-800-554-6723.
SEGLIRIDAD
DEL USLIARIO
• Use siempre protecci6n de ojos.
• Use siempre pantalones largos,
mangas largas, botas y guantes. Se
recomienda el use de pantorrilleras
de seguridad. No use el aparato
descalzo, ni con sandalias.
Mant_ngase alejado de la Ifnea
girante.
• Mantenga el cabel!o por encima de
los hombros, atAndolo para tal efecto
si es necesario. No use ropa suelta
ni ropa con corbatas, tiras, borlas,
etc. que cuelgan libremente. Pueden
enredarse en las piezas en
movimiento.
• No haga uso del aparato estando
cansado, enfermo o bajo la
influencia del alcohol, de drogas o
de remedios.
• Use protecci6n de ofdos si usa el
aparato por m_s de una hora y
media por dfa.
• Nunca ponga el aparato en marcha
ni Io deje en marcha dentro de un
recinto o edificio cerrado. Respirar
los vapores del combustible Io
puede matar.
• Mantenga las manijas libres de
aceite y de combustible.
SEGLIRIDAD
DE/
APARATO
Y
EN EL MANTENIMIENTO
• Desconecte la bujfa antes de hacer
cualquier mantenimiento menos los
ajustes al carburador.
• Inspeccione el aparato y cambie las
piezas daSadas o flojas antes de
cada uso. Repare toda fuga de
combustible antes de usar el
aparato. Mantenga el aparato en
buenas condiciones de uso.
3
TRANSPORTE
Y
ALMACENAMIENTO
• Espere que el motor se enfrfe y fije
bien el aparto antes de guardarlo o
de transportarlo en un vehfculo.
• Vacfe el tanque de combustible
antes de guardar el aparato o de
transportarlo. Consuma todo el
combustible restante en el
carburador poniendo el motor en
marcha y dejAndolo en marcha
hasta que el motor se pare solo.
• Guarde el aparato y el combustible
en un lugar donde los vapores del
combustible no puedan alcanzar
chispas ni llamas provenientes de
los termotanques, los motores o
interruptores electricos, los
calefactores centrales0 etc.
• Guarde el aparato de modo que el
limitador de Ifnea no pueda causar
heridas accidentales. Se puede
colgar el aparato por el tubo.
• Guarde el aparato fuera del alcance
de los nifios.
• Si acontece
alguna situaci6n no
prevista
en este manual,
tenga
cuidado y use buen criterio. Si
necesita
ayuda,
llame
al
1-800-554-6723.
AVISO ESPECIAL: Este aparato no
viene
equipado
con
sitenciador
limitador de temperatura ni con rejilla
antichispa que cumpla los requisitos de
los C6digos de California 4442 y 4443.
Todas las tierras forestadas federales,
m_s los estados de California, Idaho,
Maine,
Minnesota,
Nueva
Jersey,
Oreg6n y Washington, requieren por ley
que muchos motores de combusti6n
interna est6n equipados con rejilla
antichispa. Si usted utiliza el aparato
donde existen tales reglamenteos,
usted tiene la responsabilidad juridica
de instalar y mantener estas piezas en
correcto estado de funcionamiento. De
Io contrario, estarA en infracci6n de la
ley. Vea la secci6n de MAINTENIMIENTO
en este manual.
AVISO ESPECIAL: El estar expuesto a
las vibraciones
a trav_s del uso
prolongado de herramientas de fuerza a
gasolina puede causar dafios a los
vasos sangufneos o a los nervios de los
dedos, las manos y las coyunturas en
aquellas
personas
que
tienen
propensidad a los trastomos de la
circulaci6n
o a las hinchazones
anormales.
El uso prolongado en
tiempo frio ha sido asociado con dafios
a los vasos sanguineos de personas
que por otra parte se encuentran en
perfecto estado de salud. Si ocurren
sintomas
tales
como
el
entumecimiento,
el dolor, la falta de
fuerza, los cambios en el color o la
textura de la piel o falta de sentido en los
dedos, las manos o las coyunturas, deje
de usar esta m&quina inmediatamente
y procure
atenci6n
m6dica.
Los
sistemas
de
anti-vibraci6n
no
garantizan
que
se
eviten
tales
problemas. Los usuarios que hacen uso
continuo
y prolongando
de
las
herramientas de fuerza deben fiscalizar
atentamente su estado ffsico y el estado
del aparato.
CONTENIDO
DE LA CAJA
Verifique que est6n incluidas todas las
piezas que figuran en la lista a
continuaei6n.
Modelo 358.798560
• Cortadora
• Protector
• Tuerca Mariposa
Examine las piezas para verificar que
no est6n dafiadas. No use piezas
dafiadas.
Si necesita ayuda, faltan piezas o hay
piezas dafiadas, Ilame al
1-800-235-5878.
AVISO: Es normal escuchar que
golpetee el filtro de combustible en el
tanque vacio.
Es normal encontrar residuos de
combustible o aceite en el silenciador
debido a los ajustes al carburador y a
las pruebas efctuadas por el
fabricante.
MONTAJE
ADVERTENCIA:
Si recibi6 el
aparato ya montado, repita todos los
pasos para asegurar que est6
correctamente armado y que todos los
fijadores est6n fijos y seguros.
AJUSTE DE LA MANIJA
ADVERTENCIA:
AI ajustar la
manija, aseg_rese que quede entre el
gatillo y la placa de seguridad.
• Afloje la tuerca mariposa o la perilla
en la manija.
• Gire la manija en el tube hasta que
quede en posici6n vertical; vuelva a
ajustar la tuerca mariposa.
INSTALACION
DEL CABEZAL
Y
DEL PROTECTOR
ADVERTENCIA:
Es imprescindible
que el protector est_ debidamente
instalado. Provee protecciSn parcial
contra el peligro de objetos arrojados
hacia el usuano o hacia terceros y
viene equipado de un limitador de
linea que corta el exceso de Ifnea para
que quede del largo que corresponde.
El limitador de linea (debajo del
protector) es filoso y corta.
• Introduzca la m_nsula por la ranura
como se ilustra.
• Gire el protector hasta que el perno
pase por el orificio en la m6nsula.
• Enrosque la tuerca mariposa al
perno y ajQstela bien.
S
Proteitor
Tornilto Del protector_
de desechos (Instalado)
Arandela
y reborde
CONOZCA
SU APARATO
LEA ESTE MANUAL DEL USUARIO Y LAS REGLAS DE SEGURIDAD ANTES
DE PONER EN MARCHA EL APARATO. Compare las ilustraciones a su aparato
para familiarizarse con la ubicaci6n de los diversos controles y ajustes. Guarde
este manual para uso futuro.
Manija Auxiliar
/
Tubo
Cabezal
Protector
Gatillo Acelerador
Interruptor
__
J
\
Soga de
/,_,_
Bujfa
Limitador
de Lfnea
Palanca del
--_
_ILLJ"_--INTERRUPTOR
Se utiliza el interruptor para parar el
motor. El interruptor deberA estar en la
posici6n ON para poner el motor en
marcha. Para pararlo, ponga el
interruptor en la posici6n STOP.
Tapa del Tanque
de Combustible
BOMBEADOR
El bombeador retira aire de las Ifneas
de combustible y las Ilena de
combustible. Esto le permite que
ponga el motor en funcionamiento con
menos tirones a la soga de arranque.
Accione el bombeador apretandolo y
dejando que retome su forma original.
5
CEBADOR
El cebador ayuda a proveer
combustible al carburader durante el
arranque. Esto le permite al usuario
poner un motor fifo en funcionamiento.
Accione el cebador colocando la
dPalancaen la posici6n FULL. Despu6s
e que el motor se haya puesto en
marcha, coloque el cebador en la
posici6n OFE
ANTES DE PONER EL MOTOR
EN MARCHA
ADVERTENCIA:
Asegt_rese de
haber lefdo la informaci6n sobre el
combustible en las reglas de
seguridad antes de comenzar. Si no
comprende las reglas de seguridad,
no intente abastecer el aparato de
combustible. Llame 1-800-235-5878.
ABASTECIMIENTO
DEL MOTOR
Este motor estA habilitado para
funcionar con gasolina sin plomo.
Antes de usar, se deberA mezclar la
gasolina con un aceite de buena
calidad para motores de 2 tiempos
enfriados a aire. Recomendamos el
aceite marca Craftsman. Mezcle la
gasolina con el aceite en la proporci6n
de 40:1. (Se obtiene una proporci6n
de 40:1 mezclando 3,2 onzas de
aceite con cada gal6n de gasolina sin
plomo). NO USE aceite para
autom6viles ni para barcos. Estos
aceites dafiarAn el motor. AI mezclar
combustible, siga las instrucciones
impresas en el recipiente. Una vez
que haya afiadido el aceite a la
gasolina, agite el recipiente
brevemente para asegurar que el
combustible est6 completamente
mezclado. Lea siempre y siga las
reglas de seguridad que tienen que
ver con el combustible antes de
abastecer el aparato.
IMPORTANTE
La experiencia indica que los
combustibles mezclados con alcohol
(los Ilamados gasohol o los que
contienen etanol o metanol) pueden
atraer humedad, Io que puede causar
la separaci6n y la formaci6n de Acidos
durante el almacenamiento. La
gasolina acfdica puede dafiar el
sistema de combustible del motor
durante el almacenamiento.
Para evitar problemas con el motor,
deberA vaciarse el sistema de
combustible antes de almacenar el
aparato por 30 dfas o mAs.
Vacfe el tanque de combustible, ponga
el motor en marcha y d_jelo en
marcha hasta que las lineas de
combustible y el carburador queden
vacios. Cuando vaya a usar el aparato
nuevamente, use combustible freco.
Vea las instrucciones de
ALMACENAMIENTO para obtener
mAs informaciones.
Nunca use productos de limpieza de
motor o carburador en el tanque de
combustible ya que hacerlo put
PARA PARAR EL MOTOR
• Coloque el interruptor en la posici6n
STOP.
• Si el motor no se detiene, tire la
perilla del cebador a su maxima
extensi6n.
Palanca del Cebador
Interruptor
\
PARA PONER EL MOTOR EN
MARCHA
PUESTA EN MARCHA DEL MOTOR
FRIO, O DEL MOTOR CALIENTE
QUE SE HA QUEDADO SIN
COMBUSTIBLE.
ADVERTENClA:
El cabezal gira
durante el proceso de arranque. Evite
todo contacto con el silenciador. El
silenciador puede causar graves
guemaduras cuando estA caliente.
• Apoye el motor y el protector en el
suelo, de forma que sostengan el
cabezal levantado deI suelo.
• Coloque el interruptor en la posici6n
START o ON.
• Coloque la palanca del cebador en
la posicion FULL CHOKE.
• Aprete lentamente la bombilla 6
veces.
• Aprete y mantenga apretado el
gatillo acelerador. Mant6ngalo
apretado hasta que el motor marche
de forma pareja,
• Deje el motor marchar per !5
segundos, despu_s coloque la
palanca del cebador en OFF
CHOKE.
AVISO: Si el motor no ha arancado, d_
5 tirones mAs a la soga de arranque.
Si el motor aun asf no arranca, es
probable que est_ ahogado.
ARRANQUE
DIFICIL O
ARRANQUE
DE MOTOR
AHOGADO
Se puede poner en marcha los
motores ahogados colocando la
palanca del cebador en la posici6n
OFF CHOKE; acto seguido tire la soga
para despejar el exceso de
combustible del motor. Esto podrA
requerir que se tire la manija de
arranque muchas veces, dependiendo
de la cantidad de combustible que
est& ahogando el aparato.
Si et motor no arranca ann, vea la
TABLA DIAGNOSTICA o Ilame al
1-800-235-5878.
INSTRUCCIONES
DE use
POSICION DE use
USE StEMPRE
Bombeador
• De tirones bruscos a la soga de
arranque.
AVISO: Si el sonido del motor indica
que est_ tratando de arrancar antes
del 5o tir6n, prosiga inmediatamente al
pr6ximo paso. Suele ser diffcil
escuchar el sonido.
• Coloque la palanca del cebador en
la posicion HALF CHOKE.
• D6 tirones bruscos a la soga de
arranque hasta que el motor se
ponga en marcha, pero no m&s de 6
veces.
AMISO: Si el motor no se ha puesto
en marcha despu6s de 6 tirones (en
posici6n "Half Choke"), verifique que la
palanca del cebador est_ en su
posici6n corespondiente. Despu6s,
coloque la palanca del cebador a la
posici6n HALF CHOKE y d_ tirenes
bruscos a la soga de arranque hasta
que el motor no se ha puesto en
marcha, probablemente est6 ahogado.
Prosiga a "Arranque de Motor
Ahogado".
• Deje el motor en marcha per 10
segundos, despues coloque la
palanca del cebador en la posici6n
OFF CHOKE. Deje que el motor
marche otros 30 segundos en
posici6n OFF CHOKE antes de
soltar el gatillo acelerader.
AMISO: Si el motor se para con la
palanca del cebador en la posici6n
OFF CHOKE, ponga la palanca en la
posici6n HALF CHOKE y de tirones a
la soga hasta que el motor arranque.
Protecci6n
de los Ojos
Pantalones
Largos
Zapatos
Gruesos
Corte desde su derecha hacia su
izquierda.
Lleve el motor a la velocidad de corte
antes de introducir la Ifnea al material
que se ha de cortar. No haga marchar
el motor a velocidades mAs altas que
la necesaria. La Ifnea de corte corta
eficientemente con el motor
marchando a una velocidad menor
que la maxima, produciendo asf
menos ruido y vibraci6n. La Ifnea de
corte durarA per mAs tiempo y tendrA
menos probabilidad de "fundirse" a la
bobina.
Si el cabezal no gira cuando el motor
estA en marcha, aseg6rese que el eje
de propulsi6n est6 debidamente
calzado dentro de la caja del motor.
Siempre suelte el acelerador y deje
que el motor baje a marcha lenta
cuando no estA cortando.
Para parar el motor:
• Suelte el gatillo acelerador.
PARA PONER EN MARCHA
EL
MOTOR CALIENTE
• Coloque la palanca del cebador en
la posici6n HALF CHOKE.
• Aprete y mantenga apretado el
gati!lo acelerador. Mantenga el gatillo
apretado a fondo hasta que el motor
marche de forma pareja.
o D_ tirones bruscos a la soga de
arranque hasta que el motor se
ponga en marcha, pero no mAs de 5
veces.
7
• Aprete
y mantenga
apretado
el
Es la Punta
Linea Metida Dentro
interruptor
momentAneo
hastaqueel de la Linea la del Material que se
motorsehayadetenido
por
Esta Cortando
que Corta
complete.
AVANCEDELA LINEADE
CORTE
Lalineadecorteavanza
aproximadamente
5cm(2pulgadas) CORRECTO "' INCORRECTO
cadavezquesetocaelcabezal
contraelsueloconelmotoracelerado
• La linea retira f_cilmente el paste y
afondo.
las malezas de al lado de las
EllargomAseficiente
deIfneaesel
las cercas, los &rboles y las
largom_.ximo
permitido
perellimitador parades,
eras de flores, pero tambi6n puede
delinea.
cortar la corteza delicada de los
Siempre
mantenga
elprotector
&rboles y arbustos y marcar cercas.
debidamente
instalado
alutilizar
el
Para evitar daSos especialmente a la
aparato.
vegetaci6n delicada o a los &rboles
• Parahaceravancar
lalinea:
con corteza delicada, saque 10 a 13
• Acelere
elmotorafondo.
• Sostenga el cabezal encima de un
espacio de tierra con c6sped y
paralelo al mismo,
• Toque el cabezal levemente una vez
contra el suelo. La linea avanzara
unos 5 cm (2 pulgadas) con cada
toque.
Toque el cabezal siempre contra el
suelo donde haya cesped. El contacto
contra las superficies tales como el
cemento o asfalto causar_t desgaste
excesivo del cabezal.
Si no quedan m_.s que des o tres
pulgadas de Ifnea, habr& que hacer
m&s de un toque para obtener el largo
de !fnea m_.s eficiente.
ADVERTENCIA:
Use
exclusivamente linea con di_.metro de
1.6mm (0.065 de pulgada). Las Ifneas
con cualquier otro di_metro no
avanzar&n debidamente y podr_n
causar graves heridas. No use ningQn
otto material, como alambre, hilo,
soga, etc. El alambre se puede
quebrar durante el corte,
convirtiendose en proyectil peligroso
que puede causar graves heridas.
METODOS
DE CORTE
ADVERTENCIA:
Use la velocidad
minima y no aproxime el aparato a los
objetos duros (piedras, pedregullo,
postes de cercas, etc.) que el cabezal
pueda arrojar o que puedan daSar el
mismo o enredarse con la linea,
creando serio peligro.
• Es la punta de la linea la que corta.
Se conseguir_, el mayor rendimiento
y el minimo desgaste de la linea si
no se mete ta linea dentro del
material que se estA cortando. La
forma correcta e incorrecta de cortar
se ilustran a continuaci6n.
em (4-5") al largo de la linea y no
haga marchar el motor a fondo.
• Para recortar o escalpar, corte a
menos que las revoluciones mAximas
para incrementar la vida fltil de la Ifnea
y disminuir el desgaste del cabezal,
especialmente:
- Para trabajos livianos.
- Cerca de los objetos en los qua la
linea se pueda enredar, tales come
los postes y Arboles peque5os o el
alambre de las cercas.
• Para cortar c6sped o barrer, use el
acelerador a fondo para conseguir
una buena limpieza.
ADVERTENCIA:
Use siempre
protecci6n de ojos. Nunca se incline
sobre el cabezaL El aparato puede
arrojar o hacer rebotar piedras y
escombros qua pueden dar en los
ojos y la cara del usuario y causar
ceguera u otras graves heridas.
PARA RECORTAR - Sostenga el
aparato de modo que el cabezal
quede a unos 8 cm (3 pulgadas) det
suelo yen &ngulo. Permita que
Qnicamente la punta de la Ifnea haga
contacto. No meta la linea dentro del
Area que se estA trabajando.
H
Para Recortar
__'
//
Por Encima
_3C_igadas)
PARA ESCALPAR - La t_cnica de
escalpar se usa para quitar vegetaci6n
no deseada. Sostenga el cabezal a
PARA BARRER - La acci6n
ventiladora de la Ifnea en rotaci6n
puede ser utilizada para hacer una
limpieza rApida y f&cil. Mantenga la
Ifnea paralela al suelo y encima de las
superficies que se quiera barrer y
mueva el aparato repetidamente
primero hacia un lado y despu6s al
otro
unos 8 cm (3 pulgadas) del suelo y en
#,ngulo. Deje que la punta de la linea
toque el suelo alrededor de los
Arboles, los postes, los monumentos,
etc. Esta t6cnica incrementa el
desgaste de la l_nea.
Para Escalpar
Para
• //__
PARA CORTAR CESPED - El aparato
es ideal para cortar c_sped en los
lugares donde no Ilegan las cortadoras
convencionales de c_sped. Para
cortar c_sped, mantenga la linea
paralela e! suelo. Evite apretar el
cabezal contra el suelo, ya que tal
procedimiento puede escalpar e! suelo
y dafiar el aparato.
Para Cortar
Cesped
PLANILLA DE MANTENIMIENTO
TAREA DE CUIDADO Y MANTENIMIENTO
Verificar que no haya fijadores flojos ni piezas sueltas
Veriferificarque no haya piezas dafiadas o gastadas
CUANDO HACER
Antes de cada uso
Antes de cada uso
Despues de cada uso
Cada 5 horas de uso
Anualmente
Limpiar el aparato y las placas
Limpiar el filtro de aire
Cambiar la bujfa
RECOMENDACIONES
GENERALES
La garantfa de este aparato no se
aplica a los articulos sometidos al
abuso o a la negligencia del usuario.
Para recibir el valor completo de la
garanfia, el usuario debr& mantener el
aparato segQn las instrucciones en
este manual, Ser& necesario hacer
varios ajustes peri6dicamente para
mantener el aparato debidamente.
VERIFIQUE
QUE NO HAYA
PIEZAS SUELTAS NI
FIJADORES
FLOJOS
• Capucha de la Bujfa
• Filtro de Aire
• Tornillos de la Caja
• Tornillos de la Manija Auxiliar
9
• Protector
VERIFIQUE
QUE NO HAYA
PIEZAS DANADAS
NI
GASTADAS
El Centre de Servicio Sears deberA
efectuar todo cambie de piezas
daSadas o gastadas.
• Interrupter On/Stop-Aseg0rese
que
el interrupter funciona
correctamentemovi6ndolo
a la
posici6n STOP. Vea que el motor se
haya detenido; acto seguido ponga
el motor en marcha nuevamente y
contin0e.
• Tanque de Combustible-Pare
de
usar el aparato si hay indicios de
daSos o p_rdidas en el tanque de
combustible.
• Protector-Pare de usar el aparato si
el protector esta daSado.
LIMPIE EL APARATO Y LAS
PLACAS
• Limpie el aparato usando un trapo
h0medo con un detergente suave.
• S_quelo con un trape limpio.
LIMPIE EL FILTRO DE AIRE
No limpie el filtro con gasolina ni
ning0n otro solvente inflamable, ya
que hacer!o puede crear peligro de
incendio y emisiones evaporativas
nocivas.
Limpieza del filtro de aire:
Los filtros de aire sucios disminuyen el
rendimiento del motor e incrementan
PARA AVANZAR LA LINEA DE
CORTE
Haga avanzar la Ifnea tocando e!
cabezal levemente en la tiera mientras
el cabezal
estA girando
a toda
velocidad. El limitador de linea, una
cuchilla
de metal instalada
en el
protector, corta la linea al largo correcto.
PARA CAMBIAR
LA LINEAR
• Retire la bobina tirando firmemente
del bot6n de toque.
• Limpie la superficie entera del cube y
de la bobina.
• Instale una bobina pre-cargada o
corte un largo de unos 6 metros de
linea marca Weed
Eater r con
diAmetro de 1.6 mm (0,065 de
pulgada). Nunca use alambre, soga,
hilo, etc., que se pueden romper y
convertirse en proyectiles peligrosos.
el consume de combustible y la
producci6n de emisiones nocivas.
Limpie siempre el filtro de aire
despu_s de cada 5 horas de use.
Filtro de Aire
Tornillos
Tapa del
--.--_lrUW
Filtro de Aire
_
• Limpie la tapa y el Area contigua
para evitar que caiga tierra y aserrin
en la camera del carburader cuando
abra la tapa.
• Retire las piezas que se ilustran.
• Lave el filtro en agua y jab6n.
• Deje que el filtro se seque.
• Reponga las piezas.
CAMBIE LA BUJIA
Cambie la bujia todos los aries para
asegurar que el motor arranque mAs
fAcilmente y marche mejor. La
separaci6n de los electrodes deberA
ser de 0,025 de pulgada. El encendido
es fijo y no ajustable.
• Gire y luego retire la capucha de la
bujia.
• retire la bujia del cilindro y
des_chela.
• Cambiela per una bujia Champion
RCJ-8Y y aj0stela con una Ilave de
3/4 de pulgada (10-12 libras/pie).
• Vuelva a instalar la capucha.
• Meta 1 cm (1/2 pulgada) de ta punta
de la linea per el orificio peque5o en el
interior de la bobina.
° Enrosque la Ifnea en la bobina firme y
parejamente
en la direcci6n que
indica la flecha en la bobina.
• Fije la linea en la mella en la bobina,
dejando unos 7 a 12 cm (3 a 5
pulgadas) de Ifnea colgando sin
enroscar.
• Meta la punta de la linea per el orificio
de salida en el cube come se ve en la
ilustraci6n.
• Alinee la mella con el orificio de salida.
• Coloque la bobina en el cube y
emp0jela
hasta que se fije en
posici6n.
• Tire la linea que sobresale del cube
para liberarla de la mella en el interior
del cube.
10
Ajuste de Mezcla (tapas limitadoras
plAstico mAs alia de los retentores.
Lfnea en la Mella
_
Orificio de salida
Marcha
Lenta
/7
de la line_
AJUSTES
AL CARBURADOR
ADVERTENCIA:
El cabezal estar&
girando durante la mayor parte de este
procedimiento. Use su equipo de
protecci6n y cumpla con todas las
precauciones de seguridad. Despu6s
de hacer los ajustes a la mezcle,
vuelva a verificar la marcha lenta.
El ajuste del carburador es de
primordial importancia. Si se Io hace
incorrectamente, puede daSar tanto el
motor come el carburador
permanentemente. Si necesita m,_s
ayuda o no estA seguro de c6mo
hacer el procedimiento, Ilame a
nuestro tel6fono de ayuda al
consumidor, al 1-800-235-5878.
El combustible vencido, el filtro de aire
sucio o el motor ahogado pueden dar
la impresi6n de carburaci6n
desajustada. Verifique estas
condiciones antes de hacer cualquier
ajuste.
El carburador ha sido ajustado
cuidadosamente en la fabric&
Posiblemente se hagan necesarios
ajustes si se nota cualquiera de las
diguientes condiciones:
• El motor no anda a marcha lenta.
Vea "Marcha Lenta" bajo el
procedimiento de ajuste.
• El motor se para o se ahoga cuando
debe acelerar. Vea "Ajuste de la
Aceleraci6n" bajo el procedimiento
de ajuste.
• Falta de potencia para cortar. Vea
"Ajuste de la Mezcla" bajo el
procedimiento de ajuste.
Hay dos tornillos de ajuste en el
carburador. Est_n marcados con H y
"T". EstAn ubicados arriba del
bombeador.
de
Tapa del
Filtro
de
PUNTOS DE PRECALIBRACION
AI hacer precalibracion ajustes ne
fuerce las tapas limitadoras de pl_stico
m_s all_ de los retentores o puede
haber da_os. Si no se necesitan los
puntos de precalibraci6n, pase a Ia
secci6n.
AJUSTES
PRECALIBRACION
• Gire el tomillo de mezcla a la
izquierda (en contra del sentido del
retej) hasta que se detenga.
• Gire el tornillo de marcha lenta a la
derecha (en el sentido det reloj)
hasta que se detenga. Ahora girelo
hacia la izquierda 4 vueltas y media.
• Ponga el motor en marcha y corte
pasto por 3 minutos, luego proceda
a la secci6n de ajustes. Si el motor
no arranca, vea la tabla diagn6stica
o Ilame al 1-800-235-5878.
• Si el funcionamiente del motor es
aceptable con las posiciones de
precalibraci6n, no har,_ falta hacer
m_.s ajustes.
PROCEDIMIENTO
DE AJUSTE
Marcha Lenta
Deje el motor en marcha lent& Ajuste
las revoluciones hasta que el motor se
mantenga en marcha sin ahogarse.
• Gire el tornillo a la derecha (en el
sentido del reloj) para aumentar las
revoluciones si el motor se ahoga o
se para.
• Gire el tornillo a la izquierda (en
contra del sentido del retoj) para
bajar las revoluciones.
No hace falta ningQn otro ajuste si el
rendimiento es satisfactorio.
Ajuste de Mezela
NO HAGA MARCHAR EL MOTOR
con el acelerador a fondo por tiempo
prolongado mientras hace los ajustes.
El motor puede quedar daBado.
Extienda la Ifnea al largo permitido por
el limitador de linea y corte algo de
pasto. De acuerdo at rendimiento del
motor al cortar, gire e! tornillo de ajuste
de mezcla en incrementos de 1/16 de
11
vuelta del tornillo, come se detalla a
continuaci6n:
• A la derecha (en el sentido del reloj)
hasta que el motor tenga buena
potencia para cortar sin ahogarse.
No haga los ajustes per sonido ni
per revoluciones, sine per el
rendimiento del motor al cortar.
• A la izquierda (en contra del sentido
del reloj) si el motor tiene velocidad
de revoluciones pero se para o le
falta potencia al cortar.
Despu6s de cempletar estos ajustes,
verifique la aceleraci6n, Ajuste
nuevamente si es necesario.
Verificacibn de la Aceleracibn
Si el motor se para o hesita en vez de
acelerar, gire el tornillo de ajuste de la
mezcla a la izquierda (en contra del
sentido del reloj) hasta conseguir una
aceleraci6n pareja. Verifique
nuevamente y haga los ajustes
necesarios para conseguir un
funcionamiento aceptable.
Prepare el aparato para el
almacenamiento al final de la
temporada o siva a estar sin usar per
m_s de 30 dfas.
ADVERTENCIA:
• Deje que el motor se enfrfe y fije
bien el aparato antes de guardarlo o
de transportarlo.
• Guarde el aparato y el combustible
en un local bien ventilado donde los
vapores de combustible no puedan
entrar en contacto con chispas ni
llamas abiertas provenientes de los
termotanques, los motores o
interruptores el_ctricos, los
calefactores centrales, etc.
• Guarde el aparato con todas los
protectores en su lugar y coloque el
aparate de mode que las piezas
filosas no puedan causar heridas per
accidente.
• Guarde el aparato y el combustible
bien fuera del alcance de los niSos.
ASada estabilizador a la gasolina en el
tanque de combustible o en el
recipiente de almacenamfento de
combustible. Siga las instrucciones de
mezcla que se encuentran en los
envases de estabilizador. Ponga el
motor en marcha y d6jelo en marcha
per Io menos 5 minutes despu_s de
ponerle estabilizador.
El aceite CRAFTSMAN 40:1 para
motores de 2 tiempos (enfriados a
aire) viene mezclado con estabilizador
de combustible. Si no usa este aceite
de Sears, entonces puede aSadir un
estabilizador al tanque de
combustible.
SUPERFICIES
EXTERNAS
Siva a guardar el aparato durante
mucho tiempo, Ifmpielo rigurosamente
primero. GuArdelo en un lugar limpio y
seco,
• Aplique una pequeSa cantidad de
aceite alas superficies exteriores
met_.licas.
SISTEMA DE COMBUSTIBLE
Bajo Abastecimiento del Motor, en la
secci6n de Use en este manual, vea el
mensaje marcado IMPORTANTE
acerca del use de combustibles
mezclados con alcohol en el motor de
su aparato.
Los estabilizadores de combustible
son una alternativa aceptable para
minimizar la formaci6n de dep6sitos
de goma durante el almacenamiento.
INTERIOR DEL MOTOR
• Retire la bujfa la bujfa y vierta una
cucharada de las de t6 de aceite
40:1 para motores de 2 tiempos
(enfriados a aire) per la abertura
para la bujfa. Tironee lentamente de
la soga de arranque 8 a 10 veces
para distribuir el aceite.
• Reemplace la bujfa con otra del tipo
y de la gama de caler
recomendados.
• Limpie el filtro de aire.
• Examine todo el aparato para
verificar que no haya tornillos,
tuercas ni pernos sueltos. Cambie
todas las piezas dafiadas,
quebradas o gastadas.
• AI principio de la pr6xima temporada,
use exclusivamente combustible
nuevo con la proporci6n correcta de
gasolina a aceite.
OTRO
• No guarde gasolina de una
temporada a la siguiente.
• Cambie el recipiente de gasolina si
se empieza a oxidar.
12
TABLA DIAGNOSTICA
PROBLEMA
CAUSA
El motor no arranca.
•
•
•
•
•
El motor no
anda en
marcha lenta
como debe.
i.
SOLUCION
El interruptor estA en OFF
El motor esta ahogado.
EItanque de combustible
est_ vacfo
La bujia no hace chispa.
El combustible no estA
llegando al carburador
Lacompresi6n
•
•
•
Instale una bujia nueva,
Verifique si el flltro de combustible
est& sucio; limpielo Verifique si
hay dobleces en Ia Ifnea de
combustible o si est_ partida;
rep_rela o cAmbiela
Entre en contacto con el
Concesionario de Servicio
est&baja
El a uste de la marcha
enta esta muy ba o
•
El a uste de la marcha
lenta est_ muy a to.
•
Et carburador requiere
ajuste
Las juntas del cig0e5al
estAn gastadas
La compresi6n esta baja
El motor no
acelera, le
falta potencia
o se para bajo
carga
El filtro de aire estA sucio,
La bujia esta
carbonizada
E! carburador requiere
ajuste
El filtro de arie esta
sucio.
El carburador requiere
ajuste
Et motor humea
excesivamente
La mezcla de
combustible se ha
hecho incorrectamente
Se ha instalado la bujia
incorrect&
marcha con
temperatura
elevada,
•
•
•
•
Ajuste el tornillo de marcha tenta
a la derecha para aumentar las
revotuciones
Ajuste el tornillo de marcha lenta
a la izquierda para bajar las
revoluciones
Vea "Ajustes al Carburador"
Entre en contacto
Concesionario de
Entre en contacto
Concesionario de
i.
i"
con el
Servicio.
con el
Servicio,
Limpie o cabmie el filtro de aire.
Limpie o cambie la bujia y calibre
la separacion.
Vea "Ajustes al Carburador",
Entre en contacto
Concesionario de
Entre en contacto
Concesionario de
con el
Servicio
con el
Servicio
Ajuste el cebador
Vacle el tanque de combustible y
ll@nelo de combustilbe con la
mezcla correct&
Limpie o cambie el filtro de aire.
Vea "Ajustes as Carburador".
El filtro de aire est_ sucio
El carburador requiere
ajuste
Elmotor
Coloque el interruptor en ON
Vea las Instrucciones de Arranque,
Llene el tanque con la mezcla
correcta de combustible,
La mezcla de
combustible se ha
hecho incorrectamente,
Se ha instalado la bujfa
incorrect&
E! carburador requiere
ajuste.
Acumulaci6n de carb6n
13
Vea "Abastecimiento
del Aparato",
•
C_,mbiela por la bujia correcta.
•
Vea "Ajustes at Carburador".
•
Entre en contacto con el
Concesionario de $ervicio.
For the repair or replacement parts you need
delivered directly to your home
Call 7 am - 7 pm, 7 days a week
1-800-366-PART
(1-800-366-7278)
Para ordenar piezas con entrega
domicilio - 1-800-659-7084
a
For in-house major brand repair service
Call 24 hours a day, 7 days a week
1-800-4-REPAIR
(1-800-473-7247)
Para pedir servicio de reparaci6n
domicilio1-800-676-5811
a
For the location of a Sears Parts and
Repair Center in your area
Call 24 hours a day, 7 days a week
mmmmm
mmmmm
1-800-488-1222
For information on purchasing a Sears
Maintenance Agreement or to inquire
about an existing Agreement
Call 9 am - 5 pm, Monday-Saturday
1-800-827-6655
When requesting service or ordering
parts, always provide the following
information:
•
•
Product Type
Model Number
•
•
SEARS
Part Number
Part Description
A
.
is Repair
• Specialists
,
•
menca