1
SHARP
OPERATION
MANUAL
I CONTENTS
PAGE
I
• IMPORTANT SAFETY INSTRUCTIONS...2
• PARTS IDENTIFICATION
• SPECIFICATIONS
• OPERATING
...................... 4
...................................
INSTRUCTIONS.,
4
............. 5
• MAINTENANCE
INSTRUCTIONS
.......... 8
• REPLACEMENT
INSTRUCTIONS
..... 10
• BEFORE
REQUESTING
• DESCRIPTION
SERVICE ..... 14
OF ACCESSORIES
...15
• LIMITED WARRANTY ..........................
16
VACUUM CLEANER
Model
EC-14TWT6
EC-14TAT6
EC-12TWT6
EC-12TWT4
EC-12TWT2
EC-12TXT2
EC-12SXT4B
Thank
Before
please
obtain
you very much for buying SHARP
using your SHARP vacuum cleaner,
read this operation manual carefully to
the best use from your vacuum cleaner.
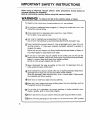
IMPORTANT
SAFETY
INSTRUCTIONS
When using an electrical
vacuum
cleaner,
basic precautions
should
followed
including the following:
Read all instructions
carefully before using this vacuum cleaner.
WAR N IN G/To reduce
1
2
Electric
the risk of fire, electric
shock could occur if used outdoors
Do not leave unattended
and before user-servicing.
when plugged
3 Close
supervision
is necessary when
Do not allow to be used as a toy.
4
5
be
or injury:
or on wet surfaces°
in. Unplug
from outlet when not in use
used by or near children.
Use only for intended use as described in this manual.
Use only the manufacturer's
recommended
attachments
and paper
bag.
Never operate this vacuum cleaner if it has a damaged cord or plug, if it is not
working properly,
if it has been dropped, damaged,
exposed to weather or
dropped
into water.
Return the vacuum
cleaner
to a Sharp Authorized
the United States for examination
6
shock,
always
Service
Dealer or Station in
and repair.
Do not pull or carry this vacuum cleaner by the power cord. Do not use the
power cord as a handle, close a door on the cord, or pull the cord around sharp
edges or corners. Keep cord away from heated surfaces.
Do not run this vacuum cleaner over the cord.
7 Never disconnect
the plug by pulling
outlet, grasp the plug, not the cord.
on the
cord. To disconnect
from
an
Never operate
8 openings
free
this vacuum cleaner with any air opening blocked. Keep the air
of dust, lint, hair and any other similar material.
When the secondary filter becomes dirty, rinse in warm water. Filters should
be completely dry before reusing.
9 Never
drop or insert any object into any opening.
1 0 Keep hair, face, fingers and loose clothing
--the agitator and all moving parts.
11 Do
away from any openings,
not pick up lit cigarettes,
hot ashes, matches
blades, needles, pins or other sharp objects.
12 Never
13 Before
2
operate
this vacuum
removing
cleaner
without
the plug from the outlet,
or similar
materials,
such as
razor
a paper bag and filters in place.
turn all controls
to the "OFF" position.
1 4
Use extra caution when cleaning
15 Never
handle plug, cord or vacuum
1 6 Do not touch the, agitator
17 Do
18
not use in presence
of flammable
with wet hands.
or combustible
on the vacuum
liquids
or fumes.
cleaner.
not step, on the hose or pull the hose forcibly'.
2{)
Do not pick up large
the hose.
21
Do not expose this vacuum
or during storage.
_)2 Store
this vacuum
23 use
the carrying
cleaner.
24
cleaner
while it is rotating.
Do not place heavy objects
19 Do
on stairs.
Before
servicing
objects such as waste paper or cloth which
cleaner
cleaner
to high temperatures
while
operating
in a dry place.
handle
at the back of the body
this vacuum
cleaner,
to carry
this
vacuum
allow all metal parts to cool first.
i
iiiii
may clog
i
ii
m
i
CAUTION:
To reduce the risk of electric shock, this vacuum cleaner has a polarized plug "_
I(one blade is wider than the other). This plug will fit in a polarized outlet only one way. If the
IPlug does not fit fully in the outlet, reverse the plug. If it still does not fit, contact a qualified
1_electrician to install the,,proper outlet. Do not change the plug in any way.
SAVE THESE
This vacuum
J
INSTRUCTIONS
cleaner is intended for household
use only.
3
PARTS IDENTIFICATION
( FRONT ")
F
L. REAR
Power Cord __
Panel __
Power Control--_
(EC-14TWT6/
14TAT6/12TWT6
only)
Dust indicator--/
/1_
ON/OFF Switch
Cord Storage
Hooks
"_7-/Y_
_
J_
Handle Screw
(EC-14"rw'r6/ i',/'_
14TAT6/12TWT6
only)
j
Clamp Knob
_"
Carrying Handle
Extension Wand
and Crevice Tool
Packed in the box;
assemble by placing
crevice tool inside
wand as shown.
Clip wand into place.
..
Headlight
(Except
EC-12TXT2/
12SXT4B
C-q-'--'-_'_:::zZ3
Suction Hose
Bumper
Upholstery Tool with
Detachable Brush
RUG/FLOOR Selector
(EC-14TWT6/14TAT6 only)
Foot Pedal Release
SPECIFICATIONS
s INPUT
(AMP)
EC-14TWT6
12.0
EC-14TAT6
12.0
/
POWER
CONTROL
YES
YES
DUST
iNDICATOR
HEADLIGHT
YES
YES
3O
YES
YES
YES
30
24
EC-12TWT6
12.0
YES
EC-12TWT4
12.0
10.0
NO
NO
YES
YES
NO
NO
9.0
NO
NO
NO
NO
21
18
NO
18
EC-12TWT2
EC-12TXT2
_EC-12SXT4B
8.5
NO
YES
I
WARNING:
Operate vacuum cleaner only at the voltage specified on nameplate.
4
CORD LENGTH
(Ft.)
24
j
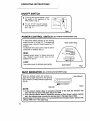
OPERATING
INSTRUCTIONS
HOW TO ATTACH THE HANDLE TO VACUUM CLEANER
1
First remove the handle screw.
Then insert the base of the handle into
the top of the body' of the vacuum cleaner
as shown. (Fig. 1)
2
Line up
with the
vacuum
(Fig. 2),
securely.
the small hole on the handle
small hole on the rear of the
cleaner and insert the screw.
Be sure the screw is tightened
Handle
Handle screw
Fig.1
i
,
Fig.2
n
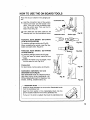
HOW TO WIND POWER CORD
1
Insert the power cord
in the clip located on
the upper cord storage
hook as shown. (Ficj. 3)
2
Clip
Wrap
excess
cord
around the cord storage hooks to prevent
dragging and any interference with cleaning.
(Fig. 4)
side
Upper cord
storage hook
Fig.4
Fig.3
HOW TO RELEASE POWER CORD
r
Rotate the upper cord storage
hook downward for quick cord
release. (Fig .5)
Upper
cord
storage hook
Fig.5
OPERATING
/
/
INSTRUCTIONS
/
/,
ON/OFF SWITCH
Ir
turn on the vacuum cleaner,
1 To
the switch on the appliance
touch
to the
=ON" position. (Fig. 6)
2
To turn off the vacuum cleaner,
touch the switch to the "OFF" position. (Fig. 7)
Fig.6
POWER CONTROL
SWITCH
A slide switch allows selection
power from low "L" to high "H".
suction power, slide the switch
position.
To decrease the suction power,
toward the "L" position. (Fig. 7)
(EC-14TWT6/14TAT6/12TWT6
of any cleaning
To increase the
toward the "H"
only)
Power Control Knob
slide the switch
HIGH:
Greatest suction powe_r for heavy vacuuming
jobs. Medium
power levels may be set
between "H" and "L".
LOW:
Low suction power for delicate cleaning jobs.
Fig. 7
•
|1
ii i
DUST INDICATOR
(EC-14Tw'r6/14TAT6/12TWT6
only)
#..When the indicator enters the red area, replace the full paper bag with a new genuine
Sharp TWIN PLY_Micro-Filtration paper bag.
(Fig. 8)
Dust Indicator
00000000
Red area
Fig. 8
NOTE:
If the vacuum cleaner takes in excessive amounts of fine dust, the indicator may
enter the red area even if the paper bag is not filled,.
If the vacuum cleaner takes in excessive amounts of fiber (thread, cottony material
etc.), the indicator may not enter the red area even if the paper bag is filled.
Should either of the above occur, it is recommended that the paper bag be replaced with
a Sharp TWIN PLYTMnew paper bag.
i
6
|
II
I
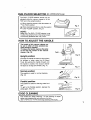
RUG/FLOOR
SELECTOR
(EC-14TW'r6/14TAT6
only)
The RUG / FLOOR selector should only be
adjusted while the vacuum cleaner is in the
"ON" and in the upright position.
1 When
cleaning carpets,
the "RUG" position.
slide the selector to
Fig. 9
2 When cleaning bare floors, slide the selector
to the "FLOOR" position. (Fig. 9)
NOTE:
Make sure The RUG / FLOOR selector is set
to either the extreme front or the extreme back
to avoid any problems that may occur.
HOW TO ADJUST THE HANDLE
i
The handle of this vacuum cleaner can
be set to either of three positions-Upright, Normal or Parallel.
To release the handle, depress the pedal
at the left rear corner of the vacuum
cleaner. (Fig. 10)
Upright
Pedal __
Fig. 10
position
Normally the handle is locked in this position
for storage or when using the On Board
Tools. By pushing the handle forward until
the handle is locked, this vacuum cleaner
will stand on its legs and wheels. (Fig. 11)
/
Legs
Normal
,i
Fig. 11
position
This position is used for normal cleaning.
(Fig. 12)
Fig. 12
Parallel position
This position is used for cleaning under furniture.
To get to the Parallel position, depress the
pedal again. (Fig. 13)
Fig. 13
EDGE CLEANING
edges near baseboards and stationary furniture.
/
This
model has
" forcleaning
the cleaning
of carpet _)
(EC-14TWT6
and"Edge
14TAT6Cleaning
have edge
with brush.)
7
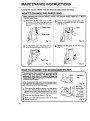
MAINTENANCE
INSTRUCTIONS
Unplug this vacuum cleaner from the electrical
outlet before servicing.
•
HOW TO CHANGE THE PAPER BAG
r When operating the vacuum cleaner, always use genuine Sharp
Filtration paper bags.
1
Push down on the clamp knob located
on the top of the dust cover and pull the
dust cover forward. (Away from the unit.)
(Fig. 14)
3
TWIN PLY
TM
Micro -_
Insert the new bag by pressing the collar
opening completely around the suction
inlet.. (Fig. 16)
Collar
_----
Clamp knob
Dust cover
Fig. 14
2
Fig. 16
4
To remove the paper bag, grasp the collar on the bag and pull it out. (Fig. 15)
Spread out the sides of the new bag.
(Fig. 17)
Paper bag
__1.
L,,_._,
Fig. 17
Fig. 15
,J
HOW TO CHANGE THE SECONDARY
FILTER
i
fThe secondary filter consists of an electrostatic
micron filter and subfilter. The filter should be
replaced at least every 10 months to keep the
micron filter highly efficient.(EC-14TWT6/14TAT6/
12TWT6/12TWT4 only)
When the secondary filter becomes excessively soiled,
wash with water and replace after it is completely dried.
(EC-12TWT2/12TXT2/12SXT4B
only)
1 First
unplug the vacuum cleaner from the electrical outlet. Remove the secondary filter from the
bottom of the paper bag compartment (Fig. 18) by
lifting it out from under the retaining lip as shown.
2
Install the new filter as shown in Fig. 19.
3
Make sure that the secondary filter is in place
before vacuuming.
filter
Secondary
Fig. 18
Micron filter
(EC-14TWT6/
14TAT6/
12TWT6/
12TWT4
Sub filteronly)
Retaining lip
Fig. 19
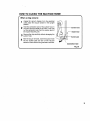
HOW TO CLEAN 'THE SUCTION
HOSE
When a clog occurs,:
=
outlet, place the vacuum cleaner in the Upright
position.
Hold the connection tube of the suction hose in
•_ one hand and the handle in the other. Then pull
out the connection tube from the suction pipe of
Suction hose
o ,u0t o o00 c,0aoor,ro
'iIi ..oe,eo.r, a,
Nozzle head
the nozzle head.(Fig. 20)
3
Remove the clog carefully without damaging the
suction hose.
--
Suction pipe
/11 After the clog is removed, insert the suction hose
into the suction pipe and turn on the vacuum
Connection tube
cleaner to check that the clog has been removed.
Fig. 20
9
REPLACEMENT
HOW TO REMOVE
INSTRUCTIONS
THE BOTTOM PLATE
Before replacing any parts, unplug the
vacuum cleaner from the electrical outlet. To
replace any of the following parts, set the
handle to the Parallel position.
Then turn the vacuum cleaner over, exposing the underside.
Loosen the bottom plate by sliding the latch
away from the mounting screw. (Fig. 21)
Then remove the bottom plate.
I
Latch
/,oon,,oO
screw
Fig. 21
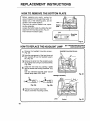
HOW TO REPLACE THE HEADLIGHT LAMP
(EC-14TWT6/14TAT6/12TWT6/
12TWT4/12TWT2 only)
i
1
2
Remove the headlight
(Fig. 22)
mounting
ii
Headlight mounting Screws
screws..
Note the arrangement of the lead wires and
then carefully lift out the headlight assembly. (Fig. 23)
3
.Remove the lamp from the socket by pushmg in gently and turning it counterclockwise.
(Fig. 23a)
4
Install the new lamp by pushing it gently
into the socket and turning clockwise. (Fig.
23b)
Use any standard bayonet base vacuum
cleaner lamp rated 125V, 20W.
Fig. 22
Headlight assembly
®
®
Fig. 23a
Fig. 23b
5 Reinsert the headlight assembly.
Secure it with the mounting screws.
Lamp
i
10
Socket
Fig. 23
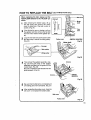
HOW TO REPLACE THE BELT
(EC-14TWT6/14TAT6
only)
ii
F
When replacing the belt, always set the
RUG/FLOOR Selector to the "FLOOR" position.
Belt cover
Rat belt
1
After removing the bottom plate, lift up
the belt cover and remove the pulley
cover to determine if the belt is worn or
broken. (Fig. 24)
2
If the flat belt is worn or broken, pull out
the agitator and then remove the flat belt
from the motor shaft and the agitator pulley.
3
Moter
shaft
Flat
belt
Guide
Loop the new belt around the motor shaft
and then loop it around the idling pulley.
(Fig. 25)
_" -...
_"_,,_
L__... __-
_,,#,,,_,_
_,
Main pulley
Idling pulley
Pulley cover
t
,
Agitator assembly
Fig. 24
Moter shaft
Fig. 25
4
Groove
Then reinsert the agitator assembly, making sure that both ends of the agitator
assembly are fitted into the groove of the
nozzle head. (Fig. 26)
Be sure to install the new flat belt into the
guide properly. (Fig. 24.)
Groove
Agitator
assembly
Fig. 26
5
Be sure that the flat belt is not twisted and
all rotating parts move smoothly. (Fig. 27)
6
After reinstalling the pulley cover, close the
belt cover and replace the bottom plate.
Belt cover
Pulley cover
Fig. 27
11
REPLACEMENT
]INSTRUCTIONS
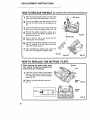
HOW TO REPLACE THE BELT
(EC-12TWT6/12TWT4/12TWT2/12TXT2/12SXT4Bonly)
1
After removing the bottom plate, lift up the belt
cover and remove the shelter plate. (Fig. 28)
2
Pull out the agitator and then remove the flat
belt from the motor shaft and the agitator pulley.
3
Loop the new belt around the motor shaft and
then loop it around the agitator pulley. (Fig. 29)
4
Reinsert the agitator assembly, making sure
that both ends of the agitator assembly' fit in
the groove of the unit.
5
Be sure that the belt is not twisted and all
rotating parts move smoothly.
6
Install the shelter plate completely in the groove
with the marking of R side toward the belt
cover.("R" means "Rear".)
7
After reinstalling the shelter plate, close the
belt cover, then replace the bottom plate.
Belt cover
Fig. 28
Shelter plate
"R"mark
New belt
HOW TO REPLACE THE BOTTOM
Fig. 29
PLATE
v_
Grooves
When replacing the bottom plate, make
sure that all the parts are properly set
and the wires are not pinched.
1
2
Insert the front six tabs of the bottom
plate into the grooves at the front end of
the nozzle head, then reset the bottom
plate.(Fig. 30)
Tabs
__tt__/
"ilatOm
Fasten it by sliding the latch as shown.
(Fig. 31)
Fig. 30
Bottom
Plate
I Latch -_
,,
Fig. 31
12
HOW TO USE THE ON BOARD TOOLS
Place the vacuum cleaner in the Upright position.
1
2
Connection tube
Hold the connection tube of the suction
hose in one hand and the handle in the
other. Then pull out the connection tube
from the suction pipe. Then use the On
Board Tools (Fig. 32)
Then select the tool best suited for the
cleaning task from the descriptions below.
Fig. 32
Extension wand
Extension
wand (Models: EC-12TWT4/
12TWT2/12TXT2/12SXT4B)
For reaching ceilings,curtains,etc.(Fig.36)
When connecting two wands, meet the illustrated mark each other .(Fig.33-1)
Telescopic wand (Models:
14TAT6/12TWT6)
Suction pipe
Fig. 33-1
O
EC-14TWT6/
For reaching cellings,curtai:ns,etc.(Fig.36)
_Turn the wand to unlock; wand will turn
freely.
Extend the wand to its full length. Then
turn the wand to Iock.(Fig.33-2)
Crevice tool
Fig. 34
For door tracks, narrow spots, etc.(Fig.34)
Combination Upholstery' tool and
Detachable brush.(Fig.35)
With detachable brush for cawed furniture,
table tops, books, lamps, baseboards, etc.
Without detachable brush for draperies, mattresses, clothing, carpeted stairs, etc.
Fig. 36
Fig. 35
Detachable brush
Press the knob downward to remove the Detachable brush
from the Upholstery tool.
Insert the front portion of the Detachable Brush into time
groove located inside the front of the Upholstery tool.
Pull up on the knob to reattach the brush the Upholstery tool.
13
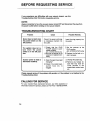
BEFORE
REQUESTING
SERVICE
If you experience any difficulties with your vacuum cleaner,
Troubleshooting
Chart first before requesting service.
use this
NOTE:
Always remember to have the vacuum cleaner turned OFF and disconnect the plug from
the power outlet before working on the vacuum cleaner.
TROUBLESHOOTING
CHART
Problem
Motor does not start when
the power switch is in the
ON position.
The agitator does not rotate
when
the power
switch is in the ON position.
Suction power is weak or
decreases suddenly.
Check
Possible Remedy
Check if the power cord plug
is completely inserted into
the outlet.
Insert the plug properly into
the outlet.
(_Check
that the RUG/
FLOOR selector is positioned correctly.
(EC-14TWT6/14TAT6 only)
Be sure the flat belt is not
severed or installed incorrectly.
_Set
the selector at the
RUG position.
(EC-14TWT6/14TAT6 only)
Q Does the paper bag need
changing?
O Change the paper bag.
(_ Check if the nozzle head,
suction
hose, etc. is
clogged.
Replace the flat belt or install it properly.
Remove any foreign objects that may have become jammed
in the
nozzle head, suction hose,
etc.
Please request service iif the problem still persists or if=the problem is not defined in the
Troubleshooting
Chart.
CALLING
FOR SERVICE
For your nearest Sharp Authorized Servicer, any other assistance or
information about this product, please call Toll-Free: 1-800-BE-SHARP.
14
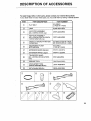
DESCRIPTION
OF ACCESSORIES
For paper bags, belts or other parts, please contact your nearest Sharp Dealer.
If your dealer does not stock these parts, you may order them by calling 1-800-BE-SHARP°
r ITEM
_.
r@
®
PART DESCRIPTION
PART NUMBER
@
FLAT BELT
EC-02BU3
(2 PCS IN 1 PACK)
®
LAMP
RLM P-A001 VBE0
®
AGITATOR ASSEMBLY
(EC-14TWT6/14TAT6 only)
DRTR-A003VBK0
®
AGITATOR ASSEMBLY
(EC-12TWT6/12TWT4/12TWT2/
12TXT2/12SXT4B only)
DRTR-A004VBK0
®
TWIN PLY_MICRO-FITRATION
PAPER BAG
EC-03PU2113PCS IN 1 PACK)
EC-10PU2 (10PCS IN 1 PACK)
®
SECONDARY FILTER
WITH MICRON
EC°01MU3
(1 PC IN 1 PACK)
@
®
EXTENSION VIAND (Slender)
PPIPPA 180VBFA
EXTENSION WAND (Larger)
PPIPPA 130VBFA
®
TELESCOPIC WAND
(EC-14TWT6/1,4TAT6/12TWT6
only)
FPIP-A004VBFA
(_
CREVICE TOOL
UCATSA057VBFA
@
UPHOLSTERY TOOL
(without Detachable Brush)
UCAT-A005VBFA
@
DETACHABLE
PBRS-A050VBEA
®
BRUSH
®
•
.
®
@
15
LIMITED WARRANTY
SHARP ELECTRONICS CORPORATION
warrants to the first consumer purchaser that this Sharp brand
product (the "Product"), when shipped in its original container, willl be free from defective workmanship and
materials and agrees that it will, at its option, either repair the defect or replace the defective Product or part
thereof at no charge to the purchaser for parts or labor for the time period(s) set forth below.
This warranty does not apply to any appearance items of the Product nor to the additional excluded item(s)
set forth below nor to any Product the exterior of which has been damaged or defaced, which has been
subjected to misuse, abnormal
construction.
service
or handling or which
has been altered or modified
in design
or
In order to enforce the right under this limited warranty, the purchaser should follow the steps set forth below
and provide proof of purchase to the servicer.
The limited warranty described herein is in addition to whatew.=r implied warranties may be granted to
purchasers by law. ALL IMPLIED WARRANTIES INCLUDING THE WARRANTIES OF MERCHANTABILITY
AND FITNESS FOR USE ARE LIMITED TO THE PERIOD(S) FROM THE DATE OF PURCHASE SET
FORTH BELOW. Some states do not allow limitations on how long an implied warranty lasts, so the above
limitation may not apply to you.
Neither the sales personnel of the seller nor any other person is authorized to make any warranties other than
those described herein or to extend the duration of any warranties beyond the time period described herein
on behalf of Sharp.
The warranties described herein shall be the sole and exclusive
warranties granted by Sharp and shall be the
sole and exclusive remedy available to the purchaser. Correction of defects, in the manner and for the period
of time described herein:, shall constitute complete fulfillment of all liabilities and responsibilities of Sharp to
the purchaser with respect to the Product and shall constitute full satisfaction of all claims, whether based on
contract, negligence, striict liability or otherwise. In no event shall Sharp be liabte, or in any way responsible,
for any damages or defects in the Product which were caused by repairs o=;attempted repairs performed by
anyone other than an authorized service. Nor shall Sharp be liable, or in any way responsible, for any
incidental or consequential economic or property damage. Some states do not allow the exclusion of incidental or consequential damages, so the above exclusion may not apply to you.
THE WARRANTY GIVES YOU SPECIFIC
WHICH VARY FROM STATE TO STATE.
LEGAL RIGHTS.
YOU MAY ALSO
Your Product model number: EC-14TWT6, EC-14TAT6, EC-12TWT6,
or EC-12SXT4B Home Use Vacuum Cleaner
EC-12TWT4,
HAVE
OTHER
RIGHTS
EC-12"I'WT2, EC-12TXT2
(Be sure to have this information available when you need service for your product.)
Warranty period for this Product: one (1) year parts and labor.
Additional
items excluded from warranty coverage: appearance
any printed materials.
items of the product, accessories, filters, or
Where to obtain service: at a Sharp Authorized Service Station or Sharp Authorized Service Dealer located
in the United States. To find out the location of the nearest Sharp Authorized Service Station or
Dealer, call Sharp toll free at 1-800-BE-SHARP.
What to do to obtain service: ship (prepaid) or car.P/in your Product to a Sharp Authorized Service Station or
Dealer. Be sure to have proof of purchase available. If you ship or mail the Product, be sure it is
packaged carefully.
SHARP,
SHARP
ELECTRONICS
Sharp Plaza, Mahwah,
CORPORATION
New Jersey 07430-2135
SHARP CORPORATION
Osaka, Japan
16
Printed in Malaysia