1
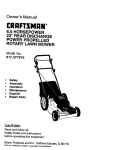
Owner's Manual
®
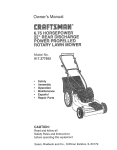
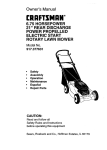
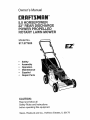
5.0 HORSEPOWER
22" REAR DISCHARGE
POWER PROPELLED
ROTARY LAWN MOWER
Model No.
917.377520
o
o
Safety
Assembly
Operation
Maintenance
, Espafioi
o Repair Parts
CAUTION:
Read and follow all
Safety Rules and Instructions
before operating this equipment
Sears, Roebuck and Co., Hoffman Estates, IL 60t79
Warranty
Safety Rules
Assembly
Operation
Maintenance Schedule
Maintenance
2
2
4
6
10
10
Product Specifications
Sewice and Adjustments
Storage
Troubleshooting
Repair Parts
Parts Ordering
11
14
15
16
35
Back Cover
LIMITED TWO YEAR WARRANTY ON CRAFTSMAN POWER MOWER
For two years from date of purchase, when this Craftsman Lawn Mower is maintained,
lubricated, and tuned up according to the operating and maintenance instructions in the
owner's manual, Sears will repair free of charge any defect in material or workmanship.
If this Craftsman Lawn Mower is used for commercial or rental purposes, this warranty
applies for only 90 days from the date of purchase.
This Warranty does not cover:
o Expendable items which become worn during normal use, such as rotary mower
blades, blade adapters, belts, air cleaners and spark plug.
o Repairs necessary because of operator abuse or negligence, including bent crankshafts and the failure to maintain the equipment according to the instructions contained in the owner's manual°
Warranty service is available by returning the Craftsman power mower to the nearest
Sears Service Center/Department in the United States. This warranty applies only while
this product is in use in the United States.
This Warranty gives you specific legal rights, and you may also have other rights which
vary from state to state.
SEARS, ROEBUCK AND CO., D/817 WA, HOFFMAN, ESTATES, ILLINOIS 60179
TRAINING:
o Read this operator's manual carefully_
Become familiai" with the controls and
know how to operate your mower
properly. Learn how to quickly stop
mower.
o Do not allow children to use your mower.
Never allow adults to use mower without
proper instructions.
• Keep the area of operation clear of all
persons, especially small children and
pets_
• Use mower only as the manufacturer
intended and as described in this manual.
• Do not operate mower if it has been
dropped or damaged in any manner_
Always have damage repaired before
using your mower.
° Do not use accessory attachments that
are not recommended by the manufac-
turer. Use of such attachments may be
hazardous.
The blade turns when the engine is
running.
PREPARATION:
o Always thoroughly check the area to be
mowed and clear it of all stones, sticks,
wires, bones, and other foreign objects.
These objects will be thrown by the blade
and can cause severe injury.
° Alway s wear safety glasses or eye
shields when starting and while using
your mower.
,, Dress properly. Do not operate mower
when barefoot or wearing open sandals.
Wear only solid shoes with good traction
when mowing.
o Check fuel tank before starting engine.
Do not fill gas tank indoors, when the
engine is running or when the engine is
2
hot. Allow the engine to cool for several
minutes before filling the gas tank. Clean
off any spilled gasoline before starting the
engine.
Always make wheel height adjustments
before starting your mower. Never
attempt to do this while the engine is
running.
Mow only in daylight or good artificial
light.
o Never cut grass by pulling the mower
towards you. Mow across the face of
slopes, never up and down or you might
lose your footing. Do not mow excessively steep slopes. Use caution when
operating the mower on uneven terrain
or when changing directions -- maintain
good footing.
° Never operate your mower without
proper guards, plates, grass catcher or
other safety devices in place.
OPERATION"
° Keep your eyes and mind on your mower
and the area being cut. Do not let other
interests distract you.
° Do not mow wet or slippery grass. Never
run while operating your mower. Always
be sure of your footing -- keep a firm
hold on the handles and walk.
, Do not put hands or feet near or under
rotating parts. Keep clear of the discharge
opening at all times.
° Always stop the engine whenever you
leave or are not using your mower, or
before crossing driveways, walks, roads,
and any gravel---covered areas.
o Never direct discharge of material toward
bystanders nor allow anyone near the
mower while you are operating it.
° Before cleaning, inspecting, or repairing
your mower, stop the engine and make
absolutely sure the blade and all moving
parts have stopped. Then disconnect the
spark plug wire and keep it away fi'0m the
spark plug to prevent accidental starting°
o Do not continue to run your mower if you
hit a foreign object. Follow the procedure
outlined above, then repair any damage
before restarting and operating you
mower.
• Do not change the governor settings or
overspeed the engine. Engine damage or
personal injury may result.
• Do not operate your mower if it vibrates
abnormally. Excessive vibration is an
indication of damage; stop the engine,
safely check for the cause of vibration
and repair as required.
o Do not run the engine indoors. Exhaust
fumes are dangerous°
MAINTENANCE
AND STORAGE;
° Check the blade and the engine mounting bolts often to be sure they are
tightened properly.
° Check all bolts, nuts and screws at
frequent intervals for proper tightness to
be sure mower is in safe working
condition.
- Keep all safety devices in place and
working.
o To reduce fire hazard, keep the engine
free of grass, leaves or excessive grease
and oilo
° Check grass catcher often for deterioration and wear and replace worn bags.
Use only replacement bags that are
recommended by and comply with
specifications of the manufacturer of your
mower.
, Always keep a sharp blade on your
mower.
° Allow engine to cool before storing in any
enclosure.
° Never store mower with fuel in the tank
inside a building where fumes may reach
an open flame or an ignition source such
as a hot water heater, space heater,
clothes dryer, etc.
CAUTION: Always disconnect spark plug
wire and place wire where it cannot
contact spark plug in order to prevent
accidental starting when setting up,
transporting, adjusting or making repairs.
WARNING
The engine exhaust from this product
contains chemicals known to the State of
California to cause cancer, birth defects,
or other reproductive harm.
3
Theseaccessories
wereavailablewhenthislawn mower was produced. They are also
available at most Sears retail outlets and service centers. Most Sears stores can also order
repair parts for you, when you provide the model number of your lawn mower. Some of these
accessories may not apply to your lawn mower.
LAWN MOWER PERFORMANCE
J,,,
CLIPPING DEFLECTOR
FOR REAR DISCHARGE LAWN MOWERS
MULCHER KITS
GRASS CATCHERS
FOR
REAR DISCHARGE
LAWN MOWERS
STABILIZER
GRASS CATCHERS
FOR
SIDE DISCHARGE
LAWN MOWERS
GAS CANS
LAWN MOWER MAINTENANCE
MUFFLERS
AIR FILTERS
.
BELTS
BLADES
BLADE ADAPTERS
Read these instructionsand this manual in its
entirety before you attempt to assemble or
operate your new lawn mower. "four new lawn
mower has been assembled at the factory with
the exception of those parts left unassembled
for shipping purposes. All parts such as nuts,
washers, bolts, etc. necessary to complete the
assembly have been placed in the parts bag.
To ensure safe and proper operation of your
lawn mower, all parts and hardware you
assemble must be tightened securely, Use the
correct tools as necessary to ensure proper
tightness.
O
,:,
WHEELS
ENGINE OIL
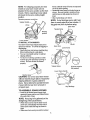
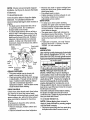
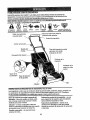
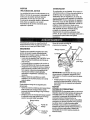
IMPORTANT: Unfoldhandles carefully so as
notto pinch ordamage controlcables.
o Raise handlesuntillower handle section
locks intoplace in mowing position.
• Remove protectivepadding, raise upper
handle section intoplace on lower handle
and tightenboth handle knobs.
o Remo,,iehandle paddingholding operator
presence control bar to upper handle.
o Your lawn mower handle can be adjusted
for your mowing comfort. Refer to "Adjust
Handle" in the Service and Adjustment
section of this manual.
Remove looseparts includedwith mower.
Cut down two end comers of carton and lay
end panel down flaL
Remove all packing materials except
padding between upper and lower handle
and padding holding operator presence
control bar to upper handle.
,
SPARK PLUGS
_, ,,,,
° Roll lawn mower out of carton and check
carton thoroughly for additional loose parts.
HOW TO SET UP YOUR LAWN
MOWER
TO UNFOLD HANDLE
TO REMOVE LAWN MOWER FROM
CARTON
Q
_
4
NOTE: For shippingpurposes,the rear
wheelson your lawn mowerare not
adjustedto the same positionas the front
wheels. Beforeoperatingmoweradjust
allwheels to the same cuttingheight
position.
Operator presence control bar
Uppper handle_./,_
Lift
up
/_,,_
"J'S"Lift up//
/.,_
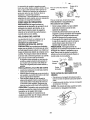
frame until both ends of frame are exposed
out of the front opening.
o Assemble lower frame to tubular frame as
shown. Be sure handle is outside of bag
and frames are fully seated as shown in
inset_
° Slip vinyl bindings over frame.
NOTE: If vinyl bindings are too stiff, hold
them in warm water for a few minutes° If
bag gets wet, let it dry before using.
Sewn hem
Tubular frame
/Y M°wing
/
!
position
Lower handle
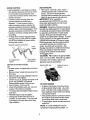
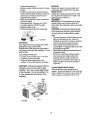
TO INSTALL ATTACHMENTS
Your lawn mower was shipped ready to be
used as a mulcher. To convert to bagging or
discharging:
o Open rear door and remove mulcher plug.
Store mulcher plug in a safe place.
o You can now install catcher or optional
clipping deflector.
, To return to mulching operation, install
mulcher plug into discharge opening of
mower. Be sure all tabs are seated
properly.
Flip lid
Sewn hem
Lower Trame
7/
Tubular frame
(Frames must be
fully seated)
Lower frame handle
Mulcher plug _
CAUTION:
Do not run your lawn mower
without mulcher plug in place or approved
clipping deflector or grass catcher in
place. Never attempt to operate the lawn
mower with the rear door removed or
\
Vinyl bindings
propped open.
TOASSEMBLE
GRASS CATCHER
o Insert leg of tubularframe through front
opening of grass catcher and thread frame
into sewn hem of bag.
NOTE: Keep bag hem gathered on the
straight leg of the tubular frame.
° When frame comes out the other end of
sewn hem, immediately work the end of
frame down inside the bag as shown in
inset°
= Slide sewn hem evenly around the tubular
5
i
I
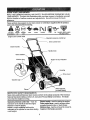
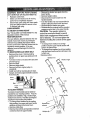
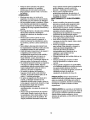
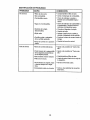
KNOW YOUR
READ THIS
LAWN
MOWER
OWNER'S
MANUALAND
SAFETY
RULES
BEFORE
OPERATING
YOUR
LAVMNMOWER. Compare the illustrations with your lawn mower to familiarize yourself
with the location of various controls and adjustments, Save this manual for future
ref..erence_..............................................................................................
..............................................................................................
These symbols may appear on your lawn mower or in literature
Learn and understand their meaning.
supplied
with the product,
& 4 o.e
CAUTION
ENGINE
ENGINE
FAST
SLOW
CHOKE
FUEL
OIL
OR WARNIN&__ .ON .......... OFF
DANGER, KEEP HANDS
AND FEET AWAY
Engine zone control cable
-Operator presence control bar
Drive control lever
Srarter handle
Handle knob
Grass catcher
Mulcher plug
Engine oil cap w/dipstick
Housing
Drive cover
Gasoline cap
Wheel adjuster
(on each wheel)
Sears rotary walk-behind power lawn mowers conform to the safety standards of the American
National Standards Institute and the U,S. Consumer Product Safety Commission, The blade
tums when the engine is nmning.
Starterhandie-usedfor
starting the engine. "
Operator pm,senee control bar - must be
Drive
control
lever
used
to engage powerheld down to the handle to start the engine.
propelled
forward
motion
of
lawn mower.
Release to stop the engine.
Mulcher
plug
must
be
removed
to convert to
Primer- pumps additional fuel from the
bagging
or
discharging
operation,
carburetor to the cylinder for use when starting
a cold engine,
_L
..........
: ==..:
..................
The operationof any lawn mowercan
resultin foreignobjectsthrown intothe
eyes,which can resultin severeeye
damage°Alwayswearsafetyglassesor
eye shieldswhileoperatingyour lawn
moweror performingany adjustmentsor
repairs. We recommenda wide vision
safety maskoverthe spectaclesor
standardsafetyglasses.
HOW TO USE YOUR LAWN MOWER
CAb'I'ION:
Do not nJn your lawn mower
without mulcher plate in place and door
closed or without an approved clipping
deflector or grasscatcher in place. Never
attempt to operate the lawn mower w_
the rear door removed or propped open.
ENGINE SPEED
The engine speed was set at the factory
for optimum performance. Speed is not
adjustable_
ENGINE ZONE CONTROL
Plate Tab
Lower Wheels for High Cut
Lever
Raise Wheels for Low Cut
TO ATTACH GRASS CATCHER
Close the flip Iido Fliplid must be closed
whileoperating lawn mower,
Lift the rear door on the mower housing and
place the grass catcher frame onto the
formed tabs on the rear door hinge bracket.
The grass catcher is secured to the lawn
mower housing when the rear door is
lowered onto the grass catcher frame.
o
CAUTION: Do not run your la:wnmower
without clipping deflector or approved
grass catcher in place. Never attempt to
operate the lawn mower with the rear door
removed or propped open.
CAUTION:
Federal regulations require
an engine control to be installed on this
lawn mower in order to minimize the risk
Hinge
bracket
of blade contact injury. Do not under any
circumstances attempt to defeat the
function of the operator control° The blade
turns when the engine is nJnningo
= Your lawn mower is equipped with an
operator presence control bar which
requires the operator to be positional
behind the lawn mower handle to start and
operate the lawn mower_
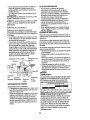
TO ADJUST CUTTING HEIGHT
° Raise wheels for low cut and lower wheels
for high cut.
o Adjust cutting height to suit your requirements. Medium position is best for most
lawns.
o To change cutting height, squeeze adjuster
lever toward wheel. Move wheel up or
down to suit your requirements. Be sure all
wheels are in the same setting.
Rear door
Formed
tabs
TO EMPTY GRASS CATCHER
° To remove grass catcher, release operator
presence control bar to stop engine°
° Lift up rear door and remove the grass
catcher by the handle.
o Do not drag the bag when emptying; it witl
cause unnecessary wear°
NOTE: Adjuster is properly positioned
when plate tab inserts into hole in lever.
Also, 9_position adjusters (if so equipped)
allow lever to be positioned between the
plate tabs.
7
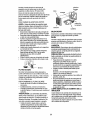
DRIVE CONTROL
o Self-propelling is controlled by holding
the operator presence control bar down
to the handle and pushing the drive
control [ever forward until it clicks; then
release the lever.
• Forward motion will stop when the
operator presence control bar is
released° To stop forward motion
without stopping engine, release the
operator presence control bar slightly
until the drive control disengages. Hold
operator presence control bar down to
handle to continue mowing without selfpropelling.
o To keep drive control engaged when
turning comers, push down on handle
and lift front wheels off ground while
turning lawn mower.
Operator presence control bar
Drive
To engage drive
control
Drive control
desengaged
:!'.}
ADD GASOLINE
• Fill fuel tank. Use fresh, clean, regular
unleaded gasoline with a minimum of 87
octane. Do not mix oil with gasoline.
Purchase fuel in quantities that can be used
within 30 days to assure fuel freshness.
IMPORTANT: When operating in
temperatures below 32°F(0°C), use fresh,
clean winter grade gasoline to help insure
good cold weather starting°
WARNING: Experience indicates that alcohol
blended fuels (called gasohol or using ethanol
or methanol) can attract moisture which leads
to separation and formation of acids during
storage. Acidic gas can damage the fuel
system of an engine while in storage. To avoid
engine problems, the fuel system should be
emptied before storage of 30 days or longer.
Drain the gas tank, start the engine and let it
nJnuntil the fuel lines and carburetor are
empty. Use fresh fue! next season. See
Storage Instructions for additional information.
Never use engine or carburetor cleaner
products in the fuel tank or permanent
damage_r_ay occur.
CAUTION:
Fill to bottom of gas tank filler
neck. Do not overfill. Wipe off any spilled
oil or fuel. Do not store, spill or use
gasoline near an open flame.
BEFORE STARTING ENGINE
OIL
Your lawn mower is shipped without oil in the
engine.
- Be sure mower is level and area around oil
fill is clean.
o Remove engine bil cap w!dipstick and fill tO
the full line on the dipstick.
o Use 20 ozs. of oil. For type and grade of oil
to use, see"ENGINE" in Customer
Responsibilities section of this manual.
• Pour oil slowly. Do not over fill.
o Check oi! level before each use, Add oil if
needed. Fill to ful! line on dipstick.
° To read proper level, tighten engine oil cap
each time.
o Reinstall engine oil cap and tighten.
° Change the oil after every 25 hours of
operation or each season. You may need
to change the oil more often under dusty,
dirty conditions.
,=filler cap
Entine oil cap w/
dipstick
TO START ENGINE
° To start a cold engine, push primer three
(3) times before trying to start. Use a firm
push. This step isnot usually necessary
when starting an engine which has already
run for_afew mim,_es.
o Hold operator presence control bar down to
the handle and pull starter handle quickly.
Do not allow starter rope to snap back.
o To stop engine, release operator presence
control bar°
NOTE: In cooler weather it may be
necessary to repeat priming steps. In
8
warmer weather over priming may cause
flooding and engine will not start, If you
do flood engine, ,waita few minutes before
attempting to start and do not repeat
priming steps.
lVlOWING TIPS
o Under certain conditions, such as very tall
grass, it may be necessary to raise the
height of cut to reduce pushing effo_ and to
keep from overloading the engine and
leaving clumps of grass clippings.
o For extremely heavy cutting, reduce the
width of cut and raise the rear of the lawn
mower housing one (t) wheel adjuster
setting higher than the front for better
discharge of grass.
° For better grass bagging and most cutting
conditions, the engine speed should be set
in the fast position.
° When using a rear discharge lawn mower in
moist, heavy grass, clumps of cut grass
may not enter the grass catcher. Reduce
ground speed (pushing speed) and/or run
the lawn mower over the area a second
time_
, If a trail of grass clippings is left on the dght
side of a rear discharge lawn mower, mow
in a clockwise direction with a small overlap
to collect the clippings on the next pass.
o Keep top of engine around starter clear and
clean of grass clippings and chaff. This will
help engine air flow and extend engine life.
- Pores in cloth grass catchers can become
filled 'with dirt and dust with use and
catchers will collect less grass. To prevent
this, regularly hose catchers off with water
and let dry before using.
Max 1/3
MULCHING
MOWING TIPS
IMPORTANT: For best performance, keep
mower housing free of built-up grass and
trash. See "Cleaning" in CUSTOMER
RESPONSIBILITIES section of this manual.
, The special mulching blade will recut the
grass clippings many times and reduce
them in size so that as they fall onto the
lawn they will disperse into the grass and
not be noticed. Also, the mulched grass will
biodegrade quickly to provide nutrients for
the lawn. Always mulch with your highest
engine (blade) speed as this will provide the
best recutting action of the blades.
o Avoid cutting your lawn when it is weL Wet
grass tends to form clumps and interferes
with the mulching action. "]'he best time to
mow your lawn is the early aftemoon: At
this time the grass has dried and the newly
cut area will not be exposed to the direct
sun.
o For best results, adjust the lawn mower
cuttJng height so that the lawn mower cuts
off only the top one-third of the grass blades.
tf the lawn is overgrown it will be necessary
to raise the height of cut to reduce pushing
effort and to keep from overloading the
engine and leaving clumps of mulched
grass° For extremely heavy mulching,
reduce your width of cut by overlapping
previously cut path and mow slowly.
• Certain types of grass and grass conditions
may require that an area be mulched a
second time to completely hide the
clippings. When doing a second cut, mow
across or perpendicular to the first cut path.
° Change your cutting pattern from week to
week. Mow north to south one week then
change to east to west the next week. This
will help prevent matting and graining of the
lawn.
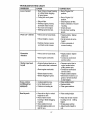
CleaPJlnspect Grass Catcher
(If Equipped) '
M
Clean Lawn Mower
6/
.......
(Power-Propelled
Clean Under DriveMowers)
Cover
Check drive belt/pulleys"
E (Power-Propelled Mowers)
a CheckJSharpeniRePlace Blade
O
6/
6/
6/
6/
,,
,
,,,i
6/
.....
:_,
6/
E Check Engine Ofi Level
N Change Engine Otl
G clean Atr Filter
I inspect Muffler
N Clean or Replace Spark Plug
6/
6/
Lubrication Chart
Clean Ba_erytRecharge
(Electric Start Mowers)
6/
6/
E Replace Air Filter Paper Cartridge
6/2
!{ - Change more often when operating under a heavy load or in high ambient temperatures_
2 * Service more often when operating in dirty or dusty conditions
3 _ Replace blades more oftsn when mewing tn sandy sell,
4 - Charge 48 hours at end of season_
GENERAL
RECOMMENDATIONS
The warranty on this !awn mower does not
cover items that have been subjected to
operator abuse or negligence, To receive
full value from the warranty, operator must
maintain mower as instructed in this
manual.
Some adjustments will need to be made
periodically to properly maintain your unit.
All adjustments in the Service and
Adjustments section of this manual should
be checked at least once each season°
= Once a year, replace the spark plug,
replace air filter element and check
blade for wear. A new spark plug and
clean/new air filter element assures
proper air-fuel mixture and helps your
engine run better and last longer.
o Follow the maintenance schedule in this
manual.
BEFORE EACH USE
- Check engine oil level.
o Check for loose fasteners.
LUBRICATION
Keep unit welt lubricated (See "LUBRICATION CHART").
LUBRICATION
Wheel
adjuster
CHART
i
@
Er
oil
(_ Handle
mounting pin
(_ Rear door
hinge
O spra ,l.b, t
Refer to CUSTOMER RESPONSIBILITIES
"ENGINE" section.
IMPORTANT: Do not oil or grease plastic
wheel bearings. Viscous lubricants will attract
dust and dirt that will shorten the life of the self
lubricating bearings° If you feel they must be
lubricated, use only a dry, powdered graphite
type lubricant sparingly.
1()
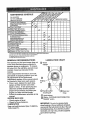
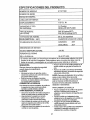
PRODUCT SPECiFiCATiONS
MODEL NUMBER
917.377520
SERIAL NUMBER
DATE OF PURCHASE
HORSEPOWER:
5.0
DISPLACEMENT:
11.5 CU. IN.
GASOLINE CAPACITY! TYPE:
1.6 QUARTS
z*
UNLEADED REGULAR
OIL TYPE (API-SF/SG/SH):
SAE 30 (ABOVE 32°F)
SAE 5W-30 (BELOW 32°F)
OIL CAPACITY:
SPARK PLUG(GAP:
20 OZSo
.030")
CHAMPION RJ19LM OR J19LM
VALVECLEARANCE:
INTAKE:
.005"
EXHAUST:
.007"
SOLID STATE IGNITION
AIR GAP:
.010 IN.
BLADE BOLT TORQUE:
35-40 FT. LBS.
The model and serial numbers will be found on a decal attached to the rear of the
lawn mower housingoRecord both serial number and date of purchas e in space
provided above.
LAWN MOWER
Always observe safety rules when performing
any maintenance.
TIRES
• Keep tires free of gasoline, oil, or insect
control chemicals which can harm rubber.
o Avoid stumps, stones, deep ruts, sharp
objects and other hazards that may cause
tire damage.
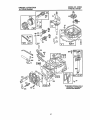
BLADE CARE
For best results, mower blade must be kept
sharp. Replace bent or damaged blades.
TO REMOVE BLADE
° Disconnect spark plug wire from spark plug
and place wire where it cannot come in
contact with spark plugo
o Turn lawn mower on its side. Make sure air
filter and carburetor are up.
° Use a wood block between blade and
mower housing to prevent blade from
turning when removing blade boll
° Protect your hands,Mth gloves and/orwrap
blade with heavy cloth.
o Remove blade bolt by turning counterclockwise. Use a 9/16" box or open-end
wrench.
o Remove blade and attaching hardware
(bolt, lock washer and hardened washer).
NOTE: Remove the blade adapter and
check the key inside hub of blade adapter.
The key must be in good condition to work
properly. Replace adapter if damaged.
TO REPLACE BLADE
o Position the blade adapter on the engine
crankshaft. Be sure key in adapter and
crankshaft keyway are aligned°
° Position blade on the blade adapter aligning
the two (2) holes in the blade with the raised
lugs on the adapter.
o Be sure the trailing edge of blade (opposite
sharp edge) is up toward the engine.
o Install the blade bolt with the lock washer
and hardened washer into blade adapter
and crankshaft.
° Use block of wood between blade and lawn
mower housing and tighten the blade bolt,
turning clockwise.
° The recommended tightening torque is 3540 ft. lbs,
IMPORTANT: Blade bolt is grade 8 heat
treated.
11
NOTE: We do not recommend sharpening blade - but if you do, be sure the blade
is balanced.
TO SHARPEN BLADE
Care should be taken to keep the blade
balanced° An unbalanced blade will
cause eventual damage to lawn mower or
engine.
• The blade can be sharpened with a file or
on a grinding wheel. Do not attempt to
sharpen while on the mower°
o To check blade balance, drive a nail into a
beam or wail. Leave about one inch of the
straight nail exposed. Place center hole of
blade over the head of the nail. if blade is
balanced, it should remain in a horizontal
position. If either end of the blade moves
downward, sharpen the heavy end until the
blade is balanced.
Blade
Crank shaft
ada_
keyway
o Remove any trash or grass cuttings from
inside the dust cover, pinion and/or drive
wheel gear teeth.
° Put wheels back in place.
• if after cleaning, the drive wheels do not
turn freely, contact your nearest
authorized service center.
GEAR CASE
° To keep your drive system working
properly, the gear case and area around
the drive should be kept clean and free
of trash build-up. Clean under the drive
cover twice a season.
- The gear case is filled with lubricant to
the proper level at the factory. The only
time the lubricant needs attention is if
service has been performed on the gear
case.
. If lubricant is required, use only Texaco
Starplex Premium 1 Grease, Part No.
750355. De not substitute.
ENGINE
LUBRICATION
Use only high quality detergent oil rated with
API service classification SF, SG, or SH.
Select the oil's SAE viscosity grade according to your expected operating temperature.
Blade
SAE VISCOSITY GRADES
bolt
Lock
washer
.........
Crank
shaft
Hardened
washer
edge
Blade
adapter
GRASS CATCHER
. The grass catcher may be hosed with
water, but must be dry when used°
o Check your grass catcher often for damage
or deterioration. Through normal use itwill
wear. if catcher needs replacing, replace
only with a manufacturer approved
replacement catcher. Give the lawn mower
model number when ordering.
DRIVE WHEELS
Check front drive wheels each time before
you mow to be sure they move freely.
The wheels not turning freely means trash,
grass cuttings, etc, are in the drive wheel
area and must be cleaned to free drive
wheels.
if necessary to clean the drive wheels,
check both front wheels.
° Remove hubcaps, hairpin cotters and
washers.
° Remove wheels from wheel adjusters.
_""/'ii
_'C ..,.'m
-_"
_1o"
o,
TEM'PI_RATURE RANGE _T)C1PATEO
ii _J
__
!C='
:_o*
_
40"
BEFORE N_
OIL CHANGE
NOTE: Although m:uifi-viscosity oils
(5W30, 10W30 etc.) improve starting in
cold weather, these multi-viscosity oils wiU
result in increased oil consumption When
used above 32°F. Check your engine oil
level more frequently to avoid possible
engine damage from running low on oil.
Change after the first 25 hours of operation at
least once a year ifthe lawn mower is not used
for 25 hours in one year.
Check the crankcase oil level before starting
the engine and after each five (5) hours of
continuous use. Tighten oil plug securely each
time you check the oil level.
TO CHANGE ENGINE OIL
NOTE: Before tipping lawn mower to
drain oil, drain fuel tank by running engine
until fuel tank is empty.
o Disconnectspark plugwirefrom spark plug
and placewire whereit cannotcome in
12
contactwithsparkplug.
o Removeengineoilcap;layasideon aclean
surface.
• Tiplawnmoweronitssideasshownand
drainoilintoa suitablecontainer.Rocklawn
mowerbackandforthto removeanyoil
trappedinsideofengine.
o Wipeoffanyspilledoilon lawnmowerand
on sideof engine.
• Fill engine with oil. Fill only to the "FULL"
line on the dipstick. DO NOT overfi[l_
o Replace engine oil cap.
o Reconnect spark plug wire to spark plug.
Container
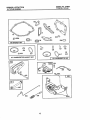
AIR FILTER
Your engine will not run properly and may be
damaged by using a dirty air filter,
Replace the air filter every year, more often if
you mow in very dusty, dirty conditions. Do not
wash air filter.
TO CHANGE AIR FILTER
- Loosen screw and tilt cover to remove.
° Carefully remove cartridge,
° Clean by gently tapping on a flat
surface. If very dirty, replace cartridge°
CAUTION: Petroleum solvents, sT_chas
kerosene, are not to be used to clean
cartridge. They may cause deterioration
of the cartridge. Do not oil cartridge. Do
not use pressurized air to clean or dry
cartridge.
MUFFLER
inspect and replace corroded muffler as it
could create a fire hazard and/or damage.
SPARK PLUG
Change your spark plug each year to make
your engine start easier and run better. Set
spark plug gap at .030 inch.
CLEANING
IMPORTANT: For best performance, keep
mower housing free of built-up grass and
trash. Clean the underside of your mower after
each use°
CAUTION: Disconnect spark plug wire
from spark plug and place wire where it
cannot come in contact with the spark
plug.
° Turn lawn mower on its side. Make sure air
filter and carburetor are up. Clean the
underside of your lawn mower by scraping
to remove build-up of grass and trash.
° Clean engine often to keep trash from
accumulating. A clogged engine runs hotter
and shortens engine life.
° Keep finished surfaces aqd wheels free of
all gasoline, oil,etc.
o We do not recommend using a garden
hose to clean lawn mower unless the
electrical system, muffler, air filter and
carburetor are covered to keep water out.
Water in engine can result in shortened
engine life.
CLEAN UNDER DRIVE COVER
Clean under drive cover at least twice a
season, Scrape underside of cover with putty
knife or similar tool to remove any build-up of
trash or grass on underside of drive cover,
Back
e
Cover
.._
tabs
Slots
Cartridge
Cover
13
CAUTION: BEFORE PERFORMING
ANY SERVICE OR ADJUSTMENTS:
o Releasecontrolbar.
o Make surethe bladeand all moving
parts havecompletelystopped°
o Disconnectspark plugwire fromspark
plug andplace whereit cannotcome
in contactwith plug.
LAWN MOWER
TO ADJUST CUTTING HEIGHT
See 'q'O ADJUST CUTTING HEIGHT" in the
Operation section of this manual.
REAR DEFLECTOR
The rear deflector, attached between the rear
wheels of your lawn mower, is provided to
minimize the possibility that objects will be
thrown out the rear of the lawn mower into the
operator's mowing position. If the rear
deflector becomes damaged, it should be
replaced.
TO REMOVF_JREPLACE DRIVE BELT
o Remove drive cover. Remove belt by
pushing down on gear case pulley and roll
belt off.
o Turn lawn mower on its side with carburetor
o Remove the starter rope guide from the
lower handle.
o Remove hairpin cotters.
° Disconnect the lower handle from the
handle brackets.
° Tum the handle over and reassemble the
hairpin cotters that have been removed,
o Reassemble the starter rope guide_
° Reassemble the controls and the operator
presence control bar to the upper handle.
CAUTION: The operator presence
control bar must pivot freely to permit
blade brake engagement when control
bar is released. Do not over tighten the
fasteners holding the controls to the upper
handle.
o To change from medium low to high
position only the upper handle section wil!
have to be turned over.
° To change from medium low to low position,
only the lower handle section 'wilthave to be
turned over.
Shipping position
Medium low
high
and fuel cap up.
° Remove blade,
o Remove debris shield.
o Remove belt from engine pulley on
crankshaft.
o install new belt by reversing above steps.
o Always use factory approved belt to assure
fit and long life,
Drive
cover
rl
i
High
Belt
_3.
L°W
Push
down
TO ADJUST HANDLE
Your lawn mower handle can be raised or
lowered for your mowing comfort. Four (4)
positions are available: high, medium high,
medium low and low. Handles are shipped
mounted in the medium low position.
° To change from medium low to medium
high position, the upper and lower handle
sections will have to be tumed over.
° Remove cable clips.
o Remove the controls and operator presence
control bar from the upper handle.
_-
\
,
Lowerhandle
Squeeze_"_'_to ""-__
bracket
14
Immediately prepare your lawn mower for
storage at the end of the season or if the unit
will not be used for 30 days or more.
LAWN MOWER
When lawn mower is to be stored for a period
of time, clean itthoroughly, remove alldirt,
grease, leaves, etc. Store in a dean, dry area.
- Clean entire lawn mower (See "CLEANING"
in the Customer Responsibilities section of
this manual).
o Lubricate as shown in the Customer
Responsibilities section of this manual.
o Be sure that all nuts, bolts, screws, and pins
are securely fastened. Inspect moving
parts for damage, breakage and wear.
Replace if necessary.
° Touch up all rusted or chipped paint
surfaces; sand lightly before painting.
HANDLE
"Youcan fold your lawn mower handle for
storage.
° Squeeze the bottom ends of the lower
handle toward each other until the lower
handle clears the handle bracket, then
move handle forward.
• Loosen upper handle mounting bolts
enough to allow upper handle to be folded
back.
IMPORTANT: When folding the handle4or
storage or transportation, be sure to fold the
handle as shown or you amy damage the
control cables.
o When setting up your handle from the
storage position, the lower handle will
automatically lock into the mowing position.
Lower
handle
Handle
bracket
Squeeze to fold
Operator presence control bar
.
Fold foward
for storage__
__v,
_"
Upper
/
handle
,_//,_"_"_,)
_';"Ji/_
iz/Fold
! backward
Lower _
Mowing
handle
position
ENGINE
FUEL SYSTEM
IMPORTANT: itis importantto prevent gum
deposits from forming in essentialfuel system
partssuch as carburetor, fuel system parts
such as carburetor, fuel filter, fuel hose ortank
during storage.,_Jso, experienceindicates that
alcoholblended fuels ( calledgasoholorusing
ethanolor methanol) can att_ct moisture
whichleads to separation add formation of
acids duringstorage_Acidic gas can damage
the fuel systemof an engine while in storage.
° Drainthe fuel tank°
o Startthe engine and let it run untilthe fuel
linesand carburetor are empty.
= Never use engine orcarburetor cleaner
productsin the fuel tank or permanent
damage may occur.
. Use fresh fuel next season.
NOTE: Fuel stabilizer is an acceptable
alternative in minimizing the formation of
fuel gum deposits during storage, Add
stabilizer to gasoline in fuel tank or
storage container. Always follow the mix
ratio found on stabilizer container. Run
engine at least 10 minutes after adding
stabilizer to allow the stabilizer to reach
the carburetor. Do not drain the gas tank
and carburetor if using fuel stabilizer.
Hairpin
cotter
15
ENGINEOIL
Drainoil(withenginewarm)andreplacewith
cleanengineoil. (See"ENGINE"inthe
CustomerResponsibilities
sectionofthis
manual).
CYLINDER
• Removesparkplug.
o Pouroneounce(29ml)of oilthroughspark
plugholeintocylinder.
o Pullstarterhandleslowlya fewtimesto
distributeoil.
, Replace with new spark plug.
OTHER
o Do not store gasoline from one season to
another.
o Replace your gasoline can if your can starts
TROUBLESHOOTING
PROBLEM
Does not start
to rust. Rust and/or dirt in your gasoline will
cause problems.
o If possible, store your unit indoors and cover
it to give protection from dust and dirL
= Cover your unit with a suitable protective
cover that does not retain moisture. Do not
use plastic. Plastic cannot breathe which
al!ows condensation to form and will cause
your unit to rust.
IMPORTANT: Never cover mower while
engine and exhaust areas are still warm.
CAUTION: Never store the lawn mower
with gasoline in the tank inside a building
where fumes may reach an open flame or
spark. Allow the engine to coo! before
storing in any enclosure.
CHART
.
CAUSE
° Dirty air filter.
o Out of fuel.
° Stale fuel.
.
°
°
°
o Water in fuelo
°
° Spark plug wire is
disconnected_
, Bad spark plug.
° Loose blade or broken blade
adapter.
° Control bar in released
position.
° Control bar defective.
°
16
CORRECTION
Clean/replaceair fitter_
Fill fuel tank°
Drain tank and refill with
fresh clean fuel.
Drain fueltank and
carburetor and refilltank
with fresh gasoline°
Connect wire to plug.
° Replace spark plug.
° Tighten blade bolt or
replace blade adapter°
° Depress control bar to
handle.
° Replace control ban
1
TROUBLESHOOTING
CHART
PROBLEM
CAUSE
CORRECTION
Loss of power
= Rear of lawn mower housing
or cutting blade dragging
in heavy grass.
Cutting too much grass_
° Set to "Higher Cu't"
position.
o Dirty air _tero
° Buildup of grass, leaves,
and trashi_)hdermower.
o Too much oil in engine.
• Walking speed too fast.
°
°
°
°
Set to "Higher Cut"
position.
Clean/replace air filter.
Clean underside of mower
housing.
Check oil level.
Cut at slower ,walking
speed.
Poor cut- uneven
Excessive
vibration
• Worn, bent or loose blade.
o Wheel heights uneven.
Replace blade. Tighten
blade bolt.
Set all wheels at same
= Buildup of grass, leaves
and trash under mower.
height
Clean underside of
mower housing.
o Worn, bent or loose blade.
o Bent engine crankshaft.
Starter rope hard
to pull
o Engine flywheel brake is on
when control bar is released.
° Bent engine crankshaft.
° Blade adapter broken.
• Blade dragging in grass.
Grass'catcher
not filling (if so
equipped)
Hard to push
.............
• Cutting height too low.
o Lift on blade worn off.
,, Catcher not venting air.
° Grass is too high or wheel
height is too Iow_
- Rear of lawn mower
housing or blade dragging
in grass.
° Grass catcher too full.
° Handle height position not
right for you.
17
.........
.........
° Replace blade. Tighten
blade bolt.
'+.
, Contact an authorized
service center.
• Depress control bar to
upper handle before
pulling starter rope.
o Contact an authorized
service center.
° Replace blade adapter.
° Move lawn mower to cut
grass or to hard surface
to start engine.
- Raise cutting heighL
° Replace blade.
° Clean grass catcher.
• Raise cutting height.
° Raise rear of lawn mower
housing one (1) se_ng
higher°
° Empty grass catcher.
• Adjust handle height to
suit.
Garantfa
Reglas de Seguridad
Montaje
Operaci6n
Mantenimiento
Programa de Mantenimiento
18
18
20
22
26
26
Especificaciones del Producto
Servicio yAdjustes
Almacenamiento
Identificaci6n de probtemas
Partes de repuesto
Orden de Partes
GARANTfA
LIMITADA DE DOS At£',IOSPARA LA SEGADORAA
27
30
21
33
Vea el manual
ingles del duefio
Contratapa
MOTOR CRAFTSMAN
Por dos (2) afios, a parfir de la fecha de compra, cuando esta Segadora Craftsman se mantenga, lubrique
y aline segSn las instrucciones para la operad6n y el mantenimiento en el manual del duefio, Sears
reparar_ gratis todo defecto en el material y la mano de obr&
Si la Segadora Craftsman se usa para fines comerciales o de aniendo, esta garantia s(51ose aptica por
noventa (90) dfas a partir de la fecha de compra.
Esta Garantia no cubre:
o Articulos que se desgastan durante el uso normal tales como las cuchillas segadoras rotatorias, los
adaptadores de la cuchilla, las correas, los filtros de alre y las bujias.
o Reparaciones necesarias debido al abuso o a la negligencia del operador, incluy_ndose a los
cigi}efiales doblados y a la falta de mantenimiento del equiposegtin las instrucciones que se incluyen
en el manual del due5o.
EL SERVtCIO DE GARANTfA ESTA DISPONIBLE al devolver la segadpra a motor Craftsman al centro/
departmento de se_cio Sears mas cercano en los Estados UnfdosoEsta garantfa se aplica solamente
mientras el producto este en uso en los Estados Unidos.
Esta Garantfa le otorga derech(_s legales especfficos, y puede que tambi_n tenga otros derechos que
yah'an de estado a estado.
Sears, Roebuck and Co., D/817WA, Hoffman Estates, IL 60179 USA
Los estandraresde seguridad exigen la presencia
del operator en los c0ntroles para reducir a un
rninimo et riesgo de lesionarse. Su unidad viene
equipada con dichos contmles. Por ningun molivo
trate det eliminar la fund6n de los controtes que
exigen la presencia del operador.
ENTRENAMIENTO:
= Lea este manual del operador
cuidadosamente. Familiarfcese con los
oontroles y aprenda a operar su segadora en
forma adecuadaoAprenda a parar su segadora
r_pidarnente.
• No perrnita que los nifios usen su segadora.
Nunca permita que los adultos operen la
segadora sin contar con las instrucciones
adecuadas.
• Mantenga el area de operaci6n despejada
de genre, especialmente de nif_ospequeAos
y de animales dom_stJcos.
• Use la segadora solamente para los fines
pmpuestos por e{ fabricante y seg_n las
explicaciones descdtas en este manual.
• No opere la segadora si se ha cafdo o dafiado en
cualquiera forma. Siempre repare los dafios
antes de usarta_
• No use accesorios que no hayan sido
recomendados por el fabricante. Et uso de dichos
accesorios puede ser peligroso.
° La cuchillagim cuando el motor est&
funcionando.
PREPARAClON;
• Siempre revise cuidadosamenteel Area que se
va a segar y despejeta de todas 1aspiedras,
palos, alambres, huesos y otros objetos
extr'aSos.Estos objetos ser_n lanzados con ta
cuchiUay pueden producir lesiones graves.
• Siempre use anteojos de segufidad o protectores
de ojos cuandoarranque y durante el tiempo
que use la segadora.
18
-
Vfstase en forma adecuada. No opere la
segadora sin zapatos o con sandalias
mientras que el motor est,. funcionando_
o Siegue siempre durante el dfa o con buena
luz artificial.
OPERACION:
- Mantenga sus ojos y su mente en la
segadora yen el _rea que se est,. cortandoo
No permita que otros intereses Io distraigan.
- No corte c_sped mojado o resbaloso. Nunca
corra mientras est6 operando su segadora.
Siempre aseg_Sresede mantener el equilibrio
- mantenga el mango agarrado firmemente y
camineo
° No ponga las manos o los pies cerca odebajo
de las partes rotatoriaso Mant_ngase
atejado de la abertura de descarga en todo
momento.
o Siempre pare el motor cuando se vaya
ocuando no est6 usando su segadora, o
antes de atravesar las entradas para autos,
los senderos, caminos y _.reas cubiertas de
ripio.
• Nunca dirija la descarga del material hacia
los espectadores ni permita a nadie cerca de
la segadora mientras la est6 operando.
• Antes de limpiar, inspeccionar o de reparar I
a segadora, pare el motor y est6
completamente seguro de que ia cuchilla y
que todas las partes que se mueven se
hayan detenido. Luego, desconecte el
alambre de la bujia y mant_ngalo alejado de
6sta para evitar e! arranque por accidente_
° No contintJe haciendo funcionar su segadora
si le pega a un objeto extrafio. Siga e!_,,
procedimiento desorito anteriormente, luego
repare cuatquier daSo antes de volver a
arrancar y de operar su segadora.
° No cambie los ajustes del regulador o
hagaque el motor ande a una velocidad
excesiva. Se pueden producir dafios en el
motor y I esiones personales.
• No opere su segadora si vibra fuera de Io
normal. La vibraci6n excesiva es una
indicaci6n de dafio; pare el motor, revise en
forrna segura la causa de la vibraci6n y haga
las reparaciones seg6n sea necesario.
° No haga funcionar el motor en
recintoscerrados. Los gases de escape son
petigrososo
o Nunca corte el c_sped tirando la segadora
hacia usted. Siegue a trav6s de la cara de
las pendientes, nunca hacia arriba o hacia
abajo pues puede perder el equilibrio. No
siegue pendientes demasiado empinadas.
Tenga cuidado cuando opere ta segadora en
terreno disparejo o cuando cambie de
direcci6n - mantenga un buen equilibrio.
o Nunca opere Jasegadora sin las
protecciones adecuadas, las planchas, el
recogedor de c_sped y otros dispositivos de
seguridad en su lugar_
MANTENIMIENTO Y ALMACENAMIENTO:
° Revise la cuchillay los pemos de montaje
del motor a menudo, para asegurarse que
estdn apretados en ]a forma adecuada.
• Revise todos los pemos, tuercas y tomillos a
intervalos frecuentes, para verificar si est_.n
apretados en forma adecuada, y
asegurarseque la segadora se encuentra en
condiciones de funcionamiento seguro.
° Mantenga todos los dispositivos de seguridad
en su lugar y listos para funcionar.
° Para reducir el petigro de incendio,
mantenga el motor sin c_sped, hojas y grasa
o aceite en excesoo
° Revise el recogedor de c6sped a menudo
para verificar si hay deterioro y desgaste y
cambie tas bolsas desgastadaso Use
solamente las bolsas de repuesto
recomendadas per el fabricante de su
segadora o que cumplen con las
especificaciones de _ste.
° Siempre mantenga una cuchilla afilada en su
segadora.
.
o Siempre permita ctue el motor se enfrfe
antes de guardada en cualquier recinto
cerrado.
° Nunca guarde la segadora con combustible
en el estanque dentro de un edificio endonde
los gases pueden alcanzar una llama
expuesta o una fuente de ignici6n, tal como el
calentador de agua, la estufa de
calefacci6n, la secadora de ropa, etc.
PRECAUCI6N:
Siempre desconecte el
alambre de la bujfa y p6ngalo donde no pueda
entrar en contacto con la bujfa, para evitar el
arranque por accidente, durante la preparaci6n,
el transporte, el ajuste o cuando se hacen
reparaciones.
PRECAUCION:
Es conocido por el Esta;do de
Califomia que los gases de escape del motor de
este productor contienen qufmicos los cuales a
ciertos niveles, pueden ocasionar, c&ncer,
defectos de nacimiento, y otros dafios al sistema
reproductivo.
19
Estos accesorios estaban disponibles cuando se produjo la segadora. Tambi_n est_i.ndisponibles en la
mayoria de las tiendas de Sears yen los centros de servicio. La mayoffa de las tiendas Sears tambi_n
pueden mandar a pedir partes de repuesto para usted, si les proporciona el n_mero det modelo de su
segadora, Algunos de estos accesorios tal vez no se apliquen a su segadora.
RE,NDIMIENTO DE LA SEGADORA
DESVIADOR
.........
:
DE RECORTES
PARA SEGADORAS CON DESCARGA TRASERA
ESTABtLIZADORES
JUEGOS PARA LA ACOLC,HADORA ..................
RECOREDOR
PARA
SEGADORAS
CON DESCARGA
TRASERA
MANTENIMIENTO
PARA
SEGADORAS
CON
DESCARGA
RECOREDOR
LATERAL
DE LA SEGADORA
BUJfAS
SILENCIADORES
CORREAS
ENVASES
DE GASOLINA
CUCHILLAS
ADAPTADORES
DE CUCHILLA
Lea estas instruccionesy este manual
completamente antes de tratarde rnontar u operar
su segadora nuev_LSu segadora nueva ha sido
montada en la f&brica con la excepci6n de aquellas
partes que se dejaron sin montar por razones de
envfo. Todas las partes como las tuercas, las
arandelas, los pemos, etc., que son necesarias
para completar el montaje han sido colocadas en la
bolsa de partes. Para asegurarse que su segadora
funcione en forma segura y adecuada, todas las
parles y los artfculos de ferreterfa que se monten
tienen que ser apretados seguramente. Use las
herrarnientas correctas,como sea necesado, para
asegurar que se aprieten adecuadamente.
PARA REMOVER LA SEGADORA DE
LA CAJA DE CARTON
.,
RUEDAS
ACF.JTE
DEL MOTOR
• Haga rodar la segadora hacia afuera de ia caja
de cart6n y revfselacuidadosamente para
verificar si todavi'a quedan partes sueltas
adicionales.
COMO PREPARAR SU SEGADORA
PARA DESDOBLAR EL MANGO
IMPORTANTE: Despliegueel mango con mucho
cuidadopara no pellizcaro dafiar los cabtes de
control.
• Levante los mangos hasta que ta secci6n del
mango inferior se asegure en su lugar, en la
posici6n para segar.
, t.evante la secciOndel mango superior hasta st]
tugar en el mango inferior, remueva la curia
protect'eray apriete ambas manillas del mango.
° Remueva la curia del mango que sujeta la barra
de los control que exige la presencia del
operador junto con el mango superior.
• El mango de la segadora puede ajustarse segL_n
le acomode para segar_Refi_rase a "AJUSTE
DEL MANGO" en la Secci6n de Servicio y
Ajustes de este manual,
• Remueva las partes sueltas que se incluyen con
la segadorao
° Corte las dos esquinas de los extremos de la
caja de cart6n y tienda el panel del extremo
piano.
° Remueva todo el material de empaque, excepto
la cuRa entre el mango superior y _1inferior, y la
curia que sujeta la barra de los control que exige
la presencia del operadorjunto con el mango
superior.
20
Barradecontrolqueexigela
presencia
deloperado
o Deslice la costura igual al rededor del marco
tubular, al mismo tiempo trabaje el marco
adentro del recogedor de c_spedo
° Monte el marco inferior al marco tubular
como demostrado.
o Deslice los sugetadores de vinilio sobre el
marco.
Mangosuperior
Levantar
Aviso: Si los sujetadores de vinilio est&n
muy duros, m_talos en agua caliente.
costura
para segar
marco tubular
_\
Mango
inferior
PARA INSTALAR
LOS ACCESORIOS
Su segadora rue enviada listapara usarse como
una acolchadora de capa vegetal. Para conve_rla
de modo que pueda ensacar o descargan
° Abra la puerta tr',,_seray remueva la tapon
acolchadora. Gu&rdeta en un lugar seguroo
° Ahora puede instalar el recogedor o el desviador
de recortes opcionaL
• Para volver a la operaciSn de acotchamiento con
capa vegetal, instale la tapon acolchadora en la
abertura de descarga de la segadora_ Aseg_3rese
de que todas las orejas est6n asentadas en
forma adecuada.
tapa
soltable
marco inferior
(los marcos
deben estar
completamente
marco tubular
bastidor
Tapon
alcolchadora
PRECAUClON:
No haga funcionar su
segadora sin la tapon acolchadora aprobada
en su lugar, o sin et desviador de recortes, o
sin el recogedor de c_sped, aprobados, en su
lugar. Nunca trate de operar la segadora
cuando se ha removido la puerta trasera o
cuando est_ un poco abierta.
PARA MONTAR EL RECOGEDOFI
DE CESPED
° Inserta la pierna del marco tubular en la
abertura del recogedor de c_sped y deslice lo
entre la costura de la bolsa.
Aviso: Mantenga ta costura de la bolsa
recogida sobre la pierna recta del marco.
° Cuando el marco salga del otto lado de la
costura, inserta inmediatamente el extremo
del marco adentro de la bolsa como
mostrado en la intercalaci6n.
21
FAMILIARICESE CON SU SEGADORA
LEA ESTE MANUAL DEL DUEt_O Y LAS REGLAS DE SEGURIDAD ANTES DE OPERAR SU
SEGADORA, Compare las ilustradonescon su segadora para familiarizarse con la ubicaci6n de los
dk'ersos controles y ajustes, Guarde este manual para referencia en el future.
producto. Aprenda y comprenda sus significados.
ATTENC|{_N O
ADVERTENCIA
MOTOR
ENCENDIO0
MOTOR
APAGAO0
FL_PtDO
LENTO
ESTRANGU
LACION
Cable de control de
zona del motor
COMBUSTIBLE
ACEITE
PEUGRO, GUARDE LAS
MANOS Y LOS PIES LEJOS
de control que exige fa
presencia det operador
Control de impulsi6n
CordSn
Manilla del
Tapa del deposito de aceite
del motor con varilla
indicadora de nivel
mango
Recogedordelc6sped
Cubierta de la
impulsi6n
Ajustador de la
rueda (en cada
rueda)
Tapon de la
acolchadera
Tapa del deposito
de la gasolina
caja
Cebador
CUMPLE CON LOS REQUISITOS DE SEGURIDAD-DE
_CPSC
................................
"................
'_
Las segadoras a motor, que se conducen desde la parte de atrds, rotatorias, Sears, cumpien con
los estdndares de seguridad del American National Standards Institute y de la U,S. Consumer
Product Safety Commission. La cuchilla gira cuando el motor est& funcionando.
Barra de con{rol que exige la prencia del
operador - tiene que sujetar-se abajo, junto
con el mango, para hacer arrancar el motor.
Sudltela para parar el motor,
Cebador - bombea combustible adicional
desde el carburador al cilindro para uso cuando
se necesita hacer arrancar un motor frfo.
Corddn arrancadorarrancar et motor.
Palanca de control de la impulsi6n - se usa
para enganchar la segadora para movimiento
hacia adelante tmpulsada a motor.
Tapon de la acolchadera - situada en ia
abertura de la descarga y debe set quitada
cuando se convierte la operacci6n de ensacado
a descargao
se usa para hacer
22
La operaci6n de cualquier segadora puede
hacer que salten objetos extrafios dentro de sus
ojos, Io que puede producir dafios graves en
_stos. Siempre use anteojos de segufidad o
protecci6n para los ojos mientras opere su
segadora o cuando haga ajustes o
reparaciones. Recomendamos una mascara de
seguridad de visi6n amptia, para uso espejuelos
o anteojos de seguridad estandarte.
COMO USAR SU SEGADORA
PRECAUCI6N: No haga funcionar su_
segadora sin el desviador de recorteso sin el
recogedor de c_sped, aprobados, en su
lugar. Nunca trate de operar ta segadora
cuando se ha removido la puerta trasera o
cuando est_ un poco abierta.
VELOCIDAD
DEL MOTOR
La velocidad det motor se estableci6 en ta
f&brica para un rendimiento 6ptimo_ La
vetocidad no se puede ajustar.
CONTROL DE ZONA DEL MOTOR
PRECAUCI6N:
Las regulaciones federales
exigen que se instale un control para el motor
en esta segadora para reducir a un mfnimo el
riesgo de lesionarse debido at contacto con la
cuchilla. Por ningL_nmotivo trate de eliminar
la funci6n del control del operador, La cuchilla
gira cuando el motor est,:5,funcionando.
• Su segadora viene equipada con una barra de
control que exige la presencia del operador, Io
que requiere que el operador est_ detras del
mango de la segadora para hacerla arr_ficar y
operada_
PARA AJUSTAR LA ALTLIRA DE CORTE
° Levante las ruedas para et corte bajo y baje las
ruedas para el corte alto.
o Ajuste la altura de corte para que se acomode a
sus requis_tosoLa posid6n del medio es la mejor
para la mayon'a de los c_spedeso
• Para cambiar la altura de corLe, empuje ta
patar_',.adel ajustador hacia la rueda. Mueva la
rueda hacia arriba o hacia abajo de modo que
se acomode a sus requisitos. AsegSrese que
todas las medas queden igualmente ajustadas.
ATENClON: Et ajustador esta correctamente
colocado cuando las orejas de la placa est_.n
insertadas en el agujero del mango.
Para un corte alto, baje las
ruedas
Orejas de la
placa
Mango
Para un corte bajo, levante las ruedas
PARA MONTAR Y ADJUNTAR El.
RECOGEDOR
DE CE_SPED
o Cierre ta tapa soltabte. La tapa sortable
debe estar cerrada cuando se esta
operando la segadora.
o Levante la puerta trasera de la caja de la
segadora y ponga el bastidor del recogedor
de c_sped en las orejas formadas en el
puntal de bisagra de la puerta trasera.
= El recogedor de c_sped esta asegurado en
la caja de la segadora cuando se baja la
puerta trasera para descansar en el
bastidor del recogedor de c_sped
PREOAUCl6N: No haga funcionar su
segadora sin el desviador de recortes o sin el
recogedor de c_sped, aprobados, en su
tugar. Nunca trate de operar !a segadora
cuando se ha removido la pi_erta trasera o
cuando est_ un poco abierta.
Puerta
trasera
Puntal de
Bastidor del
bisagra
reogedor del
cesped
Orejas
formadas
PARA VACIAR EL RECOGEDOR DE
ClaSPED
° Pard remover el recog,edor del c_.spedsuelte la
barra de control del operador para poder parar el
• motor.
° Levante la puerta de arras y remova el recogedor
del c_sped por el mango.
AVISO: No arrastre la bolsa cuando la vacfe;
se producir_ un desgaste innecesario.
Tambi_n, los ajustes de 9 posiciones (si
equipado) perrniten que el mango pueda ser
movido entre las orejas de la ptaca.
23
ahi en adelanteo Puede necesitar cambiar e!
aceite m_.s a menudo cuando las
condiciones son polvorosas o sucias.
CONTROL DE LA IMPULSION
° La autoimpulsi6n se controla al sujetar la barra
de control que eyJgela presencia del operador
hacia abajo en el mango y al empujar la palanca
de control de la impulsi6n hacia adelante hasta
que suene "clic," tuego se suetta la palancao
o El movimiento hacia adelante parar_ cuando la
barra de control que exige la presencia del
operador se suetta. Para parar el movimiento
hacia adelante sin par'-_ el motor, sualte la barra
de control que exige la presencia det operador un
poco hasta que se desenganche el control de la
impulsi6n. Sujete la barra de control que eyJgela
presencia del operador abajo en contra del
mango para continuar segando sin
autoimpulsi6n.
° Para mantener el control de la impulsi6n
enganchado cuando se de vuelta en las
esquinas, empuje el mango hacia abajo y levante
las naedasdelanteras fuera del suelo al girar la
segadora.
!
control de
\_
la impulsidn
control de la
impulsi6n
para enganchar el
control de la
impulsi6n
control de la
impulsi6n
desenganchado
ANTES DE HACER ARRANOAR
EL
MOTOR
ACEITE
Su segadora fue enviada sin aceite en el motor.
, Aseg_rese que la segadora est_ nivelada y
que el _rea alrededor del dep6sito de aceite
est_ limpia.
° Remueva la tapa del dep6sito de aceite del
motor con la vari!la indicadora de nivel y
rellene hasta ta linea de lleno en _sta.
° Use 20 oz. de aceiteo Para el tipo y la calidad
vea "MOTOR" en la secci6n de las
Responsabilidades del Cliente en este
manual.
° Vacie et aceite lentamente. No !o llene
demasiado.
° Revise et nivel del aceite antes de cada uso.
Agregue aceite si es necesado. Llene hasta
la linea de Ileno en la varilla indicadora de
nivel,,
° Para leer el nivel adecuado, apriete la tapa
del dep6sito de aceite del motor cada vez.
, Vuelva a instatar la tapa del dep6sito del
aceite y apri6tela,,
° Despu_s de las dos (2) primeras horas de
siega, cambie el aceite y cada 25 horas de
GASOLINA
o Ueneel estanque de combustible. Use gasolina
regular, sin plomo, nueva y limpia con el mfnimo
de 87 octanos. (El uso de gasolina con plomo
aumentar& los dep6sitos de 6xido de plomo y
cad_onoy se reducir& la duraci6n de la v_vuta)o
No mezcle el aceite con la gasolina. Para
asegurar que la gasolina utilizada sea fresca
compre estanques los cuales puedan ser
utilizados durante los pdmeros 30 dfas.
IMPORTANTE: CUANDO SE OPERE EN
TEMPERATURAS POR DEBAJO DE 32° F (0 ° C)
USE GASOLINA DE CALIDAD DE INVIERNO,
UMPIAY NUEVA PARAAYUDAR AASEGURAR
UN BUEN ARRANQUE EN CLIMA FRIO.
ADVERTENCIA: La experiencia ha indicado que
los combustibles mezclados con alcohol (conocidos
como gasohol, o el uso de etanol o metanol)
pueden atraer la humedad, la que conduce a la
separaci6n y formaci6n de _cidos durante el
almacenamiento. La gasolina ac{dica puede dafiar
el sistema del combustible de un motor durante el
almacenarniento. Para ev'rlarlos problemas con el
motor, se debe vaciar el sistema de combustible
antes de guardarlo por un peffodo de 30 di'as o
m_. Vacfe el estanque de combustible, haga
amancar el motor y h_galo funcionar hasta que las
Ifneas del combustible y el carburador queden
vacioso La prOxima temporada use combustible
nuevo°Vea las lnstrdcciones para el
Almacenamiento para mrs informaci6n. Nunca use
productos de limpieza para el motor o para el
carburador en e! estanque del combustible pues se
pueden producir dafios pen'nanentes.
PRECAUCI6N: Uene hasta ta parte
inferior del cuello de relleno del estanque de
gasolina. No to Ilene demasiado. Umpie el aceite o
el combustible derramado. No almacene, derrame
o use gasolina cerca de una llama expuesta.
Tapa del
deposito de
ia gasolina
24
Tapa del
deposito de
aceite det
motor con
varilla
indicadora de
, nivel
#
PARA HACER ARRANCAR EL MOTOR
CONSEJOS PARA SEGAR Y ACOLCHAR
* Para hacerarrancar un motorfn'o, empuje el
cebador tres (3) veces antes de tratarlo. Empuje
firmementeo Este paso normalmente no es
necesario cuando se hace arrancar un motor que
ya ha estado funcionando por unos cuantos
minutos.
° Sujete la barra de control que exige la presencia
del operador abajo en el mango y tire el mango
del arrancador r_pidamenteo No perrnita que el
co_6n arrancador se devuelva abruptamente.
o Para parar el motor, suelte ta barra de control
que eyJge la presencia del operador.
IMPORTANTE: Para ebtener el mejorrendimeinto
mantenga la caja de la segador a sin acumladon de
cesped y basura_Vea "LIMPIEZA" en seccion
de"RESPONSABILIDADES DEL CLIENTE" de este
manual..
AVISO: En climas m_,sfrfos puede que sea
necesario repetir los pasos del cebado. En
climas m_,s calurosos et cebar demasiado
puede producir el ahogo y el motor no va a
arrancar. Si se ahoga e! motor espere unos
cuantos minutos antes de tratar de hacedo
arrancar y no repita los pasos del cebado,
CONSEJOS PARA SEGAR
° Bajo ciertas condiciones, tal como c_sped muy
alto, puede ser necesario el elevar la altura del
corte para reducir el esfuerzo necesario para
empujar la segadora y para evitar sobrecargar el
motor, dejando montones de recortes de c6sped.
Puede que sea necesario redudr la velocidad del
recomdo y/o haga funcionar la segadora sobre el
&rea porsegunda vez.
° Para un corte muy pesado, reduzca el ancho det
corte pasando parcialmente por encima del lugar
anteriormente cortado y siegue lentamente.
° Cuando use una segadora con descarga trasera
en c6sped h0medo y pesado, los montones del
c6sped cortado puede que no entrenen el
r_.,ogedor de c6sped. Reduzca la ve[oc[dad del
recorfido (ve[ocidad de empuje) y/o haga
funcionar la segadora sobre el _rea por segunda
vez.
° Si queda una huetla de cortes en el lado derecho
de una segadora con descarga trasera, siegue
en la direcd6n en que giran las manillas del reloj,
solapando un poco para recaudar los recortes en
la pr6xima pasada.
° Los poros en los recogedores de c6sped de tela
pueden Ilenarse con mugre y polvocon el uso y
los recogedores recaudar'&nmenos c6sped.
Para evitar 6sto, roc[e el recogedor con la
manguera de agua reguIarmente y d6jelo
secarse antes de usarlo.
° Mantenga la parte superior del motor, alrededor
del arrancador, despejada y sin recortes de
c6sped y paja. Esto ayudar& el ftujo del aire del
motor y extender'& su duraci6no
° La cuchi[la acolchadora especial va a volver a
cortar los recortes de c6sped muchas veces, y
los reduce en tamaSo, de modo que si se caen
en el c_sped se van a dispesar entre _ste y no
se van a notar. Tambi_n, el c6sped acolchado se
va a deshacer r_pidamente entregando
substancias nutritivas para el c_sped. Siempre
acolche con la veloddad del motor (cuchi[la) m_s
atta, pues asf se obtendr_ la mejor acci6n de
recorte de las cuchillas.
- E_e cor'_r el c_sped cuando est6 mojado. []
c_sped mojado tiende a formar montones e
interfiere con la acci6n de acotchado. La mejor
hora para segar el c6sped es temprano en la
tarde. A esa hora 6ste se ha secado y el _rea
reci6n cortada no quedar& expuesta al sol
directo.
° Para obtener los mejores resultados, ajuste la
altura del corte de ta segadora de modo que 6sta
corte solamente el tercio superior de las hojas de
c6sped. En el caso de que el c_sped haya
cr_-_do demasiado, puede ser necesario el
elevar la altura del corte para reducirel esfuerzo
necesario para empujar la segadora y para evitar
sobr_..argar el motor, dejando montones de
recortes de c6spedo Para un acolchamiento muy
pesado, reduzca el ancho det torte pasando por
encima del lugar antefiormente cortado y siegue
lentamente.
o Ciertos tipos de c6sped y sus condiciones
pueden exigir que un _rea tenga que ser
acolchada por segunda vez para esconder
completamente los recortes_Cuando se haga el
segundo corte, siegue atravesado o en forma
perpendicular a la pasada del primer corte.
- Carnbie su patr6n de corte de_semana a
semar,,a.Siegue de norte a sur una semana y
luego cambie de este a oeste la pr6xima
sernana. Esto evitar_ que el c_sped se enrede y
cambie de direcci6n
Max, 1/3
25
.........................................................
__,_o_'_,_
S
E
Revisarsihaysuietadores
sueftos
Ltmpiariinspeccionar
el recogedor
de
c_sped(sivieneequipado)
Limp_ar'"i'a
segado_-a
.....
b/
_
_
-
G umpi_'r
debai,:,
d;,'"'i_'Cub_ert_
la,ra._mtsf6n(segadoras
conpoder_,
propuisor)
D
AS_ S.RWC,O
_
'.
_4......
..........
Rev|sarlascorreas
y laspoleasimpulsaoas {segadoras
con poder propu/sor)
_
i.o.,,i_.,
o/a,
iarica.,bi",
Ja,:u_.,,_,
J
.o ,oB,
....
T__
a
I
2
3
4
I
_,
(segadoras con arrallque e[_ctrico}
...............:...........
!_
::........
V'i
...........................
I J3
:Limpi:arla baterfairecargar .........................
Carnbiarel aceitedelmotor
Limptar
eliiiiro
d_aire ''_`'.......
_
I
'1
......
:
......
_4
........
..................
:................................................................................
.................
j
v'
....
Limpiar
olcambiaria bui_a
,,,iiii,i
Cambiar
el cartucho
de papeldelfiitro
de _lre
..... if
_'2
- Cambtarrn_ a rnenudocuandoseopere baJocargapesadao en _rnbtentes conaltas temperaturas,,
- D_ servt_iom_,sa menudo cue_doso opera en condictonessuctaso po/vorosas,
- Camb{elascuchillasm_s a menudo cuandoStegUeen Ierreno arenoso,
- Cmgar por 48 horasa! lin de la temporada..
RECOMENDACIONES
TABLA DE LUBRICACION
GENERALES
La garantra de esta segadora no cubre los
art_culos que han estado sujetos al abuso o a la
negligencia del operador. Para recibir todo el
valor de la garant[a, el operador tiene que
mantener ia segadora seg_n las instrucciones
descritas en este manual.
.(_)
Ajustadpr de ;a rueda
Aceite del
motor
Hay algunos ajustes que se tienen que hacer en
forma pedSdica para poder mantener su unidad
adecuadamente.
Todos los ajustes en la secci6n de Servicio y
Ajustes de este manual tienen que set
revisados por 1omenos un vez pot cada
temporada.
• Una vez al a5o, cambie la bujla, limpie o
cambie el elemento del filtro de aire y revise
si la cuchilla est,. desgastada. Una buji'a
nueva y [,n elemento de] filtro de aire limpio/
nuevo aseguran la m.ezcla de aire-combustible adecuada y ayudan a que su motor
funcione mejor y que dure mdso
, Siga el programa de mantenimiento en este
manual.
ANTES DE CADA USO
o Revise el nivel del aceite del motor.
o Revise si hay sujetadores sueltos.
LUBRlCACION
Mantenga la unidad bien lubdcada (yea ta
"TABLA DE LUBRICACION").
(_) Bisagra
de la
(_) Clavija de montaje
del puntal del
mango
puerta
trasera
REFtERASE
A LA SECCION DE
ROCIE EL LUBRICANTE
RESPONSABILIDADES DEL CLIENTE EN
"MOTOR"
IMPORTANTE: No acerit o engrase los
rodamientos de la rueda de plastico. Los
lubricantes viscosos atraeran polve y mugra, Io
que acortara ta duracion de los rodamientos
auto lubricantes. Si cree que lubricarse, use
solamente un lubricante tipo grafito, de polve
seco, en forma moderada°
26
ESPECIRCACIONES
DEL PRODUCTO
_IOMERO DE MODELO
917.377520
_IOMERO DE SERIE
FECHA
DE COMPRA
CABALLOS DE FUERZA:
5.0
DESPLAZAMIENTO:
11.5 CU. IN.
CAPACIDAD Y TIPO
1.6 Cuartos
DE GASOLINA:
REGULAR
TIPO DE ACEtTE:
(APi-SF/SG)
SAE 30 (sobre 32°F)
SAE 5W-30 (debajo 32°F)
CAPACIDAD DE ACEITE:
20 oz. de capacidad
BUJiA (ABERTURA:
CHAMPION
TOLERANCIA
SENCENDIDO
SOLIDO
TORSION
,030")
DE VALVULA:
SIN PLOMO
RJ19LM
OR J19LM
ADMISION:
.005"
DESCARGA:
.007"
DE ESTADO
ABERTURA
DE AIRE:
.010 IN.
DEL PERNO
DE LA CUCHILLA:
35-40 FT. LBS.
o El num_ro del nodelo y el de serie se encuentran en la calcomania adjunta a la parte
trasera de la caja de la segadora. Debe registrar tanto el num_ro de serie come la
fecha de compra y mantengalos
en un lugar seguro para refencia en et futuro.
SEGADORA
Siempre observe las reglas de seguridad
cuando haga el mantenimiento.
LLANTAS
.
Mantenga tas Ilantas sin gasolina, aceite o
substancias qufmicas para control de insectos
que pueden da_ar la goma.
o Evite los tocones, las piedras, las grietas
profundas, los objetos afilados y otros peligms
que pueden daSar alas !lantas.
CUIDADO DE LA CUCHILLA
Para obtener los mejores resultados,la cuchilla de
la segadora tiene que mantenerse afilada.
Cambie la cuchitla doblada o dafiada.
PAPA REMOVER LA CUCHILLA
o Desconecte el alambre de la bujfa y p6ngalo en
donde no pueda entrar en contacto con _sta.
= Haga descansar la segadora en su lado.
Aseg(Jrese que el fiitro de aire y que el
carburador queden mirando hacia arriba.
° Use un bloque de madera entre la cuchilla y la
caja de la segadom para evitar que la cuchilla
gire cuando se le quite el pemoo
° Proteja sus manos con guantes y/o envuelva la
cuchilla con una tela gruesa.
° Remueva el pemo de la cuchilla gir&ndolo en el
sentido contrario en que giran las manillas del
reloj.
° Remueva la cuchiUay los artfculos de ferreterfa
adjuntadores (el pemo, la arandela de seguridad
y la arandela enduredda)o
AVISO: Remueva el adaptador de la cuchilla y
revise el cubo interior de la ranura del
adaptador de la cuchil[a. La ranura tiene que
estar en buenas condiciones para que
funcione en forma adecuada. Cambie el
adaptador si est& dafiado.
PARA CAMBIAR
LA CUCHILLA
° Ponga el adaptador de la cuchilla en el ciguefial
del motor. AsegSrese que ta ranura del
adaptador y que el chaveterodel ciguefiai est_n
alineados°
= Ponga la cuchilla en el adaptador de _sta
aiineando los dos (2) agujeros en la cuchi!la con
las salientes elevadas en el adaptador.
° AsegSrese de que el borde de salida de la
cuchilla (opuesto al borde afilado) est_ hada
ardba hacia el motor.
• Instale el pemo de la cuch_la con la arandela de
seguridad y la arandela endurecida en el
adaptador de la cuchilla y el cigueSaL
27
', Use un bloque de madera entre la cuchilla y la
caja de ta segadora y apriete et pemo de la
cuchilla gi_ndolo en el sentido en que giran las
manillas del reloj. •
, La torsion para apretar recomendada es de 3540 pies libraso
IMPORTANTE: EL PERNO DE LA CUCHILLA ES
CLASE 8 TRATADO A CALOR.
AVISO: No recomendamos el afilar la cuchilla
-pero si !o hace, asegt_resede que quede
balanceada.
PARAAFtLAR
LA CUCHtLLA
Se tiene que tener cuidad0 de manteneda
batanceada. Una cuchilla que no est_ balanceada
va a producir eventua]mente daOoen la segadora o
en el motor.
o La cuchillapuede afilarse con una lima o en una
rueda rectificadore. No trate de afilafla mientras
se encuentra en la segadora.
° Para revisar el balance de ta oJchilla, clave un
clavo en una riga o en la pared. Deje alrededor
de una pulgada de un clavo i'ectoexpuesto.
Ponga el agujero central de la cuchilla sobre la
cabeza del davoo Si la cuchi!ta est& balanceada
debe permanecer en la posiciOnhorizontal. Si
cualquiera de los extremos de la cuchilla se
mueve hacla abajo, afile el extremo pesado
hasta que _sta quede b_ar_..eada.
Adaptador de la cuchilla
Chavertero det
" uefial
Ranura
Cuchi!ta
Pemo de /
la cuchilla /
CAJA DE ENGRANAJES
° Para mantener el sistemade impulsi6n
fundonando en forma adecuada, la caja de
engranajes y el _rea alrededor de la imputsi0n
tienen que mantenerse limpias y sin acumulaci0n
de basurao Umpie debajo de la cubierta de la
impulsion dos veces por temporada_
= La caja de engranajes se llena con lubdcante
hasta el nivel adecuado en la f_orica. La enica
vez que el lubricante necesita atenci6n es
cuando se le ha prestado seMcio a la caja de
engranajes.
= Si se necesita lubdcante, use solamente Grasa
Texaco Starplex Premium 1, Parte No. 750355.
No use substitutos.
RUEDAS DE IMPULSION
Revise las r,.Jedasde impulsion delanteras cada vez
antes de segar,para asegurarse de que se mueven
librementeo
Si las ruedasno giran libremente quiere decir que
hay basura, recortes de c_sped, etc. en et &rea de
las ruedasde impulsi6n y tienenque limpiarse para
tiberadas.
Es necesafio tirnpiar las ruedas de impulsion; revise
ambas ruedas delanteras.
= Remueva los tapacubos, las clavijas de horquilla
y tas arandelas.
• Remueva las ruedas de los ajustadores de las
ruedaso
= Remueva la basuray los recortes de cdsped de
dentro de la cubierta contra el polvo, pifOn y/o de
los dientes de los engranajes de las ruedas de
impulsion.
• Ponga {asruedas de vuelta en su lugar_
• Si despu_s de limpiar tas ruedas de impulsi6n no
giran libremente, pOngase en contacto con su
centro/departarnento
de servido autorizado m&s
uefial
cercano,
MOTOR
LUBRICACION
de
Arandela
segridad Endurecida
RECOGEDOR
Borde de
satida
Adaptador
de la
cuchilla
Use solamenteaceite de detergente de alia calidad
clasificadocon la das'_caci6nSF o SG de servtcio
APL Seteccione la calidad de viscostdad SAE
seg_n su temperatura de operaei6n esperada.
DE ClaSPED
(Si comprado como un acceso_o)
El recogedor de c_sped puede ser rociado con el
agua de la manguera pero tiene que estar seco
cuando se vaya a usar.
Revise su recogedor de c_sped a menudo para
verificar si est_ da,fiado o deteriorado. Se va a
desgastar con el uso normal. Si se necesita
cambiar el recogedor, c_mbielo solamente por
uno que sea aprobado por el fabricanteo D6 el
nOmerodel modelo de la segadora cuando Io
ordene.
CAL!DADES DE VISCO$1DAD DE SAE
,__mmmm
o
=o" _, 40. ' G0, " _,
°c ,,,oo"
-20',....
-to"
o,
lo'
_'
" i_'
_"
40"
GAMA D€: TEMPERATURA ANTtC1PADA ANTES OEL PROXIMO CAMBIO DE ACEI_E
AVISO: A pesar de que los aceites de
multiviscosidad (5W30, 10W30, etc.) mejoran
el arranque en clima frt'o,estos aceites de
rnultMscosidad van ha aumentar et consurno
de aceite cuando se usan en temperaturas
sobre 32° F. Revise el nivel del aceite del
motor m__sa menudo, para evitar un posibte
daOo en el motor, debido a que no tiene
suficiente aceiteo
28
plancha
trase_
Cambie e[ aceite despu_s de 25 horas de
operaci6n o por Io menos una vez al &rio si ta
segadora se utiliza menos 25 horas el afioo
Revise el nivel del aceite del c&rter antes de
arrancar el motory despu_s de cada cinco (5) horas
de uso continuado, Apriete el tap6n del aceite en
forrna segura cada vez que revise el nfvel del
aceite.
labio
ranuras
PARA CAMBIAR ELACEtTE DEL MOTOR
AVISO: Antes de inclinar la segadora para
drenar el aceite, drene el tanque de combustible haciendo correr el motor hasta que el
tanque est6 vacio.
o Desconecte el alambre de ta bujfa y p6ngalo de
modo clueno pueda entrar en contacto con _sta,
o Remueva la tapa del dep6sito del aceite; d_jela a
un lado en una superficie limpia,
• Incline la segadora y h_,galadescansar en su
lado y drene el aceite en un envase adecuado.
Mueva la segadora de atr&s para adelante para
remover todo el aceite que se haya quedado
atrapado dentro del motor.
• Umpie todo el ace_e derramado en la segadora
y en el lado del motor,
o Uene el motor con aceite. U6nelo solamente
hasta la Ifnea de tleno (FULL) en la varitla
indicadora de niveL NO LO LLENE
DEMASIADO,
- Vuelva a poner la tapa en el dep6sito del aceite°
° Vuelva a conectar el alambre de la bujfa a _sta.
Envase
FILTRO DE AIRE
Su motor no fundonar_, en forma adecuada y
puede sufrir dafios si se usa un filtro de aire sucio.
Cambie el filtro de aire cada aSo, y m&s a menudo
si siega en condiciones muy polvorosas o sucias,,
No lave el filtro de aire.
PARA CAMBtAR EL FILTRO DE AIRE
° Suelte el tomillo e incline la cubierta para
removerlo.
= Cuidadosamente, remueva el cartucho.
• Lfmpielo golpedndoto suavemente en una
superficie plan& Si est_ muy sucio cambie el
cartucho..
PRECAUCION:
Los solventes de petr61eo,
tales como el keroseno, no se deben usar
para limpiar el cartucho. Pueden producir el
deterioro de _steo No aceite el cartuchoo No
use aire a presi6n para limpiarlo o secarlo.
- Instale et cartucho, luego vuelva a poner la
cubierta asegurAndose que las orejas est_n
alineadas con las ranur_ en'la plancha trase_
Apriete et tomitto en forrna segur&
orejas de
la cubierta
caflucho
cubierta
SILENCIADOR
Inspeccioney cambie el silenciador si est,. corm[do
pues producir un peligro de incendio y/o dafio.
BUJIA
Cambie su bujfa cada a5o para hacer que su motor
arranquem&s f&cilmente y fundone mejor. Ajuste la
abertura de la bujfa en 0.030 pulgadao
LIMPIEZA
tMPORT_TrE: Para obtenerel mejor redimientom,
mantenga lacajadetasgadorasin acumulacion de
cesped y gasuraoUmpie la parte de su segadora
despues de cada uso.
PRECAUCI6N: Desconecte el alambre de la
bujfa y p6ngalo en donde no pueda entrar en
contacto con _sta.
o Haga descansar la segadora en su lado.
Aseg_rese que el filtro de aire y que el
carburador queden mirando hacia arribao Umpie
la parle inferior de su segadora rasp_indola para
remover la acumulad6n de c_sped y basura.
° Umpie el motor a men{Jdopara evitar que se
acumule
la basura. Un motor tapado funciona m_is
caliente y se acorta su durad6n.
° Mantenga las supe_cies pulidas y las ru_as sin
gasolina, aceite, etc.
° No recomendamos el uso de una manguera de
jardfn para limpiar la segadora a menos que el
sistema el_ctrico, el silenciador, el filtro de aire y
el carburador est_n tapados para evitar que tes
entre el agua. [] agua en el motor puede acortar
la duraci6n de _ste.
LIMPIE DEBAJO DE LA CUB1ERTA DE LA
IMPULSI6N
Umpie debajo de la cubiertade la impulsi6npor Io
menos dos veces cada temporad& Raspe debajo
de la cubierta con un cuch_lo para masilla o con una
herramienta parecida, para remover toda
acumulaci6n de c_sped o basura en la parte iv,ferior
de la cubierta de la impulsi6n,
29
PRECAUCION: ANTES DE DAR
CUALQUIER SERVICIO 0 DE HACER
AJUSTES:
° Suelte la barra de control y pare el motor°
, Aseg0rese que la cuchUlay que todas las partes
movibles se hayan detenido completa.mente.
° Desconecte el alambre de la bujfa y p6ngalo en
donde no pueda entrar en contacto con _sta.
SEGADORA
PAPA AJUSTAR LA ALTURA DE CORTE
Vea"PARAAJUSTAR LAALTURADE CORTE" en
la secci6n de Operad6n de e_"temanual.
DESVIADOR TRASERO
Se proporrJona un desviadortrasero,adjunto entre
las ruedastraseras de su segadora, para reducir a
un mfnimo la posibilidad clueobjetos sean tanzados
hacia afuera de la parte trasera de la segadora, en
la posici6n en donde se encuentra el operador. Si
se da6a et desviador debe cambiarse.
PARA REMOVEPJCAMBIAR
LA CORREA
DE
IMPULSION
° Remueva la cubierta de la impulsi6n.Remueva
la correa empujando hacia
abajo en ta polea de
(
la caja de engranajes.
° Haga descansar la segadora en su lade con et
filtro de aire y el carburador mirando hacia aniba.
= Remueva la cuchilla.
° Remueva la defensa en contra del desperdicio,
o Remuova la correa de la polea del motor en el
ciguefiaL
= Instale la correa nueva siguiendo los pasos
anteriores en et orden inversoo
° Siempm use la correa aprobada per la fdbrica
para asegurarse que calce y dure.
° Remueva las abrazaderas del cable.
- Remueva loscontroles y la barra de control que
exige la presencia del operadordel mango
superior.
° Remueva la gufa del cord6n arrancador del
mango inferior°
° Remueva las clavijas de horquilla.
° Desconecte el mango inferiorde los puntales del
mango(,
° De vuelta el mango y'_elva a montar las davijas
de horquilla que se habfan removido.
o Vuelva a montar la gufa det cord6n arrancador.
° Vuelva a montar los controles y la barra de
control que exige la presencia del operador en et
mango superior.
PRECAUClON: La barra de control que exige
la presencia del operador tiene que pk_otear
tibremente para permitir el enganche de ia
cuchilla/freno cuando se suelta la barra de
control, No apriete demdsiado los sujetadores
que sujetan a los controles al mango superior,
o Para carnbiar de la posid6n de mediana baja a
atta solamente se tendrd que darvuelta ta
secci6n del mango supedor,
° Para cambiar de la posici6n mediana baja a baja,
solamente se tendrd que dar vueita la secci6n
del mango inferior,
Posici6n de envio
Mediana baja
Cubierta
de la
impulsion
Mediana alta
,
Baja
Correa
Empujar
hacia
abajo
PARA AJUSTAR
_:
EL MANGO
Apriete para
Se puede Iovantar o bajar elmango do su segadora
seg0n le quedo cdmodo. Hay cuatro (4) posiciones
disponibles: alia, mediana alta, mediana baja, baja.
Los mangos se envfan montados on la posid6n
mediana baja.
, Para cambiar de la posici6n mediana baja a
mediana alta, la secci6n superiory la inferior del
mango tendrdn que darse vuelta_
Mango infedor
remover
Puntal
del
mango
30
Abrazadera de
gorqui!la
MOTOR
VELOCIDAD DEL MOTOR
CARBURADOR
Su carburador no es ajustabte. Si su motor no
est& funcionando en forma adec_Jada debido a
problemas que se sospecha vienen del
carburador, Ueve su segadora a un centre de
servicio autorizado para reparada y/o ajustada.
IMPORTANTE: Nunca manipulee el regulador
del motor, el que ha side ajustado en lafabrica
ara ia velicidaddel motor adecuada, puede ser
petigroso hacer funcionar el motor a una
vetocaded per sobre e! ajuste de ata velocidad
alta regulada del motor necesita ajuste,
pongase en contacto con su centre
departamento de servicio autorazado mas
cerano, el que cuenta con el equipo adecuado y
la experiencia para haacer los ajustes
necesarios.
La velocidad del motor ha side ajustada en la
f&brica. No trate de aumentar la vetocidad del
motor pues se pueden producir lestones
personales. Si cree que et motor est_
funcionando demasiado r&pido o demasiado
lento, Ileve su segadora a un centre/
departamento de servicio autorizado para
reparada o ajustada.
Inmediatamente prepare su segadora para el
almacenamiento al final de cada temporada o si la
unidad no se va a usar per 30 dfas o m_,s.
SEGADORA
Barra de control que exige la
presencia del operado
Mango superior
Cuando se va a guardar Is segadora per cierto
pedodo de tiempo, lfmpiela cuidadosamente,
remueva toda la mugre, la grasa, las hojas, etc.
Gu_rdela en un _rea limpiay secao
o Limpie toda la segadora (Vea "UMPIEZA" en ia
secciSn de Responsabilidades del Cliente de
este manual).
• Lubfiquela seg0n se muestra an la seccidn de
Responsabilidades del Cliente de este manual.
° Asegt_rese de que todas las tuercas y clavijas y
todos los pemos y tomillos est_n apretados en
forna segura. Inspeccione las partesclue se
mueven para verificar si est_n daSadas,
quebradas o desgastadas. C_'nbielas si es
necesarioo
• Retoque todas las superficies que est_n
oxidadas o con la pintura picada;use una tija
antes de pintar.
MANGO
Puede doblar el mango de su segadora para
almacenarla.
° Apriete los extremes inferioresdel mango inferior
entre sf hasta que el mango inferior quede
separado del puntal de! mango, tuego mu6valo
hacia adelante.
o Suelte los pemos de montaje del mango superior
to suficiente come para permitir que el mango
superior se pueda doblar hacia atr_s.
Mango inferior
Puntal del
mango
Clavija de
horquilla
31
para segar
Mango
inferior
IMPORTANTE: Cuando doble el mango para el
alacenarniento o el trasporte,asegurese que 1o
doble segun se muestra o puede danar loscables
de control.
o Cuando prepare sue mangos a partir de la
posici6n de almacenamiento, el mango inferior
autom_ticamente se asegura_ en la posici6n
para segac
MOTOR
SISTEMA
DE COMBUSTIBLE
tMPORTANTE: Es importante evitarque se forrnen
depositosde partes fundamenta]es del sistemade
comustibletalescome el carburador,el filtro del
combutible,la manguera del combustibleo en el
estanquedurante el aimacenmienfo.La
experienceatambien endica que toscombustibles
mezclados con alcohol (conocido come gasohol o
que tienen etanol o metanol) pueden atraer
humedad, Io que conduce a la separati6n y a la
formaci6n de dcidosdurante almacemamiento, la
gaso_ina&cideca puede naSar et sistema de
combustible de un motor durante el peridode
alcarnenmiento.
• Dreneelestanque
decombustible.
o Hagaarrancar
elmotoryd_ji_lo
funcionar
hasta
quelaslineasdelcombustible
yelcarburador
est_nvacfos°
° Nunca use los productos para limpieza del
carburador o del motor en el estanque de
combustible pues se pueden producir dafios
permanentes.
o Use combustible nuevo la prOxima temporadao
AVISO: E1estabilizador de combustible es
una altemativa aceptabte para reducir a un
mfnimo la formaci6n de depSsitos de goma en
el combustible durante el perfodo de
almacenamiento. Agregue estabilizador a la
gasolina en el estanque de combustible o en
el envase para el almacenamiento. Siempre
siga la proporci6n de mezcla que se
encuentra en el envase del estabilizador.
Haga funcionar el motor por Io menos 10
minutos despu_s de agregar el estabilizador,
para perrnitir que este ilegue al carburadoro No
drene ta gasolina del estanque de gasolina y
el carburador si se est& usando estabilizador
de combustible.
ACEITE DEL MOTOR
Drene el aceite (con el motor catiente) y c_mbielo
con aceite de motor timpio. (Vea =MOTOR" en la
secciOnde Responsabilidades del Cliente de este
manual..)
CILINDRO
, Remueva la bujia.
° Vacie una onza (29 ml) de aceite a tray, s del
agujero de la bujfa en el cilindro.
° Tire la manilla de arm,_qquelentamente unas
cuantas veces para distribuir el aceite.
• Vuelva a montar la nueva bujfa.
OTROS
° No guarde la gasolina de una temporada a la
otra.
° Cambie e! envase de la gasolina si se empieza a
oxidaroLa oxidaciSn y/o la mugre en su gasolina
producir&n problemas.
° Si es posible, guarde su unidad en un recinto
cerrado y c_brata para protegerla contra el polvo
y la mugre.
o Cubra su unidad con un forro protector adecuado
que no retenga la humedad. No use pl_stico. El
pt_stico no puede respirar, Io que permite la
formacidn de condensaciSn, to que producir'&la
oxidaci6n de su unidad°
IMPORTANTE: NUNCA CUBRA LA SEGADOP_,
MIENTRAS EL MOTOR Y LAS AREAS DE
ESCAPE TODAVIA ESTAN CALIENTESo
PREOAUOION: Nunca almacene la segadora
con gasolina en el estanque dentro de un
edificio en donde los gases pueden alcanzar
una llama expuesta o una chispa. Permita que
se enfri'e e! motor antes de almacenarla en
atgt_n recinto cerrado.
32
IDENTIFICACION
DE PROBLEMAS
PROBLEMA
CAUSA
CORRECCION
No arranca
o Filtro de aire sucio.
° Limpie/cambie el filtro de aireo '""
° Sin combustible.
° Llene el estanque de combustible.
° Combustible rancio.
• Drene et estanque y vuelva a
Itenarfo con combustible limpio y
nuevo.
* Agua en el combustible°
° Drene el estanque de combustible y'
el carburador y vuelva a Itenar el
estanque con gasolina nueva.
° Alambre de la bujfa
desconectado.
° Conecte el alambre a la bujfa.
oBujfa mala.
• Apriete el pemo de la cuchilla o
cambie el adaptador de la cuchilla.
° Presione la barra de control ha¢ia el
mango.
• Cambie la barra de control°
, Cambie la bujfa.
* Cuchilla suelta o adaptador
de la cuchilla quebrado.
° Barra de control en la posici6n
suelta.
Falta de fuerza
- Barra de control defectuosa.
Ajuste a la posici6n de "Corte m_s
alto."
* Parte trasera de la cajacuchilla
de la segadora arrastr_ndose
en el c_sped pesado.
Ajuste a la posici6n de "Corte m_s
alto."
° Est,. cortando mucho c_sped.
o Filtro de aire sucio.
* Limpie/cambie el fittro de aire.
"Acumutaci6n de c_sped, hojas
y basura debajo de la segadora.
° Revise el nivel det aceite.
o Demasiado aceite en el motor.
• Corte a una v_Jocidad de recorrido
m_.s lenta.
33
° Limpie la parte inferior de la caja de
la segadora.
PROBLEMA .....
_al corte -disparejo
cAUSA
o CuchiUa desgastada, doblada o o Cambie la cuchilla. Apriete el
suelta.
pemo de la cuchilta.
° Altura de las ruedas dispareja.
° Ajuste todas las ruedas a la
misma altura.
o Acumulaci6n de c6sped, hojas o! • Limpie la parte inferior de la caja
de la segadora.
basura debajo de la segadora.,
Vibraci6n excesiva
• Cuchilla desgastada, doblada o
suelta.
= Ciguefial dei motor doblado.
, Cambie la cuchitla. Apriete el
pemo de la cuchilta.
° P6ngase en contacto con su
centro de servicio autorizado
m&s cercanoo
° El freno del volante del motor
est,. aplicado cuando se suetta
la barra de control.
- CigueSat del motor doblado.
° Adaptador de la cuchilla
quebrado.
° La cuchilla se arrastra en el
c_sped.
° Presione la barra de control
hacia el mango superior antes de
tirar el cordSn arrancador.
= P6ngase en contacto con su
centro de servicio autorizado
m_s cercano.
o Cambie el adaptador de la
cuchilla.
_o
Mueva la segadora a un lugar en
donde el c_sped ha sido cortado
o a una superficie firrne para
hacer arrancar el motor.
CordSn arrancador
dificil de tirar
,,,,,,,,,,,,
,
i
i,H
,,
Recogedor de c_sped
no se tlena (si viene
equipado)
..................
Dif[cil de empujar
CORRECClC)N
..........
=
i i
,,,,,
= Altura de corte demasiado
baja.
• Levantamiento de la cuchilla
desgastado.
= Recogedor sin ventilaci6n de
aire.
i,,
m
° Eleve la altura de coder
° Cambie Lacuchillas.
° Limpie el recogedor de c6sped.
i ,i
, Et c_sped est& demaslado alto
o la altura de la rueda demasiado baja.
= Parte trasera de la cajalcuchilla
de la segadora
arrastr_ndose
en el c_sped.
• Recogedor de c_sped demasiado Ileno.
° Posici6n de la altura del mango
no adecuada par° usted.
34
o Eleve la altura de corteo
• Eleve la parte trasera de la caja d_
la segadora (1) un lugar m&s alto.
• Vacfe el recogedor de c_sped.
° Ajuste la altura det mango de
modo que le acomodeo
ROTARY LAWN MOWER -- MODEL NO. 917.377520
GEAR CASE ASSEMBLY PART NUMBER 702511
I
I
KEY
NO.
PART
NO.
17490416
2
3
4
6
137055X004
137053
57072
48373
7
8
77881
137051
DESCRIPTION
KEY
NO.
Tapping Screw 1/4-20 x
1-!/4
Engagement Bracket
Shifter
Seal
Gear Case Halves Kit
(includes Key Noso 4, 5,
and 7)
Beadng
Worm Shaft
9
t0
11
12
13
14
15
16
17
18
19
PART
NO.
137074
57079
131484
700343
86447
137050
750436X
750369
12000003
850848
81585X004
NOTE" All component dimensions
given in U.S. inches. 1 inch = 25.4 mm
35
DESCRIPTION
Drive Shaft
Hardened Washer
Clutch Yoke
Bushing
Plug
Helical Gear
Clutch Jaw
Grease
E-Ring
Hi-Pro Key
Spring Bracket
ROTARY LAWN MOWER MODEL NUMBER 917.377520
13
6
!
\
27
22
30
10
14
5o
10,
i
35
39
12
CO
37
30
56
52
4t
ROTARY LAWN MOWER MODEL NUMBER 917.377520
KEY
NO.
PART
NO.
1
2
4
5
6
8
9
10
11
12
13
14
15
16
17
18
20
22
23
25
27
28
29
30
31
32
34
35
37
!45646X479
162788
150425
66426
136376
145793
151023
128415
150050
STD512505
77400
156374X479
700365X479
133190X479
140661X479
63601
140540
84596
87677
83923
151155
142748
62335
145935X004
701037
700331X004
14663O
700326X007
150078
39
_40
151512X479
15151tX479
.=
DESCRIP_ON
Upper Handle
Engine Zone Control Cable
Mulcher Rug
Cable Clip
Handle Knob
Control Bar
Rear Door Kit
Pop Rivet
Self Tapping Screw #10-24 x 5/8
Hex Tapping Screw w/Sems 1/4-20 x 1/2
Hubcap
Back Plate
Side Baffle
Discharge Baffle
Rear Baffle
Keps Locknut 1/4-20
Rear Skirt
Engine Pulley
Hi-Pro Key #505
Hex Flange Nut
Wheel
Shoulder Bott 3/8-16 x 1
Spring Washer
Axle Arm Assembly
Selector Knob
Selector Spring
Spacer
Wheel Adjusting Bracket
Thread Cutting Screw wlSems 5/16-18 x
3/4
Handle Bracket Assembly (Left)
Handle Bracket Assembly (Right)
KEY
NO.
PART
NO.
41
150406
44
161769
46
47
48
49
50
851514
157101
851074
850263
851084
51
52
55
56
57
58
59
61
62
64
700869X479
85463
751592
88652
51793
157081X479
131959
132001
134612
......
70
--
700327)(007
161767
DESCRIP_ON
Hex Head Thread Rolling Screw 3t816 x 1-1/8
Lawn Mower Housing (Incl. Key #14,
15,51 &
Blade Adapter
Blade 22"
Hardened Washer
Helical Washer 318-24 x 1-3/8 Gr. 8
Hex Head Machine Screw 318-24 x 13/8 Gr. 8
Front Baffle
Danger Decal
Locknut 3/8-16
Hinge Screw 1!4-20 x 1-1/4
Hairpin Cotter
Lower Handle
Handle Bolt
Rope Guide
Debris Shield
Engine - (See Breakdown)
Briggs12H802-1978-E1
Wheel Adjusting Bracket
Owner's Manual (English/Spanish)
Available accessories not included with lawn mower:
-71 33303
Clipping Deflector
-_
71 33623
Gas Can (2.5 gal.)
-71 33500
Fuel Stabilizer
-71 33000
SAE 30W Oti (20 oz.)
-.
71 33417
Dust Shield
-71 33316
Mower Cover
ROTARY
G_
GO
LAWN
MOWER
MODEL
NUMBER
917.377520
ROTARY
KEY
NO.
1
2
3
4
cO
5
6
8
9
10
!I
12
t3
14
15
16
PART
NO.
145755
48385
751152
158755
146527
150495
77400
145212
88446
151156
12000058
137054
88080
88118
67725
LAWN
MOWER
MODEL
KEY
NO.
NUMBER
PART
NO.
917.377520
DESCRIPTION
DESCRIPTION
Contro! Cable Assembly
Control Head Kit
Locknut #10-24
Pan Head Machine
Screw 1/4 x 2.12
V-Belt
Spring Retainer
Hubcap
Flanged Nut
Nylon Bushing
Wheel & Tire Assembly
E-Ring
Pinion
Dust Cover
Felt Washer
Washer 1/2 x t-112 x
.134
18
25
26
701037
151522
143603
28
31
32
33
35
154990
132010
137052
48386
151521
36
37
40
41
702511
137090
75192
151520
53
54
144747
154862
55
57
86012
144748
Selector Knob
Drive Cover Decal
Pan Head Tapping
Screw #10-24 x 2-3/4
Drive Cover
Hex Flange Nut
Drive Pulley
Drive Control Cable Kit
Wheel Adjuster
Assembly (Left)
Gear Case Assembly
Spring
Spring
Wheel Adjuster
Assembly (Right)
Frame Throat
Grassbag Assembly with
tube
Driveshaft Cover
Frame Tube
BRIGGS
& STRATTON
MODEL NO. 12H802
TYPE NO. 1978-E1
968
606
'_
971A
843
967
621
529
92_P
It
258
I 131 J
%
I
1
1
I
f
124
634
!
I
_o_ 130
!
127
95 t_617
40
MODEL NO. 12H802
TYPE NO. 1978-E1
BRIGGS & STRATTON
4-CYCLE ENGINE
15
625
383
306
307
41
REQUIRES SPECIAL TOOLS
TO INSTALL. SEE REPAIR
INSTRUCTION
MANUAL,
BRIGGS
& STRATTON
MODEL NO. 12H802
TYPE NO. 1978-E1
9
_)
670A
(_
358 GASKET SET
3
i
524 0
_
20
104
_) 634
............
llll,i
i
i
'134
617
ii
ii llllll, ii,
,
_3
O
127
116
617
H
977 CARBURETOR GASKET SET
I
u
121 CARBURETOR
634
KIT
334
356
I
,_!
'_
202
"_
209
42
670A
MODEL NO. 12H802
TYPE NO. 1978-E1
BRIGGS & STRATTON
.4:CYCLE ENGINE ...........................
972
930
304
55
,
1
L_J
• .
|
43
BRIGGS
& STRAT'rON
KEY
NO.
PART
NO.
1
2
3
4
5
7
8
9
9A
10
11
12
13
15
16
493260
293708
299819
493279
214368
272916
495786
272481
272238
94650
231933
272198
94547
9_880
498565
94388
399781
94220
94612
20
22
23
24
25
492177
222698
499429
26
499425
27
28
263190
499423
29
32
33
34
35
40
45
46
499424
94699
26265'1
262652
262224
93312
262204
498275
MODEL NO. 12H802
TYPE NO. 1978-E1
DESCRIPTION
m_t
Cylinder Assembly
Bushing, Cylinder
' Seal, Oil
Sump, Engine
Head, Cylinder
Gasket, Cylinder Head
Breather Assembly
Gasket, Valve Cover
i
Gasket, Baffle Plate
Screw, Hex Head
Tube, Breather
* Gasket, Crankcase
Screw, Cylinder Head
Plug, Oit Drain
Crankshaft
Timing Gear Key
* Seal, Oil
Screw, Hex Head
Screw, Hex Head
(Used in Hole Nearest
Breather)
Flywheel '
Key, Flywh'eel
Piston Assembly,
' Standard Size
Ring Set, Piston,
Standard Size
Lock, Piston Pin
Pin, Piston, Standard
Size
Rod, Connecting
Screw, Connecting Rod
Valve, Exhaust
Valve, intake
Spring, Valve
Retainer, Valve Spring
Tappet, Valve
Gear, Cam
KEY
NO.
PART
NO,
47
51
54
55
56
58
493737
272199
94526
497442
498144
280399
60
65
8t
95
104
110
281434
94696
223664
94098
231371
---
117
121
124
494870
498260
94840
125
127
498170
...
130
t31
133
134
224908
493267
398187
398188
137
- --
I63
187
188
188A
202
2O9
272653
298049
398540
94644
262579
263044
*
*"
***
DESCRIPTION
Slinger, Oil
* Gasket, Intake Elbow
Screw, Hex Head
Housing, Rewind Starter
Pulley, Rewind Starter
Rope, Rewind Starter
(Cut To 88-5/8")
Grip, Starter Rope
Screw, Phillips
Lock, Muffler Screw
Screw, Round Head
** Pin, Float Hinge
"'* Gasket, Sealing (Sold in
Kit Only)
Jet, Main
Carburetor Kit
Screw, Carburetor
Mounting
Carburetor
0, Plug, Welch (Sold in Kit
Only)
Valve, Throttle
Shaft, Throttle
Float, Carburetor
Valve, Inlet (Includes
Seat)
"*" Gasket, Bowl (Sold in Kit
Only)
"Gasket, Air Cleaner
Hose, Fuel
Screw, Hex Head
Screw, Hex Head
Link, Governor
Spring, Governor
Included in Gasket Set (497316)
Included in Carburetor Kit (498260)
Included in both Carburetor Kit (498260),
and Carburetor Gasket Set (498261)
Included in both Gasket Set (497316),
Set (497316) and Valve overnauf
Gasket Set (498528)..
NOTE: All component dimensionsgiven in U.S_inches
1 inch = 25.4 mm
44
BRIGGS & STRATTON
.4_;.CYCLE ENGINE ..........................................................................................
KEY
NOo
PART
NO.
227
230
258
284
300
304
305
306
307
332
333
334
337
356
358
363
383
387
447
455
456
459
461
515
523
524
525
529
562
572
592
601
605
606
608
Incl:
492349
67072
94512
94511
497638
493293
94744
224324
94515
94877
802574
94731
802592
497833
497316
19069
89838
496115
95013
225121
281503
281505
94943
263073
495264
280393
495265
281299
94852
224328
231082
93053
225103
224815
497680
94904
94908
94231
94474
263175
270344
499635
396847
497465
613
615
616
617
620
62t
625
DESCRIPTION
Lever, Governor
Washer, Thrust
Screw, Hex Head
Screw, Hex Head
Muffler, Exhaust
Housing, Blower
Screw, Sems
Shield, Cylinder
Screw, Hex Head
Nut, Flywheel
Armature, Magneto
Screw, Seres
Plug, Spark
Wire, Ground
Gasket Set
Puller, Flywheel
Wrench, Spark Plug
Primer, Carburetor
Screw, Hex
Cup, Starter
Retainer, Starter
Pawl, Rachet
Screw, Shoulder
Spring, Retainer
Cap, Oil Filler
* Seal, FiIler Tube
Tube, Oil Fill
Grommet
Bolt, Governor Lever
Baffle, Cylinder
Nut, Hex
Clamp, Hose
Cover, Control
Strap, Bracket
Starter, Rewind
Screw, Hex
Nut, Hex
Screw, Hex Head
Fastener
Crank, Governor
*'* Seal, intake Elbow
Bracket, Carburetor
Switch, Stop
Tube, Fuel intake
KEY
NO.
PART
NO,
634
---
635
670
670A
741
842
843
847
851
869
870
871
66538
280512
493823
262598
280966
272616
495263
493880
213512
213513
262001
63709
262640
493442
281145
281136
397974
496116
491568
281340
94872
94873
94749
495224
493640
498261
499341
498258
922
923
925
930
957
966
967
968
969
971
971A
972
975
977
I036
1095
2500
--
12JB02-2915
498826
RPM Settings:
*
**
"*
MODEL NO. 12H802
TYPE
NO. 1978-E1
DESCRIPTION
*'" Washer, Shaft (Sold in
Kit Only)
Elbow, Spark Plug
Spacer, Fuel Tank
* Spacer, Bracket
Gear, Timing
" Seal, O-Ring
Sleeve, Lever
Tube Assembly, Oil
Terminal, Ignition Cable
Seat, Intake Valve
Seat, Exhaust Valve
Guide, Exhaust Valve
Guide, intake Valve
Spring, Brake
Brake Assembly
Cover, Linkage
Guard, Finger
Cap, Fuel Tank
Base, Air Cleaner
Filter, Air
Cover, Air Cleaner
Screw, Hex Head
Screw, Hex Head
Screw, Hex Head
Tank, Fuel
Bowl, Float
Gasket Set, Carburetor
Label Kit, Emission
Gasket Set, Valve
Overhaul
Replacement Engine
Replacement Shortbiock
Low: 1900-2100;
_3000-3200
High:
Included in Gasket Set (497316)
Included in Carburetor Kit (498260)
included in both Carburetor Kit (496260),
and Carburetor Gasket Set (49826t)
Included in both Gasket Set (497316),
Set (497316) and Valve overhaul
Gasket Set (498528).
NOTE:
45
AI! component dimensions given tn UoS. inches
1 inch = 25.4 mm
46
47
For the repair or replacement parts you need
delivered directly to your home
Call 7 am - 7 pro, 7 days a week
1=800=366=PART
(1-800-366-727B)
Para ordenar piezas con entrega a
domicUio - 1-800-659-7084
For in-house major brand repair service
Call 24 hours a day, 7 days a week
1=800-4-REPAIR
(1-800-473-7274)
Para pedir servicio de reparaci6n
domicilio - 1-800-676-5811
a
For the location of a Sears Parts and
Repair Center in your area
Call 24 hours a day, 7 days a week
1=800-488-1222
For information on purchasing a Sears
Maintenance Agreement or to inquire
about an existing Agreement
Call 9 am -5 pm, Monday-Saturday
1=800-827=6655
When requesting service or ordering
parts, always provide the following
information:
oProduct Type
oPart Number
o Model Number • Part Description
Amenca's
161767
04.29.98
REV.3
VB
Repair Speciat_$_s
Printed
in U.S.A.