1
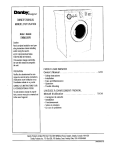
OWNER'SMANUAL
DAR483BL/W
DAR483BLS
Mode!* ModUle, Modelo
ALL REFRIGERATOR
DAR483BL
DAR483W
DAR483BLS
*
•
.
•
•
•
Before Putting Into Use ..........................
Important
....................................
Placing and Installation
.........................
Description of the Appliance
......................
Operation Control ..............................
Use ........................................
.
•
•
.
Maintenance
and Cleaning
.......................
Changing the Direction of opening the Door
Trouble Shooting Guide .................
Bulb Placement
.....................
2
3
4
5
6
8
.........
..........
, ........
9
t0
! 1
12
CAUTION:
Read and follow all safety rules
and operating instructions before
first use of this product.
PRI_CAUTION:
Veuiilezlire attentivementles
consignesde securiteet les
instructionsd'utilisationavant
TOUT RI=FRIGI_RATEUR
•
•
•
•
•
•
Avant la premi&_re mise en service
................
Conseils importants
...........................
Installation et raccordement
... : .................
Description de I'appareil ........................
Commande
..........................
,., .......
Utilisation
..........................
i : .......
!7
18
19
20
.21
23
•
•
•
•
Entretien et nettoyage ..........................
Changement
du sens d'ouverture
de la porte
En cas de probleme
...........................
Pour remplacer la lampe ........................
24
25
26
27
........
l'utitisationinitialede ce produit.
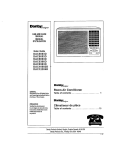
TODA REFRIGERADORA
ADVERTENCIA:
Leay sigatodaslas reglasde
seguridade instrucciones
de
funcionamiento antesde usareste
artefactopor primeravez.
•
•
•
•
•
•
•
•
°
•
Antes de come_zar a usarla .....................
Importante
..................................
Ubicaci6n e instalacion
..........................
Descripci6n del artefacto electrico .................
Controles de operaci6n .......
: .................
Uso .......................................
Mantenimiento
y limpieza
.......................
Cambio de direcci6n de la apertura de ta puerta
Gufa de soluci6n de averias
,., ..................
Cambio de ta bombitla
........................
Danby Products Limited, PC Box 1778, Ontario, Canada
N1N 6Z9
Danby Products Inc., PC Box 669, Findlay, Ohio, USA 45839-0669
......
32
33
34
35
36
38
39
40
,41
.42
"
erator
We
This
hope
Refrigerator
Thank
it will
you for buying
a Danby
successfully
serve
your
is for domestic
Silhouelte
requirements
appliance.
for many
years.
use only and is
intended for storing fresh foods at temperatures
higher than 0°/32°E
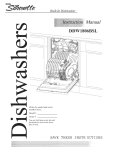
SAVE THESE
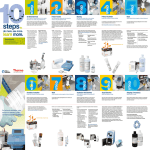
Before
Putting
Into Use
Instructions for Use
We Care for the Environment
.............
Temperature
Selection
2
Use
............................
Storing Fresh Foods
Maintenance
and
Tips for Energy Savings
Important
.......................
Disposing of Worn Out Appliances
Placing
and Installation
............
Choosing the Right Place
Placing the Self-standing
Appliance
Connection to Power Supply
Description
of the Appliance
Operation
Control
.................
INSTRUCTIONS
.........
3
4
5
6
8
Cleaning
..........
Automatic Defrosting of the Refrigerator
Cleaning of the Appliance
Switch Off the Appliance When Not In Use
Changing
the Direction
of
Opening
the Door
................
Trouble-Shooting
Guide
............
9
10
11
Before,,,,,,,puttin 9 Into
• Before connecting
the appliance
to electrical
Use
power
supply, leave it stand for about 2 hours, which will
reduce the possibility of malfunctions
in the cooling
system due to transport handling.
• Clean the appliance thoroughly, especially in the
interior (See Cleaning and Maintenance).
° in case the interior accessories
are not correctly
placed, rearrange them as described
"Description
of the Appliance".
Instructions
These
for
instructions
substantially
in chapter
Use
for use are intended
for the user.
They describe the appliance and correct operating
procedures for safe use.
SAVE THESE
INSTRUCTIONS:
• Our products use environmentally
friendly manner.
Tothis end, individual packaging materials are
clearly marked.
• These instructions are printed either on recycled
paper or chlorine free bleached paper.
• When your appliance finally wears out, please try
not to burden the environment
with it; call your
nearest authorized service agent. (See Disposing
of Worn Out Appliance)
° Try not to open the door too often, especially when
the weather is hot and humid. Once you open the
door, close it as soon as possible. This is especially
important
if you have an upright
model.
• Every now and then check if the appliance is
sufficiently ventilated (adequate air circulation
behind the appliance).
• Set the thermostat from higher to lower settings
as
soon as possible (depends on how loaded the
appliance is, ambient temperatures
etc).
• Before loading the appliance with packages of fresh
foods, make sure that they are cooled to
ambient temperature.
(excluding soups)
• Ice and frost Layers increase energy consumption,
so clean the appliance as soon as the frost layer
is 3-5 mm thick.
• If the gasket is damaged or the door seal is
poor, energy consumption
is substantially
higher. To restore efficiency, replace
the gasket.
• Always consider instrUctions stated in
sections Positioning and Energy Saving
Tips, otherwise the energy consumption
is
higher.
ant
If you have bought this appliance
to replace
an old
one equipped with a door lock that cannot be
opened from the inside (lock, bolt), make sure that
the lock is removed, disabled or destroyed before
discarding. This will make it impossible for children
to accidentally
lock themselves inside the appliance
and suffocate.
The appliance must be properly connected to an
electrical power supply. (See: Connection to
Power Supply).
If the food has a strange smell or color, throw it
away, because it is very likely that it is spoiled and
therefore is dangerous to consume.
Always disconnect the appliance from the power
supply before cleaning the appliance, replacing the
light bulb and / or attempting
repairs. WARNING:
repairs should be preformed by qualified service
personnel only.
Do not defrost the appliance with other electric
appliances
(for example a hair dryer) and never
attempt to scrape/remove
ice/frost with sharp
objects. Use only enclosed tools or tools
recommended
by the manufacturer.
The refrigerating system of the appliance is filled
with refrigerant and oil, so when the appliance is
damaged,
handle it with care and dispose of it in
compliance with environmental
protection
safeguards. (See: We Care for the Environment).
The rating plate containing
Model No/Serial No and
other technical data specific to this unit, is located
either inside the appliance
rear wall.
or outside on the
When your appliance finally wears out, dispose of it
in a safe and harmless manner. If the appliance is
equipped with a door lock that cannot be opened
from the inside (lock, bolt), make sure the lock is
removed, disable or destroyed before being
discarded. This will make it impossible for children
Io accidentally
_nd suffocate.
lock themselves
inside the appliance
The refrigerator
with refrigerant
system of the appliance is filled
and insulating substances which
should be separately treated and processed_ Call
your nearest authorized service agent or
specialized
servicing center, tf you are unable to
locate one, contact your local authorities or your
distributor.
Be careful not to damage the tubes on
the rear wall of the appliance
IMPORTANT
An empty
to children.
refrigerator
(danger of pollution).
WARNING
is a very dangerous
attraction
Remove either the gasket,latches,lids
doors from unused appliances,
action that wil! guarantee
or
or take some other
it harmless.
DANGER:Risk of child entrapment. Before you throw away
your old refrigerator or freezer:
• Take off the doors
• Leave the shelves in place so that children
may not easily climb inside.
DON'T WAIT! DO IT NOW!
Placing
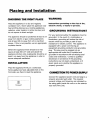
CHOOSING
and Installation
..............
WARNING
THE RIGHT PLACE
Instructions
Place the appliance in a dry and regularly
ventilated room. Never place the appliance near
heat emitting devices (e.g, cooking appliances,
radiators, water heaters or similar devices) and
do not expose to direct sunlight.
electric
pertaining
shock,
GROUNDING
to the
or injury
risk
of fire,
to persons.
INSTRUCTIONS
For your personal safety, this appliance must be
grounded.
In the event of a malfunction or
breakdown, grounding will reduce the risk of
electric shock by providing a path of least
resistance for electric current, This appliance is
equipped with a power cord having an
equipment grounding conductor and grounding
plug. The plug must be plugged into an
appropriate wall outlet that is installed and
grounded in accordance with all existing local
codes and ordinances.
Consult a qualified
electrician or serviceman if the grounding
instructions
are not clearly understood, or if
doubt exists as to whether the appliance is
properly grounded.
The appliance should be positioned at least 3 cm
away from electric or gas cooking appliances
and at least 30 cm away from oil or coal fired
stoves. If this is not possible, use an appropriate
insulation barrier.
Behind the appliance there should be a free
space at least 200 cm 2 wide and above the
appliance kitchen units (cupboards) should be at
least 5 cm away from the appliance in order to
assure adequate ventilation.
INSTALLATION
Place the appliance firmly on a sotid base.
Some appliances have adjustable feet on the
front side; use them to level the appliance.
CONNEXION
TO POWER SUPPLY
Connect the appliance power cord and plug to a _:
properly grounded wall outlet. The required
nominal voltage and frequency are indicated on
the rating plate (inside the unit or on the exterior
rear wall of the unit).
\_
4
"
"
of the
,E
B
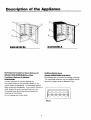
DAR483BLS
DAR483W/BL
(A)Tempered
(Models
Cantilever
Glass
DAR 483W/BL/BLS)
Cantilever
Shelves
DAR452W/BL
Shelves
(3)
or Wire
(2) (Models
(number and type of shelves depends on
the model) Shelf can be optionally placed on the
(B)WhitelBottle
(Model
Rack
DAR483W/BL/BLS
Wine/Bottle
rack is intended
ONLY)
for storage
of bottles.
The wine/bottle
rack can only be installed directly
above the crisper cover as depicted. Fig A.
guides inside the appliance,
it is protected against
being pulled out accidentally.
If you want to remove a
shelf, slightly lift up the front part and pull it out.
Perishable foods should be stored towards the
back/rear of the shelves.
(ie: the cotdest part of the shelf).
Fig A.
(C) Defrost Water Outlet
(E)
The interior of the refrigerator is cooled with a cooling
plate mounted in the rear wall. Under the plate there
is a channel and an outlet for defrost water.
The door liner consists
Regularly
The lower shelf is used for storing large bottles.
check the defrost water outlet and the drain
Door
Illumination
does become
the
use a plastic
straw to clean
(D) Fruit and Vegetable
Crisper
The crisper drawer is on the bottom of the appliance
under the glass shelf. It provides adequate humidity
which has a more
favorable effect on fruits and vegetables
dehydration).
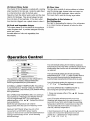
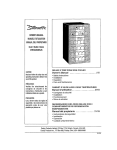
Operation
ELECTRONIC
CONTROL
shelves or holders
in the
Interior
of
Refrigerator
The light for illuminating the interior of the refrigerator
is on, when the door is opened, off when the door
is closed.
(less
Control
OPERATION;
TEMPERATURE
INCREASE
_F
TEMPERATURE
DECREASE
]
L_b DtS_'LAY
O'F
F_RENHE1T MOOE
0 "_
CE_.S]USMO[31_
0
it.
of various
used for storing eggs, cheese butter and yogurt as
well as other smaller packages, tubes, cans etc.
channe_ for blockage. They should always be kept
free and clean of food particles.
If the drain outlet
clogged,
Liner
The LED default setting for the internal (cabinet)
temperature
is the "real time" (ambient) temperature
measured
at the time the unit is connected
or power
is restored.
?
FAHR_IHErr/CE_U_
SELEffIOR
The electronic LED display on this refrigerator
programmed
to display (independently)the
following temperature(only)information,
is
INTERNAL CABINET TEMPRATURE:This
sett{ng
is represented
by a "Steady" state (non-flashing)
LED display and is the normal (LED) default setting
during operation.
SET OPERAT! NG TEMPERATURE:
this setting is
represented
by a "flashing"
LED display and can
only be programmed
(SET) by pressing and
releasing either of the A v
(temperature)keys
during operation.
NOTE:the set temperature
can only be
adjustedlset
while the LED is in"flashing"
mode.
DEFAULT SETTINGS:
When the unit is first
connected to a 120V/60Hz
power supply,
(andtor in the event of a power failure)temperature
settings automatically
revert to the following
default settings:
The LED default setting for the set operating
temperature is 50" F/lO_ C. (after a power failure
has occurred,the
previously
set temperature
is
automatically
erased and will have to be re-set)
The LED default setting for temperature
(° FI ° C)is ° F.(FarenheightScale)
SETTING
setlchange
selection
OPERATING
TEMPERATURE:To
the operating temperature;
1.Press and release
rature)keys.
either
of the
,L v
(tempe-
The LED display will temporrarily
reverl the
(flashing)
set temperature
for approximately
5
seconds.
(if you fail to set/change
the operating
temperature
within this 5 second period,the LED
will automatically
revert back and display the
internal (cabinet) temperature.
2.Each depression
of the ._ key (during flashing
mode) wilt increase the temperature increm
enlally by 1° (temperature
ranges between
636"
F~46 ° F/2 ° C-8 ° C)
3.Eachdepressionof
To turn "OFF" the refrigerator
permanently,
you
must disconnect
the power cord from the electrical
outlet. There is no "off" position(setting)
available
on the electronic
control panel.when
the refrigerator
is notto be used fora long period of time,
disconnect
the plug and leave the door partially
open.
the V key (during flashing
mode) will decrease the temperature
incrementally
by 1 ° (temperature
ranges between 36 ° F-46 °
F/2 ° C-8 ° C) display for approximately
5 secconds
after the selection
is made,then
revent back to
display the internal(cabinet)
temperature.
TEMPERATURE
SELECTION
(° F/° C): This unit
can display temperatureson
the "Farenheight"
or"
Celsius" scale. Press the temperature
selector
keypad to alternate
betwen ° F/° C scale. The
"blue" indicator
light adjacent to the corresponding
mode will illuminate
to signify the selection
made.
NOTE:wait
operation
DEFROSTING
Your retrigerator
is designed with an "Auto-Cycle"
defrost system .What is Auto Cycle defrost?
The refrigerated
surfaces of the fresh food comp
artment defrost automatically,
during the "off" cycle
of the cold control.(thermostat)
Defrost water from
the fresh food compartment
is disposed of
automatically,
by means of being channeled
onto
a drip tray located on the compressor.
Heat
transter from the compressor
causes the defrost
water to evaporate.
7
3 to 5 minutes before
has been interrupted
restarting
if
Use
Storing
Proper
Fresh
• Crispy
Foods
use of the appliance,
adequately
coldest
packed food,
correct temperature and taking into account hygienic
precautions will substantially
influence the quality of
the food stored.
• Foods to be stored in the refrigerator
should be
properly packed so as to prevent mixing various
moisture degrees and odors (in polyethylene bags
or sheet, aluminum foil, wax paper, or stored in
covered containers or bottles).
• Before storing food in the refrigerator, remove
excessive packaging (like yogurt in multi-package)
• Pack systematically
and make sure that
foodstuffs do not touch each other (various odors
may mix). Assure adequate
around packages.
• Never store flammable,
explosive
air circulation
volatile
or
substances.
• Beverages with high alcohol percentage
be stored in tightly sealed bottles in
vertical position
• Food should
shall
not touch the rear wall of
the refrigerator
• Foods should be cooled
down before storing.
and delicate
foods should
be stored in the
parts of the refrigerator
• Try not to open the door too often
• Set'the
thermostat
temperatures
to a setting
are reached.
where lowest
Set the thermostat
gradually so as to avoid freezing of foods
Use a
thermometer
and measure the temperature
in the
individual compartments
Place the thermostat in a
glass vessel filled with water. Temperature
readings
are most reliable a few hours after a steady state
condition
is reached.
• Some organic solutions like volatile oils in lemon
and orange peel, acid in butter etc. can cause
damage when in contact with plastic surfaces or
gaskets for long periods of time
• Unpleasant
odors inside the refrigerator is a sign
that something is wrong with foods or that your
refrigerator
needs cleaning.
Unpleasant odors can
be eliminated
or reduced by washing the interior of
the refrigerator with mild solution of water and
vinegar.
We also recommend
using activated carbon
filters to clean the air or to neutralize odors.
• If you are planning a long journey, make sure to
remove perishable articles of food out of the
appliance
before you leave.
Maintenance
Aut0matic
D frosting
There is no need to defrost
ice depositing
automatically.
and
Of the
the refrigerator,
because
on the inner back wall is defrosted
Ice build-up on the inner back wall during the
compressor
operation; will (when the compressor
has
i cycled off) defrost automatically.
Defrost water
collects inside the drain through passing through the
drain outlet in the inner back wall into a drain pan
situated above the compressor, from where it
evaporates.
Disconnect the power bar before cleaning
the appliance.
i Do not use coarse or aggressive cleaning agents as
you can damage the surface.
Clean the exterior with water and detergent.
Remove the detachable accessories in the interior of
the appliance and clean with water and liquid
detergent. Plastic parts cannot be washed in
Jishwashers.
¢Vash the interior of the appliance with lukewarm
t_ater, adding one or two spoonfuls of vinegar.
! &fter cleaning,
_nd reload it.
connect
the appliance
to power supply
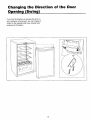
Changing
the
Direction
"
If you find the direction
of opening
the door on
your appliance inconvenient,
you can change it.
Holes on the opposite side have a_ready been
prepared in the factory.
10
of the
Door
Trouble.Shootin
Guide
Sometimes you may come across minor problems
that in most cases do not require a service call and
can be easily eliminated. The problem may have
resulted from improper handling and/or installation
of
the appliance. Please refer to the below troubleshooting guide to assist you in identifying the
possible cause and solution to your problem. Should
the problem still persist after cornpteting these
checkpoints. Contact the closest authorized service
agent in your area for assistance.
The Appliance
Fails to
Operate
After
Connecting
Electrical
Power
Supply
• The door is frequently
to
Cooling
of the
Inner
(3-5 ram), ice should be manually
Disconnect
from
the power
the electriced
After defrosting
position
is made
whatsoever
on the lifetime of the appliance.
• After
starting
the appliance,
the operation of
the compressor
and the refrigerant flow may be
louder, which does not mean that something is wrong
with the appliance and it has no influence on the
Jifetime of the appliance. Gradually the is noise
reduced.
unusual
and
louder
noise is heard,
which is rather unusual for the appliance. This noise
is often a consequence
of inadequate installation.
-The appliance must be level and installed on a firm
solid base/floor.
-It should not touch the walt or kitchen
next to it.
-Check the accessories
on the interior
units standing
of the
appliance, they should be placed correctly in their
positions; also check, bottles, tins, and other vessels
cord
outlet
is complete,
appliance
noise of the liquid is heard and when the compressor
is not operating, the refrigerant flow is heard. This is
a normal condition and it has no influence
• ,Sometimes
As long as the defrost water runs to the channel and
through the outlet to the drain pan on the
compressor, automatic defrosting of the appliance
is assured.
In case the ice formation on the inner back wall is
increased
defrosted.
in a refrigerator-freezing
possible by cooling the system using a compressor,
which will produce certain noise levels. How noisy the
appliance is depends on where it is placed, how it is
used and how old the appliance is.
• During
the operation
of the compressor
the
may be inadequate ventilation of the
(assure adequate air circulation).
on the
the
Noise
opened or left open for
ice Formation
Rear Wall
From
ptastic straw.
° Manually defrost the increased ice layer. See
"Ice Formation on the Inner rear Wall"
too long.
* The door is not properly closed (the door may sag,
the gasket may be polluted or damaged).
. Perhaps you may have overloaded the appliance
with fresh foods.
. The reason
compressor
Water
is Leaking
Refrigerator
If the discharge
water outlet is clogged, or the
defrost water drips over the channel, water will leak
from the refrigerator.
• Clean the clogged outlet, for example with a
• Check the power cord is properly connected.
• Check the power supply in the electrical outlet.
(blown fuse / circuit breaker)
• Make sure the appliance is switched on.
(thermostat knob in operating position)
Continuous
Operation
Cooling System
increased ice formation may be one of the following:
the door does not seal well (clean the gasket if it is
contaminated,
or replace it if it is damaged);
-the door is frequently opened or left too tong;
-the food stored in the refrigerator was warm;
-the food or dish is touching the inner back wall.
are not touching each other causing
and/or vibrations.
turn the knob to desired
and close the refrigerator
door.The
cause of
tl
rattling
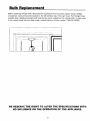
Bulb
Before replacing the light bulb, disconnect the appliance from the
screwdriver, remove the screw located on the left (center) side of
straight down. Replacement light bulb must be the same wattage
If you cannot locate this size bulb locally, contact Danby's tol! free
power supply. Using a phillips
the light cover. Pull the light cover
as the original bulb.(15 watts only)
number 1-800-26-DANBY.
1
WE RESERVE
THE
HO INFLUENCE
RIGHT
TO ALTER
THE SPECIFICATIONS
ON THE OPERATION
OF THE APPLIANCE.
12
WITH
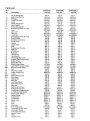
Parts List
Illus.
No.
1
1A
1B
1C
ID
1E
1F
1G
1H
11
2
3
4
5
6
8
9
11
12
13
14
15
17
18
19
20
21
22
23
24
25
26A
26B
27
28
29
30A
30B
30C
31
32
33
34
35
36
37
38
39
40
4t
42
43
44
45
46
47
48
49
50
51
52
53
54
Description
DAR483W
Part No.
DAR483BL
Part No.
DAR483BLS
Part No.
Upper Storage Bin
Bottle Shelf Washer
Bushing
CANSTOR shelf
Cover
Middle Storage Bin
Door Gasket
Bottom Storage Bin
Self Tapping Screw for Liner
Door
Door Liner
Table top
Touch pad
Self Tapping Screw for Liner
Dispray Board
EFectronic control box
Power board
Washer
Upper Hinge
Bulb
Accessories Of Lamp
Reflector
NTC senser
Bulb Box
Lamp Cover
Lamp Switch
Thermostat Box Cover
Support Plate(Lower Hinge)
Bottom Hinge
Adjustable Foot
Bottom Hinge Screw
Lock Washer (Lower Hinge)
Bushing (Lower Hinge)
Foot
Fixed Foot Screw
Power Supply Cord
Cdsper
Glass Crisper Cover
Wine Rack
Glass Shelf
Wire Clip
Load Wire Clamp
Wire Clamp Screw
SpHc Box
Earthing Wire Screw
Compressor Support
Compressor Support Screw
Compressor Bolt Washer
Suction Tube Sleeve
Spring Washer
Fixing Screw
Compressor
Starter relay
Cover
Dryer
Evaporator
Door Hinge Cover
Thermostat Sleeve Screw
Thermostat Sleeve
Fixed Table Top Screw
Support Foam
Screw
Support board
432.1A
483.01A
483.01B
483.01C
483.01D
431,1B
432.4(LG)
432.IC
483.01H
483.52(W)
483.02
483.03(W)
483,04(W)
483,05
483.06
483.08
483.09
432.10
432.11
452.12
452.13
452.15
483.t7
483.!8
452.19
452.18
483.21
432.18
432.17
432.19
432.20A
432.20B
432.20C
432.21
432.22
99352_03
432.24
482.28
482.35
482.32
432.26
432.27
432.28
432.32
432.31
99352.51
432.38
99352.08
99352.09
99352.10
99352.11
99352.!2
99352,13
99352.14
432.47
452.52
432.54(W)
432.50
432,51
432,9
483.52
432.7
432.8
432.1A
483.01A
483.01B
483.01C
483.01D
431,1B
432.4(CG)
432.1C
483.01H
483.52(BL)
483.02
483.03(BL)
483.04(BL)
483,05
483.06
48&08
483.09
432.10
432.11
452.12
452.13
452.15
483.17
48&18
452.19
452.18
483.21
432.18
432.t7
432.19
432.20A
432.20B
432.20C
432,21
432.22
99352.03
432.24
482.28
482.35
482.32
432.26
432.27
432.28
432.32
432.31
99352.51
432.38
99352.08
99352.09
99352.t0
99352. ! 1
99352.12
99352,13
99352,14
432.47
452.52
432,54(BL)
432.50
432.51
432,9
483.52
432.7
432.8
432.1A
483.01A
483,01B
483.0tC
483.01D
431.1B
432.4(CG)
432.1C
483.01H
483.52(SS)
483.02
483.03(BL)
483.04(BLS)
483,05
483.06
483.08
483.09
432.10
432.11
452,12
452,13
452.15
483,17
483.18
452.t9
452.18
483.21
432.18
432_17
432. !9
432.20A
432.20B
432.20C
432.21
432.22
99352.03
432.24
482,28
482.35
482,32
432.26
432,27
432.28
432.32
432.31
99352.51
432,38
99352.08
99352.09
99352.10
99352.1 t
99352.12
99352,13
99352.14
432,47
452.52
432.54(BL)
432.50
432.51
432.9
483.52
432.7
432.8
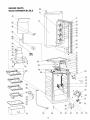
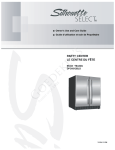
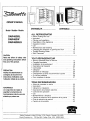
13
REPAIR PARTS
Model DAR483W/BL/BLS
\
I
I
I
I
I
I
I
t
I
I
1
I
/
I
\
//'
@
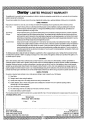
LiMiTED PRODUCT WARRANTY
Thisqualityproduct
iswarranted
tobefreefrommanufacturer's
defects
in material
andworkmanship,
provided
thattheunitisusedunderthenormaloperating
conditions
intended
bythemanufacturer.
Thiswarranty
is available
onlytotheperson
towhomtheunitwasoriginally
soldbyDanbyorbyanauthorized
distributor
ofDanby,
andisnon-transferable.
TERMSOFWARRANTY
Plasticpartsfie.evaporator
door,doorrails,covers
andtraysarewarranted
forthirty(30)daysonlyfrom
purchase
date,withnoextensions
provided.
First2 Years
Dudng
thefristtwoyears(2),anyelectrical
padsofthisprouductfoundtobedefective,
including
anysealed
systemunits,wilt
be
repairedorreplaced,
atwarrantors
option,atnochargetotheORIGINAL
purchaser.
Consumable
partsfie,Ughtbulbs)arenot
warranted
orguaranteed
foranylengthoft_me_
ThirdThrough
Fifthyear
Duringthenextthreeyears(3),anypartofthesealed
systemfoundtobedefective
(consisting
ofcompressor,
condenser,
evaporator,
dryerandat!relatedtubing)willbereplaced
withoutcharge.Thepurchaser
shal_
payforaltlabourandreturnfreightduringthisthree
year(3)periodforrepairorreplacement
ofanyseatedsystem
components.
Anyunitbeingdiagnosed
asnon-functional
duetosealed
system
failureandwarranting
anexchange
duringtheexisting
three(3)yearswillbesubiecttoanappropriate
depreciation
or userfee,
including
anyandallfreightcharges
beinglevied
againsttheconsume_
ToobtainService
Danbyreserves
therighttolimitboundaries
of"lnHomeService"
duetotheproximity
ofanAuthorized
ServiceDepot.Anyappliance
requiring
service
outsidethelimitedboundaries
of"InHomeService",
it wil!bethecustomer's
responsibility
totransport
theappliance
to
theclosestAuthorized
Service
Depotattheirownexpense.
Contact
yourdealerfromwhomyourunitwaspurchased,
or contact
your
nearest
authorized
Danbyservice
depot,
whereservicemustbeperformed
bya qualified
service
technician.
If service
isperformed
on
theunitsbyanyone
otherthananauthorized
ser_cedepot,or theunitisusedforcommerdat
application,
allobligations
ofDanbyunder
thiswarranty
shallbeatanend.
Thefollowing
clausereferstosingleanddoubledoorrefrigerators,
supplied
withorwithout
a separate
freezersection.Nothing
withinthiswarranty
shallimply
thatDanbywit]beresponsible
or liableforanyspoilage
ordamagetofoodorothercontents
ofthisappliance,
whether
duetoanydefectoftheappliance,
or its
use,whether
properorimproper.
EXCLUSIONS
Saveashereinprovided,
DanbyProducts
Limited(Canada)
or DanbyProducts
fnc.(U.S.A.),
therearenootherwarranties,
conditions,
representations
or
guarantees,
express
or implied,
madeor intended
byDanbyProducts
Limited
oritsauthorized
distributors
andallotherwa_'ranties,
condilions,
representations
or
guarantees,
including
anywarranties,
conditions,
representations
or guarantees
underanySe)eof Goods
Actorlikelegislation
orstatueishereby
expressly
excluded.
Save
ashereinprovided,
DanbyProducts
Limited(Canada)
orDanbyPred_JCtS
tnc.(U.S,A),
shallnotberesponsible
foranydamages
to persons
or
property,
including
theunititself,
howsoever
causedoranyconsequential
damages
arisingfromthemalfunction
oftheunitandbythepurchase
oftheunit,the
purchaser
doeshereby
agreetoindemnify
andsaveharmless
DanbyProducts
Limited
fromanyclaimfordamages
to persons
orproperty
causedbytheunit.
GENERAL
PROVISIONS
Nowarranty
orinsurance
hereincontained
or setoutshallapplywhendamage
orrepairiscausedbyanyofthefollowing:
1) Power
Failure.
2) Damage
intransitor whenmoving
theappliance.
3) Improper
powersupplysuchaslowvoltage,
defective
housewiringor inadequate
fuses.
4) Accident,
alteration,
abuseormisuse
oftheappliance
suchasinadequate
aircirculation
intheroomorabnormal
operating
conditions,
(extremely
highorlowroomtemperature).
5) Useforcommercial
orindustrial
purposes.
6) Fire,waterdamage,
theft,war,riot,hostility,
actsof Godsuchashurffcanes,
floodsetc.
7) Service
callsresulting
incustomer
education.
Proofof purchase
datewit!berequired
forwarranty
claims;so,pleaseretainbillsofsale.tntheeventwarranty
serviceisrequired,
present
thisdocument
toour
AUTHORIZED
SERVICE
DEPOT.
Warranty
Service
Wilh-ln
CanadaWith-inUnitedState
in Home
DanbyProductsLimited
PCBox1778,5070Whitelaw
Road,
Guelph,Onta_'io,
Canada NIH 6Z9
Telephone:(519)837-0920FAX:(519)837-0449
tnHome
08iO0
DanbyProductstnc.
PCBox669,101BentleyCourt,
Findlay,Ohio,U.S,A.45839-0569
Telephon_:(419)425-8627FAX:(4!9)425-8629