1
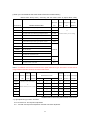
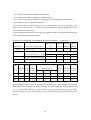
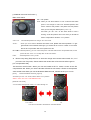
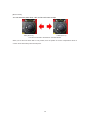
INON D-2000 Underwater S-TTL Strobe
User Manual
[Advance manual]
This manual is translated and rewritten the INON D-2000 manual , Japanese version by Yuzo Kanda. So if
you have any question, comments or suggestion regarding this manual then do not ask to INON Japan or
INON America Inc, please contact Yuzo Kanda (Naturephoto KANDA Co.ltd / uwdigitalcamera.com)
[email protected]
http://www.uwdigitalcamera.com
Please read basic manual before you read this manual.
TABLE OF CONTENTS
What is “STTL”
・・・2
What is External AUTO
・・・3
[ additional / slave strobe ]
・・・3
STTL corresponding camera
・・・4
Advanced cancel circuit
・・・5
Confirming useable function with you camera
・・・6
How to use External Auto Flash Exposure Adjustment mode
Camera system preparation
・・・7
Operation on D-2000
・・・7
Troubleshooting: External Auto Flash
・・・8
Strobe position and beam angle
・ ・ 10
When you use D-2000 as the slave strobe of the other master strobe
・ ・ 11
When you use D-2000 with a compatible SLR housing or camera
・ ・ 12
Additional manual of the function
Main mode switch
・ ・ 13
EV compensation dial
・ ・ 13
Specifications
・ ・ 15
1
[ What is S-TTL ]
Newly developed "S-TTL" is TTL-AUTO. D-2000 is controlled by camera to obtain accurate exposue in
which CCD measures D-2000 strobe light coming through camera lens. So S-TTL is free from influence of
conversion lens or filters which affects angle of view or f -number of lens.
Only the difference from genuine strobe of camera manufactures is that S-TTL employs optical signal
instead of electrical signal. The optical synchronous signal is Infrared ray(lR) created by Clear Photo
System by cutting visible light from built -in strobe light.
IR enables to catch optical synchronous signal "outside" of transparent housing so water-tight synch
connector is not necessary like a strobe which requires electrical TTL signal. S-TTL transmit optical signal
to D-2000 through durable multi-core fiber optics. All pre-flash type digital camera is compatible with
D-2000 when using in transparent housing. Since S-TTL employs optical signal, in theory, it is possible to
have numbers of strobes connecting via fiber optics in TTL-AUTO. S-TTL is ideal strobe system under
severe condition since it can freely uninstall underwater, has wide compatibility and has accurate exposure
even in multi strobe configuration.
S-TTL is compatible with pre-flash type digital
camera. Pre-flash is faint flash measuring exposure
value before main flash. In S-TTL system, D-2000
emits pre-flash and main flash same as genuine
electrical signal based TTL auto-strobe, which
acquires accurate exposure. *In principle, S-TTL is
compatible with a non pre-flash type camera.
However strobe light may be blocked before
reaching to strobe light-sensor on a camera
depending on housing shape or conversion lens
and unable to calculate correct exposure.
What is “S” for S-TTL, Proper name of S-TTL is Optical Synch. TTL. "S" stands for Synchronization. The advantageous
features of underwater TTL-AUTO photography; versatility, reliability and operationality is exerted by optical synch. signal.
Thus we named S-TTL.
[ S-TTL compatible camera ]
Existing other External Auto Strobe is hard to use with Olympus μ 10/15/30, Canon IXY400/450/500, Nikon
CP4100/ 4200 / 5200 which categorized consumable auto digital camera without settable aperture function.
(explained at later) Since S-TTL is TTL-Auto, accurate exposure image can be easily and surely taken by
just only pressing shutter release button. Any digital camera which can emit pre-flash underwater can
receive benefit of S-TTL regardless of manufacture, model or shooting mode. S-TTL offers wide variety for
selecting your digital camera. All Digital Camera System (*2) which has available INON AD Mount System
or M67 Mount System, is compatible with S -TTL. (*2: except Fuji film F710)
2
[ Why External Auto strobe is hard to use for Auto digital cameras ]
Auto-mode specialized digital camera likeμ 10/15/30, IXY400/450/500, CP4100/4200/5200 doesn't display
aperture setting on it. The hard part is to synchronize aperture value of external strobe with "guessed"
aperture value of a camera which is variable at the time of shooting. Moreover μ 10/15/30 and
CP4100/4200/5200 can not fix ISO sensitivity which makes external strobe setting extremely difficult.
External Auto Strobe having multi step aperture setting could be little bit easier for aperture setting range at
the strobe. But it would be rather difficult with single / few aperture setting on external strobe since it needs
to adjust exposure by zooming or using diffuser. In that case it will be obvious that Auto shooting getting
much harder.
[ What is External Auto ]
External auto strobe has a sensor to measure reflected light on its front side. So it needs to synchronize
aperture value on the strobe with aperture value on a camera before pressing shutter since the external
auto strobe doesn't measure strobe light through CCD Iike S-TTL.
D-2000 is equipped with 24 steps aperture setting function which enables to control shadow for
sophisticated lighting requires delicate aperture setting.
[ Problem of External Auto Strobe ]
External Auto Strobe needs to " face " to a subject since it has light sensor at front side. If a strobe does not
properly face to a subject, reflected strobe light can not reach to the sensor and fail to get a image of
accurate exposure. D-2000 is equipped with Focus Light for focusing and strobe positioning. Once
adjusting the position of D-2000 so that spot light from Focus light place in the center of LCD, D-2000
should face to a subject and you will get image with accurate exposure. Focus Light will automatically turn
off when pressing shutter release button. So flat spot on a ima ge will not happen.
[ additional / Slave strobe ]
Slave Strobe employs a sensor measuring built-in flash light amount and emits light synchronized with built-in flash. So
slave strobe works as fill in light while built-in flash works as primary light source.
Bult-in flash light shines on a subject and will eliminate modeling effect of external strobe. In case of poor visibility,
suspended particles may be exposed on a image and clear image could be hard to get
3
[ How to use S-TTL ]
Please refer “ Basic manual “. And please check your camera is compatible with Light adjustment type
“P-TTL” using group chart of the next page.
Light
Aperture
adjustment Settable displayed Settable
Manufacturor
OLYMPUS
camera model
housing
type
ISO
in LCD
Aperture
C-200Z,C-300Z
PT-009
P-TTL
◯
×
×
µ -30,25,25,15
PT-016
P-TTL
×
×
×
µ -40
PT-026
P-TTL
◯
×
×
C-40Z
PT-012
P-TTL
◯
◯
◯
X-2,X-1
PT-014
P-TTL
◯
◯
◯
X-3
PT-024
P-TTL
◯
◯
◯
C-755,745,750,740
PT-018
P-TTL
◯
◯
◯
C-770,760
PT-022
P-TTL
◯
◯
◯
C-3030,3000,2020
PT-005,007,010
P-TTL
◯
◯
◯
C-3040,2040
PT-007,010
P-TTL
◯
◯
◯
C-4040,4100
PT-010
P-TTL
◯
◯
◯
C-5050 *1
PT-015
P-TTL
◯
◯
◯
C-5060 *1
PT-020
P-TTL
◯
◯
◯
C-8080 *1
PT-023
P-TTL
◯
◯
◯
*1 When you use it with slave flash mode
R-M
◯
◯
◯
Canon
IXY D300
WP-DC100
P-TTL
×
×
×
IXY D300a
WP-DC500
P-TTL
◯
×
×
IXY D500,D450,D400 WP-DC800
P-TTL
◯
×
×
A20,10
WP-DC200
P-TTL
×
×
×
A40,30 *2
WP-DC200s
P-TTL
◯
×
×
A70,60 *2
WP-DC700
P-TTL
◯
◯
◯
A80 *2
WP-DC900
P-TTL
◯
◯
◯
A85,75 *2
WP-DC30
P-TTL
◯
◯
◯
A95 *2
WP-DC50
P-TTL
◯
◯
◯
S50,45,S40,S30 *2
WP-DC300
P-TTL
◯
◯
◯
S1IS *2
WP-DC20
P-TTL
◯
◯
◯
4
*2 When you use it with Manual mode
Nikon
R-M
◯
◯
◯
E4100,3200,2200
WP-CP1
P-TTL
×
×
×
E5200,4200
WP-CP2
P-TTL
×
×
×
Fuji
F710
WP-FX701
R-S
◯
◯
◯
SONY
P100
MPK-PHB
P-TTL
◯
◯
◯
P-TTL:Pre-flash TTL Auto Exposure Adjustment
R-M
:Manual Flash Exposure Adjustment ( without pre -flash )
R-S
:Real Time Auto Exposure Adjustment / External Auto Flash Adjustment ( without pre-flash )
[ Advanced Cancel Circuit ]
When you use the D-2000 with a camera that Light adjustment type is “R-M”, “R-S” or “R-TTL: Real time
TTL Auto Exposure Adjustment” ( at the case of using the D-2000 as the slave strobe of the other master
strobe or connect with SLR housing or else: refer page, 10-11 ) you should set the magnet in Advanced
Cancel circuit switch and make it off .
Turn the Advanced Cancel Circuit to OFF by installing the magnet into the Advanced Cancel Circuit Switch.
1) Insert the magnet into the Advanced Cancel Circuit Switch hole.
2) Thread in and screw down the Magnet Switch Screw.
Caution: Do not screw down the Magnet Switch Screw too tight.
It may damage the strobe, and always use the “Magnet screw tightner”
as shown in picture.
It is no needs to install the magnet for other group cameras or strobes
like “P-TTL”, leave the Advanced Cancel Circuit “ON”.
Always turn main mode switch OFF when you set the Advanced Cancel Circuit, On or OFF.
5
Confirming useable function with you camera
Confirm the D-2000 functions possible with your camera system. For camera system not listed in this chart,
try shooting some test images to confirm functionality.
Aperture
Light adjustment
type
Advanced
Settable displayed Settable
Cancel
Clear photo Focus light
in LCD
Aperture
S-TTL
Ext.Auto
Manual
Circuit
System *2
Function
◯
◯
◯
◯
◯
◯
◯
◯
◯
◯
◯
×
◯
◯
◯
◯
◯
◯
◯
×
×
◯
◯
*1
◯
◯
◯
◯
×
×
×
◯
◯
*1
◯
◯
◯
◯
R-M
◯
◯
◯
×
◯
◯
un-necessary
◯
△
*3
or
◯
◯
×
×
◯
◯
un-necessary
◯
△
*3
R-S
◯
×
×
×
◯
*1
◯
un-necessary
◯
△
*3
×
×
×
×
◯
*1
◯
un-necessary
◯
△
*3
P-TTL
ISO
Strobe function
Useable functions when using with digital camera
*1) For External Auto with digital cameras that do not indicate Aperture value on the LCD panel, or the
ability to set ISO value, refer to your camera manual and determine the “Effective Aperture value range”
and “Effective ISO sensitivity range”
*2) “Clear photo system” possible when using optional “ Optical cable kit “ available for various specific
camera/housing configuration.
*3) It is possible that light from the Focus Light may expose the image. We recommend first turning the
Focus Light OFF before releasing the shutter.
6
How to use External Auto Flash Exposure Adjustment mode
[ Camera system preparation ]
When you will not use “S-TTL” auto mode with digital cameras, make the following three setting.
1.
Set the camera’s built-in strobe mode to “ force-flash” or similar mode where flash will always fire.
2.
When using the D-2000’s External Auto Flash Exposure Adjustment Auto, it is necessary to pre -set the
camera’s ISO sensitivity, shooting mode and Aperture value to suit the conditions to your shooting
situation.
3.
Also, to have correct exposure depending on the subject reflectivity or conditions, it may be necessary
to use exposure compensation on the camera and flash power compensation on the D -2000.
For details on how to set the ISO sensitivity, shooting mode or aperture setting for your camera, refer to your camera
manual.
When D-2000 is configured with digital cameras it is necessary to set the D-2000's Aperture Value to match
the camera's aperture value setting, when the camera's ISO sensitivity is set to a base-line ISO 100. We
recommend setting the camera as follows, as an initial standard setting.
1.
Set the camera's ISO sensitivity to "ISO 100" on camera's that allow such setting.
2.
Set the camera's "Shooting Mode" to a mode that allows setting the Aperture Value, if your camera
allows such setting
3.
Set your camera's Aperture Value to a value that reflects your creative intent and the requirements of
your particular imaging situation.
4.
Set the camera's "Flash Mode" to "force-flash", "fill-in-flash" or "anytime flash"
5. As necessary, set camera exposure to -1EV to -2EV, especially for macro imaging.
[ Operation on D-2000 ]
1.
Main mode switch set at “AUTO” position.
2.
Set the same aperture value on D-2000 with EV compensation dial ( indicated “green” letters f
numbers) f1.4 – f11, you can select and use the one from 12 steps f stop.
3. And you can use +1/4 compensation switch, too. If you set this switch on then the strobe power will be
controlled lighten +1/4EV ( a slight br ighter)
+1/4 switch OFF
+1/4 switch ON
Wrong position
After setting the strobe and shooting some images it is possible to adjust further as follows.
After taking the image and reviewing it on the LCD monitor, in accordance with your intended results and
the shooting conditions, adjust the camera's aperture value, the camera's exposure compensation (on
7
camera's that allow this), and or the D-2000 flash output compensation. For camera's that do not allow
setting the ISO sensitivity or do not have a Shooting Mode that allows setting the aperture value, refer to the
camera's LCD monitor display, the camera manual and the lens specifications as printed on the lens itself.
We recommend checking this information .
(a)
ISO sensitivity effective range, (b) Largest “F” value (c) Smallest “F” value
Easy way to correct the exposure level:
If the result is too bright than your intention, then turn the EV compensation dial to “Left:Darken” without
modification of camera’s f stop. On the other hand, if the result is too dark than your intention, then turn the
EV compensation dial to “Right:Lighten” without modification of camera’s f stop.
And Please correct the brightness of your camera’s LCD monitor
[ Troubleshooting External Auto Flash ]
When using strobes, depending on the particular shooting conditions, subject characteristics and desired
image characteristics, it is very important to consider the total light of, and balance between both the natural
ambient light and the strobe light. Also, it is necessary to keep in mind the general characteristics of digital
cameras and how the D-2000 handles external auto flash.
Here are some common situations, with causes and possible solutions.
1) Macro photographing
Problem :
Blooming, image highlights washed out, overexposed, too bright.
Cause 1 :
Because the amount of strobe light exposing the subject is small, the proportion of natural Iight
reflecting off the subject is greater. After the strobe stops firing, when it thinks proper exposure
has been reached, natural light continues to expose the subject until the camera shutter closes,
and the digital camera's exposure latitude is overcome.
Solution:
Adjust camera to minus compensation, for example, from 0EV to -2 EV, etc.
Solution:
If using Aperture Priority or Manual Mode, step down aperture on camera, for example from f/4.0
to f/8.0 or f/11 etc.
Solution:
If using Manual Mode, increase shutter speed, for example from 1/60 to 1/125 or 1/ 180etc.
Cause 2 : When subject has depth there is a difference light amount reaching the front and back, causing
overexposure on the front or foreground, overcoming the digital camera's exposure latitude.
Solution : Adjust strobe to minus compensation, for example if the camera aperture is f/8.0, set the strobe to
f/5.6 or f/4-1/2 etc.
Solution : Using strobe arms, move strobes farther away from subject to reduce amount of light reaching the
subject.
Solutron : Attach optional D-2000 diffuser panel ( External auto mode compatible type) to strobe to
decrease flash output.
8
2) Mid-range Subject Imaging
Problem :
Blooming, image highlights washed out, overexposed, too bright.
Cause
If the subject only covers a small portion of the frame, such as a small fish with an open water
:
background, only a small amount of light will be reflected off the subject and back to the
D-2000's light sensor. The strobe, sensing very little reflected light (under exposure) will try to
emit more light than necessary, and overexpose/wash -out the subject. This is a difficult situation
for any camera / strobe system.
Solution :
Adjust strobe to minus compensation.
Solution :
As needed, set camera's exposure compensation.
3) Using Multiple Strobes (including camera's internal strobe)
Problem:
Blooming, image highlights washed out, overexposed, too bright.
Cause
The total possible minimum light output from the combined strobe system (external strobe(s) +
:
internal strobe) is too great at close distances, causing the close end (nearest the carnera) of
the effective flash exposure range to lengthen out, away from the camera. Subjects close to the
camera/flash will receive too much light and be overexposed. This is particularly the case for
camera's having internal strobes with relatively large minimum possible flash output. For such
cameras we recommend placing Clear Photo System film over the internal strobe when using
external strobe(s).
Solution 1 : Use INON "Clear Photo System"
Solution 2 : Step down camera's aperture value.
Solution 3: Adjust strobe to minus compe nsation.
Solution 4: Using strobe arms, move strobes farther away from subject to reduce amount of light reaching
the subject.
Cause
:
When using strobes other than D-2000 as TTL slave strobes ,making proper exposure difficult
or not possible.
Solution :
Use D-2000.
* INON has confirmed the compatibility of TTL slave, only combinations as follows (at Oct.2004)
Master strobe : INON D-2000
TTL slave strobe: INON D-2000, Z-220 or Z-220s
But INON Z-220 which was released on early stage ( the serial number is before #D030560 )
does not have the perfect compatibility on TTL slave with D-2000. at this case, please use Z-220
with the diffuser panel –3,-1.5 or Adjust strobe to minus compensation.
9
4) Distant Subject Photographing
Problem : Subject is underexposed, too dark.
Cause
: Subject is too far away, beyond strobe's effective range so adequate light is not reaching subject.
Solution :
Move closer to subject, to within the strobe's effective range.
5) Advanced Techniques (slow synch / using auxiliary strobes)
Problem : Blooming, image highlights washed out, overexposed, too bright.
Cause
: The proportion of exposure due to natural light is comparatively greater so that even after the
strobe stops firing at what it thinks is "proper" exposure, the shutter is still open adding natural
light exposure, causing total exposure to exceed the camera's exposure latitude.
Solution1 : Adjust strobe to minus compensation.
Solution 2: Adjust other shooting parameters on the camera .
6) Advanced Techniques (back-light subjects)
Problem : Difficulty to achieve intended image.
Cause
: The balance of natural light to strobe light is improper for the camera shooting parameters .
Solution : Set strobe flash output compensation and camera exposure compensation according to the
subject reflectivity, background brightness and to what degree the subject fills the frame. In
general, set camera exposure to plus (+) compensation and strobe flash output to minus (-)
compensation.
[ Strobe position and beam angle ]
When you use the D-2000 at “External Auto Flash” mode, as the strobe is positioned farther away from the
camera ( the angle between lens axis and the strobe becomes greater), depending on the subject and
shooting conditions, the subject reflectivity that camera measures compared to what the D-2000’s light
adjustment sensor measures could be very different and “correct” exposure may not be obtained using
External Auto. In such case, compensate flash output by adjusting D -2000 EV compensation dial.
10
[ When you use D-2000 as the slave strobe of the other master strobe ]
Master strobe Group Chart ( connecting with the master strobe by Optical Slave cable)
Light
Aperture
adjustment Settable displayed in
Master strobe model
Manufacturer
INON
type
ISO
LCD
Settable
Aperture
D-2000 w/pre-flash type digital camera
P-TTL/M Depending on the camera system
D-2000 w/in all other camera
R-TTL/M
or
D-180/D-180S w/pre-flash type digital camera
P-S/M
master strobe you are using
D-180/D-180S w/in all other camera
R-S/M
Z-220/Z-220S with Focus light controller
R-TTL/M
Z-220/Z-220S w/pre-flash type digital camera
P-M
Z-220/Z-220S w/in all other camera
Z-22
NIKON
SB-104/SB-105
R-TTL/M
Sea&Sea
YS-25DX,YS-30,YS-60,YS-90
YS-90DX,YS-120,YS-300,350
YS-25AUTO,YS-90AUTO
Pre-flash cancel mode-OFF
P-S
Pre-flash cancel mode-ON
R-S
Notice: It is different from the twin connection from optical cable kit W type. This chart is for the case of
using D-2000 as the slave strobe of the other master strobe.
Aperture
Light adjustment
Type *1
Advanced
Settable displayed Settable
ISO
in LCD
Aperture
Slave Strobe function
Cancel
Clear photo Focus light
TTL
Ext.Auto*2
Manual
Circuit
System *2
Function
P-TTL
Depending on the camera system
×
◯
◯
◯
un-necessary
◯
P-S
or
×
◯
◯
◯
un-necessary
◯
P-M
master strobe you are using
×
◯
◯
◯
un-necessary
◯
R-S
◯
◯
◯
un-necessary un-necessary
◯
R-M
◯
◯
◯
un-necessary un-necessary
△
*3
R-TTL
◯
◯
◯
un-necessary un-necessary
△
*3
Useable functions when using with the other master strobe
*1) Light adjustment type means as follows
P-TTL:Pre-flash TTL Auto Exposure Adjustment
P-S
:Pre-flash Auto Exposure Adjustment / External Auto Flash Adjustment
11
P-M :Manual Flash Exposure Adjustment ( with pre-flash)
R-M :Manual Flash Exposure Adjustment ( without pre -flash )
R-S
:Real Time Auto Exposure Adjustment / External Auto Flash Adjustment ( without pre -flash )
R-TTL:Real Time TTL Auto Exposure Adjustment
*2) For External Auto with digital cameras that do not indicate Aperture value on the LCD panel, or the
ability to set ISO value, refer to your camera manual and determine the “Effective Aperture value range”
and “Effective ISO sensitivity range”
*3) It is possible that light from the Focus Light may expose the image. We recommend first turning the
Focus Light OFF before releasing the shutter.
[ When you use D-2000 with a compatible SLR housing or camera ]
Light adjustment
Settable
Aperture
Settable
type
ISO
displayed
Aperture
R-TTL
◯
◯
◯
+Nikonos compatible housing or camera
R-TTL
◯
◯
◯
INON optical converter D+NEXUS D100
P-M
◯
◯
◯
INON optical converter D+NEXUS D70
R-M
◯
◯
◯
Manufacturer
INON
system chart
Housing or camera model
X1-LZ,X1-NZ,X1-Z
INON optical converter TTL
Light
adjustment
type
Aperture
Settable displayed
ISO
Advanced
Settable
Strobe function
Cancel
in LCD
Aperture
TTL
Ext.Auto
Manual
Clear photo Focus light
Circuit
System
Function
R-TTL
◯
◯
◯
◯
◯
◯
un-necessary
un-necessary
△
*1
R-M
◯
◯
◯
×
◯
◯
un-necessary
un-necessary
△
*1
P-M
◯
◯
◯
×
◯
◯
un-necessary
◯
*1
◯
1*) It is possible that light from the Focus Light may expose the image. We recommend first turning the
Focus Light OFF before releasing the shutter. And When you use the D-2000 with “INON optical converter
TTL”, you can not make it OFF the focus light. And when you use the D-2000 with the housing or camera
other than INON X-1Z, X-NZ or X1-LZ housing, you can not turn OFF the focus light from the switch on the
housing.
12
[ Additional manual of the function ]
Main mode switch:
OFF : OFF position
STTL: When you use the D-2000 at “S-TTL” mode and the strobe
power is not enough at “STTL-Low” standard position, then
set the switch at this position. And please use this position
when you are using the diffuser panel ( -1.5 or –3).
And when you use “TTL” as the slave strobe or with a
housing, set at this position. But on this case you should set
the EV compensation dial at the “TTL” position.
STTL-Low :
The standard position for using S -TTL auto mode.
AUTO :
When you use D-2000 at External Auto Flash mode, please set at this position. To get
good result well controlled strobe light, you should set the correct f number on the strobe
with the EV compensation dial as the Aperture set dial.
M-0.5▼ -6: Manual position,( you can control the power of D-2000 with the EV compensation dial, as the
power set dial –0.5 to –6 / 12 steps with 1/2 EV increments.
FULL
l
: Manual position “FULL” power.
Strobe ready lamp (Red) will turn on when the charge level reaches almost 80% of it, so if
you need “real” Full power, Please release the shutter after a few seconds after it light on.
[ EV compensation dial ]
This dial has multi function. When you use the D-2000 at S-TTL mode, it works as the EV
compensation dial. When you use the D-2000 at External Auto mode, it works as the Aperture
value set dial. And When you use the D-2000 at Manual mode, it works as the power set dial.
[STTL]
Please refer Basic manual ( page.13)
And when you use “TTL” mode, set the dial at “TTL” position.
Notice: “STTL” and “TTL” is the different mode
[External Auto mode]
You can select the aperture value f1.4 +1/2EV through f11
f 1.4 +1/2EV
f11
You can turn the dial to clockwise or counterclockwise
13
[Manual mode]
You can select the power FULL –6EV to Full-0.5EV with 12 steps
-6EV ( G.N 2.5 )
-0.5EV (G.N 17)
You can turn the dial to clockwise or counterclockwise
When you set the main switch dial at “Full” position, then the position of the EV compensation dial is no
concern and D-2000 always fire with full power.
14
Specifications
model name
INON D-2000
Strobe control
STTL Auto・ External Auto・ Manual setting・ TTL Auto
Guide Number
20(full) ~ 2.5(-6EV) with 1/2EV increments
Settable Aperture Values
F1.4 +1/2EV ~ F11 ( 1/2 EV increment)
* with +1/4EV compensation switch, then you can set 1/4EV increment
Beam angle
100゜x100゜(Air) circular beam
Color temp
5500K
Recycle time
1.8 seconds minimum ( NiMH batteries)
2.0 seconds minimum (Nicad batteries)
2.3 seconds minimum (alkaline batteries)
2.5 seconds minimum (Li-ion batteries)
1.9 seconds minimum (Oxy ride bat teries)
Flash capacity
approximately 520 flashes ( NiMH batteries)
approximately 240 flashes (Nicad batteries)
approximately 400 flashes (alkaline batteries)
approximately 660 flashes
(Li-ion batteries)
approximately 360 flashes (Oxy ride bat teries)
Size
Diameter 99mm x height 122mm x Length 100mm
without sensor unit and arm mounting part
Weight
525g ( without batteries)
Weight UW
Approx 43g (with 4x NiMH batteries)
Depth rating
100m
Material
Body: polycarbonate/Red
INON D-2000 English “Advanced manual “ Ver 1.01
15
21, Dec.2004