1
®
MODEL NUMBER 917.3724.70
OWNER'SMANUAL
Assembly
o Operation
o Maintenance
o Service
o Adjustments
RepairParts
(action:
Read and Fallow
all Safety Rules
and instructions
BeforeOperating
This Equipment
IIIIII
IIIIIIIIIIIIIII
IIIHIIII
III
SAFETYRULES
CAUTION:
ALWAYS DISCONNECT SPARK PLUG WIRE AND PLACE WIRE
WHERE IT CANNOT CONTACT SPARK PLUG TO PREVENT ACCIDENTAL STARTING WHEN
SETTING-UP, TRANSPORTING,
ADJUSTING
OR MAKING
A_.
_k
REPAIRS
TOYOUR
LAWN
MOWER
IMPOBTANT
FEDERAL REGULATIONS REQUIRE OPERATOR PRESENCE BLADE STOP CONTROLS TO MINIMIZE THE
RISK OF BLADE CONTACT INJURY. YOUR LAWN MOWER IS EQUIPPED WITH SUCH CONTROLS_ DO
NOT ATTEMPT TO DEFEAT THE FUNCTION OF THE OPERATOR PRESENCE CONTROL UNDER ANY
CIRCUMSTANCES°
•
BE CAREFUL-WHEN THE ENGINE IS RUNNING THE BLADE IS TURNING.
o Please read your owner's manual Only allow
raerSonswho know the safety rules to use your
wn
DO NOT tie the operator presence control bar
to the handle. Control must be free to permit
brake engagement when handles and control
are released.
o DO NOT allow children to use your lawn
mower'.
o
o
•
o
•
•
•
a
"
o
DO NOT continue to run your lawn mower if
you hit a foreign object° Stop the engine,
disconnect the spark plug wire from the spark
plug, inspect the lawn mower for damage and
make repairs as required.
DO NOT use a damaged lawn mower_ Always
have damage repaired before mowing
DO NOT run your lawn mower if it vibrates
too much. Stop engine and make repairs.
Vibration is an indication of damage_
Never use your lawn mower without proper
guards or deflectors in place,
Always mow across a slope or inclined area.
DO NOT mow up or down a slope or inclined
area,
DO NOT mow in wet grass. Be careful of
footing when mowing in wet grass, use shoes
with good traction_
DO NOT run with the lawn mower,
DO NOT run your lawn mower indoors° Exhaust gases are deadly poison.
Always disconnect the spark plug wire from
spark plug to prevent accidental starting when
transporting or storing your' lawn mower after
the mowing season.
DO NOT attempt to raise engine speed above
factory settings° Engine damage or personal
injury may result.
If a grass catcher is used on your lawn mower',
check the catcher often for damage or
deterioration° It will wear through normal use°
Use only a recommended replacement catcher.
Always stop blade to remove or' install catcher.
DO NOT store your lawn mower or gasoline
where fumes may reach an open flame and
cause a fire.
DRAIN THE GASOLINE
from your lawn
mower before transporting your lawn mower'
inside your car or other' vehicle.
mower_
•
°
•
•
o
•
Check your lawn mower over before each use
Tighten any loose bolts, nuts, etc.
Remove all sticks, stones, wires, cans, boards,
etc. from area to be mowed These objects can
be thrown by the blade.
DO NOT allow children, bystanders or pets in
the area while mowing
Always wear shoes when mowing. DO NOT
operate lawn mower when barefoot or wear'ing open sandals.
Always wear safety glasses or eye shields
before starting your lawn mower' and while
mowing°
Always shut off engine before trying to adjust
whee/heights.
When engine is running, DO NOT put hands
or feet under lawn mower or in the discharge
chute, nor make any adjustments.
Stay clear of discharge opening at all times_
Do not fill gas tank when engine is running,
when indoors or when engine is hot. Allow
engine to cool for several minutes before filling gas tank. Clean off any spilled gasoline
before starting engine°
Mow only in good light_
Always stop blade when not cutting grass or
when crossing gravel drive, sidewalk, or'
roadway_
.....................
,iqlnllllll
i iii
i
•
•
o
o
o
•
•
•
,,
o
,
iiiiiiiiii i,i
i,i1,111
i
LOOKFORTHISSYMBOLTO POINTOUTIMPOR- I
TANTSAFETY
PRECAUTIONS.
IT MEANS-.-ATTEN-I
TION!!! BECOMEALERT!!!YOUR SAFETYIS I
INVOLVED.
J
PRODUCT
SPECH:RCATRONS
CONGRATULATIONS
on your purchaseof a SearsCraftsman Lawn Mower. It has been designed,
engineeredand manufacturedto give you the best
possibledependability and performance.
Shouidyou experienceany problemyou cannoteasily remedy, pleasecontact your nearest Sears Ser_
, ,,
vice Center/Departmento We have competent, welltrained technicians and the proper tools to service
or repair this unit,
ill,nil ,i;
MODEL
NUMBER
,,, ,,,
5.0
DISPLACEMENT:
11.57 cu. in.r
.......
GASOLINE
CAPACITY:
,,,,
,,
1.5 ,quart.,
(bmeaaea,_
Please read and retain this manual_ The instructions
wil! enable you to assemble and maintain your lawn
mower properly_ Always observe the "SAFETY
RULES"_
,,11111.1
,,
HORSE POWER:
SAE 30 or
(SAE IOW30)
OIL (21 oz. Capacity):
iiiiii ,i,n,,
SPARK
i,,
PLUG
(GAP
_030 ira):
,111 ,
Champion
RJ19-LM or
917.372470
Sears 7j 33312
or STD 361458
SERIAL
NUMBER
i, ,,,i........................
VALVE CLEARANCE:
DATE OF
PURCHASE
, i
THE MODEL AND SERIAL NUMBFRS WILL BE
FOUND ON A DECAL ATTACHED TO THE REAR
OF THE LAWN MOWER HOUSING
SOLID
Intake:
.006 ino
Exhaust:
_008 in.
i ,1111,
STATE
IGNITION
AIR GAP:
_010 inn
u
YOU SHOULD RECORD BOTH SERIAL NUMBER
AND DATE OF PURCHASE AND KEEP tN A SAFE
PLACE FOR FUTURE REFERENCE.
i ii1,,
,i,i
BLADE BOLT TORQUE:
35-40 fl._lbs.
....
MAONTENANCE
AGREEMENT
A Sears
Maintenance
Agreement
is available
on this product°
Contact
your
nearest
Sears
store for details._
CUSTOMER
RESPONSDBRLITIES
o
o
I
Read
and observe
the safety
rules_
Follow a regular schedule in maintaining, caring for and using your lawn mower..
Follow the.!nstructions under "Maintenance"
and "Storage"
sections of this Owner's
Manual.
TWOYEARLIMBTED
WARRANTYON CRAg:TSMAN
POWERMOWER
For two years from the date of purchase, when this Craftsman Lawn Mower is maintained, lubricated and tunedup accordinq to the instructions in the owner's manual, Sears will repair, free of char cle, any defect in material
and workmc]nshlp
if this Craftsman Lawn Mower is used for commercial
days from the date of purchase.
This warranty
or rental purposes, this warranty
applies
for only 90
does not cover:
Expendable items which become worn during normal use, such as rotary
belts, air cleaners and spark plug.
mower blades, blade adapters,
Repairs necessary' because of operator abuse or negligence, including bent crankshafts and the failure to
maintain the equipment according to the instructions contained in the owner's manual°
WARRANTY
SERVICE IS AVAILABLE BY RETURNING
THE CRAFTSMAN
POWER MOWER
NEAREST SEARS SERVICE CENTERIDEPARTMENT
IN THE UNITED STATES° THIS WARRANTY
ONLY WHILE THIS PRODUCT IS IN USE IN THE UNITED STATES
This warranty
to state
TO THE
APPLIES
gives you specific legal rights, and you may also have other rights which may vary from state
Sears, Roebuck and Company,
D/731CR-W,
Sears Tower,
Chicago,
IL
60684
TABLEOF CONTENTS
SAFETYRULES................................................
PRODUCTSPECIFICATIONS.............................
CUSTOMERRESPONSIBILITIES.........................
WARRANTY ....................................................
LAWN MOWER ACCESSORIES........................
ASSEMBLY......................................................
OPERATION ...................................................
MAINTENANCE ............................................
2
3
3
3
5
6
7
12
SERVICE AND ADJUSTMENTS ........................
15
STORAGE .....................................................
18
SERVICE RECOMMENDATIONS ......................
19
TROUBLESHOOTING .....................................
31
REPAIR PARTS - LAWN MOWER ............... 20-24
REPAIR PARTS - ENGINE ..........................
25-29
PARTS ORDERING/SERVICE .......... BACK COVER
nNDEX
H
Operator PresenceControlBar ............. 8
Handle:
Options:
Attachments.................................. 5
Adjustment .................................
17
P
Assembly...................................... 6
L
Repair Parts
LawnMower........................
20-24
Lubrication:
Engine................................... 25-29
Engine........................................
19
R
RearDoor Hinge......................... 19
Handle BracketMountingPin....... 19
Responsibilities,
Customer.................... 3
Wheel Adjuster ........................... 19
S
M
Safely Rules............................
2
Maintenance:
Serviceand Adjustments:
Carburetor.................................. 16
Agreement ....................................
3
Air Filter.....................................
14
EngineSpeed.............................. 16
BladeCare/Replacement............. 12
Handle ....................................... 17
Engine........................................
13
ServiceRecommendations
.................. 19
C
GrossCatcher............................. 13
Spark Plug......................................... 14
Lubrication ........................................ l g
Controls:
Specifications
..........................
3
Spark Plug.................................. 14
Operator PresenceControlBar ...... 8
Startingthe Engine:
Drive Control................................. 8
DriveControl................................. 8
Mowing Tips......................................
11
CustomerResponsibilities ..................... 3
Mowing/MulchingTips....................... I I
Stoppingthe Engine........................... 11
E
O
Storage.............................................. 18
T
Oil:
Engine:
Oil Change ................................. 13
Engine........................................
10
TroubleShootingChart....................... 31
Oil Level..................................... 10
W
Storage.......................................
18
OilType......................................
I0
Operation:
Warranty .............................
3
Starting ....................................... I 1
OperatingLawnMower .......... 7-11
Wheels:
ControlBar ................................... 8
Storage.......................................
18
Wheel Adjusters............................ 8
F
EngineControl.............................. 8
Fuel:
Type ........................................... t0
Storage....................................... 18
A
Accessories............................................ 5
Adjustments:
Carburetor.................................. t 6
EngineSpeed.............................. 16
Handle Height.............................. 17
Height of Cut................................. 9
Air Filter:
Service........................................ t4
Assembly:
GrassCatcher............................... 6
Handle ......................................... 6
B
Blade:
Sharpening................................. 12
Replacement............................... 12
These accessories were available when this lawn mower was produced. They are also available at most Sears
retail outlets, catalog and service centers. Most Sears stores can order repair parts for you, when you provide
the model number of your lawn mower. Some of these accessories may not apply to your lawn mower,,
ENGINE
....+
........
.
SPARKPI.UG
MUFFLER
AIR FILTER
i,,_u_ +_,1
GAS CAN
+¸.¸¸¸++2
ENGINE OIL
STABILIZER
©
tf lawn
mower
is an etectric
start
LAWN MOWER PERFORMANCE
.......
REARBAG
OPTIONAL
REPLACEMENT
BAG FORREAR
DISCHARGE
LAWN MOWERS
DUSTSHIELD
::7++++ : ...................................
+ ,,,
CLIPPING DEFLECTOR
FABRICBAG
PERMANEXCATCHER
,,u m,,, nu,_
OPTIONAL
CATCHER
FOR
SIDE DISCHARGECATCHER
SiDEDISCHARGE
LAWNMOWER
LAWNMOWERMABNTENANCE
BELT
BLADE
BLADEADAPTER
S
WHEELS
LAWN P_OWERCOVER
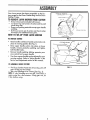
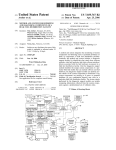
Your' lawn mower has been assembled at the factory except for the Grass Catcher Bag and the Grass
Catcher Frame.
TO R MgVE
•
•
o
•
MOWERFROMCARTON
OPERATOR
CONTROL
UPPER
PRESENCE
BAR
HANDL
LIFT UP
LIFT
UP
Remove loose parts included with mower.
Cut down two end corner's of carton and lay end
panel down flat.
Remove all packing materials except upper handle
padding.
Roll lawn mower out of carton and check carton
thoroughly for additional loose parts.
tJ
HgW TO SET=UP
YOURLAWNMOWER
TO UNFOLDHANDLE
•
•
•
Raise handles until lower handle section locksinto
place in mowing position (See Fig. 1).
Raise upper handle section into place on lower
handle, remove protective podding and tighten
both handle knobs.
Remove handle padding holding operator presence control bar to upper handle.
Your lawn mower handle can be adjusted for your
mowing comfort. Refer to "Adjust Handle" in the
Service and Adjustment section of this manual.
•
TO ASS[MBLE
GRASSCATCHER
Put Grass Catcher Frame into Grass Bag with stiff
part of Bag on the bottom.
o Slip vinyl bindings over Frame (See Fig. 2).
NOTE: If vinyl bindings are too stiff, hold them in
warm water for a few minutes. If Bag gets wet, let
it dry before using°
o
FIG. 2
MOW,NG
POSITION
O?I!IAT
I_.-Ll
..............................
I.t_,l
.............................
i=
i
iii
J.............................
..-LI!I,.,,,
1...i
.............................
.............
11
=1
if;c,
............................
_i
_.;i
ii;i;i:
,, ..............................................
J,!.,+=J
_t_,,.................................
RHOW1t'1:)11LAWNIOWlll
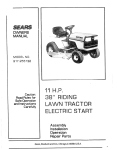
READ THIS OWNER'S MANUAL AND SAFETY RULES BEFORE OPERATING YOUR LAWN MOWER., Compare the illustrations with your Lawn Mower to familiarize yourself with the location of various controls
and adjustments. Save this manual for future reference.
OPERATOR
CONTROL
PRESENCE
BAR
ENGINE ZONE
CONTROL CABLE
_-
--DRIVE
STARTER
CABLE
CONTROL
LEVER
HANDLE
CLIP_
LE KNOB
E CLIP
E CAP
GRASS
ENGINE OIL CAP
IPSTICK
CATCHER
!,
DRIVE COVER
PRIMER
AIR
FILTE
WHEEL ADJUSTER
(ON EACH WHEEL)
Sears Rotary Walk-Behind
Power Lawn Mowers
conform to the safety standards
of the American
National
Standards
institute and the U S Consumer Product Safety Commission
The blade turns when the engine
is running
held down to the handle to start the engine. Release
to stop the engine,
propelled
forward
PRIMER - pumps additional fue! from the carburetor
to the cylinder for use when starting a cold engine.
STARTER
HANDLE
motion of lawn mower°
- used for starting
the engine°
I"
...........................................................................................................
r...............................................................
_ ..................
,JiU
11 _,l
_t ..........................................................................................................................
$_i
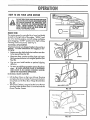
flOW TO USEYOURLAWNMOWER
DO NOT RUN YOUR LAWN MOWER WI'i'HOUT
MULCHERPLATEIN PLACEAND DOOR LATCH
IN LOCKED POSITION OR APPROVED
PING DEFIFCTOR OR GRASSCATCHER IN
PLACE. NEVER ATTEMPT TO OPERATE "filE
LAWN MOWER WITH THE REAR DOOR P.EMOVED OR PROPPED OPEN.
ENGINE SPEED
The engine speed is controlled by a lever (red knob)
locatedon the right side of the engine. "HIGH" position isfor starting engine, normal cutting and better
grass bagging. "LOW"
position is for light cutting,
trimming and fuel economy (See Fig° 4).
TO INSTALLA'I-rACHMENTS
Your lawn mower was shipped readv to be used as a
mulcher. To install attacfiments for'bagging or discharging:
o Rotate rear door latchclockwise to allow rear door
to be opened (See Fig. 5A).
•
FIG. 4
Open rear door, remove mukher plate and rotate
latch counterclockwise to its original poslhon (See
Fig, 5B).
REAR
DOOR
FIG. 5A
<_ You can now install catcher or optional clipping
deflector.
•
Toreturn to mulching operation reverse the above
steps. BE SURE MULCHER PLATE IS INSTALLED
AND LATCH IS IN LOCKED POSITION BEFORE
USING FOR MULCHING OPERATION.
TO INSTALL GRASS CATCHER
o
Lift the Rear Door on the Lawn Mower Housing
and place the Grass Catcher Frame onto the formed up Tabs on the Rear Door Hinge Bracket (See
Fig. 6A)_
The Grass Catcher is secured to the Lawn Mower
Housing when the Rear Door is lowered
Grass Catcher Frame.
(h
FORMED UP TABS
MULCHER
onto the
FIG. 5B
HINGE
BRACKET/_/
/
_REAR
GRASS
CATCHER
DOOR
FORMED UP TABS
V
-
FIG. 6A
FRAME
U ......................
TO IMPTY GRASSCATCHER
o To remove Grass Catcher, release Operator
Presence Control Bar to stop engine.
_, Lift up Rear Door and remove the Grass Catcher
by the Handle (See Fig. 613).
o Do not drag the Bag when emptying; it win cause
unnecessary wear_
DRIVECONTROL
o
Self-propelling
is controlled by holding the
operator presence control bar down to the handle and pushing the drive control lever forward
until it dicks; then release the lever (See Fig. 7)°
o Forward motion will stop when the operator
presence control bar is release& To stop forward
motion without stopping the engine, release the
operator, presence control bar slightly until the
drive control disengages° Hold operator presence
control bar down tohandle to continue mowing
without self-propelling
o To keep drive control engaged when turning corners, push down on handle and lift front wheels
off ground while turning lawn mower.
FIG. 6B
'-
TO ADJUSTCUTTINGHEIGHT
_'_\
TO ENGAGE
_\:
DRIVE CONTROL
Raise wheels for low cut and lower wheels for
high cut.
i> Wheels are set in low cut for shipping_ Adjust cutring height to suit your requirements_ Medium
position is best for most lawns_
o To change cutting height, squeeze adjuster lever
toward wheel. Move wheel up or down to suit
your requirements. Be sure all wheels are in the
same setting (See Fig° 8)°
DRtVF CONTROL
DISENGAGED
FIG. 7
LOWER
WHEELS
FOR HIGH
__,
RAISE
CUT
FIG. 8
g
WHEELS
FOR LOW
CUT
IIiFOIE STAITIIGIINGINI!
OIL FILL CAP
W1DIPSTICK
OIL:
A 20 oz. bottle of Pennzoil
SAE 30 Oil is included
FUEL
TANK
with your new lawn mower.
o Remove engine oil cap with dipstick (See Fig, g).
and fill to the FULL line on the dipstick.
Use 20 ozso of SAE 30 oil SAE 10W 30 oil can
also be used. DO NOT use SAE 10W 40 oil,
o POUR OIL SLOWLY.
DO NOT OVER FILL,
o Check oil level before each use. Add oil if needo
o
o
GASOLINE
FILL CAP
ed. Fill to FULL line on dipstick.
To read proper level, tighten engine oil cap each
time.
FIG. 9
Replace engine oil cap with dipstick and tighten.
After the first two (2) hours of mowing, change
the oil, and every 25 hours thereafter.
You may
need to change the oil more often under dusty,
dirty conditions.
TOSTAITllIll E
o
GAS:
o Fill gasoline tank with fresh, clean unleaded
gasoline. DO NOT USE PREMIUM GASOLINE.
BE CAREFUL NOT TO OVERFILL TANK (SEE
FIG. g).
WARNING: Experience indicates that alcohol blended fuels (called gasohol or' using ethanol or methanol)
can attract moisture which leads to separation and
formation of acids during storage. Acidic gas can
damage the fuel system of an engine wMe in storage.
To avoid engine problems, the fuel system should be
emptied before storage for 30 days or longer'. Drain
the gas tank, start the engine and let it run until the
fue! lines and carburetor are empty. Use fresh fuel
next season. See Storage Instructions for additional
information.
Never use engine or carburetor cleaner products in
the fuel tank or permanent damage may occur..
o
,,,
To start a cold engine,push primer three (3) times
before trying to start. Osea firm push. Thisstep is
not usually necessary when starting an engine
which has already run for a few minutes.
Push engine speed control lever to HIGH position.
o Hold operator presence control bar down to the
handle and pull starter' handle quickly. Do not
allow starter rope to snap back.
o To STOP engine, release operator presence control bar.
NOTE: In cooler weather it may be necessary to
repeat priming steps, tn warmer weather over' priming may cause flooding and engine will not start. If
you do flood engine wait a few minutes before attempting to start and DO NOT repeat priming steps.
ENGINE ZONE CONTROL
..................................................
AIR CLEANER
,,,,,
CAUTION:FEDEI_LREGULATIONS
IEQUiREAN
ENGINECONTROLTO BE INSTALLED
ON THIS
LAWN t_OWERIN ORDERTO MINII_iZE THE
RISK OF BLADECONTACTINJURY. DO NOT
UNDERANYCIRCU_ASTANCES
AITE_AP?
TO DEFEAT THE FUNCTION OF THE OPERATOR
CONTROL.THEBLADE
TURNSWHENTHEENGINE
IS RUNNING.
Your' lawn mower is equipped with an Operator
Ingine Control Bar which requires the operator
to be positioned behind the lawn mower handle
to start and operate the lawn mower°
10
o Under certain conditions, such as very tait grass,
it may be necessary to raise the height of cut to
reduce pushing effort
and to keep from
overloading the engine and leaving dumps of
grass clippings°
o For extreme{y heavy cutting, reduce the width of
cut and raise the rear of the lawn mower housing one (1) wheel adjuster setting higher than the
front for better discharge of grass.
o When using a rear discharge lawn mower in
moist, heavy grass, clumps of cut grass may not
enter the grass catcher_ Reduce ground speed
(pushing speed) and/or run the lawn mower over
the area a second time_
• if a trail of grass clippings is left on the right side
of a rear discharge lawn mower, mow in a
clockwise direction with a small overlap to collect the clippings on the next pass.
_. Pores in cloth grass catchers can become filled with
dirt and dust with use and catchers will collect less
grass. To prevent this, regularly hose catchers off
with water and let dry before using.
MAX1/3
FIG. 10
MULCHING MOWING TIPS
The special mulching Blade will recut the grass
clippings many times and reduce them in size so
that ast-heyfal(onto the lawn they will disperse into
the grass and not be noticed. Also, the mulched
grass will biodegrade quickly to provide nutrients
for the lawn. Always mulch with your highest
engine (blade) speed as this will provide the best
recurring action of the blades.
Avoid cutting your lawn when it is wet, Wet grass
tends to form clumpsand mterteres w|th the mulching action. The best time to mow your lawn is the
early afternoon. At this t!me the grass has dried
and the newly cut area w_ll not be exposed to the
direct sun.
11
o
For best results, adjust the lawn mower cutting
height so that the lawn mover cuts off only the top
one-third of the grass blades (See Fig. 10). If the
!awn is overgrown it will be necessary to raise the
height ot cut to reduce pushing effort and to keep.
from overloading the engine and leaving clumps of
mulched grass. For extremely heavy mulching,
reduce your width of cut, mow slowly and raise
the rear of the lawn mower one wheel adjuster
setting higher thanthe front.
o
Certain types of grass and qrass conditions may
require that an area be mulched a second time to
completely hide the clippings. When doing a
second cut, mow across or perpendicular to the first
cut path.
o
Change your cutting pattern from week to week.
Mow north to south one week then change to east
to west the next week. This will help prevent
matting and graining of the lawn.
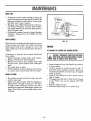
BLADE
a
Once a year you should replace the spark plug,
a'r f'lter ana check blade for' wear° A new spark
plug and air filter assures proper air-fuel mixture
andhelps your engine run better and last iong,er
o You should check aft fasteners and be sure they
are tighL
o Follow the Service Recommendation
Schedule on
page lg.
ADAPTER
DETAIL
CRANKSHAFT
&
_ED_
w
ASHEF{
K£Y
BLADE
BOLT- _!
CRANKSHAFT
LAWNMOWER
BLADE/BLADE
ADAPTERCARE
FIG. I ]
Your lawn mower will work better with a sharp
blade.
CAUTION: DISCONNECT
SPARKPLUG WIRE!
FROMSPARKPLUGAND PLACEWIREWHERE
tTCANNOTCO/VIE
I_ CONTACT
WITHTHESPARE
PLUG.
The recommended tightening torque is 35-40 ft.
ibs_
o Torque wrenches are available at most Sears
stores and through the catalog
TO REMOVE BLA_E:
Turn lawn mower' on its side_ Make sure air filter
and carburetor are up_
Use block of wood between blade and lawn
mower housing to prevent blade from turning
when removing the blade boll
Protect your hands with gloves and/or wrap
blade with heavy cloth.
Remove blade bolt by turning counter-clockwise,
Use a 9/16" box or opemend wrench;
• Remove blade and attaching hardware (bolt,
tockwasher and hardened washer) (See Fig° ! 1)o
NOTE:Remove the blade adapter and check the key
inside hub of blade adapter.. The key must be in good
condition to work properly_ Replace adapter if
damaged.
iiiiii ,, ,i,,i
i,i,
i
g
CAUTION:A LOOSE
BLADECAN BEDANGEROUS
ANDMAY MAKETHEENGINEHARDTO START.
I:lHi
HI
,,
Use only a Sears authorized replacement blade to
get the best cutting resuhs.,
NOTE: We do not recommend sharpening blade - but
if you do, be sure the blade is balanced°
TO SHARPEN BLADE:
o The blade can be sharpened with a file or on a
grinding wheel. Do not attempt to sharpen while
on the lawn mower_
• Care should be taken to keep the blade balanced_ An unbalanced blade will cause excessive
vibration when running and eventual damage to
lawn mower or engine_
• To check blade balance, drive a nail into a beam
or wall Leave about one inch of the straight nail
exposed_ Place center' hole of blade over' the head
of the nailo If blade is balanced, it should remain
in a horizontal position° If either end of the blade
moves downward,
blade is not balanced,
Sharpen the heavy end until the blade is
balanced_
TO REPLACE BLADE:
Position the blade adapter
on the engine
crankshaft., Be sure key in adapter and key way
in crankshaft are aligned.
o Position blade on to the blade adapter' aligning
the two (2) holes in the blade with the raised lugs
on the adapter.
NOTE: Be sure the word TOP (stamped on the blade)
is toward the engine (See Fig. 11)o
o Install the blade bolt with the Iockwasher and
hardened
washer into blade adapter
and
crankshaft (See Fig. 11)o
o Use block of wood between blade and lawn
mower housing and tighten the blade bolt, turin
ing clockwi_e_
12
o To keepyour drive systemworking properly, the
gear caseand area around the drive should be
kept cleanandfree of trashbuild-up.Cleanunder
the drive cover twice a season.
• The gear caseis filled with lubricant to the pro_
per level at the factory. Theonly time the _ubricant needsattentionis if servicehasbeenperformed on the gear case.
If lubricant is required, use only Texaco Starplex
Premium 1 Grease, Part No. 750355.
substitute.
Do Not
DRIVE WHE_:LS
FIG. 12
Check front drive wheels each time before you mow
to be sure they move freely, The wheels not turning
freely means trash, brass, cuttings, etco are in the
drive wheel area and must be cleaned to free drive
wheels°
ENGINE
TO CHAHG_:OIL (WAR_ OIL I)R/_.INSBEliER)
If necessary to clean the drive wheels, check both
front wheels.
Remove hubcaps, hairpin cotters and washers_
Remove wheels from wheel adjusters.
Remove any trash or grass cuttings from inside
the dust cover, pinion andtor drive wheel gear
teeth°
o Put wheels back in place°
• If after cleaning, the drive wheels do not turn freely, contact your nearest Sears Service Center.
CAUTIOH:DI5COHHECT
SPAREPLUGWIREFRO_
SPAREPLUGAHDPLACEWIREWHEREIT CAHNOT
COMEIN CONTACTWITH SPAREPLUG.
o
GRASS
CATCHER
o
o
•
The catcher may be hosed with water, but must
be dry when used°
Check your grass catcher often for damage or
deterioration. Through normal use it will wear_
If catcher needs replacing, replace only with a
manufacturer approved replacement catcher from
Sears. Give the lawn mower model number when
ordering.
o
o
o
'13
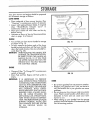
Remove engine oil cap with dipstick; lay aside on
a clean surface,
Tip lawn mower on its side as shown in Fig° 12
and drain oi_ into suitable container. Rock lawn
mower back and forth to remove any oi_trapped
inside of engine.
Wipe off any spilled oil on lawn mower and on
side of engine.
Fill engine with SAE 30 or 10W 30 oilo Fill only
to the "FULL" tine on the dipstick° DO NOT
overfill.
Replace engine oil cap°
Reconnect spark ptug wire to spark ptug.
T
AiR FILTER
...............
..................................................................................
BACK
Ctean or replace Air Filter every 25 hours or every
season, whichever
occurs first,
NOTE: Service Air Filter more often under dusty
conditions°
CARTRIDGE
LIP
TO SERVICE AIR FILTER
Loosen Screw and tilt Cover as shown in fig. 13.
Carefully remove Cartridge,
Clean by tapping gently on a flat surface. If very
dirty, replace Cartridge or clean as follows:
Wash in a low or non-sudsing detergent and
warm water solution. Rinse thoroughly with flowing water' from mesh side until water runs clear,
Let Cartridge air' dry thoroughly before using.
CAUTION:PETROLEUM
_LVENTS, SUCHAS
KEROSENE,
ARENOTTO BEUSEDTO CLEAN
o
o
o
COVER
TABS
t//
FIG. 13
CARTRIDGE.
THEYMAY CAUSE
DETERIORATIONOFTHECARTRIDGE.
DOHOTOILCARTRIDGE.DO HOTUSEPRESSURIZED
AIR TO
CLEANOR DRYCARTRIDGE.
°
°
o install Cartridge, then replace Cover making sure
the tabs are aligned with the slots in Back Plate.
Fasten Screw securely (See Fig. 13).
*
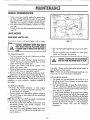
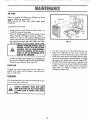
SPARKPLUG
Change your spark plug each year" to make your
engine start easier and run better° Set spark p{ut"
gap at D30 inch.
CLEANONG
We recommend that you clean the underside of your
lawn mower after each use_
i,
ii lUl,
,11111
julu
i' i,
CAUTION:DISCONNECTSPARK PLUG WIRE
FROMSPARKPLUGAND PLACEWIREWHERE
IT CANNOTCOMEIN CONTACTWITH SPARK
PLUG.
m i,
i
....i,,,H...................
CO_ER
_REW
i
14
Turn lawn mower on its side with carburetor up
Clean the underside of your' lawn mower by
scraping to remove build-up of grass and trash.
Clean your lawn mower and engine often to keep
trash from accumulating around engine. A clogged engine runs hotter and shortens engine life.
We DO NOT recommend using a garden hose
to clean lawn mower unless the electrical system,
muffbr, air filter, and carburetor are covered to
keep water out. Water in engine can result in
shortening engine life,
TO RmOV_REP_CEDRIVe:.
_fLT
......,_
r
r ,,,,I
,u
^
I'
_................' .................................
r..tlillilil: II_!II,_IIEL"i'f,
PAR[PI.UGWIREI:ROili
_
l
/
$PitRI(PLUG. PLIICEWIREWHEREIT CAltIIOT
!_
/
COllIEIN COIITACI"
WiTH SPARKPLUG.
Remove
drive
cover_ Remove
belt
by
pushing
down on gear case putle_/(See Fig_ 14).
Turn lawn mower on its side with carburetor and
fuel cap up.
• Loosen hex head screw and move belt snubber
away from pulley (See Fig_ 14).
Remove belt from engine pulley on crankshaft and
carefully slip belt off over blade.
o CAUTION: Sharp edges of blade can cut belt.
o Install new belt reversing above steps°
o Move belt snubber back in place and tighten hex
head screw.
NOTE: Belt snubber clears belt by approx.]/32
inch
when installed°
o Always use factory approved belt to assure fit
and long life_
ROTATE
fiG. 14
,,JAM NUT
8
,JAM
NUT
C _"
DRIVE
POSITION
ERS
ARM
f
TO ADJUSTDRIVE CONTROLCABLE
ROTATE
A drive control cable that needs adjustment will keep
your lawn mower from self-propelling properly and
can also cause gear case components to wear out
sooner,
•
•
Remove drive cover_
Loosen cable clamp screw "A"
IlCl#
FiG, 15
and nuts "B" and
"
llfllltt lifll f_OII
o Hold down operator presence control bar to handle and engage drive control.
° Move shifter arm to drive position while rotating
front wheels to be sure jaw clutch is engaged_ Pull
threaded sleeve with pliers (See Fig !5). Do Not
pull on control cable.
o Tighten nut "C" until sleeve is snug_
Tighten screw "A" and nut "B".
Push lawn mower back and forth to be sure gear
case is engaged
_, Replace drive cover_
Release operator presence control bar_
The rear deflector,attached between the rear wheels
of your lawn mower, is provided to minimize the
possibility that objects will be thrown out the rear
of the lawn mower into the operator's mowing
positiom
If the rear deflector becomes damaged,
replaced.
1S
it should be
T
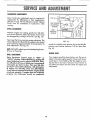
CAABUEETOR ADJUSTMENTS
TOP NO LOAD SCREW
Minor Carburetor
adjustment
may be required to
compensate
for differences
in Fuel, temperature,
affitude or load. The Air Cleaner and Air Cleaner
Cover
must be assembled
to Carburetor
when
I
IDLE SPEED
ADJUSTING
SCREW
running.
INTIAL ADJUSTMENT:
IDLE
MIXTURE'
SCREW
With the engine not running, gently turn idle Mixture Screw clockwise until it just closes. Screw may
be damaged by turning it in too far (See Fig. 16).
Next open the Screw one turn counter.clockwise.
This
initial adjustment will permit the engine to be started
and warmed up (approximately
5 minutes) prior to
final adjustment (See Fig. 16).
FIG. 16
usually to a slightly richer mixture, by turning the idle
mixture screw counter-clockwise
1/8 turn more (See
Fig. 16).
NOTE: DO NOT adjust top no load adjusting Screw.
(Pre-set at Factory).
ENGINE SPEED
FINAL ADJUSTMENT
Place
Equipment
Control
Lever
in
"iDLE"
Your engine speed has been factory seL Do not attempt to increase engine speed or it may result in personal injury. If you believe that the engine is running too tast or too slow, take your lawn mower to
an authorized Sears Service Center For repair and
adjustment.
or
"SLOW"
position. Adjust idle RPM, by turning Idle
Speed Adjusting Screw to obtain 1400 RPM. Next,
turn Idle Mixture Screw in (clockwise - lean mixture)
until engine just starts to slow. Then turn Idle Mixture Screw out (counter-clockwise - rich mixture) until engine runs unevenly. Now turn Idle Mixture
Screw midway between Hch and lean. Engine should
accelerate smoothly, if engine does not accelerate
properly,
the Carburetor
should be readjusted,
16
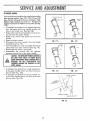
TO ADJUSTHANDLE
Your Lawn Mower Handle can be raised or lowered for
SHIPPING
POSITION
your mowing comfort. Figs. 17A, 17B, t7C and 17D
show the four (4) positions that are available:
High,
Medium High, Medium Low and Low. Handles are
shtpped mounted in the Medium Low position (See Fig.
17A).
o To change from medium low to medium high position, the upper and lower handle sections will
have to be turned over (See Fig. 17B).
o Remove the controts and operator
presence control bar from the upper handle,
o Remove the starter rope guide from the lower
handle
o
o
Remove hairpin cotters
Disconnect
the lower handle
from
the
MEDIUM
NIGH
handle
FIG. 17A
FIG. 17B
FIG. 17C
FIG. !7D
brackets (See Fig 18).
o Turn the handle over and reassemble the hairpin
cotters that have been removed
(See Fig 18)_
• Reassemble the starter rope guide
° Reassemble
the controls
and the operator
presence control bar to the upper handle_
............................
CAUTION: THE OPERATORPRI_SENCE
CON!"RO'L
......
BAR MUST PIVOT FREELYTO PERMIT BLADE
BRAKEENGAGEMENTWHEN CONTROLBAR IS
RELEASED. DO NOT OVERTIGNTEN THE
FASTENERS
HOLDING THE CONTffOLSTO THE
UPPER HANDLE.
o
To change from medium low to
ly the upper handle section will
ed over (See Fig. 17C)
o To change from medium low to
ly the lower handle section will
ed over (See Fig. 17D).
high position onhave to be turnlow position, onhave to be turn-
LOWER
\
HANDLE
t
HAIRPIN
COTTER
HANDLE
FIG. 18
17
BRACKET
Your lawn mower and engineshouldbe prepared
for' off-seasonstorage as follows:
LAWN MOWER
o Clean underside of lawn mower housing_ (See
"Cleaning"
in maintenance section of manual.)
o Inspect and replace/sharpen blade, if required
(See "BtadelBlade
Adapter
Care"
in
maintenance section of manual).
° Hose grass catcher off with water and let dry
before storing.
o Lubricate as shown in Service Recommendation
chart on page lg of manual,
LOWER
HANDLE
o You can fold your lawn mower handle for storage
as shown in Fig_ 19.
o To fold, squeeze the bottom ends of the lower'
handle toward each other until the lower handle
clears the handle bracket, then move handle forward (See Fig. 20).
IMPORTANT: WHEN FOLDING THE HANDLE FOR
STORAGE OR TRANSPORTATION,
BE SURE TO FOLD THE HANDLE AS
SHOWN IN FIG, 19. IF YOU FOLD
THE UPPER HANDLE SECTION THE
WRONG WAY, YOU MAY DAMAGE
THE CONTROL CABLES.
k
NDLE
FIG. 19
LOWER
HANDLE
HANDLE
HAIRPIN
BRACKET
COTTER
ENGINE
Change oil (See "To Change Oil" in maintenance
section of manual)_
°
Drain Fuel and Run Engine until fuel system is
empty.
TO PREVENT
IMPORTANT: IT IS IMPORTANT
GUM DEPOSITS FROM FORMING
IN ESSENTIAL FUEL SYSTEM PARTS
SUCH AS THE CARBURETOR, FUEL
FILTER, FUEL HOSE, OR TANK DURING STORAGE.
ALSO,
EXPERIENCE INDICATES THAT ALCOHOL
BLENDED FUELS (CALLED GASOHOL OR USING
ETHANOL
OR
METHANOL) CAN ATTRACT MOISTURE WHICH LEADS TO SEPARATION AND FORMATION OF ACIDS
DURING STORAGE. ACIDIC GAS
CAN DAMAGE THE FUEL SYSTEM
OF
AN
ENGINE
WHILE
IN
STORAGE.
o
FIG. 20
OTHER
o Do not store gasoline from one season to another.
o Replace your gasoline can if your can starts to
rust. Rust and/or dirt in your' gasoline can cause
problems°
o Do not store your lawn mower under any plastic
cover'. Plastic cannot breathe which allows condensation to form and can cause your' lawn
mower to rust.
o When setting up your handle from the storage
position, the lower handle will automatically lock
into the mowing position.
18
T
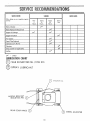
SERVICE
RgCORD
Fi)l in dates as you complete
service
SCIIEDUtE
SERVICE
DAT_
regular
First
2
Hours
Every
Every
Hours
Hours
10
25
Every
Use
,,,i ,,u,i
BJade Checked
Blade Replaced (Sharpened)
v_
Engine Oil Change
Engine Oil Check
//
Air Cleaner
Spark Plug Replaced
Lubricate Lawn Mower
Cleaning
P'_
Grass Catcher (if applicable)
Muffler
-
CHECK
LUBRKATiON
Q
SAE 30 MOTOR
Q
SPRAY
OIL (10W
30)
LUBRICANT
WHEEL
1 c_
ADJUSTER
20