1
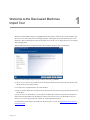
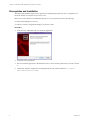
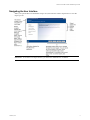
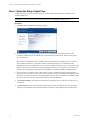
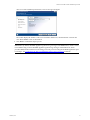
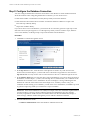
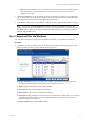
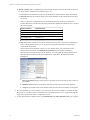
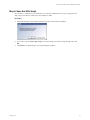
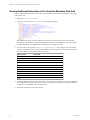
VMware vCenter Discovered Machines Import Tool
User's Guide
Version 5.3.0.25
for vCenter Configuration Manager 5.3
This document supports the version of each product listed and supports all
subsequent versions until the document is replaced by a new edition. To
check for more recent editions of this document, see
http://www.vmware.com/support/pubs.
EN-000471-00
VMware vCenter Discovered Machines Import Tool User's Guide
You can find the most up-to-date technical documentation on the VMware Web site at:
http://www.vmware.com/support/
The VMware Web site also provides the latest product updates.
If you have comments about this documentation, submit your feedback to:
[email protected]
© 2006-2010 VMware, Inc. All rights reserved. This product is protected by U.S. and international copyright and
intellectual property laws. VMware products are covered by one or more patents listed at
http://www.vmware.com/go/patents.
VMware is a registered trademark or trademark of VMware, Inc. in the United States and/or other jurisdictions. All
other marks and names mentioned herein may be trademarks of their respective companies.
VMware, Inc.
3401 Hillview Ave.
Palo Alto, CA 94304
www.vmware.com
2
VMware, Inc.
Contents
About This Book
5
Welcome to the Discovered Machines Import Tool
7
Prerequisites and Installation
Navigating the User Interface
Step 1: Select the Nmap Output Files
Step 2: Configure the Database Connection
Step 3: Select and Filter the Machines
Step 4: Select Devices
Step 5: Import the Machines
Step 6: Save the SQL Script
Configuring the Discovered Machines Import Tool
Changing the Log File Name
Changing the Log Level
Viewing Additional Information in the Selection Machines Data Grid
Useful Nmap Command Lines
OS Detection
Examples
Reference
VMware, Inc.
8
9
10
12
13
17
18
19
21
21
21
22
23
23
23
23
3
VMware vCenter Discovered Machines Import Tool User's Guide
4
VMware, Inc.
About This Book
This manual, VMware vCenter Discovered Machines Import Tool User's Guide for VCM, describes how to
import discovered machines and devices into the VCM database.
This document contains the following information:
n
Configuring the database connection.
n
Selecting machines and devices, and importing machines.
n
Configuring the application and using Nmap command lines.
Read this document and complete the associated procedures to prepare for a successful import.
Intended Audience
The information presented in this manual is written for system administrators who are experienced
Windows or UNIX/Linux system administrators and who are familiar with managing network users and
resources, and performing system maintenance.
To use the information in this guide effectively, you must have a basic understanding of how to configure
network resources, install software, and administer operating systems. You also need to fully understand
your network’s topology and resource naming conventions.
VMware VCM Documentation
The VMware vCenter Configuration Manager (VCM) documentation consists of the VCM online Help,
Hardware and Software Requirements Guide, Installation and Getting Started Guide, and other associated
documents.
Document Feedback
VMware welcomes your suggestions for improving our documentation. If you have comments, send
your feedback to [email protected].
VMware, Inc.
5
VMware vCenter Discovered Machines Import Tool User's Guide
Technical Support and Education Resources
The following technical support resources are available to you. To access the current version of this book
and other books, go to http://www.vmware.com/support/pubs.
Online and Telephone
Support
To use online support to submit technical support requests, view your product
and contract information, and register your products, go to
http://www.vmware.com/support.
Customers with appropriate support contracts should use telephone support for
priority 1 issues. Go to http://www.vmware.com/support/phone_support.html.
6
Support Offerings
To find out how VMware support offerings can help meet your business needs,
go to http://www.vmware.com/support/services.
VMware Professional
Services
VMware Education Services courses offer extensive hands-on labs, case study
examples, and course materials designed to be used as on-the-job reference tools.
Courses are available onsite, in the classroom, and live online. For onsite pilot
programs and implementation best practices, VMware Consulting Services
provides offerings to help you assess, plan, build, and manage your virtual
environment. To access information about education classes, certification
programs, and consulting services, go to http://www.vmware.com/services.
VMware, Inc.
Welcome to the Discovered Machines
Import Tool
1
The Discovered Machines Import Tool (DMIT) obtains information related to discovered machines and
devices that are retrieved by Network Mapper (Nmap), and imports selected machines into the VCM
database as discovered machines. After the machines are in VCM, you can begin the process of licensing
and managing them.
This guide describes how to import machines discovered by Nmap into the VCM database.
The Discovered Machines Import Tool provides the following capabilities:
n
Allows you to retrieve current information found in the database and compare this information with
the information retrieved by Nmap.
n
Provides a list of machines that exist in the database.
n
Reports whether differences exist between the information retrieved by Nmap and the information in
the database.
If you have access to the database, you can import machines discovered by Nmap into the database. To
import discovered machines into the database when you do not have access to the database, the tool
allows you to create a SQL script that contains all of the required information.
For information about Nmap commands, see the Nmap Reference Guide at: http://nmap.org/book/manbriefoptions.html.
VMware, Inc.
7
VMware vCenter Discovered Machines Import Tool User's Guide
Prerequisites and Installation
The Discovered Machines Import Tool is supported on multiple Agent platforms. For a complete list, see
the VCM Hardware and Software Requirements Guide.
Before you can use the Discovered Machines Import Tool, your machine must have the following:
n
Nmap (with WinPcap) version 5.2.1.
n
VMware vCenter Configuration Manager version 4.9 or later.
Procedure
1. Locate the .msi, and double-click it to install the application.
2. Accept the license agreement.
3. Select to install the application to the default location or choose another path where you want to install
it.
4. Click Install, and then complete the wizard. By default, the files will be installed to C:\Program
Files\VMware\VCM\Tools\DMIT.
8
VMware, Inc.
Welcome to the Discovered Machines Import Tool
Navigating the User Interface
When you open the Discovered Machines Import Tool, the Welcome window explains how to start the
import process.
IMPORTANT To use the tool to import devices, you must have Administrator credentials.
VMware, Inc.
9
VMware vCenter Discovered Machines Import Tool User's Guide
Step 1: Select the Nmap Output Files
To begin the import process, locate the Nmap file, which contains information about the discovered
machines and devices.
IMPORTANT You must obtain the Nmap information before continuing the import process.
Procedure
1. Click Next. The Nmap Machines File page appears.
2. Click Select file… to specify the Nmap file to use to provide information about the discovered
machines, and then choose the XML file that contains the Nmap information. The file name appears
next to the button.
The Nmap file contains information related to discovered machines. It is helpful, but not essential, to
know the domain name for a particular machine; if the domain name is not available but other
required information is available, the tool can use the available information to parse the machines and
import them into the VCM database. If the required information for the machine is not available, the
machine will be discarded as indicated by Discarded Entries, and will be added to the DMIT log file.
3. Select a schema from the drop-down. The schema is used to validate the xml file being imported to
ensure the tool can read it correctly. The format of the data is stored in the schema, and the data of the
xml passed as an input to the tool is verified against the schema. After the xml data is validated against
the schema, the tool can parse it and load the data into the VCM database.
4. Click Generate Schema. A standalone .xml file will be generated. Save the schema to the directory of
your choice.
5. Click Process File to process the Nmap file. When the file contains valid Nmap information, the file
will be processed and information about the discovered devices will be displayed. If the selected file
10
VMware, Inc.
Welcome to the Discovered Machines Import Tool
does not contain valid Nmap information, an error message will appear.
The results displays the number of discovered machines and devices, and the number of entries that
were discarded due to lack of information.
6. Click Next to continue the import process.
IMPORTANT By default, the DMIT application generates log messages at the ERROR level, which is useful
for troubleshooting. To have the DMIT application generate log messages at the INFO level, which
provides additional information for items being processed, you must configure the DMIT application prior
to running it. See "Configuring the Discovered Machines Import Tool" on page 21 for details.
VMware, Inc.
11
VMware vCenter Discovered Machines Import Tool User's Guide
Step 2: Configure the Database Connection
You must configure the database connection and connect to the database to obtain useful information
about the machines. After configuring the database connection, you can use the tool to:
n
Determine whether a machine discovered by Nmap already exists in the database.
n
Determine if the information about a machine stored in the database is different or equal to the
information provided by Nmap.
n
Import the machines directly.
If you do not have access to the database, you must use the tool wizard to generate a SQL script. At the
end of the wizard, an option appears to save the SQL script. After you have saved the script, and have
access to the database, use the SQL script to import the machines into the database.
Procedure
1. Click Next to continue through the wizard.
2. In the SQL Server text box, enter the name of the SQL Server instance. If you do not know the
instance name, click the ellipsis (…) button and wait for the field to be populated or select from the
SQL Servers list. You may need to wait several moments for the tool to obtain the SQL Servers list.
3. In the Database Name text box, enter the name of the VCM database. If you do not know the name of
the database, click the ellipsis (…) button, select the SQL Server, and then enter your credentials. If the
credentials do not enable access to the database list, the tool displays a message indicating that the
database list cannot be retrieved from the selected SQL server, and that you must verify your
credentials. If after entering your credentials, you still cannot access the database, click Next to proceed
to generate a SQL script, which you can then use to import machines.
IMPORTANT If the selected database is not valid (for example, it does not contain the required tables or
stored procedures), a message appears indicating that the selected database does not meet the
necessary requirements. In this case, the tool will disconnect from the selected database, display a
status message, and then continue through the process without a database connection.
4. Select the authentication mode:
n
12
Windows Authentication: Selects the Windows Authentication mode.
VMware, Inc.
Welcome to the Discovered Machines Import Tool
n
SQL: Selects SQL authentication. You must provide a login name and password. When selecting
SQL Authentication, only the login name is saved; the password is not saved to avoid any
potential security risks.
5. Click Test Connection to verify the settings. When the connection is successful, a message indicating
success appears. The connection settings will be saved and available the next time you use the tool. If
the connection is not successful, a message indicating failure appears.
6. Click Next to continue and save the database configuration in the configuration file (dmit.exe.config).
NOTE If you did not click Test Connection to attempt to connect to the database, but all of the
settings needed to connect to the database are entered, a new connection will be attempted when you
click Next. When a connection to the database has been established, the log system will log into the
database using the DBE system.
Step 3: Select and Filter the Machines
You must select the machines to import into the database. Optionally, you can filter the machine list.
Procedure
1. Click Next to continue through the wizard. The Machines with Known OS wizard page appears and
displays machines that have a clearly identified Operating System.
VMware, Inc.
n
Default description: Creates a description that is applied to all machines in the data grid. When
entering a description in the field, you cannot use the following characters: ' " < > &.
n
Apply: Applies the description to the selected machines.
n
Select All: Selects all of the machines in the data grid.
n
Define Filter: Creates a filter for the displayed machines.
n
Data Grid: The data grid displays information about a machine discovered by Nmap. You can enter
a default description and apply it to all of the displayed machines in the data grid. You can also
change the description for each row.
n
Import (column): Selects an individual machine.
13
VMware vCenter Discovered Machines Import Tool User's Guide
n
Details (column): Links to additional information in the database when the information retrieved
by Nmap exists in the database. Possible link types are:
n
exist: Indicates the machine already exists in the database and matches the Nmap information.
n
different: Indicates the machine already exists in the database, but the Nmap information does
not match.
When a connection to the database exists, detailed information is retrieved. To determine
whether differences exist between the Nmap information and database fields, the tool compares
the following fields:
n
Nmap Information
Database Fields
Machine name
[machine_name]
DomainName
[domain_name]
Port
[machine_connection_http_port]
OperatingSystem
[machine_os]
HttpProxyID
[http_proxy_id]
edit: Indicates the machine is not present in the database, but that a connection to the database
exists. Clicking this link allows you to modify the Nmap information before the machine is
inserted into the database.
When a link exists in the Details column, you can click the link to view information in the
database for that machine. The Machine information dialog box appears and displays
information retrieved by Nmap from the database. You can modify the Nmap information. If
the link indicates the discovered values and database values differ, the differences will be
highlighted.
n
Discovered Values: Displays information for machines retrieved by Nmap. Some of this can
be modified.
n
Database Values: Displays information about the machine retrieved from the database.
n
Accept: Stores modifications in the database when all of the selected machines are imported.
2. Select the machines you want to import. You must select one or more machines to continue through
the process. If you do not select any machines, the wizard will still allow you to navigate through the
pages, but you will not be able to complete the wizard.
3. To filter the machine list, define a filter. Click Default Filter. The Filter Definition dialog box appears.
14
VMware, Inc.
Welcome to the Discovered Machines Import Tool
4. To add a new filter rule, click the Attribute column drop-down arrow and select the attribute. The
drop-down list displays the attributes used to filter the machines. Some of these attributes are
predefined values. For example, the attribute labeled “Different” indicates differences between the
Nmap information and the database information. Possible values are Yes/No.
NOTE When defining filters, text entries are not case sensitive. Wildcards are supported by using an
asterisk (*). The wildcard is part of the "contains" operator, and is entered in the Value field
5. To add an Operator to the filter rule, click the Operator drop-down arrow and select the operator.
Possible operators are:
Operator
Value of Attribute
=
Must be equal to the value defined in the Value Column.
!=
Must be not equal to the value defined in the Value Column.
<
Must be less than the value defined in the Value Column.
>
Must be greater than the value defined in the Value Column.
contains
Contains a value defined in the Value Column. Wildcards are supported by
using an asterisk (*). The wildcard is part of the "contains" operator, and is
entered in the Value field.
6. In the Value field, enter a value for the filter. Some attributes have pre-defined values. To view those
values, click the Possible Values drop-down.
7. To set a machine as a workstation, select the machine, scroll to the ClassID column, click in the field,
and then enter 2.
VMware, Inc.
15
VMware vCenter Discovered Machines Import Tool User's Guide
8. Click Next. The Machines with Uncertain OS wizard page appears and displays machines on which the
Operating Systems were not fully identified. The value displayed for each machine's Operating System
is the most accurate value assigned by Nmap.
9. Select the machines you want to import.
16
VMware, Inc.
Welcome to the Discovered Machines Import Tool
Step 4: Select Devices
The Devices page displays the devices discovered in the Nmap file.
IMPORTANT To import devices, you must have Administrator credentials. If you do not have
Administrator credentials, the Discovered Machines Import Tool will display a message indicating the
current credentials are not sufficient, and the Devices page will be disabled.
Procedure
1. Click Next. The Devices page appears.
2. Select the devices to import. Devices can include any supported equipment such as phones, switches,
hubs, routers, firewalls, etc. A complete list of devices is contained in DeviceID.xml, which is stored in
C:\Program Files (x86)\DMIT by default, or in the folder where you installed the application
software.
3. Define any filters, and then click Next to continue.
VMware, Inc.
17
VMware vCenter Discovered Machines Import Tool User's Guide
Step 5: Import the Machines
After all previous steps are complete, you can import the selected machines. The final page displays
information about the selected machines and devices to be imported.
Procedure
1. Confirm the information on the final page of the wizard is correct.
2. If the information is not correct, return to the previous pages and make any corrections.
3. Click Finish to import the machines and any devices.
4. The wizard displays the status of the import process. During the import process, if a connection to the
database exists, all of the selected machines will be added. If a connection does not exist, on the last
page of the wizard you must save the generated SQL script, and then after a connection to the
database is established run the script in either SQL Query Analyzer (for SQL Server 2000) or SQL
Server Management Studio (for SQL Server 2005).
5. When the process completes, the Results dialog box appears displaying a summary of the machines
and devices that imported successfully, and whether the devices were licensed successfully.
18
VMware, Inc.
Welcome to the Discovered Machines Import Tool
Step 6: Save the SQL Script
In cases where a connection to the database has not yet been established, save a copy of the generated
SQL script to run after the connection to the database is made.
Procedure
1. The Results dialog box may indicate that the tool is not connected to the database.
2. To save the script, click Save SQL Script. To close the dialog box without saving the SQL script, click
OK.
3. Click Finish to complete the process of importing the machines.
VMware, Inc.
19
VMware vCenter Discovered Machines Import Tool User's Guide
20
VMware, Inc.
Configuring the Discovered Machines
Import Tool
2
You can configure various options in the Discovered Machines Import Tool application.
IMPORTANT If you change the options in the DMIT application, you must follow all of the
recommendations listed here. Do not change any setting that is not mentioned in this document.
All of the settings for the DMIT application are configured in the dmit.exe.config XML file. To view the
various sections in this file, use an XML editor of your choice.
Changing the Log File Name
1. Open the dmit.exe.config file.
2. Locate the section named: <log4net>
3. Locate the sub-section named: <appender…>
4. Locate the parameter defined as:
<param name="File" value="dmi.log" />
5. Replace the current value, dmi.log, with your new path and filename. For example: c:\newdmi.log
6. Restart the application to apply the changes to the settings.
NOTE When a connection to the database has been established, the DMIT application logs information to
the VCM database. If a connection has not been established, the application writes information to a local
log file.
Changing the Log Level
1. Open the dmit.exe.config file.
2. Locate the section named: <root>
3. Locate the sub-section named: <level… />
4. Change the value to the log level required. You can use the following levels: ERROR, WARN, INFO,
DEBUG, OFF, FATAL, or ALL. The default is ERROR. For example:
<level value="ERROR" />
5. Restart the application to apply the changes to the settings.
VMware, Inc.
21
VMware vCenter Discovered Machines Import Tool User's Guide
Viewing Additional Information in the Selection Machines Data Grid
To view additional information about the discovered machines, on the Selection Machines wizard page,
follow these steps:
1. Open the dmit.exe.config file.
2. Locate the section named: <appSettings>. The settings resemble:
The SQLTimeout setting is used to determine the timeout for several SQL operations, including
connecting to the database, retrieving additional information from the database, and importing the
machines and devices into the database. The SQLTimeout setting is seconds.
3. Locate the sub-section named: <add key="columnsToHide"…>. This setting is a list separated by
commas, and specifies which columns will be hidden in the data grid. The current values are shown
here, with default values marked with an asterisk (*):
Machine Name
Platform ID
Selected *
MachinePlatformID *
DateDiscovered *
OperatingSystem
ExistInDB
Port
Accuracy *
HttpProxyID *
Different *
ConnectionName
DeviceType
DomainName
Description
DomainTypeID *
IP
ProtocolTypeID *
NetBiosNameFQ
ConnectionIPAddressInternal *
ClassID *
ConnectionIpAddressExternal *
OSID *
4. To display additional information, delete entries from the list. For example, if you want to display the
ProtocolTypeID, delete this entry from the list. If you want hide a column in the data grid, add the
column name to be hidden, such as DomainName.
5. Restart the application to apply the changes.
22
VMware, Inc.
Useful Nmap Command Lines
A
The syntax for using Nmap is as follows:
nmap [ <Scan Type> ...] [ <Options> ] { <target specification> }
OS Detection
n
-O: Enables OS detection. Output scan is in normal, XML, s|<rIpt kIddi3, and Grepable formats,
respectively, to the given filename.
OUTPUT:
-oN/-oX/-oS/-oG <file>
n
-R: Specifies DNS resolution for all targets. This option instructs Nmap to always perform reverse DNS
resolution on the target IP addresses. Reverse DNS is typically performed only against responsive
(online) hosts.
Examples
nmap.exe –O -R -oX c:\nmapoutput.xml 10.30.200.45
nmap -O –R -oX c:\myOutput2.xml 10.*0.0.*
Reference
For further information about the Nmap commands, see the Nmap Reference Guide at:
http://nmap.org/book/man-briefoptions.html
VMware, Inc.
23
VMware vCenter Discovered Machines Import Tool User's Guide
24
VMware, Inc.