1
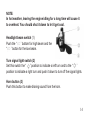
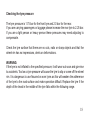
Manual-DB50QT-A
Dear Customer:
Thank you for purchasing the Direct Bikes DB50QT-A scooter.
The Direct Bikes DB50QT-A scooter is manufactured using some of the most
advanced production techniques in the world. The scooter features high
performance, economic fuel consumption and low noise levels. This manual
provides detailed information about the correct operation, maintenance and
adjustment of your DB50QT-A scooter. Please read this manual carefully to
ensure safety and maximum ease of use.
1
Important Notice:
• Driver and passenger
This vehicle is designed to carry only one driver and one passenger. The
driver is required to have the appropriate licence for these requirements.
Do not exceed the rated load capacity specified on the specification label.
• Road condition
This vehicle is designed to travel on flat roads. Do not ride this vehicle in
freezing or hazardous conditions.
• Modifications
This vehicle should not be modified.
CAUTION:
Personal injury or mechanical damage may result if you fail to operate
as instructed in the manual.
2
Location of Component parts
(1) Back-view mirror
(4) Muffler
(2) Headlight
(5) Taillight
(3) Front turn signal light
(6) Seat
3
Meter Panel and Indicators
All the controls for the indicators and warning lights are located on the meter
panel.
(1) Speedometer
(2) Mileometer
(3) High beam indicator
(4) Turn right signal light
(5) Turn left signal light
(6) Fuel meter
Fuel gauge
The fuel gauge indicates the approximate amount of fuel remaining in the fuel
tank. When the needle pointer stays in the F(full) position, it means the total
capacity of the fuel tank is now 6.0 litres (including reserve fuel). When the
needle pointer approaches the first dot on the red mark, it means that the fuel
tank must be refilled immediately.
4
Identification
The VIN or chassis number is located on the frame of the scooter and is
either under the seat or under the clip in cover in the front of the foot well.
The engine number is located on the left side on the bottom of engine.
NOTE:
You should regard this manual as a permanent component part of your
vehicle, it is essential for the continued operation and safety of your
scooter to perform periodic servicing by an approved dealer. This is
required under your warranty.
5
Fitting the accessories
Mirrors
The mirrors come ‘handed’, i.e. a left and right one. They screw into either the left
and right switch gear or into the front and back brake lever assemblies.
There is a lock nut on the threaded part of the mirror to ensure the mirror does not
come loose. Wind this lock nut up as far as it will go and carefully screw the mirror
into the mount.
It is important you do not ‘cross thread’ the mirror as it will damage the mount. When
the mirror is in as far as it will go sit on the motorcycle and make sure you can see
behind you. Once done move the lock nut down and tighten being careful not to
over tighten. Finish by sliding the rubber boot down over the lock nut.
6
Top box
1. Check the accessories.
2. Put the plastic bottom-board centrally
on the rear bracket, notice the four
holes highlighted in photo with white
circles.
7
3. Put the top box centrally on the
plastic bottom-board, notice the four
holes inside the top box highlighted in
photo with white circles.
4. With these four holes (highlighted in
white circles in figure 3) insert the 4
bolts and 4 washers.
8
5. Insert the bolts through the four aligned
holes in the bottom-board (highlighted
in white circles in figure 2). Hold the
long slotted bars under the rack with
the edges of the bars facing upwards.
Put the bolts through the holes of the
slotted bars.
6. Attach nuts to the bolts nearest the tail
of the scooter. With the further bolts
attach the rubber buffers in between the
slotted bars and bottom-board.
9
7. Attach nuts and tighten up all bolts.
8. This process is completed on both
sides of the top boxes so both slotted
bars are attached and secure.
10
9. Tighten the 4 bolts with a screwdriver
and wrench.
10. Put the foam pad inside the top box.
Please note: A maximum weight of 10 kilos is recommended. The weight may also
alter the handling of the scooter.
11
Fitting the battery
Make sure the scooter ignition is in the off position. Put the battery in the
compartment.
Fit the 2 red leads (sometimes one or both of these leads are covered by a
protective black sleeve, if you lower the sleeves you will see the red leads) to the +
side (also marked red on the terminal.) using the screw provided.
The black lead is then fitted with the crew provided to the - negative side.
If the battery needs to be charged you may use a car battery charger or take it to
your local approved dealer for a boost.
12
Guide to Operation
Ignition Switch
(1)
position Turn the switch this position
to start the engine; the switch key can not
be pulled out in this position.
(2)
position Turn the switch to this position
to shut down the engine; the switch key can
be pulled out in this position.
(3)
position Turn the switch all the way to the left, push it down and turn
to the
position; the key can be pulled out. In this case, the vehicle can
not be steered and the engine as well as the lighting system will not work.
13
NOTE:
In hot weather, leaving the engine idling for a long time will cause it
to overheat. You should shut it down to let it get cool.
Headlight beam switch (1)
Push the “
” buttom for high beam and the
“
” button for the low beam.
Turn signal light switch (2)
Set this switch the “
” position to indicate a left turn and to the “
”
position to indicate a right turn and push it down to turn off the signal lights.
Horn button (3)
Push this button to make blaring sound from the horn.
14
Start button (4)
When this button is pushed, the starting
motor works to start the engine. See the
part “Starting the Engine” for the starting
procedure.
Headlight switch (5)
“
” Position: When the switch is set to this position, the headlight,
taillight, position light and meter light all go on.
“
” Position: When this switch is set to this position, the position light,
taillight and meter light go on.
OFF Position: When the switch is set to this position (in gray dot mark),
the headlight, taillight and meter light go off.
15
Important Checks
The scooter is nearly ready to go, but before
you put any petrol or oil into the scooter, there
are a few final things that need checking.
These checks should be carried out routinely
to insure good performance and safe operation.
Checking the oil
The engine oil dipstick and cap are combined and is located on the right side of the
engine. With the bike on its centre stand and on level ground remove the dipstick
and clean it. Re-insert it and remove it again. The oil level should be visible on the
hatched marking between the lower and upper level. Add or remove as appropriate.
Using the recommended type of oil
SAE 10W-40 for 4-stroke engines.
16
Brakes
Checking the front brake
Check the brake for normal
performance and adjust it’s
free play. The free play refers
to the distance for which the
front brake lever travels freely
to achieve the braking effect.
Required free play : 5 to 10 mm. This must be checked with steering at left, right
and centre.
Checking the back brake
Measure the traveling distance of the rear brake lever before the brake begins to
create the braking effect, which should be within 10 to 20 mm from the top end of the
brake lever. This must be checked with the steering at left, right and centre.
Maintaining the brakes
Replace the brake shoe and lining when it is found worn down to the limit at your
nearest approved dealer.
17
Checking the tyre pressure
The tyre pressure is 1.75 bar for the front tyre and 2.0 bar for the rear.
If you are carrying passengers or luggage please increase the rear tyre to 2.25 bar.
If you are a light person or heavy person these pressures may need adjusting to
compensate.
Check the tyre surface that there are no cuts, nails or sharp objects and that the
wheel rim has no impressions, dents or deformations.
WARNING:
If the tyre is not inflated to the specified pressure, it will wear out soon and give rise
to accidents. Too low a tyre pressure will cause the tyre to slip or come off the wheel
rim. It is dangerous to use fissured or worn tyres as this will weaken the adherence
of the tyre to the road surface and make operation difficult. Replace the tyre if the
depth of the tread in the middle of the tyre falls within the following range.
18
Suspension
The suspension should be nice and free and should return to its normal position
when bounced up and down. There should be no leaks.
Fuel / Vacuum Pipes
Please check that all fuel / vacuum pipes are connected and that there are no loose
pipes. If you have any questions regarding this please contact Direct Bikes for
assistance Tel: 0845 652 0680
19
Electrics
Please go through the controls and make sure that the following systems are
working correctly; Indicators: left and right, front and rear. Lights: sidelights, front
and rear. High and low beam for the front light. Rear brake light, working from both
the front and rear brake independently. The horn: It should be a sharp loud noise.
The main fuse is located next to the battery and is rated at 15 amps. Do not use a
larger fuse.
Throttle
Test that the throttle is fully operational. Make sure there is about an eighth of a turn
(1/8) freeplay in the throttle. Check with the throttle at left, right and centre.
Steering
Test that the steering is fully operational. The steering should be free and have little
resistance to turning. If it has, check the cables are routed correctly.
20
General ‘walk around’
Before use please go around the scooter and check that all nuts and bolts are tight
and secure and that there are no loose parts.
Starting the scooter
Before starting you need to put petrol in. The petrol cap is either located under the
seat or at the rear of the foot well under a locked flap. These scooters use normal
unleaded (90> octane). You must not over fill with petrol as any spillages will
damage the paint and may spill onto a hot engine creating a hazard. Make sure the
scooter is on the main centre stand. Put the key in the ignition and turn clockwise
until the ignition lights come on. Hold the rear brake and press the ignition button
on the right hand switchgear. Keep the button pressed in until the scooter starts but
for no longer than 5 seconds if it does not. Wait 10 seconds before trying again. You
should not need to touch the throttle as the carburettor has an auto choke. These
scooters are also fitted with a manual kick start on the left side of the engine. To
operate this you still need to have the rear brake applied. Push the kick-start pedal
down slowly until there is resistance in the engine then release until the pedal
returns to the top. Push the pedal all the way down briskly and release. Repeat as
necessary until the scooter has started. DO NOT REV THE SCOOTER WHILST IT
IS ON THE STAND. The scooter is fitted with an auto clutch and could go forward if
it comes off the stand and cause injury.
21
Riding the Scooter
Please always wear a HELMET and PROTECTIVE CLOTHING! Familiarise
yourself with the controls BEFORE you go out on a public road. Take the
appropriate training if you do not all ready know how to ride a scooter. Failure to do
so could put yourself or others at risk of injury! The controls are designed for ease
of use. The right hand controls the throttle front brake and the switch for the lights
and starter. The left hand controls the rear brake and the switch for the high low
beam, indicator (left and right) and the horn switch. Start the scooter. Sit astride the
scooter with one or both feet on the floor and you’re hands on the handle bars with
the brakes on. Let the brakes off as you gently twist the throttle and simultaneously
lift you’re feet into the footwell. When you want to slow or come to stop release the
throttle and gently apply the brakes.
For safety do not ride your scooter in freezing weather conditions; in cold weather
conditions it is advisable to lubricate throttle cable with wd40 or silicon greece.
22
CAUTION:
Always start the engine with the rear brake pedal depressed.
The engine should not be allowed to run too fast when it is being warmed up.
Quick opening and closing of the throttle must be avoided.
Running in
Your new scooter requires a ‘running in’ period. This is very important because it
allows the mechanical parts to bed in and will increase the serviceable life of the
machine. It is recommended that for the first 100 miles of use the no more than
two thirds of throttle is used and try not to go above 20mph. Vary the speed. After
100 miles have been achieved please go through all the ‘Checks’ as mentioned
previously. In addition change the engine oil, the rear drive oil, check and clean the
air filter, check and clean the spark plug, check the level of the front brake fluid, the
play in the rear brake, check the pressure in the tyres. The engine oil required is a
good quality Sae10w-40 suitable for scooters using a wet clutch. The approximate
capacity is 1000ml. The final drive should use 200ml of a Sae90w gear oil, again
suitable for scooters. The front brake fluid required should be of at least DOT4 or
higher. The gap in the spark plug should be 0.7mm.
23
Storage
When not using your scooter a waterproof cover should be used to protect the
scooter from the elements. If storing the scooter for periods in excess of six weeks it
is advisable that a few further things are done. Drain the fuel. You will find the drain
cock at the lowest point of the carburettor. Disconnect the battery and leave it on a
‘trickle’ charger such as an ‘optimate’. Raise the wheels off the floor. Take the spark
plug out and put 15ml of oil into the cylinder and turn the engine over. Leave the
spark plug out and put a clean cloth over the hole to stop dust/debris getting into
the engine. Spay scooter with lube, e.g. ‘WD40’. On re-commission of the scooter;
change the engine oil, reconnect the battery, install the spark plug and go through
all of the ‘Important Checks’. Test drive the scooter at low speed and not on the
public road to ensure safety.
24
Cleaning
Your new machine should be cleaned on a regular basis. This stops the ingress of
corrosion, maintains its lustrous finish and gives you a chance to observe anything
that may be broken or damaged. The bike should be washed off in warm soapy
water using a sponge or soft cloth. Please use a detergent designed for scooters
as washing- up liquids and wash’n’wax style soaps are not fit for the purpose. Do
not use a pressure washer. A hosepipe with a spay attachment is ok. A good quality
wax for the bodywork, a quality spray such as WD-40 for the engine and ancillaries
is ok. DO NOT GET EITHER ONTO THE BRAKES. If you do, use brake cleaner to
remove.
Servicing and schedule
To ensure safety, good performance and durability of the vehicle and reduced
emission, be sure to perform periodic maintenance by an approved dealer. If you
are unaware of your local approved dealer, please contact Direct Bikes on: 0845
652 0680
The following maintenance schedule is made accordingly to the distance travelled
or duration of ownership which ever is sooner.
25
26
Repeat same service intervals when exceeding 31000kms / 64 months from the
table above.
27
Troubleshooting
Checking the carburettor
In the unlikely event that your scooter fails to
start please check the air pilot screw on the
side of the carburettor. It should be 2.5 turns
out. Screw all the way in and count the
number of turns out.
28
Checking the spark plug
A dirty spark plug with dirty electrodes or excessive
gap between electrodes will not be able to generate
full sparks.
(Cleaning)
• The best result can be achieved if you clean the
spark plug with a spark plug cleaner.
• If you do not have such a cleaner, you can clean
it with a wire brush.
(Adjusting the gap between electrodes)
• The side electrode gap should normally be within 0.6 to 0.7 mm
(as shown in the figure).
• Recommended type of spark plug for use: NGK
NOTE: Never use other types of spark plug than the recommended one.
CAUTION:
• Avoid burning yourself when working at a hot engine just shout down.
• Screw the spark into place first by hand and tighten it with the socket wrench.
29
Checking the fuse
Turn off the master switch and check the fuse to see if it is blown. Replace the blown
fuse with one of the specified capacity:
• Always find out the cause before replacing a blown fuse.
• Unscrew the two screws battery and remove the battery cover.
The fuse is located in the fuse box by the side of the battery.
• Open the fuse box and remove the fuse by expanding the fuse clamp from both ends of the fuse.
Fuse capacity: 9 A
• Always use original products of the
recommended specifications when
replacing electric components (lights,
meters, etc).
• Do not flush your vehicle with
pressurized water when cleaning it.
30
CAUTION:
• When removing the fuse, do not expand the fuse clamp too wide.
• After the fuse is installed, check the fuse clamp to see if it runs loose. The fuse will generate heat if the fuse clamp is loose. Which is often the major cause of trouble.
WARNING:
Never use a fuse having an amperage capacity different from the rated value as
this will cause damage to the electric system and give rise to fire hazards or make
it impossible to use the lighting system when you travel during the night or cause
engine failure.
If you require technical assistance please contact Direct Bikes on: 0845 652 0680
31
Safety Precautions
It is only the driver that can ensure the safety of travel.
A safety-minded scooter driver always spends much time learning how to drive and
develop his driving skills in a place where traffic is not so busy before he begins to
drive on a public road.
1. A great many of scooter accidents are caused by the failure of the car driver to
see the scooter driver. The scooter driver should use every means to make himself
clearly seen by the car driver. He can do this, for example, by:
• Wearing colourful and eye-catching clothes
• Avoiding the blind spot to traffic and driving without any mental alertness
2. Many scooter accidents happen at the intersection of roads, entrance to a
parking lot and on a carriage way. Therefore be extremely careful when driving
through these areas.
3. High-speed driving is a major cause for scooter accidents. Always observe the
speed limit and never drive in excess of it.
4. Many scooter accidents are caused by inexperienced drivers. Those who have
just learnt how to drive a scooter should be thoroughly familiarized with the
performance of the vehicle before driving on a public road. Never lend your vehicle
to anyone who is inexperienced in driving.
32
5. As most serious scooter accidents cause injuries of the drivers head, always
wear a helmet and protective clothing such as protective glasses, boots, gloves,
thick and strong coat.
6. Do not drive on rough rugged roads as rough surfaces may lead to loss of control
and cause damage to the vehicle.
Safety Rules
1. Before driving a scooter, be sure to check it carefully (See the section
“Inspection before Operation” of the manual).
2. Always put on a helmet and if possible wear boots, gloves, eye-protecting
glasses and colourful clothes to ensure safety.
3. The rear luggage rack or top box installed by the driver is used to carry
lightweight objects only. If a top box is attached to either rear side of the vehicle, the
objects should be equally distributed inside either top box. The objects being carried
should be securely fastened into place so that they will not move during travel. See
the relevant part of the manual for the detailed information on loading.
4. When driving hold the handlebar with both hands and put feet on the footrest.
5. Before driving on a public road, you should practice on a place free of busy traffic
to familiarize yourself fully with the performance of your vehicle.
33
6. Always remember to switch on the turn signal lights before making a turn or
change lanes.
7. Do not drive your vehicle on the shoulder on either side of the road.
Loading
WARNING:
A) The top box is used to carry only lightweight objects, not for very heavy
ones.
B) When determining if the vehicle is overloaded (the rated load capacity
being 150kg), the weights of the objects being carried, the vehicle and the
driver should be put together.
C) An overloaded vehicle is unable to run steadily and becomes difficult to
operate.
34