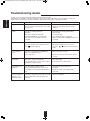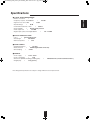
1
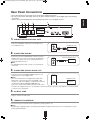
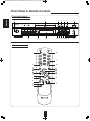
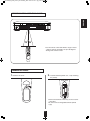
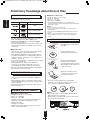
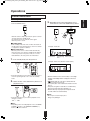
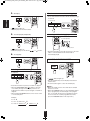
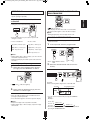
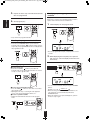
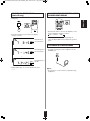
5505(G) cover_cover.qxp 2010-12-17 오후 5:20 페이지 1
OPERATING INSTRUCTIONS
CD-5505
COMPACT DISC PLAYER
CD-5505(G)_ENG_110113_CD-5505(G)_ENG2011-01-24오전9:28페이지2
Introduction
ENGLISH
READ THIS BEFORE OPERATING YOUR UNIT
This symbol is intended to alert the user to the presence of
uninsulated "dangerous voltage" within the product's
enclosure that may be of sufficient magnitude to constitute
a risk of electric shock to persons.
CAUTION
: TO REDUCE THE RISK OF ELECTRIC
SHOCK, DO NOT REMOVE COVER (OR
BACK). NO USER-SERVICEABLE PARTS
INSIDE. REFER SERVICING TO
QUALIFIED SERVICE PERSONNEL.
This symbol is intended to alert the user to the presence of
important operating and maintenance (servicing)
instructions in the literature accompanying the appliance.
WARNING : TO REDUCE THE RISK OF FIRE OR ELECTRIC SHOCK, DO NOT EXPOSE THIS APPLIANCE TO RAIN OR MOISTURE.
CLASS 1
LASER PRODUCT
CAUTION
Invisible laser radiation when the unit is open.
Do not stare into beam.
CAUTION : USE OF ANY CONTROLS, ADJUSTMENTS, OR PROCEDURES OTHER THAN THOSE SPECIFIED
HEREIN MAY RESULT IN HAZARDOUS RADIATION EXPOSURE.
FOR YOUR SAFETY
EUROPE
AUSTRALIA
220 V
240 V
Units shipped to Australia are designed for operation on 230 V AC only.
To ensure safe operation, the three-pin plug supplied must be inserted only into a standard threepin power point which is effectively earthed through the normal household wiring. Extension cords
used with the equipment must be three-core and be correctly wired to provide connection to earth.
Improper extension cords are a major cause of fatalities. The fact that the equipment
operates satisfactorily does not imply that the power point is earthed and that the installation
is completely safe. For your safety, if in any doubt about the effective earthing of the power
point, consult a qualified electrician.
PAN-EUROPEAN UNIFIED VOLTAGE
All units are suitable for use on supplies 220-240 V AC.
2
CD-5505(G)_ENG_110113_CD-5505(G)_ENG2011-01-24오전9:28페이지3
CAUTION
• Leave a space around the unit for sufficient ventilation.
• Avoid installation in extremely hot or cold locations, or in an area
that is exposed to direct sunlight or heating equipment.
• Keep the unit free from moisture, water, and dust.
• Do not let foreign objects in the unit.
• The ventilation should not be impeded by covering the ventilation
openings with items, such as newspapers, table-cloths, curtains,
etc.
• No naked flame sources, such as lighted candles, should be
placed on the unit.
• Please be care the environmental aspects of battery disposal.
• The unit shall not be exposed to dripping or splashing for use.
• No objects filled with liquids, such as vases, shall be placed on
the unit.
• Do not let insecticides, benzene, and thinner come in contact
with the set.
• Never disassemble or modify the unit in any way.
■Notes on the AC power cord and the wall outlet.
• The unit is not disconnected from the AC power source(mains)
as long as it is connected to the wall outlet, even if the unit has
been turned off.
• To completely disconnect this product from the mains,
disconnect the plug from the wall socket outlet.
• When setting up this product, make sure that the AC outlet you
are using is easily accessible.
• Disconnect the plug from the wall outlet when not using the unit
for long periods of time.
These symbols on the products, packaging, and/or
accompanying documents mean that used electrical and
electronic products and batteries should not be mixed
with general household waste. For proper treatment,
recovery and recycling of old products and used
batteries, please take them to applicable collection
points, in accordance with your national legislation.
By disposing of these products and batteries correctly,
you will help to save valuable resources and prevent any
potential negative effects on human health and the
environment which could otherwise arise from
inappropriate waste handling.
For more information about collection and recycling of
old products and batteries, please contact your local
municipality, your waste disposal service or the point of
sale where you purchased the items.
[Information on Disposal in other Countries outside the
European Union]
These symbols are only valid in the European Union. If
you wish to discard these items, please contact your
local authorities or dealer and ask for the correct method
of disposal.
Note for the battery symbol (bottom two symbol
examples):
The sign Pb below the symbol for batteries indicates that
this batteries contains lead.
PRECAUTIONS
■Moisture condensation
Moisture may form on the lens in the following conditions.
• Immediately after a heater has been turned on.
• In a steamy or very humid room.
• When this unit is moved from a cold place to a warm one.
If moisture forms inside this unit, it may not operate properly.
In this case, turn on the power and wait about one hour for the moisture to evaporate.
■If there is noise interference on the TV while a broadcast is being received.
Depending on the reception condition of the TV, interference may appear on the TV screen while you are watching a TV
broadcast and this unit is left on. This is not a malfunction of this unit or the TV. To watch a TV broadcast, turn off this unit.
■Do not transport this unit with discs left in it.
■Do not place on the component such as amplifier or receiver that generates heat.
If so, the temperature inside this unit rises and malfunction may occur.
3
ENGLISH
Information for Users on Collection and Disposal of
Old Equipment and used Batteries
CD-5505(G)_ENG_110113_CD-5505(G)_ENG2011-01-24오전9:28페이지4
ENGLISH
CONTENTS
Introduction
• READ THIS BEFORE OPERATING YOUR UNIT
Rear Panel Connections
I
I
2
5
Front Panel & Remote Controls
I
6
• REMOTE CONTROL OPERATION RANGE
• LOADING BATTERIES
I
9
Preliminary Knowledge About Discs & Files
• PLAYABLE DISCS
I
10
• USB MEMORY DEVICES
I
10
• PLAYABLE AUDIO FILE FORMATS
I
• CARE AND HANDLING OF DISCS
I
I
9
10
10
Operations
• PLAYING TRACKS/FILES
I
11
• PLAYING IN RANDOM ORDER
I
12
• REPEAT PLAY
I
13
• PLAYING THE FIRST 10 SECONDS OF EACH TRACK/FILE
I
• PLAYING IN DESIRED ORDER
I
13
• SELECTING A TIME DISPLAY (Audio CD only)
I
15
• ADJUSTING THE BRIGHTNESS OF THE FLUORESCENT DISPLAY
• LISTENING WITH HEADPHONES
I
15
Troubleshooting Guide
Specifications
I
I
16
17
4
13
I
15
CD-5505(G)_ENG_110113_CD-5505(G)_ENG2011-01-24오전9:28페이지5
• Do not plug the AC input cord into the AC outlet when making connections.
• Be sure to connect the white plugs to the L(Left) jacks and the red plugs to the R (Right) jacks when making
connections.
• Refer to the connecting diagram in the operating instructions of your amplifier/receiver
5
4
CD-5505
ANALOG
DIGI LINK
DIGITAL
COMPACT DISC PLAYER
POWER SOURCE
230V
POWER CONSUMPTION
L
50Hz
14 W
DESIGNED IN USA
ASSEMBLED IN CHINA
R
OPT
SN.
1. CONNECTING ANALOG AUDIO OUTS
• Connect the ANALOG L and R jacks to the CD IN jacks of
your amplifier/receiver.
ANALOG
Amplifier/receiver
L
CD IN
R
2. CONNECTING DIGILINK
• Connect this jack to the DIGILINK jack of Sherwood system
amplifier/receiver to control this unit remotely by DIGILIN II or
III system. (For details, refer to the operating instructions of
Sherwood amplifier/receiver.)
■Note :
• The DIGILINK operation may not work on some Sherwood
components.
DIGI LINK
Sherwood amplifier/receiver
DIGILINK
3. CONNECTING OPTICAL DIGITAL OUT
• Connect this jack to the OPTICAL DIGITAL IN jack of your
amplifier/receiver to enjoy digital sound.
■Notes :
• It is not recommended to record digital audio signals with
digital audio connection between this unit and MD or CD
recorder, etc.. When recording the sounds played on this unit,
record them through the ANALOG AUDIO OUT jacks.
• Some of the commercially available optical fiber cords cannot
DIGITAL
Amplifier/receiver
OPTICAL IN
OPT
be used for the equipment. If there is an optical fiber cord which cannot be connected to your equipment, consult your dealer
or nearest service organization.
4. AC INPUT CORD
• Plug the cord into a wall AC outlet.
5. TERMINAL FOR UPGRADE
• This terminal may be used in the future to update the operating software, etc.
■Note :
• Programming for upgrade requires specialized programming knowledge and for that reason we recommend that it only be
done by qualified installers.
5
ENGLISH
Rear Panel Connections
CD-5505(G)_ENG_110113_CD-5505(G)_ENG2011-01-24오전9:28페이지6
Front Panel & Remote Controls
ENGLISH
Front panel controls
1
3
11
21
22
2
4
Remote controls
2
19
11
13
16
d
a
f
b
c
e
8
12
6
14
15
17
18
6
12
7
18
6
9 8 1014 13
5
20
CD-5505(G)_ENG_110113_CD-5505(G)_ENG2011-01-24오전9:28페이지7
16. INTROSCAN BUTTON
1. POWER SWITCH
Press this button to play the first 10 seconds of each
track/file.
17. FOLDER UP/DOWN (+/-) BUTTONS
2. POWER ON/STANDBY button
Press these buttons to select the desired folder.
In the standby mode, press this button to turn the power
on and to enter the operating mode.
In the operating mode, press this button again to turn
the power off and to enter the standby mode.
18. TIME BUTTON
Press this button to display the different time
information on the Audio CD.
3. DISC TRAY
19. DIMMER BUTTON
Load a disc on the disc tray.
4. OPEN/CLOSE (
Press this button to select the brightness of the
fluorescent display as desired.
) BUTTON
20. HEADPHONE JACK
Press this button to open or close the disc tray.
Stereo headphones can be plugged into this jack for
private listening.
5. USB CONNECTOR
For details, see next page.
21. REMOTE SENSOR
6. CD/USB SELECTOR BUTTON
This receives the signals from the remote control unit.
Press this button to select the disc or the USB memory
device as playback source.
22. FLUORESCENT DISPLAY
For details, see next page.
7. PLAY/PAUSE (
) BUTTON
■DIGILINK SYSTEM REMOTE CONTROL
ⓐPress this button to start play in the stop or pause
mode.
ⓑPress this button to interrupt play temporarily.
8. STOP (
This unit can be remotely conrolled with Sherwood
DIGILINK III amplifier or receiver.
• For avaliable functions, refer to the compatible
unit’s operating instructions.
• To listen to a CD by DIGILINK system, first
make DIGILINK connection between this unit
and the Sherwood compatible amplifier or
receiver.
) button
Press this button to stop play or clear the programmed
tracks/files.
9. BACKWARD SKIP/SEARCH(
/
) BUTTON
ⓒPress this button to replay from the beginning of the
current track/file or return to a previous track/file.
ⓓPress and hold down this button to search for a
specific passage in fast backward.
10. FORWARD SKIP/SEARCH(
/
) BUTTON
ⓔPress this button to play from the beginning of a next
track/file.
ⓕPress and hold down this button to search for a
specific passage in fast forward.
11. NUMERIC(0~9) BUTTONS
Press the corresponding buttons to select a track/file
for play or programming.
12. PROGRAM BUTTON
Press this button to program your favorite tracks/files or
to review the programmed tracks/files.
13. RANDOM PLAY BUTTON
Press this butto to play tracks/files in random order.
14. REPEAT (1/F/ALL) BUTTON
Press this button to play a track/file, a folder, or all
tracks/ files repeatedly.
15. REPEAT A↔B BUTTON
Press this button to play a specific passage repeatedly.
7
ENGLISH
Push this switch to turn the power off and to enter the
standby mode.
To switch the power off, push this switch again.
CD-5505(G)_ENG_110113_CD-5505(G)_ENG2011-01-24오전9:28페이지8
■USB CONNECTOR
ENGLISH
• An USB memory device can be connected to th USB connector to listen to MP3 or WMA
files stored on it through this unit.
■ Note :
• After USB playback, remove the USB memory device in the stop mode or in the standby
mode.
USB memory device
■FLUORESCENT DISPLAY
PROGRAM indicator
PAUSE indicator
PLAY indicator
MUSIC CALENDAR display
REPEAT indicators
RANDOM indicator
Track/file number, playing time, operating information, etc.
8
CD-5505(G)_ENG_110113_CD-5505(G)_ENG2011-01-24오전9:28페이지9
ENGLISH
REMOTE CONTROL OPERATION RANGE
• Use the remote control unit within a range of about
7 meters (23 feet) and angles of up to 30 degrees
aiming at the remote sensor.
LOADING BATTERIES
1. Remove the cover.
2. Load two batteries(“AAA” size, 1.5V) matching
the polarity.
• Remove the batteries when they are not used for
a long time.
• Do not use the rechargeable batteries (Ni-Cd
type).
9
CD-5505(G)_ENG_110113_CD-5505(G)_ENG2011-01-24오전9:28페이지10
Preliminary Knowledge About Discs & Files
ENGLISH
PLAYABLE DISCS
■WMA(Windows Media Audio)
• Sampling frequency : 32, 44.1, 48 kHz
• Bit rate : 32 ~ 320 kbps
• Extension : .wma, .WMA
• WMA Tag is not available
• Windows Media and the Windows logo are trademarks or
registered trademarks of Microsoft Corporation in the United States
and/or other countries.
■Notes :
• Folders can be up to ten levels deep.
• For some files, it may not be possible to use certain functions
during playback.
• Files protected by DRM(Digital Rights Management) cannot be
played.
• When the data of file and folder names is larger than the unit’s
memory capacity, some files, etc. cannot be recognized and
played.
This unit supports the following discs.
Disc
Logo
Format or file type
PCM
Audio CD, MP3, WMA
Audio CD, MP3, WMA
• This unit supports CD-R and CD-RW discs recorded in
Audio CD(CD-DA) format, MP3 or WMA format.
• Only CD-R and CD-RW discs recorded with ISO9660
format can be played back.
• This unit supports multi-session discs. Some multi-session
discs may take a long time to load and some may not be
loaded at all.
CARE AND HANDLING OF DISCS
• In handling a disc, hold it carefully
with edges.
■Unplayable discs
• Since this unit cannot support disc types, formats and file
types not listed above, do not play such discs.
• Some CD-R and CD-RW discs cannot be played due to
incomplete disc finalization, recording quality or physical
condition of the disc, characteristics of recording device or
authoring software, etc.
See the operating instructions supplied with your recording
device for more information.
• Some Audio CDs use copy protection that doesn’t
conform to the official CD standard. Since these are
nonstandard discs, this unit cannot play them properly.
• When an Audio CD recorded in DTS-ES or Dolby Digital
EX is played, noise may be heard.
• Do not stick paper or write
anything on the printed surface.
• Finger marks and dust on the
recorded surface should be
carefully wiped off with a soft cloth.
Wipe straight from the inside to the
outside of the disc.
USB MEMORY DEVICES
• Always keep the discs in their
cases after use to protect them
from dust and scratches.
• An USB memory device can be connected to the USB
connector on the front panel to play MP3 or WMA files
stored on it.
• Only USB memory devices conforming to mass storage
class and MTP(Media Transfer Protocol) standards can be
played on this unit.
• Thin unit supports FAT16 or FAT32 file format system for
USB memory divece.
• Do not use a cracked, deformed, or repaired disc.
These discs are easily broken and may cause serious
personal injury and apparatus malfunction.
PLAYABLE AUDIO FILE FORMATS
■Notes:
• Do not expose discs to direct sunlight, high humidity or
high temperature for a long time.
• When loading or unloading a disc in the disc tray, always
place it with the printed side up.
■MP3(MPEG-1 Audio Layer-3)
• Sampling frequency : 32, 44.1, 48 kHz
• Bit rate : 32 ~ 320 kbps
• Extension : .mp3, .MP3
• Fixed bit-rate files are recommended. Variable bit-rate
(VBR) fiels are playable, but playing time may be
displayed incorrectly.
• ID3 Tag is not avaliable.
• MPEG Layer-3 audio coding technology licensed from
Fraunhofer IIS and Thomson.
10
CD-5505(G)_ENG_110113_CD-5505(G)_ENG2011-01-24오전9:28페이지11
Operations
Before operation
3. Depending on the selected playback source,
• Push the POWER switch.
load a disc or connect the USB memory device.
or
• Then this switch is kept depressed, the power is turned
off and it enters the standby mode.
• To switch the power off, push this switch again.
• Then the power is cut off.
■Standby mode
• In the standby mode, this unit is not disconnected from
the AC mains and a small amount of current is retained
to support the operation readiness.
Example : Audio CD
■Auto Power Save
• The auto power save is a function that automatically
turns the power off to enter the standby mode. When it
is in the stop mode, in the pause mode, etc. for more
than 30 minutes, the auto power save will function.
Total tracks
Total playing
time
Music calendar
1. In the standby mode, turn the power on.
Example : Music files (923 files and 15 folders)
or
+
Total files
• Each time this button is pressed, this unit is turned on to
enter the operating mode or off to enter the standby
mode.
Total folders
• When the number of files is more than 99 (i.e. a three-digit
number), the third-digit number is displayed on the music
calendar.
• “ ” indicator lights up on the music calendar when the
number of tracks is more than 14.
• 8 cm (3 inch) discs can be loaded on the inside circle of the
tray, too.
• It may take a long time to read a disc or an USB memory
device that contains many files and folders, etc.
• When the disc tray is kept opened, if it elapsed over 30
seconds, it will be closed automatically.
2. Select the disc or the USB memory device as a
playback source.
or
■Note :
• Do not open or close the tray by force.
Doing so may damage it.
• Each time this button is pressed, the playback source
changes as follows :
“Cd” ↔ “USb”
■Note :
• Depending on the selected playback source, the OPEN/
CLOSE(
) button or the FOLDER UP/DOWN(+/-)
buttons, etc. will not function.
11
ENGLISH
PLAYING TRACKS/FILES
CD-5505(G)_ENG_110113_CD-5505(G)_ENG2011-01-24오전9:28페이지12
4.
To advance or reverse fast during play
Start play.
ENGLISH
• Press and hold down the button until the desired passage
is reached.
To reverse fast
or
or
To advance
fast
•“
” indicator lights up.
• The unit plays from the first track/file.
5.
Selecting a folder during play
To interrupt play temporarily.
To select previous
or
To select next
•“
” indicator lights up.
• To resume play, press the PLAY(“
6.
” or “
”) button.
• Each time the button is pressed, the previous or the next
folder is selected and the first file in that folder is
automatically played.
To stop play.
PLAYING IN RANDOM ORDER
or
or
Selecting a track/file during play
To skip back
or
•“
” indicator lights up.
• The unit automatically selects and plays tracks/files in
random order.
• Press this button again to cancel the random play.
To skip
ahead
■Notes :
• When the number of files is more than 99, the random
play does not work.
• When the NUMERIC buttons are pressed during random
play or program play, the random play or the program
play is canceled. (However, the programmed contents
are not cleared. To recall the programmed contents,
press the PROGRAM button in the stop mode.)
• Each time the button is pressed, a track/file is skipped.
• When the BACKWARD SKIP(
) button is pressed
once midway through a track/file, play returns to the
beginning of that. When it is pressed again, a track/file is
skipped.
• When using the NUMERIC buttons on the remote control
or on the front panel.
Example :
For “3” : 3
For “15” : 1 within 2 sec.
within 2 sec.
For “123” : 1
5
2
within 2 sec.
3
12
CD-5505(G)_ENG_110113_CD-5505(G)_ENG2011-01-24오전9:28페이지13
PLAYING THE FIRST 10 SECONDS OF
EACH TRACK/FILE
REPEAT PLAY
• You can play a track/file, a folder, all tracks/files or a
specific passage repeatedly.
ENGLISH
Repeating a track/file, a folder, all
tracks/files
• During play of the desired track/file or folder,
•“
” indicator flickers.
• The unit plays the first 10 seconds of each track/file.
• Press this button again to cancel the introscan play.
■Note :
• During program play, introscan play will not work.
or
PLAYING IN DESIRED ORDER
• Each time this button is pressed, the repeat mode
changes as follows.
• In case of Audio CD
• In case of files
• Up to 20 tracks/files can be programmed to be played in
any desired order.
→ ALL(“RPT”) : All track repeat
→ ALL(“RPT”) : All file repeat
1.
↓
ONE(“RPT1”) : Track repeat
↓
OFF : Repeat mode off
↓
ONE(“RPT1”) : File repeat
↓
FOL(“RPT”) : Folder repeat
↓
OFF : Repeat mode off
or
■Notes :
• During random play or introscan play, you can select the
all track/file repeat mode only.
• During program play, the folder repeat mode cannot be
selected.
• Then “
Repeating a specific passage
1.
In the stop mode, enter the program mode.
” indicator flickers.
2. Select the desired track/file and store it in the
memory.
During play at the beginning of the desired
passage, press the REPEAT A↔B button.
or
•“
” and “
Example :
When selecting and storing track 4 on an Audio CD
” indicators light up.
Track No.
Programmed order
2. At the end of the desired passage, press the
REPEAT A↔B button again.
• Then “ ” indicator lights up as well and the desired
passage is played repeatedly.
• Press this button again to cancel the repeat A↔B play.
• You can select a track/file with pressing the NUMERIC
buttons.
Example :
■Notes :
• Repeat A↔B play works only within a track/file.
• During random play or introscan play, repeat A↔B play
will not work.
For “3” : 3
For “15” : 1
within 2 sec.
within 2 sec.
5
2
within 2 sec.
For “123” : 1
3
• Then the selected track/file is stored automatically without
pressing the PROGRAM button.
13
CD-5505(G)_ENG_110113_CD-5505(G)_ENG2011-01-24오전9:28페이지14
ENGLISH
3.
4.
Rectifying any wrong programmed
track/file
Repeat the above step 2 until the desired tracks
/files are programmed.
Example :
When track 5, 9 and 7 are programmed and you want to
replace track 9 with track 10 on an Audio CD.
Start program play.
1.
Find track(/file) 9 in the program mode.
or
or
• Play starts in the programmed order.
Checking the programmed tracks/files
• Each time the PROGRAM button is pressed in the
program mode (meaning “
” indicator lights up in the
stop mode), the programmed tracks/files are displayed in
the programmed order.
• Then the programmed track(/file) is displayed for several
seconds.
or
2. While displaying the track(/file) to be replaced
with new one, select track(/file) 10 and store it in
the memory.
Clearing the programmed tracks/files
■To clear on by one
• Each time the STOP(
) button is pressed in the
program mode, the programmed tracks/files are cleared
one by one in the opposite order.
or
or
• You can select a track(/file) with pressing the NUMERIC
buttons.
within 2 sec.
Example : For “10” : 1
0
• When selecting a track with the NUMERIC buttons, the
selected track is stored automatically without the
PROGRAM button.
• When the track/file to be replaced disappears, perform
the above step 1 again.
■To clear all programmed tracks/files
• Press the STOP(
) button for more than 4 seconds in
the program mode.
• Opening the disc tray or selecting the other playback
source clears all programmed tracks/files, too.
■To clear a specific track/file
• Find the desired track/file and clear it in the program
mode.
or
14
CD-5505(G)_ENG_110113_CD-5505(G)_ENG2011-01-24오전9:28페이지15
SELECTING A TIME DISPLAY
(Audio CD only)
ADJUSTING THE BRIGHTNESS OF THE
FLUORESCENT DISPLAY
ENGLISH
• During play,
or
• Each time this button is pressed, the brightness of the
fluorescent display changes as follows.
→ ON → dimmer → OFF
• Each time this button is pressed, the time display
changes as follows.
• In the display OFF mode, pressing any buttons
cancel the display OFF mode to display the operation
status.
Elapsed time of
the current track
→
LISTENING WITH HEADPHONES
↓
Remaining time of
the current track
• For private listening, insert the headphones into the
PHONES jack.
↓
Remaining time of
the disc
• During random play, etc., the time display may show
“--:--”.
■Note :
• Be careful not to set the volume too high when using
headphones.
15
CD-5505(G)_ENG_110113_CD-5505(G)_ENG2011-01-24오전9:28페이지16
ENGLISH
Troubleshooting Guide
If a fault occurs, run through the table below before taking your unit for repair.
If the fault persists, attempt to solve it by switching the unit off and on again. If this fails to resolve the situation, consult your
dealer. Under no circumstances should you attempt to repair the unit yourself. This could void the warranty.
No power
PROBLEM
• The AC input cord is disconnected.
• Poor connection at AC wall outlet or the outlet
is dead or off.
POSSIBLE CAUSE
REMEDY
• Connect the cord securely.
• Check the outlet using a lamp or another
appliance.
No play
• The disc is loaded upside down.
• Dirty disc.
• Defective or deeply scratched disc.
• The CD-R/CD-RW disc is nonstandard.
• Music files in non-compatible format are
recorded.
• Reload the disc with the printed side up.
• Clean the disc.
• Load another disc.
• See “Unplayable discs” on page 10.
• Only music files in MP3 and WMA formats can
be played.
No sound
• Incorrect connections.
• Incorrect operation of the amplifier/receiver.
• The “ ” indicator lights up.
• Make connections correctly.
• Operate the amplifier/receiver correctly.
• Press the “
” button to cancel the pause
mode.
Poor or distorted
sound
• The unit is connected to the PHONO input
jacks of the amplifier/receiver.
• Poor connections.
• Make connections correctly.
• Check the connections and connect all cords
securely.
Sound skips
• Defective or deeply scratched disc.
• The unit is placed on a surface that is subject
to vibration or physical shock.
• Play another disc.
• Place this unit on a stable surface.
Programming is not
performed
• The disc is dirty or badly scratched.
• The programming procedure is not correct.
• The number of the programmed tracks/files is
20.
• Try again with a scratch-free disc.
• Try again.
• Check the number of the programmed
tracks/files.
It takes a long time to
read a disc or an
USB memory device.
• It may take a longer time to read a disc or an USB
memory device that contains many files and
folders, etc.
• This is not mulfuntion.
16
CD-5505(G)_ENG_110113_CD-5505(G)_ENG2011-01-24오전9:28페이지17
■ TYPICAL AUDIO PERFORMANCES
• Number of channels
I
2
• Frequency response, 20~20,000 Hz
I
±0.8 dB
• Signal to noise ratio, A Wtd.
I
94 dB
• Dynamic Range
I
86 dB
• Total harmonic distortion, 1 kHz
I
0.009 %
• Wow and flutter
I
Quartz crystal precision
• Audio output level
I
2 V RMS
• Digital output, optical, wavelength 660 nm
I
-20 ~ -15 dBm
■ OPTICAL READOUT SYSTEM
• Laser
I
Semiconductor laser
• Wavelength
I
760~800 nm
• Numerical aperture
I
0.45
■ SIGNAL FORMAT
• Sampling Frequency
• D/A Conversion
I
• Oversampling
I
I
44.1 kHz
Multibit (Sigma-delta conversion)
8 times
■ GENERAL
• Power supply
I
230 V ~ 50 Hz
• Power consumption
I
14 W
• Dimensions (WxHxD, including protruding parts)
• Weight (Net)
I
3.4 kg (7.5 lbs)
I
440x95x258 mm (17-5/16x3-3/4x10-1/8 inches)
Note: Design and specifications are subject to change without notice for improvements.
17
ENGLISH
Specifications
5505(G) cover_cover.qxp 2010-12-17 오후 5:20 페이지 2
CD-5505
COMPACT DISC PLAYER
5707-00000-487-0S