1
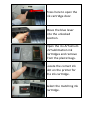
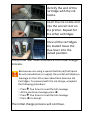
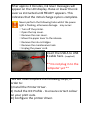
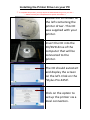
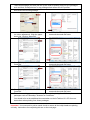
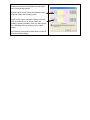
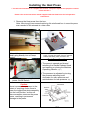
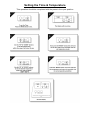
Installing the Dye Sublimation Printing System Instructions for Epson Stylus Pro 4450 Printer Beta Maxi A2 Swing Away Heat Press Index Page Contents 1 Contact Information 2 Unpacking and Preparing the Printer 3 Unpacking and Preparing the Printer continued 4 Unpacking the bulk ink feeder and installing it 5 Unpacking the bulk ink feeder and installing it cont. 6 Unpacking the bulk ink feeder and installing it cont. 7 Additional Supporting Notes 8 Installing the Printer Driver 9 Installing the ICC Colour Profile 10 Configuring the Printer Driver 11 Configuring the Printer Driver cont 12 Configuring the Printer Driver cont 13 Printing a Nozzle Check 14 Performing a Head Clean 15 Installing the Heat Press 16 Setting the Times & Temperature on the Heat Press Health & Safety Notices For more instructional guides, videos, technical information and resources, please refer to the Installation and Training CD supplied with your print system. Thank You and Welcome Firstly, Thank you for purchasing your Dye Sublimation printing system from ISub (Education) Limited and we welcome you to the growing number of schools that have chosen to work with our company. We are a small, dedicated team of supportive staff, and our aim is to help you introduce or expand the use of Dye Sublimation within your school – simply and easily. These installation instructions are designed to assist you in unpacking, setting up and getting started with the Dye Sublimation printing equipment and should cover most questions that may arise. However, if during the installation process you require any further assistance or just have some additional questions, please don’t hesitate to contact us. Our contact details are as follows:- ISub (Education) Limited, Education House, 36 Spencer Street Burton Latimer Kettering, Northamptonshire, NN15 5SQ. Telephone: Fax: e-mail: 0121 288 9898 01536 725081 [email protected] Website: www.isub-education.co.uk The Team at ISub (Education) Limited Unpacking and Preparing the Printer Locate the printer box. Find the perforated flap that contains the documentation and remove it from the box. Separate into two piles as shown here. The parts shown on the left are required for the installation. These parts are not required, but should be retained for future reference. Open the printer box. Locate the standard Epson ink cartridges. These are NOT to be used during this installation, as they contain the standard printing ink and NOT Dye Sublimation ink. Remove the paper trays Remove the roll paper belt. Remove the roll paper feed support Now remove the printer from the box. This requires two people. Caution: this printer is heavy. Remove the paperwork from the face of the printer and remove the blue transit tapes marked with arrows, now remove the clear film covering the plastic lid. Now remove the tape securing this card and open the lid of the printer. Follow the string secured to the card to locate the carriage fixing board and screws that secure it in place and unscrew them both. Carefully remove the carriage fixing board and retain it for possible future use. Locate the green print head lock / unlock tab and unlock by pulling in the direction of the red arrow. Do not try to totally remove this green tab. It does not get removed from the printer. Locate the paper feed tray and remove the plastic bag and protective wrapping. Remove the blue transit tapes and put the paper trays into position in the front of the printer. Insert the power cable here on the back of the printer and plug into the mains. Turn on the printer using the on/off button on the printers control panel. After a short time the LCD display will show NO INK CRTG Press here to open the ink cartridge door. Move the blue lever into the unlocked position. Open the 4 x ArTainium UV Sublimation ink cartridges and remove from the plastic bags. Locate the correct ink slot on the printer for the ink cartridge. Select the matching ink cartridge. Identify the end of the cartridge with the ink nozzle. Insert the ink nozzle end into the correct slot on the printer. Repeat for the other cartridges. Once all the cartridges are loaded move the blue lever into the locked position. The printer will now commence the initial charge process. Because we are using a special textile ink (that Epson do not manufacture or supply) the printer will display a message on the LCD screen about Non Genuine Ink Cartridges. To proceed with the ink charge, complete the following procedure: Press five times to read the full message. At the continue message press . Press five times to read the full message. Press to Accept. The initial charge process will continue. After approx 2 minutes, ink lever messages will appear on the LCD display. Raise or lower the ink lever as instructed until READY appears. This indicates that the initial charge cycle is complete. Never perform the following tasks whilst the pause light is flashing, otherwise damage may occur: Turn off the printer. Open the top cover. Remove the rear cover. Move the paper lever to the release. Remove the ink cartridges. Remove the maintenance tank. Unplug the power cord. Insert the USB A to USB B cable here. (supplied) ** Do not plug in to the computer yet ** We will now complete the following steps, in order to: i) Install the Printer Driver. ii) Install the ICC Profile - to ensure correct colour on your print outs. iii) Configure the printer driver. Installing the Printer Driver on your PC ** To complete this process, you may require an Administrators log on for your PC ** ** Please consult your IT department for specific information ** Locate the CD shown on the left containing the printer driver. This CD was supplied with your printer. Insert the CD into the CD/DVD drive of the computer that will be connected to the printer. The CD should autostart and display the screen on the left. Click on the ‘Stylus Pro 4450’. Click on the option to set up the printer via a local connection. Click on accept when the License Agreement screen is displayed. Wait a few minutes whilst the driver is loaded. When prompted plug in the USB cable into a spare USB socket on the computer. The driver install will complete and display a finished screen. Important: You now need to follow the steps to install the ICC profile. The ICC profile ensures correct colour output on your print outs. Instructions for completing this are on the next page. Installing the ICC Colour Profile Note: You may need someone from IT to give you Administrator rights to be able to install software. Locate the ICC profile either supplied on a CD with the printer or via email from ISub (Education) Limited. If you do not have the ICC profile, please contact us and we will supply it to you again via email. Right click on the icon and click on Install Profile Important: You now need to follow the steps to configure the printer driver, to use the specific Dye Sublimation settings. Instructions for completing this are on the next page. Configuring the Printer Driver on your PC 1. Click on Start 2. Click on Control Panel 3. Click on Printers and Faxes 4. Right click on the printer you have installed 5. Click on ‘Printing Preferences’ 6. Choose the settings highlighted. 7. Click on the page layout tab and click on Mirror Image, then click back on the main tab. 8. Click on the custom button and select ICM. 9. Click on the Advanced tab. 10. Click on show all profiles and select the 11. Click on ‘Save/Del’ ICC profile ‘ArTainium UV+ 4450 RGB v1.2’ from the drop down list and click on OK. 12. Enter ‘Non ICC A4’ in the name box and if required you can enter a note in the comment box. Click on Save. 13. Click on the main tab and change the paper size to A3. 14. Click on ‘Save/Del’. 15. Enter ‘Non ICC A3’ in the name box and if required you can enter a note in the comment box. Click on Save. 16. Change the paper size to A2 and click on ‘Save/Del’. 17. Enter ‘Non ICC A2’ in the name box and if required you can enter a note in the comment box. Click on Save. These three settings you have just set up are used for printing from non ICC packages such as Word, Powerpoint etc or any packages that cannot use ICC profiles. Now select the following settings. 18. Click on the ‘custom’ button and select ‘no colour adjustment’. Click the paper size to A4. Click on ‘Save/Del’. 19. In name, enter ‘ICC (A4)’ and fill in the comments box and click save 20. Change the paper size to A3. Click on ‘Save/Del’. 21. In name, enter ‘ICC (A3)’ and fill in the comments box and click save 22. Change the paper size to A2. Click on ‘Save/Del’. In name, enter ‘ICC (A2)’ and fill in the comments box and click save These three settings you have just set up are used for printing from ICC compliant packages such as Photoshop, Illustrator or CorelDraw. You should refer to the additional documentation on the ArTainium UV+ CD for more instructions when printing from these packages. Important: You now need to print a nozzle check to ensure all the inkjet heads are printing correctly. Instructions for completing this are on the next page. Printing a Nozzle Check. 1. On the computer attached to the dye sublimation printer - Click on Start 2. Click on Control Panel 3. Click on Printers and Faxes 4. Right click on the printer you have installed 5. Click on ‘Printing Preferences’ 6. Click on the utility tab. Now load a piece of plain paper into the printer. 7. Click on the nozzle check button. 8. Click on Print. The printer will now print a nozzle check. 9. The printer will now print a nozzle check. Once the print has finished you should then look closely at the nozzle check print out and follow the on screen instructions. A good nozzle check should be unbroken lines, as shown under the heading ‘good’. If your nozzle check contains missing coloured lines or broken lines, as shown under the heading ‘cleaning needed’, then you will need to run a cleaning cycle by clicking on the clean button. If you have a good nozzle check then you are ok to proceed with printing. Performing a Head Clean. Note: Instructions may differ based on operating system or printer driver versions installed. Occasionally a printer will not print all the colours correctly due to a blocked ink nozzle on the inkjet printing head. There can be a number of reasons for this, including the printer being left for a long time without running any prints or the printer being in a dusty / dirty environment or just simple daily use. Follow the instructions below to complete a head clean cycle. 1. On the computer attached to the dye sublimation printer - Click on Start 2. Click on Control Panel 3. Click on Printers and Faxes 4. Right click on the printer you have installed 5. Click on ‘Printing Preferences’ 6. Click on the utility tab. 7. Click on the head cleaning button. 8. Click on Start. 9. Once head cleaning finishes, you can print a nozzle check to confirm that you have a good nozzle print pattern. Note: In extreme cases you may need to do 2 or 3 cleans. Installing the Heat Press ** You will need assistance to complete this section. The press requires two people to remove it from the box ** Please refer to the instruction manual supplied with the Heat Press for full operation instructions. 1. Remove the Heat press from the box. Note: We strongly recommend retaining this reinforced box in case the press ever needed to be returned at a later date. 2. 2. Insert the power cord here and ideally plug directly into a 13amp socket. 3. Raise the handle of the press to open the press. To open the press, first you need to release the safety catch circled in red. Basic Press Operation i) The press is opened and closed releasing the Handle Release Knob and opening or closing the Machine Operating Handle. (Fig. 1) 4. Turn the press on using the power On/Off Switch ii) The pressure is adjusted by turning the pressure adjusting knob clockwise for more pressure and anticlockwise for less pressure. (Fig. 1) Caution: Never increase the pressure to the extent of requiring undue force to lower the toggle/heat plate assembly into the lock position, as this will place excessive stress on the press frame, resulting in permanent damage to the press. Fig. 1 Setting the Time & Temperature This operation should be completed with the press in the open position IMPORTANT HEALTH & SAFETY NOTICES ► The press should be placed on a sturdy suitable stand. ► Power supply cord must be disconnected before cleaning or servicing press. ► The heat press operates at high temperatures. Pay particular attention to the risk of burns which can be sustained by touching the heated platen during use. ► Keep hands clear from the platens of the press during platen lock down as the pressure can cause injury. ► It is recommended that students should not operate the heat press unattended. ►When the press is turned off it takes approx 30 minutes to cool down. It is recommended that a ‘Caution Hot’ sign is displayed on the press or that a guard is placed around the press.