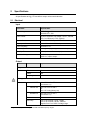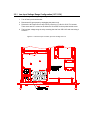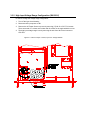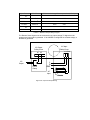
1
Model 2003RP
AC Power Source
User and Programming
Manual
Contact Information
Telephone: 800 733 5427 (toll free in North America)
858 450 0085 (direct)
Fax: 858 458 0267
Email:
Domestic Sales: [email protected]
International Sales: [email protected]
Customer Service: [email protected]
Web: www.programmablepower.com
March 2011
Document No. 4005-995 Rev N
About AMETEK
AMETEK Programmable Power, Inc., a Division of AMETEK, Inc., is a global leader in the design
and manufacture of precision, programmable power supplies for R&D, test and measurement,
process control, power bus simulation and power conditioning applications across diverse
industrial segments. From bench top supplies to rack-mounted industrial power subsystems,
AMETEK Programmable Power is the proud manufacturer of Elgar, Sorensen, California
Instruments and Power Ten brand power supplies.
AMETEK, Inc. is a leading global manufacturer of electronic instruments and electromechanical
devices with annualized sales of $2.5 billion. The Company has over 11,000 colleagues working
at more than 80 manufacturing facilities and more than 80 sales and service centers in the United
States and around the world.
Trademarks
AMETEK is a registered trademark of AMETEK, Inc.
Other trademarks, registered trademarks, and product names are the property of their respective
owners and are used herein for identification purposes only.
Notice of Copyright
AC Power Source, User and Programming Manual © 2010 AMETEK Programmable Power, Inc. All
rights reserved.
Exclusion for Documentation
UNLESS SPECIFICALLY AGREED TO IN WRITING, AMETEK PROGRAMMABLE POWER, INC.
(“AMETEK”):
(a) MAKES NO WARRANTY AS TO THE ACCURACY, SUFFICIENCY OR SUITABILITY OF ANY
TECHNICAL OR OTHER INFORMATION PROVIDED IN ITS MANUALS OR OTHER
DOCUMENTATION.
(b) ASSUMES NO RESPONSIBILITY OR LIABILITY FOR LOSSES, DAMAGES, COSTS OR
EXPENSES, WHETHER SPECIAL, DIRECT, INDIRECT, CONSEQUENTIAL OR INCIDENTAL,
WHICH MIGHT ARISE OUT OF THE USE OF SUCH INFORMATION. THE USE OF ANY SUCH
INFORMATION WILL BE ENTIRELY AT THE USER’S RISK, AND
(c) REMINDS YOU THAT IF THIS MANUAL IS IN ANY LANGUAGE OTHER THAN ENGLISH,
ALTHOUGH STEPS HAVE BEEN TAKEN TO MAINTAIN THE ACCURACY OF THE
TRANSLATION, THE ACCURACY CANNOT BE GUARANTEED. APPROVED AMETEK CONTENT
IS CONTAINED WITH THE ENGLISH LANGUAGE VERSION, WHICH IS POSTED AT
WWW.PROGRAMMABLEPOWER.COM.
Date and Revision
March 2011 Revision N
Part Number
4005-995
Contact Information
Telephone:
Fax:
Email:
Web:
800 733 5427 (toll free in North America)
858 450 0085 (direct)
858 458 0267
[email protected]
[email protected]
www.programmablepower.com
i
This page intentionally left blank.
ii
Important Safety Instructions
Before applying power to the system, verify that your product is configured properly for your
particular application.
Hazardous voltages may be present when covers are removed. Qualified
personnel must use extreme caution when servicing this equipment.
Circuit boards, test points, and output voltages also may be floating above
WARNING (below) chassis ground.
The equipment used contains ESD sensitive ports. When installing
equipment, follow ESD Safety Procedures. Electrostatic discharges might
cause damage to the equipment.
WARNING
Only qualified personnel who deal with attendant hazards in power supplies, are allowed to perform
installation and servicing.
Ensure that the AC power line ground is connected properly to the Power Rack input connector or
chassis. Similarly, other power ground lines including those to application and maintenance
equipment must be grounded properly for both personnel and equipment safety.
Always ensure that facility AC input power is de-energized prior to connecting or disconnecting any
cable.
In normal operation, the operator does not have access to hazardous voltages within the chassis.
However, depending on the user’s application configuration, HIGH VOLTAGES HAZARDOUS TO
HUMAN SAFETY may be normally generated on the output terminals. The customer/user must
ensure that the output power lines are labeled properly as to the safety hazards and that any
inadvertent contact with hazardous voltages is eliminated.
Guard against risks of electrical shock during open cover checks by not touching any portion of the
electrical circuits. Even when power is off, capacitors may retain an electrical charge. Use safety
glasses during open cover checks to avoid personal injury by any sudden component failure.
Neither AMETEK Programmable Power Inc., San Diego, California, USA, nor any of the subsidiary
sales organizations can accept any responsibility for personnel, material or inconsequential injury,
loss or damage that results from improper use of the equipment and accessories.
SAFETY SYMBOLS
iii
Product Family: California Instruments Model 2003RP
Warranty Period: One Year
WARRANTY TERMS
AMETEK Programmable Power, Inc. (“AMETEK”), provides this written warranty covering the
Product stated above, and if the Buyer discovers and notifies AMETEK in writing of any defect in
material or workmanship within the applicable warranty period stated above, then AMETEK may,
at its option: repair or replace the Product; or issue a credit note for the defective Product; or
provide the Buyer with replacement parts for the Product.
The Buyer will, at its expense, return the defective Product or parts thereof to AMETEK in
accordance with the return procedure specified below. AMETEK will, at its expense, deliver the
repaired or replaced Product or parts to the Buyer. Any warranty of AMETEK will not apply if the
Buyer is in default under the Purchase Order Agreement or where the Product or any part
thereof:
is damaged by misuse, accident, negligence or failure to maintain the same as
specified or required by AMETEK;
is damaged by modifications, alterations or attachments thereto which are not
authorized by AMETEK;
is installed or operated contrary to the instructions of AMETEK;
is opened, modified or disassembled in any way without AMETEK’s consent; or
is used in combination with items, articles or materials not authorized by AMETEK.
The Buyer may not assert any claim that the Products are not in conformity with any warranty
until the Buyer has made all payments to AMETEK provided for in the Purchase Order Agreement.
PRODUCT RETURN PROCEDURE
1. Request a Return Material Authorization (RMA) number from the repair facility (must be
done in the country in which it was purchased):
In the USA, contact the AMETEK Repair Department prior to the return of the
product to AMETEK for repair:
Telephone:
800-733-5427, ext. 2295 or ext. 2463 (toll free North America)
858-450-0085, ext. 2295 or ext. 2463 (direct)
Outside the United States, contact the nearest Authorized Service Center
(ASC). A full listing can be found either through your local distributor or our
website, www.programmablepower.com, by clicking Support and going to the
Service Centers tab.
2. When requesting an RMA, have the following information ready:
Model number
Serial number
Description of the problem
NOTE: Unauthorized returns will not be accepted and will be returned at the shipper’s expense.
NOTE: A returned product found upon inspection by AMETEK, to be in specification is subject to
an evaluation fee and applicable freight charges.
iv
Table of Contents
1
Introduction..................................................................................................................................... 1
1.1
1.2
2
Specifications ................................................................................................................................. 2
2.1
2.2
2.3
2.4
2.5
2.6
2.7
2.8
2.9
2.10
3
Functional Controls.............................................................................................................................. 23
How to examples... .............................................................................................................................. 28
Setting the Power on Initialization Values ........................................................................................... 31
Current Limit Modes ............................................................................................................................ 32
Function Strobe [Option] ...................................................................................................................... 32
Remote Inhibit [Option] ........................................................................................................................ 33
Principle of Operation ................................................................................................................... 34
5.1
5.2
5.3
5.4
5.5
5.6
5.7
5.8
5.9
6
Unpacking............................................................................................................................................ 12
Power Requirements ........................................................................................................................... 12
Input Voltage Range Selection ............................................................................................................ 14
Mechanical Installation ........................................................................................................................ 17
Input Wiring ......................................................................................................................................... 17
Output Connections ............................................................................................................................. 18
Output Voltage Ranges ....................................................................................................................... 20
Functional Test .................................................................................................................................... 21
Other Modes of Operation ................................................................................................................... 22
Front Panel Operation .................................................................................................................. 23
4.1
4.2
4.3
4.4
4.5
4.6
5
Electrical ................................................................................................................................................ 2
Supplemental......................................................................................................................................... 5
Measurements [Option] ......................................................................................................................... 6
System Specification ............................................................................................................................. 7
Unit Protection ....................................................................................................................................... 8
Mechanical ............................................................................................................................................ 8
Environmental........................................................................................................................................ 9
Regulatory ............................................................................................................................................. 9
Front Panel Controls ............................................................................................................................ 10
Available Options ............................................................................................................................. 11
Installation and Functional Test ................................................................................................... 12
3.1
3.2
3.3
3.4
3.5
3.6
3.7
3.8
3.9
4
General Description ............................................................................................................................... 1
Accessory Equipment/Rack Slides ........................................................................................................ 1
General ................................................................................................................................................ 34
Overall Description .............................................................................................................................. 34
DC Supply ........................................................................................................................................... 34
Mother Board ....................................................................................................................................... 39
Amplifier Modules ................................................................................................................................ 39
Oscillator Module ................................................................................................................................. 39
Range/Relay Board ............................................................................................................................. 39
Output Board ....................................................................................................................................... 40
IEEE 488/RS232 Interface [Option] ..................................................................................................... 40
Calibration .................................................................................................................................... 42
6.1
6.2
6.3
6.4
Calibration Equipment ......................................................................................................................... 42
Selecting Calibration Mode .................................................................................................................. 43
Routine Calibration .............................................................................................................................. 44
Non-Routine Calibration ...................................................................................................................... 48
7
Service ......................................................................................................................................... 52
7.1
7.2
7.3
7.4
7.5
8
General ............................................................................................................................................... 52
Cleaning .............................................................................................................................................. 52
Basic Operation................................................................................................................................... 52
Module Removal ................................................................................................................................. 55
Replaceable Parts ............................................................................................................................... 58
Remote Control ............................................................................................................................ 60
8.1
8.2
8.3
8.4
8.5
8.6
8.7
8.8
8.9
9
Introduction ......................................................................................................................................... 60
PGUI32 Program Requirements ......................................................................................................... 60
IEEE Interface ..................................................................................................................................... 62
RS232C Interface................................................................................................................................ 63
PGUI32 Setup and Installation ............................................................................................................ 65
Troubleshooting - RS232C.................................................................................................................. 67
Troubleshooting - IEEE-488 / GPIB .................................................................................................... 70
PGUI32 Distribution Files .................................................................................................................... 72
Software Registration .......................................................................................................................... 73
Introduction to SCPI ..................................................................................................................... 74
9.1
9.2
9.3
9.4
9.5
9.6
10
Conventions Used in This Manual ...................................................................................................... 74
The SCPI Commands and Messages ................................................................................................. 74
Using Queries ..................................................................................................................................... 76
Structure of a SCPI Message .............................................................................................................. 76
SCPI Data Formats ............................................................................................................................. 79
Bus Throughput and Timing Considerations ....................................................................................... 79
SCPI Command Reference ...................................................................................................... 80
10.1
10.2
10.3
10.4
10.5
10.6
10.7
10.8
10.9
10.10
11
Programming Examples ......................................................................................................... 106
11.1
11.2
11.3
12
Subsystem Commands ................................................................................................................... 80
Calibration Subsystem .................................................................................................................... 81
Measurement Subsystem ............................................................................................................... 85
Instrument Subsystem .................................................................................................................... 88
Source Subsystem .......................................................................................................................... 89
Output Subsystem........................................................................................................................... 92
Limit Subsystem .............................................................................................................................. 96
Display Subsystem .......................................................................................................................... 97
System Commands ......................................................................................................................... 98
Common Commands .................................................................................................................... 100
Introduction ................................................................................................................................... 106
Bus Throughput and Timing Considerations ................................................................................. 106
Making Measurements .................................................................................................................. 108
Status Registers ..................................................................................................................... 110
12.1
12.2
12.3
12.4
Power-On Conditions .................................................................................................................... 110
Standard Event Status Group ....................................................................................................... 111
Status Byte Register ..................................................................................................................... 111
Examples ...................................................................................................................................... 112
Appendix A : SCPI Command tree .................................................................................................... 113
Appendix B : SCPI Conformance Information ................................................................................... 114
Appendix C : Error Messages ........................................................................................................... 115
Index.................................................................................................................................................. 116
List of Figures
Figure 2-1: Available RMS Current as function of Output Voltage and Frequency. ............................. 4
Figure 2-2: Rack Mount Slides (-RMS option) position ....................................................................... 11
Figure 3-1: Model 2003RP AC Power Source .................................................................................... 12
Figure 3-2: Rear Panel View .............................................................................................................. 13
Figure 3-3: Internal Jumper Location, Input Line Voltage 107/115 .................................................... 15
Figure 3-4: Internal Jumper Location, Input Line Voltage 208/230 ..................................................... 16
Figure 3-5: Rack Mount Slides (-RMS option) position ....................................................................... 17
Figure 3-6: Input and Output Wiring .................................................................................................... 19
Figure 3-7: Test Setup 2003RP. .......................................................................................................... 22
Figure 4-1: Front Panel View ............................................................................................................... 23
Figure 4-2: Voltage Auto Range Switch Over Points .......................................................................... 25
Figure 4-3: Control Knob .................................................................................................................... 26
Figure 5-1: AC Power System Block Diagram ................................................................................... 35
Figure 6-1: Test Equipment Hookup for Routine Output and Voltage Measurement Calibration ...... 44
Figure 6-2: Test Equipment Hook-up for Current and Power Measurement Calibration ................... 45
Figure 6-3: Internal Adjustments ........................................................................................................ 50
Figure 7-1: Assembly Location ........................................................................................................... 56
Figure 8-1: Rear Panel View .............................................................................................................. 61
Figure 8-2: GPIB Address Selection Switch ....................................................................................... 62
Figure 8-3: RS232C Interface Cable Wiring Diagram ........................................................................ 65
Figure 8-4: System Properties Dialog Box ......................................................................................... 68
Figure 8-5: COM Port Properties Dialog Box ..................................................................................... 68
Figure 8-6: Advanced Port Settings Dialog Box ................................................................................. 68
Figure 8-7: NI AT-GPIB/TNT Settings ................................................................................................ 70
Figure 8-8: NI AT-GPIB/TNT Advanced Settings Dialog .................................................................... 70
Figure 9-1: Partial Command Tree ..................................................................................................... 75
Figure 9-2: Command Message Structure ......................................................................................... 77
Figure 12-1: AC Source Status System Model ................................................................................. 110
List of Tables
Table 1-1: Available models .................................................................................................................. 1
Table 3-1: Maximum Output Wiring Lengths ...................................................................................... 19
Table 4-1: Factory Default Power on Settings .................................................................................... 31
Table 6-1: Load Resistors and Current .............................................................................................. 42
Table 6-2: CAL Mode Status LED Indicators ..................................................................................... 43
Table 7-1: Basic Symptoms ............................................................................................................... 52
Table 7-2: Poor Output Voltage Accuracy .......................................................................................... 52
Table 7-3: Poor Output Voltage Regulation ....................................................................................... 53
Table 7-4: Distorted Output ................................................................................................................ 53
Table 7-5: Unit Shuts Down After 3-5 Seconds ................................................................................. 53
Table 7-6: No Output and No Lights on Front Panel .......................................................................... 53
Table 7-7: No Output But "Display" Is On ......................................................................................... 54
Table 7-8: Replaceable Parts ............................................................................................................. 58
Table 7-9: Fuses ................................................................................................................................ 59
Table 10-1: Mode Command Encoding ............................................................................................. 97
Table 10-2: Bit Configuration of Standard Event Status Enable Register ........................................ 101
Table 10-3: Bit Configuration of Standard Event Status Register .................................................... 102
Table 10-4: *RST Default Parameter Values ................................................................................... 104
Table 10-5: Status Registers - Power on Conditions ........................................................................ 104
Table 10-6: Bit Configuration of Status Byte Register ...................................................................... 105
Table 12-1: Bus Error Messages ..................................................................................................... 115
1
Introduction
This instruction manual contains information on the installation, operation, calibration and
maintenance of the 2003RP AC power source.
1.1
General Description
The 2003RP AC source is a high efficiency, lightweight, three-phase, 2000 VA,
programmable AC power source. In addition to the standard 2003RP model, several options
are available that may change the voltage and frequency ranges of the power source. This
user manual covers the following models:
Model
Voltage ranges
2003RP
1
2003RP-AV
Avionics version
2003RP-HV
No. of
Outputs
Max.
Current
Frequency range
135 VRMS
270 VRMS
3
5 ARMS
2.5 ARMS
16 Hz – 5000 Hz
115 VRMS
230 VRMS
3
5.9 ARMS
2.9 ARMS
360 Hz – 5000 Hz
156 VRMS
312 VRMS
3
4.3 ARMS
2.1 ARMS
16 Hz – 5000 Hz
Table 1-1: Available models
The output voltage terminals for each output phase are isolated from the chassis (earth)
ground. The nominal input can be either 107/115 VAC or 208/230 VAC at 50/60/400 Hz line
frequency.
Simple front panel controls enable the voltage, phase selection, current limit, and frequency
to be changed. An optional RS232C and IEEE 488 interface is available for applications that
require remote control and measurements. Settings are displayed for one output phase at a
time. The selected phase can be toggled between A, B, and C using the phase select key.
1.2
Accessory Equipment/Rack Slides
General Devices Company Model C300S-120-B308 rack slides may be attached to the sides
of the power source using 10-32 X 3/8 flat head screws.
1
2003RP-AV models may be factory configured with a single voltage range and fixed frequency output.
2
Specifications
All specifications at 25
2.1
5 C and 400 Hz output unless noted otherwise.
Electrical
Input
Parameter
Specification
Line Voltage:
107/120 VAC ± 10%
208/230 VAC ± 10%
Line Current:
35 ARMS maximum, line voltage = 96 VAC, full-load,
PF = 0.6, Efficiency = 75%, (typical)
Inrush Current:
185 APK at 253 VAC input line
Input power factor:
0.6 at full-load and 120 VAC input
1
Line Frequency :
50/60 Hz ± 5%
Efficiency:
75% typical (depending on line and load)
Hold-Up Time:
10 ms (with no effect on output)
Isolation Voltage:
1350 VAC, input to chassis
2300 VAC, input to output
Output
Parameter
Specification
Outputs
Phases:
3
Mode:
AC
Coupling:
AC
Voltage
2003RP:
0 to 135 V or 0 to 270 V
(see Section 3.7)
2003RP-AV:
0 to 115 V or 0 to 230 V
or
0 to 115 V only (factory set)
2003RP-HV:
0 to 156 V or 0 to 312 V
(see Section 3.7)
Resolution:
1
Accuracy :
1
0.1 volt
± 0.1% of full scale, 16 Hz - 100 Hz
± 0.2% of full scale, 100 Hz - 2000 Hz
Applies from 10 to 100% of voltage range.
Supplementary specification applies outside indicated frequency ranges.
Parameter
Specification
1
Load Regulation :
± 0.1% of full scale, 16 Hz - 500 Hz
External Sense:
Will compensate for up to 7% of voltage drop up to 2
kHz
Line Regulation:
± 0.02% of full scale
Settling time:
From start of voltage change from 5.0 VRMS or
higher voltage to within 2% of final value:
No load:
16 ms
Full load: 300 ms
(16 ms to within 15% of final value)
Distortion (THD
into linear load):
0.5% typical, 1.0% maximum below 100 Hz
1.0% typical, 2.0% maximum 100 Hz - 2000 Hz
DC Offset voltage:
AC coupled transformer output
Output noise:
< 0.1 VRMS typical
( 20 kHz to 1 MHz at full load )
Temperature
coefficient:
± 0.02% of full scale per degree C
Stability:
(24 hours)
± 0.015% of full scale under constant load, line and
temperature
Total Power:
2000 VA maximum at full scale voltage, either range
Current per Output Phase
Volt Range
ARMS
APEAK
2003RP:
135
270
5.0
2.5
15.0
7.5
2003RP-AV:
115
230
5.9
2.9
17.6
8.8
2003RP-HV
156
312
4.3
2.1
12.9
6.3
Adjustable Limit:
0.0 to Maximum available RMS current for selected
voltage range. Maximum current is available for
output voltage from 50% to 100% of range. Current
derates below 50% of range setting. See derating
chart.
Parameter
Specification
Frequency
2003RP:
2003RP-HV:
16.0 - 5000 Hz (see Figure 2-1)
Maximum output voltage available from 45 Hz and
up. Maximum voltage derates from 100% at 45 Hz
to 35% at 16 Hz.
2003RP-AV:
360.0 - 5000 Hz (see Figure 2-1)
Resolution:
Accuracy:
0.01 Hz from 16.00 to 80.00 Hz
0.1 Hz from 80.1 Hz to 800.0 Hz
1 Hz from 801 Hz to 5000 Hz
0.02% of programmed value
Temperature
coefficient:
± 5 ppm per degree Celsius
Stability:
± 15 ppm per year
Steady State:
(voltage range * 0.0005) / load current.
Impedance
Figure 2-1: Available RMS Current as function of Output Voltage and Frequency.
2.2
Supplemental
Note: Specifications listed below are typical and not guaranteed.
Parameter
Supplemental Specification
Line Frequency:
63 - 300 Hz (derate maximum output power 5%)
300 - 440 Hz (derate maximum output power 10%)
Output Voltage Accuracy
(versus output frequency):
± 1% of full scale (2000 - 4000 Hz),
± 5% of full scale (4000 - 5000 Hz)
Output Load Regulation
(versus output frequency):
± 2% (500 - 1000 Hz),
± 5% (1000 - 2000 Hz),
± 10% (2000 - 4000 Hz)
± 20% (4000 - 5000 Hz)
Measurement Accuracy:
Stated ± 5% of full scale (16 - 300 Hz),
Stated ± 1% of full scale (500 - 5000 Hz)
2.3
Measurements [Option]
Note: Specifications listed below apply from 300 Hz to 500 Hz. Refer to Supplemental
Specifications for frequencies outside this range.
Parameter
Specification
Unit
Available on standard unit.
True RMS Current
Ranges
0.000 - 4.000
0.00 – 6.00
Accuracy
ARMS
ARMS
0.2 % FS + 0.3 % reading
Resolution
0.001
0.01
ARMS
ARMS
(Remote only) 0.00 – 12.00
0.0 – 20.0
APEAK
APEAK
Peak Current
Ranges
Accuracy
0.5 % FS + 0.5 % reading
Resolution
0.01
0.1
APEAK
APEAK
Available over bus only. Requires interface option
Crest Factor
Range
0.00 - 4.00
Accuracy
0.05
Resolution
0.01
True RMS Voltage
Range
0.0 - 320.0
Accuracy
VRMS
0.1 % FS + 0.05 % reading
Resolution
0.1
VRMS
Real Power
Range
0 - 800.0
Accuracy
0.2 % FS + 0.5 % reading
Resolution
Apparent Power
W
0.2
W
Available over bus only. Requires interface option
Range
Accuracy
Resolution
0 - 800.0
VA
0.3 % FS + 0.8 % reading
0.1
VA
Parameter
Specification
Unit
Power Factor
Range
2.4
0.00 - 1.00
Accuracy
0.05
Resolution
0.01
System Specification
Parameter
Specification
Setup storage
Eight non-volatile front panel setup registers available through
interface. Power-on setting register available from front panel.
Interface
(Option package -OP1 required)
RS-232C
Bi-directional serial interface
IEEE-488
Remote Inhibit
Handshake:
CTS, RTS
Data bits:
8
Stop bits:
1
Parity:
None
Baud rate:
19200
Command syntax:
IEEE 488.2 commands and SCPI
GPIB Interface
IEEE address:
set using dip switch on rear panel from
0 to 31
IEEE functions:
SH1, AH1, T6, L3, RL2
Terminators:
LF, CRLF, EOI
Command syntax:
IEEE 488.2 commands and SCPI
(Option package -OP1 required)
Input
Function Strobe
Contact closure to ground or logic low TTL
signal required to turn off output.
Automatic recovery when RI signal is
removed.
(Option package -OP1 required)
Output
Active low TTL signal. Signal driven low
for approximately 400 sec any time
output voltage or frequency programmed
value changes. Signal level may be
changed by removing jumpers to open
collector.
2.5
2.6
Unit Protection
Parameter
Specification
Input Overcurrent:
Circuit breaker
Transients:
Surge protection to withstand EN61000-4,-5 levels
Output Overcurrent:
Constant current operation (standard)
0.1 second shutdown (constant voltage mode option)
Output Short Circuit:
Peak current limit
Shutdown (constant voltage mode Option)
Overtemperature:
Automatic shutdown
Mechanical
Parameter
Specification
Dimensions:
Height
Width
Depth
Unit
13.26
48.26
56.62
cm
5.22
19
22.29
inch
Unit Weight:
2003RP
2003RP-AV
39 kg / 85 lb
34 kg / 76 lb
Material:
Steel chassis and panels
Aluminum cover
Finish:
Painted semi-gloss polyurethane
Cooling:
Fan cooled with air intake on sides and exhaust to rear
Internal Construction:
Modular subassemblies
Chassis Slides:
–RMS Option
General Devices Model C300S-120-B308 (CI P/N 211045)
Rear Panel Mounted Connectors:
Line Input
Marathon Special Products 985 GP 03
Output/Sense
Cinch 8-140Y
RS232C
9 pin D-subminiature
IEEE-488
GPIB standard 24 pin
Remote Inhibit
Isolated BNC (requires -OP1 option package)
Function Strobe
Isolated BNC (requires -OP1 option package)
2.7
Environmental
Parameter
Specification
Operating Temp:
2.8
0 to +40 C
Storage Temp:
-40 to +85 C
Humidity:
Maximum relative humidity 80% for temperatures up to 31 C
decreasing linearly to 50% relative humidity at 40 C
Altitude:
2000 m maximum
Pollution Degree:
2
Installation Category
(Overvoltage Category) :
II
Vibration:
Designed to meet NSTA 1A transportation levels
Shock:
Designed to meet NSTA 1A transportation levels
indoor use only
Regulatory
Parameter
Specification
Electromagnetic
Emissions and
Immunity:
Designed to meet EN50081-1 and EN50082-1 Emissions and
Immunity standards as required for CE marking
Acoustic Noise:
65 dBA maximum at 0% to 50% load
75 dBA maximum greater than 50% load to 100% load
(measured at one meter)
Safety:
Designed to meet EN61010-1 safety standard as required for CE
marking
Remote Control
2.9
Front Panel Controls
Parameter
Specification
Controls:
Knobs:
Two knobs allow continuous change of voltage, frequency and
current limit for all three phase outputs. Voltage change is
inactive on single voltage range configuration units.
Function keys:
Keys control output state, voltage range, 7 segment LED Display
mode and selected phase for liquid crystal display.
Displays:
Status Indicators:
Two, 4 digit, 0.5” 7 segment LED:
For viewing programmed voltage, frequency, current limit for all
phases or for displaying measured current on selected phase.
13 LED‟s:
HIGH (voltage range)
AUTO (voltage range)
FREQ (frequency display)
I RMS (rms current display)
I PK (peak current display)
PWR (power display)
PF (power factor display)
A (phase selected for display)
B (phase selected for display)
C (phase selected for display)
FAULT (of output voltage)
REMOTE (interface active)
OUTPUT (on, relay closed)
(refer also to paragraph 4.1.1)
Phase Selection:
The phase selection and indication applies to the measurement
readouts only. Settings of voltage, frequency and current made
using the rotary knobs apply to all three phases.
2.10 Available Options
2
Option
Description
-AV
Avionics version: 2003RP-AV
115 VRMS / 230 VRMS volt ranges
5.9 / 2.9 Amp RMS maximum current per phase
Frequency range limited to 360 Hz minimum.
The unit may be factory set to fixed frequency and single voltage
range. The frequency range and voltage range setting can be
queried over the bus if the –OP1 option is installed.
-HV
Higher Voltage version 2003-HV
156 VRMS / 312 VRMS volt ranges
4.3 / 2.1 Amp RMS maximum current per phase
-L22
Locking knobs. Prevents front panel change of voltage and
frequency.
-OP1
Option package 1 includes:
Measurement Functions
Combined IEEE-488 / RS232C interface
Remote Inhibit Input
Function Strobe Output
-RMS
Rack mount slides
CI P/N 211045
General Devices Model C300S-120-B308
The rack mount slide mounting holes centerlines on the side of the power source are 2.92
inches / 74.3 mm above the bottom edge of the front panel.
Note:
The 2003RP series models cannot be mounted in a cabinet by just using
the front panel rack ears. They require additional support.
Figure 2-2: Rack Mount Slides (-RMS option) position
2
Additional options may have been made available since this manual revision. Installed options are listed on
the power source‟s type label. A manual addendum may be issued for new options not covered by this
manual.
3
Installation and Functional Test
3.1
Unpacking
Inspect the unit for any possible shipping damage immediately upon receipt. If damage is
evident, notify the carrier. DO NOT return an instrument to the factory without prior approval.
Do not destroy the packing container until the unit has been inspected for damage in
shipment.
3.2
Power Requirements
The AC Power System has been designed to operate from a single phase AC line voltage.
The nominal operating voltage is either 107/115V or 208/230V line input. The 2003RP line
input setting is shown on the type label located on the rear panel.
Figure 3-1: Model 2003RP AC Power Source
WARNING:
Do not connect the unit to AC line input unless the nominal line input settings
match those of the available AC line voltage.
3.2.1 AC Line Voltage
The AC Power Source has been designed to operate from either of the following AC line
voltage ranges:
1) 107/115 volts
2) 208/230 volts
CAUTION: The AC Power Source will be damaged if it is operated at an input voltage
that is outside its configured input range.
The input voltage range is set at the factory. Section 3.3 gives the procedure to change the
input voltage range. The location for connection of the input line is shown in Figure 3-2.
3.2.2 Line Frequency Operating Range
The AC Power Source has been designed to operate from a line frequency of 50/60 Hz, and,
derated, to 400 Hz.
3.2.3 Input Power
The input power to the AC Power Source depends upon line and load conditions and may be
as high as 2650 watts.
Figure 3-2: Rear Panel View
3.3
Input Voltage Range Selection
WARNING: Voltages up to 360 VDC and 270 VAC are present in certain sections of
this power source. This equipment generates potentially lethal voltages.
DEATH:
On contact may result if personnel fail to observe safety precautions. Do
not touch electric circuits when power is applied. Servicing should only
be performed by trained personnel.
The input voltage range is configured by one wire. See Figure 3-3 or Figure 3-4 for the
location of this wire and the A4 board (DC Supply).
3.3.1 Low Input Voltage Range Configuration (107/115 V)
In order to change the voltage range configuration:
1. Turn off the input circuit breaker.
2. Disconnect AC input power by unplugging the power cord.
3. Remove the AC Power Source top cover by removing (17) #6-32 x 5/16” FLH screws.
There are a total of 7 screws on the sides and 10 screws on the top that hold the cover.
4. The low input voltage range is set by removing the wire from CR1-AC2 and connecting it
to A4-E2.
Figure 3-3: Internal Jumper Location, Input Line Voltage 107/115
3.3.2 High Input Voltage Range Configuration (208/230 V)
In order to change the voltage range configuration:
1. Turn off the input circuit breaker.
2. Disconnect AC input power at TB1.
3. Remove the AC Power Source top cover by removing (17) #6-32 x 5/16” FLH screws.
There are a total of 7 screws on the sides and 10 screws on the top that hold the cover.
4. The high input voltage range is set by removing the wire from A4-E2 and connect to
CR1-AC2.
Figure 3-4: Internal Jumper Location, Input Line Voltage 208/230
3.4
Mechanical Installation
The power source has been designed for rack mounting in a standard 19 inch rack. The unit
should be supported from the sides with optional rack slides. See Accessory
Equipment/Rack Slides in Section 1.2. The cooling fan at the rear of the unit must be free of
any obstructions which would interfere with the flow of air. A 6.35 cm (2.5 inch) clearance
should be maintained between the rear of the unit and the rear panel of the mounting
cabinet. Adequate ventilation of the mounting cabinet must be maintained for sufficient
cooling of the power source. Use louvered side panels and/or perforated rear panels to
ensure adequate airflow. The air intake holes on the sides of the power source must not be
obstructed when mounted inside cabinet. See Figure 3-1.
The rack mount slide mounting holes centerlines on the side of the power source are 2.92
inches / 74.3 mm above the bottom edge of the front panel.
Note:
The 2003RP series models cannot be mounted in a cabinet by just using
the front panel rack ears. They require additional support.
Figure 3-5: Rack Mount Slides (-RMS option) position
3.5
Input Wiring
The AC Power Source must be operated from a three-wire single-phase service. The mains
source must have a current rating greater than or equal to 35 A for the low input range. Use
the supplied safety cover/strain relief when connecting the input wires to the power source.
Refer to Figure 3-2 and Figure 3-6 for the input power connections.
Also loop the input ground wire through the supplied ferrite filter (Ci P/N 250508) core 5 times
(5 turns) for 230V input models (AWG#12) or 3 turns for 115V input models (AWG#10).
Enclose ferrite core with the safety cover or leave it outside the safety cover if insufficient
space is available.
When connecting the input wires to input terminal block, make sure the safety grounding wire
including the 5 turns around the ferrite core from the strain relief grommet is longer than the
Line and Neutral wires so that the ground wire will be the last to take any strain. For lowrange input operation (107/115V) #10 AWG is recommended for input wires as a minimum.
For high-range input operation (208/230V) #12AWG is recommended. For European
applications (230V), the following input cordset may also be used:
Panel Components # 86518030, rated 16A, 250V, 70 C, 3x1.5mm² conductor size, VDE
approved. Install as described above for discrete wiring.
3.6
Output Connections
All load connections must be made at the terminal block on the rear panel. The remote
sense inputs allow the power source output voltages to be monitored directly at the load and
must be connected for all three phases. The remote sense wires are connected to adjacent
pins for each phase on the rear panel output terminal strip.
Because of the possibility of hazardous voltages on the output terminals, insulation of wiring
on the output must be rated for the maximum output voltage of the source, at least 270
volts. There must be no accessible live part connected to the 2003RP output terminals. See
Figure 3-6.
The output power cables must be large enough to prevent a voltage difference greater than
7% of the programmed value from the power output pins to the sense input pins. Table 3-1
shows the maximum length of the output wires allowing 1 per cent voltage drop. The table
assumes the Remote Sense input is connected at the load. For 2003RP models with lower
voltage ranges than 135 VRMS, the wires may have to be made larger. Numbers shown in
Table 3-1 are for standard a 2003RP model with 135 VRMS range.
Output Current
Wire Size
Maximum wire length from output to load, 1% drop
2
5.0 ARMS
0.75 mm
5.0 ARMS
AWG 18
5.0 ARMS
1.0 mm
2
5.0 ARMS
AWG 16
5.0 ARMS
1.5 mm
2
5.0 ARMS
AWG 14
6m
20 ft
6.4 m
21 ft
8m
26 ft
8.5 m
28 ft
12 m
39 ft
14 m
45 ft
Table 3-1: Maximum Output Wiring Lengths
The Remote Sense inputs must be connected or an output voltage 7% higher than the
programmed output will be generated. If the 2003RP is configured for constant voltage, a
fault will be generated.
AC Input
Safety Cover
AC Output
Safety Cover
L N Gnd
HI LO
AC
Output
Ferrite
Clamp
L
N
GND
AC
Input
Ferrite
Figure 3-6: Input and Output Wiring
3.7
Output Voltage Ranges
The standard 2003RP AC power source has two output voltage ranges 0-135 VAC and 0-270
VAC. The operator may switch from one range to the other with no special precautions
except to remember that the output voltage will go to zero whenever a range change takes
place.
Certain options available on the 2003RP series may result in different voltage range values
or a single voltage range only. Certain models like the 2003RP-AV may be ordered with a
single voltage range only. On single voltage range units, the range change button has no
function and the High Range LED indicator is never illuminated. The following 2003RP
versions are available:
Model
2003RP
3
2003RP-AV
2003RP-HV
No of Voltage Ranges
High range
Low Range
2
270 VRMS
135 VRMS
2
1 (Factory set)
230 VRMS
n/a
115 VRMS
115 VRMS
2
312 VRMS
156 VRMS
2003RP AC power source models with dual voltage ranges offer an auto voltage range
change mode. In this mode, the voltage range is automatically changed when the user sets
a voltage above 135 VRMS or below 130 VRMS (for standard 2003RP), above 156 VRMS or
below 150 VRMS (for 2003RP-HV); changeover points differ for different voltage range pairs).
The AUTO mode can be selected by pressing the range change button until the AUTO mode
LED illuminates. To take the AC power source out of the AUTO voltage range mode, press
the Voltage range button briefly. This will put the unit in the present range but takes it out of
auto mode.
Note:
3
Even in AUTO mode, the three outputs temporarily go to zero volts when
a voltage range change occurs. If this is not acceptable, the AC source
should be operated in the high voltage range only and not in AUTO mode.
2003RP-AV units can be factory configured for single voltage range. In this case, the high voltage range is
not present.
3.8
Functional Test
CAUTION:
Work carefully when performing these tests - hazardous voltages are
present on the input and output during the tests.
Refer to Figure 3-7 for the test setup. For -AV option units, the resistor values need to be
adjusted as follows:
Model
2003RP
2003RP-AV
2003RP
Voltage Range
Resistor
Current (ARMS)
135
27
5.0
270
108
2.5
115
20
5.9
230 (if configured)
78
2.9
156
37
4.3
312
150
2.1
1. One phase at a time, connect a voltmeter and an oscilloscope or distortion analyzer to
the AC source output at the rear panel output terminals. Connect each sense input to
the adjacent power pin on the rear panel connector.
2. Connect the AC mains voltage connections to the AC source input terminals. Turn on
the power via the front panel circuit breaker.
3. Verify that the front panel 7 segment LED displays indicate the initial start up voltage and
frequency.
4. Select the low voltage range. Set the frequency to 400 Hz with the right knob. Choose
the current function with the Select key. Set the current limit to the maximum value using
the right knob. Set the output voltage to 135 V (115 V for the –AV option, 156 V for –HV
option) with the left knob.
5. Enable the output by pressing the Output key. The green LED above the key will
illuminate when the output is on. The output should be a clean 135V (115 V for the –AV
option, 156 V for –HV option) AC sinewave having less than 2.0% distortion.
6. Apply full load (refer to table above) to the output of the source and verify the output
remains within 0.1% of the initial 135 V (115 V for the –AV option, 156 V for –HV option).
The output should still be clean and the distortion should still be less than 2.0 % at 400
Hz.
7. Using the right knob set the output current limit value to 3 amps. If the unit is configured
for Constant Current mode (factory default), the system should go into current limit and
reduce the output voltage. If the unit is configured for Constant Voltage mode, an error
message will appear on the display (err -300) that indicates an output fault condition and
the output will go off. Return the current value to the maximum current and disconnect
the load.
8. Repeat steps 4 through 7 but set the output high voltage range and the current limit to
maximum value. Refer to the table above for the relevant resistor values. For units that
are factory configured with a single voltage range, these steps do not have to be
repeated.
9. Repeat steps 1 through 7 for all three output phases.
In the event the power source does not pass the functional test, refer to the calibration
procedure in Section 6 or call California Instrument‟s customer satisfaction department for
further assistance.
To Voltmeter
12345678
L N G
GROUND
NEUTRAL
LINE
Load
Figure 3-7: Test Setup 2003RP.
3.9
Other Modes of Operation
When the 2003RP is shipped from the factory, it is configured for the Constant Current Mode
of operation. This mode means that if the load current exceeds the programmed Current
Limit value, the output voltage will drop and the current will continue at the programmed
value.
The 2003RP can be configured to operate in the Constant Voltage mode. In this mode of
operation, if the load current exceeds the Current Limit value, the output voltage will default
with the output relay open. The Constant Voltage mode will only work if the default voltage is
set for 5.0 volts. If the default is any other voltage, the power source may indicate a Fault at
power up.
To configure the 2003RP, remove the input line voltage connection from the rear panel.
Remove the top cover. Install jumpers W1 and W2 on controller assembly, A1, and jumpers
W1, W3, W4 and W6 on the Phase B/C assembly, A2. Both assemblies are on the front
panel. Reinstall the top cover.
4
Front Panel Operation
4.1
Functional Controls
The front panel can be divided in a small number of functional areas:
Status Indicator lights
Control knobs
LED displays
Control buttons
Figure 4-1: Front Panel View
4.1.1 Status Indicator Lights
Ten LED status indicators are located directly above the right hand side 7 segment LED
display. These LED‟s correspond to the following conditions:
REMOTE
The REMOTE LED indicates that the unit is in remote
control mode. If the RS232C interface is used, the
REMOTE state can be enabled by the controller using the
SYST:REM command. Any time the REMOTE LED is lit,
the front panel of the RP Series unit is disabled. There is no
LOCAL button that allows the user to regain control of the
front panel. The SYST:LOC command will enable the front
panel controls. When using the GPIB, the remote/local
state is controlled by the REN (Remote Enable) interface
line.
FAULT
The FAULT LED indicates an overtemperature condition.
Overtemperature is usually caused by poor air flow. Check
the air flow exhaust at the rear of the unit to make sure it is
not obstructed. If the power source is configured for
constant voltage, the indicator will illuminate for loss of
sense lines or an overcurrent condition.
OUTPUT
The OUTPUT LED indicates the status of the output relay.
The output relay is controlled by the OUTPUT button located
directly below the LED. When the OUTPUT LED is not lit,
the output voltage is not present at the output terminal strip
regardless of the voltage setting.
RANGE - HIGH
The RANGE HIGH LED indicates the selected output
voltage range. When it is illuminated it indicates the high
voltage range has been programmed. Any time the user
switches voltage ranges, the output is programmed to zero
volts. The output relay state is not changed however.
RANGE - AUTO
The RANGE AUTO LED indicates the 2003RP is in auto
ranging mode and will switch voltage range automatically if
the selected output voltage increments or decrements
through the low range voltage limit. (135 VRMS on standard
units). During a range change, the output voltage will be
programmed to zero momentarily. Some hysteresis is
provided. See Figure 4-2.
FREQ
Illuminates when the 7 segment LED display shows the
programmed frequency. In the calibration mode this
indicator is not illuminated for calibrating the output voltage.
When it is illuminated in the calibration mode the voltage
measurement can be calibrated.
I RMS
Illuminates when the 7 segment LED display shows the
programmed current limit, measured current values, or
current measurement calibration.
I PK
Illuminates when the 7 segment LED display shows the
measured peak current or peak current calibration. See
Note.
PWR
Illuminates when the 7 segment LED display shows the
measured power or power calibration. See Note.
PF
Illuminates when the 7 segment LED display shows the
measured power factor. It also illuminates in the calibration
mode of operation. In calibration mode, the PF LED is
always lit in combination with the measurement or output
function being calibrated. In normal mode of operation, only
one LED in this group is on at a time. See Note.
A, B, C
These three LED's indicate the LED Measurement readout
selection for phase A, B or C. The PHASE key may be used
to cycle between the three phase readouts.
Note: For peak current, power and power factor measurements, Option -OP1 is required. If
this option is not installed, these functions are not available and the SELECT button will only
toggle between FREQ and CURR modes.
270
HIGH
Low to High switch-over
135
Hysteresis
130
0
High to Low switch-over
LOW
Figure 4-2: Voltage Auto Range Switch Over Points
4.1.2 Control knobs
Counter
clockwise
Clockwise
DECREASE
INCREASE
Figure 4-3: Control Knob
There are two control knobs located below the LED displays which are used to change setup
parameters for voltage, frequency and current limit. The SELECT button selects the function
of the right knob. The right knob will control either the frequency or the current limit as
indicated by the indicator above the right LED. The left knob always controls the voltage.
Setting changes always affect all three output phases simultaneously.
4.1.3 Buttons
There are four function buttons for the Output Voltage Range, Output State, Select Mode,
and Phase Select. The following is a description of these buttons:
KEY
DESCRIPTION
RANGE
The RANGE button is used to change the voltage range
between the low range (0 to 135 or 115 volts) and high
range (0 to 270 or 230 volts). The LED above the switch will
light to indicate the high voltage range selection. The output
voltage will be reset to zero voltage after a range change. If
the 2003RP-AV is configured for a single voltage range,
this button is disabled.
The same button may be used to put the 2003RP in the
AUTO voltage range change mode. This button toggles
from Lo, Auto, Hi and back to Lo. The AUTO LED will
illuminate when the AUTO range mode is enabled. While in
AUTO mode, the 2003RP will switch to the high range
whenever a value larger than the low range limit is
programmed. Whenever a value below the low range limit is
programmed, the unit will switch to the low voltage range.
The output is momentarily interrupted when a range change
occurs.
To take the unit out of AUTO mode, press the RANGE
button again.
OUTPUT
The OUTPUT button will toggle the output relays to connect
or disconnect the outputs. The LED above the button will
light when the output relays are closed. No output voltage
will be present when the OUTPUT button is off despite the
level of voltage programmed.
SELECT
The SELECT button selects the function of the right control
knob and 7 segment LED display. The knob will control the
output frequency and the display will show the program
frequency value when the mode selection is frequency. The
knob will program the current limit and the display will show
its value in the current mode. The display will revert back to
showing the measured current after 3 seconds from the last
movement of the control knob.
The SELECT button also allows selection of the desired
measurement function readout. Available selections are:
Current (Also puts the knob in Current Limit set mode)
Peak Current
Power
Power Factor
Measurements are updated 4 times per second. The
display mode is indicated by the LED‟s above the 7 segment
LED display. Note that voltage measurements are available
through the Voltage LED.
PHASE
This button cycles through phase A, B, and C for
measurement readout selection on the LED's.
(CAL)
There is a switch behind this hole in the front panel. When
the switch is depressed with the proper tool, the PF indicator
will illuminate to indicate the calibration mode has been
selected. The table below shows the calibration mode LED
indications after the (CAL) button is depressed.
CALIBRATE
Output voltage
INDICATORS
ILLUMINATED
PF only
Voltage measurement
PF and FREQ
Current measurement
PF and IRMS
Peak current measurement
PF and IPK
Power measurement
PF and PWR
4.1.4 LED Displays
Settings and measurements are shown on two 4 digit, 7 segment displays. The voltage
display on the left shows the programmed voltage as the user turns the left knob.
Approximately 3 seconds after releasing the knob, this display reverts back to displaying the
measured output voltage. The right hand LED display is a multipurpose display. For setup
purposes, it displays either Frequency or Current limit settings. After about 3 seconds of
inactivity, this display switches to the selected measurement parameter on the selected
phase. The SELECT button will define the operating mode or the selected measurement
parameter for the right hand display. The PHASE button selects the output phase.
Note that older model 2003RP power sources may have LCD displays instead of LED
displays. Operation of both versions is identical.
4.2
How to examples...
This section covers some common tasks that are often performed with an AC power source.
These examples are written in a “How to...” format and provide step by step instructions on
how to set up the AC Source for specific tasks.
4.2.1 Set the Output
Output parameters are Voltage, Frequency and Current Limit.
1. Disable the output by pressing the OUTPUT button. The LED above the button will turn
off.
2. Use the left knob to set the output voltage. Clockwise will increase the output, counter
clockwise will reduce the output. The display above the knob will show the voltage
setting.
3. Use the right knob to set the frequency and current limit. The SELECT button will define
the function of the knob and the display above it. The Frequency or Current LED will turn
on to indicate the function controlled by the right knob.
4. Enable the output by pressing the OUTPUT button.
4.2.2 Slew Output Values
The output parameters can be slewed using the control knobs.
1. Enable the output by pressing the OUTPUT button. The LED above it will turn on.
2. Use the left knob to set the output voltage. Clockwise will increase the output, counter
clockwise will reduce the output. The display above the knob will show the voltage
setting.
3. Use the right knob to set the frequency or current limit. The SELECT button will define
the function of the knob as indicated by the display above it. The LED‟s located above
the display will indicate the selected function.
4.2.3 Display Measurement Data
Measurements can be called up as follows:
1. For voltage, the left LED always displays the measured output voltage unless the
knob is turned. As the knob is turned, the programmed voltage will be displayed
instead. Approximately 3 seconds after releasing the knob, the display reverts back
to the measured voltage.
2. All other measurements can be displayed by using the SELECT button to toggle
through the available measurements. The LED‟s above the LED indicate the active
selection. The knob only affects programmed frequency and current limit.
3. Moving the right control knob will interrupt the selected measurement and put the
display back in Current Limit adjust mode.
4. Pressing the PHASE button repeatedly will toggle through the measurements for all
three output phases.
Note: For peak current, power and power factor measurements, Option -OP1 is required.
4.2.4 Change the Voltage Range
The voltage range can be changed as follows (if the 2003RP-AV is configured for a single
voltage range, this does not apply):
1. Press the RANGE button located in the upper left corner. The output voltage will
reset to 0 volts.
2. Use the left knob to set the output voltage.
The AUTO voltage range can be selected as follows:
3. Press the RANGE button located in the upper left corner. The AUTO LED will
illuminate. The AC source is now in Auto range mode. Turn the left knob to a value
above 135 V. The unit will switch to high range and the HIGH LED will illuminate.
4. Turn the left knob to reduce the voltage to a value below 135 V. The AC source will
switch to the low voltage range and the HIGH LED will turn off.
To turn off the AUTO voltage range, proceed as follows:
5. Press the RANGE button. This puts the AC source back in normal mode. The
voltage range that was in effect does not change. The AUTO LED will turn off.
6. Press the RANGE button again to toggle voltage ranges.
4.2.5 Control the Output
The output can be disabled or enabled using the OUTPUT button as follows:
1. Pressing the OUTPUT button when the output LED is on will open the AC source output
relays. The programmed voltage setting will remain at the last program value.
2. Pressing the OUTPUT button again will close the output relay and the output voltage will
revert to the last programmed value.
4.2.6 Measure Peak Inrush Current (Requires -OP1 Option)
The peak current measurement function of the 2003RP uses a sample and hold circuit to
track the highest peak current found until reset. The peak current sample and hold circuit is
reset any time the user toggles away from the peak current display mode to a different
measurement.
The peak inrush current for a unit under test can be measured using this function as follows:
1. Program the output to zero volts and open the output relay using the OUTPUT button.
2. Use the PHASE button to select phase A.
3. Use the SELECT button to display the present peak current value.
4. Use the SELECT button again to toggle to any other measurement readout. This will
reset the peak current sample and hold circuit to zero amps.
5. Use the left control knob to set the voltage to the nominal supply voltage of the unit under
test.
6. Use the OUTPUT button to apply the programmed voltage to the unit under test.
7. Use the SELECT button to display the measured peak current value.
Note:
The 2003RP output is turned on at random phase angle. It may be
necessary to repeat this test to find the highest possible peak inrush
current demanded by the unit under test.
Phase angle control is available over the bus if the –OP1 option package
with IEEE-488/RS232C interface is installed.
4.3
Setting the Power on Initialization Values
The 2003RP is supplied with default factory settings when the unit is powered up. The factory
settings are:
Parameter
Factory default setting
Voltage range
Low
Auto Voltage Range
OFF
Voltage
5.0 Volt
Frequency
60 Hz ( 400 Hz on 2003RP-AV models)
Current limit
5.0 amps (5.9 amps on 2003RP-AV models, 4.3 amps
on 2003RP-HV models).
Display mode
Frequency (not part of setup)
Selected Phase
Phase A (not part of setup)
Output Relay state
OFF
Output start state
OFF
Output start phase
0 degrees
Local / Remote State
Local. Front panel unlocked.
Table 4-1: Factory Default Power on Settings
It is possible to change the power-on initialization values in one of two ways:
1. Using the optional RS232 or IEEE-488 interface and the supplied PGUI32 program.
2. Using the front panel.
To change the power on initialization values from the front panel, proceed as follows:
1. Set the unit up in the desired way (range, voltage, frequency, current limit, output relay
state, display mode).
2. Press and hold the SELECT key (normally toggles LED display mode). Make sure the
correct indicator LED is illuminated, e.g., FREQ to display voltage and frequency.
3. While still holding the SELECT key, press the OUTPUT key. This will save the present
front panel settings in non volatile memory register (NVM) number 7 and assign this
register as the power-on register.
4. Release both keys.
5. This procedure can be repeated as often as needed by the user.
Note:
Front panel setups saved in non-volatile memory do not include the
Display mode or Phase selection.
4.4
Current Limit Modes
The 2003RP supports two modes of current limiting. In either mode, the user can set the
RMS current level at which the current limit function will operate. The available current limit
modes are:
Constant Current (CC) mode
This is the default mode as supplied from the
factory. In this mode, the output voltage is
automatically reduced by the AC power source to
maintain the set current. Once the current drawn
drops below the set limit value, the voltage is
increased again. No error message is generated
in this mode of operation. This mode is suitable
for starting loads that require high inrush currents
but don‟t need full nominal voltage to run. (e.g.
AC motors).
Constant Voltage (CV) mode
In this mode of operation, the output of the AC
source is turned off and the programmed voltage
is set to 0 volts as soon as the load current
exceeds the set current limit value. (Trip current).
Changing jumpers in the AC power source will change the selected current limit mode. Refer
to section 3.9 for instructions on how to change these jumpers.
4.5
Function Strobe [Option]
The Function Strobe (FS) is a TTL logic level signal provided at the rear panel of the
2003RP. This signal is synchronized to any phase A voltage and frequency output change of
the AC source and may be used to trigger external test equipment such as oscilloscopes.
Default mode of operation
The function strobe is an active low TTL output signal. Each pulse lasts approximately 400
sec . The output changes on the falling edge of the function strobe signal.
Alternative mode of operation
The function strobe output logic uses the GPIB interface DC supply to provide the required
logic levels. If the GPIB interface is connected to the user‟s PC, excessive ground noise may
prevent the function strobe from operating correctly. If this is the case, the output mode of
the function strobe may be changed to provide a floating open collector output. In this case,
the end user has to provide an external DC power supply and pull-up resistor. A 9 volt
battery may be used for this purpose. Contact California Instruments‟ service department for
details on changing the operation of the FS output.
4.6
Remote Inhibit [Option]
A Remote Inhibit BNC input is located on the rear panel of the 2003RP if the -OP1 option
was specified at the time of purchase. This input may be used to disable the AC source
output using an external control signal.
Default mode of operation
If the Remote Inhibit (RI) input is left unconnected, the output of the AC source can be turned
on using the OUTPUT button on the front panel or the appropriate bus command. To disable
the output relay, a logic low level or a contact closure needs to be present across the
terminals of the RI BNC connector.
Typical use of the RI input is in rack systems where the RI input is wired to a switch that
detects removal of the rear panel. This input may also be used to simultaneously shut down
multiple AC power sources.
Note that the RI input has an internal pull-up resistor to TTL logic high. When the RI input
cable is disconnected, the output will recover and the output relay will be closed
automatically.
5
Principle of Operation
5.1
General
An explanation of the circuits in the AC Source is given in this section. Refer to the block
diagram of the system, Figure 5-1.
5.2
Overall Description
Input power at the rear panel is routed through the EMI filter, A11, and circuit breaker to the
high current rectifier, CR1, and the DC Supply assembly, A4. The various DC supply outputs
then go to the Mother board, A5, then are directed to other modules.
The Oscillator assembly, A1 and A2, generates the oscillator and control signals, and
measures the output voltage, current, etc.
The Amplifier modules, A7, A8, A9, take DC supply voltages and input signals from the
Mother board. The high power amplifier outputs are sent via the Mother board and
Range/Relay bard, to the output transformer primaries, T1, T2, T3.
The Range/Relay board is identified as A6. This board configures the secondaries of the
output transformers for the correct output voltage range. The output of the Range/Relay
board is directed to the Output assembly, A12.
The Output assembly holds the output relays and output terminal strip, TB2. The output of
the AC Power Source is taken from the terminal strip through the rear panel.
5.3
DC Supply
This assembly is identified as A4. It generates the high power +300 VDC supply used by the
amplifiers.
The DC supply also has circuits that generate auxiliary DC voltages for the low power circuits
of the 2003RP:
1. +26V (output referred) supply for relays and fans.
2. +18V, -18V (output referred) supply for oscillator control circuits
3. +15VSW, -15VSW (input referred) supplies for amplifier control circuits
4. +15VSW1 (input referred) supply for amplifier gate drive
5. +8VISO (SELV) supply for RS232/GPIB board
GPIB
J6
A7
AMPLIFIER A
A8
AMPLIFIER B
A2
PHASE B/C
A9
AMPLIFIER C
P3
J2
A3
RS232/
GPIB
A1
CONTROLLER
J3
RS232
J10
Remote
Inhibit
J11
J2
J7
P2
J10
J2
J8
P2
J11
J2
J9
P2
J12
J4
J1
J5
J3
Function
Strobe
A5
MOTHER BOARD
J6
J5
E1
+300
E3
COM2
E4 E3 E6 E5 E8 E7
E4
E5
E1 E2 E3 E4 E5 E6
J2
J1
A4
DC SUPPLY
A6
RANGE/RELAY
A12
OUTPUT
E13
E1
E14
E2
E15
E16
E1 E2 E3
1
2
4
J4
J5
J6
J2
P4
P5
P6
P2
5 6
7
1
2
4
5 6
7
1
2
4
5 6
7
A10
E2
E1
+
-
L1
AC
L
N
B1
T1
T B1
A11
EMI FILTER
AC
CR1
Bridge
CB1
GND
Figure 5-1: AC Power System Block Diagram
T2
1
2
J4
T3
P7 J7
E3
E4
T B2
3
4
5
6
7
8
5.4
Mother Board
The Mother board, module assembly A5, routes signals between the various assemblies in
the power source.
The Mother board also has circuits that scale the oscillator reference waveforms for the two
different voltage ranges.
The oscillator reference waveforms are also adjusted via potentiometers:
1. Phase A, adjust via R4, monitor at TP4
2. Phase B, adjust via R8, monitor at TP5
3. Phase C, adjust via R12, monitor at TP6
5.5
Amplifier Modules
The AC Power Source has three switched mode amplifier modules to obtain high efficiency
AC outputs. The switched mode amplifiers operate at 200 kHz. These amplifier modules
are designated A7, A8, and A9.
Each Amplifier Module obtains its input signal from the Oscillator Assembly via the Mother
Board. A 5.0V RMS input signal will generate 100.0V RMS on the primaries of the output
transformers and full-scale output voltage at the outputs of the AC Power Source.
Each Amplifier Module requires a 300 VDC, 15VSW and +15VSW1 supplies. The +300
VDC supply comes from the DC supply through one 20 amp fuse on the DC Supply and one
of three 5 amp fuses on the Mother Board.
Each Amplifier Module has a thermal switch mounted on its heat sink. If the heat sink
temperature exceeds 100 degrees C, the amplifier shuts down and sends an OVT signal to
the oscillator module. Logic low on any of the OVT control lines will cause the front panel
FAULT indicator to be illuminated.
5.6
Oscillator Module
The Oscillator Assembly consists of two boards, the Controller board, A1, and the Phase B/C
board, A2. The Phase B/C board connects to the Controller board via a ribbon cable. The
controller board connects to the mother board via another ribbon cable.
The Oscillator assembly has the circuits to perform the following operations:
1. Generates the output voltage sinewave for phase A, B and C.
2. Interprets the Voltage, Frequency and Current limit commands from the front panel and
RS232/GRIB Board.
3. Attenuates the oscillator drive signals to operate in a constant current mode.
4. Measures the output voltage, current, peak current and power for the selected output
phase.
5. Performs voltage dropouts at a designated phase angle or one or more output phases.
5.7
Range/Relay Board
The Range/Relay board, module assembly A6, holds the AC Power Source voltage range
change relays. These relays are controlled by the LVR line.
Three current transformers on this assembly monitor the output current, one current
transformer per output phase. Each current transformer has two burden resistors for the two
different current measurement ranges. The burden resistors are selected via small relays
controlled by the AMP 4 control line.
Potentiometers are used to adjust each high current range burden resistor:
1. Phase A, adjust via R6
2. Phase B, adjust via R10
3. Phase C, adjust via R14
5.8
Output Board
The Output board, module assembly A12, takes the amplifier outputs from the Range/Relay
board, routes them through output relays and then to the output terminal strip mounted to the
rear panel. The output relays are controlled via the CNF signal.
This board also has remote sense amplifiers to monitor output voltage. The voltage is
monitored at the output terminal strip sense points if the output relay is closed (output active).
The voltage is monitored internally if the output relay is open.
5.9
IEEE 488/RS232 Interface [Option]
The 2003RP can optionally be fitted with a combined RS232C and IEEE 488 interface board,
A3. This board assembly has optocouplers for isolation of the programming interface and
the Remote Inhibit and Function Strobe connections.
The GPIB address for the AC source is selected by a DIP switch on the rear panel. Only one
interface can be active at any given time and must be selected using DIP switch position 6.
(Refer to Figure 8-2).
CAUTION
VOLTAGES UP TO 300 VAC AND 400 VDC ARE PRESENT IN
CERTAIN SECTIONS OF THIS
POWER SOURCE. THIS EQUIPMENT GENERATES
POTENTIALLY LETHAL VOLTAGES.
DEATH
ON CONTACT MAY RESULT IF PERSONNEL FAIL TO
OBSERVE SAFETY PRECAUTIONS. DO NOT TOUCH
ELECTRONIC CIRCUITS WHEN POWER IS APPLIED.
6
Calibration
Routine calibration should be performed every 12 months. Non-routine calibration is only
required if a related assembly is replaced or if the periodic calibration is unsuccessful.
Calibration can be performed through the front panel by putting the 2003RP in Calibration
mode (CAL mode) or over the RS232C or IEEE-488 bus if the interface option is installed.
For bus calibration, the PGUI32 program may be used. Refer to the PGUI32 help file
supplied with the program for instructions on calibration over the remote control bus.
All routine calibrations can be performed without removing the top cover (closed case
calibration). For the –AV option, program 115V or 230V for 135V or 270V respectively.
6.1
Calibration Equipment
Digital Multimeter (DMM):
Two (2) Fluke 8506A or 8508A
100 milliohm Current Shunt:
Isotek Model RUG-Z-R100-0.1 or equivalent
Load Bank:
Various power load resistors will be needed
Model
Range
Current
max.
2003RP
135 V
270 V
115 V
4
230 V
156 V
312 V
5.0 A
2.5 A
5.9 A
2.9 A
4.3 A
2.16 A
2003RP-AV
2003RP-HV
Load
27
108
20
78
36
144
Table 6-1: Load Resistors and Current
4
Some 2003RP-AV may be factory configured for single voltage range only. In this case, the 230 V
range is not available.
6.2
Selecting Calibration Mode
The 2003RP can be placed in calibration mode (CAL mode) by pressing the recessed CAL
button located on the front panel using a pen or similar pointed object. Briefly pressing this
button will place the 2003RP in CAL mode, indicated by the illumination of the PF LED.
While in CAL mode, the front panel controls are used to adjust the various calibration
parameters. Both controls and status indicators take on different functions while the unit is in
CAL mode. The SELECT button is used to select the various measurement parameters that
can be calibrated in this mode.
Calibration of both output and measurements must be performed for each individual phase,
one phase at a time. The PHASE button is used to select the phase to be calibrated.
The following status indications are in effect while in CAL mode:
Status LED
CAL mode * (PF LED illuminated)
Normal operating mode *
FREQ
Indicates voltage measurement
calibration is selected.
If this LED is not lit while in CAL
mode, the Output Voltage
calibration mode is selected.
Indicates frequency setting or
measurement is displayed on right
7 segment LED.
I RMS
Indicates current measurement
calibration is selected.
Indicates current limit setting or
current measurement is displayed
on right 7 segment LED.
I PK
Indicates peak current
measurement calibration is
selected.
Indicates peak current
measurement is displayed on right
7 segment LED.
PWR
Indicates power measurement
calibration is selected.
Indicates power measurement is
displayed on right 7 segment LED.
PF
Indicates 2003RP unit is in
calibration mode.
Indicates power factor
measurement is displayed on right
7 segment LED.
A, B, C
Indicates the selected phase to be
calibrated.
Indicates the selected phase for
measurement readout on LED's.
Table 6-2: CAL Mode Status LED Indicators
* Some measurement functions are optional and may not be available. The calibration mode
will only select measurement calibration for measurement functions that are installed.
Note that in normal mode of operation, at no time are more than one of the measurement
mode selection LED‟s lit at the same time. In CAL mode however, the PF LED is always on,
in addition to one of the other four measurement selection LED‟s or no other LED for output
voltage calibration.
6.3
Routine Calibration
Setup:
Connect the test equipment to the power source as shown in Figure 6-1. The DMM can be
connected to the common output terminal at the rear of the unit. Use the phase output for
phase A, B and then C in sequence to calibrate all three phases.
Never connect the load wire to the SENSE terminal at the Rear Panel terminal strip. The
load must be connected to the POWER output terminal and a jumper between the POWER
and SENSE terminal. Always connect the external DVM to the SENSE terminal.
2003RP
AC SOURCE
Pow er A
Sense A
Pow er B
Sense B
Pow er C
Sense C
Pow er N
Sense N
1
2
3
4
5
6
7
8
DMM
AC VOLT
Figure 6-1: Test Equipment Hookup for Routine Output and Voltage Measurement Calibration
6.3.1 Output Voltage Calibration
1. Select the high voltage range. Set the output frequency to 60 Hz (400 Hz on 2003RPAV). Set the output voltage to 230 volts.
2. Remove any load and enable the output voltage with the OUTPUT button.
3. Put the 2003RP in CAL mode by pressing the recessed CAL button.
4. Use the SELECT key to toggle to the output voltage calibration mode. In this mode, all
LED‟s except the PF LED are off.
5. Use the Left control knob to adjust the output voltage displayed on the external reference
DMM until it reads as close as possible to 230 VAC.
6. Press the CAL button to leave the calibration mode.
6.3.2 Measurement Calibration - Low Scale
Note:
Measurement calibration can be done at any output frequency setting as
only one set of calibration coefficients is used for measurement
calibration. However, for best results, calibrate the measurements at the
frequency, which is used in most applications, e.g. 50 Hz, 60 Hz (except
model 2003RP-AV) or 400 Hz.
Refer to Table 6-1 for correct load resistors based on model number.
Low Scale Voltage Measurement Calibration
1. Connect the test equipment to the power source as shown in Figure 6-2. Do not
connect any load during this step. Voltage calibration must be done under no load
conditions.
2. Select the Low Voltage Range and program the output voltage to 10 VAC.
3. Put the 2003RP in CAL mode by pressing the recessed CAL button.
4. Use the SELECT key to select the Voltage Measurement calibration mode. This mode is
indicated by the FREQ LED.
5. Use the left control knob to adjust the voltage reading shown on the right hand 7
segment LED until it reads as close as possible to the reference reading as displayed on
the external DMM2.
DMM 2
AC VOLT
2003RP
AC SOURCE
Pow er A
Sense A
Pow er B
Sense B
Pow er C
Sense C
Pow er N
Sense N
1
2
3
4
5
6
7
8
Load Resistor
0.1 ohm Shunt
DMM 1
AC VOLT
Figure 6-2: Test Equipment Hook-up for Current and Power Measurement Calibration
Low Scale Current Measurement Calibration
1. Connect the test equipment to the power source as shown in Figure 6-2.
2. Apply the resistive load (see Table 6-1 for model and load) to the output terminals. Make
sure external DMM1 used for current measurement is across the shunt.
3. The output voltage must be programmed to 10.0 volts.
4. Use the SELECT key to select the Current Measurement calibration mode. This mode is
indicated by the I RMS LED.
5. Use the left control knob to adjust the current reading shown on the right hand 7 segment
LED until it reads as close as possible to the reference reading indicated by the DMM
measuring the current shunt voltage (DMM 1). Note that 0.1 V reading represents 1 Amp
if the recommended 100 m shunt is used.
Low Scale Peak Current Measurement Calibration
1. Connect the test equipment to the power source as shown in Figure 6-2.
2. Program the output voltage to 10.0 volts.
3. Use the SELECT key to select the Peak Current Measurement calibration mode. This
mode is indicated by the I PK LED.
4. Use the left control knob to adjust the peak current reading shown on the right hand 7
segment LED until it reads as close as possible to the reference reading shown on the
external DMM (DMM 1) times 1.414. This value is the peak current of a sinewave
current.
Low Scale Power Measurement Calibration
1. Connect the test equipment to the power source as shown in Figure 6-2.
2. Program the output voltage to 10.0 volts.
3. Use the SELECT key to select the Power Measurement calibration mode. This mode is
indicated by the PWR LED.
4. Calculate the power by multiplying the external reference current reading (DMM 1) in
amps with the external reference voltage reading (DMM 2).
5. Use the left control knob to adjust the power measurement reading shown on the right
hand 7 segment LED until it reads as close as possible to the calculated power reading.
Note:
The method of adjusting the low scale values for voltage, current and
power insure that the measured value is correct for small values. Under a
no-load condition, however, the measured value may not be 0
6.3.3 Measurement Calibration - Full Scale
Note:
Measurement calibration can be done at any output frequency setting as
only one set of calibration coefficients is used for measurement
calibration. However, for best results, calibrate the measurements at the
frequency which is used in most applications, e.g. 50 Hz, 60 Hz (except
model 2003RP-AV) or 400 Hz.
Refer to Table 6-1 for correct load resistors based on model number.
Full Scale Voltage Measurement Calibration
1. Connect the test equipment to the power source as shown in Figure 6-1. Do not connect
any load during this step. Voltage calibration must be done under no load conditions.
2. Select the High Voltage Range and program the output voltage to 230.0 VAC.
3. Put the 2003RP in CAL mode by pressing the recessed CAL button.
4. Use the SELECT key to select the Voltage Measurement calibration mode. This mode is
indicated by the FREQ LED.
5. Use the left control knob to adjust the voltage reading shown on the right hand 7
segment LED until it reads as close as possible to the reference reading as displayed on
the external DMM.
Full Scale Current Measurement Calibration
1. Connect the test equipment to the power source as shown in Figure 6-2.
2. Apply the resistive load (see Table 6-1 for model and load) to the output terminals. Set
the power source to low voltage range.
3. Program the output voltage to a value that produces between 3 and 3.9 amps. Do not
load the output to more than 3.9 amps.
4. Use the SELECT key to select the Current Measurement calibration mode. This mode is
indicated by the I RMS LED.
5. Use the left control knob to adjust the current reading shown on the right hand 7 segment
LED until it reads as close as possible to the reference reading indicated by DMM1
(measuring the current shunt voltage). Note that .39 V reading represents 3.9 Amps if
the recommended 100 m shunt is used.
Full Scale Peak Current Measurement Calibration
1. Connect the test equipment to the power source as shown in Figure 6-2.
2. Apply the resistive load (see Table 6-1 for model and load) to the output terminals. Set
the power source to low voltage range.
3. Program the output voltage to a value that produces between 3 and 3.9 amps. Do not
load the output to more than 3.9 amps.
4. Use the SELECT key to select the Peak Current Measurement calibration mode. This
mode is indicated by the I PK LED.
5. Use the left control knob to adjust the peak current reading shown on the right hand 7
segment LED until it reads as close as possible to the reference reading derived from the
external DMM (DMM 1). Remember the peak current value is equal to 1.414 times the
value shown on the external DMM.
Full Scale Power Measurement Calibration
1. Connect the test equipment to the power source as shown in Figure 6-2.
2. Apply the resistive load (see Table 6-1 for model and load) to the output terminals. Set
the power source to low voltage range.
3. Program the output voltage to a value that produces between 3 and 3.9 amps. Do not
load the output to more than 3.9 amps.
4. Use the SELECT key to select the Power Measurement calibration mode. This mode is
indicated by the PWR LED.
5. Calculate the power by multiplying the external reference current reading (DMM1) with
the external reference voltage reading (DMM2).
6. Use the left control knob to adjust the power measurement reading shown on the right
hand 7 segment LED until it reads as close as possible to the calculated power reading.
6.4
Non-Routine Calibration
The following calibrations are not required on a routine basis:
High Current Measurement Range (Section 6.4.1). After the low current measurement
range, 0 to 4 amps, is calibrated, the high range should be within it‟s specification range. If it
is not, this adjustment must be performed.
Current Limit Adjustment (Section 6.4.2). This calibration is only required if the output
current, while operating in the constant current mode, is not equal to or more than the
programmed value.
Open Sense Adjustment (Section 6.4.3). This adjustment must be made if the output voltage
can‟t be calibrated while operating in the constant current mode. If the output faults, with noload, while operating in the Constant Voltage mode, this adjustment must also be made.
All of the non-routine calibration adjustments must be made with the top cover removed.
Refer to Figure 6-3 for the location of the internal adjustments.
6.4.1 High Current Measurement Range Adjustment
Note:
If the Current Limit and High Current Measurement Range Adjustments
are both adjusted, the High Current Measurement Range must be
adjusted first.
1. Connect the test equipment as shown in Figure 6-2. Use full load resistance for the low
voltage range.
2. Program the output voltage to 135 V (115 V for –AV option) on the low voltage range and
400 Hz.
3. Use the SELECT key to select the Current Measurement display. Note that this is not
the Current Measurement calibration mode. Only the I RMS LED should be illuminated.
4. Observe the actual output current as shown on external DMM1 and current shunt.
Adjust R6 (Phase A) or R10 (Phase B) or R14 (Phase C) on the Range/Relay board for a
measurement display equal to the actual output current.
CAUTION: The amplifier wind tunnel must be covered for proper cooling if the
adjustment takes more than 1 minute.
6.4.2 Current Limit Adjustment
Note:
If the Current Limit and High Current Measurement Range Adjustments
are both adjusted, the High Current Measurement Range must be
adjusted first.
1. Connect the test equipment as shown in Figure 6-2. Use full load resistance for the low
voltage range.
2. Program the current to 4.5 amps. Program the output to 135 V (115 V for the –AV
option, 156V and 3.9 amps for 2003RP-HV, adjust for 4.1 in step 3) on the low voltage
range and 400 Hz.
3. For Phase A, adjust R50 on the Controller board for an output current of 4.75 amps.
For Phase B, adjust R49 on the Phase B/C board for an output of 4.75 amps.
For Phase C, adjust R8 on the Phase B/C board for an output of 4.75 amps.
CAUTION: The amplifier wind tunnel must be covered for proper cooling if the
adjustment takes more than 1 minute.
Figure 6-3: Internal Adjustments
6.4.3 Open Sense Adjustment
Connect the test equipment as shown in Figure 6-1.
NOTE:
The 2003RP must be configured for the Constant Current Mode of
operation for this procedure. For this mode jumpers W1 and W2 on the
Controller board and W1, W3, W4, and W6 on the Phase B/C board must
be removed.
Disconnect the remote sense wires on the rear panel terminal strip. Connect the external AC
DMM between the appropriate two output POWER terminals on the rear panel.
Program the output to 100.0 volts and adjust indicated potentiometer on the Mother board for
an output voltage of 115 volts:
for Phase A, adjust R4,
for Phase B, adjust R8,
for Phase C, adjust R12.
Turn off the front panel circuit breaker and reinstall the top cover. Also reconnect the
external SENSE terminals at the rear panel. Replace any jumpers if removed per the note
above.
7
Service
7.1
General
This section describes suggested maintenance and troubleshooting procedures. The
troubleshooting procedure is divided into two sections. The first section deals with basic
operation and connection of the equipment. The second section requires opening the unit
and using the LED indicators and a simple multimeter to troubleshoot the unit down to the
module level. Only a qualified electronic technician should attempt this level of
troubleshooting.
7.2
Cleaning
The exterior of the power source may be cleaned with a cloth dampened with a mild
detergent and wrung out. Disconnect mains power to the source before cleaning. Do not
spray water or other cleaning agents directly on the power source.
7.3
Basic Operation
Table 7-1: Basic Symptoms
PARAGRAPH
PROBLEM
7.3.1
Poor Output Voltage Accuracy
7.3.2
Poor Output Voltage Regulation
7.3.3
Distorted Output
7.3.4
Unit Shuts Down After 3-5 Seconds
7.3.5
No Output and no lights on front panel
7.3.6
No output but “Display” on front panel is on
7.3.7
Fault Lamp on
7.3.8
Can‟t program AC Power System on GPIB/RS232
7.3.1 Poor Output Voltage Accuracy
If the power source exhibits poor programmed voltage accuracy, the following item may be at
fault:
Table 7-2: Poor Output Voltage Accuracy
CAUSE
SOLUTION
The calibration is incorrect.
Calibrate the output.
7.3.2 Poor Output Voltage Regulation
If the AC Power Source exhibits poor voltage regulation the following item may be at fault:
Table 7-3: Poor Output Voltage Regulation
CAUSE
SOLUTION
The Remote Sense lines are not
connected at the same point monitored by
the external voltmeter used for load
regulation check.
Connect AC voltmeter to Remote Sense
lines on the Rear Panel Power Output
terminal strip.
7.3.3 Distorted Output
Table 7-4: Distorted Output
CAUSE
SOLUTION
Power source is grossly overloaded.
Reduce load.
Input mains voltage is too low.
Verify at input terminal block that input
voltage is within specified limits.
The crest factor of the load exceeds 3:1.
Reduce load current peaks by reducing
load.
7.3.4 Unit Shuts Down After 3-5 Seconds
Table 7-5: Unit Shuts Down After 3-5 Seconds
CAUSE
SOLUTION
Output shorted.
Remove output short.
Output grossly overloaded.
Remove overload.
Operating load with too high inrush or start
up currents.
Consult factory for application advice.
7.3.5 No Output and No Lights on Front Panel
Table 7-6: No Output and No Lights on Front Panel
CAUSE
SOLUTION
Front panel power switched off.
Switch the breaker on.
No input power to the input connector.
Ensure correct input power.
7.3.6 No Output but “Display” on Front Panel is On
Table 7-7: No Output But "Display" Is On
CAUSE
SOLUTION
“OUTPUT” switch is turned off.
Press OUTPUT switch to so that LED is
on.
Current limit programmed down or to zero.
Program current limit higher.
Voltage programmed down or to zero.
Turn amplitude control up.
7.3.7 Fault Lamp On
If the power source Fault lamp is on, the following may be at fault:
CAUSE
SOLUTION
Ambient temperature is too high.
Operate power source between 0 and
40 C.
Fan or ventilation holes are blocked.
Remove obstructions.
Fan not working.
Replace fan. Consult factory.
If the 2003RP is configured to operate in the Constant Voltage mode, the Fault lamp comes
on when the output load current has exceeded the programmed current limit value. If the AC
Power Source Fault lamp is on, the following items may be at fault:
CAUSE
SOLUTION
The output is overloaded.
Remove the overload.
The programmable current limit level is set
too low for the load being driven.
Compute and reprogram the correct
programmable current limit level.
The programmable current limit is
incorrectly calibrated.
Perform the calibration in Section 6.4.2
The Remote Sense lines are not
connected.
On the Rear Panel Power Output terminal
block, connect terminal 1 to 2, 3 to 4, 5 to
6, and 7 to 8.
7.3.8 Can’t Program AC Power System on GPIB or RS232
If the power source does not respond to GPIB or RS232 programming, the following items
may be at fault:
7.4
CAUSE
SOLUTION
The power source unit address is
incorrect.
Set correct address. See section 8.3.
GPIB or RS232 cable is loose at power
source rear panel.
Check connection, tighten jack screws.
The GPIB/RS232 selector switch is in the
wrong position.
Set DIP switch to desired function. Refer
to Section 5.9
RS232/GPIB Assembly has failed.
Replace the RS232/GPIB Assembly.
Module Removal
Figure 7-1 shows the location of the internal modules and assemblies.
Figure 7-1: Assembly Location
7.4.1 Oscillator Module Removal/Replacement
If a fault is found that requires the replacement of the Oscillator Module (assemblies A2 and
A3) follow the following steps and refer to Figure 7-1 for the module locations:
1. Turn off the front panel circuit breaker. Remove the input power from the rear panel
terminal block.
2. Remove the top cover.
3. Remove the front panel knobs and nuts. The knobs are held in place with 1/16 inch
Allen screws. The nuts are removed with a 1/2 inch wrench.
4. Remove 4 screws that hold the Phase B/C board and the 5 screws that hold the
controller board to the front panel. The oscillator assembly can now be removed.
7.4.2 Amplifier Removal/Replacement
If a fault has been found that indicates the failure of an amplifier module (assemblies A7, A8,
A9), check the condition of the fuses in series with the +300VDC power supply before
replacing the amplifier. The associated fuses are F3 on the DC Supply board, A4, and F1
(Phase A), F2 (Phase B), and F3 (Phase C) on the Mother board, A5. Refer to Figure 7-1 for
the location of these fuses.
There are three stacked amplifier modules: Phase A on top, Phase B in the middle, Phase C
on the bottom.
If it is determined that an amplifier module must be replaced, perform the following
procedure:
1. Turn off the input circuit breaker.
2. Disconnect AC input power at the rear panel.
3. Remove the AC Power Source top cover by removing (17) #6-32 x 5/16” flathead
screws.
4. Remove an amplifier by lifting its outside edge slightly and withdraw it from the
connectors.
5. Amplifiers may be replaced by following this procedure in reverse order.
WARNING:
Do not touch any parts inside the unit during this test, as they will be live
and dangerous. Always wear safety glasses.
7.5
Replaceable Parts
In order to ensure prompt, accurate service, please provide the following information, when
applicable, for each replacement part ordered.
a. Model number and serial number of the instrument.
b. California Instruments‟ part number for the sub-assembly where the component is
located. (C.I. PART #)
c.
Component reference designator. (SEQ #)
d. Component description.
e. Component manufacturers' FSCM number. (VENDOR)
All replaceable part orders should be addressed to:
California Instruments Corporation.
Attention: Customer Service
9689 Towne Centre Drive
San Diego, California 92121-1964
United States of America
Orders may be placed by fax using the fax following fax number:
+1 858 677 0940
SEQ#
C.I.PART #
DESCRIPTION
VENDOR
QTY
A1
4005-714-2
PC Assy, Controller
16067
1
A2
4005-720-1
PC Assy, Phase B/C
16067
1
A3
4005-702-2
PC Assy, RS232/GPIB
16067
1
A4
4005-722-1
PC Assy, DC Supply
16067
1
A5
4005-719-1
PC Assy, Mother Board
16067
1
A6
4005-721-1
PC Assy, Range/Relay
16067
1
A7,8,9
4008-410-3
Amplifier Assy, Phase ABC
16067
1
A10
4005-718-1
PC Assy, Input Shutdown
16067
1
A11
4005-724-1
PC Assy, EMI Filter
16067
1
A12
4005-723-1
PC Assy, Output/Sense
16067
1
B1
241182
Fan, 4”, 24VDC
77062
1
OUTPUT TRANSFORMERS, T1, T2, T3
T1, T2, T3
4008-024-1
Output Transformer, 2003RP
CI
3
T1, T2, T3
4008-028-1
Output Transformer, 2003RP-AV
CI
3
T1, T2, T3
4008-021-1
Output Transformer, 2003RP-HV
CI
3
Table 7-8: Replaceable Parts
SEQ#
C.I.PART #
DESCRIPTION
VENDOR
QTY
DC SUPPLY, A4
F3
270176
20A, 250V, quick acting (Bussmann ABC20)
71400
1
F4
270174
1A, 250V, very quick acting (Bussmann, PCC1)
71400
1
MOTHER BOARD, A5
F1
270209
5A, 250V, quick acting (Littelfuse, 312005)
75915
1
F2
270209
5A, 250V, quick acting (Littelfuse, 312005)
75915
1
F3
270209
5A, 250V, quick acting (Littelfuse, 312005)
75915
1
Table 7-9: Fuses
8
Remote Control
8.1
Introduction
The 2003RP can be furnished with a combination IEEE-488 and RS232C control interface at
the time of purchase. This interface is part of the -OP1 option package. The interface option
also includes the California Instruments Graphical User Interface program - PGUI32. This
Windows™ program provides a soft front panel to the instrument when connected to a PC
through the RS232C or IEEE-488 interface. Additional benefits are obtained from using the
PC as a control interface. Some of these benefits include the ability to store measurement
data to disk, interact with other programs, and produce output transients to simulate
commonly occurring AC line conditions.
The PGUI32 is a Windows™ program and as such requires a PC capable of running
Windows 95™, Windows 98™, or Windows NT . For best performance, a Pentium-based
PC is recommended. Intel™ 80486 based PC's will exhibit poor performance while
generating transients due to their lack of processing speed.
Complete information on how to use the PGUI32 can be found in the on-line help supplied
with the program. Use the Help menu or press on any of the many Help keys located in all
program windows for an explanation of the relevant screen or function.
As always, California Instruments appreciates your patronage and would welcome any
comments and suggestions you might have regarding this software or any of its other
products. Use the End-user feedback form located on page Error! Bookmark not defined..
The same form can be used to report software bugs should you encounter any.
8.2
PGUI32 Program Requirements
To successfully install and operate the PGUI32 program, you will need the following
equipment:
California Instruments AC power source. Supported models are :
1001P
Single phase output
1251P
Single phase output
801RP
Single phase output
1251RP
Single phase output
2001RP / 2001RP-AV / 2001RP-LZ
Single phase output
2003RP / 2003RP-AV / 2003RP-HV
Three phase output
PC capable of running Windows XP™, Windows Vista™ or Windows 2000
RS232C communications port
RS232C serial cable (supplied with the -OP1 option package). See next section for
RS232C cable wiring
or
National Instruments IEEE-488 Controller Card
Figure 8-1: Rear Panel View
Note:
8.3
The PGUI32 can be run in the absence of a power source. If no AC source is
available, the PGUI32 can be operated in a simulation mode. The program will
detect these conditions and start up in simulation mode after notifying the
operator. Measurements in this case will be simulated and should not be used
for any analytical purpose.
IEEE Interface
The 2003RP can optionally be equipped with both RS232C and IEEE-488 interfaces. The
desired interface is selected by moving the DIP switch position 5 to the correct mode. Only
one interface can be active at a time. Refer to
Figure 8-1 for the location of this switch.
The IEEE address of the 2003RP is set using the DIP switch at the rear of the unit. Switch
position 4 through 0 corresponds to bits 4 through 0 of the IEEE address. See figure below.
Figure 8-2: GPIB Address Selection Switch
The black section represents the switches.
The above configuration would cause the 2003RP to be in GPIB mode at address 10.
Listen only must be in the up position to work properly.
Note:
Switch setting changes do not take effect until power is cycled.
8.4
RS232C Interface
A suitable cable to connect the 2003RP AC Source to a 9 pin PC-AT style serial port is
supplied with the source. If you are unable to locate this cable, you need to use a cable that
conforms to the wiring diagram shown in Figure 8-3.
Note:
This cable is not bi-directional, so it is important to mark the PC side and the
AC source side of this cable. If the cable is connected in reverse, it will not
operate correctly.
The RP Series expects a LF (Hex 10) terminator at the end of each string sent over the
RS232C interface. If the programming environment you use to develop test programs does
not append a LF terminator to each output string, the RP Series will not respond. This is true
of programs like LabView™ using VISA drivers.
8.4.1 Serial Communication Test Program
The following sample program written in Quick-BASIC can be used to check communication
to the RP Series AC source over the RS232C serial interface. The interface is optional and
must be installed for this to work.
'California Instruments 2001P RS232C Communication Demo Program
'(c) 1998 Copyright California Instruments, All Rights Reserved
'
'This program is for demonstration purposes only and is not to be
'used for any commercial application
'================================================================
'Function and Subroutine Declarations
DECLARE FUNCTION retstring$ ()
'================================================================
'MAIN PROGRAM CODE
'================================================================
'OPEN COM2. Replace with COM1, COM3 or COM4 for Com port used
'The input and output buffers are set to 2K each although
'this is not required for most operations.
OPEN "COM2:19200,n,8,1,BIN,LF,TB2048,RB2048" FOR RANDOM AS #1 LEN = 1
CLS
PRINT "**** 2001P INTERACTIVE MODE ****"
'Enter and endless loop to accept user entered commands
DO
INPUT "Enter Command ('quit' to exit)--> ", cmd$
IF cmd$ <> "QUIT" AND cmd$ <> "quit" THEN
IF cmd$ <> "" THEN
PRINT #1, cmd$ + CHR$(10);
END IF
IF INSTR(cmd$, "?") THEN
PRINT "AC Source query response = "; retstring$
END IF
'Check for Errors after each command is issued
PRINT "Sending non-query syntax check *ESR?"
'On fast PC's we may have to hold off between commands
FOR t = 0 TO 1000: NEXT t
PRINT #1, "*ESR?" + CHR$(10);
esr% = 0 'Clear last error
'Mask off bits 5,4,3,2 only. Other bits are not used.
esr% = VAL(retstring$) AND 60
'Process esr% value for error bits
IF esr% AND 4 THEN
PRINT "*** Query Error Reported by AC Source ***"
END IF
IF esr% AND 8 THEN
PRINT "*** Instrument Dependent Error Reported by AC Source ***"
END IF
IF esr% AND 16 THEN
PRINT "*** Command Execution Error Reported by AC Source ***"
END IF
IF esr% AND 32 THEN
PRINT "*** Command Syntax Error Reported by AC Source ***"
END IF
'Clear ERR. -XXX Message from front panel if any error occurred
IF esr% <> 0 THEN
PRINT #1, "*CLS" + CHR$(10);
END IF
END IF
LOOP UNTIL cmd$ = "QUIT" OR cmd$ = "quit"
'Close COM port on exit
CLOSE #1
END
'================================================================
FUNCTION retstring$
'This function returns a response string from the P/RP Series
'AC power source. The QBasic statement LINE INPUT cannot be used
'as the P/RP Series does not return a CR <13> after a response
'message. The LINE INPUT function waits for a CR before
'returning a string. The P Series returns a LF <10> instead
'so we need to poll each returned character for a LF to
'assemble the response string. The COM port needs to be
'opened AS random with a record length of 1 for it to support
'this function. Also, the device number is assumed to be #1
'Optionally, this value could be passed as a parameter to
'make this program more generic.
DIM char AS STRING * 1
DIM resp AS STRING
char = ""
resp = ""
DO
char = INPUT$(1, #1)
resp = resp + char
LOOP UNTIL char = CHR$(10)
'Return result
retstring = LEFT$(resp, LEN(resp) - 1)
END FUNCTION
8.4.2 Serial Cable Diagram
California Instruments AC power sources require a special RS232C cable to communicate
with a PC. Standard null-modem cables obtained from a computer hardware store most
likely will not work. For this reason, all California Instruments power sources that operate
over RS232C are supplied with a RS232C 9 pin female to 9 pin female cable.
If for some reason this cable cannot be located, the cable diagram shown in Figure 8-3
should be used when constructing a serial cable.
DB-9 PC
Pin
1
2
3
4
5
6
7
8
9
DB-9 AC Source
Pin
1
2
3
4
5
6
7
8
9
Direction
output
input
output
output
input
output
Description
reserved
Receive data(RxD)
Transmit data (TxD)
Data Terminal Ready (DTR)
Signal Ground
Data Set Ready (DSR)
no connect
no connect
reserved
Figure 8-3: RS232C Interface Cable Wiring Diagram
8.5
PGUI32 Setup and Installation
This section covers installation of the PGUI32 from the distribution disk to the user‟s PC.
Make sure the PC is capable of running Windows with at least 16 Mbytes of memory and 4
Mbytes of available hard disk space.
8.5.1 Connecting the AC Source to the PC When Using RS232
Connect the AC source to the PC using an RS232C cable.
Set the AC source COM port settings as follows:
Baud rate:
19200 baud for model 2003RP
Data bits:
8
Stop bits
1
Parity bits:
none
Handshake:
Hardware
The AC source is configured to accept the above setting.
Select the RS232 interface by sliding the interface selection DIP switch on the rear panel to
the RS232 position.
8.5.2 Connecting the AC Source to the PC Using IEEE-488
Connect the AC source to the PC using an IEEE-488 interface cable. A National Instruments
GPIB controller card is required to use the PGUI32 program.
Select the IEEE-488 interface by sliding the interface selection dip switch on the rear panel to
the IEEE-488 position.
Set the desired IEEE address using DIP switch position 4 through 0 on the rear panel.
8.5.3 Installing the PGUI32 Software
The PGUI32 software is distributed on a set of 3.5 inch high density floppy diskettes or on
CD-ROM. The PGUI32 must be installed from these diskettes or CD using the included
setup program as all required files are compressed. You cannot copy the contents of these
diskettes or CD to your PC hard drive and run the program. To install the PGUI32, proceed
as follows:
1.
Turn on the PC and boot up in Windows™
2.
Insert the first disk (labeled Disk 1 of 3) in drive A or B or insert the CD in your
CD-ROM drive.
3.
From the Windows Start Menu, select RUN.
4.
At the “Open” prompt, type A:Setup or B:Setup depending on which disk drive
you used and click on the OK button. If you are installing from CD ROM, locate
the Win32/PGUI32 directory on the CDROM and run the setup program.
5.
Follow the instructions provided by the setup program to complete the
installation. At some point, you will be asked to insert the second disk (Disk 2).
Remove the first disk and replace it with disk 2 and press OK to continue the
installation. Continue through the last disk.
6.
When the installation is complete, remove the last disk from the floppy drive and
store the disks in a safe place.
Reboot the PC to activate the new settings. You are now ready to start using the PGUI32
software.
8.6
Troubleshooting - RS232C
This section provides guidelines for resolving communication problems that may occur when
using the PGUI32 software under Windows .
You may encounter problems when using the serial interface with the PGUI32 program that
is supplied with the interface option for this source.
Symptoms:
1. Unable to verify connection to the power source through RS232C interface. Time-out
occurs and dialog box appears that asks if you want to switch to simulation mode. An
error message (ERR -100) may appear on the front panel 7 segment LED‟s of the power
source.
- Or 2. Verification is successful but slewing of voltage, frequency or current limit results in an
ERR -100.
Things to check first:
1. Is the PC COM port you selected to use really available for this purpose? On older PC‟s
COM port interrupts are often shared between COM1 and COM3 as well as COM2 and
COM4. If any of these other com ports is in use, it may prevent you from using the COM
port that shares the same interrupt.
2. Did you use the RS232C cable that was supplied with the P/RP AC source? This is not a
null-modem cable and cannot easily be obtained at a computer store. If you do not have
the original cable, consult the PGUI32 on line help under Interface settings for a wiring
diagram.
3. Did you connect the cable in the right direction? This cable is unidirectional and should
be marked with a SOURCE and a PC label. Make sure you connect the SOURCE side of
the cable to the back of the AC source and the PC side of the cable to the PC port.
Resolution for Symptom 1
The P and RP Series of AC sources require hardware handshaking to control data flow from
the PC to the AC source. After receiving a command, the AC source asserts the DTR line to
hold off further communication from the PC until the command just sent has been processed.
Under Windows 95, it is possible to use a 16 byte transmit buffer if a 16550 UART is present.
This FIFO exceeds the length of most AC source commands. When enabled, this mode
may result in more than one command being placed in the UART output buffer. If this
happens, the handshake from the AC source will not prevent the content of this buffer being
sent to the AC source and thus will result in more than one command being sent to the AC
source.
To resolve this problem, the UART FIFO length needs to be reduced or disabled altogether.
The procedure to disabled the FIFO mode is outlined in the next paragraph.
Note: If turning off the UART FIFO conflicts with other applications that need to run on the
same PC using the same COM port, this solution may not be acceptable. In this case, skip
this step and proceed to the second symptom resolution which relies on a software
implemented hold-off instead of turning off the FIFO buffer. If you are using Windows 3.1 and
experience the same problem, the latter method is the only resolution available to you so you
should skip the next paragraph as well.
Procedure
1. Make sure the PGUI32 program is closed and no
device is using the COM port in use.
2. From the Windows desktop, right click on the “My
Computer” icon which is located in the top left corner
of the screen.
3. From the popup menu, select the “Properties” entry.
4. This brings up the System Properties dialog box
5. From the tabs shown at the top of the dialog box,
select the “Device Manager” tab.
6. The relevant screen is shown in Figure 8-4.
7. Expand the Ports(COM&LPT) tree selection by
clicking on the „+‟ sign
8. Select the COM port you plan to use to
communicate with the P or RP series power source.
9. With the correct COM port selected, click on the
Properties button at the bottom left of the dialog box.
10. This brings up the settings dialog box for the COM
port. In this example, COM2 is used.
11. From the tabs at the top of the dialog box, select the
“Port Settings” tab.
Figure 8-4: System Properties Dialog Box
12. This should bring up the dialog shown in Figure 8-5.
13. Next, select the Advanced button to bring up the advanced port
settings dialog box shown in Figure 8-6.
Figure 8-6: Advanced Port Settings Dialog Box
14. At the top of the dialog box, disable the “Use FIFO
buffers (requires 16550 compatible UART)”
checkbox. This will bypass the UART FIFO‟s and
enable the hardware handshake to work correctly.
15. Click on the all OK buttons to close all dialog boxes
that remain open.
16. This should enable the PGUI32 to work correctly.
Figure 8-5: COM Port Properties Dialog Box
Resolution for Symptom 2
Execute the suggested procedure to resolve symptom 1 first. If an occasional error
continues to occur while slewing the voltage or frequency slider controls in the PGUI32
program, add a command delay to the PGUI32 Registry Interface section using the following
procedure. This symptom may occur on some PC‟s.
Procedure
1. Close the PGUI32 program if it is still open.
2. Run the Windows Registry Editor (Regedit.exe) from the Run command line.
The correct setting is located at the following key:
HKEY_CURRENT_USER\Software\VB and VBA Program Settings\pgui32\Interface
3.
4.
5.
6.
7.
8.
Locate the HKEY_CURRENT_USER key and double click on it
Locate the Software key and double click on it.
Locate the VB and VBA Program Settings and double click on it.
Locate the Pgui32 key and double click on it.
Locate the Interface Key and double click on it.
In the right pane of the Registry Editor should be an entry called “CmdDelay”. If no such
entry is present add it yourself.
9. The default value for the CmdDelay is set to 10. Change this value to 20 by double
clicking on the CmdDelay key and entering the new value from the keyboard.
10. Close the Registry Editor when done.
11. Try to connect again. You may have to cycle the power on the AC source if it still shows
the Err -100 display.
Higher values than 20 may be set for the CmdDelay parameter if this fix does not resolve
your problem.
8.7
Troubleshooting - IEEE-488 / GPIB
This section provides guidelines for resolving communication problems that may occur when
using the 2003RP with or without the PGUI32 software with a IEEE-488 / GPIB interface.
Symptoms:
1. Unable to verify connection to the power source through IEEE-488 interface. Time-out
occurs any time an attempt is made to verify connection.
2. Communication seems to work but Error 100, Command Errors occur when sending a
series of setup commands to the AC source.
Things to check first:
1. Is the 2003RP interface option set to use the IEEE-488 interface instead of the RS232C
interface? The DIP switch on the rear panel is used to select the desired interface mode.
Refer to section 8.3.
2. Does the bus address selected in the System, Interface dialog match the address set
using the DIP switches on the 2003RP? The GPIB address selected must match the
settings on the DIP switch. If changes are made to the DIP switch setting, the 2003RP
power must be cycled off and on to have the new settings take effect.
3. Did you connect the cable in correctly and are both ends of the GPIB cable securely tied
down?
Resolution for Symptom 1
When using a fast IEEE-488 bus controller, the 2003RP‟s IEEE-488 interface may not
handshake fast enough to satisfy the controller‟s timing requirement. If this is the case, a
time-out will result any time a command is sent to the power source. To rectify this situation,
the IEEE-488 controller must be set to use delayed bus timing. For National Instruments
GPIB controller cards running under Windows™, this can be done from the device manager.
Select the GPIB interface and click on the NI-488.2M Settings tab. An Advanced button at
the bottom of the screen will provide access to the Bus Timing parameter. Set this value to
2 sec to operate with the 2003RP
GPIB interface.
Figure 8-8: NI AT-GPIB/TNT Advanced
Settings Dialog
Figure 8-7: NI AT-GPIB/TNT Settings
Resolution for Symptom 2
The 2003RP has a limit on how fast it can process commands sent over the bus. When
developing an application program that controls the 2001RP AC source, this must be
considered. Specifically, if non-query commands (commands that don‟t wait for a response
such as output setup commands) are sent at too high a rate, the AC source may not be able
to process them. In that case, a –100 Command Error will be reported.
This condition may exist on both RS232 and GPIB interface modes and is more prone when
faster controllers are used to run the application software. To prevent this condition, it will be
necessary to space out successive commands using a 20 msec delay. Alternatively,
commands could be sent to other instruments in the same system to accomplish the same
result.
8.8
PGUI32 Distribution Files
The installation program will install the following files in the directories specified. Note that
files with the same name that already exists in these directories will not be overwritten as part
of the installation process. If older files of the same name are found, they will be replaced. If
you need to retain a copy of these older version files, we recommend you back these files up
prior to running the installation program.
Application directory files
The following files are copied to the application directory. The application directory name is
chosen by the user during the installation process. The default directory for the PGUI32 is:
C:\Program Files\California Instruments\PGUI32
Pgui32.exe
Pgui32.hlp
Pgui32.cnt
Executable
On Line Help file
Help Contents file
Windows System directory files
The following shared files are stored in the Windows\System directory during installation:
Mscomm32.ocx
ss32x25.ocx
Comdlg32.ocx
Comctl32.ocx
Msvbvm50.dll
Mfc42.dll
Msvcrt.dll
Oleaut32.dll
Microsoft Serial communications active control
Grid spreadsheet active control
Microsoft Common dialog active control
Microsoft Common controls
Microsoft Visual Basic 5.0 virtual machine library
Microsoft Foundation Classes
Microsoft Visual C++ run-time library
Microsoft OLE automation server
IEC Test Programs Directory Files
File name
Description
Generic IEC 1000-4-11 Voltage Variations Test.411_Vars
Test levels for IEC 1000-4-11
Generic IEC 1000-4-11 Voltage Dips Test.411_Dips
Test levels for IEC 1000-4-11
EN 61326-1 Voltage Interrupts.411_Dips
Test levels for IEC 1000-4-11
Generic IEC 1000-4-14 Test Level 1.414_Fluc
Test levels for IEC 1000-4-14
Generic IEC 1000-4-14 Test Level 2.414_Fluc
Test levels for IEC 1000-4-14
Generic IEC 1000-4-28 Freq Vars Test Level 1.428_Vars
Test levels for IEC 1000-4-28
Generic IEC 1000-4-28 Freq Vars Test Level 2.428_Vars
Test levels for IEC 1000-4-28
Generic IEC 1000-4-28 Freq Vars Test Level 3.428_Vars
Test levels for IEC 1000-4-28
User files for above tests may be distributed as well. These files use a 4XX_USER
extension.
Test Sequence Program Directory Files
File name
Description
Sample sequence test file.SEQ
Sample output sequence file
Note: The location of these files as well as the files themselves may change with future
versions of the PGUI32. Consult the included readme file for last minute program
information.
8.9
Software Registration
Updates of this and other California Instruments programs are posted on a regular basis on
the California Instruments web site. You can find available programs by selecting the
Software, GUI's and Drivers menu. To gain access to these downloads, you will need to
register as a user on our web site. For instructions on how to register and request the
required access level for software downloads, visit our web site at
www.calinst.com
9
Introduction to SCPI
SCPI (Standard Commands for Programmable Instruments) is a programming language for
controlling instrument functions over the RS232 or IEEE 488 bus. The same SCPI
commands and parameters control the same functions in different classes of instruments.
For example, you would use the same MEAS:VOLT? command to measure the AC source
output voltage or the output voltage of a SCPI-compatible Multimeter.
9.1
Conventions Used in This Manual
Angle brackets<>
Vertical bar |
Square Brackets[]
Boldface font
Upper case font
9.2
Items within angle brackets are parameter abbreviations. For
example, <NR1> indicates a specific form of numerical data.
Vertical bars separate alternative parameters. For example, 0 | 1
indicates that either "0" or "1" can be used as a parameter.
Items within square brackets are optional. The representation
[SOURce:]VOLT means that SOURce: may be omitted.
Boldface font is used to emphasize syntax in command definitions.
CURR <NRf> shows a command definition.
Upper case font is used to show program lines in text. OUTP 1
shows a program line.
The SCPI Commands and Messages
This paragraph explains the syntax difference between SCPI Commands and SCPI
messages.
The AC source supports two types of commands, IEEE-488-2 common and SCPI
subsystem.
IEEE-488-2 common commands are generally not related to specific operations but to
controlling overall AC source functions such as reset, status and synchronization. All
common commands consist of a three-letter mnemonic preceded by an asterisk:
*RST
*IDN? *SRE 255
SCPI subsystem commands perform specific AC source functions. They are organized
into an inverted tree structure with the "root" at the top. Some are single commands
while others are grouped within specific subsystems. You must include the root
header in all commands sent to the AC source.
Refer to appendix A for the AC source SCPI tree structure.
Types of SCPI Messages
There are two types of SCPI messages, program and response.
A program message consists of one or more properly formatted SCPI commands sent
from the controller to the AC source. The message, which may be sent at any time,
requests the AC source to perform some action.
A response message consists of data in a specific SCPI format sent from the AC source
to the controller. The AC source sends the message only when commanded by a
program message called a "query."
The SCPI Command Tree
As previously explained, the basic SCPI communication method involves sending one or
more properly formatted commands from the SCPI command tree to the instrument as
program messages. The following figure shows a portion of a subsystem command tree,
from which you access the commands located along the various paths (you can see the
complete tree in appendix A).
Root
[:SOURce]
:SYSTem
:VOLTage
[:LEVel]
:CURRent
:RANGe
:REMote
:ERRor
:LIMit
:FREQuency
:LOW?
:HIGH?
Figure 9-1: Partial Command Tree
The Root Level
Note the location of the ROOT node at the top of the tree. Commands at the root level are at
the top level of the command tree. The SCPI interface is at this location when:
the AC source is powered on
a device clear (DCL) is sent to the AC source
the SCPI interface encounters a message terminator
the SCPI interface encounters a root specifier
Active Header Path
In order to properly traverse the command tree, you must understand the concept of the
active header path. When the AC source is turned on (or under any of the other conditions
listed above), the active path is at the root. That means the SCPI interface is ready to accept
any command at the root level, such as SOURCe or MEASurement.
If you enter SOURCe the active header path moves one colon to the right. The interface is
now ready to accept :VOLTage :FREQuency, or :CURRent as the next header. You must
include the colon, because it is required between headers.
If you now enter :VOLTage, the active path again moves one colon to the right. The interface
is now ready to accept either :RANGe or :LEVel as the next header.
If you now enter :RANGe you have reached the end of the command string. The active
header path remains at :RANGe If you wished, you could have entered :RANGe 150 ;LEVel
115 and it would be accepted as a compound message consisting of:
1. SOUR:VOLT:RANG 150.
2. SOUR:VOLT:LEV 115.
The entire message would be:
SOUR:VOLT:RANG 150;LEV 115.
The message terminator after LEVel 115 returns the path to the root.
Note: The 2003RP interface buffer is limited to 45 characters + [LF]. As such, compound
commands should be used with care to make sure they do not exceed this message length
limit.
Moving Among Subsystems
In order to combine commands from different subsystems, you need to be able to restore the
active path to the root. You do this with the root specifier (:). For example, you could set the
output frequency to 60 Hz and set the display mode to frequency.
FREQ 60
DISP:MODE 0
Because the root specifier resets the command parser to the root, you can use the root
specifier and do the same thing in one message:
FREQ 60;:DISP:MODE 0
Including Common Commands
You can combine common commands with system commands in the same message. Treat
the common command as a message unit by separating it with a semicolon (the message
unit separator). Common commands do not affect the active header path; you may insert
them anywhere in the message.
VOLTage 115;*ESE 255
OUTPut 0;*RCL 2
9.3
Using Queries
Observe the following precautions with queries:
Set up the proper number of variables for the returned data.
Read back all the results of a query before sending another command to the AC source.
Otherwise a Query Error will occur and the non-returned data will be lost.
9.4
Structure of a SCPI Message
SCPI messages consist of one or more message units ending in a message terminator. The
terminator is not part of the syntax, but implicit in the way your programming language
indicates the end of a line (such as a newline or end-of-line character).
The Message Unit
The simplest SCPI command is a single message unit consisting of a command header (or
keyword) followed by a message terminator.
FREQuency?<newline>
VOLTage?<newline>
The message unit may include a parameter after the header. The parameter usually is
numeric:
VOLTage 20<newline>
OUTPut 1<newline>
Combining Message Units
The following command message is briefly described here, with details in subsequent
paragraphs.
Data
Query Indicator
Message Unit
Header
SOUR:VOLT 80; FREQ 60; :CURR? <NL>
Header Message
Separator Unit
Separator
Root
Message
Specifier Terminator
Figure 9-2: Command Message Structure
The basic parts of the above message are:
Message Component
Headers
Header Separator
Data
Data Separator
Message Units
Message Unit Separator
Root Specifier
Query Indicator
Message Terminator
Note:
Example
SOUR VOLT FREQ CURR
The colon in SOUR:VOLT
80
60
The space in VOLT 80 and FREQ 60
VOLT 80
FREQ 60
CURR?
The semicolons in VOLT 80; and FREQ 60;
The colon in :CURR?
The question mark in CURR?
The <NL> (newline) indicator. Terminators are not part of
the SCPI syntax
The use of compound messages such as the one shown in Figure 12-2 is
not recommended as they typically exceed the available receive buffer
length of the RP Series interface.
Headers
Headers are instructions recognized by the AC source. Headers (which are sometimes
known as "keywords") may be either in the long form or the short form.
Long Form
The header is completely spelled out, such as VOLTAGE, SYSTEM, and
OUTPUT.
Short Form
The header has only the first three or four letters, such as VOLT, SYST, and
OUTP.
The SCPI interface is not sensitive to case. It will recognize any case mixture, such as
VOLTAGE, VOLTage or Voltage. Short form headers result in faster program execution.
Note:
In view of the 45 character receive buffer size of the RP Series, the short
form is recommended under all circumstances.
Header Convention
In the command descriptions in chapter 10 of this manual, headers are emphasized with
boldface type. The proper short form is shown in upper-case letters, such as DELay.
Header Separator
If a command has more than one header, you must separate them with a colon
(SYSTem:ERRor LIMit:FREQuency:LOW).
Optional Headers
The use of some headers is optional. Optional headers are shown in brackets, such as
VOLTage[:LEVel] 100.
Query Indicator
Following a header with a question mark turns it into a query (VOLTage?, VRANGe?).
Message Unit Separator
When two or more message units are combined into a compound message, separate the
units with a semicolon (VOLT 100;FREQ 60).
Root Specifier
When it precedes the first header of a message unit, the colon becomes the root specifier. It
tells the command parser that this is the root or the top node of the command tree. Note the
difference between root specifiers and header separators in the following examples:
SOURce:VOLTage:LEVel 100
All colons are header separators
:SOURce:VOLTage:LEVel 100
Only the first colon is a root specifier
SOURce:VOLTage:LEVel 100;:FREQuency 55
Only the third colon is a root specifier
You do not have to precede root-level commands with a colon; there is an implied colon in
front of every root-level command.
Message Terminator
A terminator informs SCPI that it has reached the end of a message. The only permitted
message terminator is:
newline (<NL>), which is ASCII decimal 10 or hex 0A.
In the examples of this manual, there is an assumed message terminator at the end of each
message. If the terminator needs to be shown, it is indicated as <NL> regardless of the
actual terminator character.
9.5
SCPI Data Formats
All data programmed to or returned from the AC source is in ASCII. The data type may be
numerical or character string.
Numerical Data Formats
Symbol
Data Form
Talking Formats
<NR1>
Digits with an implied decimal point assumed at the right of the leastsignificant digit. Examples: 273
<NR2>
Digits with an explicit decimal point. Example:.0273
<NR3>
Digits with an explicit decimal point and an exponent. Example: 2.73E+2
<Bool>
Boolean Data. Example: 0 | 1
Listening Formats
<Nrf>
Extended format that includes <NR1>, <NR2> and <NR3>. Examples:
273.2 , 2.73E2
<Bool>
Boolean Data. Example: 0 | 1
Character Data
Character strings returned by query statements may take either of the following forms,
depending on the length of the returned string:
9.6
<CRD>
Character Response Data. Permits the return of character strings.
<AARD>
Arbitrary ASCII Response Data. Permits the return of undelimited 7-bit
ASCII. This data type has an implied message terminator.
<SRD>
String Response Data. Returns string parameters enclosed in double
quotes.
Bus Throughput and Timing Considerations
The 2001RP has a limit on how fast it can process commands sent over the bus. When
developing an application program that controls the 2001RP AC source, this must be
considered. Specifically, if non-query commands (commands that don‟t wait for a response
such as output setup commands) are sent at too high a rate, the AC source may not be able
to process them. In that case, a –100 Command Error will be reported.
This condition may exist on both RS232 and GPIB interface modes and is more prone when
faster controllers are used to run the application software. To prevent this condition, it will be
necessary to space out successive commands using a 20 msec delay. Alternatively,
commands could be sent to other instruments in the same system to accomplish the same
result.
10 SCPI Command Reference
Where appropriate, related commands or queries are included. These are listed because
they are either directly related by function, or because reading about them will clarify or
enhance your understanding of the original command or query.
This chapter is organized as follows:
Subsystem commands, arranged by subsystem
IEEE 488.2 common commands
10.1 Subsystem Commands
Subsystem commands are specific to AC source functions. They can be a single command
or a group of commands. The groups are comprised of commands that extend one or more
levels below the root. The description of common commands follows the description of the
subsystem commands.
The subsystem command groups are listed in alphabetical order and the commands within
each subsystem are grouped alphabetically under the subsystem. Commands followed by a
question mark (?) take only the query form. When commands take both the command and
query form, this is noted in the syntax descriptions.
10.2 Calibration Subsystem
The commands in this subsystem allow you to do the following:
Enable and disable the calibration mode
Calibrate all measurement circuits and store new calibration coefficients in nonvolatile
memory.
Subsystem Syntax
CALibrate
:STATe
:MEASure
:CURRent
[:FSC]
:ZERO
:PCURrent
[:FSC]
:ZERO
:POWer
[:FSC]
:ZERO
:VOLTage
[:FSC]
:ZERO
[:SOURce]
:VOLTage
Enables or disables the calibration mode
Calibrate full scale AC current measurement
Trim AC current measurement offset
Calibrate full scale AC peak current measurement
Trim AC peak current measurement offset
Calibrate full scale AC power measurement
Trim AC power measurement offset
Calibrate full scale AC voltage measurement
Trim AC voltage measurement offset
Calibrate output voltage
10.2.1 Calibration State
CALibrate:STATe
This command puts the AC source in calibration mode. The calibration mode is required to
use the data entry form of the calibration commands. Without setting the correct state using
this command, only the query form can be used to query any calibration coefficients but no
new calibration can be performed. Calibration queries return the calibration coefficient for
the specified measurement parameter. Calibration coefficients range from -127 to + 127.
Note
Any changes made to calibration coefficients are not saved in non-volatile
memory until the SYSTem:SAVE command is issued before turning the Cal
state off.
CAL:STAT 0
CAL:STAT 1
Command Syntax
Parameters
Examples
Related Commands
Turns calibration mode off.
Turns calibration mode on.
CALibrate:STATe 0|1
<Bool>
CAL:STAT 1
CAL:STAT 0
CAL[:SOUR]
CAL:MEAS
SYST:SAVE
10.2.2 Measurement Calibration
All measurement calibrations are performed by adjusting the measurement reading up or
down using a calibration coefficient. The coefficient value ranges from -127 (adjust full-scale
downward, zero upward) to + 127 (adjust full-scale upward, zero downward). When used in
combination with the MEAS commands, an automated measurement calibration procedure
can be implemented by adjusting the coefficient and reading the new measurement value
iteratively until the delta between an external reference measurement device and the AC
source internal measurement is within the specified accuracy.
CALibrate:MEASure:CURRent[:FSCale] <NRf>
This command affects the calibration of the AC current measurement at full scale.
Command Syntax
Parameters
Examples
Query Syntax
Returned Parameters
Related Commands
CALibrate:MEASure:CURRent[:FSCale] <NRf>
<NRf> (value range -127 to +127)
CAL:MEAS:CURR -23
CALibrate:MEASure:CURRent?
<NR1> (value range -127 to +127)
CALibrate:MEASure:VOLTage
CALibrate:MEASure:CURRent:ZERO <NRf>
This command affects the calibration of the AC current measurement zero offset.
Command Syntax
Parameters
Examples
Query Syntax
Returned Parameters
Related Commands
CALibrate:MEASure:CURRent:ZERO <NRf>
<NRf> (value range -127 to +127)
CAL:MEAS:CURR:ZERO +12
CALibrate:MEASure:CURRent:ZERO?
<NR1> (value range -127 to +127)
CALibrate:MEASure:CURRent
CALibrate:MEASure:PCURrent[:FSCale] <NRf>
This command affects the calibration of the AC peak current measurement at full scale.
Command Syntax
Parameters
Examples
Query Syntax
Returned Parameters
Related Commands
CALibrate:MEASure:PCURrent[:FSCale] <NRf>
<NRf> (value range -127 to +127)
CAL:MEAS:PCUR -23
CALibrate:MEASure:PCURrent?
<NR1> (value range -127 to +127)
CALibrate:MEASure:VOLTage
CALibrate:MEASure:PCURrent:ZERO <NRf>
This command affects the calibration of the AC current measurement zero offset.
Command Syntax
Parameters
Examples
Query Syntax
Returned Parameters
Related Commands
CALibrate:MEASure:PCURrent:ZERO <NRf>
<NRf> (value range -127 to +127)
CAL:MEAS:PCUR:ZERO +12
CALibrate:MEASure:PCURrent:ZERO?
<NR1> (value range -127 to +127)
CALibrate:MEASure:CURRent
CALibrate:MEASure:POWer[:FSCale] <NRf>
This command affects the calibration of the power measurement at full scale.
Command Syntax
Parameters
Examples
Query Syntax
Returned Parameters
Related Commands
CALibrate:MEASure:POWer[:FSCale] <NRf>
<NRf> (value range -127 to +127)
CAL:MEAS:POW 78
CALibrate:MEASure:POWer?
<NR1> (value range -127 to +127)
CALibrate:MEASure:CURRent
CALibrate:MEASure:POWer:ZERO <NRf>
This command affects the calibration of the power measurement zero offset.
Command Syntax
Parameters
Examples
Query Syntax
Returned Parameters
Related Commands
CALibrate:MEASure:POWer:ZERO <NRf>
<NRf> (value range -127 to +127)
CAL:MEAS:POW:ZERO -5
CALibrate:MEASure:POWer:ZERO?
<NR1> (value range -127 to +127)
CALibrate:MEASure:POWer
CALibrate:MEASure:VOLTage[:FSCale] <NRf>
This command affects the calibration of the rms voltage measurement at full scale.
Command Syntax
Parameters
Examples
Query Syntax
Returned Parameters
Related Commands
CALibrate:MEASure:VOLTage[:FSCale] <NRf>
<NRf> (value range -127 to +127)
CAL:MEAS:VOLT 56
CALibrate:MEASure:VOLTage?
<NR1> (value range -127 to +127)
CALibrate:MEASure:CURRent
CALibrate:MEASure:VOLTage:ZERO <NRf>
This command affects the calibration of the rms voltage measurement zero offset.
Command Syntax
Parameters
Examples
Query Syntax
Returned Parameters
Related Commands
CALibrate:MEASure:VOLTage:ZERO <NRf>
<NRf> (value range -127 to +127)
CAL:MEAS:VOLT:ZERO +4
CALibrate:MEASure:VOLTage:ZERO?
<NR1> (value range -127 to +127)
CALibrate:MEASure:VOLTage
10.2.3 Output Calibration
The AC voltage output calibration is performed by adjusting the output up or down using a
calibration coefficient. The coefficient ranges from -127 (adjust upward) to + 127 (adjust
downward). An external traceable reference AC voltmeter should be used for this purpose.
CALibrate[:SOURce]:VOLTage <NRf>
This command will set the calibration coefficient for the AC full scale output voltage.
Command Syntax
Parameters
Examples
Query Syntax
Returned Parameters
Related Commands
CALibrate[:SOURce]:VOLTage <NRf>
<NRf> (a value between -127 and +127)
CAL:VOLT -2
CALibrate:VOLTage?
<NR1> (value range -127 to +127)
CAL:STAT
10.3 Measurement Subsystem
This subsystem programs the measurement capability of the RP Series AC source. To
select the desired phase, use the INST:NSEL command before the measurement command.
Once selected, a phase selection remains in effect until the next INST:NSEL command.
Subsystem Syntax
:MEASure
:VOLTage?
:CURRent?
:AMPLitude
:MAX?
:RESet
:CREStfactor?
:RANGe
:POWer
[:REAL]?
:APParent?
:PFACtor?
Returns the rms value of voltage
Returns the rms value of current
Returns peak current
Reset the peak current measurements
Returns current crest factor
Selects measurement range 0 = High, 1 = Low, 2 = AUTO
Returns real power in Watt
Returns apparent power in VA
Returns power factor
MEASure:VOLTage?
This query returns the AC rms voltage being sourced at the output terminals. Note that the
output relay must be closed or no voltage will be present at the output terminals.
Query Syntax
Parameters
Examples
Returned Parameters
Related Commands
MEASure:VOLTage?
None
MEAS:VOLT?
<NR2>
OUTP 0 1
MEASure:CURRent?
This query returns the rms value of the output AC current being sourced at the output
terminals. Note that the output relay must be closed to obtain current flow.
Query Syntax
Parameters
Examples
Returned Parameters
Related Commands
MEASure:CURRent?
None
MEAS:CURR?
<NR2>
OUTP 0 1
MEAS:CURR:AMPL:MAX?
MEASure:CURRent:AMPLitude:MAX?
This query returns the peak value of the output AC current being sourced at the output
terminals. Note that the output relay must be closed to obtain current flow. The peak current
measurement circuit uses a sample and hold method and latches the highest peak current
value found since the last peak measurement reset command.
Query Syntax
Parameters
Examples
Returned Parameters
Related Commands
MEASure:CURRent:AMPLitude:MAX?
None
MEAS:CURR:AMPL:MAX?
<NR2>
OUTP 0 1
MEAS:CURR?
MEASure:CURRent:AMPLitdue:RESet
This command resets the peak current measurement sample and hold circuit to zero.
Query Syntax
Parameters
Examples
Related Commands
MEASure:CURRent:AMPLitude:RESet
None
MEAS:CURR:AMPL:RES
MEAS:CURR:AMPL:MAX?
MEASure:CURRent:CREStfactor?
This query returns the crest factor of the output AC current being sourced at the output
terminals. Crest factor is the ratio of peak value to rms value. Note that the output relay
must be closed to obtain current flow.
Query Syntax
Parameters
Examples
Returned Parameters
Related Commands
MEASure:CURRent:CREStfactor?
None
MEAS:CURR:CRES?
<NR2>
MEAS:CURR? MEAS:CURR:AMPL:MAX?
MEASure:CURRent:RANGe
This commands selects the measurement range to use for current, peak current and power
measurements. Available choices are high range (0), low range (1) or auto ranging (2). See
measurement specifications (section 2.3) for actual range values.
Query Syntax
Parameters
Examples
Returned Parameters
Related Commands
MEASure:CURRent:RANGe
0|1|2
MEAS:CURR:RANG?
<NR2>
MEAS:CURR? MEAS:CURR:AMPL:MAX?
MEASure:POWer[:REAL]?
This query returns the true power delivered to the unit under test by the AC source. Note that
the output relay must be closed to obtain current flow.
Query Syntax
Parameters
Examples
Returned Parameters
Related Commands
MEASure:POWer[:REAL]?
None
MEAS:POW?
<NR2>
MEAS:VOLT? MEAS:CURR?
MEASure:POWer:APParent?
This query returns the apparent power delivered to the unit under test by the AC source.
Note that the output relay must be closed to obtain current flow.
Query Syntax
Parameters
Examples
Returned Parameters
Related Commands
MEASure:POWer:APParent?
None
MEAS:POW:APP?
<NR2>
MEAS:POW?
MEASure:POWer:PFACtor?
This query returns the power factor. The power factor is the ratio between real power and
apparent power. This value is always between 0.00 and 1.00. If the current measured is too
low to determine the power factor, a 1.00 value is returned.
Query Syntax
Parameters
Examples
Returned Parameters
Related Commands
MEASure:POWer:PFACtor?
None
MEAS:POW:PFAC?
<NR2>
MEAS:POW? MEAS:POW:APP?
10.4 Instrument Subsystem
The Instrument subsystem controls the selected phase of the AC power source for
configurations capable of operating in three phase mode.
Subsystem Syntax
INSTrument
:COUPle 1 | 0
:NSELect 1 | 2 | 3
Couples or uncouples commands
Selects phase A, B or C using numeric references
INSTrument:COUPle
This command may be used to couple all output phases in three phase mode. For the
2003RP, this command only applies to the OUTPut:DROP command. When the phases are
coupled, the OUTP:DROP command affects all three phases. This allows the output voltage
to be dropped for all three phases using a single command and without the need to select
each phase individually. When uncoupled, the OUTP:DROP command must be preceded by
the INST:NSEL command and will only affect the selected phase.
Available parameters are 1 to couple all phases and 0 to uncouple all phases.
Command Syntax
Parameters
Examples
Query Syntax
Returned Parameters
Related Commands
INSTrument:COUPle
1|0
INST:COUP 1
INST:COUP?
<NR1>
INST:NSEL
OUTP:DROP
INSTrument:NSELect
This command may be used select a specific output phase using a numeric reference. A 1
denotes phase A, a 2 denotes phase B and a 3 denotes Phase C. For the OUTP:DROP
command, the coupling state determines if the phase selection is used. For measurement
commands, the phase selection always applies. Thus, coupling does not affect the operation
of the measurement queries.
This means the instrument can remain in coupled mode while doing measurement queries
using “INST:NSEL <n>;MEAS:VOLT?".
Note that when the instrument is subsequently put in the uncoupled state using “INST:COUP
0”, the last issued phase selection will still be in effect for measurement queries. To make
sure the desired phase is selected, follow the “INST:COUP 0” command with an
“INST:NSEL <n>” command
Command Syntax
Parameters
Examples
Query Syntax
Returned Parameters
Related Commands
INSTrument:NSEL
1|2|3
INST:NSEL 1
INST:NSEL?
<CRD>
INST:COUP
MEAS
10.5 Source Subsystem
This subsystem programs all the output parameters of the RP Series AC source.
Subsystem Syntax
[SOURce:]
CURRent:
VOLTage:
[LEVel]
RANGe:
[LEVel]
AUTO
FREQuency:
Set the rms current limit in amps.
Set the rms output voltage value in volts.
Set the output voltage range.
Enables or disables the AUTO range mode.
Set the output frequency value in Hz.
[SOURce:]CURRent
This command sets the rms current limit of the output. If the load current exceeds the
programmed current limit, the unit responds in one of two ways, depending on the current
limit mode that is configured (hardware configuration only). In the default constant current
mode, the output voltage will fold back as much as needed to retain the current at the
programmed limit. No error message is generated when operating in this mode. If constant
voltage mode is configured instead, the output latches into a disabled state when current
limiting occurs. The output voltage is set to 5.0 volt when this condition occurs and the
output relay state is set to 0 (output relay open). A “ 300, Device specific error” fault is
generated.
Note that the CURRent command is coupled with the VRANGe. This means that the
maximum current limit that can be programmed at a given time depends on the voltage
range setting in which the unit is presently operating.
Command Syntax
Parameters
Unit
*RST
Examples
Query Syntax
Returned Parameters
Related Commands
[SOURce:]CURRent <NRf>
0 to a value specified by the LIM:CURR
A (rms amperes)
Defined by the PON
CURR 5
CURRent?
<NR2>
VOLT:RANG
[SOURce:]FREQuency
This command sets the frequency of the output sinewave.
Command Syntax
Parameters
Unit
*RST Value
Examples
Query Syntax
Returned Parameters
Related Commands
[SOURce:]FREQuency <NRf>
range specified by the LIM:FREQ:LOW and LIM:FREQ:HIGH
commands
Hz (Hertz)
defined by PON
FREQ 50
FREQuency?
<NR2>
LIM:FREQ;LOW? LIM:FREQ:HIGH?
[SOURce:]VOLTage
This command programs the AC rms output voltage level of the power source. The
maximum voltage value allowed is determined by the selected voltage range. For 2003RPAV models configured for single voltage range, only one range is available.
Command Syntax
Parameters
Unit
*RST Value
Examples
Query Syntax
Returned Parameters
Related Commands
[SOURce:]VOLTage[:LEVel] <NRf>
0 to maximum voltage range specified by the VRAN command
V (rms voltage)
0 volt
VOLT 250
VOLT:LEV 25
[SOURce:]VOLTage[:LEVel]?
<NR2>
VOLT:RANGe
[SOURce:]VOLT:RANGe[:LEVel]
This command sets the voltage range of the power source. Two voltage ranges are
available: a 135 volt range and a 270 volt range. However, 2003RP units with optional
voltage ranges (2003RP-HV) are available as well. In this case, the actual voltage range
values will be different. To determine the actual range values, use the query format of the
RANGE command. The returned values for high and low range (e.g. 135 and 270) should be
used to change range. In most cases, the high voltage range value will be two times the low
voltage range value. Sending a parameter other than the actual range values will not be
accepted.
For 2003RP-AV models configured for single voltage range, only one range is available. In
this case, the VOLT:RANG commend will return the value for the only available range.
Attempting to select any other voltage range will result in a “–100, Command Error”. The
presence of a single voltage range unit may be determined using the Limit subsystem, see
section 10.7.
Some RP Series may use other voltage range values than shown here. It is recommended
to query the actual range values using the LIM:VOLT? query as part of your application
program. See section 10.7.
When the range is set to 135, the maximum rms voltage that can be programmed is 135
volts.
The VOLT:RANG command is coupled with the CURRent command. This means that the
maximum current limit that can be programmed at a given time depends on the voltage
range setting in which the unit is presently operating.
Command Syntax
Parameters
*RST Value
Examples
Query Syntax
Returned Parameters
Related Commands
[SOURce:]VOLTage:RANGe[:LEVel] <NRf>
135 | 270
defined by the PONS
VOLT:RANG 135
VOLT:RANGe?
<NR2>
VOLT
LIM:VOLT? VOLT:RANG:AUTO
[SOURce:]VOLT:RANGe:AUTO
This command sets the AC source range to the AUTO mode. While in AUTO mode, the AC
source automatically switches to the optimal voltage range for the voltage programmed.
Note that switching voltage ranges causes the output to be interrupted momentarily. If power
to the unit under test cannot be interrupted, the AUTO range should not be used.
To determine the actual voltage range in which the unit is operating, the VOLT:RANG?
command query can be used.
For 2003RP-AV models configured for single voltage range, only one range is available. In
this case, the VOLT:RANGe:AUTO command has no meaning and should not be used.
The maximum current limit that can be programmed at a given time depends on the voltage
range setting in which the unit is presently operating. Programming a current limit value that
exceeds the high voltage range capability does NOT cause the voltage range to change,
even while in AUTO mode. Only voltage changes can prompt an automatic voltage range
change.
Command Syntax
Parameters
*RST Value
Examples
Query Syntax
Returned Parameters
Related Commands
[SOURce:]VOLTage:RANGe:AUTO <Bool>
<Bool> 0 | 1
0
VOLT:RANG:AUTO 1
VOLT:RANG:AUTO?
<Bool>
VOLT
LIM:VOLT?
VOLT:RANG:LEV
10.6 Output Subsystem
This subsystem controls the main output function of the RP Series source.
Subsystem Syntax
OUTPut
[:RELay]
:DROP
STARt:
[STATe]
PHASe
Opens or closes the output relay.
Drops the output voltage for a specified amount of time or
indefinitely.
Enables or disables the start phase angle mode
Sets the start phase angle value in degrees.
OUTPut[:RELay]
The output of the AC source can be isolated from the unit under test by opening the output
relay. The programmed output voltage is set to zero before opening the relay and is returned
to its programmed value when closing the relay. This avoids hot switching the output relay
contacts.
Command Syntax
Parameters
*RST Value
Examples
Query Syntax
Returned Parameters
Related Commands
OUTPut[:RELay] <bool>
<Bool> 0 | 1
defined by the PONS
OUTP 1
OUTPut?
0|1
OUTP:DROP OUTP:STAR
OUTPut:DROP
The output drop command may be used to interrupt the voltage to the UUT without opening
the output relay. This method uses an electronic means of interrupting the AC source output
which enables short interruptions of as little as 1 ms or as long as 4000 s.
In addition to short interruption times, the drop command can be set to use any of four start
phase angles at which to execute the voltage drop.
The parameter passed with the OUTP:DROP command is the drop duration in seconds.
This value can range from 0.001 ( 1 ms) to 4000 ( 1 hour, 6 minutes, 40 seconds) but only
four digits of resolution are allowed. If no parameter is passed, the output is dropped
indefinitely or until a voltage command is issued. Thus valid times are:
Time range
0.001 - 9.999
1 ms to 10 s
10.00 - 99.99
10 s to 100 s
100.0 - 999.9
100 s to 1000 s
1000 - 4000
1000 s to 4000 s
no parameter
Infinite time. Use VOLT command to turn output on.
Phase Selection
Phase selection is available for the Output Drop command. Thus, any specific phase may be
selected for phase loss test applications or all three phases. The INSTrument:COUPle and
INSTrument:NSELect command may be used to select all three phases or any individual
phase. Phase angle programming always applies to phase A. Phase B and C have fixed
phase offsets with respect to phase A.
Example: Turing on output voltage at a specified phase angle for all phases
The following command sequence will turn the output voltage on at a specified phase angle.
This may be required to measure worst case inrush current.
/* Set up sequence
VOLT 0
INST:COUP 1
OUTP 1
OUTP:STAR:STAT 1
OUTP:STAR:PHAS 90
OUTP:DROP
/* Turn on sequence
VOLT 230
Set output voltage to zero
Couple all output phases
Close output relay
Enable start phase mode
Set start phase angle to 90 degrees on phase A
Put AC source in infinite drop mode
Turn on voltage to 230 V at 90 degrees
Example: Individual Phase Loss Test
The following command sequence will drop the output of phase A only for 10 cycles at 400
Hz.
/* Set up sequence
VOLT 115;FREQ 400
INST:COUP 0
INST:NSEL 1
OUTP 1
OUTP:STAR:STAT 1
OUTP:STAR:PHAS 90
OUTP:DROP 0.025
Set output voltage to 115 V at 400 Hz (all phases)
Uncouple output phases
Select phase A
Close output relay
Enable start phase mode
Set start phase angle to 90 degrees on phase A
Drop for 25 ms (10 cycles @ 400 Hz)
Output drop status query
The status of a drop in progress can be queried using the query format of the OUTP:DROP
command. This query will return a <Bool> indicating if the output time specified has expired
(0) or the drop is still in progress (1).
Command Syntax
Parameters
*RST Value
Examples
Query Syntax
Returned Parameters
Related Commands
OUTPut:DROP <NRf>
<NRf> | none
none
OUTP:DROP 0.001
OUTP:DROP?
0|1
OUTP:STAR:STAT
OUTP:STAR:PHAS
INST:NSEL
INST:COUP
OUTPut: STARt[:STATe]
The output start state command is used to enable or disable the start phase logic of the AC
source controller. If disabled (State = 0), any voltage drops with the OUTP:DROP command
or voltage changes with the VOLT command are executed immediately without regard for the
phase angle of the output sinewave.
If enable (State = 1), any voltage drops or voltage changes take place at one of four user
specified phase angles. See the OUTP:STAR:PHAS command for available phase angle
settings.
Command Syntax
Parameters
*RST Value
Examples
Query Syntax
Returned Parameters
Related Commands
OUTPut:STARt[:STATe] <bool>
<Bool> 0 | 1
0
OUTP:STAR 1
OUTP:STAR?
0|1
OUTP:DROP OUTP:STAR:PHAS
INST:NSEL
INST:COUP
OUTPut: STARt:PHASe
The output start phase command is used to set the start phase angle for drop or voltage
programming commands. This phase angle information is used only if the
OUTP:DROP:STATe is on (1). If not, all drops and voltage changes occur at random phase
angles.
Available phase angle values are 0°, 90°, 180° and 270°. All other values when passed as a
parameter to this command will generate a syntax error.
Command Syntax
Parameters
*RST Value
Examples
Query Syntax
Returned Parameters
Related Commands
OUTPut:STARt:PHASe <NR2>
0 | 90 | 180 | 270
0
OUTP:STAR:PHAS 90
OUTPut?
0 | 90 | 180 | 270
OUTP:DROP OUTP:STAR:STAT
INST:NSEL
INST:COUP
10.7 Limit Subsystem
This subsystem controls the voltage frequency and current limit of the power source. These
limits are set at the factory and depend on the power source rating. It is not accessible by
the user. The query format is accessible however.
Subsystem Syntax
LIMit:
CURRent?
FREQuency:
LOW?
HIGH?
VOLTage?
Queries the upper current limit
Queries the lower frequency limit
Queries the upper frequency limit
Queries the upper voltage limit
LIMit:CURRent?
This command queries the maximum current limit the power source will operate at in the low
voltage range.
Command Syntax
Parameters
Query Syntax
Returned Parameters
LIMit:CURRent <NRf>
maximum current limit at low voltage range
protected]
LIMit:CURRent?
<NR2>
[command
LIMit:FREQuency:LOW?
This command queries the lower frequency limit of the power source. On the 2003RP-AV,
the frequency range may have been factory configured to a fixed single value. In this case,
the High and Low frequency limits will be set to the same value and both queries will return
the same number. Sending a frequency command with any value other than the set value
will result in a “-100, Command Error”.
Command Syntax
Parameters
Query Syntax
Returned Parameters
LIMit:FREQuency:LOW <NRf>
Low freq limit [command protected]
LIMit:FREQuency:LOW?
<NR2>
LIMit:FREQuency:HIGH?
This command queries the upper frequency limit of the power source. On the 2003RP-AV,
the frequency range may have been factory configured to a fixed single value. In this case,
the High and Low frequency limits will be set to the same value and both queries will return
the same number. Sending a frequency command with any value other than the set value
will result in a “-100, Command Error”.
Command Syntax
Parameters
Query Syntax
Returned Parameters
LIMit:FREQuency:HIGH <NRf>
High freq limit [command protected]
LIMit:FREQuency:HIGH?
<NR2>
LIMit:VOLTage?
This command queries the maximum voltage the power source will operate at in the high
voltage range. For 2003RP-AV models configured for single voltage range, only one range is
available. In this case, this command will return the value for the only available voltage
range. The presence of a single range configuration can be derived from the limit value
returned. If the voltage limit value is less than 201 volt, the 2003RP is configured for single
voltage range operation. If a value above 200 volt is returned, the 2003RP has a high and a
low voltage range. On dual range configurations, the maximum voltage in the high range is
returned and this value must be even. The low range value is half that of the high range. On
single voltage range units, the value voltage of the only available range is returned and this
value can be odd or even.
Only the Query format of this command is available to the user.
Command Syntax
Parameters
LIMit:VOLTage<NRf>
maximum voltage available in high voltage range [command
protected]
LIMit:VOLTage?
<NR2>
Query Syntax
Returned Parameters
10.8 Display Subsystem
DISPlay:MODE
This command is used to control the right hand side AC source display. The command will
allow the multifunction 7 segment LED display to switch between display of frequency,
current, peak current, power or power factor data.
The encoding for the mode command is as shown in the table below,
Parameter
Frequency
1
Current
2
Peak Current
3
Power
4
Power Factor
5
Table 10-1: Mode Command Encoding
Command Syntax
Parameters
*RST Value
Examples
Query Syntax
Returned Parameters
Related Commands
Value
DISPlay:MODE <NR2>
1|2|3|4|5
1
DISP:MODE 2
DISPlay:MODE?
<NR1>
none
10.9 System Commands
The system commands control the system level functions of the AC Source.
Subsystem Syntax
SYSTem:
ERRor?
KLOCk
LOCal
PON
REMote
SAVE
Returns the error number and error string
Keyboard Lock. Sets the power on REMOTE/LOCAL state.
Go to local mode
Define the power on register number
Go to remote mode
Saves calibration coefficients if calibration state is on
SYSTem:ERRor?
This query returns the next error number followed by its corresponding error message string
from the remote programming error queue. The queue is a FIFO (first-in, first-out) buffer that
stores errors as they occur. As it is read, each error is removed from the queue. When all
errors have been read, the query returns 0,”No Error”. If more errors are accumulated than
the queue can hold, the last error in the queue is -350,”Queue overflow”.
Query Syntax
Parameters
Returned Parameters
Example
SYSTem:ERRor?
None
<NR1>,<SRD>
SYST:ERR?
SYSTem:KLOCk
This command sets or clears the power-on LOCAL or REMOTE state. When set (1), the AC
Source will power up in remote state, locking out all keyboard controls. The local state can
only be entered by sending a bus command. This mode may be used to prevent operator
access to front panel controls under all conditions. Note that changing the state of the KLOC
setting does not change the REMOTE or LOCAL state. This setting only affects the
REMOTE/LOCAL state at power-up.
Command Syntax
Parameters
Example
Query Syntax
Returned Parameters
Related Commands
SYSTem:KLOCk
0|1
SYST:KLOC 1
SYST:KLOC?
<NR1>
SYST:REM
SYST:LOC
SYSTem:LOCal
This command sets the interface in Local state, which enables the front panel controls. This
command only applies to the RS232C interface. If IEEE 488 is used, the remote/local state
is determined by the REN line on the IEEE 488 interface.
Command Syntax
Parameters
Example
Related Commands
SYSTem:LOCal
None
SYST:LOC
SYST:REM
SYSTem:REMote
This command sets the interface in the Remote state, which disables all front panel controls.
This command only applies to the RS232C interface. If IEEE 488 is used, the remote/local
status is determined by the REN line on the IEEE 488 interface.
Command Syntax
Parameters
Example
Related Commands
SYSTem:REMote
None
SYST:REM
SYST:LOC
SYSTem:PON
This command is used to define the register value the power source will use to initialize its
parameters at power-up. If data in the selected register is not valid or the selected register is
8, the initialization will be with factory default values. Refer to Table 4-1: Factory Default
Power on Settings on page 31.
Note that units with the -AV option installed should not use the SYSTem:PON command with
parameter 8 to select the factory defaults as the factory default setting would set the output
frequency to 60 Hz. The lowest allowable frequency on -AV units is 360 Hz. Valid parameter
range for the SYSTem:PON command on -AV units is 0 through 7
Command Syntax
Parameters
Examples
Query Syntax
Returned Parameters
Related Commands
SYSTem:PON <NRf>
0 to 8 (0 to 7 for –AV option units)
SYST:PON 1
SYST:PON?
<NR1>
*SAV
SYSTem:SAVE
This command saves the calibration coefficients for output and measurement calibration to
the non volatile memory of the AC source. This command is only valid while the AC source
is in the Calibration mode. (See section 10.2.1 for details).
Command Syntax
Parameters
Examples
Related Commands
SYSTem:SAVE
none
SYST:PON
CAL:STAT
10.10 Common Commands
Common commands begin with an * and consist of three letters (command) or three letters
and a ? (query). Common commands are defined by the IEEE 488.2 standard to perform
some common interface functions. The power source responds to the required common
commands that control status reporting, synchronization, and internal operations. RP Series
units also respond to optional common commands that control stored operating parameters.
Common commands and queries are listed alphabetically. If a command has a
corresponding query that simply returns the data or status specified by the command, then
both command and query are included under the explanation for the command. If a query
does not have a corresponding command or is functionally different from the command, then
the query is listed separately. The description for each common command or query specifies
any status registers affected. Refer to Chapter 12 which explains how to read specific
register bits and use the information that they return.
Common Commands Syntax
*CLS
*ESE <n>
*ESE?
*ESR?
*IDN?
*RCL <n>
*RST
*SAV <n>
*SRE <n>
*SRE?
*STB?
Clear status
Standard event status enable
Return standard event status enable
Return event status register
Return instrument identification
Recall instrument state
Reset
Save instrument state
Set service request enable register
Return service request enable register
Return status byte
10.10.1
*CLS
This command clears the following registers (see chapter 12 for descriptions of all status
registers):
Standard Event Status
Status Byte
Error Queue
Command Syntax
Parameters
10.10.2
*CLS
None
*ESE
This command programs the Standard Event Status Enable register bits. The programming
determines which events of the Standard Event Status Event register (see *ESR?) are
allowed to set the ESB (Event Summary Bit) of the Status Byte register. A "1" in the bit
position enables the corresponding event. All of the enabled events of the Standard Event
Status Enable Register are logically OR-ed to cause the Event Summary Bit (ESB) of the
Status Byte Register to be set. See Section 16 for descriptions of the Standard Event Status
registers.
The query reads the Standard Event Status Enable register.
Table 10-2: Bit Configuration of Standard Event Status Enable Register
Bit Position
7
6
5
4
3
2
1
0
Bit Name
PON
not used
CME
EXE
DDE
QYE
not used
not used
Bit Weight
128
32
16
8
4
CME
Command error
DDE
Device-dependent error
EXE
Execution error
QYE
Query error
PON
Power-on
Command Syntax
Parameters
Power-On Value
Example
Query Syntax
Returned Parameters
Related Commands
*ESE <NRf>
0 - 255
128
*ESE 129
*ESE?
<NR1>(Register value)
*ESR? *STB?
10.10.3
*ESR?
This query reads the Standard Event Status register. Reading the register clears it. The bit
configuration of this register is the same as the Standard Event Status Enable register (see
*ESE).
Query Syntax
*ESR?
Parameters
None
Returned Parameters <NR1>(Register value)
Related Commands
*CLS *ESE *ESE?
If the *ESR? returns the value of the status bits in the ESR register. Refer to Table 10-3 for
the status bits and their meaning.
Table 10-3: Bit Configuration of Standard Event Status Register
Bit Position
7
6
5
4
3
2
1
0
Bit Name
PON
not used
CME
EXE
DDE
QYE
not used
not used
Bit Weight
128
32
16
8
4
CME
Command error
DDE
Device-dependent error
EXE
Execution error
QYE
Query error
PON
Power-on
10.10.4
*IDN?
This query requests the source to identify itself. It returns the data in four fields separated by
commas. Note that any installed options such as –AV are not reflected in the *IDN? query
response. The presence of these options that may affect the power source‟s capabilities
must be determined by querying the Limit system. See section 10.7.
Query Syntax
Returned Parameters
Example
*IDN?
<AARD>
Field
Information
CI
Manufacturer
xxxxxx
Model number and letter
nnnnnn
Serial number or 0
Rev. x.x
Revision level of firmware
"CI,2003RP,12345,Rev 1.0"
The following table shows the series of queries that may be used to detect the presence of a
2003RP or a 2003RP-AV and to determine the frequency range setting of a 2003RP-AV:
Step
1
2
Query command
*IDN?
LIM:VOLT?
For 2003RP-AV models only:
3
LIM:FREQ:LOW?
4
10.10.5
LIM:FREQ:HIGH?
Response
"CI,2003RP,12345,Rev 1.0"
270
312
230
115
Interpretation
2003RP series unit.
2003RP standard unit
2003RP-HV, dual Vrange.
2003RP-AV, dual Vrange.
2003RP-AV, single Vrange
360
400
5000
400
Standard frequency range
Fixed 400 Hz (?)
Standard frequency range
Fixed 400 Hz
*RCL
This command restores the AC source to a state that was previously stored in memory with a
*SAV command to the specified location. The RP Series offers eight non-volatile memory
locations for storing instrument setups.
Note:
The state of the 7 segment LED display mode and phase selection is not
part of the non-volatile setup registers.
Command Syntax
Parameters
Example
Related Commands
WARNING:
*RCL <NRf>
0 through 7
*RCL 3
*RST *SAV
Recalling a previously stored state may place hazardous voltages at
the AC source output if the output relay state saved is ON.
10.10.6
*RST
This command resets the AC source to a setting defined by the values in the register defined
by PON if valid or by the following factory-defined states:
Table 10-4: *RST Default Parameter Values
Item
Value
Item
Value
VOLT
5.0 V
FREQ
60 Hz
CURR
5.0 A
VOLT:RANGe:LEVel
135 V
VOLT:RANGe:AUTO
0 (OFF)
OUTP
0 (OFF)
DISP:MODE
1 (FREQ)
OUTP:STARt:STATe
0 (OFF)
OUTP:STARt:PHASe
0
NOTE: The factory defaults cannot be used on units with the -AV option. Instead, one
of the setup registers 0 through 7 must be selected for the power on state.
Executing the *RST command will recall the settings from the assigned setup
register. Use the SYST:PON to select one of the available setup registers for
the power on and *RST states.
Command Syntax
Parameters
Related Commands
*RST
None
*SAV
Table 10-5: Status Registers - Power on Conditions
Register
Status on Power On
Status after *RST
- ESE register
All 0‟s
All 0‟s
- ESR register
PON bit = 1, all others 0
PON = 0, all others unaffected
- STB register
All 0‟s
All 0‟s
- SRE register
All 0‟s
All 0‟s
Note: Sending the *RST command will cause the unit to recall the REMOTE or LOCAL state
based on the setting of the SYSTem:KLOCk command. This may put the unit in local if this
state is set to 0. To avoid this, either set the SYSTem:KLOCk state to 1 or follow the *RST
command with a SYST:REM command. See SYSTem:KLOCk for information on the power
up remote / local state.
10.10.7
*SAV
This command stores the present state of the AC source to a specified location in memory.
The RP Series offers eight non-volatile memory locations for storing instrument setups.
Command Syntax
Parameters
Related Commands
10.10.8
*SAV
0 through 7
*RCL *RST
*SRE
This command sets the condition of the Service Request Enable Register. This register
determines which bits from the Status Byte Register (see *STB for its bit configuration) are
allowed to set the Master Status Summary (MSS). A “1” in any Service Request Enable
Register bit position enables the corresponding Status Byte Register bit and all such enabled
bits then are logically OR-ed to cause Bit 6 of the Status Byte Register to be set. See
Section 12 for more details concerning this process.
When the controller conducts a STB? command, the MSS bit is not cleared. When *SRE is
cleared (by programming it with 0), the source cannot generate an MSS bit.
Command Syntax
Parameters
Default Value
Example
Query Syntax
Returned Parameters
Related Commands
10.10.9
*SRE <NRf>
0 to 255
128
*SRE 255
*SRE?
<NR1>(Register binary value)
*ESE *ESR
*STB?
This query reads the Status Byte register, which contains the status summary bits and the
Output Queue MAV bit. Reading the Status Byte register does not clear it. The input
summary bits are cleared when the appropriate event registers are read (see Section 12 for
more information).
Table 10-6: Bit Configuration of Status Byte Register
Bit Position
7
6
5
4
3
2-0
Bit Name
OPER
MSS
ESB
MAV
QUES
not used
Bit Weight
128
64
32
16
8
OPER
operation status summary
ESB
event status byte summary
QUES
questionable status summary
Query Syntax
Returned Parameters
MSS
master status summary
MAV
message available
*STB?
<NR1> (Register binary value)
11 Programming Examples
11.1 Introduction
This chapter contains examples on how to program the AC source. Simple examples show
you how to program:
Output functions such as voltage and frequency
Measurement functions
The examples in this chapter use generic SCPI commands. See Section 9 for information
about encoding the commands as language strings. Where appropriate, optional commands
are shown for clarity in the examples.
11.2 Bus Throughput and Timing Considerations
The 2003RP has a limit on how fast it can process commands sent over the bus. When
developing an application program that controls the 2003RP AC source, this must be
considered. Specifically, if non-query commands (commands that don‟t wait for a response
such as output setup commands) are sent at too high a rate, the AC source may not be able
to process them. In that case, a –100 Command Error will be reported.
This condition may exist on both RS232 and GPIB interface modes and is more prone when
faster controllers are used to run the application software. To prevent this condition, it will be
necessary to space out successive commands using a 20 msec delay. Alternatively,
commands could be sent to other instruments in the same system to accomplish the same
result.
Example:
VOLT 100
delay(0.020)
FREQ 60
Alternatively, a query command can be inserted in which case no additional delays are
needed.
VOLT 100
SYST:ERR?
FREQ 60
Programming the Output
Power-on Initialization
When the AC source is first turned on, it wakes up with the output state defined by the PON
register number. If the register number or the register has no valid data, the AC source
initializes to the following state.
VOLT 5.0
FREQ 60
OUTP 0
VOLT:RANG 135
The following commands are given implicitly at power-on:
*RST
*CLS
*SRE 128
*ESE 0
*RST is a convenient way to program all parameters to a known state. Refer to Table 10-4
under the *RST command in paragraph 10.10.6 to see how each programmable parameter
is set by *RST.
Enabling the Output
To enable the output, use the command:
OUTP 1
Voltage and Frequency
The AC rms output voltage is controlled with the VOLTage command. For example, to set
the AC output voltage for all three phases to 125 volts rms, use:
VOLT 125
The maximum voltage that the AC source can output is limited by the rms value of the
waveform. This value is defined by the LIMIT subsystem.
Voltage Ranges
The power source has two voltage ranges that are controlled by relays. The command that
controls the range is:
VOLTage:RANGe 135 | 270
When the range is set to (135), the maximum rms voltage that can be programmed is 135
volts rms, but it is only on this range that the maximum output current rating is available.
The VOLT:RANGe command is coupled with the CURRent command. This means that the
maximum current limit that can be programmed at a given time depends on the voltage
range setting in which the unit is presently operating.
Frequency
The output frequency is controlled with the FREQuency command. To set the output
frequency to 400 Hz, use:
FREQuency 400
Turning on output voltage for all three phases at a specified phase angle
The following command sequence will turn the output voltage on at a specified phase angle.
This may be required to measure worst case inrush current.
/* Set up sequence
VOLT 0
OUTP 1
INST:COUP 1
OUTP:STAR:STAT 1
OUTP:STAR:PHAS 90
OUTP:DROP
VOLT 230
Set output voltage to zero
Close output relay
Select all phases
Enable start phase mode
Set start phase angle to 90 degrees
Put AC source in infinite drop mode
Turn on voltage to 230 V at 90 degrees
Individual Phase Loss Test
The following command sequence will drop the output of phase A only for 10 cycles at 400
Hz.
/* Set up sequence
VOLT 115;FREQ 400
INST:COUP 0
INST:NSEL 1
OUTP 1
OUTP:STAR:STAT 1
OUTP:STAR:PHAS 90
OUTP:DROP 0.025
Set output voltage to 115 V at 400 Hz (all phases)
Uncouple output phases
Select phase A
Close output relay
Enable start phase mode
Set start phase angle to 90 degrees on phase A
Drop for 25 ms (10 cycles @ 400 Hz)
Current Limit
To set the RMS current limit use (where <n> is the RMS current limit in amperes):
CURRent <n>
If the load attempts to draw more current than the programmed limit, the AC source will
attenuate its voltage to maintain the output current at the programmed level.
Note:
The CURRent command is coupled with the VOLTage:RANGe. This means
that the maximum current limit that can be programmed at a given time
depends on the voltage range setting in which the unit is presently
operating.
11.3 Making Measurements
The source has the capability to return current, peak current, crest factor, true power,
apparent power, power factor and voltage measurements for any of the three output phases.
The INST:NSEL command must be used to select phase A (1), B (2) or C (3). Once a phase
has been selected, it remains selected until the next INST:NSEL command is issued.
Note:
The INST:COUP command has no effect on the phase selection for
measurements.
Voltage Measurement
To measure the RMS voltage, use:
OUTP 1
INST:NSEL 1
MEAS:VOLT?
Current Measurements
/* Close output relay if it was not closed already.
/* Select phase A
/* Query output voltage measurement
To measure the RMS current, use:
MEAS:CURR?
To measure the peak current, use:
MEAS:CURR:AMPL:RES
MEAS:CURR:AMPL:MAX?
/* resets track and hold for peak curr. meas.
/* It may be need to turn the output on or program
/* as specific voltage at this time before taking a
/* peak current reading.
/* retrieves peak current reading.
To measure the current crest factor, use:
MEAS:CURR:CRES?
Power Measurements
To measure the true power, use:
MEAS:POW:REAL?
To measure the apparent power, use:
MEAS:POW:APP?
To measure the power factor, use:
MEAS:POW:PFAC?
12 Status Registers
You can use status register programming to determine the operating condition of the AC
source at any time. For example, you may program the AC source to generate an MSS bit
when an event such as a current limit occurs. When the MSS bit is set, your program can
then act on the event in the appropriate fashion.
Standard event status
Event
Enable
Logic
*ESR? *ESE
n.u.
n.u.
QYE
DDE
EXE
CME
n.u.
PON
0
1
2
4
3
8
4 16
5 32
6
7 128
4
8
16
32
128
Output
Queue
Data
Data
Data
OR
Service
Status request
Byte
enable
*STB? *SRE
n.u.
n.u.
n.u.
n.u.
MAV
ESB
MSS
n.u.
0
1
2
3
4
5
6
7
16
32
64
16
32
64
Logic
OR
Figure 12-1: AC Source Status System Model
Figure 12-1 shows the status register structure of the AC source. The Standard Event,
Status Byte, and Service Request Enable registers and the Output Queue perform standard
IEEE-488 functions as defined in the IEEE 488.2 Standard Digital Interface for
Programmable Instrumentation.
12.1 Power-On Conditions
Refer to the *RST command description in paragraph 10.10.6 for the power-on conditions of
the status registers.
12.2 Standard Event Status Group
This group consists of an Event register and an Enable register that are programmed by
Common commands. The Standard Event register latches events relating to interface
communication status. It is a read-only register that is cleared when read. The Standard
Event Enable register functions similarly to the enable registers of the Operation and
Questionable status groups.
Command
*ESE
*ESR?
Action
programs specific bits in the Standard Event Enable register.
reads and clears the Standard Event register.
The PON bit in the Standard Event register is set whenever the AC source is turned on.
12.3 Status Byte Register
This register summarizes the information from all other status groups as defined in the IEEE
488.2 Standard Digital Interface for Programmable Instrumentation. The bit configuration is
shown in Table 10-6.
Command
*STB?
Action
reads the data in the register but does not clear it (returns MSS in bit 6)
The MSS Bit
This is a real-time (unlatched) summary of all Status Byte register bits that are enabled by
the Service Request Enable register. MSS is set whenever the AC source has one or more
reasons for needing service. *STB? reads the MSS in bit position 6 of the response but does
not clear any of the bits in the Status Byte register.
The MAV bit and Output Queue
The Output Queue is a first-in, first-out (FIFO) data register that stores AC source-tocontroller messages until the controller reads them. Whenever the queue holds one or more
bytes, it sets the MAV bit (bit 4) of the Status byte register.
12.4 Examples
The following section contains examples of commonly used operations involving the status
registers.
You can determine the reason for an MSS bit set by the following actions:
Step 1 : Determine which summary bits are active. Use:
*STB?
Step 2 : Read the corresponding Event register for each summary bit to determine which
events caused the summary bit to be set. Use:
*ESR?
Note:
When an Event register is read, it is cleared. This also clears the
corresponding summary bit.
Step 3 : Remove the specific condition that caused the event. If this is not possible, the
event may be disabled by programming the corresponding bit of the status group
Enable.
Appendix A: SCPI Command tree
Command Syntax Tree
Root
Level 1
CALibrate
Level 2
:STATe
:MEASure
Level 3
Level 4
:CURRent
[:FSCale]
:ZERO
[:FSCale]
:ZERO
[:FSCale]
:ZERO
[:FSCale]
:ZERO
:PCURrent
:POWer
:VOLTage
[:SOURce]:VOLTage
INSTrument
:COUPling
:NSELect
[SOURce]
:CURRent
:FREQuency
:VOLTage
OUTPut
MEASurement
[:RELay]
:DROP
:STARt
[:LEVel]
:RANGe
[:STATe]
:PHASe
:CURRent?
:AMPLitude
:POWer
:CREStfactor
:RANGe
[:REAL]?
:APParent?
:PFACtor?
:VOLTage?
DISPlay
:MODE
SYSTem
:PON
:REMote
:LOCal
:KLOCk
:SAVE
LIMit
:CURRent
:VOLTage
:FREQuency
:LOW
:HIGH
:MAX?
:RESet
User and Programming Manual - Rev N
California Instruments
Appendix B: SCPI Conformance Information
SCPI Version
The RP Series AC power sources conform to SCPI version 1990.0.
114
March 2011
2003RP
User and Programming Manual – Rev N
California Instruments
Appendix C: Error Messages
Error Number
0
Error Message String
Error Causes
"No error"
-100
"Command error"
Generally the result of sending a
command that uses incorrect syntax.
This same error may result from the
inability of the AC source to process
successive GPIB non-query commands
sent to it. To avoid this condition, it is
necessary for the application
programmer to insert a 20 msec delay
between commands.
-200
"Execution error"
Generally the result of sending a value
that is out of range, i.e., a VOLT 200
command when the unit is in the 135 V
(Low) range.
-300
"Device specific error"
Generally the result of an over current
(current limit trip) or over temperature
condition.
-350
"Queue overflow"
Generally caused by too many errors
being generated without reading error
status, causing error buffer to overflow.
-400
"Query error"
Generally caused by sending a query
followed by another command without
accepting the query response first.
Table 12-1: Bus Error Messages
User and Programming Manual - Rev N
California Instruments
Index
A
F
Acoustic ............................................................. 9
Altitude .............................................................. 9
factory
default power on setting .............................. 31
Finish
paint............................................................... 8
form
End-user feedback ...................................... 60
formats
data ............................................................. 79
forms
bug report .................................................... 60
Frequency
specification .................................................. 4
FREQuency .................................................... 90
frequency range
2003RP-AV ................................................. 96
fixed ............................................................. 96
front panel ................................................. 23, 60
lock .............................................................. 24
Function Strobe .............................................. 32
Functional Test ............................................... 21
B
bugs ................................................................. 60
C
CALibrate:MEASure:CURRent:ZERO .......... 82
CALibrate:MEASure:CURRent[
FSCale] ....................................................... 82
CALibrate:MEASure:PCURrent:ZERO ......... 82
CALibrate:MEASure:PCURrent[
FSCale] ....................................................... 82
CALibrate:MEASure:POWer:ZERO .............. 83
CALibrate:MEASure:POWer[
FSCale] ....................................................... 83
CALibrate:MEASure:VOLTage:ZERO .......... 83
CALibrate:MEASure:VOLTage[
FSCale] ....................................................... 83
CALibrate:STATe ........................................... 81
CALibrate[:SOURce]:VOLTage .................... 84
Calibration ....................................................... 42
CLS ............................................................... 101
command
subsystem .................................................... 80
commands
bus ............................................................... 80
common ....................................................... 76
comments ........................................................ 60
Connect ........................................................... 65
Construction
internal ........................................................... 8
Conventions .................................................... 74
Cooling .............................................................. 8
Current
Constant current mode ................................ 32
Constant Voltage ......................................... 32
specification ................................................... 3
CURRent ......................................................... 89
D
Dimensions........................................................ 8
DISPlay:MODE ................................................ 97
E
Efficiency ........................................................... 2
Emissions .......................................................... 9
ESE ............................................................... 101
ESR? ............................................................. 102
116
March 2011
G
GPIB ............................................................... 62
address selection ........................................ 62
troubleshooting ............................................ 70
H
hard disk space
required to install ......................................... 65
header
optional ...................................................... 78
separator ..................................................... 78
Header ............................................................ 75
Hold-Up Time.................................................... 2
Humidity ............................................................ 9
I
IDN? .............................................................. 103
IEEE-488................................................... 40, 62
address selection ........................................ 62
troubleshooting ............................................ 70
Immunity ........................................................... 9
Impedance
specification .................................................. 4
initialization
changing ...................................................... 31
Input power factor ............................................. 2
Inrush Current ................................................... 2
installation ................................................. 17, 65
program ....................................................... 65
Installing
2003RP
User and Programming Manual – Rev N
software ....................................................... 66
INSTrument:COUPle ....................................... 88
INSTrument:NSELect ...................................... 88
Insulation ........................................................... 9
Introduction ........................................................ 1
Isolation Voltage ................................................ 2
K
keyboard
lock out......................................................... 98
knob ................................................................. 26
L
LabView
RS232C terminator ...................................... 63
LED.................................................................. 52
LED indicators ................................................. 52
LIMit:CURRent? .............................................. 96
LIMit:FREQuency:HIGH? ................................ 96
LIMit:FREQuency:LOW? ................................. 96
LIMit:VOLTage? .............................................. 97
Line Current: ...................................................... 2
Line Frequency .................................................. 2
Line Voltage ....................................................... 2
M
maintenance .................................................... 52
Material
chassis ........................................................... 8
MEASure:CURRent:AMPLitdue:RESet ........... 86
MEASure:CURRent:AMPLitude:MAX? ........... 86
MEASure:CURRent:CREStfactor? .................. 86
MEASure:CURRent:RANGe ........................... 86
MEASure:CURRent? ....................................... 85
MEASure:POWer:APParent? .......................... 87
MEASure:POWer:PFACtor? ........................... 87
MEASure:POWer[
REAL]?......................................................... 87
MEASure:VOLTage[:AC]? ............................... 85
memory
required to install.......................................... 65
models
supported ..................................................... 60
O
Output
specification ................................................... 2
OUTPut:DROP ................................................ 93
OUTPut:STARt:PHASe ................................... 95
OUTPut:STARt[:STATe].................................. 95
OUTPut[:RELay] .............................................. 92
Overcurrent........................................................ 8
overload ........................................................... 24
Overtemperature ............................................... 8
California Instruments
P
PGUI32 ........................................................... 60
Pollution Degree................................................ 9
Q
queries ............................................................ 76
R
RCL ............................................................... 103
registration ...................................................... 73
remote control ................................................. 24
Remote Inhibit ................................................. 33
replacement parts ........................................... 58
Requirements
PGUI32 ........................................................ 60
root .................................................................. 78
Root ................................................................ 75
RS232C .......................................................... 40
RST ............................................................... 104
S
Safety ................................................................ 9
SAV ............................................................... 105
SCPI ................................................................ 74
message ...................................................... 74
program message ....................................... 74
response message ...................................... 74
Separator ........................................................ 78
Setup
program ....................................................... 65
Shock ................................................................ 9
Short Circuit
current ........................................................... 8
shuttle ............................................................. 26
simulation mode .............................................. 62
SOURce:CURRent ......................................... 89
SOURce:FREQuency ..................................... 90
SOURce:VOLTage ......................................... 90
SOURce:VOLTage:RANGe:AUTO ................. 92
SOURce:VOLTage:RANGe[:LEVel] ............... 91
SRE ............................................................... 105
status .............................................................. 24
STB? ............................................................. 105
suggestions ..................................................... 60
SYSTem:ERRor? ............................................ 98
SYSTem:KLOCk ............................................. 98
SYSTem:LOCal .............................................. 98
SYSTem:PON ................................................. 99
SYSTem:REMote............................................ 99
SYSTem:SAVE ............................................... 99
T
Temperature
operating,storage .......................................... 9
terminator ........................................................ 78
User and Programming Manual - Rev N
California Instruments
RS232C ....................................................... 63
Transients
Input ............................................................... 8
troubleshooting ................................................ 52
V
Vibration ............................................................ 9
Voltage
specification ................................................... 2
VOLTage ......................................................... 90
voltage range
118
March 2011
dual.............................................................. 97
single ........................................................... 97
voltage ranges ................................................ 20
VOLTage:RANGe:AUTO ................................ 92
VOLTage:RANGe[:LEVel] .............................. 91
W
Weight............................................................... 8
wiring
input............................................................. 17
2003RP