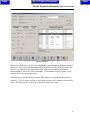
1
Go To Table Of Contents OPERATION MANUAL Version 8.1.1 Part Number: 3-100-1038 Revision 8.1.1B Next Back Go To Table Of Contents IQmark Diagnostic Workstation Operation Manual Next Next Back IQmark Diagnostic Workstation Operation Manual TABLE OF CONTENTS A WORD OF THANKS ................................................................................................. III IN THIS VERSION: NEW FEATURES AND ENHANCEMENTS ......................... III COMPUTER DATE INFORMATION ........................................................................ IV I. GENERAL INFORMATION ....................................................................................1 A. DESCRIPTION ..............................................................................................................1 NECESSARY COMPUTER SKILLS ............................................................................................2 II. SYSTEM INSTALLATION ...................................................................................3 A. HARDWARE AND SOFTWARE REQUIREMENTS .............................................................3 B. THIN CLIENT CONFIGURATION ...................................................................................4 Thin Client Using the IQmark Virtual Channel Solution .................................................4 Thin Client Using COM Port Mapping ............................................................................5 C. SOFTWARE INSTALLATION ..........................................................................................8 Windows Taskbar .............................................................................................................8 Screen Saver .....................................................................................................................8 Updating Brentwood Diagnostic Workstation versions 3.x software and older ..............8 Uninstalling Previous Versions of the IQmark Diagnostic Workstation .........................8 Installing the IQmark Diagnostic Workstation and Bundled Software ............................9 D. CONFIGURING THE IQMARK DIAGNOSTIC WORKSTATION ........................................15 Serial Port.......................................................................................................................16 Vital Signs .......................................................................................................................17 Weight Scale ...................................................................................................................19 EZ Stress Settings ...........................................................................................................19 Database Settings ...........................................................................................................20 List Management ............................................................................................................21 E. WORKING WITH PEER-TO-PEER NETWORKS .............................................................25 Configuring for Peer-to-Peer Networks .........................................................................25 Creating a Central Peer-to-Peer Database....................................................................26 Setting Up the Peer-to-Peer Data Source ......................................................................27 Switching Between a Local and Central Database ........................................................28 F. WORKING WITH CLIENT/SERVER NETWORKS ...........................................................29 Configuring for Client Server Networks .........................................................................29 G. IQMARK DATA MANAGEMENT SYSTEM ...................................................................30 i Go To Table Of Contents Back IQmark Diagnostic Workstation Operation Manual II. OPERATION .........................................................................................................31 A. INTRODUCTORY NOTES .............................................................................................31 B. STARTING THE PROGRAM..........................................................................................31 C. OPENING SCREEN ......................................................................................................32 D. TESTING A NEW PATIENT .........................................................................................34 Smoking History tab .......................................................................................................36 Medications Tab .............................................................................................................38 Vital Signs Tab................................................................................................................39 Review Vital Signs – Trend .............................................................................................42 History tab ......................................................................................................................43 Contact Info Tab .............................................................................................................44 Pen Button ......................................................................................................................44 View Data Button............................................................................................................45 Edit Button ......................................................................................................................45 Patient Data Screen – Button Bar ..................................................................................45 E. REVIEWING PATIENT DATA ......................................................................................47 Reviewing Reports for One Patient ................................................................................50 F. MORE ON FILE FUNCTIONS .......................................................................................52 Delete ..............................................................................................................................52 Read from File (Restore) ................................................................................................52 Save to File (Archive) .....................................................................................................53 Save to File (PDF or JPEG file) ....................................................................................55 Send by Email .................................................................................................................56 Receiving Reports through Email ...................................................................................56 Copy to Network/Local Database...................................................................................56 G. FAXING REPORTS ......................................................................................................57 APPENDIX .......................................................................................................................59 A. SCREEN SUMMARY ...................................................................................................59 B. TROUBLESHOOTING GUIDE .......................................................................................61 C. TIPS FOR USING THE IQMARK VSM IRDA INTERFACE .............................................64 IrDA Device Driver Installation .....................................................................................65 D. GLOSSARY ................................................................................................................67 E. CLIENT SERVICE, MAINTENANCE AND WARRANTY ..................................................69 Warranty .........................................................................................................................69 Return Materials Authorization ......................................................................................69 ii Next Go To Table Of Contents Back Next IQmark Diagnostic Workstation Operation Manual A Word of Thanks Thank you for purchasing the IQmark Diagnostic Workstation. We trust our product will enable you to reduce the time your staff spends on entering, organizing and locating patient data and will help you to enhance your patient‟s health. Midmark Diagnostics Group provides a range of diagnostic products, including ECG, Spirometry and Holter, which are accessed using the IQmark Diagnostic Workstation program. We believe you will be pleased with the user-friendly operation of our product and with your results. As your partner in patient care, we look forward to working with you in the coming years as we develop even more sophisticated diagnostic technology for the medical field. Your thoughts, questions and comments about our product and direction are welcomed. Midmark Diagnostics Group PH (800) 624-8950 www.midmark.com In This Version: New Features and Enhancements This latest release of the IQmark Diagnostic Workstation includes the following new features and enhancements: IQmark Workstation Integrated the IQmark Digital Vital Signs Monitor. Separated the weight scale interface from the Vital Signs dialog so its now possible to obtain the patient‟s weight independently. IQmark ECG Added support for the IQmark Virtual Channel Client for Microsoft Terminal Services and IQmark Virtual Channel Client for Citrix ICA products to allow use of the IQmark ECG in a wider range of network environments. IQmark Spirometry Added support for the IQmark Virtual Channel Client for Microsoft Terminal Services and IQmark Virtual Channel Client for Citrix ICA products to allow use of the IQmark Spirometer in a wider range of network environments. iii Go To Table Of Contents Back IQmark Diagnostic Workstation Operation Manual IQmark EZ Holter Improved the QRS and VE detection algorithm. IQmark Advanced Holter Improved the QRS and VE detection algorithm. IQmark EZ Stress Added the Duke Treadmill point score measurement. Improved noise immunity of the real time analysis algorithm during lead off conditions. Improved the immunity of the USB ECG module interface software to static electricity discharge. NOTE: To read about the IQmark Diagnostic Workstation and our new IQmark products, please access our website at: http://www.MidmarkDiagnostics.com or you can talk to us directly by calling Midmark Diagnostics Group Client Service at (800) 624-8950. Computer Date Information The IQmark Diagnostic Workstation uses the current date from the computer and the patient‟s birth date (entered by the operator) to calculate the patient‟s age. Since many equations and interpretive analysis use the patient‟s age to produce appropriate diagnostic statements, it is important that your computer‟s current date is accurate. Contact your system administrator if your computer‟s date is incorrect. iv Next Back Go To Table Of Contents Next IQmark Diagnostic Workstation Operation Manual Physician’s Responsibility Instruments that run through the IQmark Diagnostic Workstation can provide interpretations if you enable this feature. These interpretations are for the exclusive use of licensed Physicians or personnel under their direct supervision. The suggested interpretation and the numerical and graphical results should be examined with respect to the patient‟s overall clinical condition. Final analysis should always be determined and verified by a Physician. Proper administration of the test is the Physician‟s responsibility, as is making a diagnosis, obtaining expert opinions on the results, and implementing the correct treatment, if indicated. Notice The information in this operation manual is subject to change without notice. Brentwood Medical Technology Corp. shall not be liable for technical or editorial omissions made herein, nor for incidental or consequential damages resulting from the furnishing, performance, or use of information in this operation manual. This document contains proprietary information protected by copyright. No part of this document may be photocopied or reproduced in any form without prior written consent from Brentwood Medical Technology Corp. IQmark is a registered trademark of Midmark. Windows and Microsoft are registered trademarks of Microsoft Corporation. Pentium is a registered trademark of Intel Corporation. v Go To Table Of Contents Back IQmark Diagnostic Workstation Operation Manual This page intentionally left blank vi Next Go To Table Of Contents Back Next IQmark Diagnostic Workstation Operation Manual I. General Information A. Description IQmark Diagnostic Workstation - Opening Screen The IQmark Diagnostic Workstation serves as a patient data management utility. It organizes all tests performed using IQmark digital diagnostic products, including the IQmark Digital ECG, Holter, Spirometer and Stress. It also organizes and stores digital information captured via electronic weight scales and the IQmark Digital Vital Signs Monitor. NOTE: Complete specifications and operational information on IQmark products, including the Digital ECG, Digital Spirometer, Holter (EZ and Advanced), EZ Stress and the IQmark VSM are detailed in the Operation Manual included with each product. 1 Go To Table Of Contents Back IQmark Diagnostic Workstation Operation Manual Necessary Computer Skills This manual assumes that you are already capable of using Windows based applications, that you have some understanding of how a PC works, and that you are familiar with the basic operations of Windows. If this is true, you will have no problem using the product. However, in the event that you have any technical questions or problems, please refer to the Troubleshooting Guide in the Appendix of this manual for immediate troubleshooting assistance. Complete Client Service contact information is listed at the end of this manual, or you can use the telephone number listed here. Midmark Diagnostics Group PH (800) 624-8950 2 Next Go To Table Of Contents Back Next IQmark Diagnostic Workstation Operation Manual II. System Installation A. Hardware and Software Requirements The IQmark Diagnostic Workstation is a 32-bit Windows-based software package. The software will occupy approximately 90 megabytes (MB) of disk space when all options are installed. Additional disk space is required if you choose to store the results of diagnostic tests you may perform. Storing the data is optional. This software will run on a personal computer using a Pentium-class 500 MHz or faster processor, running Windows 2000, Windows XP or Windows Vista. For each operating system listed, the program will run on the minimum RAM requirements as recommended by Microsoft: Windows 2000 Windows XP Windows Vista 128 MB of RAM 256 MB of RAM 512 MB of RAM In order to install and successfully use the Workstation, your computer must meet the following minimum requirements: 1. Windows-based PC with Windows 2000/XP/Vista. Precaution: The Workstation has been tested for proper function with the Off-The-Shelf (OTS) Operating Systems (OS) specified in this manual. Do not operate the Workstation with an operating system other than the OTS OS specified. Future releases of currently approved operating systems should not be used until Midmark Diagnostics Group has had an opportunity to test the Workstation with them. Before updating your operating system, contact Midmark Diagnostics Group for the latest OTS OS information. 2. Keyboard, mouse, and a CD-ROM drive. 3. VGA display accommodating 800x600, 1024x768, 1280x1024, or higher resolution. Minimum 256 colors (16-bit color recommended). NOTE: Your IQmark hardware products may have additional computer hardware requirements. Please refer to the Operation Manual for your IQmark product. For example, the IQmark Holter requires an interface for a compact flash card to transfer data and a parallel port (or USB port) for a hardware security key to activate the software. 3 Go To Table Of Contents Back IQmark Diagnostic Workstation Operation Manual B. Thin Client Configuration If you have a thin client environment, you can install the IQmark Diagnostic Workstation software on the Terminal Server and operate the IQmark Digital ECG and/or the IQmark Digital Spirometer through a thin client terminal. The IQmark Diagnostic Workstation supports two thin client configurations. The IQmark Virtual Channel Solution is appropriate when using Microsoft Windows based PCs as clients. In this configuration, you can use either the USB or serial port versions of the IQmark Digital ECG and IQmark Digital Spirometer products in high latency, limited bandwidth network configurations. The following section describes the virtual channel solution. The second possible configuration is to use the serial port version of the IQmark Digital ECG, IQmark Digital Spirometer and IQmark VSM products and connect them to client devices via COM port mapping. This configuration is appropriate when using nonWindows thin client devices on low latency high-speed networks. The section entitled Thin Client Using COM Port Mapping discusses this solution. Setting up any application on a network environment typically requires special access rights and knowledge of the network. Please have your network administrator install and setup the IQmark Diagnostic Workstation to fit your office environment. Thin Client Using the IQmark Virtual Channel Solution The IQmark Thin Client Virtual Channel software provides the following advantages over COM port mapping. 1. Operation over high latency, low bandwidth, high loss networks. For Microsoft Terminal Services, the virtual channel provides a 10 to 1 improvement in performance in latency tolerance over COM port mapping. For Citrix ICA the performance improvement is approximately 40 to 1 in latency tolerance. 2. No COM port mapping is required. 3. It is possible to use the USB versions of the ECG and Spirometry modules. 4. Improved device auto-configuration and diagnostics. NOTE: The IQmark Virtual Channel Solution has specific requirements for computer hardware, software and network performance. System administrators must read the document entitled Application Note: Using the IQmark Thin Client Virtual Channel Software before installing, configuring and using this software in a thin client environment. The following block diagram describes the IQmark Virtual Channel Solution. In this thin client environment, the client computers must be running Windows XP SP2 or Windows Vista. 4 Next Back Go To Table Of Contents Next IQmark Diagnostic Workstation Operation Manual To use the IQmark Virtual Channel Solution, load the IQmark Diagnostic Workstation software on the terminal server and install one of the following software components on each Windows client PC that you intend to use for ECG or Spirometry data acquisition. 1. IQmark Virtual Channel Client for Microsoft Terminal Services (part number 4100-1420) if you are using Microsoft Terminal Services (also called Microsoft RDP). 2. IQmark Virtual Channel Client for Citrix ICA (part number 4-100-1430) if you are using Citrix software on your clients and servers. The above software products are provided separately and may be obtained by contacting Midmark Diagnostics Group‟s Client Services department at (800) 624-8950. Once you have installed the software on the server and client computers, you must configure the IQmark Diagnostic Workstation software for virtual channel operation as described in the “Configuring the IQmark Diagnostic Workstation” section of this operation manual. Thin Client Using COM Port Mapping COM port mapping refers to a configuration in which the Midmark ECG, Spirometer and IQmark VSM devices connect to a serial port of the client and the server is configured so that logical COM ports on the terminal server are mapped to the physical COM ports of the client. 5 Go To Table Of Contents Back IQmark Diagnostic Workstation Operation Manual If you are using non-Windows based thin client terminal devices on a low-latency, highspeed network you must use the serial port versions of the IQmark Digital ECG, IQmark Digital Spirometer and the IQmark VSM and configure the thin client server for COM port mapping. NOTE: In order to use the COM port mapping solution in a thin client environment, the computer hardware and software as well as the network must meet stringent performance requirements. System administrators must read the document entitled Application Note: IQmark Products Over Thin Client Environments before installing, configuring and using this software in a thin client environment using COM port mapping. The following block diagram illustrates the use of the IQmark Digital ECG, IQmark Digital Spirometer and IQmark VSM products in a thin client environment using COM port mapping. 6 Next Back Go To Table Of Contents Next IQmark Diagnostic Workstation Operation Manual To use the IQmark products in this configuration, install the IQmark Diagnostic Workstation on the terminal server and configure the server to map to the COM port on the client terminal. System administrators should configure the terminal server for COM port mapping as described in the document entitled Application Note: IQmark Products Over Thin Client Environments. 7 Go To Table Of Contents Back IQmark Diagnostic Workstation Operation Manual C. Software Installation The Installation CD includes software for the installation and operation of the IQmark Diagnostic Workstation. Before installing the IQmark Diagnostic Workstation on your computer, it is important that you understand and carry out the following tasks appropriately. Windows Taskbar The IQmark Diagnostic Workstation is designed to run as a full-screen program. For best results, the Windows Taskbar should be set to Auto hide to provide maximum display area. To do this, position the mouse pointer on the gray portion of the Taskbar on bottom of the screen. Press on the right mouse button and select Properties. Make sure the Auto hide box is checked. Click the OK button. Screen Saver If screen saver or any energy saving feature is enabled on the computer, disable it. Refer to your computer or software manual to find and change these settings. Updating Brentwood Diagnostic Workstation versions 3.x software and older If you are updating from a version of Brentwood Diagnostic Workstation earlier than version 4.0 and have ECG or Holter records that you would like to retain and transfer to the new version, you must first archive those records. Then you must uninstall the old Diagnostic Workstation version, install this new version, and restore the archived records. Refer to the Save To File (Operation, Section F) section of this manual to archive patient records. Patient records should be archived to a temporary location other than the Brentwood folder on your hard disk. To restore patient archives, follow the instructions in the Read From File (Operation, Section F) section. If you do not have any patient records that you want to retain and transfer to this new version, you can simply uninstall your version of Diagnostic Workstation and install this new one. Uninstalling Previous Versions of the IQmark Diagnostic Workstation WARNING: Uninstalling versions of the IQmark Diagnostic Workstation older than version 4.0 may automatically DELETE all patient records and reports. Contact Customer Service before installing a new version or the IQmark Diagnostic Workstation. NOTE: 8 Uninstalling Version 4.0 or higher will not delete patient records or reports. Next Go To Table Of Contents Back Next IQmark Diagnostic Workstation Operation Manual 1. 2. 3. 4. 5. 6. 7. 8. 9. From the Windows Task Bar, click on Start. Select Settings and then double-click on Control Panel. In Control Panel, double-click on Add/Remove Programs. Click on IQmark Diagnostic Workstation. (For some versions, select Brentwood Valentine ECG.) Click the Add/Remove button. Click Yes to confirm. Click OK at the end of the process. Click OK in the Add/Remove Programs Properties dialog box. On the task bar, click Start and select Shut Down. Select Restart and click OK. Installing the IQmark Diagnostic Workstation and Bundled Software NOTE: Close all Windows programs before running this software installation. Once the installation program is initiated, it should not be interrupted until completed. The approximate installation time is five minutes. IMPORTANT: If you are running Windows 2000, XP or Vista you MUST log in as the Administrator before proceeding. Contact your Network Administrator if you do not have this authority. 1. Insert IQmark software CD into the CD-ROM drive and close the drive door. If you have not uninstalled the previous version of Workstation, you will be prompted to do so. Follow the instructions on the screen to remove the previously installed version and then begin again. 2. Wait for the CD to automatically start the installation. The program will display the Midmark Diagnostics Group logo and then the installation opening screen. Follow the instructions on the screen. Click Next to continue. Then read the license agreement and select the appropriate choice. You must select I accept … to proceed with the installation. If you accept the license agreement, click Next to proceed to Step 3. 9 Go To Table Of Contents Back IQmark Diagnostic Workstation Operation Manual IQmark Installation – License Agreement 3. The program enables you to select which hard drive to install the software. It is recommended you install on the C: drive if you are running the program on a single computer. Select the drive desired and click Next. The program automatically selects the Brentwood directory for the installation. This directory name cannot be changed. Click Next. On the next screen, click Install to continue. The program will automatically install the software. This process may take 10 to 30 seconds (depending on the processor speed of your computer). 4. When complete, the installation software displays the registration page. Enter the appropriate information and click the Print button. This prints a registration page that you can fax or mail to Midmark Diagnostics Group. Completing this form assures you are registered with Midmark Diagnostics Group and makes sure you are able to receive software enhancements and improvements when newer versions are released. All customers that are within warranty will receive new versions. 10 Next Back Go To Table Of Contents Next IQmark Diagnostic Workstation Operation Manual Registration Page If you do not have Adobe Acrobat Reader Version 5.0 or newer installed on your computer, the installation software will ask you to install it from our installation disk. You must install this Reader to view and print our on-line Operation Manuals. Please select the appropriate buttons to install the Reader. Contact Adobe with any questions about Adobe Acrobat Reader. IQmark Sync 5. If you do not have IQmark Sync/IQmark PDA software, skip to step #7. If you have IQmark Sync software installed, the following message will appear: IQmark Sync Application Detected Click Yes to update the IQmark Sync software. You must update this software to work with this new version of Workstation. When you select Yes on the previous screen, the following screen will appear. 11 Go To Table Of Contents Back IQmark Diagnostic Workstation Operation Manual IQmark Sync – Update Screen Select Update and click Next. Once this installation is complete, the Maintenance Complete dialog box will appear. Click Finish. The program will prompt you to set up your Pocket PC device. Your PDA must be turned on, docked and synced with your computer before you proceed. Click Yes to continue and OK to select the destination folder. IQmark Sync – Setup 12 Next Back Go To Table Of Contents Next IQmark Diagnostic Workstation Operation Manual The IQmark Sync Setup dialog box will appear. It is recommended that you select the default Destination Folder displayed. Click OK to continue. The program will display the following screens: Click Yes to proceed. You will then be asked to install the program using the default directory. Click Yes to proceed. The program will display the following screens: Click OK and check your PDA device. If the program was previously installed, the PDA screen will display the following message: Midmark Diagnostics Group IQmark PDA is already installed. Re-install? On the PDA, tap on OK and then tap on Yes to All to Confirm File Replace. Once the files are replaced, the PDA screen will return to its previous state. 6. The next message on the computer refers to Holter users. Please refer to your Holter manual for instructions on installing the CF Card Reader. 13 Go To Table Of Contents Back IQmark Diagnostic Workstation Operation Manual IQmark Holter – CF Card Reader 7. Click the Finish button to end the installation of the Workstation files. It is recommended that you restart your computer after any installation. Assure all other programs are closed and files saved before you restart your computer. You can access the online Operation Manual from the Windows Task Bar through the following sequence: Start Programs Midmark Diagnostics IQmark Diagnostic Workstation Manual 8. The installation program adds three IQmark shortcuts to your Windows desktop: one for the IQmark Workstation, one for the IQmark Configuration, and one for the Spirometry Calibration. You can use the IQmark Configuration to set the communications port that the ECG, Spirometer, Vital Signs monitor or weight scale uses and also to set up your network database. If you installed the Adobe Acrobat Reader, this icon is also added to your Windows desktop. NOTES: The ECG, Spirometer, Holter and Stress applications use the IQmark Diagnostic Workstation to manage patient records. When you install or upgrade these modalities, the local or network database for the IQmark Diagnostic Workstation is automatically installed or upgraded accordingly. You can also run the WSUpgradeUtil.exe to upgrade the database to the current version. The application WSUpgradeUtil.exe is located at \Brentwood\Programs directory. Depending on the speed of your computer, there may be moments of pause on the screen while the computer is busy installing software components. Software components for the IQmark Diagnostic Workstation will be installed regardless of the IQmark products purchased. To create a complete medical diagnostic solution for your office, call Midmark Diagnostics Group for information about the other IQmark products available for use with your IQmark Diagnostic Workstation. 14 Next Go To Table Of Contents Back Next IQmark Diagnostic Workstation Operation Manual D. Configuring the IQmark Diagnostic Workstation You can configure the IQmark Diagnostic Workstation to meet your individual needs. Along with the application program, a configuration program is installed that enables you to individualize the IQmark Diagnostic Workstation for your operation. If you are using the database on your network, the Configuration also enables you to set your default database. The configuration program can be accessed from the Windows Task Bar through the following sequence: Start Programs Midmark Diagnostics IQmark Configuration or Double-click the IQmark Configuration icon to start the configuration application. The following dialog box appears. IQmark Configuration Settings Dialog Box With Default Values Enter the Institution Name and Address information of your own medical practice. The software will display this information on printed reports. Enter a name that describes your practice or location to enable other medical personnel to recognize the origin of your reports. 15 Go To Table Of Contents Back IQmark Diagnostic Workstation Operation Manual In the configuration dialog box, you can choose Metric or English units of time and measurement, and an AC power source frequency of 50 Hz or 60 Hz. The frequency setting is necessary for the ECG module (if you have added it to your computer). Refer to the ECG manual for information on frequency. Once you are satisfied that the configuration selections are set appropriately, click OK to save the settings. These settings are applied the next time the IQmark Diagnostic Workstation is started or immediately if you make the changes from the New Test screen. If you decide not to make changes to the configuration, simply click the Cancel button and no changes are saved. You can also click the Default button to restore all settings to the default values except for Institution Name and Address. Serial Port The serial port settings do not apply if you are using the USB version of the ECG or Spirometry modules. The configuration dialog box also enables you to select the Serial Port that is used by the IQmark Digital ECG, Digital Spirometer, Vital Signs monitor and the weight scale. Click the Serial Port button to open the following dialog box. Serial Communications Port Setup NOTE: The default Communications Port is COM 1. If COM1 is not available, the software enables you to Auto Detect the module on the serial ports available. To use Auto Detect, you must have the specific module connected to an available serial port on the computer. Make sure the module is fully functional and click the Auto Detect button on the left. If you have a USB device connected, the Auto Detect button will not appear. Instead the text USB Detected will be displayed (See the Spirometry COM Port area in Serial Communication Port Setup image). 16 Next Go To Table Of Contents Back Next IQmark Diagnostic Workstation Operation Manual The Thin Client Channel setting applies only if you are using the IQmark Diagnostic Workstation in a thin client environment. This setting is ignored when the software is not running in a thin client environment. The drop down combo box contains the following selections. 1. COM port mapping (default) 2. Microsoft RDP 3. Citrix Select “COM port mapping” if you are using the IQmark Diagnostic Workstation product in a thin client and are not using the IQmark Virtual Channel Solution. If you are using the IQmark Virtual Solution, select Microsoft RDP if your clients and servers are using Microsoft Terminal Services or select Citrix if your clients and servers are using Citrix software. Please refer to the document entitled “Application Note: Using the IQmark Thin client Virtual Channel Software” for more information. Vital Signs The IQmark Diagnostic Workstation enables you to import blood pressure, pulse rate, temperature, and pulse oximetry (SpO2) from the IQmark Digital Vital Signs Monitor. Click on the Enable Vital Signs Interface check box so that it is checked to enable the IQmark VSM interface. Click Setup in the Vital Signs area to open the IQmark VSM Control Panel dialog box. Select the desired temperature units from the Temperature Units control group. 17 Go To Table Of Contents Back IQmark Diagnostic Workstation Operation Manual NOTE: The temperature units setting only affects the temperature units of the IQmark VSM Control Panel dialog box. It will not affect the temperature units setting of the IQmark VSM. If you plan to connect the IQmark VSM to your PC via a USB cable then select the USB radio button. If you plan to connect to the IQmark VSM via a serial port cable then select the Serial Port radio button and select the COM port from the combo box list. If you do not know which COM port numbers correspond to the serial connectors or your PC then you can use the auto-detection feature of the IQmark VSM Control Panel. Perform the following steps to automatically to determine the COM port. 1. Connect the IQmark VSM to the serial port of your PC using the serial cable. 2. Turn on the power of the IQmark VSM and wait for it to complete its poweron self-test sequence. “PASS” will appear in the front panel displays of the IQmark VSM when it is ready. 3. Click on the Auto Detect button of the IQmark VSM Control Panel. A dialog box similar to that shown in the following figure will appear. 4. If the software detects the IQmark VSM connected to a serial port or the USB of your computer, it will indicate the detected connection. Click on the OK button to accept the new setting. 18 Next Go To Table Of Contents Back Next IQmark Diagnostic Workstation Operation Manual Weight Scale If you plan to connect a weight scale to you PC to automatically read patient weight measurements, click on the Enable Scale check box in the Serial Communications Port Setup dialog box. Then click on the Setup button in the “Weight Scale” control group of that dialog. The following dialog box will appear. Select the model of the scale from the combo box. Then select the serial port (COM port) that you plan to connect the scale to on your PC. Click on the OK button. The Units selection will be disabled because the units (English/Metric) are determined in the IQmark Configuration Settings Dialog Box. EZ Stress Settings For IQmark EZ Stress, click Stress Settings button, and then click the Hardware tab on the EZ Stress Settings dialog, the following dialog will appear: 19 Go To Table Of Contents Back IQmark Diagnostic Workstation Operation Manual Select serial port for stress treadmill and ECG module (if the serial port version of the ECG module is used). Please refer to IQmark EZ Stress Operation Manual for more information on the EZ Stress settings Database Settings Click the Database Settings button in the configuration settings dialog box to switch between a local database and a network database (if enabled). The IQmark Diagnostic Workstation can be set up to work in a peer-to-peer or client-server environment. Refer to Configuring for Peer-to-Peer Networks or Configuration for Client-Server Networks later in this manual for setup information. The following dialog box appears when you click the Database Settings button in the IQmark Configuration dialog box. Once the network database is setup correctly, selecting Enable Network Database will set the program to save all reports in the network database. NOTE: 20 If the IQmark Data Management System (IQmark DMS) is installed (optional, purchased separately), List Management functions must be completed by a system administrator. Please see the IQmark DMS Operation Manual for additional information. Next Go To Table Of Contents Back Next IQmark Diagnostic Workstation Operation Manual Database Settings The Archive/Email ECG Reports As settings enable you to select the file format used when you save ECG reports to file (Archive) or email them to another person. The compressed archive report format (*.car) is the default file format used by the IQmark Diagnostic Workstation for saving all diagnostic reports. The SCP-ECG file format is a European standard file format now used by several ECG device manufacturers. You should use the SCP-ECG file format to share report files with other Physicians who have software systems that can read this file format. List Management The List Management button in the IQmark Configuration dialog box enables you to customize the lists used in the IQmark Diagnostic Workstation. Lists that you can customize include: Medications; History Statements; ECG/Holter Indications; Race Categories; ECG Diagnostic Statements; Technician‟s Names; Physician‟s Names. To access List Management, double-click the IQmark Configuration icon, and then click the List Management button. The following dialog box will appear. List Management Utility Dialog Box 21 Go To Table Of Contents Back IQmark Diagnostic Workstation Operation Manual Select the appropriate database and click the Manage Lists button. This will open the List Management dialog box that enables you to add, edit and delete the lists that appear throughout the program. List Management – General List Management tab General List Management tab This tab enables you to customize the Medications, History Statements, ECG/Holter Indications, and the Race Categories. Select the desired list from the Current List pull down menu and then use the Add, Edit and Delete buttons to customize the list. Add – Use this feature to add a statement to the list. Edit – Use this feature to edit an existing statement. Highlight the statement with the cursor, and then press the Edit button. Delete – Use this feature to delete an existing statement. Highlight the statement with the cursor, and then press the Delete button. ECG Statements tab This tab enables you to customize the diagnostic statements you use to quickly edit when interpreting an ECG. Add, Edit, and Delete work the same way as in the General List Management tab. Refer to the IQmark Digital ECG Operation Manual for additional information on ECG Statements. 22 Next Back Go To Table Of Contents Next IQmark Diagnostic Workstation Operation Manual User Names tab This tab enables you to add the physicians and technicians names that appear when you start a new test. You can assign a name to either list or both. List Management – User Names tab Click the Add button and the following appears. Add/Edit A User Enter the User Name, select the list(s) where this name should appear and click OK. After you have completed entering in the Technician and Physician names desired, these names will appear in the New Test and Review windows. 23 Go To Table Of Contents Back IQmark Diagnostic Workstation Operation Manual For example, selecting New Test within the Workstation program displays the following: New Test Dialog Box Use the arrows to the right of the appropriate box to select the name from the list. This feature reduces the time required to enter Technician, Physician, and Indication information each time a test is performed and it adds valuable information to the final report without having to type it in. All three of these fields can be customized to fit your practice using List Management. 24 Next Go To Table Of Contents Back Next IQmark Diagnostic Workstation Operation Manual E. Working with Peer-to-Peer Networks A peer-to-peer network usually consists of several personal computers running on Microsoft Windows 2000, XP or Vista operating systems connected by hardware in a Local Area Network (LAN) configuration. In such a system, this product may be set up such that one of the computers contains the central database that would be accessed from the several PCs connected to the network. Configuring for Peer-to-Peer Networks After you have set up the LAN network and are sure it is working, follow these steps to set up a peer-to-peer network database. NOTE: If the LAN network is Windows 2000/XP/Vista based, you will need to install the IQmark Diagnostic Workstation on all required computers, including the central database, under the Administrator privilege. After successful installation, you should return access levels to the original privileges for normal operation. Step 1. Designate one of the computers in the network as the central database. It is not necessary to install the Workstation product on this machine, but it is necessary to create certain folders and files. See Creating a Central Peer-to-Peer Database later in this section. However, if the IQmark Diagnostic Workstation is installed on the computer that is to contain the central database, then all of the necessary folders and files are established. It is not necessary to have the IQmark Diagnostic Workstation running on the central database computer in order to provide access to the networked computers running Workstation, however if this is the first time you have installed Workstation, you must launch the program to create the database. Step 2. Make sure the disk drive that contains the central database is set up for shared read and write access. To do this, open the Windows Explorer Program on the central computer, click with the right mouse button over the designated folder. Click the Sharing button. Verify or make appropriate changes. To save changes, click Apply then click OK. Please refer to your Microsoft operation manual for detailed instructions on Windows. Step 3. Install the IQmark Diagnostic Workstation software on each computer that will access the central database. Refer to Software Installation above. Step 4. At each computer, set up the network data source for the central database. See Setting Up the Peer-To-Peer Data Source in this section for more help. 25 Go To Table Of Contents Back IQmark Diagnostic Workstation Operation Manual Step 5. Once the network has been set up and the data source has been established at each computer, double-click the IQmark Configuration icon and click the Database Settings button. Step 6. In the Database Settings dialog box, click Enable Network Database, so that it is checked, then select Network under Default Database. Click the OK button on the Database Settings dialog box and click OK on the IQmark Workstation Configuration Settings dialog box. Creating a Central Peer-to-Peer Database NOTE: The disk drive that will contain the central database must be configured for full sharing on the network. Installing the IQmark Diagnostic Workstation may require that you restart the computer. If you have installed the IQmark Diagnostic Workstation on the computer designated as the central database, then the database folders and files are already set up. Refer to Software Installation earlier in this manual for complete instructions. If you do not intend to install the IQmark Diagnostic Workstation on the central database computer, then it is necessary to follow this procedure to set up the required folders and files for the central database. Step 1. Create the following folders on the central database computer: \Brentwood\Database \Brentwood\Database\Holter Step 2. Copy the Workstation database file: WorkstationDatabase.mdb from one of the other computers (after the software is installed) to the central database computer in the folder: \Brentwood\Database 26 Next Go To Table Of Contents Back Next IQmark Diagnostic Workstation Operation Manual Setting Up the Peer-to-Peer Data Source After you have installed the IQmark Diagnostic Workstation software on each network computer and established the central database (see Creating a Central Peer-to-Peer Database), follow these steps to set up the data source for each computer. Step 1. From the Windows desktop, click Start, Settings, and then My Computer. Step 2. Double-click the Control Panel icon. Step 3. For Windows 2000/XP/Vista, double-click Administrative Tools, and then double-click Data Sources (ODBC). Step 4. On the ODBC Data Source Administrator dialog box, click the Add button and the Create New Data Source dialog box will appear. Step 5. On the list box showing the available database drivers, select Microsoft Access Driver (*.mdb). Click the Finish button. Step 6. In the ODBC Microsoft Access Setup dialog box, type as follows for the Data Source Name: Brentwood Network Database Step 7. Click the Select button and the Select Database dialog box will appear. Step 8. Under Database Name, type the network location of the central database. The format for this is as follows: \\ComputerName\Brentwood\Database\WorkstationDatabase.mdb “ComputerName” is the network name of the computer where the central database is located. For example, suppose that the central database is on a computer named “John”, and then the Database Name should be as follows: \\John\Brentwood\Database\WorkstationDatabase.mdb. Step 9. Click the OK button. Step 10. Click the OK button on the ODBC Microsoft Access 97 Setup dialog box. 27 Go To Table Of Contents Back IQmark Diagnostic Workstation Operation Manual Switching Between a Local and Central Database The computer that contains the central database should be set to the Local database. All other computers that need access to this central database must be set to the Network database on the IQmark Configuration application. You can temporarily switch between the two databases on the IQmark Diagnostic Workstation Opening Screen. Refer to the section on Opening Screen. However, if you want to set the default database back to the Local database or vice versa, follow these steps: Step 1. Double-click the IQmark Configuration icon from the Windows Desktop to open the configuration dialog box. Step 2. Click the Database Settings button and the Database Settings dialog box will appear. Step 3. Select Local under Default Database, and click OK on the Database Settings dialog. Step 4. Click OK on the IQmark Workstation Configuration Settings dialog box. When you start the IQmark Diagnostic Workstation application again, you will be connected to the local database. Step 5. To switch back to the central database, simply repeat the same steps above and select Network under Default Database. Make sure Enable Network Database is checked. 28 Next Go To Table Of Contents Back Next IQmark Diagnostic Workstation Operation Manual F. Working with Client/Server Networks Versions 4.0 and higher of the IQmark Diagnostic Workstation are all capable of operating with Microsoft SQL Server 7.0 or later. To use the IQmark Diagnostic Workstation in a client/server environment, you must have the following: 1. A network with at least one Windows Server 2000 or later. 2. Microsoft SQL Server installed on the server. 3. Client computers (running Windows 2000, XP or Vista). 4. Familiarity with the Microsoft SQL Server product. Configuring for Client Server Networks NOTE: Setting up a server database requires qualified and authorized IT personnel. Please refer to database topics in the online help of the IQmark Diagnostic Workstation application for a detailed discussion of database configurations. The following describes the general steps for setting up a server database. The online titles are enclosed in brackets ([ ]). Step 1. Create an empty database. This step requires the use of the SQL Server Enterprise Manager. Click Start SQL Server Enterprise Manager. Follow the steps shown in [Creating an Empty Database]. Step 2. Create the tables and indexes on the new database for the IQmark Diagnostic Workstation. The installation program installs an SQL script that can be used to create the database tables and indexes. See Creating Database Tables. If you have been using the IQmark Diagnostic Workstation in a peer-to-peer configuration and wish to copy patient data and reports into the server database, see Importing Data from MS Access. Step 3. Create users and grant them the appropriate access to the database. Before users can access the client/server database, you must create a database user and grant the appropriate access to each user using SQL Server Enterprise Manager. See Creating Users and Granting Access Rights. Step 4. Install the IQmark Diagnostic Workstation software on each client computer. 29 Go To Table Of Contents Back IQmark Diagnostic Workstation Operation Manual Step 5. Create a data source on each client computer called "Brentwood Network Database". See Creating a Network Data Source for a Client/Server Database. Step 6. Configure the IQmark Diagnostic Workstation software at each client computer to use the network data source. This is accomplished by using the IQmark Configuration application provided with the installation package, or by selecting the network database using the “Change” button on the Opening Screen. However, the latter change is only temporary. On the client computer, you can switch between the local database and the server‟s central database. Refer to the section Switching Between Local and Central Database under Working with Peer-to-Peer Networks. G. IQmark Data Management System The IQmark Data Management System is a network oriented client/server database product. This is a companion product to the IQmark Diagnostic Workstation, IQmark Digital ECG, IQmark EZ and Advanced Holter and IQmark Digital Spirometer products that enables you to store and manage a large number of reports in a centralized, secure database. The IQmark Data Management System operates on a Microsoft Windows 2000 Server or Windows Server 2003 system running MSDE or Microsoft SQL Server. The main features of this product are: Audit trail of user activities. Electronic report signature. User security management protects patient data from unauthorized access. Create and manage a single database than can span several locations of care. Generation of statistics and administrative reports. Manual/customized report generation. Nineteen different reports are available. Graphical user interface for administration and report generation tasks. The IQmark DMS is an optional product. It is not included with the IQmark Diagnostic Workstation. Please contact your local Midmark Diagnostics Group representative or Midmark Diagnostics Group directly at 800-624-8950, ext 2 for more information about this option. 30 Next Go To Table Of Contents Back Next IQmark Diagnostic Workstation Operation Manual II. Operation A. Introductory Notes This manual describes the various features in the IQmark Diagnostic Workstation. As a Windows-based application, many of the features are interconnected and can be accessed from more that one screen. The bottom of each screen has a menu bar that lists other screens that may be accessed. To visit any of these screens, simply click once on the appropriate button. Overall, we believe that you will find this program to be both userfriendly and flexible. B. Starting the Program The IQmark Workstation application is located on your Windows Desktop as a shortcut icon. Double-clicking this icon will start the Workstation program. or Start from the Windows Task Bar through the following sequence: Start Programs Midmark Diagnostics IQmark Diagnostic Workstation 31 Go To Table Of Contents Back IQmark Diagnostic Workstation Operation Manual C. Opening Screen When you start the Workstation application, an opening screen will appear. The IQmark Products Installed section on the left displays the types of products available through Midmark Diagnostics Group. Call Midmark Diagnostics Group for information on additional available products. Opening Screen 32 Next Back Go To Table Of Contents Next IQmark Diagnostic Workstation Operation Manual There are six choices on the opening screen: STAT ECG – Acquire an ECG before entering patient demographics or selecting a patient. Please see the IQmark Digital ECG Operation Manual for information on this feature. New Patient – Enables you to register a new patient. Please refer to the specific product Operation Manual for a description of the patient details required for specific tests. Patient List – Enables you to view a list of patients previously entered into the database. Selecting a patient from the list enables you to access, edit, add and delete data that patient‟s records and view data from previous tests. Configuration – Displays which database is currently selected and enables users to configure the program to meet their needs. See Configuring the IQmark Diagnostic Workstation in this manual. Help – Provides on-line assistance regarding the use, operation and troubleshooting of the IQmark Diagnostic Workstation and other products. Return to Windows – Exits the program and returns you to the Windows desktop. 33 Go To Table Of Contents Back IQmark Diagnostic Workstation Operation Manual D. Testing A New Patient For a new patient, click the New Patient button on the opening screen. This opens the Patient Data Entry screen. Patient Data Screen The Patient Data screen enables you to enter the data that is specific and pertinent to your patient. NOTE: You must enter a name or ID for the patient to start a new test. It is highly recommended that you enter all information available, including an ID. Access the data fields shown on this screen by clicking in them with the mouse or by pressing the tab key. Although this information may not be absolutely essential for the test you are running, it is important to complete each of these fields as accurately as possible. Different diagnostic tests (e.g., ECG, Holter and Spirometry) have different patient data requirements, which may affect the computer-generated interpretation of the test, so it is important that you refer to the appropriate Operation Manual (provided with each instrument) when completing this screen. The following table provides a brief description of the functions of the fields in the Patient Data screen as well as the individual tabs listed on this screen. Fields that play a diagnostic role in the interpretive program are noted. 34 Next Go To Table Of Contents Back Next IQmark Diagnostic Workstation Operation Manual Patient Data Fields Field Last Name First Name Middle Initial ID Date of Birth Diagnostic Role Recommended Description Used for identification purposes. Providing complete information facilitates easier retrieval of patient data at later dates. Letters and numbers may be used. Used for identification purposes. Letters and numbers may be used. Required for ECG and Spirometry Used for information purposes, and plays a diagnostic role in ECG and Spirometry. Entered using a month/day/year format (the order may be changed in IQmark Configuration settings). Enter two digits for month and date, and four digits for the year. The IQmark Diagnostic Workstation program uses this data to calculate the age of the patient. Sex Required for ECG and Spirometry Used for identification purposes, and plays a diagnostic role in ECG and Spirometry. Select the appropriate gender. Race Required for Spirometry Used for information purposes, and plays a diagnostic role in Spirometry. Click in the field. A pull-down menu enables you to select one of the following: Unspecified, Caucasian, Black, Asian, American Indian, Hispanic, AfricanAmerican, or African-European. If the patient‟s race is not listed, if you do not know the patient‟s race, or if they are of multiracial origin, select the race as identified by the patient. Height Required for Spirometry (Vital Signs tab) Used for informational purposes, and plays a diagnostic role in Spirometry. Use only numbers. Data may be entered in either English or metric units, depending on which option is selected in the IQmark Configuration settings. Weight (Vital Signs tab) Used for information purposes, and may play a diagnostic role in Spirometry. Use only numbers. Data may be entered in either English or metric units, depending on which option is selected in the IQmark Configuration settings. (mm/dd/yyyy e.g. 02/14/1961) Address Phone Number (Contact Info tab) Used for identification or contacting purposes. Letters and numbers may be used. Medications Recommended for Resting ECG and Spirometry (Medications tab) The physician may use this information as a diagnostic tool when interpreting test results. Clicking this button opens a pop-up dialog box, which is described below. 35 Go To Table Of Contents Back IQmark Diagnostic Workstation Operation Manual Patient Data Fields Field Smoking Diagnostic Role Recommended for Spirometry (Smoking History tab) Description Plays a diagnostic role in the Spirometry interpretive program. Enables the operator to enter smoking history. Enter Vital Signs (Vital Signs tab) Enables operator to enter vital signs (height, weight, blood pressure, etc.) for the patient. Clicking the Review Vital Signs button provides access to previously entered vital signs information for the patient. Angina; Risk Factors; Activity (Risk Factors tab) Used for information purposes. History (History tab) The information entered in this tab appears in the Patient Data Report and may be used along with diagnostic test results to evaluate the patient‟s condition. Used for information purposes. Clicking the button activates a pop-up dialog box, which is described below. The data entered or edited will be automatically stored in the database when you perform one of the following actions: Exit the Patient Data Entry Screen (Patient List, View Report, New Test, or Exit). Click the New Patient button. Click the View Data button. Click the Review Vital Signs button. Smoking History tab Select the Smoker check box if the patient has ever smoked cigarettes. Enter the number of cigarettes per day and the number of years the patient has smoked. If the patient has quit smoking, select the Quit box and enter the number of years since the patient quit. 36 Next Back Go To Table Of Contents Next IQmark Diagnostic Workstation Operation Manual Smoking History tab If the patient is currently a non-smoker but did smoke, you must first select Smoker, enter the amount of cigarettes a day and number of years before you can select Quit. 37 Go To Table Of Contents Back IQmark Diagnostic Workstation Operation Manual Medications Tab Clicking the Medications tab to display the current medications assigned to this patient. You have the option of adding, editing or deleting a medication from the patient‟s profile. Medications tab - Add A Medication To add a medication, click Add. The Add A Medication dialog box appears with the following three categories: Medication: Most standard medications can be selected from a pull-down menu. Simply highlight the appropriate medication and double-click on it. You may also add any unlisted medications by entering them in the medication field. At any time, you can modify or delete the patient‟s medication data by using the Edit and Delete buttons. This should be done whenever the patient advises you of a change in medications, dosage or schedules. NOTE: When entering a new medication, you will be given a choice to add it to the list of standard medications for future patients. If you choose No, the new medication will only be included for the current patient. Dosage: Enter the dosage the patient is taking. Schedule: Select Daily, Hourly, or Weekly from the pull-down menu, or enter descriptive text. 38 Next Go To Table Of Contents Back Next IQmark Diagnostic Workstation Operation Manual Vital Signs Tab The Vital Signs group of controls in the left area of the Patient Data Entry screen displays the most recently entered vital signs data for the patient. If no vital signs have been entered for this patient, the title of the control group title reads “Vital Signs” and each field is white, indicating that data may be entered. If vital signs have been previously entered for the patient, the control group title will read “Vital Signs as of mm/dd/yy hh:mm:ss,” indicating the date and time of data entry. Each edit box in this group of controls will be gray indicating the fields are read only, as shown below. Vital Signs tab If the edit boxes are white, simply enter the patient height, weight, blood pressure, temperature, etc. You cannot enter the BMI (Body Mass Index). This is calculated automatically if the patient‟s height and weight are entered. BMI = W/H2 (where weight is in kilograms and height is in meters). The World Health Organization (WHO) considers a BMI over 25 to be overweight, and over 30 to be an indicator of obesity. However, there are a variety of references available on-line that use different cut off points. Please research this and use the one you are most comfortable with. If the edit boxes are gray, click the New Vital Signs button. The software will clear the current vital signs (except height and weight) and make the text boxes available. You can then enter patient height, weight, blood pressure, etc. If you have an IQmark VSM connected to your PC and have enabled the interface, the IQmark VSM Control panel dialog will appear. See “Using the IQmark VSM Interface” section below. 39 Go To Table Of Contents Back IQmark Diagnostic Workstation Operation Manual Every time the operator updates a vital signs measurement, the software stores the data as a new record in the database. To review the patient‟s vital signs records, click the Review Vital Signs button. Using the Weight Scale Interface If you have a scale connected to your PC, you can automatically read the patient‟s weight directly from the scale by clicking on the scale button. Prior to clicking on the Scale button, make sure that the weight scale is on and connected to the appropriate serial port. The Scale Control Panel will appear. Scale Control Panel Dialog Have the patient stand on the scale. Click on the OK button after the weight measurement has stabilized and the weight measurement will appear in the weight field of the Vital Signs tab. 40 Next Back Go To Table Of Contents Next IQmark Diagnostic Workstation Operation Manual Using the IQmark VSM Interface If you have an IQmark VSM, you can acquire vital signs measurements directly into the patient‟s record by following these steps. 1. Use the IQmark VSM to acquire the vital signs measurements such as blood pressure, temperature or SpO2. 2. If the IQmark VSM is not connected to your PC then connect it now using the USB cable or the serial cable. If your PC is equipped with an infra-red (IrDA) sensor, then you can use it to connect to the IQmark VSM. See Tips for Using the IQmark VSM IrDA Interface in Appendix C. 3. Click on the New Vital Signs button of the Vital Signs tab. The Vital Signs Control Panel shown below will appear. The measurements that appear on the front panel displays of the IQmark VSM will appear on the displays of the Control Panel dialog box. IQmark VSM Control Panel Dialog 4. If you are satisfied with the measurements displayed in the Control Panel then click on the OK button. The Control Panel will close and the measurements will be inserted into the patient's record. 41 Go To Table Of Contents Back IQmark Diagnostic Workstation Operation Manual 5. If you are not satisfied with the measurements that appear in the Control Panel you can acquire new measurements while the Control Panel is displayed. You can also start a new BP measurement by clicking on the Start button of the Control Panel. 6. If you wish to discard the acquired measurements then click on the Cancel button. Review Vital Signs – Trend Click Review Vital Signs and Vital Signs review screen opens (see below), depicting the patient‟s Vital Signs history in chronological order. This review screen displays the previously entered Vital Signs numerically and graphically. In addition, previously entered Vital Signs numbers can be corrected or deleted. To edit a number, highlight the appropriate line and click the Edit button. You can also edit a line by simply double-clicking on the line. To correct a previously entered number, highlight the number and type in the new number. To delete a previously entered number, highlight the number and type in 0 (zero). The field will not display a zero after the edit box is closed. Review Vitals Review Screen This tab enables you to select the information you want to graph. You can select different Vital Signs parameters for each axis. You can select from: Weight; Height; BP (Systolic); BP (Diastolic); BP (Sys/Dia) Pulse, Temperature or SpO2. 42 Next Go To Table Of Contents Back Next IQmark Diagnostic Workstation Operation Manual However, if you select BP (Sys/Dia) for either axis, you are already using both systolic and diastolic so you will not be able to select either for the other axis. After you have selected your choice for both axes, you can print a copy of this data by clicking on the Print button and selecting Print. History tab Selecting the History tab on the patient data screen activates a pop-up dialog box that gives you the option of adding or deleting a number of medical histories. The History dialog box enables you to select a number of common conditions that may play a role in the Physicians final diagnosis. To select a condition, click the Add button. History Tab Under Select Statements, you may select any of the available diagnostic conditions. You can amend the list by typing a new condition in the Add New Statement box and then clicking the Add New button. Add History Statements Dialog Box 43 Go To Table Of Contents Back IQmark Diagnostic Workstation Operation Manual After completing this screen, click OK and you will be returned to the History tab. The History tab contains other fields to add descriptive information regarding the patient. These fields include Pacemaker, Physician, Referred By, and Hospital. Physician and Referred By use the lists created in List Management. The pacemaker fields in the History tab are for information only and do not affect the automatic ECG interpretation. If the patient has a pacemaker then check the Pacemaker check box and you can enter a description of the pacemaker type in the text box. Contact Info Tab Selecting the Contact Info tab gives you the option of adding the patient‟s address and phone number. Contact Info Tab Pen Button The Pen button is located in the upper right corner of the patient data screen. It allows users of “tablet” type computers to enter birth date numbers without having to write the numbers. Simply click the Pen button (or touch it on a touch screen monitor) and adjust the numbers by highlighting them and using the up/down arrows. 44 Next Go To Table Of Contents Back Next IQmark Diagnostic Workstation Operation Manual View Data Button The View Data button is located in the upper right corner of the patient data screen. It displays a summary report of the patient‟s data. This report shows the most recent information entered for the patient including: patient demographics, Vital Signs, History, Medications and a summary of the most recently performed diagnostic tests. You can print this report or just view it on the screen. Edit Button After a patient‟s data is initially entered, you cannot edit the demographic fields without clicking the Edit button. This enables the user to add, edit or delete any patient demographics previously entered. Upon completion of the Patient Data screen, review it to ensure that everything is accurate and up to date. Once you have verified the accuracy, you are ready to proceed with a new patient test. Patient Data Screen – Button Bar Note the buttons available at the bottom of the Patient Data screen. Besides offering a variety of powerful functions, such as help, these buttons enable you to review data for current and prior patients in a variety of formats. Note that some of the buttons may not be available. If a button is grayed out, it is disabled in the current screen. Which buttons are active and disabled changes from screen to screen but the button bar displays the buttons in the same location. The following table summarizes each of these Patient Data screen buttons, and they are also described in detail in other sections of this Operation Manual. Patient Data Screen Buttons Button Name File Print New Patient Patient List Patient Data View Report Function(s) Displays a menu with various options – Delete, Restore, Archive, Copy, Email. Different options are available in different screens. See More on File Functions later in this section for more information. Displays a menu to print or see a print preview of a report. Clears information from the previous patient (if applicable) and prepares the screen for entry of information for a new patient. Previous patient data is automatically stored in the database. Displays the list of all previously entered patients. Displays the Patient Data Screen. If a patient is selected from the Patient List Screen and Patient Data is selected, the current patient‟s data is displayed. Displays the Report Review Screen. This screen will automatically display the most recent report for the patient. 45 Go To Table Of Contents Back IQmark Diagnostic Workstation Operation Manual New Test Help Exit 46 Enables creation of a diagnostic report (ECG, Holter, Spirometry, etc.) for the current patient. Displays the New Test Dialog. If you are connected to a network database and are using the IQmark Data Management System, this button will display a slightly different version of the New Test Dialog (Data Management System). Displays the integrated help function. Displays the Opening Screen. Next Go To Table Of Contents Back IQmark Diagnostic Workstation Operation Manual E. Reviewing Patient Data Patient reports can be managed effectively with the IQmark Diagnostic Workstation. All reports for a specific patient are listed on the Patient Data screen. To display all reports for all patients, click the Patient List button and then click the Go To Report List Screen button from the Patient List screen. You can also access this feature any time you start the program from the Opening Screen: Opening Screen Patient List Go To Report List Screen Opening Screen Click the Patient List button to open the patient list search screen. Workstation will search for the desired patient using his/her Last Name or Patient ID. Search results will be displayed on the lower section of the dialog box. You may also proceed to the Multi-Patient Report List screen by clicking the Go To Report List Screen button. The Patient List search screen contains a comprehensive listing of the patients entered into the database. These patients are listed in alphabetical order by last name. You can sort the information on this screen by Last Name, First Name, Middle Initial, or ID. An asterisk next to the column name (Last Name *) indicates that the patients are sorted by that criterion. You may re-sort the list by clicking on the name of a different column. To reverse the order, click on the column name a second time. 47 Next Go To Table Of Contents Back IQmark Diagnostic Workstation Operation Manual Patient List Screen – Search for a patient You can view any patient‟s data simply by double-clicking on their last name. If you know the patient‟s last name, patient‟s ID, or both, you can quickly locate the patient by typing that information in the appropriate field at the top of the screen. If Auto Update is checked, the program will continue to query the database as you type in letters or numbers. If no matches are found, the screen will be blank. If the program finds a match, it will display the Patient List highlighting the first match. You may then double-click on that match to access the patient‟s data and reports. The bottom of the Patient Data screen contains the File button. File enables you to delete or restore records for any of your patients. Simply highlight the desired patient record, and then click the File button. You will be provided with the option of permanently deleting their data or restoring previously archived reports. See More on File Functions section for detailed information. The Patient List screen also contains a Go To Report List Screen button that will take you to the Multi-Patient Report List screen as shown. 48 Next Back Go To Table Of Contents Next IQmark Diagnostic Workstation Operation Manual Report List Screen: Multi-Patient This screen lists the patients and tests performed at your facility with the IQmark Diagnostic Workstation. It also provides patient ID numbers, indicates the report type, gives the date of each test, and provides other useful information. Use the horizontal scroll bar to view other information. You can sort the information on this screen by Last Name, First Name, Middle Initial, ID, Report Type and Date, Requested By, Reviewed By and Reviewed Date. Click on the title of the column you want to sort by and the program will place an asterisk (*) next to the name of the column and sort the reports by that column. Click on the same title again to sort from the other direction (top to bottom or bottom to top). If you want to display only those tests that were conducted during a given time period, you can use the Filter Reports section. This provides a selective show feature. To use this feature, select the Show Range, Show Today, Previous Month, or Show only reports not reviewed button on the Report List screen. Select Show All to display dates from the earliest report to the current date. With Show Range selected, you may indicate a range of time using the From and To date fields. Select Previous Month to display the reports done the previous month. Select Show Today to display only those reports prepared on the date currently displayed by the computer calendar. The default setting is Show All. If the Show only reports not reviewed box is checked, then the selected report types that have not been reviewed and also match the other selected filter criteria will be listed. 49 Go To Table Of Contents Back IQmark Diagnostic Workstation Operation Manual NOTE: The From date box will not accept dates before 01/01/97. The Show Reports area enables the operator to select one or more of the following reports for display: ECG, RR Variability, Holter (Full Report and Summary Report), Stress and Spirometry. Click Show All to display all available types of reports. Under the Show Reports area, there are two pull down boxes labeled Requested By and Reviewed By. You can use these boxes to filter the reports shown by which person requested or reviewed the reports. Click on the down arrow and select the name from the list. The appropriate results will display in the Report List area. Filter reports: Requested By Reviewing Reports for One Patient You can also summarize reports for one specific patient by double-clicking on a patient‟s report. This will open the Patient Data screen that contains all the reports for that patient. From the Opening Screen, follow these steps to display the reports for a single patient. Opening Screen Patient List Search for Patient Patient Data Screen The reports for this patient are listed in the lower right hand corner of the screen, in the section titled Diagnostic Reports. The reports in this window can be sorted by Type, Date, Reviewed, Reviewed by and Comments/Format. Click on a column title to sort by that criterion. The Comments/Format field displays the total number and the type of tests performed in the Spirometry session. When you highlight a report, the interpretation will appear in the gray area just below the Diagnostic Reports. 50 Next Back Go To Table Of Contents Next IQmark Diagnostic Workstation Operation Manual Patient Data Screen In the screen shot above, an ECG test is highlighted in the Diagnostic Reports section of the screen. You can see that the interpretation for that test is listed in the box below the reports. You can select any report listed in the Diagnostics Report section and the interpretation (if one exists) will be listed here. If you double click on a report, it will open the review screen for that report. Note that there is an asterisk next to Date. This denotes the column that the tests are sorted by. Click on it once on Date to sort oldest to newest, click again to sort newest to oldest. The tests can be sorted by any column by simply selecting it. 51 Go To Table Of Contents Back IQmark Diagnostic Workstation Operation Manual F. More on File Functions When you are in the Patient List screen, clicking the File button at the bottom provides many options: Delete, Read From File (Restore), Save To File (Archive), Send By Email and Copy to Network/Local Database. NOTE: On the Report List screen, you can select multiple reports from different patients by clicking on the desired reports while holding down the Control key [Ctrl] on the keyboard. On the Patient Data screen, you can select multiple reports from the same patient by clicking on the desired reports while holding down the Control key [Ctrl] on the keyboard. Delete NOTE: Deleted patient records cannot be restored. You can use the Delete feature in many screens. If you are on the Report List screen, select the desired reports, click File, and then click Delete. If you are on the Report Review screen, the report displayed is automatically selected, click File, and then click Delete. Clicking File then Delete will display a confirmation dialog box, and a warning message that the selected item(s) will be permanently deleted. If you delete a patient from the Patient Data screen, all reports associated with that patient will also be deleted including the patient data information. However, if you deleted all the reports for a specific patient in the Report List screen, the patient data information will be retained even though no report is available. Read from File (Restore) Only archived reports can be restored. To restore a report, click File then Restore, select the source location and desired archived patient reports. Archived reports may be restored from a diskette, backup drive, removable hard disk or another computer on the network. More than one report can be selected at one time for restoring. 52 Next Go To Table Of Contents Back Next IQmark Diagnostic Workstation Operation Manual Restore Archived Reports Dialog Box Two operation options are available when restoring reports. If Copy Archived Reports is selected, the selected archived reports will be copied and restored, leaving the original archives intact at the source location. If Delete Archived Reports is selected, the selected archived reports will be restored and the original archives will be deleted automatically. The latter operation will prevent multiple copies of the same report in different locations. Save to File (Archive) Any patient report can be saved or archived onto a diskette, backup drive, removable hard disk or another computer on the network, for transportation or storage. Select the desired reports on the Report List screen or if you are at the Report Review screen, the report displayed is automatically selected. Click File and Save to File (Archive), and select the destination location for the file. 53 Go To Table Of Contents Back IQmark Diagnostic Workstation Operation Manual Archive Reports Dialog Box Two Operation options are available for archiving. If Copy Reports is selected, the selected reports will be copied and archived to the destination location while the original reports remain intact in the computer. Selecting Archive Reports will move and archive the selected reports and delete the original reports from the computer, leaving only one copy of the reports archived at the destination location. NOTE: If you are updating from a version before 4.0, you must first archive all patient reports that you want to maintain in this version. See Software Installation section. NOTE: A quick way to select all reports is to select a patient from the Patient List screen, then select the Report List button. Click on the first report at the 54 Next Back Go To Table Of Contents Next IQmark Diagnostic Workstation Operation Manual top of the screen. Position the mouse pointer on the last report, use the vertical scroll bar if necessary, and click on the last report while holding down the Shift key [Shift] on the keyboard. Alternatively, you can pick and choose specific reports by holding down the Control key [Ctrl] and clicking on the desired reports one at a time. Save to File (PDF or JPEG file) Starting from Workstation Version 7.2, patient reports can also be saved in PDF format JPEG format. Save Report to PDF file Select “Portable Document Format Files” or “JPEG Files” in the Save as type drop down menu, and then click Save button, the report will be saved to PDF file or JPEG file. For JPEG file, resolution and compress ratio can also be specified. 55 Go To Table Of Contents Back IQmark Diagnostic Workstation Operation Manual Send by Email Patient reports can be sent to another physician with an email account. This function only works if you have a modem, Internet access and an email account already established and functioning properly. To send by email, select desired report(s) at the Report List screen or if you are at the Report Review screen, the report displayed is automatically selected. Click on File and Send By Email. Follow the instructions on the email dialog box and fill in all relevant information including the recipient‟s email address. When done, click Send and the selected reports will be sent as attachments to the email. NOTE: You may also archive the reports you want to send and enclose them as attachments to your message using any email application of your choice. Receiving Reports through Email After receiving the Email with the patient report attached, simply double-click on the attachment or report icon to retrieve the report. When asked if you want to save the file onto the disk or open it, select open. The IQmark Diagnostic Workstation will automatically start, bringing up the retrieved report displayed in the Report Review screen. The report is automatically saved. The recipient must have the IQmark Diagnostic Workstation installed on their PC in order to view patient reports. NOTES: The format and operation of your email depends on your Internet Service Provider and the Internet mail service that is installed on your computer. Please refer to those manuals for operation details. Email recipients must have the IQmark Diagnostic Workstation to view patient reports. Copy to Network/Local Database If an IQmark Diagnostic Workstation central database is setup on your network, you can copy test reports from one database to the other. Starting from your local database, select the desired test reports to copy to the central database, click the File button, and click Copy To Network Database. If you are starting from your network central database, the Copy To Local Database option will be available instead. 56 Next Go To Table Of Contents Back Next IQmark Diagnostic Workstation Operation Manual G. Faxing Reports If the computer you are using to view the test reports has a modem and fax application installed, you can fax any report directly from the IQmark Diagnostic Workstation. Most fax applications, like Microsoft Fax, will create a fax printer/driver selection after it is installed. To send by fax, you must first select the default fax printer. From the desktop, doubleclick on the IQmark Configuration icon. Click on Select in the lower right side of this dialog box, under Default Fax Printer. Select the appropriate fax printer and click OK. NOTE: Depending on the fax application, if you are faxing multiple reports, you may be required to enter the recipient information and fax number separately for each report even though they are going to the same recipient. Configuration Settings Dialog Box 57 Go To Table Of Contents Back IQmark Diagnostic Workstation Operation Manual Select Fax Printer Dialog Box When you are operating Workstation, select the desired report on the appropriate screen, or if you are at the report review screen, the report displayed is selected automatically. Click the Print button and select Fax. The fax software should be activated automatically and prompt you for the recipient information and fax number. Detailed operations vary depending on the fax software. 58 Next Go To Table Of Contents Back Next IQmark Diagnostic Workstation Operation Manual Appendix A. Screen Summary Summary of Screens Screen Name Screen Summary Main Functions Opening Screen Enables the operator to access the main functions of the IQmark Diagnostic Workstation. Access New Patient screen. Access Patient List screen. Configure the Workstation. Access on-line Help. Exit to Windows desktop. Run a Stat ECG (if ECG installed). Patient Data Entry screen Contains data fields for patient information including name, ID, medications, smoking and medical history. Enter essential patient data. Edit data for an existing patient. Initiate a test for the patient. Select a previously saved test to review. Review Reports screen Shows the results for the latest report stored or the report selected. Initiate test for the patient. Select a report to view. Edit currently viewed report. Print currently viewed report. Delete currently viewed report. Restore (retrieve) archived reports. Archive currently viewed report. Save currently viewed report to PDF or JPEG file. Copy currently viewed report to network/local database. Send currently viewed report by Email. Return to the multi-patient report list (if report was selected from this screen). Patient List screen Shows a list of all patients in the database. Search for a specific patient using their name, ID and other criteria. Scroll through the patient list. Select patient records. Open the Multi-Patient Report List screen. 59 Go To Table Of Contents Back Next IQmark Diagnostic Workstation Operation Manual Summary of Screens Screen Name Report List screen (Multi-Patient) Screen Summary Shows a list of all reports for all patients. Main Functions 60 Review selected report. Print one or more selected reports. Delete one or more selected reports. Restore archived reports. Archive one or more selected reports. Save one or more selected reports to PDF or JPEG files. Copy selected reports to the network/local database. Send one or more selected reports by Email. Search for a patient using their name, ID and other criteria. Go to the previous or next page of patient list. Filter report list by test type, dates and/or reports that have not been reviewed. Go To Table Of Contents Back Next IQmark Diagnostic Workstation Operation Manual B. Troubleshooting Guide This Troubleshooting Guide provides a comprehensive list of solutions or recommendations to situations that you may encounter with the IQmark Diagnostic Workstation. Before calling Midmark Diagnostics Group for Customer Service, please refer to the following table for help. Error messages may be displayed at the center or at the bottom right corner of the screen. NOTE: For errors that occur during patient testing with an IQmark product, please refer to the Troubleshooting Section in the corresponding Operation Manual (ECG, Holter, Stress or Spirometry). Error Message or Problem Solution or Recommendation EMAIL NOT AVAILABLE. PLEASE SETUP THE EMAIL OPTION. Message appears after clicking on File and Send By Email. Email functionality is not setup or not working properly on the computer. To send patient reports by Email, you must install a modem and establish an Internet/Email account with an Internet Service Provider (ISP). You must also have an Email application such as Eudora, Microsoft Internet Mail or Outlook Express. Consult your Microsoft manual and/or ISP for assistance. If you have Internet accessibility established, verify that your Email is working properly by sending a test message to the recipient. Alternatively, you may first archive desired reports, then start up your Email application and attach the archived reports to your message before sending. Email recipient receives patient report as scrambled text. The Email setup is incorrect. Verify that the send message format for your Email application is set to Plain Text and Uuencode, not HTML or MIME. If you are using Microsoft Exchange or Outlook, click Start on the Task Bar. Select Settings and click on Control Panel. Double-click on the Mail or Mail and Fax icon. Select Internet Mail and click on the Properties button. Select the Message Format button and set the option Use MIME to OFF when sending messages. 61 Go To Table Of Contents Back IQmark Diagnostic Workstation Operation Manual Error Message or Problem Solution or Recommendation FAILED TO CREATE EMPTY DOCUMENT Message appears immediately after initial software installation and thereafter each attempt to start the IQmark Diagnostic Workstation. All Windows programs must be closed before installation of the IQmark Diagnostic Workstation. Uninstall the IQmark Diagnostic Workstation (refer to Section II-B). Restart the computer. Close and exit all Windows programs. Reinstall the IQmark Diagnostic Workstation (refer to Section II-B). The Holter application is not installed. This warning message appears when attempting to run, print or fax a Holter report. In order to perform a Holter scan, or print/fax the report created, the IQmark Holter program must be installed on the same computer used for printing and/or or faxing. Please contact Midmark Diagnostics Group Sales for information on Holter products. The [test] report dated [test date] for [patient name] is in use by [network computer name] Message appears when trying to open a specific test report. This Report Locking feature prevents more than one operator from accessing the same report at the same time, specifically in a LAN environment where different computers are sharing a central database. Report Locking can also be caused by improperly exiting the patient report from any computer. Close the desired test report for the specific patient at the [network computer name] computer using the Review Exit button This patient’s record is in use by: [network computer name] Message appears when trying to open a specific Patient Data screen. This Record Locking feature prevents more than one operator from accessing the same patient record simultaneously, specifically in a LAN environment where different computers are sharing a central database. Record Locking can also be caused by improperly exiting the Patient Data screen from any computer. Close the specific Patient Data screen at the [network computer name] computer using the Exit button. Unable to create big button Message appears when attempting to launch/start the IQmark Diagnostic Workstation. 62 Click on the „X‟ close button on the top right hand corner to exit the IQmark Diagnostic Workstation. Start the MS-DOS Prompt. Change the directory to C:\windows\system32 Type regsvr32 threed32.ocx and press Enter. Exit MS-DOS Prompt and start the IQmark Diagnostic Workstation. Next Go To Table Of Contents Back Next IQmark Diagnostic Workstation Operation Manual Error Message or Problem All other operational problems. Solution or Recommendation Please refer to the on-line help by clicking on the Help button found on all screens. Additional troubleshooting covering a specific device, i.e., ECG testing and acquisition, may be found in the Operation Manual for that device. Contact Midmark Diagnostics Group Customer Service, for Customer Service. Please see the contact information at the end of this manual. 63 Go To Table Of Contents Back IQmark Diagnostic Workstation Operation Manual C. Tips for Using the IQmark VSM IrDA Interface If your computer is equipped with an IrDA sensor, you can capture vital signs measurements simply by pointing the IrDA sensor at the front panel of the IQmark VSM and displaying the Control Panel. This topic presents some tips and suggestions on the best practices for using the IrDA interface of the IQmark VSM. MDG provides the IrDA interface as an easy way to obtain a snapshot of the vital signs measurements into a patient's medical record. MDG does not intend that the IrDA link be used as an alternative to a USB or serial port connection to the IQmark VSM for extended monitoring periods. The software does not allow the user to initiate a new NIBP measurement from the Control Panel (the Start button is disabled). The reason for this is that the IrDA is a wireless data link and is not as inherently reliable as the USB or serial port connections. MDG recommends the following workflow when using the IrDA link to communicate with the IQmark VSM. 1. First use the IQmark VSM to acquire the desired vital signs measurements. 2. When you are satisfied with the measurements displayed on the front panel of the IQmark VSM, align the IrDA sensor of your computer with the front panel of the IQmark VSM. 3. The maximum range of the IrDA link is approximately 3 feet (one meter) so be sure that you are holding the computer close enough to the IQmark VSM. 4. Display the IQmark VSM Control Panel by clicking on the New Vital Signs button. 5. The measurements will appear on the displays of the Control Panel dialog box. 6. Click on the OK button of the Control Panel dialog box. The software will disconnect from the IQmark VSM and the measurements will be added to the patient's medical record. Notes: 1. When you display the Control Panel, the Status indication in the lower portion of the dialog box will indicate "IrDA --Connecting...". It normally requires around five or six seconds to establish a link. However, it occasionally requires as long as 10 seconds to establish a connection. 2. When the IQmark VSM detects a valid communications link with the PC it will sound a tone sequence indicating a successful connection. The tone pattern is a low frequency tone followed by a high frequency tone. The Status indication will show "IrDA -- Connected". 64 Next Back Go To Table Of Contents Next IQmark Diagnostic Workstation Operation Manual 3. The IQmark VSM plays a high tone, low tone sequence to indicate that the connection has been terminated. 4. Do not attempt to close the Control Panel dialog box while the Status indication displays "IrDA -- Connecting..." as this may result in an abnormal program termination. Wait until the status changes to "IrDA -- Connected" or "IrDA -Disconnected" before attempting to close the Control Panel dialog box. 5. The first time that you attempt to connect to the IQmark VSM via the IrDA link, Windows will display the "Found New Hardware" dialog box. See IrDA Device Driver Installation below for the proper procedure for installing the device driver. IrDA Device Driver Installation This section guides you through the procedure for installing the default Windows device driver for the IQmark VSM IrDA interface. Windows will display the "Found New Hardware" dialog box shown below the first time you align the IrDA sensor of your computer with the IQmark VSM. Select "Yes, this time only" and then click on the Next button. The following dialog box will appear. 65 Go To Table Of Contents Back IQmark Diagnostic Workstation Operation Manual Make sure that the "Install the software automatically (Recommended)" radio button is selected Click on Next. A dialog box that indicates "Please Wait While the Wizard Searches..." will appear. The search process may require two or three minutes. When Windows completes the driver installation process, a dialog box that reads, "Completing the Found New Hardware Wizard, Standard Modem Over IR Link" will appear. Click on the Finish button to complete the installation process. The IrDA interface to the IQmark VSM is now ready to use. 66 Next Go To Table Of Contents Back Next IQmark Diagnostic Workstation Operation Manual D. Glossary ARCHIVING CLICK DATABASE DESKTOP DIALOG BOX ECG Email ELECTROCARDIOGRAM FOLDER IQmark Diagnostic Workstation IQmark Digital ECG IQmark EZ Holter IQmark Advanced Holter IQmark Digital Spirometer IQmark EZ Stress Placing either a copy or moving the original data into temporary storage where it can be accessed at a later date. In this manual, Click refers to tapping a mouse button once – quickly and firmly. For example, if you want to display the Medications tab, you will Click on the tab name. Double-Click refers to performing this task twice, and is generally used to start programs. A collection of data arranged into methodically organized categories. In this manual, the term refers to the collection of test reports that an IQmark Digital instrument stores on your hard drive. The background image that appears on your computer monitor behind the application window(s). An on-screen form you complete to provide the Workstation with information used to accomplish tasks; an example is the Medications dialog box. See electrocardiogram. Electronic mail that is sent from one computer to another via telephone lines through Internet access. Patient reports are sent as attachments to an Email. A graphic recording that displays the electrical activities of the heart. Permits the detection of abnormalities in the transmission of the cardiac impulse through the heart muscle and serves as an important aid in the diagnosis of heart ailments. During an electrocardiogram, the heart‟s electrical impulses are typically measured through electrodes placed on the chest and limbs. Folders, which function like the drawers in a filing cabinet, are used by Windows to organize files and applications. The Workstation application resides in a folder named “Brentwood,” located on your hard drive. The name of the software application you install on your Windows based computer in order to use IQmark instruments. Midmark Diagnostics Group's portable module for converting a Windows based PC into an electrocardiograph with interpretive capability. The IQmark Digital ECG is operated using the Workstation software application. Midmark Diagnostics Group's portable module for converting a Windows based PC into an analysis program for Holter. The IQmark EZ Holter is operated using the Workstation software application. Midmark Diagnostics Group's portable module for converting a Windows-based PC into an analysis program for Holter. The IQmark Advanced Holter is operated using the Workstation software application. Midmark Diagnostics Group's portable module for converting a Windows-based PC into a Spirometer with interpretive capability. The IQmark Digital Spirometer is operated using the Workstation software application. Midmark Diagnostics Group‟s exercise stress testing system. 67 Go To Table Of Contents Back IQmark Diagnostic Workstation Operation Manual MY COMPUTER PORT SERIAL PORT SHORTCUT ICON START BUTTON TASKBAR TEXT BOX 68 A Windows icon that appears on the desktop in the form of a stylized computer. Clicking on My Computer enables you to explore your computer‟s disks, printers, Control Panels and other functions. A place where data is passed in and out of a computer. Windows based PCs typically have several ports located on the back panels of the computer. The IQmark Digital ECG communicates the data it collects from patients through a serial port. May be referred to as a Serial Port or a Parallel Port. A 9- and/or 25- pin port that is used by computers to communicate serial data. These ports are typically labeled COM1 and COM2. Hardware that typically uses these ports includes the mouse, modem, printer, etc. The IQmark Digital ECG connects to a 9-pin serial port, or a 25-pin serial port if an adapter is used. Consult your computer Operation Manual for more information on configuration and capabilities. Generally appearing on the desktop, shortcut icons enable you to open a document, application, or folder simply by double-clicking on them. Appears at the left end of the Windows Taskbar, and enables you to start applications, open files, get to the Control Panel and exit Windows. A gray bar that typically appears at the bottom of your screen. The Taskbar provides rapid access to the Start Button and applications you have started. The Workstation requires that the taskbar be set to Auto hide in order for it to work properly. Refer to section II-C or see your Windows Operation Manual for more details. A box where one is able to type in text relative to an application or task. Select the text box by clicking in it, and then type in, or select data. Next Go To Table Of Contents Back Next IQmark Diagnostic Workstation Operation Manual E. Client Service, Maintenance and Warranty For help in diagnosing problems with this product, refer to the online help for immediate assistance. You can also contact Midmark Diagnostics Group Client Service at (800) 624-8950. Office hours are 6:30 AM to 4:30 PM, Pacific Standard Time (PST). Warranty All Midmark Diagnostics Group Products are warranted free from manufacturing and material defects for 12 months from the date of purchase. Any misuse or abuse of the product voids all warranties. Return Materials Authorization To return any product for repair, a Return Materials Authorization (RMA) number must be obtained from Midmark Diagnostics Group Customer Service. This number should be referenced on the package(s) containing the items to be returned and in any correspondence regarding the return. Shipping Before shipping any unit to Midmark Diagnostics Group, be certain that an RMA number has been issued and that all guidelines regarding this authorization are followed. We highly recommend that you follow all guidelines for the shipment of a medical product set forth by the shipping company of your choice. If a question should arise regarding an appropriate method of shipment, please feel free to ask when calling for your RMA Number. It is ultimately the responsibility of the customer when shipping a product to ensure that all packages and their contents get to Midmark Diagnostics Group safely. Midmark Diagnostics Group will not assume any responsibility for damage due to improper packaging, shipment or use of a product. Such actions will result in all warranties being void. It is the customer’s responsibility to ensure proper packaging and shipment of the product. Packaging and shipping costs associated with the return of the product to Midmark Diagnostics Group are also the customer’s responsibility. Midmark Diagnostics Group 1125 W. 190th Street Gardena, California, USA 90248 RMA# PH 800-624-8950 69 Back Go To Table Of Contents Midmark Diagnostics Group 1125 W. 190th Street Gardena, California 90248 Support Services: 1-800-624-8950, Option 2 www.midmark.com ©Midmark Corporation 2009