1
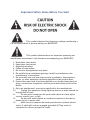
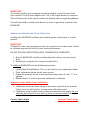
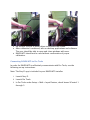
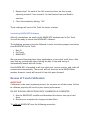
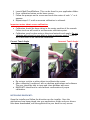
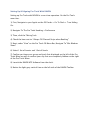
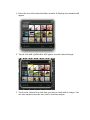
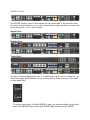
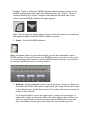
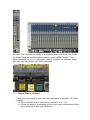
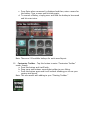
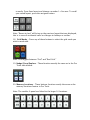
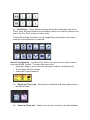
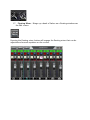
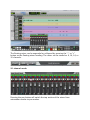
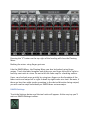
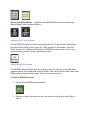
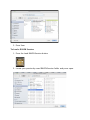
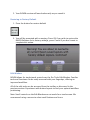
MTi
A PRODUCT OF:
USER GUIDE
VOL. 1
Updated 10/24/13
Table of Contents
Important Safety Notes Before You Start .......................................................................2
Warranty Information..............................................................................................................2
Maintenance and Care ............................................................................................................2
• Cleaning the RAVEN MTi ..................................................................................... 2
• Revitalizing the RAVEN MTi Glass ....................................................................... 2
• System requirements .......................................................................................... 2
• RAVEN MTi Dimensions ...................................................................................... 2
• Attaching The MTi To Its Stand ........................................................................... 2
• Connecting RAVEN MTi to your computer ........................................................... 2
• Software Installation and Touch Calibration ........................................................ 2
• Connecting RAVEN MTi to Pro Tools ................................................................... 2
• Launching RAVEN MTi Software .......................................................................... 2
Review of Touch Calibration ...............................................................................................2
INSTALLING RAVEN MTi: ........................................................................................................2
Setting Up & Aligning Pro Tools With RAVEN ..............................................................2
RAVEN MTi Software Features ............................................................................................2
• The RAVEN Mixer ............................................................................................... 2
• RAVEN Channel Strip .......................................................................................... 2
• Automation Modes ............................................................................................. 2
• Icons .................................................................................................................. 2
• RAVEN Toolbar ................................................................................................... 2
• RAVEN Settings .................................................................................................. 2
• Saving a Pro Tools Session ................................................................................. 2
• Saving a RAVEN Session ..................................................................................... 2
• Restoring to Factory Default ............................................................................... 2
• Edit window ....................................................................................................... 2
Working with Plugins ..............................................................................................................2
• Loading Plugins: ................................................................................................. 2
• Controlling Plugins: ............................................................................................ 2
• Closing a Plugin: ................................................................................................ 2
Important Safety Notes Before You Start
This symbol indicates that dangerous voltage constituting a
risk of electric shock is present within your RAVEN MTi.
This symbol indicates there are important operating and
maintenance instructions in the literature accompanying your RAVEN MTi.
1.
2.
3.
4.
5.
6.
Read these instructions
Keep these instructions
Regard all warnings
Follow all instructions
Do not use this apparatus near water
Do not block any ventilation openings. Install in accordance to the
manufacturer’s instructions
7. Do not install near any heat sources such as radiators, heat registers,
stoves, or other apparatus (including amplifiers) that produce heat.
8. Protect the power cord from being walked on or pinched particularly at
plugs, convenience receptacles, and the point where they exit from the
device.
9. Only use attachments/ accessories specified by the manufacturer.
10.
Unplug this apparatus during lightning storms or when unused for
long periods of time.
11.
Do not press strongly on the panel with a hand or sharp object
such as a pencil, pen, or nail.
12.
Do not stick metal objects or conductive material in the device,
power chord, or power inlet.
13.
Make sure you connect the earth ground wire to prevent electric
shock. A cable with a three-pronged grounded AC Plug must be
connected to a three-pronged AC outlet.
Power Source
Operate your RAVEN MTi only from the power source included.
Servicing
Servicing of the RAVEN MTi is to be done by qualified service personnel only. To
reduce the risk of electric shock, do not perform any servicing other than that
contained in the operating instructions unless you are qualified to do so.
DAMAGE REQUIRING SERVICE
Unplug the device from the power outlet and refer servicing to qualified service
personnel under the following conditions:
• When power supply is damaged
• If liquid has been spilled or objects have fallen into the RAVEN MTi.
• If your RAVEN MTi has been exposed to rain or water.
• If your RAVEN MTi has been dropped or damaged in any way.
• When your RAVEN MTi exhibits a distinct change in performance.
Important Note About DVI Cables
As in many studios, your computer may be located in a room far away from
your console. For DVI cable lengths over 15ft, a DVI signal booster is required.
This will ensure the video signal reaches the display with no signal degradation.
Warranty Information
Hardware Limited Warranty
A. Limited Warranty
Slate Media Technology (SMT) warrants that its hardware will be free from
defects in materials and workmanship, for one (1) year after it has been
acquired by the first user when given normal, proper and intended usage. SMT
will repair or replace nonconforming product (or a component thereof) that is
returned to SMT within the warranty term at no charge.
This warranty applies to products purchased anywhere in the world. You may
have additional consumer rights under local laws. SMT will provide the
minimum warranty term required by applicable law.
B. Warranty Recipient
The limited warranty applies only to genuine SMT products when sold by an
SMT reseller, distributor or dealer.
C. Exclusions from Warranty
This warranty does not cover problems caused by your acts, the acts of others,
or events beyond SMT’s reasonable control.
SMT does not warrant that use of SMT products will be uninterrupted or errorfree. This limited warranty does not apply to expendable components and is
void if the product serial numbers have been removed. SMT has no obligation
under this warranty to repair or replace products damaged as a result of 1)
normal wear and tear, 2) improper or unauthorized use or repair, 3) customer
fault or negligence, 4) natural or manmade disaster, or 5) causes external to the
products including, but not limited to, exposure to moisture, extreme
temperatures, power outages, or other customer site conditions.
D. Limitation on and Exclusion of Damages for Breach of Warranty
You may recover from SMT and its suppliers only direct damages up to the
amount you paid for the product.
You cannot recover for loss of present or prospective profits, data loss,
business damage, or any other consequential, special, indirect or incidental
damages.
E. Warranty Procedures
For information regarding your warranty, please contact Slate Media Technology
or your local authorized reseller, distributor, or dealer. Product registration at
www.slatemt.com is required in order to process a warranty claim. You will be
required to provide proof-of-purchase to validate your claim.
Hardware may require return-to-factory, and customer is responsible for
properly packing and labeling and insuring any warranty returns for shipment
to Slate Media Technology. Customer is responsible for any damage or loss
incurred due to improper packaging or labeling. Customer is required to pay
shipping/handling one way for warranty product returns and applicable custom
duties, V.A.T. and other associated taxes and charges for international service.
Maintenance and Care
Cleaning the RAVEN MTi
The RAVEN MTi ships with a NanoGlide™ coating, which protects the screen
from oil, water, and dirt. The coating also strengthens the surface of the glass
making it scratch resistant and smooth to the touch.
IMPORTANT
Do not use regular cleaning solutions on the RAVEN MTi
Household sprays and cleaners will affect the touch glass coating, which can
impact performance. We recommend a simple microfiber cloth to clean the
surface of the glass.
If more intensive cleaning is required, use a lightly damp cloth. Make sure that
the cloth is not too wet; the coating will make the water bead and drip. As a
precaution, keep a dry cloth at the bottom of the screen to catch any runoff.
Do not allow moisture from liquids to accumulate on the screen when cleaning.
Accumulation of liquids can damage internal electrical devices. If a damp cloth
must be used, make sure to remove any excess water immediately after
cleaning.
To clean RAVEN MTi’s exterior metal parts use a simple microfiber cloth. If
deeper cleaning is required, a non-abrasive cleaning solution can be used on
the metal parts only. Be sure to not spray cleaner on the RAVEN MTi directly,
rather spray the cleaner on to a cleaning cloth away from the RAVEN MTi, then
use the dampened cloth on the RAVEN MTi’s metal parts.
The high gloss lacquer finish on RAVEN MTi’s side panels can be damaged by
some cleaners. Use a gentle cleaning solution. Test in an inconspicuous area
first.
Revitalizing the RAVEN MTi Glass
The RAVEN MTi comes out of the box with a NanoGlide™ coating that repels oil,
water, and leaves the surface incredibly smooth to the touch.
After some use, it may be necessary to revitalize to bring the glass back to its
original slickness. We recommend using the revitalizing solution when you feel
the glass has substantially more friction than when you first started using your
RAVEN MTi.
The coating process is very easy and can be done following the steps below. All
you need is a microfiber cloth and the supplied 4oz bottle of
Revitalizer/Protector solution.
IMPORTANT:
Apply the revitalizer solution in a well-ventilated area
NOTE:
The Revitalizer Solution is not a product of Slate Media Technology. Please read
the Revitalizer label for more information, precautions, and first aid
instructions.
1. Using a microfiber cloth, clean the RAVEN MTi screen to remove dust and
fingerprints.
2. Spray the revitalizer solution directly onto the RAVEN MTi glass. It should
take approximately six sprays to cover the glass completely.
a. IMPORTANT: Do not spray so much that the solution drips down
the screen. Excess moisture could damage the display and touch
system. If you are unsure, place a cloth at the bottom of the screen
to catch any runoff.
3. Using a microfiber cloth LIGHTLY spread the solution around to cover the
entire screen.
a. IMPORTANT: DO NOT WIPE/BUFF AWAY ALL OF THE
REVITALIZER SOLUTION FROM THE SCREEN. The coating on the
glass leaves a very thin residual layer of Revitalizer, which
significantly adds to the slickness and oil repellency. Removing all
of the product will leave the glass less smooth than desired.
b. USE A LIGHT TOUCH TO APPLY THE REVITALIZER AROUND THE
SCREEN.
NOTE: There will be a residual oil layer on the glass after revitalizing. When the
screen is turned OFF, the glass may appear cloudy. This is OK. You should not
be able to notice this layer when the screen is turned ON. If you do, wipe gently
until you cannot see the oil layer.
Your RAVEN MTi is now back to its original slickness!
Getting Started
System requirements
The RAVEN MTi will run on any Mac computer, however we recommend these
specifications for optimal performance.
- OSX 10.7 (Lion) or 10.8 (Mountain Lion)
- Intel i7 or Xeon processor with a clock speed of at least 2.4 GHz.
- Minimum 2GB RAM
- Graphics card with minimum 512MB memory, though 1GB graphics memory
is recommended
- Any Mac Pro produced after 2010 is ideal and will meet all the requirements,
though MacBook Pro’s, Mac Mini’s and iMac’s meeting the requirements should
do fine. Graphic response speed will vary depending on the capabilities of the
computer’s graphics card.
RAVEN MTi Dimensions
NOTE:
If you are creating custom furniture for your RAVEN MTi, CAD drawings with
precise dimensional information may be available on request.
Attaching The MTi To Its Stand
Along with the MTi, you will also notice two available metal stands and four
screws. Attach the stand to the back of the MTi using the four screws and to
prop the MTi to its inclined state.
Note: Do not attempt to plug in any cords until the stand has been attached to
the body.
Connecting RAVEN MTi to your computer
●
RAVEN MTi connects to your computer using a DVI and USB connection
Attach DVI video cable to the first slot on your Mac Pro. (Note, HDMI is
also available if you prefer.)
2 Connect USB to any available slot on your computer.
3 Turn computer on and computer will sync to display.
4 In System Preferences, click Displays and select the RAVEN MTi as your
main display.
1
IMPORTANT
As in many studios, your computer may be located in a room far away from
your console. For DVI cable lengths over 15ft, a DVI signal booster is required.
This will ensure the video signal reaches the display with no signal degradation.
You will now need to install touch drivers in order to get touch response from
RAVEN MTi.
Software Installation and Touch Calibration
Installing the RAVEN MTi software and calibrating the touchscreen is a quick
process.
IMPORTANT
Calibration is the most important process for accurate use of the screen. Failure
to calibrate properly will result in poor touch performance.
DO NOT RUN ANY APPLICATIONS UNTIL CALIBRATION IS COMPLETED
1. Run the RAVEN MTi installer and download the drivers onto your hard
drive.
2. Restart your computer for changes to take effect.
To calibrate RAVEN MTi use the following procedure:
Launch MultiTouchPlatform. This can be found in your application folder.
Press calibration button on the home screen.
Follow the prompts on the screen and touch the center of each “+” as it
appears.
4 Repeat steps 2-3 until an accurate calibration is achieved.
1
2
3
Important notes about screen calibration.
Calibration should be done sitting in the center position of the console.
Failure to do so will result in an inaccurate calibration point.
● Calibration must be done using a direct and natural touch angle. Do not
calibrate with a bend in your wrist or from an extreme angle. Failure to
do so will result in an inaccurate calibration.
●
Correct Touch Angle
Incorrect Touch Angle
Do not use a stylus or other object to calibrate the screen.
After calibration is achieved, test on desktop applications and software.
The user should be able to open and close windows with ease.
● RAVEN MTi should not be used without confirmation of proper
calibration.
●
●
Connecting RAVEN MTi to Pro Tools
In order for RAVEN MTi to effectively communicate with Pro Tools, use the
following set up instructions.
Note: The Ney-Fi app is included in your RAVEN MTi installer.
1
Launch Ney-Fi.
2
Launch Pro Tools.
3
In Pro Tools under Setup > Midi > Input Devices, check boxes VControl 1
through 3.
4
Open Setup > Peripherals > Then go to the Midi Controllers tab. Under
the dropdown menu, select HUI control, Receive from vcontrol 1, Send to
vcontrol 1.
5
Repeat step 5 for each of the HUI control sections on this screen,
selecting vcontrol 2 and vcontrol 3 in the Receive from and Send to
sections.
6
Close the window by hitting, “Ok.”
These settings will save in Pro Tools for future sessions.
Launching RAVEN MTi Software
After all connections are made in the RAVEN MTi hardware and in Pro Tools.
You will be ready to launch the RAVEN MTi software.
The following sequence must be followed in order to achieve proper connection
from RAVEN MTi to Pro Tools.
1
2
3
Ney-Fi
Pro Tools
RAVEN MTi
We recommend keeping these three applications in your dock at all times. Also
note that we recommend right-clicking the Ney-Fi app and having it
automatically launch with the Finder.
Once RAVEN MTi is launched it will sync with your current session, and make all
connections automatically. The mouse will not function in the RAVEN Mixer
window, however, touch will control it from this point forward.
Review of Touch Calibration
IMPORTANT
Calibration is the most important process for accurate use of the screen. Failure
to calibrate properly will result in poor touch performance.
DO NOT RUN ANY APPLICATIONS UNTIL CALIBRATION IS COMPLETED
3. Run the RAVEN MTi installer and download the drivers onto your hard
drive.
4. Restart your computer for changes to take effect.
To calibrate RAVEN MTi use the following procedure:
Launch MultiTouchPlatform. This can be found in your application folder.
Press calibration button on the home screen.
Follow the prompts on the screen and touch the center of each “+” as it
appears.
8 Repeat steps 2-3 until an accurate calibration is achieved.
5
6
7
Important notes about screen calibration.
Calibration should be done sitting in the center position of the console.
Failure to do so will result in an inaccurate calibration point.
● Calibration must be done using a direct and natural touch angle. Do not
calibrate with a bend in your wrist or from an extreme angle. Failure to
do so will result in an inaccurate calibration.
●
Correct Touch Angle
Incorrect Touch Angle
Do not use a stylus or other object to calibrate the screen.
After calibration is achieved, test on desktop applications and software.
The user should be able to open and close windows with ease.
● RAVEN MTi should not be used without confirmation of proper
calibration.
●
●
INSTALLING RAVEN MTi:
Open the installer and follow the directions on the installer. Once the
applications have been placed into your applications folder and your drivers
have been downloaded, add the applictions to your dock for easy access.
Setting Up & Aligning Pro Tools With RAVEN:
Setting up Pro Tools with RAVEN is a one-time operation. On the Pro Tools
menu bar;
1) First, Navigate to your Apple on the OS Finder > Go To Dock > Turn Hiding
On.
2) Navigate To The Pro Tools Heading > Preferences
3) Then, click the “Mixing” tab
4) Check the box next to: “Always Fill Channel Strips when Banking”
5) Next, under "View" on the Pro Tools OS Menu Bar, Navigate To "Mix Window
Views"
6) Select 1 Set of Inserts and 1 Set of Sends.
7) Confirm you have your group and track lists displayed on the left of the Pro
Tools Mixer as well as confirm your clip lists are completely hidden on the right
of the Pro Tools Mixer.
8) Launch the RAVEN MTi Software from the dock.
9) Notice the light grey vertical Line on the left side of the RAVEN Toolbar.
10) Again, make sure your track list is showing, and your Pro Tools mixer
tracks are scrolled fully to the left. Then use the mouse to grab the right side of
the track list and align the “grey vertical line” with the edge of the Track List.
When complete, the vertical navigation cursor on the Track List should be
centered with the “grey vertical line” on the RAVEN Toolbar.
11) Look at the RAVEN Mixer and confirm that the meters do not have any
holes, and that the lines of the RAVEN Mixer tracks are aligned from the top to
bottom. Note: Confirm the tracks correctly aligned before moving on as
incorrect alignment will affect your use of RAVEN negatively.
12) Now, touch the EDIT/MIX button on the RAVEN Toolbar.
13) Touch the HIDE RAVEN button on the top left of the Raven Toolbar.
14) Click the Green Maximize window button on the top left of the Pro Tools
Edit Window.
15) Take the lower right corner of the Edit Screen at bring the window size to
about on half the screen top to mid-screen.
16) Touch the SHOW RAVEN button in the lower left corner of the screen.
17) Again, take the lower right corner of the Pro Tools Edit window and align it
so it displays completely with the scroll bars aligning with the top of the second
Raven Toolbar rack.
18) Save Pro Tools by touching the SAVE PRO TOOLS button on the lower left
of the Raven Toolbar and you are ready to mix.
RAVEN MTi Software Features
RAVEN MTi is loaded with many custom features made for a touch screen.
The RAVEN Mixer
The RAVEN Toolbars provide controls typical of most DAW’s. From the RAVEN
Mixer you are able to have MultiTouch access to all of the controls of the mixer.
RAVEN Channel Strip
The RAVEN channel strip is where you find your controls. Examples are: faders,
solos, mutes, pans, inserts, and automation modes
Fine Faders - Tap the DB display window to put single channels into fine
mode.
Automation Modes
!
Automation on the RAVEN MIXER:
1. Pressing the button below the word “AUTO” directly on the RAVEN
Mixer will display your automation.
Automation on the FLOATING MIXER:
1. Pressing the button above the INS button, the automation drop-down
menu will appear.
2. Select the desired mode, and the mode indicator will change.
Icons
The RAVEN has built in icons to help you identify your tracks in a busy mix. To
load an icon:
1. Press the Icon slot below the fader module. A floating icon window will
appear
2. Tap an icon and a yellow box will appear around selected image.
3. Touch each channel icon slot that you wish to load with an image. You
can also swipe across the icon slot to load the images.
4. To remove an icon, touch the blank icon box in the palette, and then
touch the channel icon slot you wish to remove. Note: Sliding also
works here.
RAVEN Toolbar
The RAVEN Toolbar rests on the bottom of the screen and is the control center
for many essential features. It can be viewed with a single, double, or triple rack
space using the + and – rack buttons.
Single Rack:
Double Rack:
Triple Rack:
To Add or Remove Racks press the + to show more racks in your toolbar or – to
show less racks. RAVEN Racks can be customized to show as many or few tools
as you would like.
To interact with your OS while RAVEN is open, we have provided a quick and
easy Hide RAVEN button above the RAVEN Power button on the RAVEN
Toolbar. Touch to Hide your RAVEN software almost entirely except for the
RAVEN on the bottom left hand side displaying the text, “Show.” Touch or
click the RAVEN Logo “Show” button on the bottom left hand side of the
screen and the RAVEN software will again appear.
Note: This can be very helpful when using an internet browser or something
that appears hidden behind RAVEN’s software overlay.
1. Power – Exits the RAVEN software.
When the power button is pressed and held, you will be prompted to save a
RAVEN session. If you wish to save your RAVEN session, press yes. If not, press
no. Pressing cancel will keep the current RAVEN session running. (See section
on Saving a RAVEN Session for further details.)
2. Banking – Moving between tracks is quick and easy. Using your finger on
the lower half of the fader plate, simply glide one finger across the screen
in the direction you would like to move. The tracks will move one track at
a time in this scenario.
If you would prefer to move by eight tracks, simply use two fingers to
swipe left or right on the lower half of the fader plates. Note: If there are
less than eight tracks to the end of the project, RAVEN will restrict you
from overswipes. Simply glide your finger for the remaining tracks.
3. Commands and Modifiers – All normal functions such as Save and Undo
are found in the toolbar. The Modifier keys latch when touched once and
unlatch when a command is executed.
4. Open/Close Last Plugin - Use this button to close plugin windows or to
show the last open plugin.
5. Pan Left/Pan Right – This button shows the right side of any stereo
track. To see stereo tracks, touch the button so that it reads “PAN RIGHT”
the only track visible will be the right side of any stereo track in your
session. Touch the button again to see left panners and mono tracks.
6. Pan Mode – This changes the control of the pan knobs from rotary to
traditional up/down. In rotary mode, move your finger in a circular
motion around the perimeter of the knob. In up/down mode, touch the
middle of the knob and move up or down to adjust pan.
7. NavPad - Launches a floating navigation window where you can Zoom,
Scroll, Shuttle and Scrub.
Note: The NavPad uses an X, Y-axis to control zooming. Use only a single
touch to control zooming. The NavPad is not designed for two finger
pinch gestures for zooming. A two-finger touch moved along the x or yaxis will scroll the edit window.
Put the window anywhere on the screen by grabbing one of the two side
handles.
There are two NavPads on the RAVEN Mixer. One floating window, and
one built into the toolbar. Both have the same functionality.
a. Note – Separate your fingers when using a two-finger gesture for
proper performance.
Floating Navpad Window:
Toolbar NavPad:
Note: Press the Track Zoom button to toggle between individual Track
Zoom or Track Zoom All.
8. Big Counter – Displays the counter synced with the transport in Pro
Tools.
9. Edit/Mix – Switch back and forth between the Edit and RAVEN Mixer
window.
Note: You can remove the Raven Mixer by touching the RAVEN Mixer button
and see the actual Pro Tools mixer. Please note, the Pro Tools mixer will not
be multitouch.
Additionally you can control the size of your mix window between 22 faders
and 24 faders, which shows and hides your Track and Groups list. Simply
touch the Mixer 24 or 22 faders button and the Track and Group list will
appear and disappear.
10. Fine Faders – Tap this button to put faders into “FINE” mode, where
finger movements are slowed to tenths of a DB. Use the “FINE FADERS”
button to put all faders into fine mode. Tap the DB display window to put
single channels into “FINE” mode.
We have also included the ability to control the response of the Fine Faders
by double-tapping the Fine Faders button on the RAVEN Toolbar. Then,
adjust between 1 and 10, 1 being the slowest response for extreme detail
and 10 being the fastest Fine Fader response.
11.
Custom Macro “Hotkeys”
Create your own hotkeys using standard keyboard commands. To create
a hotkey:
a. Press and hold any of the buttons labeled 1-6 or 1-8.
b. A box will appear, prompting you to enter a key combination. Enter
the combination into your keyboard.
c. Press Enter when command is displayed and then, enter a name for
the hotkey. Type a name and hit enter again.
d. To remove a Hotkey, simply press and hold the hotkey to be erased
and hit enter twice.
Note: There are 22 Available hotkeys for each saved layout.
12. Customize Toolbar – Tap this button to enter “Customize Toolbar”
mode. Simply:
a. Press the button and it will latch.
b. Drag icons and buttons around the toolbar to your liking.
c. Press the button again and it will unlatch allowing you to use your
custom tool layout.
Note: This also works with adding to your “Floating Toolbar.”
13. Floating Toolbar – Pressing this button will bring up a customizable
floating window. You can populate this window with tools that are
essential to your workflow, and can move them anywhere on the screen.
Once the Floating Toolbar button is pressed, the semi-transparent window will
appear with the familiar Customize Toolbar button as well as + / – Rack
buttons.
To customize your Floating Toolbar:
• Press the Customize Toolbar button on the top left corner of the palette.
•
•
Drag desired tools to the palette. The palette will automatically resize to
fit more or less tools in your configuration.
Press Customize Toolbar button again to exit.
Your Floating Toolbar is now ready to use. You may now remove racks all racks
if you want to work with just the Floating Toolbar. To bring back the Raven
Toolbar, simply press the + Rack button on the Floating Toolbar.
14. Save Layout – Saves your RAVEN toolbar layout, your Floating Toolbar
layout and your configured Hotkeys to a specific button you can get back
to easily. Press Save layout and choose a number 1-4 to save. To recall
your saved layout, press the assigned button.
Note: “Revert to Last” will bring up the previous layout that was displayed,
this is in case of accidental saves or changes to hotkeys or toolbar.
18. Grid Modes – Press any of these buttons to select the grid mode you
wish to work with.
Note: Grid toggles between “Grid” and “Reel Grid.”
19. Nudge/Drop/Replace – These function exactly the same as in the Pro
Tools edit window.
20. Memory Locations – These buttons function exactly the same as the
memory locations feature in Pro Tools.
Note: The smaller 6-panel are linked to the larger 16 locations.
21. Tool Palette – These buttons activate the tools commonly used in Pro
Tools. Since they are located on the toolbar, there is no need to reach to the
top of the Pro Tools screen to select tools.
Tools with multiple functions can be toggled by pressing the tool button
until the correct function is selected.
Smart Tool Selection – Just like in Pro Tools, the smart tool can be accessed
from the RAVEN Toolbar. To access the smart tool:
• Using two fingers, press the trim and select buttons simultaneously.
• The buttons will turn yellow.
• Smart tool is now selected.
15. Duplicate/Clip Loop - Easy tools to duplicate and loop sound clips in
the edit window.
16.
Zoom in/Zoom out – Zooms in or out of a section in the edit window.
17. Floating Mixer – Brings up a bank of faders on a floating window over
the Edit screen.
Pressing the floating mixer button will engage the floating mixer that can be
adjusted and moved anywhere on the screen.
The floating mixer can be expanded or collapsed by pressing the “-“ or “+”
button on the floating mixer heading. The mixer can be viewed as 8, 16, 24, or
32 channels.
24-channel mode.
Pressing the pan button will switch the top section of the mixer from
automation modes to pan modes.
Pressing the “X” button on the top right of the heading will close the Floating
Mixer.
Banking the mixer using finger gestures
Like the RAVEN Mixer, the Floating Mixer can also be banked using finger
swipes. Touch the fader faceplate and glide your one finger left and/or right to
bank by one track at a time. Do not touch the fader cap for a banking motion.
Users can also bank more quickly by using two-fingers on the faceplate of the
fader tracks and swipe left or right to bank by eight tracks at a time. But note, if
there are less than eight tracks remaining in the desired direction being swiped,
you will need to swipe individually as RAVEN does not overswipe.
RAVEN Settings
Touch the Settings button and the tool racks will appear. At the very top you’ll
notice a RAVEN Settings toolbar.
There are five buttons on the RAVEN Settings bar.
Save As – Brings up the dialog window for renaming and saving the RAVEN
session to a location.
Load RAVEN Session – Loads a previously saved RAVEN session. (.ravlay file)
Set User Default/User Default - RAVEN automatically launches in RAVEN
Factory Default layout. However, once a user gets things to the way they like
them with saved layouts, etc. The user can set their current layout to launch at
default by touching the “Set User Default” button. Once highlighted to “User
Default,” the user knows that they are using their layout as default.
Restore Factory Default/Factory Default – Restores the RAVEN software to
factory settings.
Stereo/Surround Meters - Switches the RAVEN Mixer between displaying
Stereo Meters and Surround Meters.
Saving a Pro Tools Session
On the RAVEN Toolbar, we have included a Save Pro Tools button that allows
you to quick and easily save your Pro Tools progress. Remember, your Pro
Tools session is a different file than your RAVEN Session so be sure to save
both frequently when changes have been made.
Saving a RAVEN Session
The RAVEN software allows you to save your current layouts, icons and other
customizations to a dedicated session folder. You can save this folder with your
DAW sessions and instantly recall them at any point in time.
To Save A RAVEN Session:
1. Hit the Save RAVEN Session button
2. Choose a folder you want to save the session to and give the folder a
name.
3. Press Save.
To Load a RAVEN Session:
1. Press the Load RAVEN Session button
2. Locate your previously saved RAVEN Session folder and press open.
3. Your RAVEN session will now load exactly as you saved it.
Restoring to Factory Default
!
1. Press the button for restore default
2. You will be prompted with a warning. Press OK if you wish to restore the
RAVEN Software to its factory settings, press Cancel if you don’t want to
complete this action.
Edit Window
RAVEN allows for single touch control over the Pro Tools Edit Window. Familiar
tools and functions can be easily accessed with your fingertips, offering an
improved workflow.
All of the edit tools can be accessed from the toolbar as discussed in the
previous section. Experiment with button layouts to find your optimal workflow
positioning.
Note: Small controls on the Edit Window are not made for a touchscreen. We
recommend using a mouse to select small buttons and icons.
Working with Plugins
Loading Plugins:
On The Raven Mixer:
Like Pro Tools, you simply reach out and touch the desired rack space on your
Inserts. Simply and easily tweak the plugin and use the Close plugin button to
remove the plugin from the screen.
On The Floating Mixer:
1
Hit the INS button on a given channel. The floating plugin window will
then open.
- The floating plugin window can be moved anywhere on the screen.
Select any plugin slot to bring up the plugin drop down list.
Touch and hold the “no insert” tab to activate the plugin list. We suggest
dragging your finger down the list to get the most accurate response.
4 Release finger to load selected plugin.
2
3
Controlling Plugins:
IMPORTANT:
Since RAVEN is a brand new platform for controlling audio, there has yet to be
development by many 3rd party plugin manufacturers for touch. While,
multitouch developments are being worked on, some limitations exist.
It is not recommended to touch controls that are small in size.
Plugins should only be touched when there is a large control that is easy to
activate via touch. Otherwise, a mouse should be used to control the plugin.
Plugin parameters are controlled by a single touch only. Functionality is the
exact same as using a mouse and uses the familiar up/down movements to
control knobs.
Closing a Plugin:
RAVEN is developed with custom ways to open and close plugins.
IMPORTANT
Never try to close a plugin window by touching the small, red “close” circle on
the top left on the window. The button is too small to have accurate results.
1
Plugins can be opened and closed using the “Open/Close Last Plugin”
button found in the toolbar.
2
Plugins can also be opened and closed by touching the plugin slot on the
PlugBot floating window.
3
Tapping the INS button on the channel will close plugbot, but leave the
plugin window open.