1
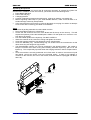
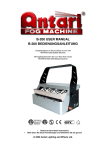
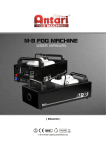
ENGLISH USER MANUAL User Manual B-200 Bubble Machine Thank you for choosing the Antari B-200 Bubble Machine. You now own a rugged and powerful state-of-the-art machine. Prior to use, we suggest that you carefully read all of the instructions. By following the suggestions found in this user manual, you can look forward to exceptional performance from your Antari Bubble Machine for years to come. Please follow these operation, safety and maintenance instructions to ensure a long and safe life for your Antari Bubble Machine. CAUTION Pay attention to all warning labels and instructions printed on the exterior of your Antari Bubble Machine This appliance must be earthed Do not overfill your bubble machine. Overfilling will cause the unit to leak. Do not tilt or angle the bubble machine. This may result in bubble liquid spilling out of the liquid tray. Danger of electric shock Keep this device dry. Keep the bubble machine upright. For the 110V models, use 3-prong grounded electrical outlet only. Prior to use take care to determine that the unit is installed at the rated voltage. Turn off or unplug when not in use. This machine is not waterproof or splash-proof. If moisture, water, or any liquid gets inside the housing, immediately unplug the unit and contact a service technician or your dealer before using it again. No user serviceable parts inside. Refer to your Antari dealer or other qualified service personnel. For indoor use only. Not designed for outdoor use. This appliance must be earthed. For adult use only. The bubble machine must be installed out of the reach of children. Never leave the unit running unattended. Never aim the output at open flames. Extended use may make surfaces where the bubbles land slippery. Position output of bubbles away from persons. Switch off from mains when refilling the liquid or cleaning the system. Regular cleaning of the bubble wheel is required. Do not transport with liquid. If the machine get wet, do not use until it is completely dry. Antari bubble liquid may leave permanent marks on clothing. Pay attention to all warning labels and instructions printed on the exterior of your Antari Bubble Machine. WWW.BEGLEC.COM 1/3 B-200 PRO BUBBLE ENGLISH USER MANUAL Unpacking & Inspection Open the shipping carton and check that all equipment necessary to operate the system has arrived intact. In addition to this user manual, you should receive the following items: 1. B-200 Bubble Machine 2. Power cord and plug 3. A hanging bracket 4. 2 pieces of tightening screws and metal screws, 5 pieces of washers, one safety ring. Before beginning initial setup of your Antari Bubble Machine, make sure that there is no evident damage caused by transportation. In the event that the unit’s housing or cable is damaged, do not plug it in and do not attempt to use it until after contacting your dealer for assistance. Setup Remove all packing materials from the bubble machine. Place the bubble machine on a flat surface. Loosen the side screws at the front of the B-200 and lift the top of the case up. This will expose the liquid tray where the bubble liquid is added. Fill the liquid to no more than 3 cm from the top of the tray. Pour the bubble liquid into the liquid tray, DO NOT OVERFILL. When the container is full, lower the housing and tighten the screws. Screw the hanging bracket by two tightening screws, metal screws. Screw the M8 safety ring. Hooked safety ring can double insure the machines do not fall down when they are hanged in high position. The B-200 Bubble machine can now be positioned in the desired location. Be careful to keep the machine level while moving and installing otherwise liquid may spill out of the liquid tray. This is especially important when the hanging bracket is used to suspend the B200. Once the machine is securely positioned and a final check is made to insure that no liquid has leaked, connect the power cord to the electrical supply. If there is any leakage or moisture on the machine, the cord or the remote, leave the machine unplugged until the B200 is dry. Washer Tightening screw Washer M8 Screw DMX DIP SW. OFF SW. 1 2 3 4 5 6 7 8 ON 9 CH. 1 2 4 8 16 32 64 128 256 WWW.BEGLEC.COM 2/3 B-200 PRO BUBBLE ENGLISH USER MANUAL OPERATION The B-200 bubble machine can be operated with or without the remote control. In addition, this bubble machine has DMX built in and can be controlled using one channel. To connect the wireless or timer remote control, plug the stereo jack into the socket labeled REMOTE CONTROL on the back of the bubble machine. The socket is located to the left of the dip switches. Without the remote control: Turn on the power switch located on the back of the bubble machine. The internal bubble drum will begin to rotate and the internal fan will be activated. Bubbles will now be constantly generated until the power is switched off. Using DMX to control the B-200: Set the desired DMX channel using the dip switches at the back of the machine. (see above illustration) To do this, you need to know that DMX dip switches have the following values: # 1=1; #2=2; #3=4; #4=8; #6=32; #7=64; #8=128; #9= 256. And you need to know that DMX address setting are the sum of the dip switch values. For instance, Address Value 1 4 7 10 DMX Dip switches “ ON” #1 #3 #1& #2, #3 #2, #4 Connect the bubble machine to the DMX chain using the input and output sockets. NOTE: The machine uses only one DMX channel. This channel does not control bubble volume, it only controls on & off functions. With optional BCT-1 timer remote control attached: When the remote is connected, the B-200 can be controlled in two ways. The green button on the remote is a manual override and the dial on the remote control sets the timer function. The B-200 will generate bubbles for as long as the green button is held down. To enable the timer function, turn the dial clockwise. When the yellow light on the remote turns on, the timer is on. The duration of bubbles is set at 10 seconds and is not adjustable. The interval between bubble blasts is adjustable between 3 – 220 seconds. To increase the interval, rotate the dial clockwise. To decrease the interval, rotate the dial counterclockwise. With optional BCR-1 wireless remote control attached: When the button on the wireless key chain transmitter is pressed, the B-200 bubble machine will bubble continuously until the button is pressed again. The transmitter has a range of up to 50 meters from the receiver. Save and read these instructions ♦ Bitte lesen Sie und sichern Sie diese Anweisungen ♦ Lisez et Gardez ces instructions 2004 Antari Lighting and Effects Ltd. WWW.BEGLEC.COM 3/3 B-200 PRO BUBBLE