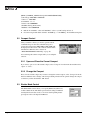
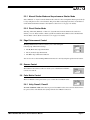
1
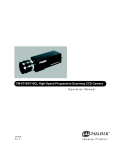
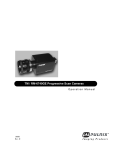
TMC-6700/TMC-1000
Progressive Scan High Resolution Camera
Software Manual
69-0070
Rev. A
Notice
The material contained in this manual consists of information that is proprietary to PULNiX America, Inc., and may only
be used by the purchasers of the product. PULNiX America, Inc. makes no warranty for the use of its product and assumes
no responsibility for any errors which may appear or for damages resulting from the use of the information contained
herein. PULNiX America, Inc. reserves the right to make changes without notice.
Microsoft, Windows 98, Windows 95, Windows NT, and Windows Explorer are either registered trademarks or trademarks of Microsoft Corporation in the United States and/or other countries.
Warranty
All of our solid state cameras have a full three-year warranty. If any such product proves defective during this warranty
period, PULNiX America, Inc. will repair the defective product without charge for parts and labor or will provide a
replacement in exchange for the defective product. This warranty shall not apply to any damage, defect or failure caused
by improper use or inadequate maintenance and use.
Certifications
CE Compliance
The TMC-6700 and TMC-1000 have been certified to conform to the requirements of Council Directive 89/336/EC for
electromagnetic compatibility and to comply with the following European Standards:
Immunity:
EN500082-2/1995
Emissions:
EN55022:1995 Class A / CISPR 22:1993
All PULNiX products bearing the CE mark have been declared to be in conformance with the applicable EEC Council
Directives. However, certain factory installed options or customer requested modifications may compromise electromagnetic compatibility and prohibit use of the CE mark. Please note that the use of interconnect cables that are not properly
grounded and shielded may affect CE compliance. Contact PULNiX Applications Engineering Department for further
information regarding CE compliance.
FCC
This equipment has been tested and found to comply with the limits for a Class A digital device, pursuant to Part 15 of the
FCC Rules. These limits are designed to provide reasonable protection against harmful interference when the equipment
is operated in a commercial environment. This equipment generates, uses and can radiate radio frequency energy and, if
not installed and used in accordance with the instruction manual, may cause harmful interference to radio communications. Operation of this equipment in a residential area is likely to cause harmful interference in which case the user will
be required to correct the interference at his own expense.
WARNING
Changes or modifications to this unit not expressly approved by the party responsible
for FCC compliance could void the user’s authority to operate the equipment.
TMC-6700/TMC-1000 Camera Control Software Manual
Printing: April 2000
PULNiX America, Inc.
1330 Orleans Drive
Sunnyvale, CA 94089
Tel: (408) 747-0300
Tel: (800) 445-5444
Fax: (408) 747-0880
E-mail: [email protected]
www.pulnix.com
TABLE OF CONTENTS
1
INTRODUCTION ................................................................1
2
SOFTWARE CONTROL FEATURES.................................1
3
SOFTWARE INSTALLATION.............................................2
3.1
3.2
3.3
Before Installing the Software................................................... 2
Installing the Software .............................................................. 2
Uninstalling the Software.......................................................... 2
4
SOFTWARE OPERATION .................................................3
5
OPERATING THE CONTROL INTERFACE
SOFTWARE ......................................................................3
5.1
5.2
5.3
5.4
5.5
5.6
5.7
5.8
5.9
5.10
5.11
5.12
5.13
6
Before Running the Software ................................................... 3
Comport Control ....................................................................... 4
Shutter Mode Control ............................................................... 4
Edge Enhancement Control ..................................................... 5
Gamma Control ........................................................................ 5
Color Matrix Control ................................................................. 5
White Balance Control.............................................................. 6
Gain Control ............................................................................. 7
ADC Offset Control................................................................... 7
ADC Reference Top Control ..................................................... 7
Write the Current Setting.......................................................... 8
Read the Setting....................................................................... 8
Advanced Control ..................................................................... 9
TROUBLESHOOTING AND FAQ ....................................10
6.1
6.2
PC and Camera Have no Communication ............................. 10
How to Contact Us ................................................................. 11
i
April 3, 2000
TMC-6700/ TMC-1000
Camera Control Software
Manual
1
INTRODUCTION
The TMC-1000 and TMC-6700 are color video cameras that use a progressive scan interline transfer
CCD and digital processing. These cameras are specially designed to capture images in progressive scan
(non-interlace) format, producing a full frame of electronic shutter images, as well as normal images.
The TMC-1000 and TMC-6700 cameras are excellent in applications such as dynamic motion
capturing, still-picture storage, on-line inspection, gauging, printing, high-definition graphics, and highresolution surveillance.
2
SOFTWARE CONTROL FEATURES
The following camera functions can be controlled by PC via RS-232C communication using PULNiX’s
TMC-6700/TMC-1000 camera control software.
•
Shutter Mode and Speed
•
Edge Enhancement
•
Gamma
•
Color Matrix
•
White Balance
•
Gain
•
ADC Offset
•
ADC Reference Top
•
Hard disk access
•
EEPROM access
•
RGB to YCrYCb Converter
•
Digital Signal Processing (DSP) RGB Offset
•
DSP Gain
Page 1
SOFTWARE INSTALLATION
3
SOFTWARE INSTALLATION
The TMC-6700/TMC-1000 camera can be operated from a PC
by using the PULNiX’s TMC-6700/TMC-1000 camera control
software. Instructions to install, use, and uninstall the software
follow.
3.1 Before Installing the Software
•
The TMC-6700/TMC-1000 camera control software
requires Microsoft Windows 95, 98, or NT 4.0.
•
It is recommended that you use small fonts for the Display
Properties dialog in the control panel.
•
The TMC-6700/TMC-1000 camera control software
requires one free serial communication port that is not in
conflict with other peripherals such as the mouse or modem.
•
Installation of the TMC-6700/TMC-1000 camera control
software requires 3.0 MB of hard disk space.
3.2 Installing the Software
To install the TMC-6700/TMC-1000 camera control software,
follow the steps below.
1.
2.
3.
Insert the installation diskette into the floppy drive of your PC and run “Setup.exe.”
The installer will direct you to install the application code.
Follow the installer instructions.
Note: You can change the installation directory if you want.
3.3 Uninstalling the Software
You can uninstall the TMC-6700/TMC-1000 camera
control software from either the control panel or the
taskbar. To uninstall from either location, follow the
steps below.
3.3.1 From the Control Panel
1.
2.
Page 2
Open “Add/Remove Programs” in the control
panel.
Select “TMC1000” from the lists of the installed
software.
TMC-6700/ TMC-1000 Camera Control Software Manual
SOFTWARE OPERATION
3.
Click the “Add/Remove” button, and then click “Yes” to confirm.
3.3.2 From the Task Bar
4
1.
Go to “Start,” select “Programs,” then select “Pulnix.”
2.
Run “Remove PULNiX TMC1000.”
SOFTWARE OPERATION
Following is a typical way to use this software.
Start the TMC-6700/TMC-1000 camera control software.
2. Select “Comport” and “Open.” If the PC and camera establish communication, the camera name
(TMC-6700 or TMC-1000) will appear on the bottom of the software window.
3. Select “Read” and specified Bank number. The setting of the bank will appear.
4. Modify any parameters you want.
5. Change RAM Bank to the current setting by clicking on “Read” and selecting “Bank1” to “Bank4.”
6. Write the settings to the EEPROM by clicking on “Write” and then selecting “EEPROM.”
7. Save a single bank setting into the hard disk as a file by clicking on “File” and selecting “Save As.”
8. Save all four-bank data into the hard disk as a file by clicking on “Adv” and selecting “List All
RAM Data.”
9. Restore a single bank setting from file by clicking on “File” and selecting “Open.”
10. Restore all four-bank data from file by clicking “Adv” and selecting “Initialize All RAM.”
11. Close the comport.
12. Exit the application.
1.
5
OPERATING THE CONTROL INTERFACE SOFTWARE
5.1 Before Running the Software
Before running the TMC-6700/TMC-1000 Camera Control Software, you need to edit the file
“tmc6700.reg” for the TMC-6700 camera or “tmc1000.reg” for the TMC-1000 camera and run it to set
the comport information and camera type in the registry. The “tmc6700.reg” or “tmc1000.reg” file is
located in the same directory as the “TMC-6700/TMC-1000” camera control software. To edit the
registry file, follow the steps below.
1.
Open Windows Explorer and go to the directory in which the TMC-6700/TMC-1000 camera control software is installed.
2.
Right-click the mouse on the “tmc6700.reg” or “tmc1000.reg” file and select “Edit.” Notepad will
open with the registry file. The contents of this file are as follows.
(Example of “tmc1000.reg”)
REGEDIT4
TMC-6700/ TMC-1000 Camera Control Software Manual
Page 3
OPERATING THE CONTROL INTERFACE SOFTWARE
[HKEY_CURRENT_USER\Software\pulnix\TMC6700\TMC6700]
;Camera Type: TMC1000 or TMC6700
“Camera” = “TMC1000”
;Port Number: 1, 2 or 3
“PortNo”=dword:00000002
; BaudRate Setting (Write in hex)
“BaudRate”=dword:00004b00
3.
4.
Edit the “Port Number” value and “Baud Rate” value as your PC setting and save it.
Close the Notepad and double-click the “tmc6700.reg” or “tmc1000.reg” file in Windows Explorer.
5.2 Comport Control
After you run the software, you need to open the current
communication port. Once the communication port is
opened, the camera name (TMC-1000 or TMC-6700) will
be displayed on the bottom of the software window. If this
information is different, refer to Section 6,
“TROUBLESHOOTING AND FAQ,” on page 10.
You can change the current comport while you are using the
software.
5.2.1 Open and Close the Current Comport
If you want to open or close the current comport, select “Comport” from the menu bar and then select
“Open” or “Close.”
5.2.2 Change the Comport
First, close the current comport. If you want to change the current comport, select “Comport” from the
menu bar and then select “Change.” The Comport Setting window will be opened. Change the comport
to whatever you like and click the “OK” button.
5.3 Shutter Mode Control
The Shutter Mode control allows you to specify Manual, Asynchronous,
or Direct shutter mode. The shutter speed selection settings for Manual
and Asynchronous modes are 0 to 9. For more detail regarding shutter
speed, please refer to the Operations Manual.
Page 4
TMC-6700/ TMC-1000 Camera Control Software Manual
OPERATING THE CONTROL INTERFACE SOFTWARE
5.3.1 Manual Shutter Mode and Asynchronous Shutter Mode
Select “Manual” or “Async” from the shutter mode combo box. You can input the shutter speed value (0
to 9) by using the text box or arrow buttons. The preset shutter value (Exposure time) of each dial 0 - 9
can be defined in the Preset shutter control (Refer to Section 5.13.4 on page 9 for details).
5.3.2 Direct Shutter Mode
Selecting “Direct M” (Manual) or “Direct A” (Asynchronous) from the shutter mode combo box
enables you to use direct manual or direct asynchronous shutter. Direct shutter value is defined in the
“Preset shutter control” (Refer to Section 5.13.4 on page 9 for details).
5.4 Edge Enhancement Control
The Edge Enhancement combo box allows you to select among the
following edge enhancement settings.
•
The H (Horizontal) edge enhancement
•
The V (Vertical) edge enhancement
•
The H&V edge enhancement function.
You can also choose between Edge Enhancement Levels 1 and 2 by using the up/down arrow buttons.
5.5 Gamma Control
The Gamma Control Select combo box allows you to switch between Gamma
correction on and off.
5.6 Color Matrix Control
The Color Matrix Control panel allows you to control the Color Matrix value.
5.6.1 Unity, Preset1, Preset2
The TMC-6700/TMC-1000 camera has two preset Color Matrix values. You can select between these
two preset values or the default value (Unity) from the Color Matrix combo box.
TMC-6700/ TMC-1000 Camera Control Software Manual
Page 5
OPERATING THE CONTROL INTERFACE SOFTWARE
5.6.2 User Setting
The Color Matrix Setting window appears when you select “User” from the combo box.
This window allows you to change the Color Matrix values to any number between –3.96875 and
3.96875 by clicking the up/down arrow buttons or editing each text box directly. The up/down arrow
buttons set values in increments of 0.03125. Users must first start by changing the values of RR, GG,
and BB. Then, chnage the value of RG. The software will automatically change the value of RB to meet
the condition of RR+RG+RB=1. The same applies to all three rows. This condition keeps white as white
after color matrix conversion.
By selecting “Load” from the menu bar, you can load the Color Matrix values of “Unity,” “Preset1” or
“Preset2.”
5.7 White Balance Control
The WB (White Balance) combo box allows you to select either Internal White Balance mode or
External White Balance mode. WB status indicates which WB mode you have selected.
5.7.1 Internal White Balance Control
Selecting Internal White Balance mode enables auto white
balance adjustment of the camera controlled internally by the
accumulator built-in DSP. To select an Internal White Balance
mode, select “Int” from the WB combo box.
Clicking the Hold button when “Internal” is selected on the White Balance combo box holds the current
white balance setting. Clicking it again releases the white balance setting and returns to auto-tracking
internal white balance.
Page 6
TMC-6700/ TMC-1000 Camera Control Software Manual
OPERATING THE CONTROL INTERFACE SOFTWARE
5.7.2 External White Balance Control
Selecting External White Balance mode enables you to set
your own white balance parameters. To select an External
White Balance mode, select “Ext” from the WB combo
box.
You can input specific R Gain and B Gain values between
–128 and 127 by using the slider control, text box, or
arrow buttons. The large arrow buttons set values in
increments of 10, while the small arrow buttons set values
in increments of 1.
5.8 Gain Control
You can change the Gain value by using the Gain control panel.
To change this value, type the desired number directly in the text
box, move the Gain slider control, or click the up/down arrow
buttons. The large up/down arrow buttons vary the value in
increments of 10, while the small up/down arrow buttons vary the
value in increments of 1. The Gain control value allows you to
select any integer between 80 and 100.
5.9 ADC Offset Control
The ADC Offset control panel allows you to change the ADC
(Analog to Digital Converter) Offset value. To change this
value, edit the value directly in the text box, slide the Gain
slider control, or click the large and small up/down arrow
buttons. The large up/down arrow buttons vary the value in
increments of 10, while the small up/down arrow buttons vary
the value in increments of 1. The ADC Offset control value can
be any integer between 200 and 250.
5.10 ADC Reference Top Control
You can change the ADC Reference Top value by using the
ADC Reference top control panel. To change this value, edit
the value in the text box, either by moving the Gain slider
control, or by clicking the large and small up/down arrow
buttons. The large up/down arrow buttons vary the value in
increments of 10, while the small up/down arrow buttons vary
the value in increments of 1. You can select any ADC
Reference Top integer value from 0 to 255.
TMC-6700/ TMC-1000 Camera Control Software Manual
Page 7
OPERATING THE CONTROL INTERFACE SOFTWARE
5.11 Write the Current Setting
The current setting can be saved as a file on the hard disk, or on the camera’s EEPROM.
5.11.1 Write the Current Setting into the Hard Disk as a File
Click on “File” and select “Save” from the menu bar. The
Save dialog window will appear. Type the file name you
want and save it. This allows you to save the current bank
setting as a file.
Note:
If you select bank1 and save it as a file, only the
setting of the currently selected bank (in this case,
bank1) is saved. Other bank data will not be saved.
5.11.2 Write the Current Setting into the EEPROM
The current setting can also be saved by writing the setting
to the EEPROM. Click on “Write,” and select “EEPROM”
from the menu bar. Note that all bank data (from bank 1 to
4) is saved into EEPROM.
5.12 Read the Setting
A single bank setting can be restored from PC hard disk as a file. The setting can be read from one of
four banks of the camera’s internal RAM.
5.12.1 Read the Current Setting from the Hard Disk
The TMC-6700/TMC-1000 camera control software
allows you to restore a single bank setting from the file.
To load the setting, click on “File” and select “Open”
from the menu bar.
5.12.2 Read the Current Setting from
Memory Bank
You can read the setting from one of four banks of camera RAM memory space. Click on “Read” and
select “Bank Number (1 to 4)” from the menu bar.
Page 8
TMC-6700/ TMC-1000 Camera Control Software Manual
OPERATING THE CONTROL INTERFACE SOFTWARE
5.13 Advanced Control
5.13.1 RGB to YCrCb Converter
The TMC-6700/TMC-1000 camera has a built-in
YCrCb 4:4:4 and 4:2:2 converter. You can select
the color mode from RGB (24-bit), YCrCb 4:4:4
(24-bit) or YCrCb 4:2:2 (24-bit). To select the
color mode, go to “Adv” and select “RGB to
YCrCb Converter.”
5.13.2 DSP RGB Offset Control
Selecting the DSP RGB Offset Control enables you
to input specific R offset, G offset, and B offset
values. To set these values, go to “Adv.” and select
the “DSP RGB offset” option from the menu bar.
You can input specific R Offset, G Offset and B
Offset values that range from –128 to 127 by using
the text box, slider control, or up/down arrow
buttons. The large up/down arrow buttons set
values in increments of 10, while the small up/
down arrow buttons set values in increments of 1.
5.13.3 DSP Gain Control
Selecting the DSP Gain Control enables you to
set your own DSP Gain value. To set the DSP
Gain, go to “Adv” and select the “DSP Gain”
option from the menu bar. The DSP Gain setting
window will appear.
You can enter a specific DSP Gain value between
–128 to 127 by typing values in the text box, or by moving the slider control or up/down arrow buttons.
The large up/down arrow buttons set values in increments of 10, while the small up/down arrow buttons
set values in increments of 1.
5.13.4 Preset Shutter
Selecting the Preset Shutter Control enables you to define your own shutter speed value (Exposure
time). To choose the Preset shutter value, go to “Adv” and select the “Preset Shutter” option from the
menu bar. The Preset Shutter Setting window will appear.
TMC-6700/ TMC-1000 Camera Control Software Manual
Page 9
TROUBLESHOOTING AND FAQ
In the “Manual” and “Async” group,
each category corresponds to a
shutter speed dial. To set your own
shutter speed value, enter them in the
text box directly. You may enter any
integer value from 0 to 1048.
You can also set the Direct Manual
shutter or the Direct Asynchronous
shutter value to any integer between
0 and 1048. These values are used
when you select “Direct M” or
“Direct A” from the shutter mode
combo box. See “Shutter Mode
Control” on page 4 for details on
selecting the shutter mode.
Note that the preset shutter value is
not necessarily equal to the number
(exposure time (H)) in Shutter Mode
Control Panel. TMC-6700/TMC1000 has its own conversion formula for exposure time calculation. Please contact PULNiX for details.
5.13.5 Initialize All RAM
Selecting “Initialize all RAM” enables you to restore all four RAM bank data from a file. Go to “Adv”
and select the “Initialize All RAM” option from the menu bar.
5.13.6 List all RAM Data
Selecting “List all RAM Data” enables you to save all four banks of parameter settings to a file. You
may use this file to inspect current RAM data or use it to to restore these settings into camera later on by
selecting “Initialize All RAM.”
6
TROUBLESHOOTING AND FAQ
Following are some troubleshooting suggestions for some common problems. If these suggestions do
not solve your problem, please see Section 6.2, “How to Contact Us,” on page 11.
6.1 PC and Camera Have no Communication
If the current communication port cannot be opened, check the following:
•
Page 10
Make sure the RS-232 cable is properly connected.
TMC-6700/ TMC-1000 Camera Control Software Manual
TROUBLESHOOTING AND FAQ
•
Check if you have correctly customized the “tmc6700.reg” or “tmc1000.reg” file for the Windows
registry and register REG file. To register the REG file, double-click REG file from Windows
Explorer. When Windows correctly registered the file, it will show message box, which says “Information in ******.reg has been successfully entered into the registry.”
•
Check whether your serial communication port conflicts with other devices.
6.2 How to Contact Us
For further information and support:
Phone:
(408) 747-0300
(800) 445-5444
(800) 3-PULNIX (24-hour message access)
Fax:
(408) 747-0660
E-mail:
[email protected]
Mail:
PULNiX America Inc.
Sales Department
1330 Orleans Drive
Sunnyvale, CA 94089
ATTN: Video Applications
Web Site:
www.pulnix.com
TMC-6700/ TMC-1000 Camera Control Software Manual
Page 11
,
Industrial Products Division
PULNiX America, Inc.
1330 Orleans Drive
Sunnyvale, CA 94089
Tel: 408-747-0300
Tel: 800-445-5444
Fax: 408-747-0660
Email: [email protected]
www.pulnix.com
69-0070 Rev. A
Printed 3/00