1
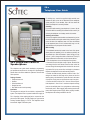
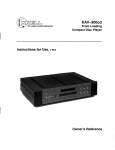
Local: 863-614-1900
Toll Free: 866-770-4930
Fax: 888-782-3072
E-mail: [email protected] or Skype Us
TelephonemanOfAmerica.com or shop.telephonemanofamerica.com
TELEPHONE MAN OF AMERICA
Earning Your Business Every Step of the Way!
Specializing in Telecom Equipment of all Brands, Carrier Services, Technician
Services, Maintenance Agreements and Purchasing Excess Telecom Equipment!
I will always do my best to match or beat any competitors bid!
5S-c
Telephone User Guide
5S-c Single-Line Caller ID
Speakerphone
This telephone user guide details installation, programming,
and operational instructions for the Aegis-5S-c speakerphone.
Please refer to the Scitec website for updates to this and other
Scitec products.
Package Contents
• Telephone base unit
• Handset
• Coiled handset cord
• Straight line cord
• Note: Wall mount kit sold separately
Installation
This telephone is designed for use behind a registered PBX
system. The telephone user or system installer must supply an
RJ-11 6-position 2-wire modular wall jack to connect this telephone to the PBX system. The PBX “station port” type must be
“Industry Standard Analog” or “POTS.” This telephone cannot
be used with “digital” PBX station ports.
For desktop use, connect the supplied straight modular cord
between the jack on the rear of telephone and the telephone
system wall jack. Lift the handset, and a dial tone should be
heard if the telephone is correctly installed.
Assembly
If you will be wall-mounting your telephone, it is best to do the
conversion before connecting the handset and line cords. If you
will using the telephone on a desktop, attach the handset.
Attaching the handset
Connect the supplied coiled handset cord between the jack on
the end of handset and the jack marked with a “handset” symbol
on the left side of the telephone base unit. Place the handset
on the telephone base unit or if wall-mounted, hang it on the
desk/wall-mount clip to depress the hook switch.
Wall-mounting
• The wall/desk handset clip located on the front of the phone
directly above the speaker grill. In its wall-mount position, the
clip extends up to hold the handset in place. Gently pull it up
and turn ½ turn to change from desk to wall mount. This clip is
spring-loaded and not removable, so that it cannot be lost:
1. Turn the telephone over so the telephone face is down.
2. Connect line cord to the jack on rear of phone. Route the line
cord through the line cord channel. Pass the other end of the
line cord through the rectangular hole in the back of the mounting bracket Coil up any excess line cord length for placement
between the telephone and the wall-mounting bracket.
3. Position the wall-mounting bracket so that the Scitec “Sun”
designs are toward the front edge of the phone and the four
retaining tabs on the bracket line up with the slots in the bottom
of the phone. Firmly press on the bracket to snap it into place.
4. Connect the free end of the RJ-11 line cord to the wall jack.
Hold telephone in front of the 2 mushroom shaped mounting
posts on the wall jack plate. Line up keyholes on wall-mounting
bracket with posts. After engaging wall-mounting bracket with
posts, slide telephone down slightly. When properly installed,
the telephone will be firmly attached to the wall.
5S-c
Telephone User Guide
5S-c Key, Switch, and Connector Descriptions
0-9, *, # - Standard 3 x 4 telephone keypad for dialing
M1 ~M5 - One-touch memory dialing keys. Note that these
keys are named M1 through M5 for reference but are not
labeled on the telephone. These are the five blank keys in a
row above the numeric dialing keys on the keypad.
SciTouch™ - Red touchbar key on front edge of phone.
Functions as an additional speed dial memory key and is
usually programmed by the user to access voice-mail
functions on a PBX. Also, the message-waiting and visual
ringing indicator lamps are located beneath the SciTouch™
key for easy visibility.
VOL - Adjusts the handset volume (3 levels)
LCD - Displays the previous Caller ID entry. Also used when
setting user options
DEL - Deletes Caller ID entries
DIAL - Dials the selected Caller ID entry
SET - Selects and sets user options
STORE - Stores numbers into speed dial memory keys M1 ~M5
FLASH - Generates a hook flash at the programmed flash
time (600ms , 300ms or 100ms)
REDIAL - Redials the last-dialed telephone number
PAUSE - Used to enter a pause during speed dial key
programming
SPKR - Sets the hands-free speakerphone function on or off.
The LED above this key lights when the speakerphone is on.
RINGER - Slide switch on rear of telephone to set ringer
volume high, low or off.
VOLUME - Slide control for adjusting the speakerphone
receive volume. This control is located on the right side of the
telephone.
HOLD - Functions as “local hold” key or a programmable
“system hold” key, depending on the user option setup. As a
local hold key, holds the telephone line off hook, even with the
handset placed in the cradle. As a “system hold’ key, pressing
this key functions as a programmable speed dial key.
This key may be used to access any PBX system function
accessed by a DTMF sequence, “system hold” being one
option. The actual “hold” function is provided by the PBX
system itself, not by the telephone. Availability and usage of
the feature may vary from system to system. Please consult
your PBX system vendor or installer for more information on
the usage of this feature.
MUTE - Turns off transmitted audio from both the speaker
phone and the handset microphones for privacy. An LED
indicator lights when the mute function is turned on. When the
MUTE LED is illuminated, you will be able to hear the party at
the other end of your call, but they will not be able to hear you.
SciTouch™ - The red touchbar key at the front of the tele
phone serves as a speed dial key for dialing a voice mail system
to retrieve and listen to voice mail messages. The visual ringing
indicator and message-waiting light are also located beneath
the clear red SiTouch button. Visual ringing indicator: Will flicker
rapidly in cadence with the audible ringer whenever the telephone rings. Even if the audible ringer is switched off, this visual
ringing indicator will still light up whenever telephone receives
a “ringing” signal. Message Waiting indicator: [SciTouch] will
either light up steadily or blink slowly whenever a voice-mail
message is waiting for the telephone user. This is controlled by
the user’s PBX and voice mail system. [SciTouch] is compatible
with both “NEON” and “Centrex/CLASS/VMWI” message waiting
formats.
To use this feature, the PBX must support one of the
following types of message-waiting light signaling
• NEON/90V
• AT&T/Lucent /Avaya/Low Voltage LED
• Centrex/CLASS/VMWI/FSK
Use of this message waiting indicator requires proper programming of the user’s PBX and voice mail system. Please consult
your PBX vendor or installer for more information. The message-waiting indicator only operates while the telephone is “onhook.” Retrieving voice mail messages: [SciTouch] key may be
programmed to dial the telephone number of the connected
voice mail system. Once [SciTouch] key has been programmed,
the following key presses will play back stored voice mail messages:
• Lift the handset or press SPKR to take telephone off-hook.
• Press [SciTouch] touchbar. Pressing any part of touchbar
will dial out the correct number to access the voice
mail system. Note: telephone must be off-hook on either
the handset or speakerphone first, before pressing [SciTouch].
• When the voice mail system answers and prompts for a
passcode, enter personal passcode using the standard
dialing keys.
• When finished listening to voice mail, replace handset in
the cradle or press SPKR to hang up.
5S-c
Telephone User Guide
Operating instructions
Telephone Options Setup
The user options should be set on the 5S-c telephone prior to
placing it into service. The following options are user-programmable on the 5S-c:
• LCD contrast level (1-8)
• Real-time clock time and date (hour, minute, month, day)
• User name (up to 15 characters)
• Local telephone number (up to 14 digits)
• Local area code (3 digits)
• PBX prefix (1 digit)
• Caller ID on call waiting (on or off)
• Voice Message Service Selection(on or off)
• Hold mode (local or PBX)
• Flash time (600ms, 300ms, or 100ms)
• Pause time (2.2 or 3.6 seconds)
To set user options
• Verify that the phone is connected to a functioning telephone
line. Remove the faceplate overlay to expose the hidden programming keys SET, STORE, and PAUSE.
• Verify that the phone is “on-hook” and that it is in standby
mode. In standby mode, the time, date, new call count, and user
name (“SCITEC INC.” by default) will be displayed on the LCD.
User options are set as follows
1) Press SET to enter user options setup mode and to select the
CONTRAST menu. (Note: Once in user options setup mode,
you must press a key at least once every 10 seconds or the
telephone will automatically revert back to standby mode. If this
happens, simply press SET and repeat the user options setup
sequence.)
2) Press Toggle to select the desired LCD contrast (1-8)
3) Press SET to confirm and to select the SET TIME/DATE
menu
4) Press Toggle to set the hour (1-12)
5) Press SET to confirm and to select minute
6) Press Toggle to set minute (0-59)
7) Press SET to confirm and to select month
8) Press Toggle to set month (0-12)
9) Press SET to confirm and to select Day
10) Press Toggle to set day (1-31)
11) Press SET to confirm and to select SET NAME menu.
12) Press Toggle to position the cursor for each character to be set.
13) Press the following keys alternatively to select characters
in the name to be set:
• 1 to select “?”, “?”, “:”, or “1”
• 2 ABC to select “A”, “B”, “C”, or “2”
• 3 DEF to select “D”, “E”, “F”, or “3”
·• 4 GHI to select “G”, “H”, “I”, or “4”
• 5 JKL to select “J”, “K”, “L”, or “5”
• 6 MNO to select “M”, “N”, “O”, or “6”
• 7 PQRS to select “P”, “Q”, “R”, “S” or “7”
• 8 TUV to select “T”, “U”, “V”, or “8”
• 9 WXYZ to select “W”, “X”, “Y”, “Z” or “9”
·• 0 to select space “ “, period “.”, slash “/”, or “0”
• * to select “(“, “)”, semicolon “;”, or plus “+”
• # to select “<”, “=”, “>”, or “?”
14) For example, to enter “ABEL” as the name:
• Press Toggle, 2 ABC to enter an “A”
• Press Toggle, 2 ABC to enter a “B”
• Press Toggle, 3 DEF, 3 DEF to enter an “E”
• Press Toggle, 5 JKL, 5 JKL, 5 JKL to enter an “L”
15) Unused positions may be erased by pressing * then 0
16) Press SET to confirm and select SET LOCAL NUM. menu
17) Press Toggle to position the cursor to the display digit to be set.
18) Use the digit keys 0 to 9 WXYZ to select each digit of the
telephone number. Use the # key to enter a dash “-”
19) Press to confirm and select the LOCAL AREA CODE menu
20) Press Toggle repeatedly to set the first area code digit (0-9)
21) Press SET to confirm and to select the second area code digit
22) Press Toggle repeatedly to set the second area code digit (0-9)
23) Press SET to confirm and to select the third area code digit
24) Press Toggle repeatedly to set the third area code digit (0-9)
25) Press SET to confirm and to select the SET PBX PREFIX
menu
26)Press Togglerepeatedly to set the PBX prefix digit (0-9 or none)
27) Press SET to confirm and to select the CALL WAITING menu
28) Press Toggle repeatedly to set the Caller ID on call waiting
feature ON or OFF. The default mode is ON.
29) Press SET to confirm and to select the CLEAR MESSAGE menu
30) Press Toggle repeatedly to set the voice message service
feature ON or OFF. The default is OFF
31) Press SET to confirm and to select the SET HOLD MODE
menu
5S-c
Telephone User Guide
32) Press Toggle to select LOCAL or PBX hold mode of hold.
The default mode is PBX.
33) Press SET to confirm and to select the SET PAUSE TIME
menu. The default flash time is 600ms
34) Press Toggle to select a flash time of 600ms, 300ms,
100ms
35) Press SET to confirm and select the SET PAUSE TIME
menu
36) Press Toggle to select a pause time of 2.2s or 3.6s. Default
pause time is 2.2s
37) Press SET to confirm and exit user options setup.
Placing a call
1) Lift the handset or press SPKR and listen for a dial tone.
2) Dial the desired telephone number using the keypad. Dialed
digits are displayed on the LCD as the number is dialed. After
15 seconds the dialed digits will be replaced by the call length
timer.
3) To end a call, place the handset on the telephone base unit,
or if using the hands-free speakerphone, press the SPKR key.
The call time length will remain on the display for 5 seconds,
and then the display will revert to the standby display mode.
Placing a call on hold (local hold mode)
a. Using handset: Press HOLD, then place the handset in its
cradle.
b. Using speakerphone: Press HOLD.
Retrieving a held call
a. Using handset: Lift the handset from its cradle.
b. Using speakerphone: Press SPKR.
Last number redial
1) Lift the handset or press SPKR and listen for a dial tone.
2) Press REDIAL. The last number dialed will be displayed and
dialed automatically.
Handset Volume Adjustment
Press VOL repeatedly to adjust the handset volume to the
desired level. One of three levels (low, medium, and high) may
be selected.
Speakerphone Volume Adjustment
To adjust the speakerphone volume, slide the control on the
right side of telephone.
Speed Dial Memory Key Programming and Dialing
Programming the One-Touch Speed Dial Keys (M1~M5)
1) Verify that the phone is on-hook, as speed-dial key
programming may only be performed with the telephone
on-hook.
2) Remove the faceplate overlay to gain access to the
programming keys.
3) Press STORE. “STORE NUMBER” will appear on the
display.
4) Dial the telephone number to be stored, up to 22 digits.
These digits may be 0- 9 WXYZ, * , # , FLASH and PAUSE,
each of which is counted as one digit.
5) Press the desired one-touch speed dial key (M1 ~ M5) to
store the dialed number in memory.
6) To change a stored number, repeat the instructions above
and the new telephone number will replace the previously
stored number.
Making calls with the One-Touch Speed Dial Keys (M1~ M5)
1 )Pick up the handset or press SPKR and listen for dial tone.
2) Press the desired one-touch speed dial key M1~M5; the
stored number will be dialed automatically.
Viewing Caller ID entries
The 5S-c telephone stores Caller ID data for the last 60 calls
received, including “UNAVAILABLE” and “BLOCKED” calls.
1) Press Toggle to view calls starting with the newest call.
2) Press Toggle to view calls starting with the oldest call.
3) Repeatedly press the Toggle button to scroll through the call
list as desired.
Deleting entries from the Caller ID list
Deleting a single Caller ID entry
1) Press Toggle as needed to select the Caller ID entry to be deleted.
2) Press DEL. “DELETE CALL ? “ will be displayed on the LCD.
3) To cancel without deleting the selected entry, press ? or ?
4)To continue deleting the selected caller ID entry, press DEL.
Deleting all Caller ID entries
1) Press theToggle to display any caller ID entry.
2) Press and hold DEL for at least 3 seconds, until the LCD
displays “ERASE ALL CALL?”
3) To cancel without deleting any calls, press Toggle.
4)To continue deleting all entries, press DEL. All entries will be
deleted and “NO CALLS” will be displayed on the LCD.
5S-c
Telephone User Guide
On-hook
1) Press Toggle to select the caller ID entry to be dialed.
2) Press DIAL. The LCD will display “PICK UP OR ADJ “ for
10 digit numbers, or “PICK UP PHONE “ for 7 digit or 11 digit
numbers.
3) To adjust the phone number, press DIAL. For instance, a
7-digit local number sometimes cannot be dialed because it
requires a 10-digit or 11-digit format. Press DIAL repeatedly
to scroll through the 7, 10, and 11-digit numbers.
4) To dial the displayed number, pick up the handset or press
SPKR. The LCD will display “DIALING ... “ and the number
will be dialed automatically.
Off-hook
With Local Area Code programmed
1) Select the telephone number variation to be dialed using the
Toggle keys.
2) If the displayed number is 10 digits, press the DIAL and the
LCD will display “DIALING ...”. The selected 10 digit number
will be prefixed with a “1” and dialed automatically.
3) If a prefixed “1” is not desired, press and hold the DIAL key
for 2 seconds. The LCD will display “DIALING...” and the 10
digit number will be dialed automatically.
4) If the displayed number is 7 digits, no adjustment can be
made.
With Local Area Code not programmed (default setting “- - -”)
1) Press Toggle to select the number to be dialed.
2 ) If the displayed number is 10 digits, press DIAL . The LCD
will display “DIALING...” and the 10-digit number will be
dialed automatically.
3) To prefix the 10 digit number with a “1”, press and hold the
DIAL key for 2 seconds. The LCD will display “DIALING ...”
and a “1” followed by the 10 digit number will be dialed
automatically.
4) If the displayed number is 7 digits, no adjustment can
be made.
*Note: If necessary, you may reset the user programmable
menu options to the original factory set by disconnecting the
telephone line, pressing and holding the Toggle and DIAL keys
simultaneously, connecting the telephone line, then releasing
both keys after 2 seconds. All user options will be set to defaults
and all the contents of Caller ID messages and speed-dial
memory keys will be cleared.
5S-c
Telephone User Guide
Required FCC Notice
This equipment complies with Part 68 of the FCC rules and
the requirements adopted by the ACTA. On the bottom of
this equipment is a label that contains, among other information, a product identifier in the format US:AAAEQ##TXXXX. If
requested, this number must be provided to the telephone company. The REN is used to determine the number of devices that
may be connected to a telephone line. Excessive RENs on a
telephone line may result in the devices not ringing in response
to an incoming call. In most but not all areas, the sum of RENs
should not exceed five (5.0). To be certain of the number of
devices that may be connected to a line, as determined by
the total RENs, contact the local telephone company. The REN
for this telephone is part of the product identifier that has the
format US:AAAEQ##TXXXX. The digits represented by ## are
the REN without a decimal point (e.g., 03 is a REN of 0.3).
If this equipment causes harm to the telephone network, the
telephone company will notify you in advance that temporary
discontinuance of service may be required. If advance notice
isn’t practical, the Telephone Company will notify you as soon
as possible. Also, you will be advised of your right to file a complaint with the FCC if you believe it is necessary. The Telephone
Company may make changes in its facilities, equipment, operations, or procedures that could affect the operation of this telephone. If this happens, the Telephone Company will provide
advance notice in order for you to make the necessary modifications in order to maintain uninterrupted service. If you experience trouble with this telephone, please contact Scitec, Inc. at
(217) 384-6041 for repair or warranty information. If the trouble
is causing harm to the telephone network, the Telephone Company may request that you
5025 Galley Road
Colorado Springs, CO 81915 USA
+1.719.638.8821 tel
+1.719.638.8815 fax
[email protected]
www.scitecinc.com
Required FCC Notice
remove this equipment from the network until the problem is
resolved. The customer can do the following repairs: replacement of cords or handset; replacement of window for telephone
number. Connection to party line service is subject to state tariffs. Contact the state public utility commission, public service
commission or corporation commission for information. This
telephone cannot be used on Telephone Company provided
coin service. If your home has specially wired alarm equipment
connected to the telephone line, ensure the installation of the
telephone does not disable your alarm equipment. If you have
questions about what will disable alarm equipment, consult your
telephone company or a qualified installer. This equipment is
hearing aid compatible. If the telephone is used with a leased
system, permission of the owner of the equipment must be
obtained for connection of the telephone because modification
of the host system is often required.
Jacks
A plug and jack used to connect this equipment to the premises
wiring and telephone network must comply with the applicable
FCC Part 68 rules and requirements adopted by the ACTA. A
compliant telephone cord and modular plug is provided with this
product. It is designed to be connected to a compatible modular
jack that is also compliant.
© 2009 Scitec, Inc.
Scitec is a registered trademark of Scitec Inc.
Specifications subject to change without notice.
Refer to www.scitecinc.com for latest data.
Scitec, Inc. is a minority-owned business.