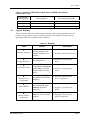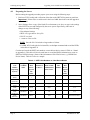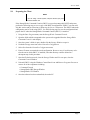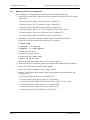
1
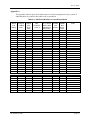
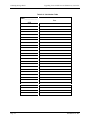
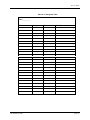
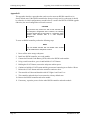
Service Guide
Upgrading From an HSZ70 to an HSG80 Array Controller
This guide provides a procedure for upgrading an HSZ70 Array Controller to an HSG80 ACS Version 8.3 Array
Controller. It contains a roadmap, twelve sections with step-by-step instructions, and an appendix with tables for
creating an HSZ70 to HSG80 unit map. Refer to the HSG80 Array Controller ACS Version 8.3 Configuration and
CLI Reference Guide for information on configuring the HSG80 Array Controller.
Impact of Architectural Differences between the HSZ70 and HSG80
The HSZ70 to an HSG80 Array Controller upgrade described in this document is a well-defined
process. There will be an impact on your operations and applications due to the architectural
differences between the HSZ70 and HSG80 Array Controllers. In this section, you will find the
key areas that you will need to be aware of to make the entire process successful.
The most significant difference lies in the architecture of the interconnect between the Array
Controller and the Host Bus Adapter. The HSZ70 provides a connection to an UltraSCSI Wide
host bus, on which it presents up to 8 individual target IDs (TID) with up to 8 Logical Unit
Numbers (LUNs) per target. The HSG80 establishes its connection via a Fibre Channel
Arbitrated Loop (FC-AL) to a Fibre Channel Host Bus Adapter installed in a server. The server
hen maps the Arbitrated Loop Physical Addresses (AL_PAs) to SCSI target IDs to be used by the
server’s operating system.
The difference in these methodologies is most readily apparent in the assignment of Unit
Numbers on the HSZ70 and HSG80. Unit Numbers on the HSZ70 follow the DTZL format,
where the ‘T’ is the SCSI target ID, the ‘Z’ is always zero and the ‘L’ is the Logical Unit
Number. Together, the ‘T’ and ‘L’ components of the Unit Number provide the SCSI target ID
and LUN, which will be visible to the server’s operating system.
The Unit Numbers on the HSG80 range from D0-D99 for Fibre Port 1 and D100-D199 for Fibre
Port 2. When combined with the Arbitrated Loop Physical Addresses (AL_PAs) assigned to
Fibre Port 1 and Fibre Port 2, the Unit Numbers will be mapped to SCSI target IDs and LUNs,
by the server. For example, if Fibre Port 1 is assigned an AL_PA of hexadecimal 72, then Unit
D0 will be mapped to SCSI target ID 64 and LUN 0; Unit D1 will be SCSI target ID 64 and
LUN 1, etc.
Based on this difference in mapping Fibre Channel Unit Numbers to the server SCSI target IDs
and LUNs, there will be new device assignments after the upgrade. Please make sure to
accurately record these changes. Then use this record to update partition information for
filesystem mounts and any applications, such as databases or logical volume managers that make
use of these new device names.
Copyright © 1999, COMPAQ Computer Corporation
All Rights Reserved
EK-HSG80-UP. B01
Page 1
COMPAQ StorageWorks
Upgrading From an HSZ70 to an HSG80 Array Controller
If after reading this guide, you determine that you want assistance with upgrading your RAID
system, please contact a Compaq Services representative.
NOTE
The HSZ70 Array Controller uses a trilink connector with SCSI
host bus cables. The HSG80 Array Controller uses fibre optic
host cables. The following procedures assume that the user
has the appropriate fibre channel cables and hubs to connect
to the host subsystem.
CAUTION
The HSG80 controller(s) that will be used in this procedure
must be factory default. If the controller(s) have been used or
the packages have already been opened, they must be
restored to the factory default state before starting the
upgrade process. The procedure described in Appendix B can
be used to restore the factory default configuration; however,
that procedure could also erase customer and configuration
data; therefore, it should NOT be used on a RAID subsystem
containing data.
1.0
Upgrade Restrictions
Before starting the upgrade procedure review this entire document and the following criterion to
determine if this upgrade will meet your requirements.
•
Upgrades Supported:
⇒
HSZ70 Version 7.1 to HSG80 Version 8.3 on:
⇒
⇒
⇒
⇒
⇒
⇒
⇒
•
Windows NT
HP-UX
SGI IRIX
SUN Solaris
Digital Unix/Tru64 Unix
IBM AIX
StorageWorks Command Console Version 2.0 to Version 2.1.
Table 1-1 compares the maximum number of HSZ70 SCSI Logical Units versus the maximum
number of HSG80 Fibre Channel units supported by the various operating systems. If your
server operating system supports fewer Fibre Channel Logical Units than SCSI Logical Units,
the system administrator will need to consolidate some Logical Units.
Table 1–1 Number of HSZ70 SCSI Logical Units vs. HSG80 Fibre Channel Logical Units
Connection Type
Operating System
Page 2
SCSI Logical Units
Fibre Channel Logical Units
SUN Solaris
8 TIDs X 8 LUNs = 64 LUNs
2 ALPAs X 64 LUNs = 128 LUNs
HP UNIX
8 TIDs X 8 LUNs = 64 LUNs
2 ALPAs X 8 LUNs =16 LUNs
SGI IRIX
8 TIDs X 8 LUNs = 64 LUNs
2 ALPAs X 64 LUNs = 128 LUNs
EK-HSG80-UP. B01
Service Guide
Table 1–1 Number of HSZ70 SCSI Logical Units vs. HSG80 Fibre Channel
Logical Units – Cont.
Connection Type
Operating System
2.0
SCSI Logical Units
Fibre Channel Logical Units
WNT - Intel
8 TIDs X 8 LUNs = 64 LUNs
2 ALPAs X 8 LUNs =16 LUNs
Tru64 Unix
8 TIDs X 8 LUNs = 64 LUNs
2 ALPAs X 8 LUNs = 16 LUNs
IBM AIX
8 TIDs X 8 LUNs = 64 LUNs
2 ALPAs X 16 LUNs = 32 LUNs
Upgrade Roadmap
Table 2-1 below outlines the specific tasks and actions involved in the upgrade process. Its
purpose is to give you an overview and process flow for following the necessary steps in
upgrading an HSZ70 to an HSG80 Array Controller.
Table 2–1 Roadmap
Task
1
Action
Reference
Hardware Inventory
Determine if all of the
necessary hardware and
software components are
available.
⇒ Section 3.0, Hardware Inventory
2
Backup the user data and
host configuration.
⇒ Section 4.0, Preparing the
Server
Save the HSZ70
configuration and uninstall
StorageWorks Command
Console (SWCC) if using
SWCC.
⇒ Section 5.0, Preparing the
Client
Uninstall the SWCC Agent,
and remove the SCSI Host
Adapter(s).
⇒ Section 6.0, Removing the
Server Components
Record the storageset and
unit configuration, then
shutdown the HSZ70
controller(s).
⇒ Section 7.0, Preparing the
HSZ70
Disconnect all cables and
remove all of the necessary
hardware.
⇒ Section 8.0, Removing the
HSZ70 Components
Prepare the Server
3
Prepare the Client
4
Remove Server
Components
5
Prepare HSZ70
6
Remove HSZ70
Components
EK-HSG80-UP. B01
Page 3
COMPAQ StorageWorks
Upgrading From an HSZ70 to an HSG80 Array Controller
Table 2–1 Roadmap Continued
Task
7
Install HSG80
Components
8
Install Second
HSG80 Controller
Reference
Install the HSG80 controller
and cache modules; setup
the initial controller
configurations.
⇒ Section 9.0, Installing the HSG80
Components
Install the second HSG80
controller if the HSZ70
configuration included two
controllers.
⇒ Section 10.0, Installing the Second
HSG80 Controller
Create the host visible
logical units from the
existing HSZ70 storagesets.
⇒ Section 11.0, Creating the HSG80
Logical Units
Install the device driver for
the Fibre Channel adapter,
also install the Version 8.3
SWCC Agent.
⇒ Section 12.0, Upgrading the Server
⇒ Section 13.0, Upgrading the Client
Upgrade the Client
Install the SWCC Client
Version 8.3 and restore the
storageset configuration.
12
Complete the final steps of
the upgrade procedure.
⇒ Section, 14.0, Completing the
Upgrade
9
Create the HSG80
Logical Units
10
Upgrade the Server
11
Complete the
Upgrade
Page 4
Action
EK-HSG80-UP. B01
Service Guide
3.0
Hardware Inventory
Before starting the upgrade procedure ensure that all of the following material is available.
1. HSG80 Hardware – One or two of each of the following depending on the configuration of
the HSZ70 that is being upgraded:
•
•
•
•
•
•
HSG80 Controller(s) with factory default settings, including cache.
(see Appendix B for resetting controller(s) to default state)
Fibre Optic GLM Module(s) (included with controllers).
HSG80 External Cache Battery (ECB) Battery Cable(s) (with controllers)
PCMCIA Card(s) with Version 8.3 or 8.4 Firmware
Version 8.3 or 8.4 Solution Software for the Target Server Operating System
HSG80 World Wide Name (WWN) Node ID Number and Checksum Label (Included with
controllers)
2. Server – One or two of each of the following depending on the target HSG80 configuration.
•
•
•
•
•
Fibre Channel Host Adapter(s)
Fibre Channel Hub or Switch
Giga-Bit Interface Converter(s), GBIC, for the Fibre Channel Hub or Switch – one for
each connection.
Fibre Optic Cables for controller to hub/switch connections and from HBA to hub/switch
connections.
SGI IRIX Only - Media Interface Adapter(s), MIA one for each SGI Fibre Channel Host
Adapter, SGI P/N: X-F-OE-KIT
Part Numbers for the above mentioned items are located in Appendix C.
EK-HSG80-UP. B01
Page 5
COMPAQ StorageWorks
4.0
Upgrading From an HSZ70 to an HSG80 Array Controller
Preparing the Server
Before starting the upgrade procedure prepare your server using the following steps:
1. Perform a FULL backup and verification of the data on the HSZ70 filesystems or partitions.
Important: Failure to do so could result in the loss of ALL data in the event the upgrade is
not successful.
2. Server Settings: Save a copy of the listed file or document (write down on paper) the settings
of the HSZ70 as seen and configured by the server system. Specifically, make note of
changes to any of the following:
•
Host Adapter Settings
• IRIX /var/sysgen/master.d/scip file
• HP-UX /etc/fstab
•
~steam/etc/client.ini file.
NOTE: Save the file if it includes a large number of clients.
•
For IBM AIX, list the physical volume IDs; use the lspv command and record the PVIDs
in the table in Appendix A.
Correlate and record the HSZ70 unit numbers versus the host device names in Table A-1 found
in Appendix A. This table will also be used later to record the HSG80 information to create an
HSZ70 to HSG80 unit map. (Some of the information will be filled in later, e.g. HSG80 Host
Device Name). Table 4-1 below is a sample:
Table 4–1 HSZ70 Unit Numbers vs. Host Device Names
PVID
HSZ70
Unit
Number
(Operating
System)
Storageset
or JBOD
Name
HSZ70
Host
Device
Special
File
Name
Host
Partition #
or Slice #
Server Mount
Point or Disk
Administrator
Drive Letter
D105
(IRIX)
DVGRPR0
dks4d1l5s
7
7
/Genome
N/A
D1500
(WIN-NT)
DISK50300
diskNN
E:
N/A
D800
(SUN)
DISK60000
c2t8d0s0
/apps
N/A
D900
(HP-UX)
DVGRPS0
c5t1d1
/mnt1
N/A
D600
(Tru64 UX)
DVGRPS1
rx8c
/net
N/A
D400
IBM AIX
DVGRPS2
hdisk7
/mnt
00201622c6c680a3
Page 6
0
HSG80
Unit
Number
HSG80
Host
Device
Special
File
Name
EK-HSG80-UP. B01
Service Guide
5.0
Preparing the Client
NOTE
If you are using a Tru64 system, skip this section (5.0) and
proceed to Section 6.0.
If the StorageWorks Command Console (SWCC) was used to manage this HSZ70 subsystem,
perform the following steps to save a copy of the HSZ70 configuration. If SWCC was not used,
skip this section and go to Section 6.0 Removing the Server Components. The HSZ70 subsystem
configuration can be saved using SWCC. Use the following steps to save the configuration and
prepare the PC where the StorageWorks Command Console (SWCC) is installed:
1. Using the Start Program menu, start the StorageWorks Command Console.
2. Open the folder which corresponds to the system to be upgraded from the StorageWorks
Command Console’s main display.
3. Once the system’s folder is open, double click the Storage Window to open it.
4. Under the Storage menu item select Controller Configuration.
5. Select Save from the Controller Configuration menu.
6. Enter a file name to contain the saved configuration. Be sure to save it in a directory other
than the one in which SWCC is installed, since that directory could be deleted in a
subsequent step in this procedure.
7. Once the file has been saved, close the Storage Window and if it was open, close the
Command Console Window.
8. Uninstall SWCC using the Windows Control Panel icon Add/Remove Programs. Be sure to
remove all of the components including:
•
Command Console
• StorageWorks HSZ Storage Window
• StorageWorks CLI Window
9. Once the software has been uninstalled, reboot the PC.
EK-HSG80-UP. B01
Page 7
COMPAQ StorageWorks
6.0
Upgrading From an HSZ70 to an HSG80 Array Controller
Removing the Server Components
The remaining server components can now be removed with the following steps:
1. Uninstall the existing SWCC Agent. Refer to the operating system specific HSZ70 Getting
Started Guide.
•
Getting Started for Solaris Installation Guide, AA-R60VC-TE
•
Getting Started for HP-UX Installation Guide, AA-R84KC-TE
•
Getting Started for SGI IRIX Installation Guide, AA-R8JRD-TE
•
Getting Started for Windows NT - Intel Installation Guide, AA-R770D-TE
•
Getting Started for Tru64 Unix Installation Guide, AA-R60KC-TE.
•
Getting Started for IBM AIX Installation Guide, AA-R84GD-TE
2. Unmount any filesystems or database partitions that were located on the HSZ70.
For HP-UX export all volume groups at this time. For example:
# umount /mnt1
# vgchange -a n /dev/vg01
# vgexport -v -m vg01.mapfile
For IBM AIX, use smit to:
# Unmount the file system
# Deactivate the volume group
# Export the volume group
Uninstall the SCSI Host Adapter driver if it is no longer required.
4. Shut down and power-off the host system in accordance with established local procedures.
5. Remove the SCSI cable from the SCSI Host Adapter.
6. Remove the SCSI Host Adapter if it is no longer required.
7. Install the Fibre Channel Host Adapter. Refer to the appropriate documentation for your
operating system:
•
•
•
•
•
•
Page 8
Quick Setup Guide for Sun Solaris, AA-RFBNA-TE
HP Fibre Channel Mass Storage Adapters, A3636-90002
Origin Fibre Channel RAID Installation Instructions - SGI P/N: 108-154-002
Installation Reference Guide, Windows-NT, AA-RFA9B-TE
Installation Reference Guide, Tru64 Unix, AA-RFAUA-TE
Installation Reference Guide, IBM AIX - AA-RJ25A-TE
EK-HSG80-UP. B01
Service Guide
7.0
Preparing the HSZ70
Use the following steps to prepare the HSZ70 for upgrade:
1. Connect a PC or terminal to the operational controller’s maintenance port. The controller that
you are connected to is “this controller.”
2. If the HSZ70 storagesets were originally created with the SAVE_CONFIGURATION option
enabled then the current configuration of the HSZ70 will be retained on the disk in that
storageset. To determine if storageset was initialized with SAVE_CONFIGURATION
enabled use the command:
HSZ70> SHOW DEVICES FULL
In the output that is displayed search for the phrase:
“Configuration being backed up on this container”
If that statement is displayed, then the HSZ70 configuration is being saved on the device and
portions of the configuration can be restored to the HSG80 once it is installed. If the
statement is not displayed, the configuration has not been saved to the device and can only be
restored using SWCC or by manually recreating the storagesets from the information that will
be recorded in Step 2 below. Tru64 users will recreate storagesets manually using the CLI
interface.
1) If the configuration is being saved on a device then force an update of the configuration
using the following commands:
HSZ70> SET unit name WRITE_PROTECT
HSZ70> SET unit name NOWRITE_PROTECT
Where unit name is the name of a unit with save configuration enabled on the HSZ70, e.g.
D100
NOTE
If any of your storagesets are JBOD units, it is IMPERATIVE
to record their configuration as detailed in Section 4.0 of this
document. Because the configuration restore operation on the
HSG80 cannot restore units; failure to record this information
manually will cause it to be lost.
2) Obtain the disk and unit information with the following commands:
HSZ70> SHOW UNITS FULL
HSZ70> SHOW STORAGESETS FULL
Record this information in the Unit Table and the Storageset Table provided in
Appendix A of this document.
EK-HSG80-UP. B01
Page 9
COMPAQ StorageWorks
Upgrading From an HSZ70 to an HSG80 Array Controller
3) If the HSZ70 controllers were set in mirrored mode, disable it with the following
command:
HSZ70> SET THIS_CONTROLLER NOMIRROR
If the cache modules were mirrored both controllers will restart after this command is
issued. If the controllers restart, wait until they have restarted completely before
continuing.
4) Disable failover and take the controllers out of their dual-redundant configuration with
the following command: (Important: This will shut down the other controller.)
HSZ70> SET NOFAILOVER
5) Shut down the controller with the following command:
HSZ70> SHUTDOWN THIS_CONTROLLER
When the controller shuts down, its reset button is lit continuously.
Page 10
EK-HSG80-UP. B01
Service Guide
8.0
Removing the HSZ70 Components
Use the following steps to remove the HSZ70 Components:
1. Power-off all the HSZ70 enclosures that will be upgraded at this time.
CAUTION
Electro-Static Discharge (ESD) can easily damage
controller. Wear a snug-fitting, grounded ESD wrist strap.
a
2. Remove the SCSI cables from the trilink connector(s) and then remove the trilink
connector(s) from the controller(s).
3. Remove the serial cable from the controller’s maintenance port.
4. Disengage both retaining levers and remove “this controller,” then place it into an antistatic
bag or onto a grounded antistatic mat.
5. Disengage both retaining levers and remove the “other controller,” then place it into an
antistatic bag or onto a grounded antistatic mat.
6. Disengage both retaining levers and partially remove Cache Module A—about half way.
7. Disengage both retaining levers and partially remove Cache Module B—about half way.
8. Disable both External Cache Batteries (ECBs) by pressing their battery disable switches until
the status light stops blinking—about five seconds.
CAUTION
The ECB must be disabled—the status light is not lit or is not
blinking—before disconnecting the ECB cable from the cache
module. Failure to disable the ECB could result cache module
damage.
11. Disconnect the ECB cables from both cache modules, remove the cache modules, and place
them into an antistatic bag or onto a grounded antistatic mat.
12. Disconnect the ECB cables from the ECBs.
13. Remove ECB cables.
EK-HSG80-UP. B01
Page 11
COMPAQ StorageWorks
9.0
Upgrading From an HSZ70 to an HSG80 Array Controller
Installing the HSG80 Components
Use the following steps to install the HSG80 components:
CAUTION
ESD can easily damage a cache module or controller. Wear a
snug-fitting, grounded ESD wrist strap.
Make sure you align the cache module and controller in the
appropriate guide rails. If you do not align the modules
correctly, damage to the backplane can occur.
CAUTION
The ECB must be disabled—the status light is not lit or is not
blinking—before connecting the ECB cable to the cache
module. Failure to disable the ECB could result in ECB
damage.
Important: If performing a dual-redundant controller upgrade, do ONLY the upper controller at
this time.
1. Insert the new cache module into left slot A, and engage its retaining levers.
2. Connect the new ECB cable to the new, Cache Module A and the ECB.
3. Make sure the program card is not in the controller and insert the new controller into the top
slot, A, and engage its retaining levers.
4. Connect the host fibre cables to Controller A. One or two host fibre cables may be attached
depending upon the configuration.
5. Connect a PC or terminal to the controller’s maintenance port.
6. Power-on all of the HSG80 enclosures. Wait for the indicator lights on the EMU to turn off.
7. Using a pen or small screwdriver, press and hold PORT BUTTON 6 on the HSG80 Operator
Control Panel and insert the program card. Wait until the RESET button/LED starts blinking,
then release PORT BUTTON 6. If the Operator Control Panel LEDs do not begin to flash when
the program card is inserted, continue to hold OCP PORT BUTTON 6, then eject and re-insert
the program card.
8. Silence the EMU alarm by depressing the yellow push button on the EMU.
9. Automatic reboot takes place and if saved the previous configuration is restored. This takes
several minutes—please be patient. If the configuration is restored the CLI displays:
NOTE
Saved configuration
configuration.
Page 12
restored.
Rebooting
with
new
EK-HSG80-UP. B01
Service Guide
If a previous configuration was saved and the message above was not displayed, the
configuration was not restored. To retry the restore: Restart the procedure at Step 1 of this
section. If the configuration is still not restored, then either the HSG80 controller(s) was not
set to factory default or, the configuration was not previously saved. Refer to Appendix B to
restore the HSG80 controller(s) to a factory default state. If the configuration was not
previously saved, continue onto the next step. The configuration will be restored by SWCC
(if used) or manually using the CLI and tables in Appendix A.
10. If the previous configuration was not saved on disk it can be restored with the StorageWorks
Command Console or recreated by using the HSG80 CLI. The SWCC method of restoring
the configuration is described in the section, “Client Upgrade”. The CLI method will be
described in Section 11.0, Creating the HSG80 Logical Units. Regardless of which method
is used to restore the configuration, continue with the following steps. Tru64 users will
restore the configuration by using the CLI method described in Section 11 of this document.
11. If you get an invalid cache message use the following command to clear it:
HSZ70> CLEAR THIS_CONTROLLER INVALID_CACHE DESTROY_UNFLUSHED_DATA
12. If the configuration was not saved on disk, proceed to Step 14. If the configuration was saved
on disk, verify that the HSZ70 storagesets have been recreated on the HSG80 using the
command:
HSZ70> SHOW STORAGESETS FULL
13. Compare the output with the data recorded in the Storageset Table completed in Section 7.0,
Preparing the HSZ70. If the storagesets are correct, continue to Step 14. If the storagesets are
not correct, power-off the HSG80 and restart the upgrade at Step 6 of this section.
14. The controller environment settings must now be established. The restart controller messages
can be ignored until so instructed.
Set the prompt to the new controller type using:
HSZ70> SET THIS_CONTROLLER PROMPT=”HSG80> “
Clear the persistent error messages using:
HSG80> CLEAR CLI
Using the World Wide Name node number and checksum from the enclosed label set the
HSG80 WWN using:
HSG80> SET THIS_CONTROLLER NODE=NNNN-NNNN-NNNN-NNNN CHECKSUM
For Windows NT Servers, do not enable the Command Console LUN, proceed to “Set the
ALPA Profile type” below. For UNIX Servers, enable the SWCC Command Console LUN
using:
HSG80> SET THIS_CONTROLLER COMMAND_CONSOLE_LUN
Set the ALPA Profile type using:
HSG80> SET THIS_CONTROLLER PORT_1_PROFILE=PLDA
HSG80> SET THIS_CONTROLLER PORT_2_PROFILE=PLDA
For Arbitrated Loop environments the Fibre Channel topology using:
HSG80> SET THIS_CONTROLLER PORT_1_TOPOLOGY=LOOP_HARD
HSG80> SET THIS_CONTROLLER PORT_2_TOPOLOGY=LOOP_HARD
EK-HSG80-UP. B01
Page 13
COMPAQ StorageWorks
Upgrading From an HSZ70 to an HSG80 Array Controller
For Fibre Channel switch environments the topology using:
HSG80> SET THIS_CONTROLLER PORT_1_TOPOLOGY=FABRIC
HSG80> SET THIS_CONTROLLER PORT_2_TOPOLOGY=FABRIC
Using information from the Installation Reference Guide for your server’s operating system,
set the Arbitrated Loop Physical Address (ALPA) NN of the controller ports using:
HSG80> SET THIS_CONTROLLER PORT_1_AL_PA=NN
HSG80> SET THIS_CONTROLLER PORT_2_AL_PA= NN
Set the SCSI version using:
HSG80> SET THIS_CONTROLLER SCSI_VERSION=SCSI-2
Restart this controller for the new settings to take effect.
HSG80> RESTART THIS_CONTROLLER
If the configuration being upgraded is a single controller proceed to Section 11.0, Creating
the HSG80 Logical Units. If the configuration included dual-redundant controllers, install the
second controller as outlined in the next section.
Page 14
EK-HSG80-UP. B01
Service Guide
10.0
Installing the Second HSG80 Controller
Use the following steps to install the second HSG80 controller:
1. Once the controller has restarted install the “other controller” and its cache module by
starting FRUTIL with the following command:
HSG80> RUN FRUTIL
FRUTIL displays the following:
Do you intend to replace this controller’s cache battery? Y/N
2. Enter N(o). FRUTIL displays the FRUTIL Main menu:
FRUTIL Main Menu:
1. Replace or remove a controller or cache module
2. Install a controller or cache module
3. Replace a PVA module
4. Replace an I/O module
5. Exit
Enter choice: 1, 2, 3, 4, or 5 ->
3. Enter option 2, Install a controller or cache module, from the FRUTIL Main menu. FRUTIL
displays the Install Options menu:
Install Options:
1. Other controller and cache module
2. Other controller module
3. Other cache module
4. Exit
Enter choice: 1, 2, 3, or 4 ->
4. Enter option 1, Other controller and cache module, from the Install Options menu. FRUTIL
display the following:
Insert both the slot B controller and cache module? Y/N
5. Enter Y(es) and press return. FRUTIL displays the following:
Quiescing all device ports. Please wait..
Device Port 1 quiesced.
Device Port 2 quiesced.
Device Port 3 quiesced.
Device Port 4 quiesced.
Device Port 5 quiesced.
Device Port 6 quiesced.
All device ports quiesced.
.
.
EK-HSG80-UP. B01
Page 15
COMPAQ StorageWorks
Upgrading From an HSZ70 to an HSG80 Array Controller
Perform the following steps:
1. Turn off the battery for the new cache module by
pressing the battery’s shut off button for five
seconds
2. Connect the battery to the new cache module.
3. Insert the new cache module in slot B within 4 minutes.
NOTE
A countdown timer allows a total of four minutes to install both
the cache module and controller. If you exceed four minutes,
“this controller” will exit FRUTIL and resume operations.
CAUTION
ESD can easily damage a controller or a cache module. Wear
a snug-fitting, grounded ESD wrist strap.
6. Disable the ECB to which you are connecting Cache Module B by pressing the battery
disable switch until the status light stops blinking—about five seconds.
CAUTION
The ECB must be disabled—the status light is not lit and is
not blinking—before connecting the ECB cable to the cache
module. Failure to disable the ECB could result in ECB
damage
Make sure you align the cache module and controller in the
appropriate guide rails. If you do not align the modules
correctly, damage to the backplane can occur.
7. Connect the new ECB cable to the ECB and the right side, Cache Module B.
8. Insert Cache Module B into its slot and engage its retaining levers. FRUTIL displays the
following:
Insert the controller module, WITH its program card, in slot B within 4 minutes.
9. Ensure that the program card is in the replacement controller and insert the new controller
into its slot. Engage its retaining levers. When fully seated, the newly installed controller will
boot.
FRUTIL displays the following:
If the other controller did not restart, follow these steps:
1. Press and hold the other controller’s reset button.
2. Insert the other controller’s program card.
3. Release the reset button.
Press return to continue.
Page 16
EK-HSG80-UP. B01
Service Guide
NOTE
In mirrored mode, FRUTIL will initialize the mirrored portion of
the new cache module, check for old data on the cache
module, and then restart all device ports. After the device
ports have been restarted, FRUTIL will test the cache module
and the ECB. After the test completes, the device ports will
quiesce and a mirror copy of the cache module data will be
created on the newly installed cache module.
NOTE
One or two host fibre cables may be attached, depending on
the configuration.
10. Press return to continue. FRUTIL will exit. If the other controller did not restart, follow these
steps:
a. Press and hold the other controller’s RESET button.
b. Insert the other controller’s program card.
c. Release the RESET button.
11. Connect the host fibre cables to controller B.
12. Enable failover, and re-establish the dual-redundant controller configuration with the
following command:
HSG80> SET FAILOVER COPY=THIS_CONTROLLER
13. Set the prompt to the new controller type using:
HSZ80> SET OTHER_CONTROLLER PROMPT=“HSG80>”
This command copies the subsystem’s configuration from “this controller” to the new
controller. This will cause the other controller to restart.
EK-HSG80-UP. B01
Page 17
COMPAQ StorageWorks
11.0
Upgrading From an HSZ70 to an HSG80 Array Controller
Creating the HSG80 Logical Units
Use the following steps to create the HSG80 units from the HSZ70 storagesets:
1. Once the controller has restarted, the Logical Units can be created. If SWCC will be used to
restore the storageset configuration proceed to Section 12.0, Upgrading the Server. Tru64
users, proceed to Step 2 and complete all steps in Section 11.0 of this document.
2. If the HSG80 storagesets were not saved on disk, they now need to be recreated using the
information recorded in the storageset table. See HSG80 Array Controller ACS Version 8.3
Configuration and CLI Reference Guide for more information on configuring a controller
and CLI commands.
HSG80> ADD storage set type storage set name DISKNNNNN …
CAUTION
Do NOT use the INITIALIZE command! This will
ERASE all user data in the storageset.
3. Repeat the ADD storage set type command for all of the HSZ70 storagesets that must be
recreated.
4. Add the units as needed. Create an HSG80 unit to correspond to the previously used HSZ70
units. Consult the HSZ70 Host Device Name Table completed in Section 4. At this time,
fill-in the HSG80 unit numbers as they are created. Substitute the storageset name from the
table for the storage set name in the following commands. Assign the unit numbers in
accordance with the recommendations or restrictions described in the Installation Reference
Guides for your server.
Unit numbers on the first controller are in the range D0 through D99, D0 through D7 for
HP-UX and Tru64 Unix V4.0F, and V4.0G.
Unit numbers on the second controller are in the range D100 through D199, D100 through
D107 for HP-UX and Tru64 Unix V4.0F, and V4.0G.
The Command Console LUN (CCL) if enabled is unit D0.
HSG80> ADD UNIT D1 storage set name WRITE_BACK
HSG80> ADD UNIT D100 storage set name WRITE_BACK
5. After all of the storagesets have been created, it is suggested to save the new configuration.
Identify a unit that has “configuration backed up on this container.” For example D2:
HSG80> SET D2 WRITE PROTECT
HSG80> SET D2 NOWRITE_PROTECT
Page 18
EK-HSG80-UP. B01
Service Guide
12.0
Upgrading the Server
Use the following steps to upgrade the server components:
1. Power-on and bootstrap the host.
2. Install the host adapter drivers according to operating system specific Installation Reference
Guide.
3. Reconfigure the kernel or reboot if necessary.
4. Once the operating system has been bootstrapped, ensure that the Command Console LUN
has been located and configured on the UNIX Servers.
•
•
•
•
•
SGI IRIX
HP-UNIX
SUN Solaris
Tru64
IBM AIX
# inv –v
# ioscan –nf
# format –e
# file /dev/rrz*c
# lsdev –Cc disk
5. Recreate the device special file or drive letter for the CCL, if necessary for your server
operating system.
6. Install the Version 8.3 SWCC Agent according to the instructions in the specific Installation
Reference Guide for your operating system.
7. Restore the ~steam/etc/client.ini file if it was saved in a previous step. A restart of the Agent
is required if the client.ini was restored from a backup file or any time that the configuration
files are changed.
EK-HSG80-UP. B01
Page 19
COMPAQ StorageWorks
13.0
Upgrading From an HSZ70 to an HSG80 Array Controller
Upgrading the Client
Use the following steps to upgrade the server components:
1. Install the Version 8.3 SWCC client kit, especially the following components:
•
HSG80 Storage Window
• HSG80 CLI Window
2. If the configuration has already been restored and the HSG80 Logical Units created, skip to
section 14. If the configuration was not restored from the saved configuration or recreated
using CLI commands the configuration that was saved with the previous version of SWCC
can now be restored using the following menu sequence:
•
•
Start the StorageWorks Command Console.
From the File menu select Add System and add the system name where the upgrade is
taking place.
Close the Add System Window.
Open that systems’ folder.
Open the HSG80 Storage folder.
Open the Storage Window.
On the Storage Window select the Controller Configuration menu item.
•
Select Load.
•
•
•
•
•
•
Select Load Configuration Only.
• Then browse for the configuration file that you saved in Section 5.
3. Depending upon the storageset configuration, the restore may require up to 10 minutes. Only
the storageset configuration is restored. Controller parameters and unit numbers are HSG80
specific and are not restored from the HSZ70 saved configuration data.
4. The controller(s) will restart a number of times as the configuration is restored—please be
patient.
5. Once the storagesets have been recreated use the SWCC CLI Window to create the units
from the recreated storagesets. Consult the HSZ70 Host Device Name Table completed in
Section 4. Add the units as needed. Create an HSG80 unit to correspond to the previously
used HSZ70 units. At this time, fill-in the HSG80 unit numbers in the table as they are
created. Substitute the storageset name from the table for the storage set name in the
following commands. Assign the unit numbers in accordance with the recommendations or
restrictions described in the Installation Reference Guide for your server.
Unit numbers on host port 1 are in the range D1 through D99.
Unit numbers on host port 2 are in the range D100 through D199.
The Command Console LUN (CCL) if enabled is unit D0.
HSG80> ADD UNIT D1 storage set name WRITE_BACK
HSG80> ADD UNIT D100 storage set name WRITE_BACK
6. After all of the storagesets have been recreated use the SWCC CLI Window to save all of the
new configuration data with these commands. Identify a unit that has “configuration backed
up on this container.” For example D2:
HSG80> SET D2 WRITE_PROTECT
HSG80> SET D2 NOWRITE_PROTECT
Page 20
EK-HSG80-UP. B01
Service Guide
14.0
Completing the Upgrade
Use the following steps to complete the upgrade:
1. Reconfigure the kernel or reboot the server if necessary to configure all of the new units.
Using either the SWCC CLI or the maintenance terminal, check that the HSG80 controller
connection(s) to the host are set correctly. Use the command:
HSG80> SHOW CONNECTIONS
For connections whose status is listed as:
OL THIS or OL OTHER
Check that the operating system is set correctly for your server. The default setting is WINNT for
Windows NT. To change the operating system type for the online (OL) connections, use the
appropriate command for your system:
NOTE
Replace XX shown in the commands with the online
connection name when the “SHOW CONNECTIONS”
command was previously used in this step (above).
HSG80> SET !NEWCONNXX OPERATING_SYSTEM=SUN
HSG80> SET !NEWCONNXX OPERATING_SYSTEM=SGI
HSG80> SET !NEWCONNXX OPERATING_SYSTEM=WINNT
HSG80> SET !NEWCONNXX OPERATING_SYSTEM=DIGITAL_UNIX
NOTE
For HP–UX and IBM AIX use default operating system
WINNT. Refer to Section 3.0 of the HP-UX Release Notes,
AA-RFBDC-TE/387370-003 for a detailed description.
2. Recreate or modify the mount points and file system tables to include the new device names
(See Table A-1).
For HP-UX, import all volume groups at this time. Important: DO NOT use SAM to import the
volume groups. This must be done by using HP-UX commands. For example:
# mkdir /dev/vgxx
# mknod /devvgxx/group c 64 0xXX0000
# vgimport -m vgXX.mapfile /dev/vgXX /dev/dsk/c4t0d6
# vgchange -a y /dev/vgXX
EK-HSG80-UP. B01
Page 21
COMPAQ StorageWorks
Upgrading From an HSZ70 to an HSG80 Array Controller
For IBM AIX, list the physical volume IDs using the LSPV commands. This will cross-reference
you to the HSG80 Host device name in Table A-1. Use smit to:
•
Import volume groups
•
Mount the file systems
3. Mount the file system(s).
4. Update partition information in applications, such as Databases and Logical Volume
Managers to point them to the correct device names (See Table A-1).
5. Affix the World Wide Name (WWN) label to the lower shelf of the HSG80 pedestal for
future reference.
Page 22
EK-HSG80-UP. B01
Service Guide
Appendix A
This appendix contains copies of the tables used to record the configuration of your system. If
additional tables are required, these tables may be reproduced.
Table A–1 HSZ70 Unit Numbers vs. Host Device Names
HSZ70
Unit
Number
Storageset
or JBOD
Name
EK-HSG80-UP. B01
HSZ70
Host
Device
Name
Host
Partition #
or Slice #
Server Mount
Point or Disk
Administrator
Drive Letter
HSG80
Unit
Number
HSG80
Host
Device
Name
PVID
Page 23
COMPAQ StorageWorks
Upgrading From an HSZ70 to an HSG80 Array Controller
Table A–2 Unit Number Table
Date________________
Uses
LUN
Page 24
EK-HSG80-UP. B01
Service Guide
Table A–3 Storageset Table
Date__________
Name
EK-HSG80-UP. B01
Storageset
Uses
Used By
Page 25
COMPAQ StorageWorks
Upgrading From an HSZ70 to an HSG80 Array Controller
Appendix B
This appendix describes a procedure that can be used to restore an HSG80 controller to its
factory default state. If the HSG80 controller has been previously used in a subsystem it should
be restored to its initial configuration or erased before it is used in the HSZ70 to HSG80 upgrade.
Otherwise, the saved configuration will not be restored.
CAUTION
This procedure may result in the loss of both customer data
and subsystem configuration data. Therefore, the following
procedure should NOT be performed on a subsystem which
contains valid customer data or a valid subsystem
configuration.
To erase an HSG80 controller perform the following steps:
NOTE
Only one HSG80 controller and one HSG80 cache module
can be installed in the subsystem at a time.
1. Power off the entire storage subsystem.
2. Install one HSG80 controller, one cache module.
3. Connect the External Cache Battery (ECB) cable to the HSG80 cache module.
4. Using a small screwdriver, press in and hold the # 5 OCP button.
5. Holding the #5 OCP button, turn on the subsystem cabinet power.
6. Continue to hold the #5 OCP button until the green RESET button begins to flash at 1 Hertz.
7. Release the #5 OCP button and let the controller continue to boot.
8. The controller will boot and then halt with OCP lights 1 and 2 and 3 ON.
9. This controller and cache have been restored to a factory default state.
10. Remove the HSG80 controller and cache module.
11. If necessary, repeat the process for the other HSG80 controller and cache module.
Page 26
EK-HSG80-UP. B01
Service Guide
Appendix C
Platform Kits
380551-001 Windows NT/Intel V4.0
380553-001 Tru64 Unix V4.0F
380554-001 Sun Solaris V2.5.1 & V2.6
380555-001 OpenVMS V7.2
380556-001 SGI IRIX V6.4.1
380557-001 HP UX V10.2, V11.01
380559-001 Novell NetWare V4.20
380661-001 SCO UnixWare V7.X
HSG80 Controller(s)
380671-B21 HSG80 Controller w/64 MB cache
380672-B21 HSG80 Controller w/256 MB cache
HSG80 Storage Controller Software
(1 required per controller)
380577-001 ACS V8.3 FC/AL Software
128697-B21 ACS V8.4 FC/SW Software
Fibre Optic GLM Module Set
380593-B21 Optical GLM (2) upgrade kit for G80/CU
Cache Upgrade Module(s)
380673-B21 HSx80 64MB cache (2*32MB)
380674-B21 HSx80 256MB cache (2*128MB)
External Cache Battery Cable
400298-001 - Pedestal
401913-001 - Rack-Mount
GigaBit Interface Connector (GBIC)
380579-B21 - 3 GBIC + 2 2M Cables
380596-B21 - 2 GBIC + 2 2M Cables
380561-B21 - Single GBIC
EK-HSG80-UP. B01
Page 27
COMPAQ StorageWorks
Upgrading From an HSZ70 to an HSG80 Array Controller
Appendix C (cont.)
Hubs and Switches
295573-B22 - Hub 12 Port
234453-001/B31/291 – Hub 7 port Dom/Int/Jpn
242795-B22 - Hub 7 port retma/metric mounting kit
380591-B21 - Switch 8 Port
380578-B21 - Switch 16 Port
Fibre Cables
Page 28
234457-B21
- Cable, FC, 2M
234457-B22
- Cable, FC, 5M
234457-B23
- Cable, FC, 15M
234457-B24
- Cable, FC, 30M
234457-B25
- Cable, FC, 50M
EK-HSG80-UP. B01