1
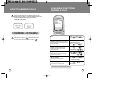
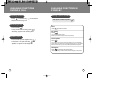
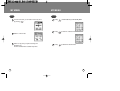
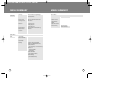
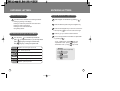
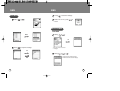
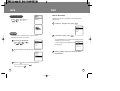
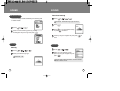
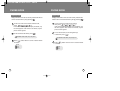
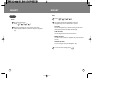
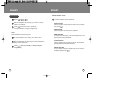
Z720i User’s Manual
TABLE OF CONTENTS
CHAPTER1
BEFORE USING YOUR PHONE
PACKAGE INCLUDES..................................................................7
HANDSET DESCRIPTION............................................................8
Main LCD & display indicators ..................................................................9
The function keys....................................................................................11
USING THE BATTERY ...............................................................15
Battery installation...................................................................................15
Battery removal.......................................................................................15
BATTERY CHARGING................................................................16
Charging with traveler’s adapter .............................................................16
CHAPTER2
TABLE OF CONTENTS
ENTERING LETTERS.................................................................35
Numbers and Symbols............................................................................35
To select an input type in Input Mode .....................................................35
ENGLISH/ Romanian- Input Mode..........................................................36
T9 English- Input Mode..........................................................................37
T9 Rom- Input Mode ...............................................................................38
SMS.............................................................................................39
New MSG................................................................................................39
Received MSG........................................................................................40
Sent MSG ...............................................................................................42
Setting ....................................................................................................43
Receive the message .............................................................................45
Annunciator.............................................................................................46
CHAPTER3
BASIC OPERATION
MENU FUNCTION
WEB ............................................................................................49
TURNING THE PHONE ON / OFF..............................................19
Turning the phone on..............................................................................19
To turn off the phone...............................................................................19
MAKING A CALL.........................................................................20
To end a call ...........................................................................................20
HOW TO ANSWER CALLS.........................................................21
AVAILABLE FUNCTIONS DURING A CALL...............................22
Adjusting volume.....................................................................................23
Recording a call ......................................................................................23
Speaker phone........................................................................................23
AVAILABLE FUNCTIONS IN STAND- BY ..................................24
Storing a phone number .........................................................................24
Dialed call ...............................................................................................25
Etiquette mode........................................................................................25
Lock phone .............................................................................................26
Easy display screen setup ......................................................................26
ACCESSING THE MENU............................................................27
MY MENU....................................................................................29
Add .......................................................................................................25
View .......................................................................................................25
MENU SUMMARY.......................................................................31
1
Mobile Explorer .......................................................................................49
Zapp Me..................................................................................................49
How to download .................................................................................50
How to search for applications ............................................................51
Help .....................................................................................................52
Setting.....................................................................................................53
Changing the order of application........................................................54
Moving applications .............................................................................55
Manage applications............................................................................56
Changing the main menu view ............................................................57
Help.........................................................................................................58
ENTERTAINMENT ......................................................................59
Camera ...................................................................................................59
Screen Shot.........................................................................................59
Outside Camera (Using the external LCD) ......................................60
Album ..................................................................................................60
Camera Setting....................................................................................63
Camera Help .......................................................................................65
Game ......................................................................................................66
Stored Image Box ...................................................................................66
Stored Melody Box..................................................................................66
Memory stare ..........................................................................................66
DISPLAY .....................................................................................67
Main Display ...........................................................................................67
2
TABLE OF CONTENTS
Sub Display.............................................................................................68
Greeting ..................................................................................................69
Contrast ..................................................................................................69
Backlight .................................................................................................70
SOUND........................................................................................71
Receive mode .........................................................................................71
Melody ....................................................................................................71
Volume....................................................................................................72
Key Tone.................................................................................................73
Group Bell ...............................................................................................73
PHONE BOOK ............................................................................74
Find .........................................................................................................74
Store .......................................................................................................75
Call Log...................................................................................................76
Call Time.................................................................................................79
My Own Number .....................................................................................80
EDIARY .......................................................................................81
Wake-up Call ..........................................................................................81
View.....................................................................................................81
Set .......................................................................................................82
Alarm.......................................................................................................83
View.....................................................................................................83
Set .......................................................................................................84
Scheduler................................................................................................85
View.....................................................................................................85
Add Schedule event ............................................................................86
Add D-day event..................................................................................87
Delete All .............................................................................................87
Calculator................................................................................................88
Stopwatch ...............................................................................................89
World Clock.............................................................................................89
Bio-rhythm...............................................................................................90
VOICE SERVICE........................................................................ 91
Answering Machine.................................................................................91
Inbox....................................................................................................91
Setting .................................................................................................91
Voice Memo ............................................................................................94
Record .................................................................................................94
Play......................................................................................................94
Delete All .............................................................................................94
SETTINGS...................................................................................95
TABLE OF CONTENTS
Language ................................................................................................96
Call Waiting.............................................................................................96
Call Forward............................................................................................97
Uncondition..........................................................................................97
No Answer ...........................................................................................97
Busy.....................................................................................................98
Busy/No Answer ..................................................................................98
Data Service ...........................................................................................99
Receive Mode......................................................................................99
RM Speed............................................................................................99
Data Port ...........................................................................................100
Time Format..........................................................................................100
Answer Mode ........................................................................................101
SECURITY ................................................................................102
Privacy ..................................................................................................102
Lock Phone ...........................................................................................103
Change Code........................................................................................103
Restrict..................................................................................................104
Incoming Call.....................................................................................104
Outgoing Call.....................................................................................104
Overseas Call ....................................................................................105
Clear Memory .......................................................................................105
Reset phone..........................................................................................106
Version..................................................................................................106
CHAPTER4
USER GUIDELINES
WHEN YOU COME ACROSS ANY OF THESE PROBLEMS ..109
EXPOSURE TO RADIO FREQUENCY SIGNALS....................110
DRIVING SAFETY.....................................................................111
OTHER SAFETY GUIDELINES ................................................112
HANDLING GUIDELINES .........................................................113
BATTERY HANDLING INFORMATION ....................................114
RF SPEC...................................................................................116
SAR ...........................................................................................117
DECLARATION OF CONFORMITY....................................118
Auto Answer............................................................................................95
Voice Privacy ..........................................................................................95
3
4
MEMO
CHAPTER 1
BEFORE USING YOUR PHONE
Please read this chapter before using your phone.
PACKAGE INCLUDES
HANDSET DESCRIPTION
USING THE BATTERY
BATTERY CHARGING
5
6
PACKAGE INCLUDES
PACKAGE INCLUDES
HANDSET DESCRIPTION
This package should include all items listed below.
Antenna
Camera Key
LED
Volume Keys
External
LCD(SUB LCD)
Adapter
Camera
Earpiece
Display
Handset
Standard Battery
1000mAh
Select Key
END/
POWER KEY
Send key
Clear Key
User Manual
7
Hand strap
Microphone
8
HANDSET DESCRIPTION
Main LCD & Display Indicator
Status display
HANDSET DESCRIPTION
Voice Privacy
Data Call
Etiquette Set
Graphic display
Mute
Vibrator
Bell after Vibrator
Icons on the main display
Bell and Vibrator
Signal Strength
Roaming
Service Indicator
The [
The [
] icon indicates a call is in progress.
] icon indicates your phone cannot find signal.
New Message
Alarm
Battery
Answering machine
Bell
Side Bell
9
10
HANDSET DESCRIPTION
The function keys
This key clears the digits or text from the display.
Press to access the menu or function displayed on
bottom line.
HANDSET DESCRIPTION
Key
FOLDER
Open
Closed
IN STAND BY
Press [
] long key and start camera Preview.
Short pressing enters Camera Menu.
Press [
] long key start External
LCD camera preview.
Open
Press [
] increase keypad tone. Press [
]
and Camera Preview Image rotate (180 degree).
Closed
Press [
up.
] long key and the external LCD will light
Open
Press [
] to decrease keypad tone.
Closed
Press [
] long key to set the Flash On//Off
This key is used to access “SMS ”.
Press to access ZappMe or Mobile Explorer.
To go into a sub menu, press the corresponding
number or select the desired item and press [ ].
This key is used to make or receive a call.
This key is used to terminate a call or exit the
current menu. This key is used to turn the
handset ON or OFF.
This key is used to set the etiquette mode. Press
and hold [
].
Press [
] and hold it to enter Lock Mode.
Navigation key.
11
12
HANDSET DESCRIPTION
BELL RINGS
Press [
] long key to stop the Bell.
Press [
] to increase Ringer volume.
HANDSET DESCRIPTION
In Idle Mode the navigation key has the following functions:
My Menu
Name Search
Press [
Voice Service
] to decrease Ringer volume.
eDiary
DURING A CALL
Press [
] and hold for two seconds to start
recording while you are in conversation.
Press [
] shortly to stop recording.
13
Press [
] to increase the earpiece volume.
Press [
] to decrease the earpiece volume.
14
USING THE BATTERY
Battery Installation
Insert the bottom of battery into the groove at the bottom of
the handset. Then press in the top of the battery until it
snaps.
BATTERY CHARGING
Charging with traveler's adapter
POWER CONNECTION
The travel Adapter is used to recharge the phone.Put AC
blade into the power outlet and connect Adapter plug into
the socket at the bottom of the phone.The phone can still be
used while it is plugged into the travel Adapter,but this will
cause the phone to charge more slowly.
To quickly charge the phone,turn the power Off.
TOP
Battery Removal
Pull down the release latch, lift up the battery and remove
the battery from the handset.
BATTERY CHARGING LED
The red LED indicates charging is in progress.
The green LED indicates charging is completed.
Fully charge the battery before using - it is not charged when
purchased.
Please do not use any other Travel Adapter except packaged one into the Z720i.
The operating time of batteries is subject to what function you use,where you use
a phone, what service provider is in use and so on.
15
16
MEMO
CHAPTER 2
BASIC OPERATION
TURNING THE PHONE ON / OFF
MAKING A CALL
HOW TO ANSWER CALLS
AVAILABLE FUNCTIONS DURING A CALL
AVAILABLE FUNCTIONS IN IDLE MODE
ACCESSING THE MENU
MY MENU
MENU SUMMARY
ENTERING LETTERS
SMS
17
18
TURNING THE PHONE ON / OFF
Turning the phone on
MAKING A CALL
1 Enter the phone number, then press [
].
Press [
] and hold until the “Power On” logo appears
and the tone sound is heard.
When you press a wrong number
press
once to clear up a digit or press
all the digits entered.
To turn off the phone
Press [
To dial a call which is recently placed, answered or not answered,
press [
] once and you will see dialed / answered / not answered numbers
displayed in a time order. You can use the right and left navigation key to
move to each of the item above. You can choose one of them and place a call
simply by pressing [
].
] and hold until “Power Off ” appears.
Immediately charge or recharge the battery when
“Low Battery ” appears on the display. Memory
may possibly be damaged if the phone turns off
due to the battery completely drained.
Turn the phone off before removing or replacing
the battery. If the phone is on, data may be lost.
19
and hold it to clear up
To end a call
To end a call, close folder or press [
].
20
HOW TO ANSWER CALLS
AVAILABLE FUNCTIONS
DURING A CALL
1 If an incoming call is the one that is stored in your
phone book, the caller s name is displayed and if it is
not the number stored in your phone book,
“Caller ID” is displayed.
Find
] and talk into phone.
2 Open folder or press [
To end a call, close the folder or press [
]
Press [
] and [
].
You can find a saved phone number.
Send phone number
Automatically transmits your phone number to
the other party during a call without manually
entering the number.
Keypad Mute
Enables you to store or search for the
phone number with no key tone being
heard during a call.
Mute
Keeps caller from hearing your voice and
any sound on your side.
My own number
To transmit your phone
number during a call,
press [
] and [
].
Press [
] and [
To deactivate [
].
][
].
Press [
] and [
To deactivate [
][
].
Press [
].
] and [
].
You can see your phone number.
After 3 seconds, your phone number
will disappear automatically.
Voice Privacy*
Press [
][
down select.
You can select voice privacy mode.
] and up,
*This function is not available in Zapp network.
21
22
AVAILABLE FUNCTIONS
DURING A CALL
AVAILABLE FUNCTIONS IN
STAND-BY
Adjusting volume
Press [
] to increase and [
earpiece volume during a call.
Storing a phone number
] to decrease the
Enter phone number and press [
].
Recording a call
Store
Press and hold [
].
To stop and store the recording, press [
].
“Recording ” appears if the recording starts.
Press [
] to store the number.
By number
Press [
]
You can find saved phone number.
Enables you to search for phone number on phonebook.
Speaker phone
Press and hold up-arrow navigation key [
To deactivate, also press and hold [
].
“Speaker on” appears on the display.
].
Pause Symbol
Press [
].
You can dial or save a phone number with pauses for use in the automated
systems where you need to enter a credit card number, and so on. This feature
will be convenient when you are linked to ARS (Advanced Record System).
Add Hyphen
Press [
] and enter the rest of the number.
Inserts hyphen among numbers for better and easier recognition of the numbers.
23
24
AVAILABLE FUNCTIONS IN
STAND-BY
Dialed Call
AVAILABLE FUNCTIONS IN
STAND-BY
Lock Phone
You can place a call to a number recently dialed simply by looking it up
from call history.
Press and hold [
].
To clear out of the mode
] and you will see the numbers that
1 Press [
were recently dialed.
Enter a four-digit password.
Password is initially set to 0000.
Easy Display Screen Setup
To change screen image, press [
press [
number.
].
] you can add the selected phone
2 Select one of the numbers and press [
a call.
] to make
Etiquette Mode
Press and hold [
].
To clear out of the mode
Press and hold [
].
The previous mode returns.
25
26
ACCESSING THE MENU
ACCESSING THE MENU
1 In the idle mode, press [
to access each function.
Hotkey
In the idle mode move the direction Key as follows to
access these functions:
]
My menu
Name Search
2 Use the direction key to scroll through functions.
Voice Service
ediary
To search through the menu in numerical order, press to the right.
To change background image, press [
]
3 To return to the previous page, press [
].
To exit the current menu and return to the idle mode, press [
].
4 Press [
] to go into a function when its main page is
displayed or press its assigned number to have a direct
access to the function.
27
28
MY MENU
Add
1 In some menu state, you can add a menu to My menu
by pressing [
].
2 Select to “YES” to Add.
3 Select Icon by press [1~4] after searching with
Navigation key.
Then the selected Menu is added to My Menu.
29
MY MENU
View
1 Press [
] in Idle mode and you will see My Menu.
2 Press [
] to enter the selected menu.
3 Press [
] to delete the selected menu.
30
MENU SUMMARY
MENU SUMMARY
1. WEB
6. eDiary
1.Mobile Explorer
1.Wake-up Call
2.Alarm
2. Entertainment
1.Camera
1.View Wake-up Call
2.Set Wake-up Call
2. ZappMe
1.View Alarm
2.Set Alarm
1.Screen Shot
2.Album
3.Scheduler
3.Camera Setting
4.Calculator
4.Help
5.Stop Watch
2.Game
6.World Time
3.Stored Image Box
7.Bio-rhythm
4.Stored Melody Box
3. Display
5.Memory State
Image/Melody/Photo/Total/Available
1.Main Display
Background/Clock Mode
2.Sub Display
Digital CLK/Analog CLK/Character&
7. Voice Service
1.Inbox (Play/Delete All)
2.Setting
(1.Mode Set/2.Record Greeting)
3.Answer Times/4.Speaker On/Off)
2.Voice Memo
CLK/Greeting&CLK
1.Record
3.Greeting
Main/Sub Greeting
2.Play
4 Contrast
Main/Sub Screen
3.Delete All
5.Backlight
10s/20s/30s/always on
8. Setting
4. Sound
1.Answering
Machine
1.Receive Mode
Bell/Slide Bell/Vibrator/Mute/
Bell Aft Vib/Bell And Vib
2.Melody
1.Melody
1.Auto Answer
Not Use/1 Ring/3 Rings
2.Voice Privacy
Standard Mode/Enhanced Mode
3.Language
Romanian/ Hungarian/ English
4.Call Waiting
Active/Cancel
5.Call Forward
1.Uncondition (Active/Cancel)
2.Download Melody
3.Volume
2.No Answer (Active/Cancel)
Key tone/Bell/Alarm/Ear Volume/Connect/
3.Busy (Active/Cancel)
Release/Fade/1 minute/Power
4.Group Bell
Family/Friend/Office/Other
1.Find
By Name
2.Store
Search
4.Busy/No Answer (Active/Cancel)
6.Data Service
1.Receive Mode (Inactive/Data/Fax)
2.Rm Speed (230400/115200/19200 bps)
5. Phone Book
3.Data Port (RS-232C/USB) 12/24
7.Time Format
8.Answer Mode
3.Call Log
Folder open / Press key
Dialed Call/Answered Call/
Missed Call
4.Call Time
Last Call/Sent Calls/Received Calls/
All Calls
5.My Own Number
31
32
MENU SUMMARY
0. Security
1.Privacy
MENU SUMMARY
Phone Book/Call Log/Message/
Schedule/Photo
2.Lock Phone
After Pwr On/After 20s/Not Use
3.Change Code
New Code
4.Restrict
1.Incoming Call
CALL MENU
1. Find
Search
2. Send Phone #
3. Keypad Mute
4. Mute
2.Outgoing Call
3.Overseas Call
5.Clear Memory
Phone Book/ Schedule/Call Log
6.Reset Phone
NO/YES
5. My Own Number
6. Voice Privacy
Standard Mode/
Enhanced Mode
7.Version
SMS MENU
SMS
1.New MSG
2.Received MSG
3.Sent MSG
4.Setting
1.Direct View (Release/Set)
2.Bell Type (Bell/Mute/Vibrator)
3.Notice Method
(One time/Every 10 min/No notice)
4.Erase All
1.Received MSG
2.Sent MSG
5.Save Edit MSG
(Prompt/Do Not Save)
6.Acknowledge
(Activate/Deactivate)
33
34
ENTERING LETTERS
Numbers and Symbols
1 Input Mode will be available in the following situations.
Entering a greeting in LCD display.
Entering a number into phone with name and memo.
Entering a name in Phonebook.
Entering a memo in Schedule Input.
Using D-Day feature.
To select an input type in Input Mode
1 You can press [
] to a desired input mode and
press [
] to a symbol modem, or you can input mode
press [
] long-key to change to number mode,
and [
] long key, to change to symbol mode.
English : Standard English input mode
123 : Number input mode
om
Rom
T9 Rom : Quick Romanian input mode
Rom : Standard Romanian input mode
T9 Eng : Quick English input mode
ENTERING LETTERS
English/ Romanian - Input mode
1 Select "English" or "Romanian" by pressing [
].
2
1 Select the desired symbol using the navigation key.
3
1 Press the left-navigation key to move the cursor to the
left and press [
] to move the cursor to the right.
4
1 Press key [1 ~9 ] to select a certain character.
5 You can change between small letter an capital letter
1
by pressing [
].
- Once - capital mode : press [
- Capital letter mode : press [
- Small letter mode : press [
] key once
] key twice
] key 3 times
Example:
Input the word "school" (in English mode)
Press[
] key 4 times
Press[
] key 3 times
Press[
] key twice
Press[
] key 3 times
Press[
] key 3 times
Press[
] key 3 times
Symbol : Symbol input mode
35
36
ENTERING LETTERS
ENTERING LETTERS
T9 English - Input Mode
T9 Rom - Input Mode
This mode allows you to enter English letters by pressing
the keys only once.This way, you press each key only once,
even if the letter you want is not the first letter on the key.
When you press the keys, a word is suggested.
KEY
This mode allows you to enter Romanian letters by pressing the
keys only once. This way, you press each key only once, even if the
letter you want is not the first letter on the key.When you press the
keys, a word is suggested.
Character order
Character order
KEY
ABC2
2
DEF3
3
GHI4
4
JKL5
5
MNO6
6
PQRS7
7
TUV8
8
WXYZ9
9
.,_?!‘@;|
.,_?!‘@;|
To shift between capital and lower-case letters
To shift between capital and lower-case letters
Press repeatedly to scroll between the
suggested words
Press repeatedly to scroll between the suggested words
To delete letters and numbers
To delete letters and numbers
To move the cursor
To move the cursor
Example:
Input the word "school" (in T9 Eng mode)
Press [
][
][
][
][
37
][
]
38
SMS
SMS
3 Press [
New MSG
1 Press [
],[
].
] to send the message.
4 Select “Yes” or “No”, press [
save it.
] to
Received MSG
Text MSG
01: 1111
02: 2222
03: 3333
04: 4444
05: 5555
Menu
01: 1111
02: 2222
03: 3333
04: 4444
1 Press [
],[
].
Ok
2 Press [
] to input the message.
Show the number of received
messages.
Ok
2 Press [
Edit
39
],[
],[
]
1. Detail: see the selected message.
2 .Delete: delete the selected message.
40
SMS
SMS
Text MSG
123456789
[002] This is a th
st message. Have a
nice day...12345678
Menu
1. Reply
2. Resend
3. Delete
4. Save Number
Sent MSG
1 Press [
],[
].
Menu
Detail
1. Reply: answer to the person who sends the message.
2. Resend: send the selected message to another person.
3. Delete: delete the selected message.
4. Save Number: save the phone number of the selected message on the
phonebook.
Menu
1.Delete the message.
2.Send again the message.
41
42
SMS
SMS
3 Press [
Setting
1 Press [
],[
],[
],[
],[
],[
],[
].
].
Set: When the message is received, show up the content.
Release: When the message is received, show up the sender’s name and
phone number with out showing the content.
One time: Lets you know only one time that a new message has arrived.
Every 10min: Every 10 minutes, the phone reminds you that a new message
was arrived.
No notice: Never notify you about the received message.
4 Press [
],[
],[
],[
],[
] or [
].
You delete all the received or sent messages.
2 Press [
],[
],[
],[
].
5 Press [
Bell: Bell rings as soon as the message arrives.
Mute: No sound when the message arrives.
Vibrator: Vibrate as soon as the message arrives.
43
],[
],[
].
Save all edited messages.
Select one of the options (Prompt /Do Not save) by using the navigation key.
44
SMS
SMS
6 Press [
],[
],[
].
Annunciator
Activates Delivery Acknowledgement to confirm delivery of message.
Select one of the options (Activate/Deactivate) by using the navigation key.
Blue : Normal priority
Orange : Urgent priority
Red : Emergency priority
Receive the message
Text MSG
123456789
[002] This is a th
st message. Have a
nice day...12345678
1.Reply
2. Resend
3. Delete
4. Save Number
Delete
Message received screen.
45
46
MEMO
CHAPTER 3
MENU FUNCTION
WEB
ENTERTAINMENT
DISPLAY
SOUND
PHONE BOOK
EDIARY
VOICE SERVICE
SETTING
SECURITY
47
48
WEB
WEB
How to download
Mobile Explorer
Press [
[
],[
],[
].
],[
Applications are organized in a catalog based on their categories such as
games and tools.
] or
1 To select the “Zapp Me ”menu, press [
].
Mobile
Explorer
Zapp Me
This feature allows you to download pictures, music or games from
MobileShop and store them into your phone.
2 To select the “Catalog”, press [
].
If you downloaded the item you wanted, the corresponding icon will be
displayed in the "main menu" screen.
1 To access the “MobileShop”,
press [
],[
],[
]
or [
],[
].
You can arrange and move the applications from
the setting menu.
2 Scroll through the menus by using the navigation key.
3 Selecting “Catalog ” allows you to access the Mobile
Shop Download.
3 Press the [
] key to go into the selected item.
To return to the previous page, press[
To exit Zapp Me, press[
].
49
].
50
WEB
WEB
How to search for applications
Help
You may also search for applications by keywords. In the find dialog box,
Input the desired keyword.
1 To select the “Zapp Me”menu, press [
1 To select the “ Help” menu, press [
].
].
2 Selecting “ Help” allows you to find information about
using the MobileShop.
2 Enter the Search menu by pressing [
].
3 Input all, or just part of the word that
you would like to find.
4 Pressing [
] enables you to select any of
the functions in the lower part of the display.
51
52
WEB
WEB
Changing the order of applications
Setting
1 To access ZappMe, press [
].
2 To access the Settings menu, press [
1 To access the “Order Apps” menu, press [
].
Order Applications: Draws application in order.
Move Applications: Moves application to the folder that you want.
Manage Applications : Show the applications status and allow to
perform other operations to downloaded
applications.
Main Menu View : Indicates how applications are shown in the main screen.
Small icon - applications are displayed as small icons.
Large icon - applications are displayed as large icons.
List - applications and title are displayed by list.
Screen Saver : You may purchase screen saver from Mobile Shop.
2 The downloaded items will be displayed if entering the
Main menu by pressing [
].
3 Press [
] after selecting the item that you like
and change it’s location by pressing [
].
It is placed if you press [
3 Press [
53
].
].
] to save it.
54
WEB
WEB
Moving Applications
1 Press [
] after selecting “Move apps”.
2 By pressing [
] after selecting the “Main menu”, the
downloaded items will be displayed.
Manage Applications
1 Press [
] after selecting “Manage app”.
2 If you press [
] again, the used memory storage and
available memory storage will be displayed in detail.
3 If pressing [
] after selecting the item you want, you
can select one of Favorites, Work and Fun and move.
55
56
WEB
WEB
Changing the Main Menu View
Help
Enables you to view information about “Mobile Shop” menu.
1 Press [
] after selecting “Main Menu View”.
1 Select the Help menu, press [
To return to the previous page, press [
].
].
2 To select one of the options using the [
key, then press [
].
]
2 Following is displayed by selecting the small icon.
3 If selecting Large icon.
Press [
] to left or right to
select the item.
4 If selecting List.
57
58
ENTERTAINMENT
ENTERTAINMENT
Sticker Shot
Camera
1 Press the [
][
press the [
][
1 Press [
] key or
].
You can rotate the view 180o by pressing [
] key.
].
You can select different backgrounds by
pressing [
].
A total of 4 camera functions are available.
Outside Camera (Using the external LCD)
If you want to take a self-portrait in “Outside camera ” mode,
press [
] and the sub LCD preview will activate.
If “Memory full” is displayed, you have used up all storage allowed.
Please delete old images that are no longer necessary for you.
Album
1 Press [
[
][
Screen Shot
Press [
][
][
] key or
][
].
] key to get into “Screen Shot” mode.
Photo Shot
1 Press [
2 Press [
] to scroll through all stored pictures.
You can enlarge the selected picture by pressing [
].
You can rotate the view 180o by pressing [
].
].
] key allows you to delete, delete all,
3 Pressing the [
rename or set wallpaper the selected picture.
2 Press the [
picture name.
59
] key to save picture after entering the
1. Delete
2. Delete All
3. Edit Name
4. BG Setup
5. Lock
6. Phonebook
60
ENTERTAINMENT
ENTERTAINMENT
Delete
4 Press the [
Lock
8 Press the [
] key.
Select “YES” by using the [
] key
and press the [
] key to delete the
selected picture.
] key.
Select “YES” by using the [
] key
and press the [
] key to lock
selected picture.
Delete All
5 Press the [
Phonebook
] key.
Select “YES” by using the[
] key
and press the [
] key to delete all
stored pictures.
9 Press the [
] key.
Select “Phonebook” by using the [
] key and press the [
] key.
Edit Name
6 Press the [
] key.
The existing name can be deleted by pressing
the [
] key and saved in a new name.
Press the [
] key save the new name.
BG Setup
7 Press the [
] key.
Select “Check Box” by using the [
key and press the [
] key to Set
Wallpaper the selected picture.
61
]
62
ENTERTAINMENT
ENTERTAINMENT
Camera Setting
1 Press [
[
][
][
][
Shutter Sound
Select the shutter sound mode by pressing the [
key and then press [
].
] key or
][
].
]
Say cheese, E-effect, M-effect, Silent
Capture
Select the capture mode by pressing the [
and then press [
].
Quality
] key
Auto, Day, Night
Select the Quality mode by Pressing the [
and then press [
].
] key
Base, High, Best
Flash
Select the Flash mode by pressing the [
and then press [
].
] key
on, off
Graphic mode
Select the graphic mode by pressing the [ ] key
and then press [ ].
The amount of storage can vary depending on the selected
setting.
VGA 640 x 480, SCIF 320 x 240, SQCIF 160 x 120.
63
64
ENTERTAINMENT
Camera Help
1 Press [
],[
Game
].
1. Rotate
2. Flash
3. Effect
4. Zoom
5. Brightness
6. Shutter
7. Preview change
Provides information on the keys to be used
while taking a picture and camera functions.
Please refer to the following information when you take a
picture.
Refer to the picture description shown on the left and
properly adjust rotate and brightness.
The camera sensor needs time to automatically adjust
exposure.
The best clarity can be obtained when subject is at a stop.
Camera operation may not work well in dark places or
cloudy weather conditions.
For best results, please take a picture in bright places or
clear weather.
The image clarity can vary depending on image
compressed format when saving photos.
This camera does not support a high resolution so please
use a digital camera or film for higher clarity.
Battery times are shorter when using the camera flash.
Handle with care as the camera is very weak at dropping
or shock.
Scrub the lens with a soft cloth.
65
ENTERTAINMENT
BLACKJACK
You know the rules of the game - whoever gets closest to 21 without going over
wins. Think you can beat the dealer? Good luck!
1 Press [
],[
],[
].
2 Press any key to start the game.
Stored Image Box
Zapp Logo
1 Press [
],[
],[
].
Stored Melody Box
1 Press [
],[
],[
].
Memory State
1 Press [
],[
],[
].
Displays used memory state.
If you want to delete each stored element, select it and,
press [
],[
]
66
DISPLAY
DISPLAY
Main Display
Sub Display
Background
To change the display for the standby mode.
Your new Phone offers option for what you see on the
subdisplay screen when in standby mode.
1 Press [
1 Press [
],[
],[
],[
2 Select “Background1~5” by Pressing
the [
]key.
3 To save it, press [
],[
],[
].
].
2 Select “Digital CLK”,“AnalogCLK”,
“Character&CLK”,“Greeting&CLK”and
press [
] to save it.
].
Clock Mode
To change the clock’s appearance on the standby screen:
1 Press [
],[
],[
],[
].
2 Select “None” ,“Small CLK”,“Large CLK”,
“Calendar”and press [
] to save it.
67
68
DISPLAY
DISPLAY
Greeting
Backlight
Main Greeting
The text greeting can be up to twelve characters and is
displayed on your phone’s screen standby mode.
To display or change your custom greeting:
1 Press [
],[
],[
],[
].
],[
],[
].
Backlights the display and keypad for easy viewing in dark
places.
1 Press [
],[
],[
].
Sub Greeting
1 Press [
],[
Contrast
To adjust the display contrast:
1 Press [
],[
],[
].
2 Select “Main Screen” or “Sub Screen” and use the left
and right navigation keys to modify the value.
Main Screen: Level1-5
Sub Screen: Level1-5
3 To save it, press [
69
].
70
SOUND
SOUND
Download melody
Receive mode
Controls the Ringer volume and alerts you to incoming calls
in various modes.
1 Press [
],[
],[
],[
].
Downloads : Downloaded ringer types and music.
2 Press [
1 Press [
],[
],[
].
].
2 Select one of the following options by pressing
the Navigation Key to the right and press [
].
] to use the selected melody
3 Press[
or press [
] to delete it.
4 Select by using the navigation key and press [
store.
Melody
] to
Volume
Melody
1 Press [
],[
],[
],[
2 Select your desired ringer type.
Music Bells : 1~30
].
1 Press [
],[
],[
].
2 Select one of the following volume
options by using the navigation key and
press [
].
Keytone / Bell / Alarm / EarVolume / Connect / Release
/ Fade / 1Minute / Power
71
72
SOUND
PHONE BOOK
Key Tone
Find
With folder open, control key tone with [
and press [
].
] /[
]
Retrieves an entry by name.
1 Press [
],[
],[
].
2 All entries will appear in alphabetical order.
“By Name” will appear at the top of the list.
The key tone is not heard in etiquette mode.
Lower
Group Bell
1 Press [
],[
2 Press [
] to select one Group.
],[
].
3 Select one melody by using Navigation
key and press[
] to store.
73
Higher
3 Type in a name or character string, and all the matching
entries will be displayed. Select an entry and either
delete it by pressing [
],[
] or view it by pressing
[
].
4 To call the selected number,press [
].
If there is no match, “No Matched Name Found” will appear.
If the entry is set to secret, you will be asked for your
password.
74
PHONE BOOK
PHONE BOOK
Store
1 Press [
Call Log
],[
],[
Dialed Call
].
2 To save the number in the first empty position suggested,
press [
].
To save the number in another position, press left or right
navigation key and select a new position.Then press[
].
3 Enter a name and press[
].
Press the navigation key down to select other options
(Home #, Office #, Faximily #, Mobile #, Ringer,
E-Mail, Address, Set Secret, Group, Photo).
Displays information of the 30 most recently outgoing calls.
Place a call to a received number by simply pressing[
].
1 To see a list of the 30 most recent outgoing
calls, press [
],[
],[
].
If the number is already stored in your phone
book, only the name appears. If the number is
not stored, only the phone number appears.
2 To view outgoing call details, press [
4 To store the entry, press [
].
5 Set which number you want for quick dial and press[
After “Stored at #address” appears on the display, the
number is stored.
].
Call details include date, time, and phone.
].
]. Select “Store” to save it or select “Delete”
3 Press [
to erase it.
Detail
Store
Delete
75
76
PHONE BOOK
PHONE BOOK
Answered Call
Missed Call
Displays information of the 30 most recently answered calls.Place a
call to a received number by simply pressing [
].
Displays information of the 30 most recently missed calls.
Place a call to a received number by simply pressing[
].
1 To see a list of the 30 most recent answered calls,
press [
],[
],[
],[
].
If the number is already stored in your phonebook, only
the name appears. If the number is not stored, only the
phone number appears.
1 To see a list of the 30 most recent outgoing
calls, press [
],[
],[
],[
].
If the number is already stored in your phonebook, only
the name appears. If the number is not stored, only the
phone number appears.
2 To view answered call details, press[
2 To view missed calls, use the navigation keys
to select then press [
].
].
Call details include date, time, and phone.
Call details include date, time, and phone.
3 Press [
]. Select “Store” to save it or Select “Delete”
to erase it.
Detail
Store
Delete
77
3 Press [
]. Select “Store” to save it or Select “Delete”
to erase it.
Detail
Store
Delete
78
PHONE BOOK
PHONE BOOK
Call Time
My Own Number
Checks the talk time and manages your calls within the limit you
set. The five timers include:
1 Press [
],[
],[
].
To display your phone number and service provider:
1 Press [
],[
],[
].
2 To return to the previous page, press [
79
].
80
EDIARY
Wake-up Call
View
1 To view the wake-up call Lists
Press[
],[
],[
],[
].
EDIARY
Set
1 Press[
],[
],[
],[
].
2 The setting field will be highlighted. Press the
navigation key down to select wake-up call options.
SETTING
Use the Navigation key to select a setting for the
wake-up call (Release, Mon-Fri, Mon-Sat, EveryD).
TIME SETTING
Use the keypad to set a time for the wake-up call.
2 Use the navigation key to choose a wake-up call.
Press [
] then select "Modify" or "Delete".
SNOOZE SETTING
Use the Navigation key to select a Snooze setting
(Snooze Off, Snooze On).
RINGER SETTING
To set a “Ringer” using the Navigation key.
3 To save a wake-up call setting, press[
81
].
82
EDIARY
EDIARY
Set
Alarm
1 Press [
View
1 To view the alarm lists,
Press[
],[
],[
],[
].
2 Move the navigation key to choose an alarm then
select "Modify","Delete" or "Del All" using the navigation
key.
],[
],[
],[
].
2 The setting field will be highlighted. Press the
navigation key down to select alarm options.
SETTING
Use the navigation key to select a setting for the alarm
( Release/ once/ Mon-Fri/ Mon-Sat/ EveryD).
TIME SETTING
Use the keypad to set a time for the alarm.
MEMO SETTING
To edit a memo, press the navigation key right and input
memos.
RINGER SETTING
To set a "Ringer" Using the Navigation key.
3 To save an alarm setting press [
83
].
84
EDIARY
EDIARY
Add Schedule event
Scheduler
1 Press [
],[
],[
].
2 Move the Navigation key left, right, up or down to choose
a date in the calendar.
] then select "View", "Schedule",
3 Press [
"D-Day" or "Delete", using the navigation key.
View
Show Schedule Lists and D-day Lists.
1 To view Scheduler Lists or D-day Lists, select "View".
2 Move the Navigation key left or right to choose Schedule or
D-day Lists or D-day Lists.
] then select "Modify" or "Delete" using the
3 Press [
navigation key.
85
1 To add A Schedule, Select "Schedule".
DATE SETTING
Use the keypad to change enter the date for the scheduler
then Press[
]
TIME SETTING
Use the keypad to set a time for the scheduler.
MEMO SETTING
To edit (a memo/a location), press the navigation key to the
right and input (memos/locations).
ALERT SETTING
Use the navigation key to select an alert for the scheduler
(Release/before10/ before30/ before60).
RINGER SETTING
To set a "Ringer" Using the navigation key and to save the
scheduler setting press [
].
86
EDIARY
Add D-day event
1 To add a D-Day, select "D-day"
D-Day
Show the D-day.
DATE SETTING
Use then keypad to change or enter the date for the
scheduler then Press[
]
EDIARY
Calculator
To access the calculator:
1 Press [
],[
].
2 Follow the instructions below to calculate (8*6)/4-2.5
Input 8.
Move the Navigation Key leftword.
Input 6 then press the Navigation Key.
rightward.
Input 4 then press the Navigation Key.
Move it downward.
Input 2 then press the
to input (.).
Press 5,
.
TITLE SETTING/ MEMO SETTING
To edit (a memo/a location), press the navigation key to the
right and input(memos/locations).
Delete All
Delete All Lists.
],[
:/
:+
:-
:x
:.
:=
1 To delete all schedules and D-days, Select "Delete".
87
88
EDIARY
EDIARY
Stopwatch
Bio - rhythm
This function identifies the bio-rhythms of today or a specific
day using solar calendar.
To operate the stopwatch:
1 Press[
],[
],[
].
1 Press[
2 To measure a time period.
1. To start the stop watch, press[
]Start.
2. To pause it, press[
]Stop.
3. Press [
]‘Rst’ to Clear the time.
4. To stop the second and continue measuring
a third one, press [
]Spl.
],[
],[
].
2 Select ”My Birthday” or ”Others Birthday”. using the leftright navigation key.
3 Input a Birthday using the key pad.
4 Then input the day for which you want to know the bio rhythm.
5 Create biorhythms using the left or right navigation keys
or press [
].
World Clock
To display the time and date in pre-programmed cities:
1 Press[
],[
],[
].
2 Select a city.
MY Birthday:
Enter your birthday in year/moth/day.
Create biorhythms:
Physical...
Intellectual...
Emotional...
Lived Days...
3 The world map appears with the city, its date and time.
Use the Navigation Key to select another.
4 To return to the previous page, press [
89
].
90
VOICE SERVICE
VOICE SERVICE
Record Greeting
Answering Machine
Answering Machine, by which you can record up 10minutes.
You can also overhear the recording and can choose to
accept or reject the call.
1 Press [
],[
],[
].
1 Press [
],[
],[
],[
2 Press[
] and select one action.
Record
1 Press [
],[
],[
],[
],[
],[
].
] button to start recording, by speaking
2 Press [
clearly into the moth piece/microphone. Maximum
recordable time is 30 seconds.
Inbox
Play
3 Select ”Save”[
],[
] or “Cancel”[
].
].
Play: Play answer message
Delete: Delete answer message
Detail: View detail information
Edit: Edit message title
Play
Delete All
1 Press [
1 Press [
],[
],[
],[
],[
],[
],[
],[
],[
],[
].
].
2 Select "Yes" or "NO" by navigation key, and press[
]
2 Select “Yes” or “No” with the Navigation key and
press [
].
Setting
Mode set
1 Press [
],[
],[
],[
],[
].
2 Select “Not use”or “Use” with the scroll
key and press [
] to save it.
Not use
Use
91
92
VOICE SERVICE
VOICE SERVICE
Answer Time
Voice Memo
1 Press [
],[
],[
],[
],[
].
2 Select “Immediately”, “4 secs”, “8 secs”,
“12 secs”,”16 secs” with the scroll key and press [
to save it.
By selecting this function, you can record
messages of your choice, and then listen to
them.
]
1 Press [
],[
],[
].
],[
],[
],[
Record
1 Press [
2 Select ”Save”[
]or “Cancel”[
].
Play
Speaker On/Off
1 Press [
].
],[
],[
],[
],[
1 Press [
].
],[
],[
],[
].
Memo List
01/08 01 : 04
2 Select “On”or “Off” with the scroll key and press [
save it.
] to
m
2 Press [
Play: Play select voice
memo
Delete
Detail: view detail
information
Edit:Edit voice memo title
001k
] to select one of the options.
Delete All
1 Press [
],[
],[
],[
2 Select “Yes” or “No” with the
navigation key and press [
93
].
].
94
SETTINGS
SETTINGS
Auto Answer
Language
Automatically answers a call after a preset number of
rings. An ideal setting for the hands-free car kit.
1 Press [
],[
],[
].
2 Select one of the Auto Answer options:
Not Use
1 Ring
3 Rings
Selects the language in which letters are displayed on
screen.
1 Press [
],[
],[
2 Select either “English”,“Hungarian” or “Romanian”with
the Navigation key.
3 To save, press [
3 To save, press [
].
].
].
Call Waiting
1 Press [
Voice Privacy
],[
],[
].
2 Select one of the displayed options and press [
1 Press [
],[
],[
].
].
2 Select one of the Voice Privacy options:
Standard Mode
Enhanced Mode
3 To save, press [
].
NOTE: This function is not available in
Zapp network.
95
96
SETTINGS
SETTINGS
Busy
Call Forward
Call forwarding sends your phone’s received calls to
another specified phone number or forwards each call
type different specified numbers.
1 Press [
],[
],[
],[
].
2 Select one of the Busy options
and press [
].
Uncondition
1 Press [
],[
],[
],[
].
2 Select one of the Uncondition options
and press [
].
Busy / No Answer
1 Press [
],[
],[
],[
].
2 Select one of the Busy/No Answer options
and press [
].
No Answer
1 Press [
],[
],[
],[
].
2 Select one of the No Answer options
and press [
].
97
98
SETTINGS
SETTINGS
Data Port
Data Service
1 Press [
Receive Mode
1 Press [
],[
],[
],[
].
2 Select one of the Receive Modes:
When the cable is connected to phone,
you can select the option.
If the cable is not connected to phone,
you can see only “inactive” item.
],[
],[
],[
].
2 Select one of the Data Port:
RS-232
USB
3 To save, press [
].
Time Format
Inactive
1 Press [
3 To save, press [
].
],[
].
2 Select one of the following Time Formats with the
navigation key.
12
24
RM Speed
1 Press [
],[
],[
],[
],[
].
3 To save, press [
].
2 Select one of the following connection speeds with the
navigation key.
230400bps
115200bps
19200bps
3 To save, press [
99
].
100
SETTINGS
SECURITY
Prevents others from using the phone without permission and
allows access to security features only after inputting a
password.
Answer Mode
1 Press [
],[
],[
].
2 Select one of the following Answer Modes with the
navigation key.
Folder open
Press key
3 To save, press [
The initial password is 0000
].
Privacy
1 Press [
],[
],[
].
2 Select one of the following connection privacy with the
navigation key.
3 To save, press [
101
].
102
SECURITY
SECURITY
Lock Phone
Restrict
Prevents others from using your phone without permission.
When locked, calls cannot be made and the menu cannot be
accessed without a password.
1 Press [
],[
],[
].
Incoming Call
1 Press [
2 Press and select “After Pwr On”, “After 20s”,
“Not Use”with the navigation key.
3 To save, press [
When you attempt to make a restricted call, “This phone is
restricted” appears on the screen.
],[
],[
].
2 Select one of the options, using the navigation key.
].
Release
Restrict
3 To save, press [
Change Code
].
Outgoing Call
Changes your 4-digits password.
1 Press [
],[
],[
],[
1 Press [
],[
],[
],[
].
].
2 Select one of the options, using the navigation key.
2 Enter a new password and press [
].
3 Enter the new password again and press [
].
Release
Restrict
3 To save, press [
103
].
104
SECURITY
SECURITY
Overseas Call
Reset Phone
1 Press [
],[
],[
],[
].
Resets phone to default settings.
2 Select one of the options, using the navigation key.
],[
],[
].
2 Select “Yes” or “No” with the navigation key and
press [
].
Release
Restrict
3 To save, press [
].
Version
Clear Memory
1 Press [
1 Press [
],[
],[
].
1 Press [
],[
],[
].
2 Select one of the options, using the navigation key.
3 To save, press [
105
].
106
MEMO
CHAPTER 4
USER GUIDELINES
WHEN YOU COME ACROSS ANY OF THESE
PROBLEMS
EXPOSURE TO RADIO FREQUENCY SIGNALS
DRIVING SAFETY
OTHER SAFETY GUIDELINES
HANDLING GUIDELINES
BATTERY HANDLING INFORMATION
107
108
WHEN YOU COME ACROSS
ANY OF THESE PROBLEMS
Any Troubles?
1. No display appears
Try it out.
Please check if battery discharges completely.
Please wait if you just now turned it on. If you still have
low signal strength, please move to other place.
3. The LED of charger
blinks
4. Abnormal function &
no power supply
5. Shorter talk time
Our wireless portable hand-held phone is a low power radio
transmitter and receiver. When the phone is on, it receives
and also sends out radio frequency (RF) signals.
Try this; Turn off phone, take out battery pack and
put it back in. Then, turn it on again.
2. No Signal Strength
EXPOSURE TO RADIO
FREQUENCY SIGNALS
Please disconnect phone from charger, clean the
contactors of phone, battery and charger, and then
put it back in.
Please disconnect battery pack, connect it again,
The ministry of information and communication adopted RF
exposure guidelines with safety levels for handheld wireless
phones. The design of your phone complies with the safety
guidelines.
Should you need any other information regarding Exposure
to RF signal, please log onto the Pantech homepage
(www.curitel.com)
and then turn it on.
The charge and discharge of battery shortens its
lifetime since it is expendable. Please don’t
store it in extremely high or low temperature, which
will result in short lifetime. The operating time of battery
varies since power consumption is influenced by
area, signal and so on.
109
6. Voice echoes
Please control volume and move to other place.
7. Heat occurs while
in use.
A lot of current is in use during a call. Long-time
call or use of game and Internet can generate heat.
110
DRIVING SAFETY
Check the laws and regulations on the use of phones in the
areas where you drive. Always obey them.
Some electronic appliances are shielded from RF signals,
but others not.
Talking on the phone while driving is extremely dangerous,
Please take cautions not to cause any trouble to electronic
appliances.
it is recommended that do not use the wireless hand-held
phone while driving, if possible.
If using your phone while driving, please use handsfree
operation or ear-microphone and make the call short.
Recent research proves that placing or receiving a call
definitely distracts attention of driver and poses a serious
danger to the safety of driver.
please:
- Give full attention to driving. Driving safely is your first
responsibility.
- Use hands-free operation, if available.
- Pull off the road and park before making or answering a
call, if driving conditions so require.
- Position your phone within easy reach
(An airbag inflates with great force.)
(DO NOT place objects, including both installed or portable
wireless equipment, in the area over the airbag or in the air
bag deployment area. If in-vehicle wireless equipment is
improperly installed and the air bag inflates, serious injury
could result.)
If you are in difficulty to receive the call, please use onetouch, speed dialing, and auto answer modes.
Let the person you are speaking to know you are driving : if
necessary, suspend the call in heavy traffic or hazardous
weather conditions.
Do not takes notes or look up phone numbers while driving.
Do not engage in stressful or emotional conversations that
may divert your attention from the road.
111
OTHER SAFETY GUIDELINES
Please avoid use of hand-held phones around pacemakers
Always keep 6 inch distance between phone and
pacemaker.
Use wireless phone onto your ear distant from pacemaker
Keep wireless phone off.
Don t use wireless phone near medical devices.
Consult manufacturer to check if the medical devices are
shielded against RF signal.
Hearing aid could not work properly when wireless phone is
on.
Make sure to turn off your phone in blasting area or
explosive environment.
Please obey any regulation and instruction posted in
blasting area.
Turn off wireless phone when boarding an aircraft.
112
BATTERY HANDLING
INFORMATION
HANDLING GUIDELINES
Only use battery and charger approved by manufacturer.
Only use battery and handset for its original purpose.
Try to keep phone in a temperature between –20
and
+50 .
If wireless phone is stored in temperature above or below
the recommended range, give it time to warm up or cool
down before use.
Don t use any toxic chemical or detergent to clean phone.
Store phone in a cool, dark and dry place.
Completely drain battery before recharging.
DOs
Only use the battery and charger approved by the
manufacturer.
Only use the battery for its original purpose.
Try to keep batteries in a temperature between 5 and 35
degrees Celsius.
DON'Ts
Don't attempt to disassemble the battery – it is a sealed unit
with no serviceable parts.
Don't leave the battery in hot or cold temps.Otherwise,it could
significantly reduce the capacity and lifetime of the battery.
Don't dispose of the battery into fire.
It may take one to four days to drain completely.
Purchase new battery when its operating time gradually
decreases.
Properly dispose of battery according to local laws.
Don t attempt to disassemble phone it is a sealed unit with
no service able parts.
Read This Information Before Using Your Handset
This information keep the safety and protect the user
from possible property damage.
Do not connect the travel
charger to the bottom of the
phone by force.
The phone can be broken and
discharged.
Avoid handling the plug
roughly and do not put
heavy things on the power
code.
That could start a fire.
While charging your handset, Avoid any shock and do not
do not make a call or receive drop the battery and charger.
a call or touch the phone with It can make a fire.
wet hand.
It could start a fire or electric
shock.
Only use the battery and
charger approved by the
manufacturer.
It can make a fire.
Do not charge the
unauthorized batteries.
There is danger of fire &
electric shock.
Do not pull the electric wire
urgently and do not touch the
plug with wet hand.
It could start a fire or electric
shock.
113
114
BATTERY HANDLING
INFORMATION
Never use a damaged or
loose plug
It could start a fire or electric
shock.
Do not connect external
units between charger and
battery
There is danger of fire &
electric shock.
BATTERY LIFETIME
Standard Battery
(1000mAh)
115
RF SPEC
ITEM
RF Freq. Range
SPECIFICATION
TX : 452.500 ~ 457.475MHz
(Block A )
RX : 462.500 ~ 467.475MHz
Preferred Set Channel
Numbers
160, 210, 260
Number Of Channels
200 Channels
Bandwidth
1.25MHz
Channel Separation
25 kHz
Talk time (min)
155
TX maximum output power Typical 24dBm (23 ~ 25.5 dBm)
Stand by (hrs)
170
TX minimum output power
50dBm below
RX Sensitivity
104dBm below ( at FER = 0.5% ),
Typical
116
SAR
DECLARATION OF CONFORMITY
CDMA Mobile Phone Z720i by Pantech – Curitel.
Tx Frequency:: 453 – 457.5 MHz (CDMA)
Rx Frequency: 463 – 467.5 MHz (CDMA)
SC TELEMOBIL SA, Romania, j. Ilfov, Bucharest Way no 2B
bis, registration number at the Registry of Commerce no:
1596697, we assure, guarantee and declare at ours own risk,
in conformity with the 5th article from the Government
Resolution nr 1022 / 2002 regarding the guidance of products
and services which could risk the life, health or the work and
environment security:
SAR max: 1,220 W/kg (messured for the entire body, also for
head and members)
SAR max value accepted in Romania by MCTI rules: 2 W/kg
MOBILE PHONE CDMA450 Pantech-Curitel, model Z720i,
made in Korea with AC/DC adaptor, at which this Declaration
is regarding to, will not put in danger the life, the health or the
safety of the work, also will not have a negative impact on the
environment and it is in conformity with the following:
- SR EN 60065:2001,
- SR EN 60950+A1: 1995/A2: 1996/A3: 1997,
- SR EN 60950:2001,
- Directives 99/5/EEC, 89/336/EEC, 73/23/EEC, (as in BABT
Labs Report from 19th of August 2004)
- Declaration Of Conformity of the producer
- The phone is CE 0168 marked
- The adaptor is CE marked
- The Trial Report, issued by LABOREX Labs, regarding the
Electrosecurity tests as in the 5th article of the HG
1022/2002
TELEMOBIL SA
117
118