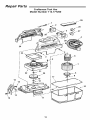
1
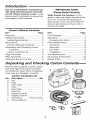
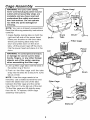
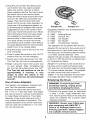
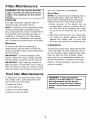
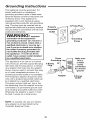
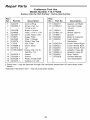
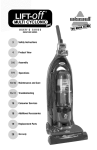
f_Save
This Manual _
for Future Reference
SEARS
owner's
manual
O
MODEL
NO.
113.177260
\
! -
CRRFTSMRN®
Serial
Number
Model and serial numbers may be found on
the handle. You should
record both model and
serial numbers in a
safe place for future
TOOL VAC
use.
FOR YOUR
SAFETY
• assembly
• operating
• repair parts
READ ALL
INSTRUCTIONS
CAREFULLY
K
J
Sears, Roebuck and Co., Hoffrnan Estates, IL. 60179 U.S.A.
Part No. SP5929
Printed in U.S.A.
FULL ONE YEAR WARRANTY
ON CRAFTSMAN
TOOL VAC
If within one year from the date of purchase, this Craftsman Vac fails due
to a defect in material or workmanship, Sears will repair it, free of charge.
If this Craftsman Vac is used for commercial or rental purposes, this warranty coverage applies for only 90 days from date of purchase.
Warranty Service Is Available By Simply Contacting The Nearest Sears
Service Center/department Throughout The United States.
This warranty applied only while this product is used in the United States.
This warranty gives you specific legal rights, and you may also have other
rights which vary from state to state.
Sears, Roebuck and Co., D817 WA, Hoffman Estates, IL 60179
IMPORTANT SAFETY INSTRUCTIONS
Safety is a combination of common
sense, staying alert and knowing how
your Tool Vac works. Read this manual to
understand the Tool Vac.
Safety Signal Words
DANGER: means if the safety information
is not followed someone will be seriously
injured or killed.
WARNING: means if the safety information is not followed someone could be
seriously injured or killed.
CAUTION: means if the safety information is not followed someone might be
injured.
When using your vac, follow basic safety
precautions including the following.
WARNING-To reduce
the risk of fire, electric shock, or
injury:
Read and understand this owner's manual
and all labels on the vac before operating.
Use only as described in this manual. To
avoid personal injury or damage to vac,
use only Sears Craftsman recommended
accessories.
Sparks inside the motor can ignite flammable vapors or dust. To reduce the risk
of fire or explosion:
• Do not vacuum, or use this vac near,flam-
mable or combustible liquids, gases, or
explosive dusts such as gasoline or other
fuels, tighterfluid, cleaners, oil-based paints,
na_ral gas, hydrogen, coal dust, magnesium dust, grain dust, or gun powder.
• Do not use this vac to pick up liquids.
This unit should be used to pick up dry
debris only.
Do not vacuum anything that is burning or
smoking, such as cigarettes, matches, or
hot ashes.
Do not vacuum fireplace soot or ash, this
is a very fine dust which will not be captured by the filter and may cause damage.
To reduce the risk of health hazards from
vapors or dusts, do not vacuum toxic
materials.
Do not use or store near hazardous materials.
Do not use outdoors or on wet surfaces.
Do not allow to be used as a toy. Close
attention is necessary when used by or
near children.
Do not use this vac with a torn filter or
without the filter installed.
Do not leave vacwhen plugged in. Unplug
from outlet when not in use and before
servicing. Turn off vac before unplugging.
To avoid injury from accidental starting,
unplug power cord before changing or
cleaning filter.
Connect
toa properly
grounded
outlet
only.Seegrounding
instructions.
Donotunplug
bypulling
oncord.To
unplug,
grasptheplug,notthecord.
Donotusewithdamaged
cord,plugor
otherparts.Ifyourvacisnotworking
asit
should,
hasmissing
parts,hasbeen
dropped,
damaged,
leftout-doors,
or
dropped
intowater,returnittoaSears
Service
Center.
Donotpullorcarrybycord,usecordas
handle,
closeadooroncord,orpullcord
around
sharpedgesorcorners.
Donot
runvacovercord.Keepcordaway
from
heated
surfaces.
Donotusethetooloutletasanextension
cord.Only use with portable electric
tools with a 6 amp rating or less.
Do not handle plug or the vac with wet
hands.
lation openings blocked; keep free of dust,
lint, hair or anything that may reduce air
flow.
Keep hair, loose clothing, fingers, and all
parts of body away from openings and
moving parts.
To reduce the risk of falts, use extra care
when cleaning on stairs.
Observe the following warnings that
appear on the motor housing of your vac.
WARNING
• TO REDUCE THE RISK OF INJURY,
MAKE SURE TOOL IS TURNED OFF
BEFORE PLACING SWITCH IN
0_
AUTO POSITION.
• TO REDUCE THE RISK OF FIRE,
DO NOT CONNECT A TOOL RATED
MORE THAN 6 AMPS TO THIS
RECEPTACLE.
Do not put any object into ventilation
openings. Do not vacuum with any venti-
• , WARNING
• Foryour own safety, read and understandowner's
manual.
• Do not pick up hot ashes, coals, toxic, flammable or
hazardousmaterials.
00
• Do not use around explosive liquids or vapors.
Q
• To reduce the risk of electric shock, do not use
outdoorsor on wet surfacesand do not pick up liquids.
SAVE THESE INSTRUCTIONS
The operation of any utility vac can result
in foreign objects being blown into the
eyes, which can result in severe eye damage. Always wear safety goggles complying with ANSI Z87.1 (shown on package)
before commencing operation. Safety
Goggles are available at Sears retail
stores.
To avoid hearing damage, wear ear protectors when using the vac for extended
hours or when, using it in a noisy area.
For dust operations, wear dust mask.
WEAR
YOUR
Introduction
This vac is intended for household use
with small hand held power tools with
current rating 6 amperes or less. It may
also be used for dedicated dry vacuuming
jobs needed in the household.
Owner's
Manual
IMPORTANT
Please
NOTE
Read Carefully
Static Shocks Are Common - In dry
areas or when the relative humidity of the
air is low, To reduce the frequency of
static shocks in your home the best remedy is to add moisture to the air with a
console humidifier,
Contents
Item
Page
Item
Page
Warranty ..........................................
Safety Instructions ...........................
Safety Signal Words .....................
Introduction ......................................
Owner's Manual Contents ............
2
2
2
4
4
Cord Storage ....................................
Operation .........................................
Emptying the Drum .......................
Filter Maintenance ...........................
7
7
8
9
Unpacking and Checking Carton
Contents ...................................
Carton Contents List ....................
Cleaning ........................................
Removal ........................................
9
9
4
4
Cage Assembly ...............................
Filter Assembly ................................
Getting to Know Your Vac ...............
5
6
6
Dry Filter ....................................... 9
Installation ..................................... 9
Vac Maintenance ............................. 9
Unpacking and Checking
Remove entire contents of carton. Check
each item against the Carton Contents
List. Notify your Sears Store immediately
if any parts are damaged or missing.
Carton
Key
A
B
C
D
E
F
G
H
J
K
Contents
List
Description ............................ Qty
Vac ..............................................
1
Hose ...........................................
1
Filter Cage .................................. 1
Filter ............................................
1
Filter Plate ................................... 1
Filter Nut ..................................... 1
Adapter Hose #0 ......................... 1
Adapter Hose #1 ......................... 1
Strip Velcro .......... 1 Strip of 3 pcs.
Owners Manual ........................... 1
Grounding Instructions ................... 10
Repair Parts ................................... 12
Carton Contents
Cage Assembly
Power Head
WARNING: For your own safety,
never connect plug to power source
outlet until all assembly steps are
complete and you have read and
understood the safety and operation instructions. Do not operate
vac with any parts damaged or
missing.
NOTE: Your vac is shipped unassembled.
Read the following assembly instructions
carefully.
1. Grasp flexible locking tabs on both the
right and left side of the power head.
Place your thumbs on the drum tabs.
Slowly pull locking tabs away from
drum and press down on the drum
tabs. Lift the power head off the drum.
Flip the power head and place it in the
drum.
WARNING: To avoid personal injury
or damage to vac be sure to keep
hands, fingers, or any other foreign
objects out of the center opening
when assembling the filter cage.
Drum
Drum
Tabs
Cage
Power
Head
Lid
\
2. Line up filter cage tabs with the slots in
the center ring of the lid.
3. Push on the filter cage until the tabs
snap into the slots for a secure fit. (One
tab at a time)
NOTE: If the filter cage needs to be
removed, use a slotted screwdriver and
insert the blade near one of the tabs
between the filter cage and the center
ring of the lid. Pry the tab out of the slot.
Tilt the filter cage and lift slightly away
from the lid. To replace, follow cage
assembly instructions.
Drum
_rum
Tabs
Filter Cage
\
J
Tabs (3)
Slots (3)/
Filter Assembly
1. Carefully slide the filter onto the filter
cage, sliding it over the center ring covering the 3 slots until the filter stops
against the lid.
_
Filter Nut
,,.j
2. Place the hole in the filter plate over
threaded screw of the filter cage.
3. Gently push on the filter plate to seat
the rubber ring of the filter inside the circular channel of the filter plate.
4. Place filter nut onto threaded screw and
tighten it. Finger tighten only.
j
NOTE: Lever of fitter nut should be away
from plate as shown.
IMPORTANT: Do not overtighten as this
may deform or crack the filter plate or filter
cage.
5. To assemble the power head to the
drum, position power head over drum,
with flexible locking tabs lined up with
recess in drum. (The power head will
only fit on the drum one way).
Filter Plate
Filter
Power
Locking
Tabs
Drum
6. Push down on the power head and listen for the locking tabs to "snap" in
place.
Drum
Tabs
7. Your vac is now ready to use. Read the
instructions on the following pages to
operate your vac safely.
Getting to Know Your Vac
1.Familiarize yourself with the controls
and features of your vac before operating.
Push or press rocker switch to "AUTO" for
automatic vac use, controlled by the hand
held power toot being used. The vac will
not energize until the tool connected to
the vac is energized. The center position
of the switch is the "OFF" position.
Push or press rocker switch to "ON" to
energize the vac for continuous run. The
vac wilt energize immediately when the
switch is in this position. Outlet is disabled.
NOTE: This vac is intended for use
with hand held power tools with amp
ratings of 6 amps or less,
Switch
Power
Vacuum
Hose
\
Power
Cord
Locking Tabs
I ON 0 OFF AUTO
Outlet for
Hand Held
Power Tool
Cord and Hose Storage
1. Your vac has a convenient area to store
your power cord and vac hose.
Handle
\
2. Wrap the power cord around the top of
the handle on the vac and attach the
end of the plug to the cord.
Power Cord
3.Wrap the hose around the vac as
shown and group the hose together as
shown in the diagram.
CAUTION: A partially unwrapped
cord may fall in coils near your feet.
You could trip. To avoid this, always
fully unwrap the cord before plugging it in.
Hose
Storage
Wrap
Area
Operation
WARNING
To reduce the risk of fire or explosion, do not operate this vac in areas with
flammable gases or flammable vapors such as lighter fluid, cleaners, oil-base
paints, gasoline, alcohol or explosive dust such as coal, magnesium, grain or
gun powder in the air. Do not vacuum explosive dust, flammable or combustible
liquids or hot ashes. To reduce the risk of health hazards from vapors or dusts,
do not vacuum toxic materials. Do not use outdoors or on wet surfaces. Unplug
power cord before changing or cleaning filter or emptying the dust drum.
CAUTION: To reduce the risk of
hearing damage wear ear protectors
when using the vac for extended
hours or when using it in a noisy
area.
The operation of any utility vac can
result in foreign objects being
blown into the eyes, which can
result in severe eye damage. Always
wear safety goggles complying with
ANSI Z87.1 (shown on package)
before commencing operation.
Safety Goggles are available at
Sears retail stores.
CAUTION: Use of this vac is
intended for general household dry
debris cleaning and dedicated use
with small portable electric tools
having a current rating of 6 amperes
or less.
This Tool Vac is designed primarily for fine
dust sanders (hand held power tools used
for wood finishing or drywall sanding
projects).
1. Connect the large end of the vac hose
to the inlet of the Tool Vac.
2.Plugthecordofthehandheldpower
toolintotheToolVacoutlet(located
belowtheswitch).
Usethe3Velcro
stripssupplied
withtheToolVactohold
thepower
cordtothevacuum
hose.
WraptheVelcro
stripsaround
thehose
andcordforsafeandconvenient
tool
usage.
Thenconnect
thehandheld
powertooltothevachosesupplied,
by
usingoneoftheadapters
supplied,
or
Adapter #0
Adapter #1
bypurchasing
theadapter
thatmaybe
suggested
foruseintheowner's
man- Suggested Wet/Dry Vac accessories for
ualofyourhandheldpower
tool.(Most dry vacuuming:
handheldpowertoolswilthaveadapt- 9-17862 Dusting Brush
ersavailable
forpurchasing
through
9-17863
Crevice Tool
service
partsintheirowner's
manuals.) 9-17868 Car Nozzle
Thelargevariety
ofhandheldpower
9-17825
Dry Nozzle
toolexhaust
portsmakes
itverydifficult 9-17861 (2) Extension Handles
tosupply
attachments
foreachportable The adapters are numbered (#0 and #1)
electric
toolinthemarket
place.
Adapter #0 connects to the swivel end of
3.Plugthepowercordofthetoolvacinto the hose and to hand held power tools
yourwalloutlet.
with dust port connections approximately
4.Pushor presstheswitch
tothe"AUTO" 1.3 inches outside diameter. This
position
(thevacwillnotenergize).
adapter will also couple with attachments
5.Switch
yourhandheldpowertool"ON". in the 9-11766 "Dust Pick Up Attachment
TheToolVacwiltturnonautomatically. Kit" available at Sears.
6.Beginusingthehandheldpowertool Adapter #1 connects to the swivel end of
on yourproject.Aftercompleting
the the hose and to hand held power tools
job,turnthehandheldpowertoot"Off'. with dust port connections approximately
The Tool Vac will continue to run for
approximately
5 seconds. It runs
longer to clear the debris in the
hose. The Tool Vac will automatically
shut off.
1.2 inches outside diameter. This adapter
wilt also couple with part number 916909, 1-1/2 inch diameter ten foot hose
(if a larger diameter hose is preferred).
Emptying
the
Drum
Use of Hose Adapters
The flexible vinyl adapters supplied with
your Tool Vac provide connection
between the hand held power tool and
the 1-1/4" x 11' Tool Vac hose. The adapters may be used in various combinations
to make these connections. The inside
diameter of the swivel hose end is for 1
inch outside diameter connections. The
outside diameter of the swivel hose end
may be used with Craftsman 1-1/4" wet/
dry vac accessories.
I
accidental starting, unplug power
ARNING: To avoid injury from
cord before emptying the drum.
1. Remove the power head as described
in step 1 of the "Cage Assembly" section, set the power head to the side and
dump the contents into a proper waste
disposal container.
WARNING: Always wear safety goggles complying with ANSI Z87.1
(shown on Package) before commencing operation. Safety Goggles
are available at Sears stores.
Filter Maintenance
WARNING: Do not remove the filter
cage. It is there to help prevent your
fingers from getting into the blower
wheel.
Cleaning
Your filter should be cleaned often to
maintain peak vac performance.
NOTE: This filter is a two stage filter made
of high quality paper designed to stop
very small particles of dust. Handle the filter carefully when removing to clean or
installing it. Creases in the filter pleats
may occur from installation but creases
wilt not affect the performance of the filter.
Removal
Dry Filter
NOTE: For best results of cleaning due to
accumulated dust, clean the filter in an
open area. Cleaning SHOULD be done
outdoors and not in the living quarters.
1. Some removal of dry debris can be
accomplished without removing the fitter from the vac by slapping your hand
on top of the lid while the vac is turned
off.
2. After filter removal from vac, remove the
dry debris by gently tapping the filter
against the inside wall of your dust
drum and the debris will loosen and fall.
Installation
To remove the filter for cleaning or
replacement, remove filter nut from the
screw on the filter cage, remove filter plate
and lift off filter.
IMPORTANT: To avoid damage to the
blower wheel and motor, always reinstall
the filter before using the vac for pick-up.
IMPORTANT: After cleaning, check
filter for tears or small holes. Do not
filter with holes or tears in it. Even a
hole can cause a lot of dust to come
your vac. Replace it immediately.
the
use a
small
out of
To ensure a proper seal, clean the lid area
where the filter will seat. Slide the new fitter over the filter cage. Replace filter plate
then run filter nut down threads, finger
tight only. Do not overtighten as this wilt
cause deformation or cracks in the filter.
Refer to "Filter Assembly" section of this
owner's manual.
Tool Vac Maintenance
To keep your vac looking its best, clean
the outside with a cloth dampened with
warm water and mild soap.
To clean the drum:
1. Dump debris out.
2. Wash drum thoroughly.
3. Wipe out with dry cloth.
WARNING: To assure product
SAFETY and RELIABILITY, repairs
and adjustment should be performed by Sears Service Centers,
always using Sears replacement
parts.
Grounding Instructions
This appliance must be grounded. If it
should malfunction or breakdown,
grounding provides a path of least resistance for electric current to reduce the risk
of electric shock. This appliance is
equipped with a cord having an equipment-grounding conductor and grounding
plug. The plug must be inserted into an
appropriate outlet that is properly installed
and grounded in accordance with all local
codes and ordinances.
WARNING:
3-Prong Plug
Properly
Grounded
Outlet
-...,
Improper
connection of the equipmentgrounding conductor can result in a
risk of electric shock. Check with a
qualified electrician or service person if you are in doubt as to whether
the outlet if properly grounded. Do
not modify the plug provided with
the appliance - if it will not fit the
outlet, have a proper outlet installed
by a qualified electrician.
This appliance is for use on a nominal
120 volt circuit, and has a grounded plug
that looks like the plug shown. A temporary adaptor that looks like the adaptor
shown may be used to connect this plug
to a 2-pole receptacle as shown if a
properly grounded outlet is not available.
The temporary adaptor should be used
only until a properly grounded outlet can
be installed by a qualified electrician.
The green colored rigid ear, tug or the
like extending from the adaptor must be
connected to a permanent ground such
as a properly grounded outlet box cover.
Whenever the adaptor is used, it must
be held in place by a metal screw.
Green
Grounding Lug_
Make sure
this is
_'-1
a metal
3-Prong
Plug
\
_
___L__
ground
° a kn°wn
__L_
Adapter
NOTE: In Canada, the use of a temporary adaptor is not permitted by the
Canadian Electrical Code.
10
connected
screw
2-Prong
Outlet
Notes
11
Repair Parts
Craftsman Tool Vac
Model Number 113.177260
Always order by Part Number - Not by Key Number
Key
No.
Part No.
1
2
824275
820563-7
3
4
5
6
7
8
9
10
11
12
824259
824660
824257-1
818977
824280
818978
73316
818989-3
821814-2
STD610805
13
14
15
16
824278-1
824264-1
824256-1
824273-1
Key
No.
Description
Cord w/Plug
Screw, Pan Hd
10-32 x 3/4
Board, Control
Hose, 1-1/4" x 11 Ft.
Cover, Motor Left
Cage, Filter
Filter, 2 Stage
Plate, Filter Top
Nut, Filter
Drum, Dust
Lid
*Screw, Pan Hd Ty
AB #8 x 1/2
Outlet
Switch
Plate, Switch/Inlet
Gasket, Lid Left
Part No.
17
18
824273
816345-1
19
20
21
22
23
15534-1
818413-5
818961
824268
824262
24
25
26
27
28
29
--
824258-1
824261
824260
824661
824661-1
824940
SP5929
Description
Gasket, Lid Right
Nut Hex Flange
1/4-20
Washer
Wheel, Blower
Spacer
Motor & Collector
Foam-Noise
Reduction
Cover, Motor-Right
Cover, Board Back
Cover, Board Front
Adaptor, Hose #0
Adaptor, Hose #1
Strip, Velcro
Owners Manual
(Not Illustrated)
1 Stock Item - may be secured through the hardware department of most sears retail
stores
*Standard Hardware Item - may be purchased locally.
12
Repair Parts
Craftsman Tool Vac
Model Number 113.177260
13
Notes
14
Notes
15
For the repair or replacement parts you need
Call 7 am - 7 pm, 7 days a week
1-800-366-PART
(1-800-366-7278)
For in-home major brand repair service
Call 24 hours a day, 7 days a week
1-800-4-REPAIR
(1-800-473-7247)
For the location of a
Sears Repair Service Center in your area
Call 24 hours a day, 7 days a week
1-800-488-1222
For information on purchasing a Sears
Maintenance Agreement or to inquire
about an existing Agreement
Call 9 am - 5 prn, Monday-Saturday
1-800-827-6655
SEARS
II;I=;,,'.
+r/;$"/: ;trt[H:_'J)
America's
Repair Speciahsts
The model and serial numbers will be found on the handle.
When requesting service or ordering parts, always provide the following
information:
• Product Type
• Model Number
• Part Number
• Part Description
Sears, Roebuck and Co., Hoffman Estates, IL. 60179 U.S.A.
Part No. SP5929
Form No. SP5929
Printed in U.S.A. 7/96