1
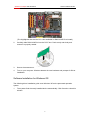
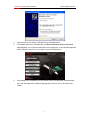
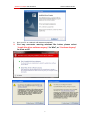
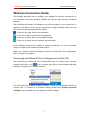
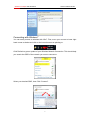
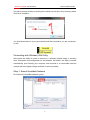
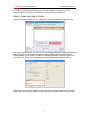
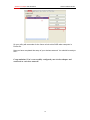
Wireless N Adapter RNX-N180PCe Quick Installation Guide Wireless N Adapter RNX-N180PCe Quick Installation Guide About This Guide This Quick Installation Guide only provides you some basic configuration instructions. For more detailed information, please refer to the Wireless Network Adapter User Manual. Before you begin, you must check the following minimum system requirements A desktop pc with an available PCI Express Slot At least a 300MHz processor and 32MB of memory An 802.11n、802.11g or 802.11b Access Point (for infrastructure Mode) or another 802.11n、802.11g or 802.11b wireless adapter (for Ad-Hoc; Peer-to-Peer networking mode.) Package Content Before getting started, please verify that your package includes the following items: 1. Rosewill 802.11n Wireless PCIe Adapter x 1 2. 2 dBi External Antenna x 2 3. Quick Installation Guide x 1 4. Low Profile Bracket x 1 5. Resource CD x 1, including: Rosewill Wireless N Client Utility and Driver User Manual QIG Installation Guide Hardware Installation 1. Make sure the computer is turned off. Remove the expansion slot cover from the computer. 1 Wireless N Adapter RNX-N180PCe Quick Installation Guide (The Highlighted slots are the PCI-e slot available for RNX-N180PCe to install) 2. Carefully slide RNX-N180PCe into the PCI-E slot. Push evenly and slowly and ensure it is properly seated. 3. Secure the antennas on. 4. Turn on your computer. Windows detects the new hardware and prompts for Driver installation. Software Installation for Windows OS The following driver installation guide uses Windows XP as the presumed operation system. 1. The system finds the newly installed device automatically. Click Cancel to close this window. 2 Wireless N Adapter RNX-N180PCe Quick Installation Guide 2. Insert the Driver and Utility CD-ROM into the CD-ROM driver. 3. The Wizard should run automatically, and Error! Reference source not found. should appear. If not, click the Start button and choose Run. In the field that appears, enter D:\autorun.exe (if ‘’D’’ is the letter of your CD-ROM drive). 4. Click Install Driver Installation on the Wireless Client Configuration Utility dialogue box, and then select the installing language from the next screen and click Next button. 3 Wireless N Adapter RNX-N180PCe Quick Installation Guide 5. Click Next 6. Click Install to start installing 7. Follow the InstallShield Wizard steps, and click Finish when done. 4 Wireless N Adapter RNX-N180PCe Quick Installation Guide 8. Now your PC or notebook will restart automatically. 9. You may encounter warning windows like below, please select “install this driver software anyway” for Win7, or “Continue Anyway” for Vista or XP. 5 Wireless N Adapter RNX-N180PCe Quick Installation Guide Wireless Connection Guide This chapter describes how to configure your Adapter for wireless connectivity on your Wireless Local Area Network (WLAN) and use the data security encryption features. After Installing the Adapter, the Adapter’s tray icon will appear in your system tray. It appears at the bottom of the screen, and shows the signal strength using color and the received signal strength indication (RSSI). - If the icon is purple, there is no connection. - If the icon is white, the network is dropping off. - If the icon is green, there is good signal strength. - If the icon is green, there is excellent signal strength. In the following instruction for making a network connection, we use the provided Utility to configure your wireless network settings. Note: You could use either the software we provide or Microsoft Zero Configuration tool to configure this adapter. Connecting with Microsoft Zero Configuration tool (Win XP) After specifying the Microsoft Zero Configuration tool to configure your wireless icon on system tray. Select “View Available Wireless network, right click on the Networks” to specify your wireless network. The tool shows the available wireless networks. Select your demanding network to connect with. To connect to a wireless network, please click Change advanced settings to be compatible with your wireless network settings. 6 Wireless N Adapter RNX-N180PCe Quick Installation Guide Connecting with Window 7 You can easily access to wireless with Win7. First, move your mouse to lower right hand corner as below and click on the icon where arrow pointing to. Click Refresh to get an update of your Wireless Network Connection. This should help you search the SSID of the network you want to connect to. Select your desired SSID, then Click “Connect”. 7 Wireless N Adapter RNX-N180PCe Quick Installation Guide You will be prompt to ask you entering the network security key. Once entered, please click OK to complete. You should see below in a very short period and find out whether you are connected or now. Connecting with Wireless LAN Utility We provide this Utility for users to connect to a wireless network easily. It provides more information and configuration for this adapter. As default, the Utility is started automatically upon starting your computer and connects to a connectable wireless network with best signal strength and with no security setting. Step 1: Search Available Network First Select the Available Network option: 8 Wireless N Adapter RNX-N180PCe Quick Installation Guide You will see a list of the SSID that your wireless adapter has scanned in your surrounding area. You can also “Refresh” to see the most updated list. Step 2: Select and Add to Profile Select your desired SSID (the one you want to link with), then click Add to Profile. After click “Add to Profile”, you will see the next window “Wireless Network Properties” popup with your current wireless signal’s setting. (RNX-N180PCe will detect the current setting of your SSID). So after the “Wireless Network Properties” popup, all you need to do is to enter the password of your SSID and click OK to continue. When done, your wireless adapter will automatically connect to this SSID. However, Please do make sure returning to “Profile” and set your SSID Profile as your default. 9 Wireless N Adapter RNX-N180PCe Quick Installation Guide So your utility will remember for the future to link to this SSID when computer is Power-On. Now you have completed the setup of your wireless network. You should be ready to surf! Congratulations! You’ve successfully configured your wireless adapter and connected to a wireless network! 10