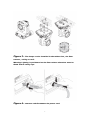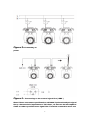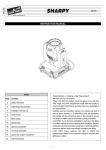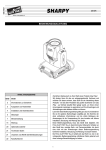
1
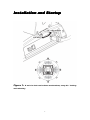
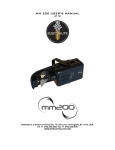
Beam 200W Moving Head Light
USER MANUAL
200W Beam Light Manual
1.Safety Information……………………………………………3
2.Installation and Startup……………………………………5
3.Menu settings …………………………………………………9
4.Technical Information………………………………………10
5.Channel function………………………………………………11
Unpacking Inspection
1、Unpacking
First of all, thank you for choosing a product from the factory, please read
this manual completely and carefully and keep it for reference. Nightjar
firms for failing to follow the Manual requires that property and shall not
be liable for personal damages caused by, the company has the right to
update the relevant parts of the specification at any time without prior
notice. Pictures of this manual and the actual product differences,
original structure, is subject to the physical.
First of all, thank you for choosing a product from the company, please
read this manual completely and carefully and keep it for reference.
Nighthawk firms for failing to follow the Manual requires that property
and shall not be liable for personal damages caused by, the company has
1
the right to update the relevant parts of the specification at any time
without prior notice. Pictures of this manual and the actual product
differences, original structure, is subject to the physical.
When you receive the product, carefully take place, inspect the product
for damage caused by transport, and check the following distribution
spare parts:
1、Signal line———1 piece
2、Instruction———1 piece
3、Hanger———2 pcs
Safety instruction
2、Safety
All related to the installation and maintenance of this equipment must :
Technician qualifications
Follow the requirements of this specification
Note: Waterproof, moisture, and lay the front of the CHassis Note
Disconnect the power ! Handle with care. The danger of high voltage
electrical shock caution!
To ensure that these conditions are normal and safe operation, the user
must comply with the following safety requirements in this manual and
Notes
Precautions, this equipment from the factory as usual.
Important
Important:
◆ manufacturer shall not be held liable for any outstanding manual
normal use and unauthorized allowed to modify their equipment
Responsible for any accidents and loss caused.
◆ Note : equipment failure caused by any random Change instructions
not covered under warranty .
◆ Do not make the power lines and other wires together ! Special
attention to the supply voltage and the host labeled voltage
Cause! Ensure the effective voltage does not exceed the voltage marked
on the rear window.
◆ ensure that the power plug into the power seat . Make sure that the
connected devices to the mains power switch is set to OFF / OFF
Position.
◆ Make sure the power cord is not to be broken or sharp objects cut or
damaged , the timing inspection equipment and power lines .
◆ When the device is not in use or disconnect the main power before
cleaning . Pull the power cord by the plug and pull
2
To drag the power cord to pull the plug .
◆ This level of protection of the equipment for Class I , so please connect
the yellow / green wire grounded .
◆ line connection , maintenance and service must be carried out by
specialized technical staff .
◆ Do not connect the device in the dimming device .
◆ Do not use in very short time intervals to continuously turn the device
on or off, otherwise it will shorten the bulb
Life.
◆ the first use of the equipment, there may be some smoke or smell . It is
normal to imagine not generation
Table equipment .
◆ Do not directly touch the surface of the device ( the use of process
equipment because the surface of the chassis has been very hot ) !
◆ replacement bulb , make sure that the same power with the original
bulb .
◆ Note ! Watch out for the eyes! Avoid looking directly into the light
source ( especially in patients with epilepsy ) !
Catalogue
Safety Information
◆ Installation:
Make sure that all parts of the lamps in good condition .
Make sure that before the installation of the fasteners securely .
Safety rope must be properly bound to the device or a fixed frame , in
order to prepare for the lamp hook off the possibility of the whereabouts
of the equipment .
◆ Minimum illumination distance :
Beam need to locate the the lens projected light projection object to
maintain at least a distance of 12 m ( 39'4 ) .
◆ minimum distance with flammable material
Lamps must be fixed installation , and to ensure that at any point of any
flammable materials and lighting the surface for at least 20cm ( 8 ' ) of
Distance
◆ mounting surface
This equipment allows installation in general combustible surface
3
◆ maximum ambient temperature
This device uses a maximum ambient temperature does not exceed 40 ℃
(104 ℉).
◆ Protection class IP20
This equipment can prevent the infiltration of a diameter of more than
12mm of solid , but not water proof , water droplets splashing into
◆ anti-lightning
The level of protection for this equipment for Class I , so please connect
the yellow / green wire grounded .
Other lighting wires and the power cord of the device Do not mix then !
Special attention to the marked voltage of the power supply voltage and
host !
Ensure the effective voltage does not exceed the voltage range indicated
on the rear window. You need to refer to the assessment (rear window
label also provides
The maximum number of input power, in order to avoid overload)
◆ ensure that the power plug into the power seat . Make sure that
connecting the device to the main power before the power switch is set
to OFF / OFF state.
◆ Make sure the power cord is not to be broken or sharp objects cut or
damaged, the timing inspection equipment and power lines .
◆ When the device is not in use or disconnect the main power before
cleaning . Disconnect the power cord , pull by the plug , not directly drag
Pull the power cord .
◆ the surface temperature
In the steady state , the equipment surface temperature of up to 100 °
(212 ° F ) .
◆ maintenance
Prior to the start of any repair work or cleaning it , be sure to cut off the
main power supply .
Shutdown , please lamps stand for at least 35 minutes, do not move any
part of the lighting accessories , in order to avoid high temperature
damage . This
The possibility of an explosion after a period of bulb is almost zero.
◆ Lamp
Factory bulb equipped with special lighting . - Please read the bulb
manufacturers to provide the "operating instructions " (with YODN
200W R5 bulb lighting installation instructions ) .
◆ for any damage or thermal deformation , replace the lamp
4
Installation and Startup
Figure 1:
X -axis its lock and release mechanisms, every 90 ° locking
and releasing
5
Figure 2:
Y -axis its lock and release mechanisms, every 45 ° locking
and releasing
6
Figure 3 :
The lamps can be installed in the rubber feet , the floor
trusses , ceiling or wall .
Warning: Lighting is positioned on the floor unless otherwise must be
fitted with a safety rope
Figure 4 :
connect and disconnect the power cord
7
Figure 5:
Connecting to
power
Figure 6 :
Connecting to the control signal line ( DMX )
Note: Please use meets specifications shielded 2-pole twisted pair signal
lines, characteristic impedance of 120 ohms , do not use the microphone
Cable or other specified uses signal line. Terminal connection must use
8
XLR 3-pin male and female connector Canon.
Important Note: 2-pole line can not be with each other or in contact with
the metal shell of the connector. Shield to pin 1 must sleeve wrapped.
Menu settings
Using the menu:
1. Boot display the main screen, press the black knob center once, the
main menu appears on the display , enter the main menu setting items ,
the main
Menu set of nine, are: 1. Exit ; 2.dmx address ; 3 . Parameter settings; 4
options; 5 display settings;
Manual control; 7. Test run; 8 Restore factory mode; 9 lamps restore .
2. By rotating black knob confirm the displayed value, or activate the
display function , or to enter the continuous menu . Clockwise menu
The display items incrementing ( auto-repeat ) , or pass on an item in the
menu . Counterclockwise menu display decreasing significantly
Shows ( automatic repeat ) or delivered to the menu on a project . Press
to exit back to the main interface , each setting item has a return value ,
Press Back to return to the previous menu.
a) Quit
b) DMX address :1 -512
c) parameter settings
i. return
ii control mode
1 . Standard mode
2 . Expansion mode
3 Compact Mode
iii. Lamps Model
d) option is set
i. return
ii. X Backward
(1) YES
(2) NO
iii. Y Backward
(1) YES
(2) NO
iv. XY exchange
(1) YES
(2) NO
v bulb control
(1) ON
(2) OFF
vi power-on lamp status
(1) OFF
9
(2) ON
vii effect round the shortest distance
(1) NO
(2) YES
viii. allow DMX reset
(1) NO
(2) YES
e) Display Settings
i. return
ii display language
1. English
2 Chinese
f) manual control
i. return
ii. CH1 (0-255) ... CH32 (0-255)
g) test run
i. return
ii. voice
self-propelled
iii.
h) to restore the factory model
i. return
ii. confirmation
i ) lamp reset
i. return
ii. confirmation
Technical parameters
voltage: 100V to 240V ± 10 % / 50 ~~ 60Hz
Ballast: electronic ballast
bulb: YODN MSD200 R5 ( optional 180W OSRAM SIRIUS HRI )
color temperature : 8000K Luminous Flux 7950lm (6m distance) , light
intensity 58760lx (20m distance )
average life expectancy : 2000H
Color wheel: 14 colors + white, positive and negative bi-directional
rotation
gobo wheel : a pattern Dribbling 17 fixed gobos + white , the pros and
cons of two-way rotation
Prism: rotating eight prism, the pros and cons of bi-directional rotation
moving effect , atomization function
Atomizing effect: 0-100 % adjustable atomization beam angle
Aperture: seven beam adjustment
Focus: linear focus
Dimmer / Shutter: 0-100 % linear dimmer light and two-piece strobe
10
governor (0.5-14 seconds)
The level scan: 540 degrees, Resolution 8Bit/16Bit , automatic correction
The scan vertical: 250 degrees, Resolution 8Bit/16Bit, auto-correction
beam angle : parallel beam angle : 0 - 3.8 °
Protection: IP20
control mode : International standard DMX512
Channels : 20 Channels
Other features: the mechanical closed light source power automatically
halved
Size: 345MM (arm width) X475MM (total high) X405 (bottom width) MM
Double flight case size: 730MMX465MMX690MM
Carton size: 460MMX385MMX550MM
Net Weight: 17KG
Patterned plate: a pattern dribbling 17 fixed gobos + white, the pros and
cons of two-way rotation
Color wheel: 14 colors + white, positive and negative bi-directional
rotation
Beam 200 Channel Sheet
Channel mode
Standard vector
CH1: X scan
0-255
CH2:
Y scan
0-255
0--450°
0--270°
CH3: X scan fine
0-255
0--2.1°
CH4: Y scan fine
0-255
0--1.0°
11
CH5: X/Y scan speed
0-255
high - slow
CH6: Dimmer
0-255
OFF - ON
CH7: Strobe
0
1--50
51--240
241--255
OFF
ON
Strobe slowly -- highly
OFF
CH8: Fog Filter
0-255
None - Fog
CH9: Color
0-8
8-15
16-23
24-31
32-39
40-47
48-55
56-63
64-71
72-79
80-87
88-95
96-103
104-111
112-127
128-191
192-255
White
Color 1
Color 2
Color 3
Color 4
Color 5
Color 6
Color 7
Color 8
Color 9
Color 10
Color 11
Color 12
Color 13
Color 14
Rainbow effect positive rotation highly -- slowly
Rainbow effect reversal rotation highly -- slowly
CH10: Color Effect
0-127
128-255
The whole stepper and governor
The micro stepper and governor
CH11: Gobo
0-6
7-13
14-20
21-27
White
Gobo 1
Gobo 2
Gobo 3
12
28-34
35-41
42-48
49-55
56-62
63-69
70-76
77-83
84-90
91-97
98-104
105-111
112-118
119-127
128-191
192-255
Gobo 4
Gobo 5
Gobo 6
Gobo 7
Gobo 8
Gobo 9
Gobo 10
Gobo 11
Gobo 12
Gobo 13
Gobo 14
Gobo 15
Gobo 16
Gobo 17
Rainbow effect positive rotation highly -- slowly
Rainbow effect reversal rotation highly -- slowly
CH12: Gobo Shaking
0-255
0--400°
CH13: Prism
0-31
32-255
None Prism
Prism
CH14: Prism Rotation
0-127
Angle
128-191
positive rotation highly -- slowly
192-255
reversal rotation highly -- slowly
CH15: Prism enlarge
0--255
Small - Big
CH16: Focus
0-255
Near -- Far
CH17: Bulb control
100-105
200-205
Time Delay OFF
Time Delay ON
CH18: Rest
0-254
No operation
255-255
Rest after a few seconds
CH19: Obligate Channel
CH20: Obligate Channel
13