1
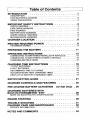
OWNERS
MANUAL
MODEL NO,
934.716140
CAUTION:
Read Rules for
Safe Operations
Carefully
Fully Automatic
Battery Charger/Maintainer
with
Start
for 6 _ngine
12 Volt
Batteries
OPERATING AND SAFETY
INSTRUCTIONS
[
Table of Contents
INTRODUCTION
.......................
1
DESCRIPTION
..............................................
HOW BATTERIES CHARGE
SPARK PREVENTION
.......................................
IMPORTANT
SAFETY
1
.. ..2
2
INSTRUCTIONS
.........
3
SHOCK HAZARDS ........
"..................................
EXPLOSION HAZARDS
.............
:. ..........................
,FJRE HAZARDS
............
. .....
.. ........................
......
.....
......
.... .......
SHORT CIRCUIT HA_RDS
. ....................................
MOVING PARTS HAZARDS ....................................
CHARGER LOCATION _.....
PROVIDE
REQUIRED
EXTENSION
POWER
CORDS ...i.......
THE BATTERY
OPERATING
INSTRUCTIONS
....
, .............
8
.............
9
.......
PREPARING
...
..
9
............
11
...............
12
CONNECTING TO BATTERIES INSTALLED IN VEHICLES
CONNECTING TO BATTERIES OUTSIDE A VEHICLE
............
CHARGING INSTRUCTIONS
..................................
CHARGING TIME INSTRUCTIONS
12
15
16
............
18
12 VOLT BATTERIES .......................................
6 VOLT BATTERIES
........................................
DETERMINING TIME TO CHARGE ............................
AUTOMOTIVE BATTERY CHARGING TIMES
...................
DEEP-CYCLE BATTERY CHARGING TIMES ....................
SWITCH SETTING GU IDE
CHARGER
CONTROLS
PRE-CHARGE
. .......
ENGINE STARTING
TROUBLE SHOOTING
SERVICE
21
. .......
22
(12 Volt Only)
. . . . . . .
. 26
. . . . . 28
STRATIFICATION
. . . ......
•
•
•
•
=
m
•
i
.....................................
NOTES AND COMMENTS
28
30
.' ..........
CARE AND MAINTENANCE
INFORMATION
18
18
18
19
19
.........
BATTERYACTiVATION
CHARGING BATTERIES WITH
BUILT-IN HYDROMETER "EYE"
CHARGER
.
AND FEATURES
MORE ON ELECTROLYTE
3
4
5
6
6
7
.................
g
•
•
•
•
.........
=
•
•
•
w
31
32
33
34
INTRODUCTION
INTRODUCTION
FOR SAFETY'S SAKE, READ THIS INSTRUCTION
PRIOR TO OPERATION
MANUAL
DESCRIPTION
The Sears model 71614, Starter!Charger/Maintainer, offers the
features you need to handle a w=de variety of applications. Its
design also eliminates much of the guesswork associated with
battery charging, improvessafety, and reduces the risk of
overcharging.
• 10 AMP CHARGE RATES for fast-charging 6 or 12 volt
batteries
2 AMP CHARGE RATE,for charging small 12 volt batteries
such as those used in motorcycles, lawn and garden
equipment, and snowmobiles.
60 AMPS OF ENGINE S'FARTING POWER to assist a
battery that's too weak to do the :job alone.
• FULLY-AUTOMATIC 12 VOLT,CHARGING turns the
charger's output off and ligStsagreen indicator at full charge.
• 12 VOLT CHARGE MONITOR automatically turns the
charger's output back on if the battery discharges.
BATTERY TYPE SELECTOR assures a full charge on both
deep-cycle and regular batteries.
TEMPERATURE COMPENSATION aUtOmatically adjusts the
output to assure a full charge _:inall temperatures.
MANUAL 6 VOLT CHARGING for added versatility.
POLARITY PROTECTION will not allow charging to begin
and lights a red indicator if the cables are hooked to a battery
in reverse.
• DOUBLE-INSULATED,
high-impact
the risks of electric shock.
plastic enclosure
reduces
AUTOMATIC-RESET CIRCU IT BREAKER prevents overload
damage to the charger.
INTRODUCTION
HOW BATTERIES CHARGE
A charger DOES NOT FORCE current into a battery - it makes a
limited amount of current available and the battery draws as much
of it as it needs, up to or slightly greater than the OUTPUT AMP
rating of the charger.
The closer a battery is to zero-charge ("dead"), the more charging
current it will want to draw. When charging begins on a "dead"
battery, a charger!s ammeter (if so equipped) will register toward
the high amps end of the scale and fall toward the zero end as the
battery becomes more fully charged. KEEP IN MIND: the
ammeter registers the amount of amperage being drawn from the
charger by the battery, not what the charger is capable of
delivering.
One would expect a battery to draw zero amps when it reaches
100% of charge. But at 100% of charge, the battery will continue
to draw a low level of current and convert it into heat within the
battery. If left connected to a MANUAL charger after reaching
100% of charge, the battery acid will begin to boil, resulting in
overcharging and possible battery damage.
But the Sears #71614 battery charger is FULLY-AUTOMATIC.
When full charge is reached, it will completely shut off the
charging current to the battery. If the battery were to discharge for
some reason, the charger will automatically resume charging the
battery until full charge is reached again.
SPARK PREVENTION
MAKE SURE NO SPARKS OR FLAMES OCCUR NEAR THE
BATTERY, especially during charging. It takes very little to ignite
the explosive gasses produced by a lead-acid battery. Read,
understand, and follow the SAFETY INSTRUCTIONS section of
this manual before attempting to work with or near a lead-acid
battery,
For more information about batteries and battery charging, contact:
Battery Council International
111 East Wacker Dr.
Chicago, IL 60601
Telephone: (312) 644-6610
and request their publication
titled:
2
BATTERY SERVICE
MANUAL
IMPORTANT SAFETY INSTRUCTIONS
I
IMPORTANT
SAFETY INSTRUCTIONS
DO NOT OPERATE UNTIL READING
SAVE THESE INSTRUCTIONS
!
!
IMPORTANT! DO NOT ATTEMPT TO OPERATE this battery
charger until you read and understand the following safety
instructions,priorto each use of this battery charger,to reduce the
risk of DEA"I'H,INJURY, AND PROPERTY DAMAGE.
SHOCK HAZARDS
ELECTRIC SHOCK CAN KILL!
NEVER expose the battery charger to rain or snow.
NEVER attempt to plug in or operate the battery charger with
defective or damaged wires, powercord or powercord plug. Have
any of these parts that are d_fecttVe or damaged replaced by
qualified personnel IMMEDIATELY.
NEVER attempt to plug in charger or operate its controls with wet
hands or while standing in water.
NEVER alter AC powercord
battery charger.
or powercord
plug provided with the
NEVER use an attachment not recommended or sold by the battery
charger manufacturer for use with this specific model battery charger.
NEVER operate this battery charger if it has received a sharp
blow, been dropped, or similarly damaged, until after being
inspected and/or repaired by qualified service personnel.
NEVER disassemble this battery charger; take it to qualified
service personnel when service or repair is needed.
ALWAYS plug in and unplug the AC powercord by grasping the
powercord plug -- NOT THE POWERCORD
-- to reduce risk of
damaging powercord.
ALWAYS unplug the battery charger from the AC outlet before
attempting any cleaning or maintenance.
Turning the charger's
3
IMPORTANT SAFETY INSTRUCTIONS
control(s) to their "OFF" position(s)
electricity from the charger.
EXPLOSION
alone will not remove all
HAZARDS
WARNING!
- RISK OF EXPLOSIVE GASSES!
Working Jn the vicinity of a lead-acid battery is dangerous.
Batteries generate explosive gasses during normal operations
and, at an even higher level, during charging. If anything is
allowed to ignite these gasses, the battery may explode, sending
pieces of the battery and extremely caustic battery acid out in all
directions and with extreme force. Since just the slightest spark is
sufficient to ignite these gasses, it is of UTMOST IMPORTANCE
that you read this manual and follow the instructions exactly,
before using your battery charger each time.
BATTERY EXPLOSION CAN KILL, INJURE, AND
CAUSE PROPERTY DAMAGE! To reduce the risk of battery
explosion, read, understand, and follow these instructions,those
published by the battery manufacturer, and those of the
manufacturerof any equipment you intend to use near the battery.
Review cautionary markings on these products and on the engine.
If unable to determine the battery manufacturerer's requirements
for charging, always charge the battery with the cell caps in place.
In addition, make certain that anyone else that uses this
equipment, or is a bystander in the vicinityof a charging battery,
understand and follow these safety instructionsas well.
NEVER smoke or allow a spark or flame in the vicinity of the
battery or engine.
NEVER operate the battery charger in a closed-in area or restrict
ventilation in any way.
NEVER charge a frozen battery as battery explosion
can result.
NEVER connect BOTH battery charger clamps DIRECTLY to the
twoposts of the same battery. SEE OPERATING
INSTRUCTIONS
FOR PROPER CONNECTION PROCEDURES.
NEVER charge batteries other than a LEAD-ACID type.
Especially, DO NOT use for charging dry-cell batteries that are
4
IMPORTANT SAFETY INSTRUCTIONS
commonly used with toys and home appliances. These batteries
may burst and cause injury to persons or damage property.
NEVER allow the DC output clamps to touch each other.
ALWAYS be extra cautious to reduce the risk of dropping a metal
object, such as a too!, onto or near the battery. Doing so could
produce a spark or short circuit the battery or other electrical part
that could cause an explosion.
ALWAYS make sure the area around a battery is well ventilated
while it is being charged. Gas can be forcefully blown away by
using a piece of cardboard or other non-metalic material as a fan.
ALWAYS make sure that theAC _wercord is unplugged from the
AC outlet or extension cord BEFORE connecting or disconnecting
the battery charger clamps to the battery to prevent arcing or burning.
ALWAYS locate the batter){, charger as far away from the battery
as the DC output cables w_l! permit.
ALWAYS twist or rock charger clamps back and forth several times
on the battery post and the 6ther point of connection at the time of
initial connection. This helps keep the clamps from slipping off their
points of connection which helps reduce the risk of sparking.
NOTE: DO NOT rock the clamp connected to the battery post
AFTER the second connection (at a point away from the battery)
is made or sparking may occur at the battery post.
FIRE HAZARDS
DAMAGE!
FIRE CAN KILL, INJURE, AND CAUSE PROPERTY
_
NEVER use an attachment not recommended or sold by the battery
charger manufacturer for use with your specific model charger.
NEVER dissassemble the battery charger; take it to qualified
service personnel when service or repair is needed.
5
IMPORTANT
SAFETY INSTRUCTIONS
ALWAYS make sure that the AC powercord is unplugged from the
AC outlet or extension cord, BEFORE connecting or disconnecting
the battery charger clamps, to prevent arcing or burning.
BA'I-rERY ACID HAZARDS
BATTERY ACID CAN CAUSE SERIOUS INJURY AND
PROPERTY DAMAGE!
ALWAYS have someone within range of your voice and close
enough to quickly come to your aid when working near a lead-acid
battery.
ALWAYS have plenty of fresh water and soap nearby in case
battery acid contacts eyes, skin, Or clothing.
ALWAYS wear complete eye and clothing protection and avoid
touching eyes while working with a battery,
ALWAYS act QUICKLY if contact with battery acid is made. If
acid contacts skin or clothing, wash IMMEDIATELY with soap and
water. If acid enters eye, IMMEDIATELY flood eye with running
cold water for at least 10 minutes and get medical attention
IMMEDIATELY.
SHORT CIRCUIT HAZARDS
ELECTRICAL
SHORT
CIRCUITS
CAN INJURE!
ALWAYS remove personal metal items such as rings, bracelets,
and watches when working with a lead-acid battery. A lead-acid
battery can produce a short circuit current high enough to weld a
ring orthe like to metal causing a severe burn.
6
IMPORTANT SAFETY INSTRUCTIONS
MOVING PARTS HAZARDS
MOVING
ENGINE
PARTS CAN INJURE!
NEVER connect or disconnect battery charger clamps to a vehicle
when the engine is running.
ALWAYS stay clear of fan blades, fan belts, pul!eys and other
moving engine parts when working near an engine. Moving
engine parts can cause severe personal injury including
dismemberment.
ALWAYS make sure that battery chargercables and clamps are
positionedso they will not come Jncontact with any moving engine parts.
7
IMPORTANT SAFETY INSTRUCTIONS
Locate charger in a clean, dry, stable, well-ventilated spot as far
away from the battery as the DC output cables permit.
NEVER place charger directly above the battery being charged;
gasses from the battery will corrode and damage the charger.
NEVER allow battery acid to drip on charger when reading
specific gravity or filling the battery.
NEVER set a battery on top of the charger.
8
PROVIDE REQUIRED
I:
POWER
PROVIDE REQUIRED POWER
This battery charger requires a nominal 120volt, 60 Hertz,
alternating current (AC) power source. The power source must be
fused at an amperage greater than or equa! to the INPUT AMPS
rating of this charger.
This battery charger is double-insulated and does not require a
grounded AC outlet for safe operation.
DO NOT PLUG CHARGER INTO THE AC POWER SOURCE
UNTIL TOLD TO DO SO IN THE OPERATING INSTRUCTIONS.
ELECTRIC SHOCK CAN KILL! To reduce risk of
electric shock, never alter .A,C,l_..wercord or powercord plug
provided on the charger. If it will not fit the outlet, have a proper
outlet installed by a qualified electrician.
EXTENSION CORDS
An extension cord should not be used unless absolutely
necessary. If necessary, care must be taken to select an
extension cord suitable for •use with your specific battery charger.
ELECTRIC
SHOCK CAN KILL!
FIRE CAN KILL, INJURE, AND CAUSE PROPERTY
DAMAGE!
9
PROVIDE REQUIRED POWER
_m r
T.o reduce risk of electric shock and fire, never alter the AC
powercord or powercord plug provided on the charger. Never
alter extension cords or extension cord plugs. Make sure the
extension cord isproperly wired and in good electrical condition.
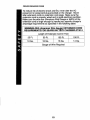
Make sure thewire s_ze (American Wire Gauge or AWG) of the
extension cord is large enough to handle your specific charger!s
amperage requirements as specified in the following table:
MINIMUM AWG (American Wire Gauge) EXTENSION CORD
REQUIREMENTS FOR SEARS BATTERY CHARGER #71614
Length of Extension Cord in Feet
25 Ft,
50 Ft.
100 Ft.
150 Ft.
18 Ga.
18 Ga.
16 Ga.
14 Ga.
Gauge of Wire Required
10
PREPARING THE BATTERY
PREPARING
THE BATTERY
BATTERY EXPLOSION CAN KILL, INJURE, AND
CAUSE PROPERTY DAMAGE! Never smoke or allow a spark or
• flame in the vicinityof the battery or engine.
If necessary to remove the battery from the vehicle to charge it,
make sure all accessories in the vehicle are off and ALWAYS
remove the grounded cable from the bakery FIRST.
If needed, add distilled water to each cell of the battery until
battery acid reaches the manufacturer's specified level. DO NOT
OVERFILL. This helps remove excessive explosive gasses from
the battery. For maintenance free batteries!Without caps, carefully
follow the battery manufacturer's
recharging instructions.
BATTERY ACID CAN CAUSE SERIOUS INJURY AND
PROPERTY DAMAGE! Always wear complete eye and clothing
protection and avoid touching _;_yesWhile working near battery.
Clean battery terminals.
in contact with eyes.
Be careful to keep corrosion from coming
Study all of the battery manufacturer's specific precautions such
as removing or not removing cell caps while charging and
recommended rates of charge. If unable to determine the battery
manufacturerer's requirements for charging, always charge the
battery with the cell caps in place.
If battery voltage cannot be determined from the information on
the battery itself, refer to the owner's manual of what ever product
the battery is/was installed in.
BATTERY EXPLOSION CAN KILL, INJURE, AND
CAUSE PROPERTY DAMAGE! Never attempt to charge a
marine (boat) battery on board a boat. Remove battery and
charge it on shore. On-Board charging requires special
equipmentfor safe charging.
11
OPERATING
INSTRUCTIONS
OPERATING
INSTRUCTIONS
DO NOT ATTEMPT TO OPERATE THIS BATTERY CHARGER
unless you have read and understand the entire SAFETY
INSTRUCTIONS section of this manual.
CONNECTING
TO BATTERIES
INSTALLED
IN VEHICLES
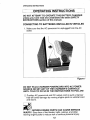
1. Make sure that the AC powercord is unplugged from the AC
outlet.
Figure 1
DO NOT PLUG CHARGER POWERCORD
INTO AC POWER
SOURCE OR SET ANY OF THE CHARGER'S CONTROLS
UNTIL TOLD TO DO SO IN THE INSTRUCTIONS
TO FOLLOW.
2. Position AC powercord and DC output cord in such a manner
that will avoid damage by moving engine parts or vehicle hood
and doors.
MOVING ENGINE PARTS CAN CAUSE SERIOUS
INJURY! Stay clear of fan blades, belts, pulleys, and other
moving engine parts to reduce risk of serious personal injury.
12
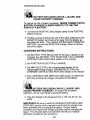
OPERATING INSTRUCTIONS
3. Check the polarity of the battery'terminals.
The POSITIVE
terminal should be marked: POSITIVE, POS, +, or P. The
NEGATIVE terminal should be marked: NEGATIVE, NEG,
ORN.
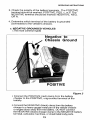
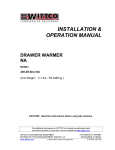
4. Determine which terminal of the battery is grounded
(connected) to the vehicle's chassis.
a. NEGATIVE-GROUNDED
(The most common type)
VEHICLES
Negative to
Chassis Ground
POSITIVE
Figure 2
i. Connect the POSITIVE (red) clamp from the battery
charger to the POSITIVE, ungrounded terminal of the
battery.
ii.Connect the NEGATIVE (black) clamp from the battery
charger to a heavy gauge metal part of the vehicle chassis
or engine block away from the battery. DO NOT connect
the NEGATIVE (black) charger clamp to the NEGATIVE battery
terminal, carburetor, fuel lines, or sheetmetal body parts.
13
OPERATING
INSTRUCTIONS
Positive
Chassis
to
Ground
gative
Figure 3
b, POSITIVE-GROUNDED
i. Connect the NEGATIVE
NEGATIVE, ungrounded
VEHICLES
(black) charger clamp to the
terminal of the battery.
ii.Connect the POSITIVE, (red) charger clamp to a heavy
gauge metal part of the vehicle chassis or engine block
away from the battery. DO NOT connect the POSITIVE
(red) charger clamp to the POSITIVE battery terminal,
carburetor, fuel lines, or sheetmetal body parts.
14
OPERATING
INSTRUCTIONS
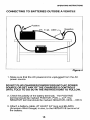
CONNECTING TO BATTERIES OUTSIDE A VEHICLE
Positive
24"
6 ga.
cable
Negative
Figure 4
1. Make sure that the AC powercord is unplugged from the AC
power source.
DO NOT PLUG CHARGER POWERCORD INTO AC POWER
SOURCE OR SET ANY OF THE CHARGER'S CONTROLS
UNTIL TOLD TO DO SO IN THE INSTRUCTIONS
TO FOLLOW.
2. Check the polarity of the battery terminals. The POSITIVE
terminal should be marked: POSITIVE, POS, +, or P. The
NEGATIVE terminal should be marked: NEGATIVE, NEG, -, OR N.
3. Attach a battery cable, AT LEAST 24" long and #6 AWG
(American Wire Gauge) in size, to the NEGATIVE terminal of
the battery.
15
OPERATING INSTRUCTIONS
BATTERY EXPLOSION CAN KILL, INJURE, AND
CAUSE PROPERTY DAMAGE!
To reduce the risk of battery explosion, NEVER CONNECT BOTH
BATTERY CHARGER CLAMPS DIRECTLY TO THE TWO
POSTS OF A BATTERY.
4. Connect the POSITIVE
battery terminal.
(red) charger clamp to the POSITIVE
5. Position yourself and the free end of the cable (attached to the
NEGATIVE battery terminal) as far away from the battery as
the cable will allow. Thenl WHILE FACING AWAY FROM THE
BATTERY, connect the NEGATIVE charger clamp to the free
end of the cable.
CHARGING INSTRUCTIONS
.
Set BATTERY TYPE SELECTOR for the type of battery to be
charged. See BATTERY TYPE SELECTOR in the CHARGER
CONTROLS AND FEATURES section of this manual.
2. Set FUNCTION
.
SELECTOR
to CHARGE.
Set AMP SELECTOR to the charging amps desired, for the
voltage battery being charged. See AMP SELECTOR in the
CHARGER CONTROLS AND FEATURES section of this manual.
4. See CHARGING TIME INSTRUCTIONS
how long to leave the charger connected
section to determine
to the battery.
BATTERY EXPLOSION CAN KILL, INJURE, AND
CAUSE PROPERTY DAMAGE! To reduce risk of battery
explosion, do not overcharge a lead-acid battery.
5. Plug the charger's
outlet.
AC powercord
into a 120 volt, 60 Hz, AC
IMPORTANT: Be sure to read the CHARGER CONTROLS AND
FEATURES section of this manual to verify that the charger has
been activated and is charging the battery. Certain battery
conditions can require pre-charge activation before charging will
begin. The indicator lights and ammeter will tell you if special
activation procedures are necessary.
16
OPERATING INSTRUCTIONS
6. When ou wish to disconnect the charger from the battery,
unplugYthecharger'-sAC powercord from the AC outlet.
BATTERY EXPLOSION CAN KILL, INJURE AND
CAUSE PROPERTY DAMAGE! To reduce risk of battery
explosion, follow the charger cable removal steps below EXACTLY.
a. FOR BATTERIES INSTALLED IN VEHICLES, remove the
charger clamp attached to the vehicle's chassis FIRST, then
remove the charger clamp attached to the battery.
b. FOR BATTERIES NOT IN A VEHICLE, remove the Negative
(black) charger clamp from the cable (attached to the
negative battery terminal) FIRST, as far from the battery as
the cable will permit. Then remove the Positive (red) charger
clamp attached to the positive battery terminal.
17
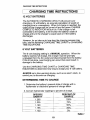
CHARGING TIME INSTRUCTIONS
CHARGING
TIME INSTRUCTIONS
1"2VOLT BATTERIES
The AUTOMATIC CHARGING CIRCUIT will prevent over
charging a 12 volt battery, so accurate calculation of length of
charging time is unnecessary.
When full charge is reached, the
output of the charger will be turned off and the green CHARGE
COMPLETE INDICATOR will turn on. If the charger is left
connected to the battery, it will monitor the battery's state of
charge and turn the charger's output back on if the battery
discharges.
However, for an idea as to how long the charging process may
take, see the following CHARGING TIME CHART or CHARGING
TIME EQUATIONS.
6 VOLT BATTERIES
The 6 volt charging setting is a MANUAL operation. When the
battery reaches full charge, the charger must be promptly
unplugged from the AC outlet and disconnected from the battery.
If this is not done, overcharging can occur that could result in
damage to the battery.
Use the CHARGING TIME CHART or CHARGING TIME
EQUATIONS to determine how long to charge your 6 volt battery.
ALWAYS set a time-warning device, such as an alarm clock, to
remind you to discontinue charging.
DETERMINING TIME TO CHARGE
1. Determine the battery's present state of charge with a
hydrometer or electronic percent-of-charge
tester.
2. Convert hydrometer
readings to percent of charge.
SPECIFIC
GRAVITY
1.265
1.225
1.190
PERCENT OF
CHARGE
100%
75%
50%
1.155
1.!20
"
25%
0%
Table 1
18
CHARGING
TIME INSTRUCTIONS
CAUTION - Batteries that are 25% charged or lower can easily
freeze and should be chargedat once, but DO NOT CHARGE
A BATTERY THAT IS ALREADY FROZEN.
_3. To determine time to charge on chart below, find the section
for the voltage of the battery to be charged. Follow the row to
the right, from the amp setting to be used, to where it meets
the percent-of-charge
column that comes closest to the
battery's present state of charge.
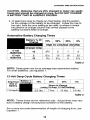
Automotive Battery Charging Times
Battery % Of
75%
50%
25%
TIME TO CHARGE
0%
(HOURS)__
er Am
6 volt
Batteries
12 volt
Batteries
10
22/3
5
7
9
2
61/2
12
18
23
10
1¾
314
5
614
Table 2
NOTE: Times given are for an average-size
For small batteries, use equation 1.
12-Volt Deep-Cycle
Amp-Hour
Size of
Battery
115 AmpiH r
of
Battery Charging
75%
"
50%
automotive
battery.
Times
0%
25%
Hours to Charge
(using 10 Amp, 12 Volt Setting)
3.5Hrs
[
7Hrs
J 10Hrs
!
14Hrs
Table 3
NOTE: These times are for reference only. Actual times may vary
due to battery design and physical condition of the battery.
For a more accurate determination
Equation 1.
19
of length of charging time, use
CHARGING
TIME INSTRUCTIONS
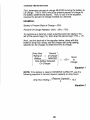
First, determine percent-of-charge-NEEDED to bring the battery to
full charge. This is 100% minus the present percent of charge of
the battery (determined above). Then, to use it in the equation,
express the percent-of-charge-needed as a decimal.
EXAMPLE:
Battery,s Present State of Charge = 25%
Percent-Of-Charge-Needed:
100% - 25% = 75%
To express as a decimal, insert a decimal point two digits to the
left of the percent sign (%), then drop the percent sign: 75% = .75
Next, use this decimal in the equation below, along with the =
battery's amp-hour rating, and the charge rate (amp) setting
selected on the charger, to determine time to charge,
_Amp Hour
Percent
Rating of
x of Charge
Battery
NEEDED
Amp Setting Selected
On Charger
x
1.25=
Hours
to
Charge
Equation
I
NOTE: If the battery is rated in RESERVE CAPACITY, use the
following equation to convert reserve capacity to amp-hours.
Amp Hour Rating =
( Reserve _r,_it,,_...,.._..C..,j
+ 15.5
2
Equation
20
2
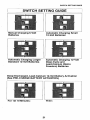
SWITCH SETTING GUIDE
SWITCH SETTING GUIDE
Manual Charging 6-Volt
Batteries
Automatic Charging Small
12-Volt Batteries
Automatic Charging Larger
Standard 12-Volt Batteries
Automatic Charging 12-Volt
Deep-Cycle and
Lead-Calcium (Delco
Freedom) Batteries
Deep-Discharged,
Lead-Calcium
12-Volt Battery Activation
(See PRE-CHARGE BATTERY ACTIVATION)
For 1st 10 Minutes:
Then:
21
CHARGER CONTROLS
AND FEATURES
Bottom switch can be in either position
Engine Starting
CHARGER
CONTROLS
AND FEATURES
AMP SELECTOR is to be set to the same voltage as the battery
to be charged: 6 or 12 volts. For 12 volt batteries, there are 2
charge rate settings to choose from: 10 amps or 2 amps. These
two settings are controlled by the AUTOMATIC CHARGING
CIRCUIT. The 6 volt setting is a 10 amp manual charge rate.
NOTE: The 2 amp setting should be selected to charge only
SMALL 12 volt batteries. If used to charge larger automotive or
deep-cycle batteries, full charge may never be fully reached.
When the switch is set to its right-most setting, 60 amps of engine
starting power is available. When this setting is used, the
FUNCTION SELECTOR must be set to the right or START
position.
•
IMPORTANT!
The 6 volt setting is NOT automatic. The charger
must be manually-disconnected
when a 6 volt battery reaches full
charge to prevent overcharging and battery damage.
SMALL 12 VOLT BATTERIES, such as those used in
motorcycles, lawn tractors, and snowmobiles, have a maximum
charge rate limit. Unless otherwise stated on a particular battery,
always charge small 12 volt batteries on the 2 amp setting to
prevent battery damage.
FUNCTION SELECTOR
has 2 positions: CHARGE and
START/ACTIVATE.
It must be set in the CHARGE position when
ever 6 or 12 volt charging is desired. The only time it is moved to
START/ACTIVATE
is for engine starting or pre-charge activation.
22
CHARGER
CONTROLS AND FEATURES
IMPORTANT! If charging is attempted when the FUNCTION
SELECTOR is in the START position, the automatic circuitry will
be bypassed, causing all settings to be manual.
BATTERY TYPE SELECTOR must be set for the type of battery
being charged. Set to the left DEEP-CYCLE positionfor charging
deep-cycle batteries or any other battery with a built-inhydrometer
"eye", such as the Delco Freedom battery. Set all other battery
types to the right ALL OTHER position.
CAUTION
- SET SWITCH
CORRECTLY!
Charging a standard battery on the DEEP-CYCLE setting may
result in excessive gassing and possible overcharging.
Charging a deep-cycle battery on the ALL OTHERS setting will
result in an undercharged battery.
Charging a battery (such as a Delco Freedom) with a built-in
hydrometer "eye" on the ALL OTHERS setting will result in a fully
charged battery, but the "eye" may fail to change to indicate a
satisfactory charge level.
AUTOMATIC CHARGING CIRCUIT controls the two 12 volt
settings. It monitors the battery's state of charge and
automatically reduces the current to the battery as it nears full
charge. In some cases, it will taper to such a low rate that the
ammeter wilt appear to be on or near zero for some time. When
full charge is reached, the output to the battery is completely shut
off and the green CHARGE COMPLETE indicatorcomes on. At
this point, the charger continues to monitor the battery's state of
charge. If the battery discharges for any reason, the charger will
turn the output back on until the battery reaches full charge once
again.
NOTE: The 2 amp setting should be selected to charge only
SMALL 12 volt batteries. If used to charge larger automotive or
deep-cycle batteries, full charge may never be fully reached.
The automatic charging circuit is temperature compensating.
will assure that a full charge is reached regardless of the
temperature at which it is being used.
This
REVERSE HOOK-UP PROTECTION CIRCUIT will not allow the
charger to begin charging and will light the red REVERSE
HOOK-UP indicator if the charger is connected to the battery in
reverse.
23
CHARGER
CONTROL5
AND FEATURE,_5
CHARGE COMPLETE INDICATOR lightturns on when the
battery reaches full charge. This lightonly operates when the
charger is in one of the two 12 volt charging modes and the
FUNCTION SELECTOR is set to CHARGE. It will indicate
complete charge even if the charger is unplugged.
REVERSE HOOK-UP INDICATOR lightturns on when the
charger clamps are connected to a battery in reverse. This light
will turn on whenever a reverse hook-up occurs, regardless of how
the three switches are set.
AMMETER indicates the charging current being drawn from the
charger by the battery. As the batterybecomes more fully
charged, the charge rate lessens and the ammeter needle moves
toward the lower amp numbers on the meter.
CAUTION - DO NOT USE AMMETER
FULL CHARGE IS REACHED!
TO DETERMINE
WHEN
When charging small 12 volt batteries on the 2 amp setting, or
when any batter,.., nears full charge, the ammeter needle will be
•very close to zero. When_charging 12 volt batteries, the automatic
circuit is in control of the charging process. When full charge is
reached, the output shuts off and the green CHARGE
COMPLETE indicator lights up. But when_charging 6volt
batteries, overcharging can occur if the chargeris not
disconnected once full charge is reached. Therefore, it is
important to follow the CHARGING TIME INSTRUCTIONS,
earlier
in this manual, when charging 6 volt batteries. When the charger
will be used for engine starting, the ammeter needle will move into
the "Start" range on the ammeter.
Several battery conditions can also cause the ammeter to appear
to indicate a battery near full charge, when in fact charging has
only begun.
m
Cold Battery
Sulfated Battery
Deeply-Discharged
Lead-Calcium
automotive batteries)
Battery (many newer
COLD BATTERIES (temperatures lower than 32 degrees F or 0
degrees C) will begin charging at a low rate of charge. But as the
battery warms up through charging, the charge rate will increase.
Then, as the battery charges up, the charge rate will decrease
normally.
24
CHARGER CONTROLS
AND FEATURES
SULFATED and DEEPLY-DISCHArGED
LEAD-CALCIUM
BATTERIES require a special activation procedure. Refer to the
following PRE-CHARGE ACTIVATION instructions.
SHORTED BATTERIES - When the battery being charged has a
short circuit,the ammeter will "pin" tothe far right in the "Start"
range.' If after 5 to 10 minutes of charging, the needle has not
startedto move toward lower amperages, unplug the charger and
discontinuecharging. If available, use a voltmeter and read the
voltage of the battery, if the voltage is under 12.0 volts for a 12
volt battery,or 6.0 volts for a 6 volt battery, plug the charger back
in and resume charging. If after another 15 to 20 minutes, the
ammeter has failed to move toward lower amperages, repeat the
voltmeter test. If the voltage has not increased, the battery needs
to be serviced or replaced.
25
PRE-CHARGE
BATTERY ACTIVATION
PRE-CHARGE
(12 Volt Only)
BATi"ERY ACTIVATION
The need for pre-charge activation is indicated when the ammeter
reads zero and neither the REVERSE HOOK-UP or CHARGE
COMPLETE indicators are lit, or if a battery is known to be dead
and the CHARGE COMPLETE light comes on after charging just
a few minutes. It should be needed only when charging sulfated
or deeply-discharged
lead-calcium batteries (such as the Delco
Freedom and many newer automotive batteries).
Pre-charge
activation is a two-step process:
CHARGER ACTIVATION - These types of batteries can be down
to such a low voltage (less than I volt) that they can "trick" the
automatic circuit into thinking that the charger is not connected to
a battery and will not allow charging to begin. The automatic
circuit must then be temporarily bypassed until the battery voltage
is raised to alevel that the charger can detect.
CAUTION - IF "CHARGE COMPLETE" INDICATOR IS LIT, DO
NOT ATTEMPT PRE-CHARGE ACTIVATION UNTIL VERIFYING
(WITH HYDROMETER OR ELECTRONIC
PERCENT OF
CHARGE TESTER) THAT THE BATTERY iS DISCHARGED.
1. With the AMP SELECTOR set to the desired charge setting,
move the FUNCTION SELECTOR to ACTIVATE. The
charger's automatic circuit is now bypassed and the charger is
in a manual charge mode.
2. Allow the charger to charge for 10 minutes, then move the
FUNCTION SELECTOR back to CHARGE to return to
automatic charging.
The green light and ammeter needle will now be pulsing rapidly.
The pulsing will begin to s!ow and the ammeter needle will be
slightly off zero. When the needle reaches about 2 amps, the
green lightwill go off completely.
3. The charger is now in control of the charging process.
NOTE: if the green light goes out AND the ammeter falls back to
zero, repeat steps 1 and 2 above.
BATTERY ACTIVATION - After activating the charger, the
ammeter may continue to display very low amps until the sulfate
barrier, on the plates of the battery, is broken through. This can
take as long as 4 to 8 hours. After breaking through the sulfate
barrier, the ammeter will register higher amps. Charging will now
26
PRE-CHARGE
progress normally and the ammeter
takes a charge.
BATTERY ACTIVATION
(12 Volt Only)
Will decrease as the battery
If you estimated the length of time to charge the battery, charging
time begins from the time the charger finally breaks through the
sulfate barrier.
It should be noted that battery activation time cannot be
shortened. Each_individual battery and its condition will determine
how long it takes to break through the sulfate barrier.
CAUTION - DO NOT LEAVE CHARGER UNATTENDED
DURING PRE-CHARG E ACTIVATION. OVERCHARGING
COULD OCCUR, RESULTING IN BATTERY DAMAGE OR
EXPLOSION. RETURN TO THE "CHARGE"
FUNCTION
WITHIN 10TO 15 MINUTES.
27
CHARGING
BATTERIES WITH BUILT-IN HYDROMETER
"EYE"
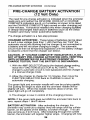
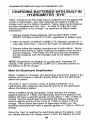
CHARGING BATTERIES WITH BUILT-IN
HYDROMETER "EYE"
Often, maintenance free lead-calcium batteries are equipped with
a built-in hydrometer "eye" that indicates the battery's state of
charge (such as the Delco Freedom). Many deep-cycle batteries
are also equipped with this "eye". In order to make the "eye"
indicate properly at full charge, it is important to follow these
instructions.
1. Always charge these batteries with the BATTERY'TYPE
SELECTOR set to DEEP-CYCLE, regardless of battery type.
2. After the green CHARGE COMPLETE indicator comes on, it
may take more than 1 hour for the "eye" to indicate full charge.
.
Always follow the battery manufacturer's instructions. Some
recommend tilting or lightly shaking the battery once an hour
during charging. This helps mix the acid that has stratified
during charging, with the stronger acid at the bottom of the
battery.
NOTE: Regardless of whether or not the "eye" indicates full
charge, if the green CHARGE COMPLETE indicator comes on,
the battery is at full charge.
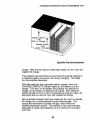
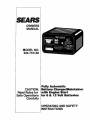
More On Electrolyte
Stratification
When a battery is charged, the electrolyte around the plates in the
battery will increase in specific gravity faster than the electrolyte
above the plates.
The built-in "eye", found in many of today's batteries, is a
hydrometer that measures the specific gravity of the electrolyte
above the battery plates.
When a battery being recharged, finally reaches full charge
(specific gravity of 1.265), the electrolyte above the plates of the
battery will have a specific gravity of only about 1.1 90, or 50% of
charge. But the electrolyte surrounding the battery plates will
have a specific gravity of as much as 1.300, or about 110% of
charge. When these two layers of electrolyte finally mix, the
resulting electrolyte will have a specific gravity of 1.265 or 100% of
charge.
Since the "eye" is reading the electrolyte above the plates, it will
not initially indicate full charge when, in fact, the battery is at full
28
CHARGING
BATrERIES
WITH BUILT-IN HYDROMETER
"EYE"
Specific Gravity Illustration
charge. After the two layers of electrolyte finally mix, the "eYe" will
register full charge.
This problem has lead Delco to recommend the gentle shaking of
a Freedom battery once each hour during charging. This helps
mix the stratified electrolyte.
With this particular fully-automatic battery charger, when the
CHARGE COMPLETEindicator
lights up, the battery is at full
charge. The "eye" on the battery wilt probably not indicate full
charge, but the battery is indeed at full charge. After sitting for
awhile (usually an hour or two, but possible as long as a day), the
electrolyte will mix and the "eye" will indicate full charge.
Non-automatic chargers will more readily get the "eye" to indicate
full charge, but is accomplished through overcharging.
This
causes the electrolyte to bubble and gas, which mixes the
stratified electrolyte quicker. This practice is not recommended,
especially on deep-cycle batteries, as it is harmful to the battery
over time.
29
ENGINE STARTING
ENGINE STARTING
J
This battery charger can provide a high,current output to help start
a vehicle that has a weak battery. However, some vehicles'
on-board computers can be damaged if jump starting is tried.
ALWAYS READ THE VEHICLE OPERATOR'S MANUAL
BEFORE AUXILLIARY STARTING to determine if jump starting
can do damage to the vehicle. If not, read and follow these
instructions.
CAUTION - DO NOT TRY TO BOOST START A VEHICLE
WITHOUT A BATTERY IN IT, OR YOU MAY DAMAGE THE
VEHICLE'S ELECTRICAL SYSTEM.
1. Connect the battery charger to the vehicle according to the
previous :OPERATING INSTRUCTIONS.
2. Charge battery for 5 to 10 minutes at the appropriate
rate for size of battery.
charge
3. Set the AMP SELECTOR to the 60A ENGINE START setting,
and the FUNCTION SELECTOR
to START.
4. Then try to start the vehicle. If the vehicle doesn't start after
about 2 to 3 seconds, STOP and wait 3 to 4 minutes. Repeat
until engine starts.
NOTE: If the engine spins, but fails to start after several starting
attempts, there is some problem with the engine other than its
starting system. Discontinue cranking the engine until the other
problem is found and corrected.
CAUTION -Excessive
starter motors.
engine starting can damage vehicle
NOTE: This battery charger has an internal thermal protector to
prevent overheating and damage to the battery charger. If, after
repeated starting attempts, the ammeter registers zero output,
wait 3 to 4 minutes for the charger to cool. The thermal protector
will automatically reset and allow you to continue.
3O
TROUBLE
I
TROUBLE
SHOOTING
sHOOTING
1. NO AMMETER READING and NO INDICATOR LIGHTS
(Charging has not yet started)
a. Make sure charger is plugged into a LIVE AC outlet
b. After unplugging unit, check connections at battery. Make
sure the clamps are making good contact with the battery
terminal and other point of connection.
c. If charging a 12 volt battery, see PRE-CHARGE BATTERY
ACTIVATION
d. Check to see that battery is capable of being charged.
be damaged, sulfated, or have an open circuit.
It may
e. Make sure you have selected the proper charge voltage for
the battery being charged.
2. NO AMMETER READING and NO INDICATOR LIGHTS
(Charging has been in process)
a. Battery is nearing full charge, green light will eventually turn on.
b. The 2 amp setting has been selected for charging a larger 12
volt battery. In this mode, full charge may never be reached
to allow the CHARGE COMPLETE light to turn on. Switch to
10 amp, 12 volt setting.
3. NO AMMETER READING,
INDICATOR IS ON
REVERSE
HOOK-UP
a. The charger's output cables are reversed at the battery and
other point of connection. Unplug charger, correct the
hook-up, then plug charger in and resume charging.
4. NO AMMETER READING, but CHARGE COMPLETE
INDICATOR IS LIT
a. Battery is fully charged. Charger may be disconnected at any time.
5. CHARGE COMPLETE INDICATOR IS ON, BUT BATTERY
EYE DOES NOT INDICATE FULL CHARGE.
a. Make sure BATTERY TYPE SELECTOR is set to
DEEP-CYCLE when charging any deep-cycle or
lead-calcium battery. This is especially important for batteries
with built-in hydrometer "eyes".
31
TROUBLE SHOOTING
b. See CHARGING BATTER!ES'WITH
HYDROMETER
EYE.
BUll[T-IN
6. CHARGE COMPLETE INDICATOR IS ON, BUT SPECIFIC
GRAVITY IS LESS THAN FULL CHARGE.
a. See MORE ON ELECTROLYTE
STRATIFICATION.
7. AMMETER AND CHARGE COMPLETE INDICATOR ARE
PULSING.
a. See PRECHARGE
CHARGER
BATTERY ACTIVATION.
CARE AND MAINTENANCE
CAUTION - Make sure charger is unplugged from AC outlet
before performing any maintenance.
A minimum amount of care can keep your battery charger working
and looking good for years.
1.Clean the clamps after each use. Wipe off any battery fluid
that may have come in contact with the clamps to prevent
corrosion. Batter:y fluid may be neutralized with a solution of
water and baking soda.
,
Coil the input and output cables neatly around the cable
wrap/handle on the rear of the charger after each use. This
will help prevent damage to the cables and the charger.
3. If needed, the case may be wiped clean with a soft cloth.
Any other service to this battery charger must be done by a
qualified repair facility. There are no user-servicable parts inside.
32
I
TROUBLE
SHOOTING
SERVICE INFORMATION
ELECTRIC SHOCK CAN KILL! To reduce risk of
electric shock, do not attempt to perform any servicing operations
other than those listed in the CHARGER CARE AND
MAINTENANCE section of this manual. Any additional service
must be performed by qualified service personnel,
Now that you have purchased your battery charger, should a need
ever exist for service, simply contact any Sears Serwce Center or
Sears, Roebuck and Co. store. Besure to provide the model
number: of your charger which is: 934,7!6140.
There are no user servicable parts inthis battery charger, and
electronic recalibration is required following any servicing. Only
Sears Service Centers can properly service this product.
FULL 1-YEAR WARRANTY
If, within t -year from the date of purchase, this battery charger fails due to a defect in
materials or workmanship, simply return it to the nearest Sears store throughout the
United States, and Sears will repair or replace it, free of charge.
This warranty gives you specific legal rights, and you may also have other rights which
vary from state to state.
Sears, Roebuck and Co., Dept. 698/731A,
Sears Tower, Chicago, Illinois 60684:
....._
SEARS ROEBUCK AND CO, CHICAGO, IL 60684 USA,
33