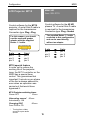
1
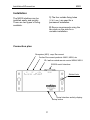
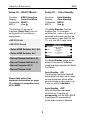
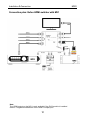
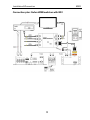
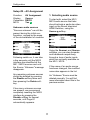
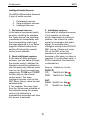
of Re:connect M 203 RS232 Interface Revox Dominating Entertainment. Revox of Switzerland. E 2.03 Attention! After updating the M203 firmware to version 2.00 or higher, we recommend completely resetting the M203 interface by pressing the Disable softkey on setup page #2 for several seconds, until setup page #1 automatically appears. Please refer also to page 12 ff. Table of Contents M203 - New features - Switching between stations 1 2 Installation Connection Plan 3 3 Connection M51 Link IN M51 Link OUT RS 232 IR-LINK 4 4 4 5 5 Setup key Slot selection Serial Port Mode Setup # 1 Select Device Auto Standby 6 6-7 8 8 8 8 Serial Interface RS-232 Link RS-232 Filtered Video Controller 9 9 10 Connection plan Revox TV with M51 Revox TV TV with M219 Gefen HDMI Switcher with M51 Gefen HDMI Switcher with M219 11 11 12 13 Overview video products Gefen HDMI Switcher 4x1/4x2/6x2 Revox Plasma E642 MK 3 (2) Revox Plasma E642 MK 4 (5) Revox Projector M710 Revox Plasma 42 HD 14 14 15 15 16 16 Setup # 2 1. Selecting audio source Unknown audio sources 2. Assigning video input Disable Setup #2 Reset 17 17 17 19 20 20 Technical data Guarantee Included in delivery Appendix Appendix Appendix Introduction M203 M203 Revox New features from software V2.00 With the Re:connect M203, Revox offers an interface, for the intelligent control of many of the Revox video products. From software version 2.00, the M203 can be connected not only to an M51 but also to the M219 Side room amplifier. The correct picture input is automatically selected at the television with the help of the interface. Additionally, the next or previous TV programme can be selected for the television, through the M218 wall-mounted keypad. As a result, a Revox television can also be controlled from an side room, using the M219 Side room amplifier. The option of connecting an M203 interface to an M219 exists with the first four Side room amplifiers for each zone. As a result, a total of 16 Side room amplifiers can be connected with an M203 interface in a Revox Multiroom system with 4 different zones. Multiroom Planer V2.00 The new Multiroom Planner doesn't just calculate the correct address assignment for the M219 Side room amplifiers and M217 Wall-mounted displays, it also calculates the slot addresses for the M200 series Re:control products in the side room. Take advantage of the possibility to be able to determine in advance, all M203, M217 and M219 addresses simply and quickly and at the same time save the information as system documentation. You will find more information about addressing the M203 in the side room, on Page 6 of this manual. You can download the new Multiroom Planner V2.00 free-ofcharge from the download area of the Revox Homepage, under www.revox.com. In the same way as with the setup of an M51, you define which video input at the Revox televisions activated by which M219 audio source, through the M203 Setup. The local inputs Local 1 – 3 at the M219 can be used for the control, as well as the audio sources of the Multiroom Central unit. Important advice: If you want to use the software version 2.00, the complete Revox system must be updated to the level 2.00, or higher. 1 Introduction M203 Switching between stations using the Revox wall-mounted keypad* The M203 offers the option of selecting specific stations using the skip keys (<>) on an M218 wall-mounted keypad, once the TV tuner has been selected. This comfort function requires two settings: 1/2 Note: Monitor-only devices This comfort function is only available with TV models with an integrated TV tuner. It cannot be selected in case of monitor-only devices without a TV tuner. 2/2 Audio IN assignment M51 in combination with M203 The sound input, e.g. TV, Aux1, Optical, etc., of the remote device must be assigned to one of the following Remote buttons in the Remote menu: • Local • Local 1 • Local 2 • Local 3 TV Tuner assignment M203 Setup #2 - Input The second assignment affects Setup #2 in the M203. Here, the physical audio source of the TV sound that was assigned to a Local Remote button in the first step, is assigned to the television's TV Tuner. In the example above, the audio source TV calls the television tuner. As well as the Multiroom central unit sources, a side room amplifier also offers its own local Inputs 1-3 for the TV Tuner assignment. Assignment example M219 in combination with M203 There is no need to make an assignment through the Remote menu with an M219, because its local audio inputs (Local 1-3) are always assigned to the IR commands Local, Local 1, Local 2 and Local 3. Continue with point 2/2 * only available with Re:ception 42 HD 2 Installation & Connection M203 Installation 1) The four outside fixing holes (∅ 4,2 mm ) are used for a permanent installation. The M203 interface can be installed easily and quickly. There are two types of fixing available. 2) Revox recommends using the two slots on the side for a variable installation. Connection plan Re:system (M51) resp. Re:connect Further Re:connect products: M201, M202, etc IR-/ wall-mounted remote control M204/ M218 RS232 seriell interface Slotted hole Serial interface activity display Setup button 3 Installation & Connection M203 Connection: M203 with M51/ M219 Connection: M203 with external interfaces Socket: M51 LINK IN Setup: M219: Yes ; Socket: M51 LINK OUT Setup: M219: Yes ; The M203 interface is connected with the M51 LINK socket on the back of the M51 or the M219 LINK socket on the Side room amplifier, using the supplied telephone cable. The M203 interface is designed for the connection of further external interfaces: M51 operation Currently, the following further products can be connected with the M51:: M200 Domotic interface M201 IR interface M202 Ethernet interface M203 (2. Interface) M217 Display If you want to use a different cable, you should only use a non-crossed, 4-core telephone cable with an RJ11 plug (6P4C modular). Max. cable length: 100 m Max. cable resistance: 0.1 Ω /m M219 operation With the M219, the LINK OUT can be used for the connection of an M217 Display. Use a non-crossed, 4-core telephone cable with an RJ11 plug (6P4C modular). Max. cable length: 100 m Max. cable resistance: 0.1 Ω /m 4 Installation & Connection M203 Connection: M203 with seriell interface Connection: M203 with IR controller Socket: RS232 Setup: # 4 – from page 8 M219: Yes ; Socket: IR-Link Setup: M219: Yes ; Using the serial RS232 interface, The M203 interface can be used with other (TV) devices, which also have a serial interface. The connection to an IR receiver or a wall-mounted remote control is done through the 3pin, screw-fixable Phoenix plug connection. Many of the Revox video products have a serial interface and are therefore very easy to integrate into the Revox World. Revox recommends the use of a 2-core screened cable (microphone cable), where the screening is used as ground. This cable may be a maximum of 30 metres in length. The M203 Interface is also suitable as an interface to domestic facility management systems such as AMX or Crestron, which have a special Revox protocol. Please ensure that you use the correct polarity when setting up as otherwise you might damage your equipment. Even a Windows PC with the M230 control program can be connected to the serial interface on the M203. Symbols: + Æ Pos. voltage. 20V (DC) IN Æ IR Signal - Æ Ground You will find further information from Page 8. The maximum number of IR receivers that can be switched in parallel per M203 is 3. Serial cables with a maximum length of 10 metres can be used. 5 Installation & Connection M203 Setup key Setup #1 Function: Display: Connection: M219: a) Slot M51 Addr. assignment Slot Address M51-Link Yes ; M51 operation (fig. page 11) A different address must be assigned through the slot address, if a second M203 (M200) is connected to the M51 Link output, so that both don’t occupy the same slot address. This would cause errors. In the case of a double address assignment, neither of the two M203s (M200s) would be shown in the Version list. Using the Setup key, you call up the M203 menu, which is shown in the M51 display. If the M203 interface is connected with an M219 Additional room amplifier, the M51 display is also used. Slot address: #11 or #12 In the case of an M10 installation, display is done using the M230 service program or M-Scope. The two slot addresses 11 and 12 are available for selection. The following message appears if the selected address is already assigned: Using the Softkeys you can get to pages #1 and #2 Setup page #2 only appears if a video device has been selected on page #1 as Serial Port Mode. 6 Installation & Connection Setup #1 M203 Example b) Slot M219 In Figure A, an M203 could be connected to each of the Side room amplifiers 31 – 34. The M219 amplifiers 35 and 38 on the other hand may not be connected with an M203 interface. M219 operation - fig. Page 11 In respect of the M219, the slot address defines the assignment to the Side room amplifier. A M203 can only be connected to an Side room amplifier within the address range x1 – x4. Fig A. Multiroom version list / Zone 3 The figure below shows the Multiroom version list from Zone 3 for the M203 interfaces. You get to this menu by repeatedly pressing the Zone softkey in the sub-menu (M51, M230 etc.) of: Setup Ö Multiroom Ö Version Ö Zone x The slot address defines which Side room amplifier the M203 interface should communicate with. This is necessary because of the bus system, although in each case, the M203 is individually connected with the M219. Only one M203 interface can be used per Side room amplifier. In this case, an M203 interface was assigned to the Side room amplifier with address 4, through the slot address 314. Amplifiers 1 – 3 do not have an M203. Address assignment : Zone 1-4 M219/ 217 x1 x2 x3 x4 x5 x6 x7 x8 M200/ M203 Ö Ö Ö Ö x 11 x 12 x 13 x 14 Fig B. Multiroom version list / Zone 3 x 1 – x 4: only M219 x 5 – x 8: M217 or M219 x 11 – x 14: only M200 / M203 7 Installation & Connection M203 Setup #1 – RS232 Modus Setup #1 – Auto Standby Function: Display: Connection: M219: Function: Display: Connection: M219: RS232 interface Serial Port Mode RS232 Yes ; The function of the serial interface (Serial Port) can be configured for the following applications: Auto Standby Auto Standby RS232 Yes ; The Auto Standby function enables the TV to remain switched on, even in the case of selected audio sources that do not activate a video input at the TV, e.g. the M51 radio tuner. • RS-232 Link • RS-232 Filtered • Gefen HDMI Switcher 4x2, 4x1 • Gefen HDMI Switcher 6x2 • Revox Plasma E642 MK 3 (2) The Auto Standby option is only shown in the menu if a Revox model has been selected as Serial Port Mode. • Revox Plasma E642 MK 4 (5) • Revox Projector M710 • Revox Plasma 42 HD Auto Standby: ON The television switches itself off automatically as soon as an audio source is selected, which either cannot activate a video input, e.g. Tuner, or which is disabled Please take note of the important information on page 10 relating to a complete reset of the M203. Auto Standby: OFF After the television has been switched on, it remains on permanently until the M51/ M219 is switched off, irrespective of which audio source is selected. 8 Installation & Connection M203 RS-232 Filtered. RS-232 Link. Standardised serial interface (RS232 protocol) for connection to a PC or another serial interface. Data-reduced RS232 protocol. Only M51-specific data is transferred, so-called display and broadcast messages. Application: You should select this setting if you want to use the M230 control program for PCs or if you want to access the Revox System through domestic facility management equipment such as Crestron and AMX. Application: Simple controllers with low data traffic requirements. 9 Installation & Connection M203 Video Controller. The convenient integration can of course also be used for the M51’s integrated DVD player. Please refer to the picture on the next page – Connection : Video 1). If a video controller for a video product was selected on page #1 Port Mode, a second menu page, Setup # 2 is available. This page enables you to selectively switch on and/or between video inputs on a Revox device or an HDMI Switcher from the Gefen company, dependant on the selected M51/ M219 source. The audio source and video input links referred to in the example are defined in Setup #2. You will find an exact description of the links, starting from page 17. Complete reset? Example M200 with M51: Yes A SAT receiver can conveniently be integrated through the automatic selection of the video input on the TV by the M51. Its picture output is connected, for example, to the YC input on the Revox TV, while the audio signal is connected to the Optical digital input on the M51. Please also refer to the picture on the next page. You should always carry out a complete reset with each new configuration as well as when changing to another TV model. To do this, press the Disable softkey on Setup page #2 and keep it pressed, until the system automatically returns you to page 1. No If you now select the source SAT (Optical) at the M51, the Revox TV automatically transmits the SAT receiver picture over the Input YC and the sound from the SAT receiver is transmitted over the M51. A complete reset is not necessary with an assignment change within a TV model. 10 Installation & Connection M203 Connection plan: Revox TV with M51 A Connection plan: Revox TV with M219 11 Installation & Connection M203 Connection plan: Gefen HDMI switcher with M51 A Note The HDMI output on the M51 is only available if the DVS module is installed ® Gefen : Registered trademark of the Gefen Company/US 12 Installation & Connection M203 Connection plan: Gefen HDMI switcher with M51 13 Installation & Connection M203 Gefen HDMI Switcher 4x2, 4x1 Switcher 6x2 Control software for the HDMI Switcher from the Gefen Company (www.gefen.com) 9-Pol Pin 2 Pin 3 Pin 5 The HDMI inputs on the HDMI switcher are activated, dependant on the M51/ M219 source. If there is no assignment, the HDMI input that was last selected remains active. Setting is done on page #2 in the M203 Setup Product features: - 4 HDMI inputs (4x1,4x2) - 6 HDMI inputs (6x2) - 1 HDMI outputs (4x1) - 2 HDMI outputs (4x2), whereby both outputs can be operated in parallel - Resolution up to 1080p - HDCP-enabled - Optical audio digital output ⇒ ⇒ ⇒ ⇒ 9-Pol Pin 3 Pin 2 Pin 5 Max. cable length RS232: 10 m Gefen products are freely available through specialist retail outlets. A crossed Sub-D cable is required for the transmission. Connection type: Plug-Plug For this reason, you should use the enclosed crossover adapter and gender adapter with the supplied Revox cable. + 14 Configuration M203 E642 MK5 SN 6420004xxx Plasma-TV E642 MK 3 (2) E642 MK3 SN 6420002xxx E642 MK2 SN 6420001305- 6420001999 Control software for the E642 MK4 (5) plasma television. A crossed Sub-D cable is required for the transmission. Connection type: Plug - Plug E642 MK1 SN 6420001001- 6420001299 Control software for the E642 MK3 plasma television. Also suitable for the MK2. A special serial cable ( 9 to 25 pin) is required for the transmission, which can be purchased from Revox under the part number 1.510.100.40 (10m long). 9 pin pin 5 pin 3 pin 2 ⇒ ⇒ ⇒ ⇒ For this reason, you should use the enclosed crossover adapter and gender adapter with the supplied Revox cable. + 25 pin pin 7 pin 2 pin 3 9-pin pin 5 pin 3 pin 2 ! MK2 preparation The IR eye on the plasma television must be covered. Setting TV-Hold ⇒ Disabled TV ⇒ Disabled 9-pol pin 5 pin 2 pin 3 ! MK 4 (5) Preparation The IR eye at the plasma television must be deactivated through the 3.5 mm jack plug. ! MK3 preparation The IR eye on the plasma TV must be deactivated through a little switch beside the terminal area. M51- Remote Menu Remote Button ⇒ ⇒ ⇒ ⇒ Max. cable length RS232: 10 m Plasma-TV E642 MK 4 (5) 15 Configuration M203 LCD Projector M710 M642 HD from SN 0110 Control software for the M710 projector. A serial Sub-D cable is required for the transmission. Connection type: Plug - Plug Control software for the 42 HD plasma TV. A serial Sub-D cable is required for the transmission. Connection type: Plug - Socket The supplied Revox 1:1 cable conforms to this configuration and can be used directly, without an adapter. For this reason, you should use the enclosed gender adapter with the supplied Revox 1:1 cable. 9-pin pin 5 pin 2 pin 3 ⇒ ⇒ ⇒ ⇒ 9-pin pin 5 pin 2 pin 3 9-pol pin 5 pin 2 pin 3 M710 special feature In order not to reduce the working life of the projector lamp, the M710 controller on the M200 has a special timer control. This guarantees that important 2 minute run-on phase of the fan is always adhered to, even when an operation was carried out that would have bypassed it. M710 Projector switching times: Power-OFF 10 sec. Alternating source* Autostandby : ON 60 sec. Changing DISC From DVD to CD 60 sec. Plasma-TV 42 HD * Turning from a video source to a pure audio source. 16 ⇒ ⇒ ⇒ ⇒ 9-pin pin 5 pin 2 pin 3 Configuration M203 Setup #2 – AV Assignment Function: Display: Connection: M219: 1. Selecting audio source AV Assignment Source RS232 Yes ; To start with, select the M51 / M219 audio source that later should activate a particular video input on the Revox television/ HDMI Switcher, using the Source ± softkey. Unknown audio sources "Sources unknown" can still be present during the initial configuration, caused by the swap or the de-installation of modules. Using the Source+ and Sourcesoftkeys, you can step forwards and backwards respectively, through a loop of audio inputs, which are currently available on the M51 / M219. Following switch-on, it can take a few seconds until the M203 interface has identified all the M51 / M219 sources and until the Source ”Unknown" message disappears. If the name of an audio source has been changed, the modified name also appears in the list. Any remaining unknown sources should be deleted by pressing the Disable softkey twice and then pressing the Delete softkey. An “Unknown” Source must be deleted manually. You will find more information about this in the previous section. If too many unknown sources are present, we recommend completely resetting the M203 interface by pressing the Disable softkey for several seconds, until Page #1 automatically appears. 17 Configuration M203 Intelligent Audio Sources The M200 differentiates between 3 type of audio sources: 1. Permanent sources 2. Semi-intelligent sources 3. Intelligent sources 3. Intelligent sources In the case of intelligent sources, it is a question of sources, which, dependant on setting or medium, can transmit a video signal to accompany the audio signal. An example of an intelligent source is the DVD/CD M51 source. If there is a music CD on the M51 drive, the television is not switched on because in this case, no video is required. If, on the other hand, a DVD is identified, the television is switched on. 1. Permanent sources In the case of permanent audio sources, including for example the Tuner source, the television is switched on immediately with the corresponding video input that was assigned to it on Setup page #5. Manual switch-on or switch-off through the remote control is not possible. 2. Semi-intelligent sources In the case of semi-intelligent sources, you can define through the remote control, whether the television should be switched on with the previously defined video input or not. Such sources have respectively TV ON and TV OFF function keys in the remote control menu. The semiintelligent sources, such as the M37 Music Server, store the last selected state. If, for example, the video input from the Server was activated at the television using the remote control, the television is automatically activated next time this source is selected. Source – Switch on Yes/No DVD/CD: CD Switch on: No DVD Switch on: Yes ; SAT: Radio Switch on: No TV Switch on: Yes ; 18 Configuration M203 Setup #2 – AV Assignment 2. Assigning video inputs In the second step, a video input from the television / HDMI Switcher is assigned to the selected M51/ M219 audio source, using the Input ± softkey. Using these softkeys, you can step through a loop of video inputs that are available to the television. The following display appears, if a video input is called by one or more audio sources: Assignment example This example shows you that, as well as the currently displayed audio source (DVD), a further audio source has also been assigned to this video input (here YUV). Using the Source ± softkeys, you can search for the audio source that also calls this video input. As the televisions that can be selected from have different video inputs, only those video inputs that the corresponding TV device has, are actually displayed. Several audio sources are always required if, for example, the M300/M301 Video switch is used, which bundles several video sources together to one video input on the television. The softkey Store appears as confirmation each time the Input is changed. Press Store if you want to save your changes. Otherwise the original setting is retained. 19 Configuration M203 Setup #2 – Disable Disable assignment Reset assignment Using the Disable function, you can undo or disable the assignment of an audio source to a video input. If you want to return the settings in Setup #2 menu to the factory settings, simply press and hold the Disable softkey until the Setup- #1 page appears again. To do this, select the required audio input using the Source ± softkeys and then press the Disable softkey. The Store softkey then appears that you need to press to confirm your change. This resets all input assignments and restores the factory settings. If you don’t press Store, the original setting is retained. 20 Appendix M203 Guarantee Included in delivery The guarantee period is 24 months from the date of purchase. M203 Interface M51-Link cable ( 2 m ) Serial PC cable Your dealer should be your first contact if you need service. If he can't give you the help you need, send your M203 interface carriage free and without any accessories to your national Sales Office. (1:1 - length 3 m) (Plug-Socket) Crossover adapter Gender adapter Accessories (Installation) Please supply a complete description of the problem and a full return postal address. Manual Technical data IR-LINK: + Æ IN Æ - Æ Positive voltage 10-20V (DC) IR signal Ground (GND) Dimensions: 113 x 25 x 50 mm (WxHxD) Weight: 150 g Power consumption: 35 mA (without IR receiver) Max. cable length: 100 m (M203- M51/ M219) Max. cable length: 30 m (M203 - IR receiver) E & OE Product subject to technical modifications. 21 Appendix M203 GERMANY Revox GmbH, Am Krebsgraben 15, D-78048 VS-Villingen Telefon +49 7721 8704 0, Fax +49 7721 8704 29 [email protected], www.revox.de SCHWEIZ Revox Schweiz AG, Wehntalerstrasse 190, CH-8105 Regensdorf Telefon +41 44 871 66 11, Fax +41 44 871 66 19 [email protected], www.revox.ch Zentralservice Revox GmbH, Am Krebsgraben 15, D-78048 VS-Villingen Telefon +49 7721 8704 43, Fax +49 7721 8704 49 [email protected] Copyright by Revox GmbH, Germany. 22 M203 Interface Revox manual / Part no.: 10.30.3070