1
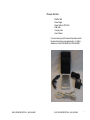
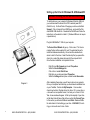
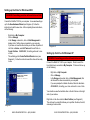
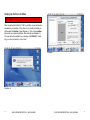
DataPort™ 250 USB 2.0 Enclosure User’s Guide WWW.CRU-DATAPORT.COM • (800) 260-9800 TABLE OF CONTENTS Package Contents Features and Requirements Installation Trouble Shooting Technical Support Warranty P AGE 1 2 4 13 14 15 DataPort™ 250 USB 2.0 Enclosure User’s Guide WWW.CRU-DATAPORT.COM • (800) 260-9800 WWW.CRU-DATAPORT.COM • (800) 260-9800 i PACKAGE CONTENTS · · · · · · DataPort 250 Power Supply Power Cable for PS/2 Port USB cable Carrying Case User’s Manual If you are missing any of the above items please contact the place of purchase to get replacements. For further assistance, contact CRU-DataPort at 800-260-9800. WWW.CRU-DATAPORT.COM • (800) 260-9800 WWW.CRU-DATAPORT.COM • (800) 260-9800 1 DataPort™ 250 FEATURES AND · · · · · · · · REQUIREMENTS USB 2.0 supports transfer rates up to 480 Mb/sec Enables the addition of a 2.5 IDE hard drive up to 9.5mm thickness USB 2.0 is backwards compatible with USB 1.1 Plug-n-Play, hot swappable Three ways are provided to power the DP250 and hard drive: bus power, PS/2 port (power cable included) and external power supply (AC power adapter included) Power/hard drive activity LED (green indicator shows steady illumination to show power on, flickers to indicate hard drive activity) Space saving design 1 year warranty For PC Users · Windows 98SE, 2K, ME & XP · USB 2.0 Port For Mac Users · Mac OS 9.7 & X · USB Port (Currently Apple only provides USB 1.1) 2 WWW.CRU-DATAPORT.COM • (800) 260-9800 WWW.CRU-DATAPORT.COM • (800) 260-9800 3 INSTALLING THE HARD DISK DRIVE (DP250) 1. 2. 3. 4. Leverage the side of the enclosure open with a small screwdriver. Slide the hard drive onto the connector. Close the enclosure by connecting one side then clipping in the other. Connect the provided USB cable between your computer’s USB port and the DP250 enclosure. 5. There are three ways to power your DP250 enclosure and hard drive: USB bus powered, PS/2 port, and external power supply (AC power adapter): • Bus powered: If your computer’s USB port features standard USB port power (DC 5V / 0.5A), your USB port will supply adequate power for most applications. However, certain models of hard drives may require additional power. Also, if the bus power is shared by more than one USB device, there may not be sufficient power for the DP250 and hard drive. Where USB bus power is not sufficient, the PS/2 port or external power supply should be used. • PS/2 port: The PS/2 port on your computer can be used to supply power to your DP250. Plug the provided PS/2 power cable into an available PS/2 port on your computer. Plug the power input end of the PS/2 cable into the power input on the back of the DP250 enclosure. (The PS/2 cable also provides a connector for your keyboard. If desired, your keyboard can be unplugged from your computer to free up a PS/2 port. Your keyboard can then be plugged into the PS/2 connector on the power cable). The PS/2 power cord will power the DP250 enclosure and drive provided your computer’s PS/2 port supplies sufficient power. • An external power supply is also provided in case your computer does not supply adequate power through the USB bus or PS/2 port. To use the external power supply, plug the power cord into the back of the enclosure (which requires DC 5V / 2.0A provided by the power supply) and into an external power source. Power source is a standard AC 100-240V 47-63 Hz outlet. 4 WWW.CRU-DATAPORT.COM • (800) 260-9800 USB input Power Input Diagram 1 Rear panel 250 USB enclosure Diagram 2 WWW.CRU-DATAPORT.COM • (800) 260-9800 5 Setting up the Drive for Windows 98 & Windows ME WARNING: Formatting your drive will result in loss of data. To install a drive on your computer for Windows 98 via the USB port you must download the drivers from CRU’s website (www.CRUDataPort.com). On the left side of the page you will see a link titled Support. Click on Support, then USB Drivers, and select the Windows 98SE USB drivers link. Download the Win98 file and follow the instructions on the website to install it. (Windows ME does not require a special driver). Plug the USB DataPort™ 250 into your computer. The Device Driver Wizard will pop up. Click on next. The “recommended” option will be selected: hit next. The wizard will be set to install the software automatically. Hit next and the wizard will ask where to look for the driver. Select the directory that you opened the driver into or select the primary drive and let the computer find it. Once the driver installation is completed hit close. · · · · · Diagram 3 6 WWW.CRU-DATAPORT.COM • (800) 260-9800 Right Click on My Computer and select Properties. Select the Device Manager tab. Click on the + beside Disk Drives. Right click on your drive and select Properties. Select the Settings tab and place a check beside Removable. After completing these steps, you will have to reboot your computer. Once your computer has booted up you should see an additional icon on your Task Bar. Double click My Computer. Your new drive should now be listed. Double click on the drive. If it is a new drive or a drive with an incompatible format, it will ask you to format it. Click Yes. A new window will appear. At the top the capacity of your drive will be listed, directly below that will be a section titled Format Type. In this section you will select Full and select Start. Read and follow the instructions to finish setting up your drive. REMEMBER, formatting your drive will result in loss of data. WWW.CRU-DATAPORT.COM • (800) 260-9800 7 Setting up the Drive for Windows 2000 WARNING: Formatting your drive will result in loss of data. Connect the DataPort™250 to your computer. A new window will pop up for the New Hardware Wizard (see Diagram 4). Follow the instructions to add the new drive. After completing these instructions, do the following: · · · · · Right click on My Computer Click on Manage In the Storage sub-section, click on Disk Management to display a list of all the drives connected to your computer. If you have not used the drive before you will have to partition it. Left click on Action, select All Tasks and then left click on Create Partition. REMEMBER, formatting will result in loss of data. This will bring up the Create Partition Wizard screen (see Diagram 5). Follow the instructions and the drive will be ready to use. Diagram 5 Setting Up the Drive for Windows XP WARNING: Formatting your drive will result in loss of data. Connect the DataPort™ 250 to your computer. Check to see if the hard disk drive is accessible in My Computer. If it does not show up, do the following: · · · · Right click on My Computer Click on Manage In the Storage sub-section click on Disk Management; this will show all the drives connected to your computer. If you are prompted to initialize the drive, follow the directions. REMEMBER, formatting your drive will result in loss of data. You should now see the hard disk drive in the list of drives on the right side of your window. Right click on the drive and click New Partition (see Diagram 5). This will launch a wizard that allows you to partition the drive, format it, and assign it a drive letter. Diagram 4 8 WWW.CRU-DATAPORT.COM • (800) 260-9800 WWW.CRU-DATAPORT.COM • (800) 260-9800 9 Setting Up the Drive for Macs WARNING: Formatting your drive will result in loss of data. After connecting the DataPort™ 250 to your Mac, a new disk should be added to your desktop. If the drive is not correctly formatted you will be asked to initialize it (see Diagram 6). Click on the partition tab and set your desired partitions, then click ok (see Diagram 7). The new disk will be added to your desktop. REMEMBER, formatting your drive will result in loss of data. Diagram 7 Diagram 6 10 WWW.CRU-DATAPORT.COM • (800) 260-9800 WWW.CRU-DATAPORT.COM • (800) 260-9800 11 Removing the Hard Disk Drive Win 98SE, ME, 2K and XP · Right click on the green arrow icon on the system tray · Select Remove/Reject · Highlight the USB Mass Storage Device in the dialog box then click on Stop. · Choose the external disk drive that you want to disconnect, then click on Stop. · Wait until the “You may safely remove this device” message appears. · Unplug the cable from the computer. WARNING: If your computer reports that the drive is busy, you must shut down your computer and then remove the drive. Failure to do so may result in data loss or corruption. Mac OS 9.7/X · When you disconnect the external drive from the Mac, close all windows and quit all applications that are running on the external drive. · Drag the external drive icon into Trash to dismount it from the desktop prior to unplugging the drive. 12 WWW.CRU-DATAPORT.COM • (800) 260-9800 TROUBLE SHOOTING For the DataPort™ 250 to be properly recognized, it is important your computer has the latest available driver updates provided by the manufacturer of your software and hardware. If your USB port was added to your computer via a PCI card, make sure that the software provided by the manufacturer was properly installed and is the latest version. If your USB port came with your computer, make sure that you have available updates from Microsoft or Apple . (Further information can be found at the CRU-DataPort website, www.CRU-DataPort.com). Check all cable connections. Contact CRU-DataPort Technical support for further assistance. WWW.CRU-DATAPORT.COM • (800) 260-9800 13 TECHNICAL SUPPORT Contact your dealer for technical support first. If you still need assistance, then contact the CRU-DataPort technical support department. You can contact CRU-DataPort’s technical support department by visiting our web site at URL http://www.CRU-DataPort.com or sending an E-mail message to [email protected]. Technical support is also available by phone at: (800) 260-9800 during the hours of: 8:00 AM to 5:00 PM, PST Monday through Friday, or by FAX (360)896-1017. When you call, please have the following information ready: · · · · 14 The part number of your CRU DataPort(s) The manufacturer’s name and model number of the hard disk drive and computer system you are using Any error messages that appeared on your screen The name of the dealer from which you purchased your CRUDataPort product(s) WWW.CRU-DATAPORT.COM • (800) 260-9800 Limited Product Warranty: CRU-DataPort warrants the DataPort™ 250 to be free of significant defects in material and workmanship for a period of one (1) year from the original date of purchase. CRU-DataPort’s warranty is nontransferable and is limited to the original purchaser. Please note: CRU-DataPort’s limited product warranty is not intended to allow customers to upgrade their CRU-DataPort products to newer versions. Product Remedies: CRU-DataPort’s entire liability and the original purchaser’s exclusive remedy for any breach of warranty, shall be, at CRU-DataPort’s option, either (a) return of the price paid or (b) repair or replacement of the hardware, provided that the hardware is returned to CRUDataPort, with a copy of the sales receipt or applicable documentation. Any replacement hardware will be warranted for the remainder of the original warranty period. These remedies are void if failure of the hardware has resulted from accident, abuse, misapplication or modification. (This will be determined by CRU-DataPort.) WWW.CRU-DATAPORT.COM • (800) 260-9800 15 Limitation of Liability: The warranties set forth in this agreement replace all other warranties. CRU-DataPort expressly disclaims all other warranties, including but not limited to, the implied warranties of merchantability and fitness for a particular purpose and noninfringement of third-party rights with respect to the documentation and hardware. No CRU-DataPort dealer, agent or employee is authorized to make any modification, extension, or addition to this warranty. In no event will CRU-DataPort or its suppliers be liable for any costs of procurement of substitute products or services, lost profits, loss of information or data, computer malfunction, or any other special, indirect, consequential, or incidental damages arising in any way out of the sale of, use of, or inability to use any CRU-DataPort product or service, even if CRU-DataPort has been advised of the possibility of such damages. In no case shall CRU-DataPort’s liability exceed the actual money paid for the products at issue. CRU-DataPort reserves the right to make modifications and additions to this product without notice or taking on additional liability. Material Return: Any product being returned to CRU-DataPort, either by a distributor, dealer or an end user, for repair or replacement must be accompanied by a Return Material Authorization (RMA) number, which must be obtained by contacting CRU-DataPort’s Customer Service Department at 800-2609800. Please have these items available when requesting an RMA: CRU-DataPort Part Number(s), and your return “Ship To” Address. IMPORTANT: Returned material must be properly packed to avoid in-transit damage. Damage to CRU products due to improper packaging will not be covered by this warranty. Product return packages must be labeled on the outside of the box as follows: CRU-DataPort. RMA Dept./RMA #XXXX 1000 SE Tech Center Drive, Suite 160 Vancouver, WA 98683 CRU-DataPort will apply its warranty policy and issue RMA numbers based on a review of the specific circumstances of each request. CRUDataPort will, at its sole discretion, determine if a product is valid for return to CRU-DataPort or if another remedy is applicable. Actual credit or refund for any item returned to CRU-DataPort will only be applied once the item has been received by CRU-DataPort and approved to adhere to CRU-DataPort’s Warranty and RMA policies. RMA product(s) sent to CRU-DataPort must be received within 30 days of the original RMA issue date. All products on each RMA must be shipped together. Prior to returning defective product(s), contact a CRU-DataPort Technical Support Specialist for problem analysis and replacement approval at 800-260-9800. To return defective product(s), please follow the guidelines below, in addition to the general RMA guidelines described above in the “Material Return” section. 16 WWW.CRU-DATAPORT.COM • (800) 260-9800 WWW.CRU-DATAPORT.COM • (800) 260-9800 17 Advance Replacement: Advance Replacement requests require an Advance Replacement Authorization, pre-approved by a CRU-DataPort Technical Support Specialist. Advance Replacements also require a credit card to secure the product being replaced. Advance replacements will typically ship within one day of RMA issue date and authorization. CRU-DataPort will pay outbound freight and insurance only. Defective Product Return Beyond 30 Days: CRU-DataPort products under warranty, but beyond 30 days of the original purchase date, are subject to repair only. To return product(s) after 30 days, please follow the guidelines below, in addition to the general RMA guidelines described above in the “Material Return” section. Prior to returning defective product(s), contact a CRU-DataPort Technical Support Specialist for problem analysis and replacement approval at 800260-9800. Defective product(s) must be sent freight pre-paid and insured by the requestor. Repair replacement product(s) will be return shipped from CRU-DataPort, freight pre-paid and insured by CRU-DataPort, within three to seven business days of receipt (depending on quantity & repair type). Please allow sufficient shipping time to and from locations; allow three business days for repair. CRU-DataPort ships all repairs via standard UPS ground unless otherwise agreed to when the RMA is issued. Rev. 1 18 WWW.CRU-DATAPORT.COM • (800) 260-9800