1
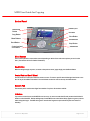
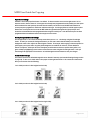
iRC1021i Image Runner MFD Guide for Copying iRC1028i MFD User Guide for Copying Contents Key Contacts 3 Introduction 4 Basic Features 5 Original Placement – Platen Glass 5 Original Placement – Document Feeder 5 Control Panel 6 Menu Buttons 6 Back Button 6 Control Pad and Scroll Wheel 6 Numeric Pad 6 ID Button 6 Clear Button 7 Reset Button 7 Stop Button 7 Start Button 7 Main Menu 7 Copy . 7 Send/Fax 11 Scan to Store 12 Direct Print 12 Device Information 13 Additional Functions 13 Media 13 On/Off Button 13 123 Key 14 Unjamming 14 Changing Toner 14 Revised 31st May 2008 Page 2 of 15 MFD User Guide for Copying Key Contacts To register service calls on your iR device call the national service number: For additional Training on your iR device contact your local Customer Training Consultant on: 0844 892 0844 For printing problems contact the Software Support Centre: 0844 892 0844 0844 892 0844 To register meter readings and order genuine Canon consumables online, visit www.canon.co.uk/eservices To order genuine Canon consumables via telephone call: Revised 31st May 2008 0844 892 0844 Page 3 of 15 MFD User Guide for Copying Introduction This guide has been designed to provide you, and all users of your Canon iR device(s) within your organisation, with all of the information needed to gain the most out for your investment. The following sections will take you through, in detail, the steps you need to take to produce high quality copies from your iR Multi Functional Printer Copier. Additional guides are available from the Canon Customer Training and Support department, which will give you all of the information you need to take full advantage of the complete features and functionality of your Canon iR Multi Functional device(s). Please ask your Customer Training Consultant (CTC) for copies of these guides. Revised 31st May 2008 Page 4 of 15 MFD User Guide for Copying Basic Features Original Placement – Platen Glass To be used when copying from books, transparencies, articles that have been cut and pasted together, torn originals or originals smaller than A5. Place original on platen glass face down. Align the corner of the original with the top left hand corner of the platen glass. Gently lower the lid. Original Placement – Document Feeder Use the document feeder to automatically scan a stack of originals. Do not place originals with torn or curled edges, large binding holes, or stapled sheets in the document feeder. Place originals in feeder face up. Adjust the slide guides to fit the size of the originals. Revised 31st May 2008 Page 5 of 15 MFD User Guide for Copying Control Panel Main Menu Button Copy Button Numeric pad ID button Clear Button Menu Buttons Back Button Control pad and scroll wheel Reset Button Stop Button Start Button Menu Buttons These can be pressed to enter various menus depending on which of the main menu options you are in at the time. (See sections above for further information). Back Button When browsing through any menu, to return to the previous menu/page simply press the Back Button. Control Pad and Scroll Wheel Use the arrows to scroll up and down the menu on screen. To enter a specific menu hit the right hand arrow or use the ‘ok’ key in the middle of the wheel. The scroll wheel can also be used to move up and down menus. Numeric Pad The numeric pad is used to enter digits from number of copies to fax numbers and IDs. ID Button If you wish to control access to the MFP IDs can be set up. A user must enter their ID and password and hit the ID button to unlock the MFP. Before walking away from the MFP a user must hit the ID key again to log out to prevent others using their log in. The MFP will log out a user who has forgotten to press the ID key after one minute of inactivity. Revised 31st May 2008 Page 6 of 15 MFD User Guide for Copying Clear Button Select the clear button if you wish to clear any numeric entry made. Reset Button Select the reset button to wipe any settings back to default. Stop Button Select the Stop Button to cancel a job. Start Button Select the Start Button to begin a function – to copy, to send a fax, email or scan. When the green LED is lit the MFP is ready for you to start. If the light is not lit more information is needed before the function can begin. Main Menu Press the Main Menu Button to return to the main menu of options. From here you can choose to Copy, Send/Fax, Scan to Store or Direct Print. Copy Select copy to enter copying mode. From here you have access to the copying menu to change any options before you start your copy using the green Start Button. The menu can also be accessed by pressing the Copy button. The following menus are then available to you: Colour Mode Settings Hit the right arrow on the control panel or ‘ok’ to enter the menu where you can choose which colour setting you wish to use - auto colour, colour or black and white. As default the MFP is on auto colour but this can be changed in the settings if appropriate (see Standard Settings Change section on page 9). Auto colour – when auto colour is selected the MFP scans each sheet individually for any colour. If colour is detected the colour toners are used. If only black and white is detected black toner is used to save money where possible when copying documents with some colour pages. For example, if a 30 page document is placed in the feeder but only two sheets have colour on them the customer will be charged for 28 black and white sheets and 2 colour. Full Colour – when full colour is selected the MFP will copy each sheet using the colour toners even to make black when the original is only black and white. For best quality colour use this option. In most office environments auto colour should suffice. Black and white – when black and white is chosen the MFP will copy every sheet as a black and white copy. Revised 31st May 2008 Page 7 of 15 MFD User Guide for Copying Paper Source Settings The MFP is set to take paper from drawer 1 as default. To choose another source use the right arrow or ‘ok’ to enter the menu to choose drawer 2. Unless paper has already been programmed into the stack bi pass this option will be shadowed out until you drop the media into the stack bi pass at the front of the MFP and follow the on screen prompts to programme in media size and then media type. Use the grey sliders to hold the paper in place. Please note: to avoid jams and to ensure the MFP takes the right media through at the right speed you must ensure the correct media has been programmed when using the stack bi pass. Once the stack bi pass has been programmed the menu will then return to the set paper source screen. Density/Background Removal Settings Use the right arrow or ‘ok’ to enter the density screen where you can + or – the density using the left and right arrows. In here if you choose the ‘background button’ you can enter a menu that will allow you to remove any background colour or fine adjust it to make it lighter or darker. For example, when copying a document printed on yellow paper you may not wish to copy the yellow background or would like to reduce it. Choose whether to remove it or adjust it. When you choose to fine adjust you will be able to choose a specific colour (yellow, red, green or blue) by highlighting it, then increase or decrease the colour using the left and right arrows. Once you have changed all appropriate colours choose ‘set’ with the right hand menu button to save your changes. Various 2 sided Settings Two sided is turned off as default although this can be altered if necessary (see Standard Settings Change section on page 10). To turn on a 2 sided mode to save paper use the right hand arrow or ‘ok’ to enter the 2 sided menu. Here you can choose from the following : 1 to 2 sided (to make a 1 sided original back to back) 2 to 2 sided (to make a 2 sided original back to back) 2 to 1 sided (to make a 2 sided original back to single sides) Revised 31st May 2008 Page 8 of 15 MFD User Guide for Copying You can also enter the ‘Layout Settings‘ menu with the right hand menu button, where you can choose if your original orientation is vertical or horizontal to create long or short edge two siding depending on how you would like to read your completed document (choose book type if your document opens like a book and calendar type if your document opens like a calendar). For example, if you have a landscape report that you wish to read down the back of one sheet onto the next ensure horizontal orientation and calendar type is chosen. Copy Ratio Settings Use the right arrow or hit ‘ok’ to enter the menu. As default the MFP is set to 100%. To save time choose from the available short cuts e.g. A5 to A4 or A4 to A5 etc as appropriate. The maximum enlargement is 200% and minimum reduction is 50%. To enter a custom size enter ‘Set Copy Ratio’ and use the key pad to enter a percentage. Original Image Quality Settings The MFP is set to Text/Photo/Map as default to ensure a good quality copy of all documents but this can be changed (see Standard Settings Change section on page 10). To choose another setting to specify that you are copying a document that is just a photo or just text choose from the options to be more specific. In here you can also choose ‘Priority Level’ using the right hand menu button to boost the priority of the scan to the photo part of your original or the text part, depending on if one is more important/less clear than the other. Use the left and right arrows to move the pointer and hit enter to confirm. Copy Multiple Pages onto 1 Page This is turned off as default, therefore, one page will copy onto one sheet unless you scroll down to choose 2 on 1 or 4 on 1. This is usually used as a paper saving option when full size originals are not needed. Sharpness Settings If you would like to increase or decrease sharpness enter this menu and use the left and right arrows to boost or reduce the scroll bar. Hit ‘ok’ to confirm. Frame Erase As default this is turned off. In this menu you can choose to do an original frame erase, book frame erase and binding erase to white out any marks on the edges of your original. Original book frame erase – in here you can choose to put a white border around the whole document in case there are any marks in the margins, such as hand written notes etc. You will be prompted to set the original size (A4, A5 or B5). Hit ‘ok’ to confirm. You will then be asked to set Frame Erase width. As default this is set to 6 mm of white. You can increase this menu using the up arrow or by using the numeric pad. The minimum frame erase is 1mm. The maximum is 50mm. If you wish to set a different measurement for each side of the document enter the ‘Uniform Margin’ menu using the right hand menu button. Book Frame Erase – this option will put a white band up the middle of the document when copying from a book – this eradicates the dark mark in the centre of the copy where light often gets in as result of not being able to get the centre of the book flush on the glass. Revised 31st May 2008 Page 9 of 15 MFD User Guide for Copying Binding Erase – set Hole Punch Location – this is used when a mark, such as hole punching, is just down one margin of a document. Choose to set the left, right, top or bottom margin as appropriate and set the measurement as highlighted above. Colour Balance If you would like to manipulate the colour output of the MFP, rather than using the default (which uses equal amounts of colour to make as accurate colour as possible), enter this menu to change the colour balance. Choose the colour you wish to reduce or boost from the menu using the scroll wheel or arrows and + or – the amount of colour using the left and right arrows. Please note that adding or reducing one colour will effect all colours mixed by the MFP as all colours are created using the 4 toners (cyan, magenta, yellow and black). Hit ‘Set’ using the left hand menu button once you are happy with your settings. If you wish to save the changes so they may be used again (for example for a specific job at a later date) enter the ‘Register/Erase’ menu using the right hand menu button. It is useful to ‘Register the Settings’ and ‘Register a Name’ for the settings you are saving using the right hand ‘Register/Erase’ button. If you wish to delete a stored setting an ‘erase’ option is available in here. You can save up to 4 entries. Collate As default collating is turned off. This means if you ask for three copies of a multi-page document you will get 3 copies of page one, three copies of page two etc. If you would like your copies collating into sets enter the menu using ‘ok’ or the right hand arrow and turn collate on to make copies in page order. If you would like to change this default see the Standard Settings Change on page 10 for further details. Copies This is set to 1 as default. If you wish to make more copies enter the menu and using the up and down arrows to increase or decrease the number. Alternatively use the numeric pad. The minimum number of copies is 1 and maximum is 99. Standard Settings Change Use this menu if you wish to change any of the default settings of the MFP, for example to make black and white or two sided the default. Select the options you wish to be the default (as if you were going to make a copy) then enter this menu and choose ‘Register’. You will be asked ‘Make the current settings standard?’ – choose ‘yes’ if you wish to save them. These will now be your default. Revised 31st May 2008 Page 10 of 15 MFD User Guide for Copying Menu buttons whilst in the Copy Menu When you are in the Copy Menu the left hand menu button will take you into the ‘Mode Memory’ menu to recall any specific settings you might have stored for a specific job you do regularly. If you want to store settings (up to 4) for regular copy jobs, select the settings you wish to save from the appropriate menus then enter ‘Mode Menu’ and choose ‘Register/Edit’ to Register the Settings and to create a Name for the settings you are saving. The right hand menu will take you into ‘Preview Image’ to display current settings details. Send/Fax Select Send/Fax to enter the Send/Fax menu, where you can send a document as a fax or email from the MFP. Here you have access to your address book to choose any already stored destinations or the option to input a one off address. Once you have chosen a destination and any necessary settings hit the Green start button to scan in and send the document. Address Book Enter the address book to choose an already stored destination. To save a destination into the address book for the first time use the left hand menu button ‘Reg/Edit/Erase’ and choose ‘Register New Dest. To Add. Book’. Choose the address type (fax, email, ifax, file or group), Register a name (highlight the letter on screen using the scroll bar) and hit ‘ok’ to enter. Once completed hit the right hand menu button to ‘Set’. You will be taken back to the ‘Register New Addresses’ screen. Choose ‘Destination Registration’ to enter the fax/email/ifax or file address using the numeric pad or on screen characters and scroll bar as appropriate. Hit the right hand menu button to ‘set’. Enter Fax Choose this menu to type in a one off fax number and hit ‘ok’ to confirm. You will then enter the ‘Resolution Settings’ menu where you can change scan settings as appropriate such as the resolution, density, copy type, if it is a two sided scan, delay sending and go into ‘Favourites’ (using the right hand menu button to choose a prestored setting for common jobs). Favourites Favourite settings for scanning can be stored using the Favourites menu accessed via the left hand menu button whilst in the Send/Fax menu. Select the settings you wish to store for future use then select ‘Favourites’ and ‘Register/Erase’. One Touch Buttons One Touch Buttons are used to store common destinations for easy retrieval. Use the right hand menu button to gain access. Select a one touch button to use if already stored or choose ‘register/edit/erase’ to register one for the first time and follow the on screen prompts to store a destination. Enter Email Use this option to enter a one off email destination you wish to scan to. Enter I-Fax This option is used when sending a fax over the Internet to another Canon i-fax machines. Revised 31st May 2008 Page 11 of 15 MFD User Guide for Copying Enter File Server This option is used to scan to folder. If you know the folder you wish to scan to has been set up with full permissions (so the MFP will be able to see it on your system) and you know the full file path of the folder enter it here to scan to that folder. Alternatively, it is recommended that you or your IT set up any folders you wish to scan to, ensuring they have full permissions set, then add them into the address book for simple selection by the end user. To add a folder destination to the address book enter ‘Register/Edit/Erase’ in the address book, choose to enter a file and follow the on screen prompts to browse to the appropriate folder, ensuring you choose the correct operating system. If unsure which options to choose check with your IT. Log Using the log you can see the last settings used when sending/faxing. Scan to Store By choosing the scan to store option you can store a document to a file server, memory media (USB or card memory) or do a remote scan. Choose file server and either enter the file server address or use the address book to access ones already set up. Hit the green start key to begin the scan. To save to memory media put a flash card, USB or SD card into the MFP and choose memory media and browse to any folders already on the media. Hit the right hand menu button to ‘set’ the settings you wish to scan with (resolution, file type, density etc) and hit the green start key to begin the scan. To use pull scan software such as Canon Network Scangear enter the ‘Remote Scan’ menu and turn scanning ‘online’. Put your document in the feeder or on the glass. At your PC use the relevant software to pull the scan into an application then return to the MFP and turn it ‘offline’ within the Scan to Store ‘Remote Scan’ menu so that other functions become available again. Direct Print Choose direct print to print directly from USB, SD card or Flash Card. The USB port is located on the right hand side of the control panel. The USB and Flash Card ports are situated on the left hand side of the control panel. You will be prompted to enter the memory card or USB Memory. You can choose the ‘Index Print’ option using the right hand menu button to print a thumbnail preview otherwise choose the Memory Media from the list and you will see all files and folders on the card or USB. Browse as appropriate using the scroll bar Choose ‘display/select’ to change the display method – for example from folder/file name to image display for thumbnails. Scroll through the files and hit ‘ok’ to add a green tick to the files you wish to print. Hit the right hand menu button to enter ‘Print Settings’ to change as appropriate (colour, number of copies etc) and hit the green start key to begin the print. Revised 31st May 2008 Page 12 of 15 MFD User Guide for Copying Device Information When you are in the main menu you can enter ‘Device Info’ using the left hand menu button to check how much paper, toner and memory is available. Additional Functions When you are in the main menu you can use the right hand menu button to enter ‘additional functions’ to set/change any background settings of the MFP, such as turning fax reports on etc. Unless you are sure what you are doing it is recommended that only IT change these settings. However, auto gradation adjustment needs to be done on a regular basis to maintain the colour quality of the MFP, which end users may be expected to do (see below for details). Additional Functions menus: Paper Settings – to register paper type in the cassette Volume Settings – to increase or decrease the volume of the tones on the MFP Common Settings – to change any common settings of the MFP Communication Settings – to change any transmission settings Address Book Settings – to register addresses and one touch buttons Printer Settings – enter to change any default printer settings Timer Settings – to change the date and time and set auto screen and auto clear times Adjustment/Cleaning – Enter this menu to do Auto Gradation Correction on a regular basis to maintain the colour quality of the MFP. Choose to do a full correction and follow the on screen prompts to print test print 1, scan back in as directed, print test print 2 and scan back in. Report Settings – including to turn on fax reports System Management Settings – to set up department IDs and a System Manager password as appropriate. To set up IDs choose Department ID Management, turn ‘on’ then input relevant IDs. Once turned on a user will not be able to access the MFP without inputting their ID. Media The iR1021i cassettes accept media between 60-120gms and the stack bi – pass will accept 60-176gms. As default the MFP will take paper from drawer 1. When using the stack bi-pass please ensure you have registered the paper type (see above) to ensure a good quality copy and to reduce the risk of jamming. Labels and transparencies should always go in the stack bi-pass. Please ensure you only use Canon approved products when using the stack bi-pass. If you are unsure please contact the Canon Consumables department for more information. On/Off Button The On/Off button is situated on right hand side of the control panel. Press once to turn onto low power. Press again to turn on. Revised 31st May 2008 Page 13 of 15 MFD User Guide for Copying 123 Key The 123 key is situated on right hand side of the control panel for counter check (meter readings). The serial number of the MFP can also be found in here. Press once to access and once again to exit. Unjamming To unjam a paper jam pull the front door front down using the handle on the front of the MFP. Do not touch the black thin film (transfer belt) on the inside of the door. As you look into the MFP at bottom, below the toners, you will see two green nodules/arrows that can be unlocked so the section can be lifted to get to any paper jam. Once unjammed lock the green arrows back into position. Paper may also be jammed at the back of the MFP as it travels through the paper path. Use the door on the back of the MFP to access and remove. Changing Toner Open the front door. Use the blue handles on each side of toner/drum unit and pull out the colour that needs changing. Remove the protective strip from the new cartridge and place in the MFP using the blue handles and close the cover. . Revised 31st May 2008 Page 14 of 15 Talk to Canon to improve performance in your business.