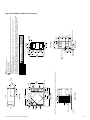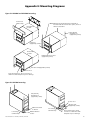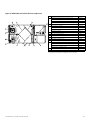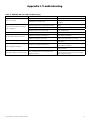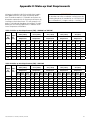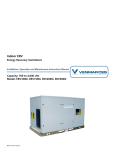
1
HRV
Heat Recovery Ventilators
Installation, Operation and Maintenance Instructions Manual
Capacity: 300 to 1,260 cfm
Model: HRV600i, HRV700i, HRV1200i
©2001 Venmar CES
Table of Contents
Nomenclature.......................................................................................................................................................................3
Safety Considerations..........................................................................................................................................................4
General Information............................................................................................................................................................4
Recommended Spare Parts............................................................................................................................................4
Inspection on Arrival......................................................................................................................................................5
Unit Application Limitations.........................................................................................................................................5
Installation............................................................................................................................................................................5
Unit Location Requirements..........................................................................................................................................5
Internal Packaging.........................................................................................................................................................6
Ceiling Mount................................................................................................................................................................6
Floor Mount...................................................................................................................................................................6
Exhaust Dampers for Indoor Units................................................................................................................................7
Ductwork........................................................................................................................................................................7
Drains..............................................................................................................................................................................8
Systems Integration.......................................................................................................................................................8
Electrical Connections....................................................................................................................................................9
Start-up...............................................................................................................................................................................10
Pre Start-up Procedure................................................................................................................................................10
Start-up Procedure.......................................................................................................................................................10
Frost Control.................................................................................................................................................................12
Sequence of Operation................................................................................................................................................12
Remote Wall Control...................................................................................................................................................13
Airflow Measurement and Balancing.........................................................................................................................13
Flow Measuring Station Positions...............................................................................................................................13
Balancing Procedure....................................................................................................................................................14
Maintenance.......................................................................................................................................................................14
Bi-monthly Maintenance.............................................................................................................................................14
Annual Maintenance...................................................................................................................................................15
Appendix A: Equipment Data...........................................................................................................................................17
Appendix B: Dimensional Drawings..................................................................................................................................18
Appendix C: Flow Measuring Station and Balancing Damper Positions........................................................................23
Appendix D: Drain Connections........................................................................................................................................24
Appendix E: Mounting Diagrams......................................................................................................................................25
Appendix F: Terminal Control Diagrams..........................................................................................................................26
Appendix G: HRV600i, HRV700i and HRV1200i Start-up Form and Checklist................................................................29
Appendix H: Electrical Control Box and Wire Connections.............................................................................................33
Appendix I: Components...................................................................................................................................................34
Appendix J: Troubleshooting............................................................................................................................................37
Appendix K: Make-up Heat Requirements.......................................................................................................................38
Manufacturer reserves the right to discontinue or change specifications or designs without notice or obligation.
VCES-HRV-IOM-1C – HRV600i, HRV700i, HRV1200i
2
Nomenclature
HRV600i Nomenclature (300–750 cfm)
1
2
3
4
5
6
1. FROST CONTROL
D – Recirc defrost1
E – Exhaust only
N – Non-defrost
6. LOW SPEED
L – Reduced low speed
N – Normal low speed
5. ACCESS DOOR
S – Standard door
R – Reverse door
(right hand flow)
2. ENERGY RECOVERY
P – Poly core
A – Aluminum core
H – HM core
4. MEF FILTRATION
M – MEF supply filtration
X – No MEF supply filtration
3. EXTERNAL FINISH
W – White pre-paint package
Note:
1 The recirculation defrost damper module is factory installed.
HRV700i Nomenclature (300–800 cfm)
1
2
2. EXTERNAL FINISH
C – Corrosion resistant package
1. FROST CONTROL
D – Recirc defrost
N – Non-defrost
HRV1200i Nomenclature (700–1,250 cfm)
1
2
3
1. FROST CONTROL
D – Recirc defrost1
E – Exhaust only
N – Non-defrost
2. ENERGY RECOVERY
P – Poly core
A – Aluminum core
H – HM core
3. EXTERNAL FINISH
W – White pre-paint package
C – Corrosion resistance package
4
5
6
6. LOW SPEED
L – Reduced low speed
N – Normal low speed
5. ACCESS DOOR
S – Standard door
R – Reverse door
(right hand flow)
4. MEF FILTRATION
M – MEF supply filtration
X – No MEF supply filtration
Note:
1 The recirculation defrost damper module is factory installed.
©Venmar CES 2001. All rights reserved throughout the world.
Illustrations cover the general appearance of Venmar CES products at the time of publication and Venmar CES reserves the
right to make changes in design and construction at any time without notice.
CES Group, LLC d/b/a Venmar CES furnishes equipment pursuant to its then-current Terms and Conditions of Sale and Limited Warranty, copies of which can be found under the Terms & Conditions of Sale and Warranty link at www.ces-group.com.
Extended warranties, if any, shall be as offered and acknowledged in writing by Venmar CES.
VCES-HRV-IOM-1C – HRV600i, HRV700i, HRV1200i
3
Safety Considerations
Warning, Caution and Important notes appear throughout this manual in specific and appropriate locations to
alert Installing Contractors and maintenance or service
personnel of potential safety hazards, possible equipment
damage or to alert personnel of special procedures or instructions that must be followed as outlined below.
!
Hazards may exist within this equipment because it contains electrical and powerful moving components. Only
qualified service personnel should install or service this
equipment. Untrained personnel can perform basic maintenance such as maintaining filters. Observe precautions
marked in the literature and on labels attached to the unit.
Follow all safety codes.
WARNING
Identifies an instruction which, if not followed, might
cause serious personal injuries including possibility of
death.
!
WARNING
Disconnect the main power switch to the unit before performing service or maintenance. Electric shock can cause
personal injury.
CAUTION
Identifies an instruction which, if not followed, might severely damage the unit, its components, the assembly or
final installation.
IMPORTANT
Indicates supplementary information needed to fully
complete an instruction or installation.
General Information
This manual is designed to provide general information
on the common operation of all standard and optional
components that may have been installed in the unit. Note
that some sections of this manual may not apply to your
unit. This manual has been designed for general purpose
and describes options offered by Venmar CES that could
be included in the unit. Consult the manual from the
Component Manufacturer if more detailed technical information about a specific component is required.
•
•
•
Instructions for accessory items which are shipped
loose for field installation are included with the item.
The electrical schematic is attached to the inside of
the control panel.
See Appendix A for more detailed equipment data.
Recommended Spare Parts
Spare parts should be ordered at the time the installation is accepted by the Owner. Spare parts will reduce
the down time in the event of a failure. The list of spare
parts outlined below is considered minimal. Installation in
remote locations or when the operation of heating equipment is essential may require more spare parts than listed.
Please contact the service department at Venmar CES for
recommendations.
VCES-HRV-IOM-1C – HRV600i, HRV700i, HRV1200i
Minimum spare parts include:
•
•
Two sets of fuses
One set of filters
4
Inspection on Arrival
Inspect the equipment exterior and interior for any damage on arrival that may have occurred during unit shipment and for shipped loose parts. Ensure that there is no
damage to any protruding exterior components such as
the access door, door latches, door hinges, duct collars,
cabinet, etc. or to internal components such as fans, motors, flat plate heat recovery module, dampers, actuators
and drain pans. File a claim with the shipping company
if the unit is damaged. Check the packing slip against all
items received. If any items are missing, sign the carrier’s
bill of lading with the notation “Shipment Received Less
Item #___”. Contact the factory immediately if damage
is found. No return shipment will be accepted without
authorization.
IMPORTANT
The exhaust dampers for indoor units (if ordered) are not
installed from the factory and must be installed on site.
See Exhaust Dampers for Indoor Units.
Unit Application Limitations
!
WARNING
Venmar CES equipment is not designed to be used for
temporary heating, cooling and/or ventilation during
construction.
Using Venmar CES units for temporary ventilation during construction is subject to the unit warranty terms and
should be reviewed carefully before proceeding, as this
may void the standard warranty conditions.
Fine dust, larger particulate matter, solvents, varnishes and
other chemicals may cause filter clogging and elevated
cabinet pressures, higher power consumption and possible
irreparable damage to the flat plate heat recovery module,
which could reduce energy recovery performance of the
plate and damage to other components. Potential damages include, but are not limited to, these examples.
Installation
Unit Location Requirements
Consult local building codes and electrical codes for special installation requirements and note additional requirements listed in this manual. In choosing the installation
location of the unit, consider the following factors:
•
•
•
The unit must be mounted in a heated area to prevent condensate lines from freezing.
When possible, mount the unit away from occupied
areas to provide quiet operation.
The unit should be installed to allow easy access for
maintenance. See Appendix B for dimensions and
recommended service and maintenance clearances.
•
•
•
•
IMPORTANT
Mounting options must allow 12” [305 mm] clearance in
front of the control box cover for access.
•
The unit should be mounted close to an exterior
partition to minimize the length of insulated ductwork required. Outdoor air intakes and exhaust air
discharge should be separated by a minimum of 10
feet [3,000 mm] for Class 2 exhaust or as required by
ASHRAE 62.1 to avoid outside cross contamination.
VCES-HRV-IOM-1C – HRV600i, HRV700i, HRV1200i
•
The fresh air intake must be positioned away from
sources of contamination such as hot chimneys or
kitchen exhaust vents.
The unit should be mounted close to a drain and
120V, 60 Hz power supply.
The unit should be mounted away from hot chimneys, electrical panels and other hazards.
Locate the unit in an area requiring the least amount
of ductwork and directional changes to allow optimum performance, to reduce pressure loss and to
achieve proper ventilation. Ductwork must be in accordance with ducting mechanical rules to prevent
sound issues and system effects. See Ductwork and
Appendix C for recommendations on ductwork.
The unit should be mounted on a level foundation to
allow condensation to flow into internal drains Space
must be left under the unit to allow for drain trap
height and connection of drain lines. See Appendix D
for specific trap height and connection requirements.
5
Internal Packaging
Remove access panels and all packaging from the unit.
Note that the reinforced rubber straps for ceiling mount
are packaged and located inside the unit as may be other
remote mounted options and/or accessories. Removal of
all packaging is critical.
Ceiling Mount
The unit must be mounted level and may be hung with
the reinforced rubber straps provided as shown in Appendix E. Check with local building codes regarding the use
of rubber straps in commercial buildings. Attach the straps
to the unit with two #8 screws provided. Then attach the
other end of the strap to the ceiling joists, trusses, custom
frame, etc.
The unit may also be hung with 3/8” [10 mm] threaded
rod and U-channels or angles (field supplied) as shown in
Appendix E.
Rubber vibration isolation may be required and is recommended for quiet operation. In some regions seismic vibration isolation may be required (isolators field supplied and
specified).
IMPORTANT
Do not block access to control box, low voltage terminal
strips or line voltage input as indicated in Appendix E. Do
not block supply or exhaust ductwork and allow for 1” to
2” [25 to 51 mm] of insulation they may have on them.
Floor Mount
The unit must be mounted level and may be mounted
on a metal or wooden curb (not supplied) bolted to the
floor as shown in Appendix E. Space must be left under
the unit for drain trap height and to allow connection of
drain lines. A gradual slope is required for the condensate
water to drain by gravity (minimum ¼”per foot [6 mm per
305 mm]). If this is not possible, a pump should be used.
See Appendix D for specific trap height and connection
requirements.
VCES-HRV-IOM-1C – HRV600i, HRV700i, HRV1200i
IMPORTANT
If attachment of the unit to the curb is required, ensure
that screws, bolts and mounting hardware do not interfere with moving parts or that the integrity of the cabinet
insulation is not affected.
6
Exhaust Dampers for Indoor Units
An exhaust gravity backdraft damper is included for indoor
units with the recirculation defrost option and shipped
loose for field installation. An exhaust gravity backdraft
damper or a motorized exhaust damper is available as
an accessory for other defrost options or additional use
and shipped loose for field installation. Gravity backdraft
dampers are for horizontal airflow installations only.
Dampers are non-insulated, for installed in duct installation and are ¼” [6 mm] smaller “outside of frame” than
the duct size listed. An access panel in the duct on the
upstream left hand side (facing the airstream) for the motorized damper is required for access to the actuator and
linkage which is mounted and located in the airstream.
The damper should be mounted sufficiently far enough
downstream from the exhaust fan discharge to avoid system effect added pressure losses. A straight length of duct
same size as the unit exhaust discharge and length as indicated in Ductwork followed by the damper and as shown
in Appendix C Note 2 is recommended.
be field supplied for the motorized exhaust damper. Run
the +24V wire connection through the fan interlock contacts on the microprocessor control board or unit terminals
6 and 7 (left side) to break power to the damper when the
exhaust fan is not running as shown in Appendix F for it to
spring return closed.
Table 1: Exhaust Dampers for Indoor Units
Model
Venmar CES
Part Number
067120
HRV600i
HRV700i
067121
067116
HRV1200i
067118
Wiring for the 24V motorized exhaust air damper must
be provided and completed in the field by the Installer. A
separate 24V, 20 VA power supply is required and must
Duct Size
(H x W)
Damper Type
Backdraft (pressure
open/gravity closed)
8” x 14”
24V non-insulated
[203 x 356 mm] motorized (power
open/spring return
closed)
Backdraft (pressure
open/gravity closed)
8” x 20”
24V non-insulated
[203 x 508 mm] motorized (power
open/spring return
closed)
Ductwork
The supply and exhaust duct connections on the unit are
as follows:
Table 2: Supply and Exhaust Duct Connection Sizes
Unit
Duct Size (H x W)
HRV600i or HRV700i
8” x 14” [203 x 356 mm]
HRV1200i
8” x 20” [203 x 508 mm]
IMPORTANT
Duct sizes are for connection purposes only. Ducts should
be sized to keep noise and pressure drop to a minimum.
The supply and exhaust ducts connected to outside, as
well as any ducts passing through an unconditioned space,
must have a minimum insulation value of R5. In addition,
a continuous integral vapor barrier over the duct insulation
must be used.
Air balancing dampers are recommended for both supply
and exhaust ducts to allow for adjustment of airflow. Also,
flexible canvas connectors should be installed close to the
unit in the supply duct to the building and the exhaust
duct from the building to reduce noise transmission from
the unit to the building (see Appendix C).
VCES-HRV-IOM-1C – HRV600i, HRV700i, HRV1200i
All ports on the 600 and 1,200 cfm units have 1” [25 mm]
flanges to facilitate the installation of the ductwork. Please
note that the outdoor air opening port has a frost control
damper incorporated with it. Ensure that any mechanical
fasteners used to connect the duct do not interfere with
the operation of the damper. Screws can be installed on
the side of the cabinet rather than the flange for this port
only. For port locations see Appendix B.
IMPORTANT
Straight duct sections minimum of 30” [762 mm] are required on supply to building and exhaust from the building to achieve good airflow performance.
All ports on the 700 cfm unit have 2” [51 mm] flanges to
facilitate the installation of the ductwork. Please note the
outdoor air opening connection is factory set to be the left
side upper port. It is possible to reverse the operation of
the frost control damper in order to use the port on top of
the cabinet for outdoor air opening connection.
To change the outdoor air opening from the side to the
top use a screwdriver to change the rotation reversing
switch on the actuator. For port locations see Appendix B.
7
Drains
The drain fittings provided with the unit will accept a ¾”
[19 mm] NPT coupler (supplied by others). The drain line
for the unit must be fabricated on site and connected to
the building main. A loop in the hose or trap in the copper
or plastic pipe must be provided to prevent sewer gases
from entering the unit when connecting to a drain as illustrated in Appendix D.
IMPORTANT
Consult local building code for plumbing requirements
in your area. If copper pipe is to be used, ensure not to
solder to the ¾” [19 mm] coupler while it is attached to
the plastic drain fitting as deformation may occur. Ensure
adequate slope is present to allow good drainage (minimum ¼” per foot [6 mm per 305 mm]).
Prime the trap by filling with water before start-up. Check
and clear drains annually. Drainage problems can occur
should drains be inactive and dry out, or due to reduced
water flow caused by buildup of algae. Regular maintenance will prevent these problems from occurring.
Systems Integration
Forced Air System
When the Heat Recovery Ventilator (HRV) is installed in
conjunction with a forced air system, the air handler and
the network of ducts associated with it are used to distribute fresh air inside the building. If this type of system is
used, the main fan of the air handler must operate continuously when the HRV unit is on. Fan interlock can be connected to terminals 6 and 7 on the low voltage terminal
strips left side on the exterior of the unit (for low voltage
Class II circuit only). These terminals are factory connected
to dry contacts (FF) on the microprocessor control board
in the unit control box. The controller makes relay contact
between these terminals when the unit is operating, See
Fan Interlock Switch (FF).
Fresh air from the HRV should be introduced into the return duct of the air handler at a point no less than 6 feet
[1,829 mm] upstream of the air handler. The duct connection for return air to the HRV should be made on the
return air duct at least 2 feet [610 mm] upstream of the
fresh air duct connection.
Separate Systems
Select locations for exhaust grilles and supply diffusers
to provide effective ventilation and avoid short circuiting
airflows through the space. Adjustable dampers should be
provided at every grille and diffuser to make balancing of
the system possible.
A proper selection of style and size of grilles and diffusers
is required to minimize pressure drop. The velocity of the
VCES-HRV-IOM-1C – HRV600i, HRV700i, HRV1200i
airflow should not exceed 400 feet per minute [2 meters
per second] for normal applications.
The duct system should be designed according to the high
speed flow rate of the unit. In order to keep the noise and
pressure drop to a minimum, a maximum air velocity of
1,100 feet per minute [5.6 meters second] should be used
in calculations in duct design. The duct runs should be
kept as short as possible with the minimum amount of elbows and transitions. The Manufacturer recommends the
use of smooth radius elbows or square elbows with turning vanes to achieve maximum performance.
Dampers
An insulated motorized outdoor air damper is included
with the unit with recirculation defrost or exhaust only defrost which closes during a frost control cycle or placed in
the ‘Off’ position with power maintained to the unit. Outdoor air damper will remain open if power is disconnected
from the unit while operating in heat recovery mode.
A backdraft gravity damper is supplied with recirculation defrost units to be installed in the exhaust air outlet
duct on indoor units. This damper is necessary to prevent
air from entering the building through the exhaust duct
when the unit is in recirculation defrost mode. See Exhaust
Dampers for Indoor Units for further installation details.
Mount the damper in the exhaust air to outside duct as
shown in Appendix C and Ductwork for fan outlet duct
considerations.
8
Electrical Connections
!
WARNING
When installed, the unit must be electrically grounded in
accordance with local codes or, in the absence of local
codes, with the National Electrical Code, ANSI/NFPA70,
and/or the Canadian Electrical Code CSA C22.1. Unit
cabinet must have an uninterrupted, unbroken electrical
ground to minimize the possibility of personal injury if an
electrical fault should occur. Failure to follow this warning could result in the Installer being liable for personal
injury of others.
Power Supply
A terminal block and strain relief bushing or a junction box
is provided for line voltage in power connection. See Appendix B for location.
The unit’s power line input power supply electrical requirements are as follows:
Table 3: Electrical Requirements
Voltage
600 CFM
700 CFM
1,200 CFM
120V
120V
120V
MCA
9.5
6.6
14.3
MOP
12.0
9.0
20.0
The units do not have a factory installed disconnect
switch. If disconnect is required field supply and install as
per NEC/Canadian Electrical Code. Use copper conductors
only.
All field wiring must comply with NEC and local requirements. In Canada, electrical connections must be in accordance with CSA C22.1 Canadian Electrical Code Part One.
Field Connections
A wiring diagram is located inside the control box cover.
Low voltage terminal strips for remote control wiring interface are provided on the exterior casing of the unit and
connected to the microprocessor control board for starting, controlling sequence and monitoring. The Installer
must provide wiring for the controls and/or accessories
that may be supplied optionally or by others to the low
voltage terminal strips. See Appendix B for location.
VCES-HRV-IOM-1C – HRV600i, HRV700i, HRV1200i
The controls available for the Heat Recovery Ventilators,
their reference and type of connection are listed below.
For more information on the controls, wiring and terminal
connections see Appendix F.
The wall control is 12 VDC. Other terminals are 24 VAC or
dry contact control.
Notes:
1. Check the Controls and/or the Control Schematic
sections of the specification, optional and accessory
items shipped loose with or inside the unit for a list
of optional controls or wiring connections required to
the unit.
2. For the unit to start both ventilation and fan speed
calls are required except as noted. For ventilation
call the remote wall control, occupied timer/sensor,
manual switch or BMS contacts can be used. For fan
speed call the remote fan control, CO2 ventilation
control, manual switch or BMS contacts can be used.
Wall Control Connection
• Four-wire LVT 24 gauge minimum (12 VDC).
Occupied Timer/Sensor Connection
• Makes a dry contact to operate unit. Timer requires
separate 24 VAC. Do not use timer with Xtra wall
control.
Remote Fan Control
• Requires single pole, double throw switch for
Low–Common–High.
• Makes dry contact for speed setting.
CO2 Ventilation Control
• Makes dry contact.
• CO2 ventilation requires separate 24 VAC.
Smoke Detector
• Makes dry contact.
• Smoke detector requires separate 24 VAC.
Fan Interlock Switch (FF)
• External fan control can be achieved by connecting
an external fan source (G) through dry contacts (FF)
on the microprocessor control board (terminals 6 and
7 on the low voltage terminal strips left side). These
contacts are closed on a call for ventilation or frost
control. See Forced Air System.
9
Start-up
Pre Start-up Procedure
Before requesting start-up, check that the installation is
complete and unit is ready. Complete the pre start-up
check list below and in Appendix G for each unit as items
are checked.
1. Check the electrical disconnect is in the ‘Off’ position.
2. Open access doors and check the unit for shipped
loose parts, obstructive packaging, objects near or in
fans, dampers, flat plate exchanger, etc.
3. Check that the fans and motors are rotating freely.
4. Check that the air filters are installed and clean. Replace if necessary.
5. Check damper and linkages for free movement.
6. Check that ductwork is connected and complete.
7. Check that condensate drain connections have been
trapped, installed correctly and filled.
8. Check that all shipped loose or field supplied components have been correctly installed and wired.
9. Check that all power supplies and control wiring
have been inspected and approved by the Local Authorities having jurisdiction.
10. Check all factory and field wiring connections for
tightness. Tighten if necessary.
11. Check that all fuses are properly installed in holders.
12. Check the voltage at the disconnect switch against
the nameplate. If the voltage is not within 10% of
rated have the condition corrected before continuing
start-up.
13. Check that all field piping, venting, installation and
connections for the heating and cooling options and/
or accessories (if equipped) have been completed and
tested.
14. Check and adjust thermostat setpoints.
Start-up Procedure
To ensure proper operation of each unit, qualified personnel should perform the start-up and complete the checklist
below and the start-up form in Appendix G for permanent
record. A completed checklist will provide valuable information for personnel performing future maintenance.
IMPORTANT
A completed copy must be sent back to the factory for
warranty validation and for factory assistance.
All units are factory run tested. Fans are set up to run correct when power is connected. All units are dynamically
balanced prior to shipping. However, there are certain operating speeds at which the natural frequency of the rotating member is attuned to the natural frequency of the unit
panels, which may cause vibrations.
These vibrations can tend to reinforce each other in such
a way that excessive vibration can be encountered under
certain conditions. It is difficult to predetermine this condition because it is affected by the mounting arrangement
and the various modules used to make up the assembly
and the ductwork connections.
If the above check reveals no apparent discrepancies and
vibration is still present, the speed of the unit should be
changed to determine if the natural frequency is causing
the vibration.
VCES-HRV-IOM-1C – HRV600i, HRV700i, HRV1200i
Under no condition should the unit(s) be allowed to continue to operate when excessive unit vibration is apparent.
Permanent damage may result which will not be covered
under the warranty if the unit is allowed to continue in
operation when excessive vibrations are evident.
1. Before proceeding complete the pre start-up checklist.
2. For the unit to start when the disconnect switch
is turned on, a ventilation and fan speed call is
required.
a. Check for ventilation call from the remote wall
control connection, occupied timer/sensor connection or BMS whichever is used. See Appendix F for which terminal connections should be
closed (contacts made) once power is connected.
Circle which device is used.
b. Check for either low speed or high speed call
from the remote fan control, CO2 ventilation
control or BMS whichever is used. See Appendix F for which terminal connections should be
closed (contacts made) once power is connected.
Circle which device is used.
c. If ‘a’ and ‘b’ are not connected, start can be accomplished by using temporary external dry contacts or a jumper wire closing timer contacts 3
and 4 (left side) plus low speed contacts 3 and 4
(right side). Check if temporary dry contacts or a
jumper wire are used.
10
!
WARNING
Only low or high speed contacts must be closed at any
one time never both using dry contacts/jumper wires otherwise permanent damage to the motor and wiring will
occur.
Remote controls, if installed and connected, operate in
conjunction with the dry contacts/jumper wires. When
controlling units with remote controls, use extreme caution around moving mechanical components such as
fans, belts and motors as they can lead to severe personal
injury.
3. Check that all access panels or doors are closed.
4. Turn the unit disconnect switch to the ‘On’ position.
5. Wait for fans to run and then shut off unit’s disconnect switch. Check that fans are rotating in the correct direction.
Note: If there is a negative pressure in the space and
an exhaust discharge damper is missing or not closing properly, the fans with single-phase motors could
be rotating in the wrong direction before the power
is turned on and may not correct itself. Check the
exhaust damper is present and dampers are closing
properly or take corrective action before proceeding.
IMPORTANT
On initial power up, the unit will perform a system check
and operate at hight speed for five seconds.
6. Check that dampers are operating properly.
7. Close all access doors and turn the unit’s disconnect
to the ‘On’ position.
8. Re-check the voltage at the disconnect switch against
the nameplate with all fans operating. If the voltage
is not within 10% of rated have the condition corrected before continuing start-up.
VCES-HRV-IOM-1C – HRV600i, HRV700i, HRV1200i
9. Check amperage draw to each motor against motor
nameplate FLA. Do not allow the motor amp draw
to exceed the Motor Manufacturer’s nameplate data.
Excessive amp draw will cause premature failure of
the motor and void the motor warranty. If significantly higher, adjust the manual balancing dampers
in the ductwork (change the ductwork static pressure) to lower the amperage draw below the nameplate FLA.
10. On the HRV600i and HRV1200i there are three
speed settings available with the controls, only two
of which can be functional. The units are factory set
to use the low and high speed taps on the blower
motors. If additional airflow is required, the medium
speed tap can be used instead of the low speed tap.
See Appendix H for instructions on how to make this
change.
11. Check the fan operation on Low, Com and High.
Use a wall control or the dry contact switching to
run fan speeds as shown in Appendix F, Wall Control
Connection.
12. Check the operation of the control options and accessories provided with the unit. See Frost Control,
Sequence of Operation and Appendix F for functional
descriptions and further details.
13. Check the setpoints on thermostats and controls; adjust and record changes as required.
14. When unit has achieved steady state take measurements and complete the readings section of the
Start-up Form in Appendix G and send copy of the
Start-up Form to Venmar CES to validate warranty.
Maintain a copy of the report at the unit for future
reference.
11
Frost Control
The unit functions are controlled by an integrated microprocessor control board included in the unit as per
the frost control selected, the sequence of operation as
described below and according to the options selected as
described in Appendix F.
Table 4: Recirculation (R) and Exhaust Only (E) Defrost
HRV
Type of
Initiate
Stage
Model
Defrost Temperature
Ventilation Time
(Minutes) Defrost
Time/Run Time
Standard Extended
Exhaust Only Defrost
Aluminum and Polypropylene Core Heat Exchangers
The exhaust only frost control cycle is electronically controlled in response to outside air temperature. On a call for
defrost, the outside air damper and the heat exchanger
core damper close, the supply fan is de-energized and the
exhaust fan continues to draw warm room air through
the flat plate heat exchanger to remove the buildup of ice.
Frost control is initiated at an outdoor temperature of 23°F
[−5°C].The defrost/ventilation cycle is time and temperature based per Table 4.
Recirculation Defrost
The recirculation frost control cycle is electronically controlled in response to the outside air temperature. On a
call for defrost, the outside air damper closes, the exhaust
fan is de-energized, the exhaust gravity backdraft and/or
motorized damper closes, the recirculation defrost damper
opens and the supply fan circulates warm air through the
flat plate heat exchanger to remove the buildup of ice. For
the HRV700i, it is possible to extend the frost control times
during very cold weather by removing the jumper JU1-F on
the circuit board. Frost control is initiated at an outdoor air
temperature of 23°F [−5°C]. The defrost/ventilation cycle is
time and temperature based per Table 4.
600i
1200i
700i
1
R/E
23°F
−5°C
12/60
N/A
2
R/E
5°F
−15°C
12/24
N/A
3
R/E
−21°F −30°C
12/12
N/A
1
R
23°F
−5°C
6/60
10/28
2
R
5°F
−15°C
6/32
10/28
3
R
−21°F −30°C
6/19
10/15
Heat and Moisture (HM) Core Heat Exchangers
600i
1200i
1
R/E
23°F
−5°C
10/50
10/30
2
R/E
5°F
−15°C
10/30
10/20
3
R/E
−21°F −30°C
10/20
10/15
Non-defrost
No frost control can be used only in areas where the winter outdoor air condition stays above 23°F [−5°C] and the
return air humidity level is below 20%.
Sequence of Operation
IMPORTANT
•
On initial power up, the unit will perform a system check
and operate at high speed for five seconds.
Unit Check Points
•
•
Power connected, no ventilation call – Both fans
are off, frost control damper (if equipped) closes off
fresh air from outside.
Power connected, low speed call – Both fans on low
speed, internal frost control damper (if equipped)
opens fresh air from outside. If equipped with recirculation module, the internal frost control damper
closes recirculation opening.
VCES-HRV-IOM-1C – HRV600i, HRV700i, HRV1200i
•
•
Power connected, high speed call – Both fans on
high speed, frost control damper opens fresh air
from outside. If equipped with recirculation module,
the internal frost control damper closes recirculation
opening.
Power connected, occupied timer/sensor connection open (unoccupied mode) – Both fans are off,
frost control damper closes fresh air from outside. If
equipped with recirculation module, the internal frost
control damper opens recirculation opening.
Power connected, FF control contacts close during
unit ventilation or frost control cycle.
12
Remote Wall Control
Remote mounted wall control options are solid state controls that can be used to control the ventilators from a
remote location. The connection from the ventilator to the
control is low voltage and requires a four conductor (24
gauge minimum) LVT cable. Models are available with a
dehumidistat control and speed switching. The following
three options are available:
Standard Wall Control
Dehumidistat to engage high speed exchange. Slide switch
operation supporting continuous low exchange and continuous high exchange.
Xtra Wall Control
Dehumidistat to engage high speed exchange. Electronic
push button operation supporting intermittent (standby)
ventilation, continuous low exchange, continuous high
exchange, maintenance indicator light and exchange indicator light.
Aqua Air Wall Control
Ideal for pool dehumidification. Dehumidistat to engage
high speed exchange. Electronic push button operation
supporting intermittent (standby) ventilation, continuous
low exchange, continuous high exchange, maintenance
indicator light and exchange indicator light.
Airflow Measurement and Balancing
Once installation is complete, the supply and exhaust airflows should be balanced to ensure proper operation and
a good quality installation. A well designed duct system
with properly sized duct runs and equal static pressure
losses of both the supply and exhaust will aid in airflow
balancing. However, it will be necessary to take flow
measurements using AMCA suggested methods. The
recommended methods would be a velocity traverse measurement or flow measuring stations (FMS) installed in the
ducts with magnehelic pressure gauges.
Flow Measuring Station Positions
It is important to locate the FMS in the ‘warm side’ ductwork to minimize the effect of differences in air density,
especially when balancing during extremely cold outside
conditions. Air density variations can affect the FMS by
more than 15%. The FMS should be located downstream
from straight sections of duct and not immediately after
fans or obstructions that will cause turbulent flow. Flow
control or balancing dampers should be installed downstream from the FMS so flow through the FMS is not
disturbed. Dampers can then be adjusted to equalize flow
rates in the ducts.
Whether flow stations are permanently installed or used
temporarily, the position they are placed in is very important to ensure accuracy as shown in Appendix C. The best
locations for mounting the FMS is in the long straight sections of ducting where airflow has stabilized across the
area of the duct. This position will provide the most accurate measurements.
VCES-HRV-IOM-1C – HRV600i, HRV700i, HRV1200i
The next best location for the FMS is immediately before
or after a 90 degree elbow and 12” [305 mm] from any
damper. In straight sections of pipe, the FMS should be
installed at least 30” [762 mm] from any fan outlet. This
applies to the supply air opening connection on the HRV
and the exhaust air opening connection.
With airflow measuring stations permanently installed,
balancing is done by measuring airflow on one side of the
HRV and then the other. Adjustments can then be made
to the damper to equalize airflows.
When using the temporary method, an FMS is installed in
one air duct of the HRV and the flow recorded. The FMS
is then relocated to the other air duct and the airflow is
recorded again. Dampers can then be adjusted to equalize
airflow. This procedure should be repeated to ensure that
the unit is balanced properly.
13
Balancing Procedure
Before proceeding with balancing, all windows, overhead
doors and walk-in doors should be closed and exhaust systems should be turned off.
gauge and record it. Remove the FMS and place it in the
supply duct. This process is not necessary if the FMS is to
be permanently mounted.
The connections between the flow stations and the ducts
must be sealed with tape. Mount the magnehelic gauge in
a convenient location where it is level and will not vibrate
or be bumped. Zero the gauge. Measure the exhaust air
first as it is often the lowest due to a longer duct system.
Repeat the procedure. If the reading is higher in the supply duct, adjust the damper until the reading is the same.
If the reading is lower, return the FMS to the exhaust duct
and adjust the damper to obtain the same reading as the
supply duct.
With the fan speed at maximum, connect the hoses from
the FMS to the magnehelic gauge. If the needle falls
below zero, reverse the hose connections. Ensure that the
damper is wide open. Take a reading from the magnehelic
Maintenance
!
WARNING
Disconnect the main power switch to the unit before performing service and maintenance procedures.
See Appendix A for physical data on units, Appendix I for
component locations and Appendix J for troubleshooting
information. A more detailed description of major maintenance items and timeframes follows.
Bi-monthly Maintenance
Bi-monthly maintenance should include:
Air Filters
The standard foam filters are washable. Under normal
conditions it is recommended that they be cleaned every
two months. More frequent cleaning may be required
under extremely dirty operating conditions. Use a vacuum
cleaner to remove the heaviest portion of accumulated
dirt, then wash with warm water.
VCES-HRV-IOM-1C – HRV600i, HRV700i, HRV1200i
A medium efficiency filter for the supply airstream is available from your Supplier. This filter is disposable and should
be replaced when it becomes dirty.
Drain Pans and Interior of Unit
With the filters removed from the unit, the foil faced insulation surfaces and drain pans should be wiped clean with
a soft cloth and mild cleaning solution. Ensure that the
drain fittings are free from dirt and draining freely.
14
Annual Maintenance
!
WARNING
Disconnect the main power switch to the unit before performing service and maintenance procedures.
Annual maintenance should include:
Air Filters
Vacuum and wash standard foam filters. Replace medium
efficiency filter if present.
Drain Pans and Interior of Unit
Wash the foil faced insulation surfaces and wipe the drain
pans with a soft cloth and mild cleaning solution. Check
the drain fittings to ensure they are draining freely.
Flat Plate Heat Exchanger
!
WARNING
Hot water and strong cleaning agents could damage the
heat exchanger. Ensure the heat exchanger is returned to
the unit in the correct orientation. Failure to do so may
result in damage to the exchanger. Follow instructions on
the label.
The flat plate heat exchanger must be handled with care.
Remove the flat plate heat exchangers by sliding them out
from the tracks holding them in place. In order to ensure
maximum efficiency of the partitions, it is recommended
that the heat exchanger be cleaned once a year following
the season of most intense use. For polypropylene and aluminum media, allow the heat exchanger to soak for three
hours in warm water and mild soap. Rinse under a heavy
stream of water. For HM heat exchangers, use a vacuum
cleaner or low pressure air. It is not recommended to use
solvents or detergents as these may damage the media
or structure of the heat exchanger. When replacing the
flat plate heat exchanger sections, ensure they are of the
proper vertical orientation. Failure to do so may result in
low airflow on the exhaust airstream due to system pressure trapping or holding condensate in the flutes.
Fans
Blower wheels and fan housing should be checked for
dirt buildup. If they appear dirty, it may be necessary to
remove the blower assembly and then vacuum the dust
out through the fan mouth. See Figure 1 and Figure 2 for
instructions on removing the blower assembly.
System Operation Check
Verification of all control modes should be checked to ensure proper operation. Refer to Sequence of Operation.
VCES-HRV-IOM-1C – HRV600i, HRV700i, HRV1200i
Testing and Replacement of the Damper
Actuator
Check damper operation by switching between Low–Com
or High–Com on the low voltage terminal strips or by
switching through the modes on the optional remote wall
control. If the damper does not respond in one or both
directions, check all connections.
700 cfm Only
Check for 24V output between the white/red and the
white/orange wires at the damper motor. If 24V can be
measured at the damper motor, the problem is either in
the connections, the frost control relay or the microprocessor control board.
600 and 1,200 cfm Only
CAUTION
120 VAC.
With the unit powered but off, check for 120V output
across the white/black wires. If 120V can be measured at
the motor, replace the motor. If 120V cannot be measured
at the motor, check for 120V across pins J1-9 and J1-1 at
the microprocessor control board.
Microprocessor Control Board Replacement
The microprocessor control board must be replaced if an
electronic problem arises. For example, the unit suddenly
stops, the unit stays in frost control mode all the time or if
control functions are not working properly.
Ensure that power is reaching the microprocessor control
board. Test the blower motors and damper actuators for
operation when directly connected to the appropriate
power voltage. If the motor and damper actuators function normally, replace the main microprocessor control
board.
Motor and Blower Removal and Installation
Disconnect power from the unit. To determine if the fan
motor is burned out, disconnect the four-wire service
connector between the motor and cabinet. Connect the
motor directly to a 120V power source with an electrical
cable as follows:
Table 5: Motor Connections
Red + White
Low speed
Blue + White
Medium speed
Black + White
High speed
15
!
Figure 2: Blower assembly removal – HRV700i
WARNING
Disconnect the main power switch to the unit before performing service and maintenance procedures.
If the motor functions normally, there is a problem with
the wiring connections or the microprocessor control
board. Check all wiring and replace microprocessor control
board if necessary.
If the blower does not run, it must be replaced. To replace
the motor, remove the flat plate heat exchanger from the
unit. Disconnect the four-wire service connector from the
unit. Remove the fasteners holding the motor assembly
in place. Lift the assembly up and out, using one hand
under the motor and one hand to steady it. Remove the
assembly carefully from the unit to avoid damage to the
insulation, shelf, etc. Install the repaired motor assembly
by following these instructions in reverse.
Vis de serrage
Connecteur
d’alimentation
Figure 1: Blower assembly removal – HRV600i and
HRV1200i
Remove these
two screws
Locking plate
Capacitor
VCES-HRV-IOM-1C – HRV600i, HRV700i, HRV1200i
16
Appendix A: Equipment Data
Table A1: Equipment Data
HRV600i
HRV700i
HRV1200i
300 to to 750 CFM
300 to 800 CFM
700 to 1,250 CFM
Direct drive
Direct drive
Direct drive
Bearing
Forward curved
Ø7” x 6”
[Ø178 x 152 mm]
Sleeve direct drive
Forward curved
Ø9” x 7”
[Ø229 x 178 mm]
Sleeve direct drive
Forward curved
Ø7” x 6” (two)
[Ø178 x 152 mm]
Sleeve direct drive
Housing
Cold rolled
Cold rolled
Cold rolled
½” [13 mm]
½” [13 mm]
½” [13 mm] keyed
¼
1⁄
6
1⁄
3
Airflow Range
Fans
Supply type
Wheel type
Wheel size
Shaft
Motor (HP)
Exhaust type
Direct drive
Direct drive
Direct drive
Wheel type
Bearing
Forward curved
Ø7” x 6”
[Ø178 x 152 mm]
Sleeve direct drive
Forward curved
Ø9” x 7”
[Ø229 x 178 mm]
Sleeve direct drive
Forward curved
Ø7” x 6”
[Ø178 x 152 mm]
Sleeve direct drive
Housing
Cold rolled
Cold rolled
Cold rolled
½” [13 mm]
½” [13 mm]
½” [13 mm] keyed
¼
1⁄
6
1⁄
3
12” x 12” x 26”
[305 x 305 x 660 mm]
Polypropylene,
aluminum or HM
23” x 23” x 19”
[584 x 584 x 483 mm]
12” x 12” x 39”
[305 x 305 x 991 mm]
Polypropylene,
aluminum or HM
Washable foam
13” x 11” x 1”
[330 x 279 x 25 mm]
2
Washable foam
22.25” x 19” x 1”
[572 x 483 x 25 mm]
1
Washable foam
13” x 11” x 1”
[330 x 279 x 25 mm]
3
MEF
13” x 11.25” x 2”
[330 x 286 x 51 mm]
2
MEF
22.625” x 19.25” x 1.75”
[575 x 489 x 51 mm]
1 (See Note 1)
MEF
13” x 11.25” x 2”
[330 x 286 x 51 mm]
3
Polypropylene
197 lbs [90 kg]
210 lbs [95 kg]
247 lbs [112 kg]
Aluminum
204 lbs [93 kg]
n/a
257 lbs [117 kg]
Wheel size
Shaft
Motor (HP)
Flat Plate Heat Recovery Module
Size
Flat plate material
Polypropylene
Filters
Type (primary)
Size
Number per airstream
Type (secondary)
Size
Number per airstream
Weight (With Recirculation Defrost)
Net core weight maximum
HM
208 lbs [95 kg]
n/a
264 lbs [120 kg]
Add 40 lbs [18 kg]
250 lbs [114 kg]
Add 40 lbs [18 kg]
Polypropylene
148 lbs [67 kg]
n/a
186 lbs [85 kg]
Aluminum
155 lbs [70 kg]
n/a
196 lbs [89 kg]
HM
159 lbs [72 kg]
n/a
Shipping weight
Weight (With Exhaust Only Defrost)
Net core weight maximum
Shipping weight
Add 40 lbs [18 kg]
n/a
Shipping Dimensions
40” x 32” x 32”
26” x 54” x 46”
(L x W x H)
[1,016 x 813 x 813 mm]
[660 x 1,372 x 1,168 mm]
Note:
1 – Available as accessory on supply only, in addition to washable foam filter
VCES-HRV-IOM-1C – HRV600i, HRV700i, HRV1200i
203 lbs [92 kg]
Add 40 lbs [18 kg]
38” x 44” x 32”
[965 x 1,117 x 813 mm]
17
VCES-HRV-IOM-1C – HRV600i, HRV700i, HRV1200i
SA
EA
C
A
Front
19.207”
[488]
34.000”
[864]
TOP VIEW
13.375”
[340]
5.125”
[130]
D
B
RA
OA
Right
12.000”
[305]
Control box
cover plate
FRONT VIEW
Note: A minimum of 12.000” [305] clearance from any
obstruction is required for removal of the control box.
FRONT VIEW
Kg
17
11
24
15
67
RIGHT VIEW
14.103”
[358]
RA-E
OA-E
14.000”
[356]
23.500”
[597]
Aluminum Core
PTS
LBS
Kg
A
40
18
B
26
12
C
55
25
D
34
15
TOTAL 155
70
B Condensate drain
7.705”
[196]
4.000”
[102]
24.500”
[622]
2.750”
[70]
Strap mounting
location
2.750”
[70]
Poly Core
PTS
LBS
A
38
B
25
C
52
D
33
TOTAL 148
Heat recovery core
15.000”
[381]
RIGHT VIEW
Kg
19
12
25
16
72
4.000”
[102]
8.000”
[203]
Reversed
door option
3.535” [90]
10.005”
[254]
LEFT VIEW
SA-E
EA-E
14.000”
[356]
28.005”
[711]
Control box
Low voltage
terminal strips
5.859” [149]
A Power line
4.028” input
[102]
Connection Table
Connection Sizes
A Line voltage in
14 gauge wire nut
B Condensate drain fitting (2x) 3/4” MPT
4.000” [102]
8.000”
[203]
8.000”
[203]
8.000”
[203]
Reversed
door option
6.500”
[165]
1.800”
[46]
HM Core
PTS LBS
A
41
B
27
C
56
D
35
TOTAL 159
Notes:
Dimensions in [ ] are millimeters.
Center of gravity
Direction of airflow
A minimum of 15.000” [381] clearance from any obstruction is required for removal of heat recovery cores, fans, etc.
This model has a damper located on the outdoor intake connection. This damper will close during a frost control cycle
or when the unit is placed in the ‘Off‘ position with power maintained to the unit. This damper is not designed as a
backdraft damper and will remain open if power is disconnected from the unit for any reason.
Note: The access door can be removed from the
cabinet with only 2.000” [51] of clearance.
Access door
Note: For units with the reversed door option, interior
components will appear as a mirror image of the above diagram.
Left
12.005”
[305]
Back
Appendix B: Dimensional Drawings
Figure B1: HRV600i unit dimensional drawing (with exhaust only defrost)
18
VCES-HRV-IOM-1C – HRV600i, HRV700i, HRV1200i
SA
Front
5.125”
[130]
12.000”
[305]
Control panel
For recirc
defrost only
RA
Right
OA
FRONT VIEW
FRONT VIEW
3.530”
[90]
8.000”
[203]
8.000”
[203]
24.500”
4.000”
[622] [102]
4.000” [102]
1.750”
[44]
LEFT VIEW
Reversed door option
SA-E
EA-E
14.000”
[356]
28.120”
[714]
15.000”
[381]
Control box
RIGHT VIEW
RA-E
OA-E
7.100”
[180]
14.100”
[358]
14.000”
[356]
RIGHT VIEW
B Condensate drain
Access door
Strap mounting
location
Low voltage
terminal strips
A Power line input
2.750”
[70]
Reversed
door option
Note: The access door can be removed from
cabinet with only 2.000” [51] of clearance.
Heat recovery
core
Access door
Note: For units with the reversed door option, interior
components will appear as a mirror image of the above diagram.
19.207”
[488]
Note: A minimum of 12.000” [305] clearance from any
obstruction is required for removal of the control box.
Left
EA
34.000”
[864]
49.550”
[1,259]
Back
1.750”
[44]
8.000”
[203]
4.000”
[102]
8.000”
[203]
Notes:
Dimensions in [ ] are millimeters.
A minimum of 15.000” [381] clearance from any obstruction is required for removal of heat recovery cores, fans, etc.
Connection Table
HRV600i (with recirculation defrost)
Connection Sizes
Poly core
197 lbs [90 kg]
A Line voltage in
14 gauge wire nut
Aluminum core
204 lbs [93 kg]
B Condensate drain fitting (2x) 3/4” MPT
HM core
208 lbs [95 kg]
Figure B2: HRV600i unit dimensional drawing (with recirculation defrost)
19
C
VCES-HRV-IOM-1C – HRV600i, HRV700i, HRV1200i
2.000”
[51]
Right
FRONT VIEW
24.736”
[628]
31.080”
[789]
51.000”
[1,295]
Control box
SA
PTS
A
B
C
D
TOTAL
Access door
Heat recovery core
RIGHT VIEW
LBS
34
67
36
74
211
Kg
15
30
16
34
95
SA-E
EA-E
20.750”
[527]
LEFT VIEW
15.250”
[387]
RA-E
OA-E
RIGHT VIEW
10.605”
Low voltage
terminal strips [269]
12.104”
[307]
2.157”
[55]
A Power line input
8.000”
[203]
40.500” 12.250”
[1,029] [311]
8.000”
[203]
3.750”
[95]
14.000”
[356]
1.875”
[48]
B Condensate drain
7.500” [191]
8.000”
[203]
10.750”
[273]
8.000”
[203]
1.875”
[48]
2.000”
[51]
Connection Table
Connection Sizes
A Line voltage in
14 gauge wire nut
B Condensate drain fitting (2x) 3/4” MPT
Notes:
Dimensions in [ ] are millimeters.
Center of gravity
Direction of airflow
A minimum of 21.000” [533] clearance from any obstruction is required for removal of heat recovery cores, fans and
control box access.
A minimum of 12.000” [305] clearance from any obstruction is required for power hook-up, low voltage remote
connection and control panel access.
Air is drawn in to the defrost air opening on top of the unit for recirculation defrost from the space or room in which
the unit is mounted. If this air is not suitable for supply air or if a negative pressure is created and is not acceptable,
then the defrost air opening should be ducted to a branch from the return air duct or from a suitable space.
Note: The access door can be removed from cabinet with only 2.000” [51] of clearance.
21.000”
[533]
RA
37.000”
[940]
D
10.000”
[254]
2.000”
[51]
Defrost air
opening
47.000”
[1,194]
22.500”
[572]
B
EA
8.000”
[203]
TOP VIEW
Front
Back
OA
3.625”
[92]
Left
A
Figure B3: HRV700i unit dimensional drawing
20
VCES-HRV-IOM-1C – HRV600i, HRV700i, HRV1200i
SA
EA
C
Front
19.207”
[488]
34.000”
[864]
TOP VIEW
14.250”
[362]
Back
5.125”
[130]
D
B
RA
OA
Right
12.000”
[305]
Control box
cover plate
FRONT VIEW
Note: A minimum of 12.000” [305] clearance from any
obstruction is required for removal of the control box.
FRONT VIEW
Kg
25
18
25
18
86
LEFT VIEW
SA-E
4.000”
[102]
Reversed
door option
EA-E
41.206”
[1,047]
40.326”
[1,024]
20.000”
[508]
11.325”
[288]
Aluminum Core
PTS
LBS
Kg
A
57
26
B
41
19
C
57
26
D
41
19
TOTAL 196
90
8.000”
[203]
10.000”
[254]
Poly Core
PTS
LBS
A
54
B
39
C
54
D
39
TOTAL 186
15.000”
[381]
RIGHT VIEW
Kg
27
20
27
20
94
Reversed
door option
Control box
RA-E
4.000”
[102]
9.878”
[251]
20.000”
[508]
RIGHT VIEW
B Condensate drain
Access door
OA-E
2.750”
[70]
20.000”
[508]
2.750”
[70]
Strap mount
location
Low voltage
terminal strips
4.028”
[102]
11.000”
[279]
8.000”
[203]
24.500”
[622]
8.000”
[203]
1.800”
[46]
Connection Table
Connection Sizes
A Line voltage in
14 gauge wire nut
B Condensate drain fitting (2x) 3/4” MPT
5.715”
[145]
A Power line input
HM Core
PTS LBS
A
59
B
43
C
59
D
43
TOTAL 204
Notes:
Dimensions in [ ] are millimeters.
Center of gravity
Direction of airflow
A minimum of 15.000” [381] clearance from any obstruction is required for removal of heat recovery cores, fans, etc.
This model has a damper located on the outdoor intake connection. This damper will close during a frost control cycle
or when the unit is placed in the ‘Off’ position with power maintained to the unit. This damper is not designed as a
backdraft damper and will remain open if power is disconnected from the unit for any reason.
Note: The access door can be removed from the
cabinet with only 2.000” [51] of clearance.
Heat recovery
core
Access door
Note: For units with the reversed door option, interior components
will appear as a mirror image of the above diagram.
Left
20.620”
[524]
A
Figure B4: HRV1200i unit dimensional drawing (with exhaust only defrost)
21
VCES-HRV-IOM-1C – HRV600i, HRV700i, HRV1200i
SA
Front
5.125”
[130]
12.000”
[305]
Control box
cover plate
For recirc
defrost only
RA
OA
Right
FRONT VIEW
FRONT VIEW
Heat
recovery
core
Access door
15.000”
[381]
RIGHT VIEW
Reversed door option
RA-E
OA-E
10.000”
[254]
20.000”
[508]
RIGHT VIEW
B Condensate drain
Access door
Strap mounting
location
20.000”
[508]
LEFT VIEW
Reversed door
option
SA-E
4.000”
24.500” [102]
[622]
8.000”
[203]
3.530”
[90]
EA-E
10.000”
[254]
8.000”
[203]
1.750”
[44]
41.240”
[1,047]
20.000”
[508]
Connection Table
Connection Sizes
A Line voltage in
14 gauge wire nut
B Condensate drain fitting (2x) 3/4” MPT
Note: The access door can be removed from
cabinet with only 2.000” [51] of clearance.
Note: For units with the reversed door option, interior
components will appear as a mirror image of the above diagram.
19.207”
[488]
Note: A minimum of 12.000” [305] clearance from any
obstruction is required for removal of the control box.
Left
EA
Back
49.550”
[1,259]
HRV1200i (with recirculation defrost)
Poly core
247 lbs [112 kg]
Aluminum core
257 lbs [117 kg]
HM core
264 lbs [120 kg]
1.750”
[44]
8.000”
[203]
4.000”
[102]
8.000”
[203]
Control box
Low voltage
terminal strips
2.750”
[70]
A Power line
input
Notes:
Dimensions in [ ] are millimeters
A minimum of 15.000” [381] clearance from any obstruction is required for removal of heat recovery cores, fans, etc.
Figure B5: HRV1200i unit dimensional drawing (with recirculation defrost)
22
Appendix C: Flow Measuring Station and Balancing Damper
Positions
Figure C1: HRV600i and HRV1200i flow measuring station and balancing damper positions
Reverse door option
Balancing damper
Flow measuring station (FMS)
Exhaust air to outside
(see Notes below)
Min. 8” [203 mm]
Flexible duct connection
Fresh air
from outside
Supply air
to space
Min. 12”
[305 mm]
Min. 30”
[762 mm]
Exhaust air
from building
Flexible duct connection
Min. 12”
[305 mm]
Notes:
1. The ‘exhaust air to outside’ duct is above the ‘supply air to space’ duct.
2. Straight duct sections minimum of 30” [762 mm] are required on supply to building and exhaust from the building to
achieve good airflow performance.
3. Flexbile duct connections, balancing damper and flow measuring stations are supplied and installed by others.
Figure C2: HRV700i flow measuring station and balancing damper positions
Flow measuring
station (FMS)
Defrost air opening
(see Note 4 below)
Exhaust air
to outside
Balancing damper
(not supplied)
Exhaust air
from space
Min. 12”
[304 mm]
Flexible duct connection
Low voltage
terminal strips
Min. 30”
[762 mm]
Supply air
to space
Min. 12”
[304 mm]
Notes:
1. The ‘fresh air from outside’ duct is above the ‘exhaust air from space’ duct.
2. Straight duct sections minimum of 30” [762 mm] are required on supply to building and exhaust from the building to
achieve good airflow performance.
3. Flexible duct connections, balancing damper and flow measuring stations are supplied and installed by others.
4. Air is drawn in to the defrost air opening on top of the unit for recirculation defrost from the space or room in which the
unit is mounted. If this air is not suitable for supply air or if a negative pressure is created and is not acceptable, then the
defrost air opening should be ducted to a branch from the return air duct or from a suitable space.
VCES-HRV-IOM-1C – HRV600i, HRV700i, HRV1200i
23
Appendix D: Drain Connections
Figure D1: HRV600i and HRV1200i drain connections
Plastic drain fitting
Min. 3”
[76 mm]
Min. 1”
[25 mm]
Min. 3”
[76 mm]
¾” NPT
coupler
Min. 4”
Min. 1” [102 mm]
[25 mm]
Min. 4”
[102 mm]
Copper or
plastic pipe
Water trap
Plastic hose
To drain
To drain
Notes:
1. All hose, pipe and couplers to be supplied by others.
2. Slop drain lines minimum ¼” per foot.
Figure D2: HRV700i drain connections
Plastic.drain.fitting
Min..3”
[76.mm]
Min..1”
[25.mm]
¾”.NPT
coupler
Min..4”
[102.mm]
Water.trap
To.drain
Min..3”
[76.mm]
Min..4”
Min..1” [102.mm]
[25.mm]
To.drain
Copper.or
plastic.pipe
Plastic.hose
Notes:.
1.. All.hose,.pipe.and.couplers.to.be.supplied.by.others.
2.. Slop.drain.lines.minimum.¼”.per.foot.
VCES-HRV-IOM-1C – HRV600i, HRV700i, HRV1200i
24
Appendix E: Mounting Diagrams
Figure E1: HRV600i and HRV1200i mounting
Reinforced
rubber strap
Note: Diagrams show standard unit configuration.
For units with the reversed door option, the door
will be located here.
Recirculation
module
3/8” [10 mm]
threaded rod
(supplied by others)
U channel
(supplied by others)
Recirculation
module
Rubber vibration isolator
(supplied by others)
Wooden curb (supplied by others)
Bolt to floor
Space must be left to allow connection of
drain lines with adequate slope for drainage
Figure E2: HRV700i mounting
3/8” [10 mm]
threaded rod
(supplied by others)
Bolt to floor
Wooden curb
(supplied by others)
Cabinet mounted
U channel
Low voltage
terminal strips
VCES-HRV-IOM-1C – HRV600i, HRV700i, HRV1200i
Rubber vibration
isolator
Low voltage
terminal strips
Space must be left to allow
connection of drain lines with
adequate slope for drainage
25
Appendix F: Terminal Control Diagrams
Wall Control Connection
Occupied Timer/Sensor Connection
Three types of remote wall controls are available:
Occupancy control is achieved by connection to the terminal interface shown below. These terminals require a dry
contact which could be provided by a number of types of
controls such as a timer, light sensor, occupancy sensor,
Building Management System or other. The unit will not
operate unless these contacts are closed!
1. Standard wall control with fan switch and dehumidistat control.
2. Xtra wall control with fan mode selection, dehumidistat control and maintenance indicator.
3. Aqua Air wall control with fan mode selection, dehumidistat control and high speed recirculation mode.
The remote wall controls work with the integrated electronic controls within the unit to control ventilation
sequences. Each wall control has different features and
requires four-wire connection to the unit as shown below.
Without the wall control, fans can be operated with a remote fan switch as shown in Remote Fan Control.
IMPORTANT
All controls accessories (ex. night setback timer, CO2 controller, enthalpy controller or smoke detector) intended
to provide a contact closure for occupancy control across
terminals 3 and 4 (left side) cannot be used in conjunction with the Xtra or Aqua Air wall controls.
If a wall control is required in addition to any of these
options, only the standard wall control may be used.
Without these options, a factory installed jumper across
terminals 3 and 4 (left side) must be installed.
The illustration below shows a factory installed jumper and
programmable timer option.
IMPORTANT
All controls accessories (ex. night setback timer, CO2 controller, enthalpy controller or smoke detector) intended
to provide a contact closure for occupancy control across
terminals 3 and 4 (left side) cannot be used in conjunction with the Xtra or Aqua Air wall controls.
If a wall control is required in addition to any of these
options, only the standard wall control may be used.
Without these options, a factory installed jumper across
terminals 3 and 4 (left side) must be installed.
Figure F2: Occupied timer/sensor connection
JUMPER
(factory installed)
2
GREEN
RED
YELLOW
1
2
1
BLACK
2
RED
WALL
CONTROL
4
JUMPER
4
OCCUPIED
TIMER/
SENSOR
5
6
7
8
9
10
LOW
3
6
7
9
10
COMMON
4
HIGH
5
FAN
INTERLOCK
CONTACT
CLASS 2 VOLTAGE
NOTE:
Connections are all dry
contacts except wall control
and 24 VAC power supply.
Use of 24 VAC circuit
requires isolating contacts
(ex. thermostat) to prevent
interconnection of Class 2
outputs.
OCCUPIED
TIMER/
SENSOR
1
1
BLACK
YELLOW
2
2
RED
LOW
3
COMMON
4
HIGH
5
8
3
WALL CONTROL
GREEN
GREEN
1
YELLOW
2
M
3
JUMPER
WALL CONTROL
BLACK
OCC. CONTROL
(field installed)
WALL CONTROL
Figure F1: Wall control connection
1
NSB Timer
FAN
INTERLOCK
CONTACT
CLASS 2 VOLTAGE
NOTE:
Connections are all dry
contacts except wall control
and 24 VAC power supply.
Use of 24 VAC circuit
requires isolating contacts
(ex. thermostat) to prevent
interconnection of Class 2
outputs.
5
6
7
1
2
3
4
5
3
4
24 (−) VAC
24 (+) VAC
OCCUPIED
TIMER/
SENSOR
5
6
7
8
8
9
9
10
10
LOW
3
COMMON
4
HIGH
5
FAN
INTERLOCK
CONTACT
CLASS 2 VOLTAGE
NOTE:
Connections are all dry
contacts except wall control
and 24 VAC power supply.
Use of 24 VAC circuit
requires isolating contacts
(ex. thermostat) to prevent
interconnection of Class 2
outputs.
6
7
8
9
10
6
7
8
9
10
VCES-HRV-IOM-1C – HRV600i, HRV700i, HRV1200i
26
CO2 Ventilation Control
Remote Fan Control
HRVs can be controlled by a CO2 controller that can be
connected to fan control Low–Com–High. As the CO2 levels exceed acceptable limits, the dry contact across High–
Com is closed, raising high speed fan ventilation.
Remote fan control can be achieved by connecting dry
contact controls to the terminal interface at terminals
labeled: Low–Com–High. These controls could be the
following: SPDT switch, dehumidistat, CO2 sensor, light
sensor, timer, building management system, etc. The illustration below represents a switch connected to the unit.
Figure F3: CO2 ventilation control
CO2 SENSOR
WALL CONTROL
2
BLACK
GREEN
RED
YELLOW
1
Do not use a wall control and remote fan switch at the
same time. Damage to the unit may occur.
7
2
JUMPER
6
3
OCCUPIED
TIMER/
SENSOR
LOW
3
5
COMMON
4
4
6
7
8
9
10
CLASS 2 VOLTAGE
NOTE:
Connections are all dry
contacts except wall control
and 24 VAC power supply.
Use of 24 VAC circuit
requires isolating contacts
(ex. thermostat) to prevent
interconnection of Class 2
outputs.
NO
Figure F4: Remote fan control
3
5
FAN
INTERLOCK
CONTACT
NC
4
HIGH
5
2
WALL CONTROL
1
6
7
2
1
8
1
BLACK
2
RED
AC GROUND
AC INPUT
NOTE 1: Terminal 5 (left side) on
CO2 sensor used only with
two-speed units.
NOTE 2: Terminal 7 and 8 (left side)
on CO2 sensor used only with
blower VFDs.
3
4
OCCUPIED
TIMER/
SENSOR
5
6
7
NORMAL OPERATION – LOW SPEED
CO2 LEVELS EXCEED SETPOINT – HIGH SPEED
8
9
10
VCES-HRV-IOM-1C – HRV600i, HRV700i, HRV1200i
GREEN
1
YELLOW
2
REMOTE FAN SWITCH
9
10
CAUTION
8
JUMPER
1
LOW
3
COMMON
4
HIGH
5
FAN
INTERLOCK
CONTACT
CLASS 2 VOLTAGE
NOTE:
Connections are all dry
contacts except wall control
and 24 VAC power supply.
Use of 24 VAC circuit
requires isolating contacts
(ex. thermostat) to prevent
interconnection of Class 2
outputs.
LOW
HIGH
6
7
8
9
10
27
Smoke Detector
Locate in a normally occupied area of premises. Recommended for compliance to NFPA-90A and IMC code 606.
HRVs can be equipped with a duct mount smoke detector
which will monitor the air when passing through the duct
system into the HRV. When sufficient smoke is detected,
an alarm condition is activated. By connecting the occupied timer/sensor contacts to the NC alarm auxiliary contacts on the duct sensor, an alarm condition will open the
auxiliary contact and stop operation of the HRV.
Figure F5: Smoke detector
9
10
AVAILABLE POWER INPUTS
A
B
C
24V
16
ALARM AUXILIARY CONTACTS
FOR FAN SHUTDOWN, ETC.
6
N.C.
120
VAC
220/240
VAC
17
C.
7
18
N.O.
N.O.
8
C.
N.C.
ALARM AUXILIARY CONTACTS SHOWN IN
STANDBY. CONTACTS TRANSFER DURING
ALARM AS INDICATED BY THE ARROWS.
2 ALARM
RED
GRN.
TROUBLE CONTACTS CLOSED IN ALARM AND
STANDBY. CONTACTS OPEN WHILE DETECTOR
HEAD OR POWER IS REMOVED, AND DURING
RESET. OPEN CONTACTS SIGNAL TROUBLE
CONDITION TO PANEL.
15
(+) ALARM SIGNAL
1 COMMON
20
FIELD
INSTALLED
JUMPER
19
3 POWER
3
N.O.
(D) AUX POWER
TROUBLE CONTACT RATING
0.3A @ 32 VAC/DC
TROUBLE CONTACTS CLOSED IN
STANDBY AND ALARM. CONTACTS
OPEN WHILE DETECTOR HEAD OR
POWER IS REMOVED, AND DURING
RESET. OPEN CONTACTS EXTINGUISH
OPTIONAL APA451 GREEN POWER
LED TO INDICATE TROUBLE CONDITION.
(+) AUX POWER
14
TROUBLE
CONTACTS
3
ALARM AUXILIARY CONTACT RATINGS
10A @ 30 VDC
10A @ 250 VAC (0.75 POWER FACTOR)
240VA @ 240 VAC (0.4 POWER FACTOR)
1/8 HP @ 120 VAC
1/4 HP @ 240 VAC
500mA MINIMUM @ 24 VDC
NOT INTENDED FOR CONNECTION
TO CONTROL PANELS.
ALARM INITIATION CONTACT RATING
2.0A @ 30 VAC/DC (0.6 POWER FACTOR)
ALARM INITIATION CONTACTS
14
POWER INPUTS ACCEPT
24 VDC, 24 VAC 50–60 HZ,
120 VAC 50–60 HZ, OR
220/240 VAC 50–60 HZ.
CONNECT POWER SOURCE
TO APPROPRIATE TERMINALS
OF EACH DETECTOR.
WALL CONTROL
1
BLACK
2
RED
3
4
OCCUPIED
TIMER/
SENSOR
5
6
7
8
9
10
GREEN
1
YELLOW
2
LOW
3
COMMON
4
HIGH
5
FAN
INTERLOCK
CONTACT
CLASS 2 VOLTAGE
NOTE:
Connections are all dry contacts
except wall control and 24 VAC
power supply.
Use of 24 VAC circuit requires
isolating contacts (ex. thermostat)
to prevent interconnection of
Class 2 outputs.
VCES-HRV-IOM-1C – HRV600i, HRV700i, HRV1200i
6
7
8
9
10
28
Appendix G: HRV600i, HRV700i and HRV1200i
Start-up Form and Checklist
•
•
•
•
•
IMPORTANT
Complete this form for each unit and email, fax or mail to Venmar CES immediately after start-up to validate warranty
and to provide valuable information for personnel performing future maintenance or for factory assistance to address
below.
Read the Installation, Operation and Maintenance Instructions Manual before proceeding.
Leave a copy of this report with the owner and at the unit for future reference and permanent record.
To ensure proper operation of each unit qualified personnel should perform the start-up, complete the checklist and
report.
All units are factory run tested. Blowers and heat wheel are set up to run correct when power is connected. If any
blower is running backwards disconnect power. If there is a negative pressure in the space and an exhaust discharge
damper is missing or not closing properly, the fans with single-phase motors could be rotating in the wrong direction
before the power is turned on and may not correct itself. Check the exhaust damper is present and dampers are closing
properly or take corrective action before proceeding.
Venmar CES
Unit Identification Information
1502 D Quebec Avenue
Saskatoon, Saskatchewan
Canada S7K 1V7
Phone: 1-866-4-VENMAR (1-866-483-6627)
Fax: (306) 651-6009
Project:___________________________________________
Model Number:____________________________________
Serial Number:_____________________________________
Tag:______________________________________________
Jobsite Contact:____________________________________
Job Name:________________________________________
Job Address:_______________________________________
Telephone:________________________________________
Email:_ ___________________________________________
Table G1: Pre Start-up Checklist
Checklist Item
1
Is the electrical disconnect set to the ‘Off’ position?
2
Have shipped loose parts, obstructive packaging, objects, tie downs on fans been removed?
3
Are fans and motors rotating freely?
4
Are air filters installed, clean or replaced?
5
Are damper and linkages free of movement?
6
Is ductwork connected and complete?
7
Are condensate drain connections trapped, installed correctly and filled?
8
Are all shipped loose or field supplied components correctly installed and wired?
9
Has power supply and control wiring been inspected and approved by the Local Authorities?
Yes
N/A
10 Have factory and field wiring connections been checked and tightened?
11 Are all fuses properly installed in holders?
12 Is voltage at the disconnect switch within 10% of nameplate?
13 Are field piping and venting installation and connections for heating and cooling options completed and tested?
14 Have all thermostat setpoints been checked and adjusted?
VCES-HRV-IOM-1C – HRV600i, HRV700i, HRV1200i
29
Serial Number:______________________________________
Table G2: Start-up Checklist
Checklist Item
1
2
Yes
N/A
Before proceeding, complete the pre start-up checklist.
For the unit to start when the disconnect switch is turned on a ventilation and fan speed call is required.
a.Is a ventilation call available from the remote wall control connection, occupied timer/sensor connection or
BMS, whichever is used? See Appendix F for which terminal connections should be closed (contacts made)
once power is connected. Circle which device is used.
b.Is either a low speed or high speed (if equipped) call available from the remote fan control, CO2 ventilation
control or BMS, whichever is used? See Appendix F for which terminal connections should be closed
(contacts made) once power is connected.
c.If ‘a’ and ‘b’ are not connected, start can be accomplished by using temporary external dry contacts or a
jumper wire closing timer contacts 3 and 4 (left side) plus low speed contacts 3 and 4 (right side) or high
speed contacts 4 and 5 (right side). Are temporary dry contacts or a jumper wire used for start?
!
WARNING
Only low or high speed contacts must be closed at any one time using dry contacts/jumper wires, not both otherwise permanent
damage to the motor and wiring will occur.
Remote controls if installed and connected operate in conjunction with the dry contacts/jumper wires. When controlling units
with remote controls, use extreme caution around moving mechanical components such as fans and motors as they can lead to
severe personal injury.
3
Close all access panels or doors.
Turn the unit disconnect switch to the ‘On’ position.
IMPORTANT
4
On initial power up, the unit will perform a system check and operate at high speed for five seconds.
5
6
7
8
9
10
11
12
13
14
Wait for blowers to run and then shut off unit’s disconnect switch. Are the blowers and motors rotating in
the correct direction?
Note: If there is a negative pressure in the space and an exhaust discharge damper is missing or not closing
properly the fans with single-phase motors could be rotating in the wrong direction before the power is
turned on and may not correct itself. Check the exhaust damper is present and dampers are closing properly
or take corrective action before proceeding.
Are dampers operating properly?
Close all access doors and turn the unit’s disconnect to the ‘On’ position.
Re-check the voltage at the disconnect switch against the nameplate with all blowers operating. If the
voltage is not within 10% of rated have the condition corrected before continuing start-up.
Check amperage draw to each motor on each phase against motor nameplate FLA. Do not allow the
motor’s amp draw to exceed the Motor Manufacturer’s nameplate data. Excessive amp draw will cause
premature failure of the motor and void the motor warranty. If significantly higher, adjust the manual
balancing dampers in the ductwork (change the ductwork static pressure) to lower the amperage draw
below the nameplate FLA.
On the HRV600i and HRV1200i, there are three speed settings available with the controls, only two of which
can be functional. The units are factory set to use the low and high speed taps on the blower motors. If
additional airflow is required, the medium speed tap can be used instead of the low speed tap. See Appendix
H for instructions on how to make this change.
Check the fan operation on Low, Com and High. Use a wall control or the dry contact switching to run fan
speeds as shown in Appendix F, Wall Control Connection.
Check the operation of the control options and accessories provided with the unit. See Frost Control,
Sequence of Operation and Appendix F for functional descriptions and further details.
Check the setpoints on thermostats and controls; adjust and record changes as required.
When unit has achieved steady state take measurements and complete readings section of Start-up Form for
each operating cycle to verify all components are functioning properly.
VCES-HRV-IOM-1C – HRV600i, HRV700i, HRV1200i
30
Start-up Readings
•
•
Serial Number:______________________________________
Allow unit to reach steady state before taking readings.
Complete based on options included with the unit.
Table G3: Start-up Readings
Mode of Operation
Power supply
Heating
Cooling
3
4
Nameplate voltage
Voltage at disconnect no motors
Voltage at full load
Full load amps
Supply fan
Power supply
with all loads
connected
Amp draw
Overload amp setting
RPM
Full load amps
Exhaust fan
Amp draw
Overload amp setting
RPM
Airflow CFM
Supply
Exhaust
Outdoor entering
Temperature °F
db/wb
Airside
Supply leaving
Return entering
Exhaust leaving
Outdoor duct
Static pressure
inches w.c.
Supply entering
Supply duct
Return duct
Exhaust duct
Stage
Electric
heating
1
2
Amp draw – L1
Amp draw – L2
Amp draw – L3
This unit has been checked out and started according with
the above procedures and completed forms and is operating satisfactorily.
After 24 hours of satisfactory operation, shut down the
unit and check all foundation bolts, fan set screws and terminals. Tighten where required.
Additional Comments:
_________________________________________________
Start-up
By:________________________________________________
Date:______________________________________________
Email:_ ____________________________________________
Company Name:____________________________________
Telephone:_________________________________________
Email to Tech Support ([email protected]) or
fax to 306-244-4221.
_________________________________________________
VCES-HRV-IOM-1C – HRV600i, HRV700i, HRV1200i
31
This page intentionally left blank.
VCES-HRV-IOM-1C – HRV600i, HRV700i, HRV1200i
32
Appendix H: Electrical Control Box and Wire Connections
Figure H1: HRV600i and HRV1200i electrical control box and wiring connections
Power line input
junction box
Low voltage
terminal strips
Microprocessor control board access plate
Microprocessor controller terminal
Control box
HRV cabinet
Control box cover plate
Figure H2: HRV600i and HRV1200i low speed setting wire connections
NO
6
B
A
2
4
PJ2011
WARNING: Disconnect the main power source to the
unit before changing low speed setting.
1
PJ1001
4
8
2
6
1
0
4
8
CR1026
PJ1001A
CR1024
PJ1007
0
2
6
CR1023
PJ2014
COM
1
3
NC
5
CR1029
PJ2003
UCB1021
FU1015
5A-600i
8A-1200i
FILTRAN
XF1015
15
10 A
XF 15V
4
855VA
600i
1200i
VCES-HRV-IOM-1C – HRV600i, HRV700i, HRV1200i
Note: Autotransformers (if equipped) are
mounted on the back of the control box.
33
Appendix I: Components
Figure I1: HRV600i exhaust only defrost components
Item Description
2
3
4
1
7
1808149
3
Core damper actuator assembly
1808139
4
Core/defrost damper
5
Washable foam filter set (supply or exhaust airstream) – 2 per set 1608152
6
Supply damper
8
13
5
12
9
8
11
10
201586
1607720
7
14
Exhaust fan wheel – require 1 per unit
Hinge kit (male/female) – require 2 per unit
2
1
1808144
Exhaust fan motor – require 1 per unit
5
6
Part Number
Exhaust fan assembly – require 1 per unit
Supply damper actuator assembly
1808138
Core poly UL kit – 2 per kit
1607781
Core poly CSA kit – 2 per kit
1607782
Core aluminum kit – 2 per kit
1607779
Core HM kit – 2 per kit
1607785
Latch/keeper kit – require 2 per unit
1607852
10
Drain nipple – require 2 per unit
1607456
11
MEF filter set (supply airstream only) – 2 per set
1608155
Supply fan assembly – require 1 per unit
1808144
Supply fan wheel – require 1 per unit
201586
Supply fan motor – require 1 per unit
1808149
12
9
13
Control box
14
Terminal strips
Some unit components listed above are optional.
Consult the unit nomenclature for standard and optional components.
Figure I2: HRV600i recirculation defrost components
Item Description
2
3
1
4
5
2
3
1
4
8
7
3
201586
Exhaust fan motor – require 1 per unit
1808149
Hinge kit (male/female) – require 2 per unit
1607720
Washable foam filter set (supply or exhaust airstream) – 2 per set 1608152
Core poly UL kit – 2 per kit
1607781
Core poly CSA kit – 2 per kit
1607782
Core aluminum kit – 2 per kit
1607779
1607785
Recirc defrost damper actuator
225855
6
Control box
7
Latch/keeper kit – require 2 per unit
1607852
8
Drain nipple – require 2 per unit
1607456
10
9
Exhaust fan wheel – require 1 per unit
5
9
10
1808144
Core HM kit – 2 per kit
12
11
Part Number
Exhaust fan assembly – require 1 per unit
6
MEF filter set (supply airstream only) – 2 per set
1608155
Supply fan assembly – require 1 per unit
1808144
Supply fan wheel – require 1 per unit
201586
Supply fan motor – require 1 per unit
1808149
11
Control box
12
Terminal strips
Some unit components listed above are optional.
Consult the unit nomenclature for standard and optional components.
VCES-HRV-IOM-1C – HRV600i, HRV700i, HRV1200i
34
Figure I3: HRV700i components
2
3
Item Description
4
1
2
Latch/keeper kit – require 2 per unit
1607852
3
Recirc damper
1604178
Actuator
225855
4
Exhaust fan assembly – require 1 per unit
1608120P
Exhaust fan wheel – require 1 per unit
120200
1
5
5
6
7
10
9
Part Number
Washable foam filter set (supply or exhaust airstream) – 2 per set 1608700
Exhaust fan motor – require 1 per unit
1604169
Supply fan assembly – require 1 per unit
1608120P
Supply fan wheel – require 1 per unit
120200
Supply fan motor – require 1 per unit
1604169
6
Terminal strip
7
Control box
8
Core poly UL – 1 per unit
1604190
Core poly CSA – 1 per unit
1604156
9
Drain nipple – require 2 per unit
1670456
10
Hinge kit (male/female) – require 2 per unit
1607720
Some unit components listed above are optional.
Consult the unit nomenclature for standard and optional components.
8
Figure I4: HRV1200i exhaust only defrost components
Item Description
1
2
3
4
5
6
1
7
8
11
10
1808148P
Exhaust fan wheel – require 2 per unit
201586
1808150
1607720
3
Core damper actuator assembly
1808139
4
Core/defrost damper
5
Washable foam filter set (supply or exhaust airstream) – 3 per set 1608153
6
Supply damper
8
12
Exhaust fan assembly powder coated – require 2 per unit
Hinge kit (male/female) – require 2 per unit
2
7
5
1808148
Exhaust fan motor – require 2 per unit
14
13
Part Number
Exhaust fan assembly galvanized – require 2 per unit
9
Supply damper actuator assembly
1808138
Core poly UL kit – 3 per kit
1607783
Core poly CSA kit – 3 per kit
1607784
Core aluminum kit – 3 per kit
1607780
Core HM kit – 3 per kit
1607787
Latch/keeper kit – require 2 per unit
1607852
10
Drain nipple – require 2 per unit
1607456
11
MEF filter set (supply airstream only) – 3 per set
1608156
Supply fan assembly galvanized – require 2 per unit
1808148
Supply fan assembly powder coated – require 2 per unit
1808148P
Supply fan wheel – require 2 per unit
201586
Supply fan motor – require 2 per unit
1808150
12
9
13
Control box
14
Terminal strips
Some unit components listed above are optional.
Consult the unit nomenclature for standard and optional components.
VCES-HRV-IOM-1C – HRV600i, HRV700i, HRV1200i
35
Figure I5: HRV1200i recirculation defrost components
Item Description
1
2
3
4
5
2
3
1
4
12
11
9
8
7
4
6
1808148
Exhaust fan assembly powder coated – require 2 per unit
1808148P
Exhaust fan wheel – require 2 per unit
201586
Exhaust fan motor – require 2 per unit
1808150
Hinge kit (male/female) – require 2 per unit
1607720
Core poly UL kit – 3 per kit
1607783
Core poly CSA kit – 3 per kit
1607784
Core aluminum kit – 3 per kit
1607780
Core HM kit – 3 per kit
1607787
Washable foam filter set (supply or exhaust airstream) – 3 per set 1608153
5
Recirc defrost damper actuator
6
Control box
225855
7
Latch/keeper kit – require 2 per unit
1607852
8
Drain nipple – require 2 per unit
1607456
9
10
Part Number
Exhaust fan assembly galvanized – require 2 per unit
10
MEF filter set (supply airstream only) – 3 per set
1608156
Supply fan assembly galvanized – require 2 per unit
1808148
Supply fan assembly powder coated – require 2 per unit
1808148P
Supply fan wheel – require 2 per unit
201586
Supply fan motor – require 2 per unit
1808150
11
Control box
12
Terminal strips
Some unit components listed above are optional.
Consult the unit nomenclature for standard and optional components.
VCES-HRV-IOM-1C – HRV600i, HRV700i, HRV1200i
36
Appendix J: Troubleshooting
Table J1: HRV600i, 700i and 1200i Troubleshooting
Symptoms
Inside air is too dry.
Persistent condensation on windows,
walls, ceilings, etc.
Unit stops functioning.
Air from supply diffusers too cold.
Possible Causes
Solutions
Over ventilation – speed setting too high.
Improper ventilation rate.
Adjust speed setting.
Set dehumidistat control in a higher position (if
applicable).
Adjust dehumidistat control knob to a lower
setting.
Install a dehumisistat (option).
Window frame is too cold or leaky.
Repair window frame.
Electrical supply interrupted.
Check the unit circuit breaker.
Check filters and heat exchangers for blockage.
Check balance of airflows.
Install electric duct heater if necessary.
Remove the motor/blower assembly and adjust
blower wheel.
Check filters and heat exchangers for blockage.
Check balance of airflows.
Check for operation of both frost control
damper actuators.
Remove flat plate heat exchanger sections and
re-position the flute side of the heat exchanger
into the supply airstream.
Dehumidistat setting too low.
Improper adjustment of dehumidistat control.
Imbalance of supply and exhaust air.
Outdoor temperature very cold.
Unit makes annoying noise.
Blower wheel out of alignment.
Imbalance of supply and exhaust air.
Heat exchanger freezing up.
Frost control damper not functioning.
Low exhaust airflow in winter season.
VCES-HRV-IOM-1C – HRV600i, HRV700i, HRV1200i
Heat exchanger flutes are positioned in the
exhaust airstream.
37
Appendix K: Make-up Heat Requirements
Although the HRV600i, HRV700i and HRV1200i models
have good efficiencies, the supply air could be colder
than the ambient room air. It is possible to eliminate the
discomfort associated with this temperature difference by
installing an electric duct heater. This will temper the air
before it is distributed throughout the building. The table
below gives the heating requirements in kilowatts at different temperatures and airflows.
IMPORTANT
The data does not reflect a reduction in effectiveness due
to frosting. Based on the standard air at: 0.075 lb/ft3 and
Cp = 0.24 Btu/lbm°F [1.2 Kg/m3 and Cp = 1.0 KJ/Kg°C].
Table K1: Make-up Heat Requirements (kW) – HRV600i and HRV700i
Supply Supply
Air
Air
(CFM)
(L/s)
Outdoor Air
−40°F [−40°C]
Outdoor Air
−22°F [−30°C]
Outdoor Air
−4°F [−20°C]
Outdoor Air
14°F [−10°C]
Outdoor Air
32°F [0°C]
Desired Air
Temperature
Desired Air
Temperature
Desired Air
Temperature
Desired Air
Temperature
Desired Air
Temperature
55°F 68°F 73°F 55°F 68°F 73°F 55°F 68°F 73°F 55°F 68°F 73°F 55°F 68°F 73°F
[13°C] [20°C] [23°C] [13°C] [20°C] [23°C] [13°C] [20°C] [23°C] [13°C] [20°C] [23°C] [13°C] [20°C] [23°C]
700
330
7.4
10.4
11.5
5.6
8.6
9.7
3.9
6.8
8.0
2.1
5.1
6.2
0.3
3.3
4.4
650
307
6.6
9.4
10.5
5.0
7.8
8.9
3.4
6.2
7.3
1.8
4.6
5.6
0.2
3.0
4.0
600
283
5.9
8.5
9.4
4.5
7.0
8.0
3.0
5.6
6.5
1.6
4.1
5.1
0.1
2.7
3.7
550
259
5.2
7.6
8.5
3.9
6.3
7.2
2.6
5.0
5.9
1.3
3.7
4.6
0.1
2.4
3.3
500
236
4.0
6.1
7.0
3.0
5.1
5.9
1.9
4.0
4.9
0.9
3.0
3.8
—
1.9
2.7
450
212
3.0
4.9
5.6
2.1
4.0
4.8
1.3
3.2
3.9
0.4
2.3
3.1
—
1.5
2.2
400
189
2.2
3.9
4.6
1.5
3.2
3.9
0.9
2.5
3.2
0.2
1.9
2.5
—
1.2
1.8
Table K2: Make-up Heat Requirements (kW) – HRV1200i
Supply Supply
Air
Air
(CFM)
(L/s)
1,250
590
Outdoor Air
−40°F [−40°C]
Outdoor Air
−22°F [−30°C]
Outdoor Air
−4°F [−20°C]
Outdoor Air
14°F [−10°C]
Outdoor Air
32°F [0°C]
Desired Air
Temperature
Desired Air
Temperature
Desired Air
Temperature
Desired Air
Temperature
Desired Air
Temperature
55°F 68°F 73°F 55°F 68°F 73°F 55°F 68°F 73°F 55°F 68°F 73°F 55°F 68°F 73°F
[13°C] [20°C] [23°C] [13°C] [20°C] [23°C] [13°C] [20°C] [23°C] [13°C] [20°C] [23°C] [13°C] [20°C] [23°C]
14.6
19.9
21.9
11.2
16.5
18.5
7.8
13.1
15.2
4.4
9.7
11.8
1.0
6.3
8.4
1,200
566
13.5
18.6
20.6
10.4
15.5
17.4
7.2
12.3
14.3
4.0
9.1
11.1
0.8
5.9
7.9
1,150
542
12.6
17.4
19.3
9.6
14.5
16.4
6.6
11.5
13.4
3.6
8.5
10.4
0.7
5.5
7.4
1,100
675
11.2
15.9
17.7
8.5
13.2
15.0
5.8
10.5
12.3
3.1
7.7
9.6
0.4
5.0
6.8
1,050
495
10.7
15.2
16.9
8.1
12.6
14.3
5.5
10.0
11.7
2.9
7.4
9.1
0.4
4.8
6.5
1,000
472
9.9
14.1
15.7
7.4
11.7
13.3
5.0
9.3
10.9
2.6
6.9
8.5
0.2
4.4
6.1
900
425
8.5
12.4
13.8
6.4
10.2
11.7
4.3
8.1
9.6
2.2
6.0
7.5
0.1
3.9
5.4
800
377
7.0
10.4
11.7
5.2
8.6
9.9
3.4
6.8
8.2
1.7
5.0
6.4
—
3.3
4.6
700
330
5.0
8.1
9.3
3.7
6.7
7.9
2.3
5.3
6.5
0.9
3.9
5.1
—
2.5
3.7
VCES-HRV-IOM-1C – HRV600i, HRV700i, HRV1200i
38
[email protected]
www.venmarces.com
Venmar CES has a policy of continuous improvement and reserves the
right to change design and specifications without notice.
©2001 Venmar CES
VCES-HRV-IOM-1C (PN 206815)
September 2014