1
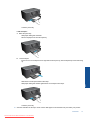
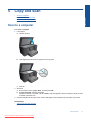
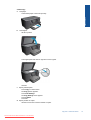
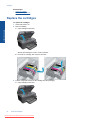
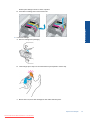
HP Photosmart Premium e-All-in-One
C310 series
Downloaded from ManualsPrinter.com Manuals
Downloaded from ManualsPrinter.com Manuals
1
HP Photosmart Premium e-All-in-One C310 series Help................................................................................................3
2
Get to know the HP Photosmart
Printer parts..........................................................................................................................................................................5
Tips for getting to know the printer.......................................................................................................................................6
3
How do I?............................................................................................................................................................................7
4
Print
Load media.........................................................................................................................................................................11
Tips for print success..........................................................................................................................................................14
5
Copy and scan
Scan to a computer............................................................................................................................................................17
Copy text or mixed documents...........................................................................................................................................18
Tips for copy and scan success.........................................................................................................................................20
6
Work with cartridges
Check the estimated ink levels...........................................................................................................................................21
Clean printhead automatically............................................................................................................................................21
Replace the cartridges.......................................................................................................................................................22
Order ink supplies..............................................................................................................................................................24
Cartridge warranty information...........................................................................................................................................24
Tips for working with ink.....................................................................................................................................................25
7
HP support
Get more help.....................................................................................................................................................................27
HP support by phone..........................................................................................................................................................27
Additional warranty options................................................................................................................................................28
8
Connectivity
Install the software for a network connection.....................................................................................................................29
Tips for setting up and using a networked printer..............................................................................................................29
9
Technical information
Notice.................................................................................................................................................................................31
Cartridge chip information..................................................................................................................................................31
Specifications.....................................................................................................................................................................32
Environmental product stewardship program.....................................................................................................................34
Regulatory notices..............................................................................................................................................................38
Regulatory wireless statements.........................................................................................................................................41
Index........................................................................................................................................................................................45
1
Downloaded from ManualsPrinter.com Manuals
Contents
Contents
Contents
2
Downloaded from ManualsPrinter.com Manuals
1
HP Photosmart Premium e-All-in-One
C310 series Help
For information about the HP Photosmart, see:
Get to know the HP Photosmart
How do I?
Print
Copy and scan
Work with cartridges
Connectivity
Technical information
Get more help
HP Photosmart Premium e-All-inOne C310 series Help
•
•
•
•
•
•
•
•
HP Photosmart Premium e-All-in-One C310 series Help
Downloaded from ManualsPrinter.com Manuals
3
Chapter 1
HP Photosmart Premium e-All-inOne C310 series Help
4
HP Photosmart Premium e-All-in-One C310 series Help
Downloaded from ManualsPrinter.com Manuals
2
Get to know the HP Photosmart
•
•
Printer parts
Tips for getting to know the printer
Printer parts
Front view of the printer
Get to know the HP Photosmart
•
•
1
Lid
2
Lid Backing
3
Glass
4
Color graphics display (also referred to as the display)
5
Photo tray
6
Paper-width guide for the photo tray
7
Paper tray extender (also referred to as the tray extender)
8
Paper-width guide for the main tray
9
Main tray (also referred to as the input tray)
10
Output tray
11
Cartridge door
12
Memory Card slots
13
Memory Card slots LED
14
Wireless LED
Top and rear views of the printer
Get to know the HP Photosmart
Downloaded from ManualsPrinter.com Manuals
5
Chapter 2
Get to know the HP Photosmart
15
Cartridge access area
16
Printhead assembly
17
Model number location
18
Rear USB port
19
Power connection (Use only with the power adapter supplied by HP.)
20
Two-sided printing accessory
Tips for getting to know the printer
Use the following tips to get to know the printer:
•
•
6
Learn about Control Panel features from the web, simply and easily. Click here to go online for more information.
Learn about Print Apps Manager for printing recipes, coupons, other content from the web, simply and easily.
Click here to go online for more information.
Get to know the HP Photosmart
Downloaded from ManualsPrinter.com Manuals
3
How do I?
This section contains links to commonly performed tasks, such as printing photos, scanning, and making copies.
Scan to a computer
•
Replace the cartridges
•
Copy text or mixed documents
•
Load media
•
Clear the paper jam from the two-sided printing accessory.
How do I?
•
How do I?
Downloaded from ManualsPrinter.com Manuals
7
Chapter 3
How do I?
8
How do I?
Downloaded from ManualsPrinter.com Manuals
4
Print
Print documents
Print photos
Print envelopes
Related topics
• Load media
Tips for print success
Print documents
Most print settings are automatically handled by the software application. You need to change the settings manually
only when you change print quality, print on specific types of paper or transparency film, or use special features.
To print from a software application
1. Make sure you have paper loaded in the paper tray.
2. On the File menu in your software application, click Print.
3. Make sure the product is the selected printer.
4. If you need to change settings, click the button that opens the Properties dialog box.
Depending on your software application, this button might be called Properties, Options, Printer Setup,
Printer, or Preferences.
NOTE: When printing a photo, you must select options for the specific photo paper and photo enhancement.
TIP: You can easily select the appropriate options for your print job by choosing one of the predefined print
tasks on the Printing Shortcuts tab. Click a type of print task in the Printing Shortcuts list. The default
settings for that type of print task are set and summarized on the Printing Shortcuts tab. If necessary, you
can adjust the settings here and save your custom settings as a new printing shortcut. To save a custom
printing shortcut, select the shortcut and click Save As. To delete a shortcut, select the shortcut and click
Delete.
6. Click OK to close the Properties dialog box.
7. Click Print or OK to begin printing.
Related topics
• Load media
Tips for print success
Print photos
•
Print photos saved on your computer
Print
Downloaded from ManualsPrinter.com Manuals
9
Print
5. Select the appropriate options for your print job by using the features available in the Advanced, Printing
Shortcuts, Features, and Color tabs.
Chapter 4
Print photos saved on your computer
To print a photo on photo paper
1. Make sure you have photo paper loaded in the photo tray.
2. Place the photo paper print side down on the right side of the photo tray.
3.
4.
5.
6.
Slide the paper-width guide inward until it stops at the edge of the paper.
On the File menu in your software application, click Print.
Make sure the product is the selected printer.
Click the button that opens the Properties dialog box.
Depending on your software application, this button might be called Properties, Options, Printer Setup,
Printer, or Preferences.
7. Click the Features tab.
8. In the Basic Options area, from the Paper Type drop-down list, select More. Then, select the appropriate photo
paper type.
9. In the Resizing Options area, from the Size drop-down list, select More. Then, select the appropriate paper
size.
If the paper size and paper type are not compatible, the printer software displays an alert and allows you to
select a different type or size.
10. (Optional) Select the Borderless printing check box if it is not already checked.
If the borderless paper size and paper type are not compatible, the product software displays an alert and allows
you to select a different type or size.
11. In the Basic Options area, select a high print quality, such as Best, from the Print Quality drop-down list.
NOTE: To achieve the highest dpi resolution, you can use the Maximum dpi setting with supported types
of photo paper. If Maximum dpi is not listed in the Print quality drop-down list, you can enable it from the
Advanced tab.
12. In the HP Real Life Technologies area, click the Photo fix drop-down list and select from the following options:
• Off: applies no HP Real Life Technologies to the image.
• Basic: enhances low-resolution images; moderately adjusts image sharpness.
13. Click OK to return to the Properties dialog box.
14. Click OK, and then click Print or OK in the Print dialog box.
Print
NOTE: Do not leave unused photo paper in the paper tray. The paper might start to curl, which could reduce
the quality of your printout. For best results, do not allow printed photos to stack up in the paper tray.
Related topics
• Load media
Tips for print success
Print envelopes
With the HP Photosmart, you can print on a single envelope, a group of envelopes, or label sheets designed for
inkjet printers.
10
Print
Downloaded from ManualsPrinter.com Manuals
To print a group of addresses on labels or envelopes
1. Print a test page on plain paper first.
2. Place the test page on top of the label sheet or envelope, and hold both up to the light. Check the spacing for
each block of text. Make adjustments as needed.
3. Load the labels or envelopes into the paper tray.
CAUTION: Do not use envelopes with clasps or windows. They can get stuck in the rollers and cause paper
jams.
4. Slide the paper-width guide inward against the stack of labels or envelopes until the guide stops.
5. If you are printing on envelopes, do the following:
a. Display the print settings, and click the Features tab.
b. In the Resizing Options area, click the appropriate envelope size in the Size list.
6. Click OK, and then click Print or OK in the Print dialog box.
Related topics
• Load media
Tips for print success
Load media
1. Do one of the following:
Load 10 x 15 cm (4 x 6 inch) paper
a. Raise photo tray lid.
Raise photo tray lid and slide paper-width guide outwards.
Print
b. Load paper.
Insert stack of photo paper into photo tray with short edge forward and print side down.
Slide stack of paper forward until it stops.
NOTE: If the photo paper you are using has perforated tabs, load photo paper so that tabs are
closest to you.
Slide paper-width guide inward until it stops at edge of paper.
Load media
Downloaded from ManualsPrinter.com Manuals
11
Chapter 4
c. Lower photo tray lid.
Load A4 or 8.5 x 11 inch paper
a. Raise the photo tray.
Slide paper-width guide outwards.
Remove all paper from the main input tray.
b. Load paper.
Insert stack of paper into main input tray with short edge forward and print side down.
Print
Slide stack of paper forward until it stops.
Slide paper-width guide inward until it stops at edge of paper.
12
Print
Downloaded from ManualsPrinter.com Manuals
Lower the photo tray.
Load envelopes
a. Raise the photo tray.
Slide paper-width guide outwards.
Remove all paper from the main input tray.
b. Load envelopes.
Insert one or more envelopes into far-right side of main input tray, with envelope flaps on left and facing
up.
Print
Slide stack of envelopes forward until it stops.
Slide paper-width guide inward against stack of envelopes until it stops.
Lower the photo tray.
2. View the animation for this topic. Some screens that appear in the animation may not reflect your product.
Load media
Downloaded from ManualsPrinter.com Manuals
13
Chapter 4
Related topics
• Tips for print success
Clear the paper jam from the two-sided printing accessory.
To clear a paper jam from the two-sided printing accessory.
1. Turn product off.
2. Remove the two-sided printing accessory.
3. Remove jammed paper.
4. Replace two-sided printing accessory.
5. Turn on product.
6. Try printing again.
7. View the animation for this topic. Some screens that appear in the animation may not reflect your product.
Print
Tips for print success
Use the following tips to print successfully.
Print tips
• Use genuine HP cartridges. Genuine HP cartridges are designed for and tested with HP printers to help you
produce great results, time after time.
• Make sure the cartridges have sufficient ink. To check the estimated ink levels, follow the instruction in the
Tools menu on the display. Alternatively, you can check the ink levels in Printer Toolbox from the software.
• Load a stack of paper, not just one page. Use clean and flat paper of the same size. Make sure only one type
of paper is loaded at a time.
• Adjust the paper-width guide in the input tray to fit snugly against all paper. Make sure the paper-width guide
does not bend the paper in the input tray.
• Set the print quality and paper size settings according to the type and size of paper loaded in the input tray.
14
Print
Downloaded from ManualsPrinter.com Manuals
•
•
•
Print
•
Use print preview to check margins. Do not let the margin settings for the document exceed the printable area
of the printer.
Learn how to share your photos online and order prints. Click here to go online for more information.
Learn about Apps Manager for printing recipes, coupons, and other content from the web, simply and easily.
Click here to go online for more information.
Learn how to print from anywhere by sending an email and attachments to your printer. Click here to go online
for more information.
Tips for print success
Downloaded from ManualsPrinter.com Manuals
15
Chapter 4
Print
16
Print
Downloaded from ManualsPrinter.com Manuals
Copy and scan
•
•
•
Scan to a computer
Copy text or mixed documents
Tips for copy and scan success
Copy and scan
5
Scan to a computer
To scan to a computer
1. Load original.
a. Lift lid on product.
b. Load original print side down on right front corner of glass.
c. Close lid.
2. Start scan.
a. On the Home screen, highlight Scan, and then press OK.
b. Highlight Computer, and then press OK.
If product is network-connected, a list of available computers appears. Select computer to which you want
to transfer to start the scan.
3. View the animation for this topic. Some screens that appear in the animation may not reflect your product.
Related topics
• Tips for copy and scan success
Copy and scan
Downloaded from ManualsPrinter.com Manuals
17
Chapter 5
Copy text or mixed documents
1. Do one of the following:
Copy and scan
1-sided copy
a. Load paper.
Load full-size paper in the main input tray.
b. Load original.
Lift lid on product.
Load original print side down on right front corner of glass.
Close lid.
c. Specify number of copies.
Touch Copy on Home screen.
The Copy preview appears.
Touch the screen to set the number of copies.
d. Start copy.
Touch B&W or Color.
18
Copy and scan
Downloaded from ManualsPrinter.com Manuals
Copy and scan
2-sided copy
a. Load paper.
Load full-size paper in the main input tray.
b. Load original.
Lift lid on product.
Load original print side down on right front corner of glass.
Close lid.
c. Specify 2-sided option.
Touch Copy on Home screen.
The Copy preview appears.
Touch Print Settings.
The Copy Settings menu appears.
Touch 2-Sided.
Touch On.
d. Specify number of copies.
Use the touch screen to set the number of copies.
Copy text or mixed documents
Downloaded from ManualsPrinter.com Manuals
19
Chapter 5
Copy and scan
e. Start copy.
Touch B&W or Color.
f. Copy the second original.
Load second page on the glass and touch OK.
2. View the animation for this topic. Some screens that appear in the animation may not reflect your product.
Related topics
• Tips for copy and scan success
Tips for copy and scan success
Use the following tips to copy and scan successfully:
•
•
•
•
•
•
•
20
Keep the glass and the back of the lid clean. The scanner interprets anything it detects on the glass as part of
the image.
Load your original, print side down, on the right front corner of the glass.
To copy or scan a book or other thick originals, remove the lid.
To make a large copy of a small original, scan the original into the computer, resize the image in the scanning
software, and then print a copy of the enlarged image.
To avoid incorrect or missing scanned text, make sure the brightness is set appropriately in the software.
If the document to be scanned has a complex layout, select framed text as the scan document setting in the
software. With this setting, the text layout and formatting are retained.
If the scanned image is incorrectly cropped, turn off the autocropping feature in the software and crop the
scanned image manually.
Copy and scan
Downloaded from ManualsPrinter.com Manuals
Work with cartridges
•
•
•
•
•
•
Check the estimated ink levels
Clean printhead automatically
Replace the cartridges
Order ink supplies
Cartridge warranty information
Tips for working with ink
Check the estimated ink levels
You can easily check the ink supply level to determine how soon you might need to replace a cartridge. The ink
supply level shows an estimate of the amount of ink remaining in the cartridges.
NOTE: 1 If you have installed a refilled or remanufactured cartridge, or a cartridge that has been used in another
printer, the ink level indicator might be inaccurate or unavailable.
NOTE: 2 Ink level warnings and indicators provide estimates for planning purposes only. When you receive a
low-ink warning message, consider having a replacement cartridge available to avoid possible printing delays.
You do not have to replace the cartridges until the print quality is unacceptable.
NOTE: 3 Ink from the cartridges is used in the printing process in a number of different ways, including in the
initialization process, which prepares the product and cartridges for printing, and in printhead servicing, which
keeps print nozzles clear and ink flowing smoothly. In addition, some residual ink is left in the cartridge after it
is used. For more information, see www.hp.com/go/inkusage.
To check the ink levels from the HP Photosmart Software
1. In the HP Solution Center, click Settings, point to Print Settings, and then click Printer Toolbox.
NOTE: You can also open the Printer Toolbox from the Print Properties dialog box. In the Print
Properties dialog box, click the Features tab, and then click the Printer Services button.
The Printer Toolbox appears.
2. Click the Estimated Ink Level tab.
The estimated ink levels for the ink cartridges appear.
To check the ink levels from the printer display
▲ From the Home screen, press the Status button. The estimated ink levels are displayed.
Related topics
• Order ink supplies
Tips for working with ink
Clean printhead automatically
If print quality is unacceptable, and the problem is not low ink levels or non-HP ink, try a printhead cleaning.
To clean the printhead from the printer display
1. From the Home screen, press the Settings button. The Setup Menu is displayed.
2. In the Setup Menu, touch the screen to highlight Tools. Press OK.
3. Touch the screen to highlight Clean Printhead. Press OK.
Work with cartridges
Downloaded from ManualsPrinter.com Manuals
21
Work with cartridges
6
Chapter 6
Related topics
• Order ink supplies
Tips for working with ink
Replace the cartridges
To replace the cartridges
1. Check that power is on.
2. Remove cartridge.
a. Open cartridge access door.
Work with cartridges
Wait for print carriage to move to center of product.
b. Press tab on cartridge, then remove it from slot.
3. Pull the orange tab and remove the cartridge from the packaging.
a. Open cartridge access door.
22
Work with cartridges
Downloaded from ManualsPrinter.com Manuals
Work with cartridges
Wait for print carriage to move to center of product.
b. Press tab on cartridge, then remove it from slot.
4. Insert new cartridge.
a. Remove cartridge from packaging.
b. Twist orange cap to snap it off. A forceful twist may be required to remove cap.
c. Match color icons, then slide cartridge into slot until it clicks into place.
Replace the cartridges
Downloaded from ManualsPrinter.com Manuals
23
Chapter 6
Work with cartridges
d. Close cartridge door.
5. View the animation for this topic. Some screens that appear in the animation may not reflect your product.
Related topics
• Order ink supplies
Tips for working with ink
Order ink supplies
To learn which HP supplies work with your product, order supplies online, or create a printable shopping list, open
HP Solution Center, and select the online shopping feature.
Cartridge information and links to online shopping also appear on ink alert messages. In addition, you can find
cartridge information and order online by visiting www.hp.com/buy/supplies.
NOTE: Ordering cartridges online is not supported in all countries/regions. If it is not supported in your country/
region, contact a local HP reseller for information about purchasing cartridges.
Cartridge warranty information
The HP cartridge warranty is applicable when the product is used in its designated HP printing device. This warranty
does not cover HP ink products that have been refilled, remanufactured, refurbished, misused, or tampered with.
During the warranty period the product is covered as long as the HP ink is not depleted and the end of warranty
date has not been reached. The end of warranty date, in YYYY/MM format, may be found on the product as indicated:
24
Work with cartridges
Downloaded from ManualsPrinter.com Manuals
For a copy of the HP Limited Warranty Statement, see the printed documentation that came with the product.
Tips for working with ink
•
•
•
•
•
Use the correct ink cartridges for your printer. For a list of compatible ink cartridges, see the printed
documentation that came with the printer. Alternatively, look in Printer Toolbox in the software.
Insert the ink cartridges into the correct slots. Match the color and icon of each cartridge to the color and icon
for each slot. Make sure all cartridges snap down into place.
Use genuine HP ink cartridges. Genuine HP ink cartridges are designed for and tested with HP printers to help
you produce great results, time after time.
Consider getting replacement ink cartridges when you receive an ink alert message. This avoids possible printing
delays. You do not need to replace the ink cartridges until print quality becomes unacceptable.
Photo and Photo Black cartridges are interchangeable.
Tips for working with ink
Downloaded from ManualsPrinter.com Manuals
25
Work with cartridges
Use the following tips to work with ink cartridges:
Chapter 6
Work with cartridges
26
Work with cartridges
Downloaded from ManualsPrinter.com Manuals
7
HP support
•
•
•
Get more help
HP support by phone
Additional warranty options
Get more help
You can find more information and help about your HP Photosmart by entering a keyword in the Search
field in the top left of the help viewer. Titles of related topics -- for both local and online topics -- will be listed.
To contact HP Support, click here to go online.
HP support by phone
Phone support options and availability vary by product, country/region, and language.
This section contains the following topics:
Phone support period
Placing a call
After the phone support period
HP support
•
•
•
Phone support period
One year of phone support is available in North America, Asia Pacific, and Latin America (including Mexico). To
determine the duration of phone support in Europe, the Middle East, and Africa, go to www.hp.com/support .
Standard phone company charges apply.
Placing a call
Call HP support while you are in front of the computer and the product. Be prepared to provide the following
information:
•
•
•
•
Product name (HP Photosmart Premium e-All-in-One C310 series)
Serial number (located on the back or bottom of the product)
Messages that appear when the situation occurs
Answers to these questions:
◦ Has this situation happened before?
◦ Can you re-create it?
◦ Did you add any new hardware or software to your computer at about the time that this situation began?
◦ Did anything else occur prior to this situation (such as a thunderstorm, product was moved, etc.)?
For the list of support phone numbers, visit www.hp.com/support .
After the phone support period
After the phone support period, help is available from HP at an additional cost. Help may also be available at the
HP online support Web site: www.hp.com/support . Contact your HP dealer or call the support phone number for
your country/region to learn more about support options.
HP support
Downloaded from ManualsPrinter.com Manuals
27
Chapter 7
Additional warranty options
Extended service plans are available for the HP Photosmart at additional costs. Go to www.hp.com/support , select
your country/region and language, then explore the services and warranty area for information about the extended
service plans.
HP support
28
HP support
Downloaded from ManualsPrinter.com Manuals
8
Connectivity
•
•
Install the software for a network connection
Tips for setting up and using a networked printer
Install the software for a network connection
Use this section to install the HP Photosmart software on a computer connected to a network. Before you install the
software, make sure you have connected the HP Photosmart to a network. If the HP Photosmart has not been
connected to a network, follow the onscreen instructions during the software installation to connect the product to
the network.
NOTE: 1 If your computer is configured to connect to a series of network drives, make sure that your computer
is currently connected to these drives before installing the software. Otherwise, the HP Photosmart software
installer might try to use one of the reserved drive letters and you will not be able to access that network drive
on your computer.
NOTE: 2 Installation time can range from 20 to 45 minutes depending on your operating system, the amount
of available space, and the processor speed of your computer.
To install the Windows HP Photosmart Software on a networked computer
1. Quit all applications running on your computer.
2. Insert the installation CD that came with the product into the CD-ROM drive on your computer and follow the
onscreen instructions.
(2) If the printer is already on the network, the software will provide other search methods for you to find the
printer over the network.
3. If a dialog box about firewalls appears, follow the instructions. If you see firewall pop-up messages, you must
always accept or allow the pop-up messages.
4. On the Connection Type screen, select the Networking option, and then click Next.
The Searching screen appears as the Setup program searches for the product on the network.
5. On the Printer Found screen, verify that the printer description is correct.
If more than one printer is found on the network, the Printers Found screen appears. Select the product you
want to connect.
6. Follow the prompts to install the software.
When you have finished installing the software, the product is ready for use.
7. To test your network connection, go to your computer and print a self-test report to the product.
Tips for setting up and using a networked printer
Use the following tips to set up and use a networked printer:
•
•
•
When setting up the wireless networked printer, make sure your wireless router or access point is powered on.
While the Wireless Setup Wizard is running, the printer searches for wireless routers, then lists the detected
network names on the display.
If your computer is connected to a Virtual Private Network (VPN), you need to disconnect from the VPN before
you can access any other device on your network., including the printer.
Learn how to find your network security settings. Click here to go online for more information.
Connectivity
Downloaded from ManualsPrinter.com Manuals
29
Connectivity
NOTE: (1) If the HP Photosmart is not connected to a network, run the Wireless Setup Wizard from the
Network menu on the HP Photosmart. If during installation, the software cannot find the product on the
network or you were unable to successfully run the Wireless Setup Wizard, the software may be able to
show you the wireless settings and if so, will redirect you to the Wireless Setup Wizard to enter this
information. Or
Chapter 8
•
•
•
•
•
Learn about the Network Diagnostic Utility and other troubleshooting tips. Click here to go online for more
information.
Learn how to change from a USB to wireless connection. Click here to go online for more information.
Learn how to work with your firewall and anti-virus programs during printer setup. Click here to go online for
more information.
Learn how to connect the HP Photosmart to a wireless home network using WiFi Protected Setup (WPS). Click
here to go online for more information.
Learn how to connect the HP Photosmart to a wireless home network using the Wireless Setup Wizard. Click
here to go online for more information.
Connectivity
30
Connectivity
Downloaded from ManualsPrinter.com Manuals
9
Technical information
The technical specifications and international regulatory information for the HP Photosmart are provided in this
section.
For additional specifications, see the printed documentation that came with the HP Photosmart.
This section contains the following topics:
•
•
•
•
•
•
Notice
Cartridge chip information
Specifications
Environmental product stewardship program
Regulatory notices
Regulatory wireless statements
Notice
Cartridge chip information
The HP cartridges used with this product contain a memory chip that assists in the operation of the product. In
addition, this memory chip collects a limited set of information about the usage of the product, which might include
the following: the date when the cartridge was first installed, the date when the cartridge was last used, the number
of pages printed using the cartridge, the page coverage, the printing modes used, any printing errors that might
have occurred, and the product model. This information helps HP design future products to meet our customers
printing needs.
HP collects a sampling of the memory chips from cartridges returned to HP's free return and recycling program (HP
Planet Partners: www.hp.com/hpinfo/globalcitizenship/environment/recycle/). The memory chips from this sampling
are read and studied in order to improve future HP products. HP partners who assist in recycling this cartridge might
have access to this data, as well.
Any third party possessing the cartridge might have access to the anonymous information on the memory chip. If
you prefer to not allow access to this information, you can render the chip inoperable. However, after you render
the memory chip inoperable, the cartridge cannot be used in an HP product.
If you are concerned about providing this anonymous information, you can make this information inaccessible by
turning off the memory chip's ability to collect the product's usage information.
To disable the usage information function
1. Touch Setup.
Technical information
Downloaded from ManualsPrinter.com Manuals
31
Technical information
The data collected from the cartridge memory chip does not contain information that can be used to identify a
customer or user of the cartridge or their product.
Chapter 9
2. Touch Preferences.
3. Touch Cartridge Chip Info, and then touch OK.
NOTE: To re-enable the usage information function, restore the factory defaults.
NOTE: You can continue to use the cartridge in the HP product if you turn off the memory chip's ability to collect
the product's usage information.
Specifications
Technical specifications for the HP Photosmart are provided in this section. For complete product specifications,
see the Product Data Sheet at www.hp.com/support .
System requirements
Software and system requirements are located in the Readme file.
For information about future operating system releases and support, visit the HP online support Web site at
www.hp.com/support .
Environmental specifications
• Allowable operating temperature range: Main printer: 5 to 40 degrees C (41 to 104 degrees F) Removable
display: -10 to 40 degrees C (14 to 104 degrees F)
• Allowable operating temperature range: 5 ºC to 40 ºC (41 ºF to 104 ºF)
• Humidity: 15% to 80% RH non-condensing; 28 ºC maximum dewpoint
• Non-operating (Storage) temperature range: -20 to 60 degrees C (-4 to 140 degrees F)
• In the presence of high electromagnetic fields, it is possible the output from the HP Photosmart may be slightly
distorted
• HP recommends using a USB cable less than or equal to 3 m (10 feet) in length to minimize injected noise due
to potential high electromagnetic fields
Print resolution
To learn more about the printer resolution, see the printer software.
Paper specifications
Technical information
Type
Paper weight
Input tray*
Output tray†
Photo tray*
Plain paper
16 to 24 lb. (60 to 90 gsm)
Up to 125 (20 lb. paper)
50 (20 lb. paper)
n/a
Legal paper
16 to 24 lb. (60 to 90 gsm)
Up to 125 (20 lb. paper)
10 (20 lb. paper)
n/a
Cards
Up to 75 lb. (281 gsm)
Up to 60
25
Up to 20
Envelopes
20 to 24 lb. (75 to 90 gsm)
Up to 15
15
n/a
Transparency film
n/a
Up to 40
25
n/a
Labels
n/a
Up to 40
25
n/a
5 x 7 inch (13 x 18 cm) Photo
paper
Up to 75 lb (281 gsm)
Up to 40
25
Up to 20
4 x 6 inch (10 x 15 cm) Photo
paper
Up to 75 lb. (281 gsm)
Up to 40
25
Up to 20
8.5 x 11 inch (216 x 279 mm)
Photo paper
Up to 75 lb. (281 gsm)
Up to 40
25
n/a
*
†
(236 gsm)
(236 gsm)
Maximum capacity.
Output tray capacity is affected by the type of paper and the amount of ink you are using. HP recommends emptying the output
tray frequently. FAST DRAFT print quality mode requiresthe extender tray to be extended and the end tray rotated up. Without
the end tray rotated up, both letter and legal-sized paper will fall on the first sheet.
*
32
Technical information
Downloaded from ManualsPrinter.com Manuals
NOTE: For a complete list of supported media sizes, see the printer driver.
Two-sided printing accessory paper specifications - all regions except Japan
Type
Size
Weight
Paper
Letter: 8.5 x 11 inches
16 to 24 lb. (60 to 90 gsm)
Executive: 7.25 x 10.5 inches
A4: 210 x 297 mm
B5 (ISO): 176 x 250 mm B5 (JIS): 182 x
257 mm
Brochure paper
Letter: 8.5 x 11 inches
Up to 48 lb. (180 gsm)
A4: 210 x 297 mm
Two-sided printing accessory paper specifications - Japan only
Type
Size
Weight
Paper
Letter: 8.5 x 11 inches
60 to 90 g/m2 (16 to 24 lb.)
Executive: 7.25 x 10.5 inches
A4: 210 x 297 mm
A5: 148 x 210 mm
B5 (ISO): 176 x 250 mm B5 (JIS): 182 x
257 mm
Brochure paper
Letter: 8.5 x 11 inches
Up to 180 g/m2 (48 lb. bond)
A4: 210 x 297 mm
Cards and photos
4 x 6 inches
Up to 200 g/m2 (110 lb. index)
5 x 8 inches
10 x 15 cm
A6: 105 x 148.5 mm
Hagaki: 100 x 148 mm
Alignment skew
• .006 mm/mm on plain paper (2nd side)
Technical information
NOTE: Media type availability varies by country/region.
Print specifications
• Print speeds vary according to the complexity of the document
• Panorama-size printing
• Method: drop-on-demand thermal inkjet
• Language: PCL3 GUI
Copy specifications
• Digital image processing
• Maximum number of copies varies by model
• Copy speeds vary according to the complexity of the document and model
• Maximum copy enlargement ranging from 200-400% (depends on model)
• Maximum copy reduction ranging from 25-50% (depends on model)
Ink cartridge yield
Visit www.hp.com/go/learnaboutsupplies for more information on estimated cartridge yields.
Scan specifications
• Image editor included
• Twain-compliant software interface
Specifications
Downloaded from ManualsPrinter.com Manuals
33
Chapter 9
•
•
•
Resolution: up to 1200 x 2400 ppi optical (depends on model); 19200 ppi enhanced (software)
For more information about ppi resolution, see the scanner software.
Color: 48-bit color, 8-bit grayscale (256 levels of gray)
Maximum scan size from glass: 21.6 x 29.7 cm (8.5 x 11.7 inches)
Environmental product stewardship program
Hewlett-Packard is committed to providing quality products in an environmentally sound manner. Design for
recycling has been incorporated into this product. The number of materials has been kept to a minimum while
ensuring proper functionality and reliability. Dissimilar materials have been designed to separate easily. Fasteners
and other connections are easy to locate, access, and remove using common tools. High priority parts have been
designed to access quickly for efficient disassembly and repair.
For more information, visit HP’s Commitment to the Environment Web site at:
www.hp.com/hpinfo/globalcitizenship/environment/index.html
This section contains the following topics:
•
•
•
•
•
•
•
•
•
•
•
•
•
•
•
Eco-Tips
Paper use
Plastics
Material safety data sheets
Recycling program
HP inkjet supplies recycling program
Set the Energy Save Mode
Power consumption
Disposal of waste equipment by users in private households in the European Union
Chemical Substances
Toxic and hazardous substance table
Battery disposal in the Netherlands
Battery disposal in Taiwan
Attention California users
EU battery directive
Eco-Tips
Technical information
HP is committed to helping customers reduce their environmental footprint. HP has provided the Eco-Tips below to
help you focus on ways to assess and reduce the impact of your printing choices. In addition to specific features in
this product, please visit the HP Eco Solutions web site for more information on HP’s environmental initiatives.
www.hp.com/hpinfo/globalcitizenship/environment/
Your product's Eco features
• Duplex printing: Use Paper-saving Printing to print two-sided documents with multiple pages on same sheet
to reduce paper usage.
• Smart Web printing: The HP Smart Web Printing interface includes a Clip Book and Edit Clips window where
you can store, organize, or print clips you have gathered from the Web.
• Energy Savings information: To determine the ENERGY STAR® qualification status for this product, see
Power consumption.
• Recycled Materials: For more information regarding recycling of HP products, please visit:
www.hp.com/hpinfo/globalcitizenship/environment/recycle/
Paper use
This product is suited for the use of recycled paper according to DIN 19309 and EN 12281:2002.
Plastics
Plastic parts over 25 grams are marked according to international standards that enhance the ability to identify
plastics for recycling purposes at the end of product life.
34
Technical information
Downloaded from ManualsPrinter.com Manuals
Material safety data sheets
Material safety data sheets (MSDS) can be obtained from the HP Web site at:
www.hp.com/go/msds
Recycling program
HP offers an increasing number of product return and recycling programs in many countries/regions, and partners
with some of the largest electronic recycling centers throughout the world. HP conserves resources by reselling
some of its most popular products. For more information regarding recycling of HP products, please visit:
www.hp.com/hpinfo/globalcitizenship/environment/recycle/
HP inkjet supplies recycling program
HP is committed to protecting the environment. The HP Inkjet Supplies Recycling Program is available in many
countries/regions, and lets you recycle used print cartridges and ink cartridges free of charge. For more information,
go to the following Web site:
www.hp.com/hpinfo/globalcitizenship/environment/recycle/
Set the Energy Save Mode
When you turn off the HP Photosmart, it goes into Energy Save mode by default. This makes the product more
energy efficient, but also means it can take longer than expected to turn the product on. Additionally, when turned
off in Energy Save mode, the HP Photosmart might not be able to complete some automated maintenance tasks.
If you routinely see messages on the display about a real-time clock failure or if you want to reduce the start-up
time, you can turn off the Energy Save mode.
NOTE: This feature is on by default.
2. Touch Preferences.
3. Touch the down arrow to scroll through the options, and then touch Energy Save Mode.
4. Touch On or Off.
Power consumption
Hewlett-Packard printing and imaging equipment marked with the ENERGY STAR® logo is qualified to the U.S.
Environmental Protection Agency’s ENERGY STAR specifications for imaging equipment. The following mark will
appear on ENERGY STAR qualified imaging products:
Additional ENERGY STAR qualified imaging product model information is listed at: www.hp.com/go/energystar
Environmental product stewardship program
Downloaded from ManualsPrinter.com Manuals
35
Technical information
To turn energy saving mode on or off
1. Touch the Setup icon.
Chapter 9
Disposal of waste equipment by users in private households in the European Union
Technical information
Chemical Substances
HP is committed to providing our customers with information about the chemical substances in our products as
needed to comply with legal requirements such as REACH (Regulation EC No 1907/2006 of the European
Parliament and the Council). A chemical information report for this product can be found at: www.hp.com/go/
reach.
36
Technical information
Downloaded from ManualsPrinter.com Manuals
Toxic and hazardous substance table
Battery disposal in the Netherlands
Battery disposal in Taiwan
Attention California users
Technical information
The battery supplied with this product may contain perchlorate material. Special handling may apply. For more
information, go to the following Web site:
www.dtsc.ca.gov/hazardouswaste/perchlorate
Environmental product stewardship program
Downloaded from ManualsPrinter.com Manuals
37
Chapter 9
EU battery directive
Technical information
Regulatory notices
The HP Photosmart meets product requirements from regulatory agencies in your country/region.
This section contains the following topics:
38
Technical information
Downloaded from ManualsPrinter.com Manuals
•
•
•
•
•
•
•
•
Regulatory model identification number
FCC statement
VCCI (Class B) compliance statement for users in Japan
Notice to users in Japan about the power cord
Notice to users in Korea
Notice to users in Germany
Noise emission statement for Germany
HP Photosmart Premium e-All-in-One C310 series declaration of conformity
Regulatory model identification number
For regulatory identification purposes, your product is assigned a Regulatory Model Number. The Regulatory Model
Number for your product is SDGOB-1021. This regulatory number should not be confused with the marketing name
(HP Photosmart Premium e-All-in-One C310 series, etc.) or product numbers (CD734A, etc.).
Technical information
FCC statement
VCCI (Class B) compliance statement for users in Japan
Regulatory notices
Downloaded from ManualsPrinter.com Manuals
39
Chapter 9
Notice to users in Japan about the power cord
Notice to users in Korea
Notice to users in Germany
Noise emission statement for Germany
Technical information
40
Technical information
Downloaded from ManualsPrinter.com Manuals
HP Photosmart Premium e-All-in-One C310 series declaration of conformity
Technical information
Regulatory wireless statements
This section contains the following regulatory information pertaining to wireless products:
•
•
•
•
•
Exposure to radio frequency radiation
Notice to users in Brazil
Notice to users in Canada
European Union regulatory notice
Notice to users in Taiwan
Regulatory wireless statements
Downloaded from ManualsPrinter.com Manuals
41
Chapter 9
Exposure to radio frequency radiation
Notice to users in Brazil
Notice to users in Canada
Technical information
42
Technical information
Downloaded from ManualsPrinter.com Manuals
European Union regulatory notice
Technical information
Notice to users in Taiwan
Regulatory wireless statements
Downloaded from ManualsPrinter.com Manuals
43
Chapter 9
Technical information
44
Technical information
Downloaded from ManualsPrinter.com Manuals
Symbols/Numerics
T
10 x 15 cm photo paper
specifications 32
technical information
copy specifications 33
environmental specifications
paper specifications 32
print specifications 33
scan specifications 33
system requirements 32
transparencies
specifications 32
A
after the support period 27
C
copy
specifications 33
customer support
warranty 28
Index
Index
32
W
warranty 28
E
envelopes
specifications 32
environment
Environmental product stewardship
program 34
environmental specifications 32
L
labels
specifications 32
legal paper
specifications 32
letter paper
specifications 32
P
paper
specifications 32
phone support 27
phone support period
period for support 27
photo paper
specifications 32
print
specifications 33
printer found screen, Windows 29
R
recycle
ink cartridges 35
regulatory notices
regulatory model identification
number 39
wireless statements 41
S
scan
scan specifications 33
security
network, WEP key 29
system requirements 32
45
Downloaded from ManualsPrinter.com Manuals
Index
46
Downloaded from ManualsPrinter.com Manuals