1
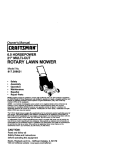
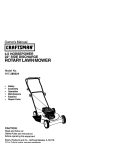
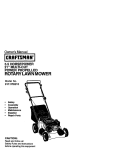
Owner's Manual
ICRRFTSMRN'I
6.75 HORSEPOWER
21" MULTI-CUT
POWER PROPELLED
ROTARY LAWN MOWER
Model No.
917,379810
•
•
•
•
•
•
Safety
Assembly
Operation
Maintenance
EspaSol
Repair Parts
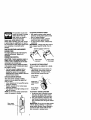
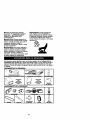
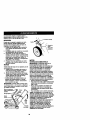
NOTE: Engines which are certified to comply with California and U.S. EPA emission regulations
for SORE (Small Off Road Equipment), are certified to operate on regular unleaded gasoline, and
include the following emission _
systems: Engine Modification (EM), and Three-way
Catalyst (TWC) (If so equipped).
AVlSO: Los motores homologados para cumplir coo la rnglamentaci6n sobre emisiones de
Califomla y de la Agancla de Proteccibn Ambiantal estadounidanse (EPA) pars equipos
peque_os no circulantss (SORE) funcionan con gasoline normal sin plomo, e incluyan los
siguientes sistemss de control de emisiones: medificaci6n del mot_" (EM) y catalizador de triple
acck_n (TWC) (en caso de tenerlo).
The D.O.M. decal includes engine life specifications for the emissions-related useful life period of
your engine. This period relates to the emission compliance life as certified by EPNCARB. To
find the/ife period specification for your engine, please match one of the following letters with the
letter pdnted on your D.O.M. decal: (C) 125 hours, (B) 250 hours, (A) 500 hours.
La celcomanla D.O.M. inc_uye especilicaciones sobre la dumc_n del motor pars el periodo de
vida dtil de su molor relaccionado con emisionss. Este perfodo se relaciona con la duracidn en
conformidad son las emisiones segOn Io corth_cadopor EPA/CARB. Para hallar la especificacion
del perlodo de vida de su motor, mire cudl de las sigulantss lelrss vlene impresa en su
cstsomanla D.O.M.: (C) 125 horas, (B) 250 horas, (A) 500 horas.
CAUTION:
Read and follow all
Safety Rules and Instructions
before operating this equipment
Sears, Roebuck and Co., Hoffman Estates, I L 60179
Visit our Craftsman websife: www.sears.com/craflsman
Warranty .................................................
2
Safety Rules ........................................ 2-4
Assembly ................................................
5
Operation ........................................... 6-10
Maintenance Schedule ........................ 11
Maintenance .................................... 11-14
Product Specifications .......................... 12
Service and Adjustments...................... 15
Storage ............................................ 16-17
Troubleshooting .............................. 17-18
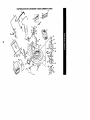
Repair Parts ..................................... 36-43
Parts Ordedng ........................ Back Cover
LIMITED TWO YEAR WARRANTY ON CRAFTSMAN POWER MOWER
For two years from date of purchase, when this Craftsman Lawn Mower is maintained,
lubricated, and tuned up according to the operating and maintenance instructions in
the owner's manual, Sears will repair free of charge any defect in matarial or workmanship.
If this Craftsman Lawn Mower is used for commercial or rental purposes, this warranty
applies for only 90 days from the date of purchase.
This Warranty does not cover:
• Expendable items which become worn during normal use, such as rotary mower
blades, blade adapters, belts, air cleaners and spark plug.
• Repairs necessary because of operator abuse or negligence, including bent
crankshafts and the failure to maintain the equipment according to the instructions
contained in the owner's manual.
Warranty service is available by returning the Craftsman power mower to the nearest
Sears Service Canter/Department in the United States. This warranty applies only
while this product is in use in the United States.
This Warranty gives you specific legal dghts, and you may also have other dghts wNch
vary from state to state.
SEARS, ROEBUCK AND CO., D/817 WA, HOFFMAN ESTATES, ILLINOIS 60179
IMPORTANT: This cutting machine is capable of amputating hands and feet and
throwing objects. Failure to observe the following safety instructionscould result in
serious injury or death.
• Be sure the area is clear of uther
I. GENERAL OPERATION
people before mowing. Stop machine if
• Read, understand, and follow all
anyone enters the area.
instructionson the machine and in the
• Do not operate the mower when
manual(s) before starting. Be thorbarefoot or weedng open sandals.
oughly familiar with the controls and the
Always wear substantial foot wear.
proper use of the machine before
• Do not pull mower backwards unless
starting.
absolutely necessary. Always look
• Do not put hands or feet near or under
down and behind before and while
rotatingpads. Keep clear of the
moving backwards.
discharge opening at all times.
• Do not operate the mower without
* Only allow responsible individuals, who
proper guards, plates, grass catcher or
are familiar with the instructions, to
other safety protective devices in
operate the machine.
place.
• Clear the area of objects such as rocks,
• See manufacturer's instructionsfor
toys, wire, bones, sticks, etc., which
proper operation and installation of
could be picked up and thrown by the
accessories. Only use accessoltes
blade.
2
approved by the manufacturer.
•
Stop the blade(s) when crossing gravel
drives, walks, or roads.
• Stop the engine (motor) whenever you
leave the equipment, before cleaning
the mower or unclogging the chute.
• Shut the engine (motor) off and wait
until the blade comes to complete stop
before removing grass catcher.
• Mow only in daylight or good artificial
light.
• Do not operate the machine while
under the Influence of alcohol or drugs.
• Never operate rnachlne in wet grass.
Always be sure of your footing: keep a
firm hold on the handle and walk; never
run.
• Disengage the sell.propelled mechanism or drive clutch on mowers so
equipped before starting the engine
(motor).
• If the equipment should start to vibrate
abnormaify, stop the engine (motor)
and check immediately for the cause.
Vibration is generally a warning of
trouble.
• Always wear safety goggles or safety
glasses with side shields v_nen
operating mower. ,
II. SLOPE OPERATION
Slopes are a major factor related to slip
and fall accidents which can result in
severe injury. All slopes require extra
caution. If you feel uneasy on a slope, do
not mow it.
DO:
• Mow across the face of slopes: never
up and down. Exemise extreme caution
when changing direction on slopes.
• Remove obstacles such as rocks, tree
limbs, etc.
• Watch for holes, ruts, or bumps. Tall
grass can hide obstacles.
DO NOT:
• Do not tdm near drop--offs, ditches or
embankments. The operator could lose
footing or balance.
• Do not tdm excessively steep slopes.
• Do not mow on wet grass. Reduced
footing cou(d cause slipping.
III. CHILDREN
Tragic accidents can occur if the operator
is cot alert to the presence of children.
Children are o1_enattracted to the
machine and the mowing activity. Never
assume that children will remain where
you last saw them.
• Keep children out of the trimming area
and under the watchful care of another
responsible adult.
• Be alert and turn machine off if children
enter the area.
• Before and while walking backwards,
look behind and down for small
children.
• Never allow children to operate the
machine.
• Use extra care when approaching blind
comers, shrubs, trees, or other objects
that may obscure vision.
IV. SERVICE
• Use extra care in handling gasoline
and other fuels. They are flammable
and vapors are explosive.
• Use only an approved container.
• Never remove gas cap or add fuel
with the engine running. Allow
engine to cool before refueling. Do
not smoke.
- Never refuel the machine indoors.
• Never store the machine or fuel
container inside where there is an
open flame, such as a water heater.
• Never run a machine inside a closed
area.
• Never make adjustments or repairs with
the engine (motor) running. Disconnect
the spark plug wire, and keep the wire
away from the plug to prevent accidental starting.
• Keep nuts and belts, especially blade
attachment boils, tight and keep
equipment In good condition.
• Never tamper with safety devices.
Check their proper operation regblady.
• Keep machine tree of grass, leaves, or
other debds build-up. Clean oil or fuel
spillage. Allow machine to cool before
storing.
* Stop and inspect the equipment if you
stdke en object. Repair, if necessary,
before restarting.
• Never attempt to make wheel height
adjustments while the engine (motor) is
running.
3
• Grass catcher components are subject
to wear, damage, and deterioration,
which could expose moving parts or
allow objects to be thrown. Frequently
check components and replace with
manufacturer's recommended parts,
when necessary.
• Mower blades are sharp and can cut.
Wrap the blade(s) or wear gloves, and
use extra caution when servicing them.
• Do not change the engine governor
setting or overspeod the engine.
_,WARNING: Engine exhaust, some of its
constituents, and certain vehicle components contain or emit chemicals known to
the State of California to cause cancer
and birth defects or other reproductive
harm.
AWARNING: Battery posts, terminals and
related accessories contain lead sod lead
compounds, chemicals known to the State
of California to cause cancer and birth
defects or other reproductiveharm. Wash
hands after handling.
ALook for this symbol to point out
important safety precautions. It means
CAUTIONZII BECOME ALERTlll YOUR
SAFETY IS INVOLVED.
A CAUTION: Muffler and other engine
parts become extremely hot dudng
operation and remain hot after engine has
stopped. To avoid severe burns on
contact, stay away from these areas.
_, WARNING: In order to prevent accidental starting when setting up, transporting, adjusting or making repairs, always
disconnect spark plug wire and place wire
where it cannot contact spark plug.
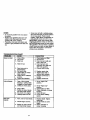
Thase accessories were avzulablewhso thislawn mowerwas produc_L 1'hey are not
stripped with your mower. They am also avaiable at mcatSears retailoutlstsand serviea
centers. Most Sears storeacan also on:lerrepairpartsfor y_J, whan youprevidethe rnodei
numberct your lswnrncwer. Some ofthese accessoriesmay not applyto yourlawnmower.
LAWN MOWER PERFORMANCE
FOR REAR DISCHARGE LAWN MOWERS
REAR
MULCHER KITS
DISCHARGE
STABILIZER
SIDE DISCHARGE
LAWN MOWERS
LAWN MOWERS
GAS CANS
LAWN MOWER MAINTENANCE
MUFFLERS
BELTS
AIR FILTERS
BLADES
BLADE ADAPTERS
4
SPARK PLUGS
WHEELS
ENGINE OIL
Read these instructionsand this manual
in its entirety before you attempt to
assemble or operate your new lawn
mower.
IMPORTANT: This lawn mower Is
shipped WITHOUT OIL OR GASOLINE in
the engine.
Your new lawn mower has been assembled at the factory with the exception
of those parts left unassembled for
shippingpurposes. All parts such as nuts,
washers, belts, etc., necessary to cornplete the assembly have been placed in
the parts bag. To ensure safe and proper
operation of your lawn mower, all parts
and hardware you assemble must be
tightened securely. Use the correct tools
as necessary to ensure proper tightness.
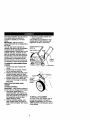
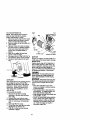
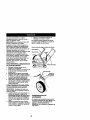
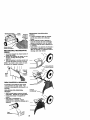
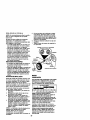
3. Remove any packing material from
around control bar.
Your handles may be adjusted for your
mowing comfort. Refer to Service and
Adjustments section of this manuel.
Operator
con_'olbar
Lift Ul
Mowing
position
TO REMOVE LAWN MOWER FROM
CARTON
1. Remove loose parts included with
mower.
2. Cut down two end comers of carton
and lay end panel down flat.
3. Remove all packing materials except
padding between upper and lower
handle and padding holding operator
presence control bar to upper handle.
4. Roll lawn mower out of carton and
check carton thorougly for additional
loose parts,
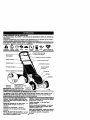
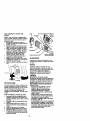
HOWTO SET UPYOUR
MOWER
TO UNFOLD HANDLE
Lower handle
pin
Sq
3-Position
handle
/
bracket
LAWN
IMPORTANT: Unfold handle carefully so
as not to pinch or damage control cables.
1. Raise lower handle section to
operating position and squeeze the
hoftom ends of lower handle towards
each other until the pin in handle can
be inserted into one of the three
height adjustment holes.
2. Remove protective padding, raise
upper handle section into place on
lower handle and tighten both handle
knobs.
TO INSTALL ATrACHMENTS
Your lawn mower was shipped ready to
be used as a mulcher.To convert to
bagging or discharging, see '3"0 CONVERT MOWER" in the Operation section
of this manual.
5
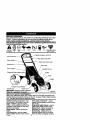
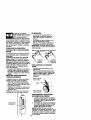
KNOWYOUR LAWN MOWER
READTHIS OWNERS MANUAL AND SAFETY RULES BEFORE OPERATING YOUR LAWN
MOWER. Compare the ilustratanswith yourlawn mowerto familarize youms_withthe
Ioc_ian ofvadous (x_nlrdsand a_ustmants. Save thismanusl for futurereference.
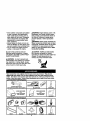
These symbols may appear on your lawn mower or in literaturesuppled with the product.
Learn and understand _
meaning.
CAU]ION
ENGINE
OR WARNING
ON
ENGINE
OFF
FAST
SLOW
CHOKE
FUEL
OIL
DANGER,KEEP HANDS
AND FEET AWAY
_peed control lever
zone contrd cable
Drive cover
Gasoline filler cap
Single
Air tilter
.Pdmer
Mulcherplug
Mulcher
IMPORTANT: This lawn mower is shipped
without oil or _lasoline in the engine.
Housing
MEETS CPSC SAFETY REQUIREMENTS
Sears rotary walk-behind power lawn mowers conform to the safety standards of the
Amedcan National Standards Institute and the U.S. Consumer Product Safety Commission. The blade turns when the engine is running.
Operator presence control bar - must
be held down to the handle to start the
engine. Release to stop the angJne.
Primer - pumps additional fuel from the
carburetor to the cylinder for use when
starting a cold engine.
Starter handle - used for startingthe
engine.
Drive control bar - used to engage
power-pmpeUed foward motion of lawn
mower.
Drive speed control lever - used to
engage power-propelled forward motion
lawn mower.
Single point height adjuster- used to
adjust cutting height of lawn mower.
Muleher door - allows conversion to
discharging or bagging operation.
Mulcher plug - Located at the rear
discharge opening must be removed
when converting to bagging operation.
6
Theoperation
ofanylawn TO OPERATE DRIVE SYSTEM
mower
canresultinforeign • With engine running, select ground
objects thrown into the
eyes, which can result in
severe eye damage.
Always wear safety glasses or eye
shields while operating your lawn mower
or performing any adjustments or repairs.
We recommend a wide vision safety mask
over spectacles or standard safety
glasses.
HOWTO USEYOUR LAWN MOWER
ENGINE SPEED
"13_angine speed was sst at the factoryfor
speed by moving drive speed control
lever to desired position.
• To start forward motion, pull ddve
control bar hack against handle.
• To stop forward motion, release drive
control bar.
IMPORTANT: Always keep ddve control
fully engaged against handle when in
use,
Ope_rator_
controlbar
opt_numbarformonse.Speedis nnt
adjustable.
ENGINE ZONE CONTROL
&CAU'nON: Federal re_JlstJnns.mguirsan
engine ccr_rulto be _
on 1his_w,'n
mowerin orderto minirn_ethe riskof blade
contactinjury.Do not underany
circumstancesattemptto defeatthe fu_
ofthe operator control "[heblada turnswhen
the engine is running.
• Your lawn mower is equipped with an
operatorpressnse controlbar whidn
requiresthe operatorto be pusiE_ed
behind the lawn mower handleto stad and
operatethe lawn mower.
I
Drive control
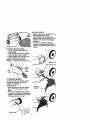
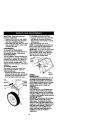
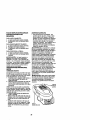
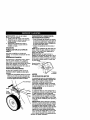
TO ADJUST CUTFING HEIGHT
All four wheels are adjusted by a single
lever.
• Pull adjuster lever toward wheel. To
raise mower, move lever forward to
desired position. To lower mower,
move the lever toward the rear.
Lower Wheels
GROUND DRIVE SPEEDS
Your lawn mower provides multiple
speeds to let you select the speed that
surfsyou hast.
• Lower speeds are for heevy/thick grass
cutting or trimming.
• Medium speeds are for normal grass
cutting or trimming.
• High speeds are for light cutting and for
ground transport.
NOTE: Do not move speed control lever
unless the engine Is running
for High Cut
/
height adjuster
lever
Raise Wheels
for Low Cut
TO ATTACH GRASS CATCHER
1. Liftthe rear door of the lawn mower
and place the grass catcher frame
hooks into the slots of the rear door.
2. The grass catcher is secured to the
lawn mower housing when the rear
door is lowered onto the grass catcher
frame.
A,CAUTION: Do not run your lawn mower
without clipping deflector or approved
grass catcher In place. Never attempt to
operate the lawn mower with the rear
door removed or propped open.
Dnve speed
control
7
Grass
catcher
Catcher frame hook
SIDE DISCHARGING
• Mulcher plug must be installed into rear
discharge opening of mower.
• Open mulcher door and install discharge deflector under guard as shown.
• Mower is now ready for discharging
operation.
• To convert to mulching or bagging
operation, discharge deflector must be
removed and discharge guard must be
closed.
TO EMPTY GRASS CATCHER
1. Lift up on grass catcher using the
frame handle.
2. Remove grass catcher with clippings
from under lawn mower handle.
3. Empty clippings from bag using both
frame handle and bag handle.
NOTE: Do not drag the bag when
emptying; it will cause unnecessary wear.
4ulcher door
Open mulcher door
Grass
frame
h_dle
•Bag
handle
TO CONVERT
MOWER
Your lawn mower was shipped ready to
be used as a mulchar. To convert to
bagging or discharging:
REAR BAGGING
• Open rear door and remove mulcher
plug. Store mulcher plug in s safe
place.
• You can now install the grass catcher.
• To convert to mulching or discharging
operation, install mulcher plug into rear
discharge opening of mower,
Discha_Je
deflector _.
Muncher
8
SIMPLE STEPS TO REMEMBER WHEN
CONVERTING YOUR LAWN MOWER
FOR MULCHING 1. Rear mulcher plug installed.
2. Mulcher door closed.
FOR REAR BAGGING 1. Rear rnulcher plug removed.
2. Grass catcher installed.
3. Mulcher door closed.
FOR SIDE DISCHARGING 1. Rear rnulcher plug installed.
2. Side discharge deflector installed.
a_CAUTION: Do not run your lawn mower
without rear mulcher plug in place or
approved grass catcher in place.
Never attempt to operate the lawn mower
with the rear door removed or prepped
open.
BEFORE STARTING ENGINE
ADD OIL
Your lawnmower is shipped without oil in
the engine. Engine holds 20 oz. of oil.
For type and grade of oil to use. see
=ENGINE" in Maintenance section of this
manual.
1. Be sure lawnmower is level and area
around oil fill is clean.
2. Remove engine oil cap and fill to the
full line on the dipstick. Pour oil slowly.
Do not over fill.
NOTE: Allow oil to settle down into engine
for accurate reading. To read proper level,
tighten engine oil cap, then remove it to
read the dipstick.
3, Reinstall engine oil cap and tighten.
• Check oil level before each use. Add
oil if needed. Fill to full line on dipstick.
• Change the oil after every 25 hours of
operation or each season. You may
need to change the oil more often
under dusty, dirty conditions.
ADD GASOLINE
• Fill fuel tank. Use fresh, clean, regular
unleaded gasoitne with a minimum of
87 octane. Do not mix oil with gasoline.
Purchase fuel in quantities that can be
used within 30 days to assure fuel
freshness.
AWARNING: Experience indicates that
alcohol blended fuels (called gasohol or
using ethanol or methanol) can attract
moisture which leads to separation and
formation of acids dudng storage. Acidic
gas can damage the fuel system of an
engine while in storage. To avoid engine
problems, the fuel system should be
emptied before storage of 30 days or
longer. Drain the gas tank, start the
engine and let it run until the fuel lines
and carburetor areempty. Usefresh fuel
next season. See Storage Instructionsfor
additional information. Never use engine
or carburetor cleaner products in the fuel
tank or permanent damage may occur.
A CAUTION: Fillto bottom of gas tank
filler neck. Do not overfill. Wipe off any
spilled oil or fuel. Do not store, spill or use
gasoline near an open flame.
tiller cap
Engine oil cap
TO START ENGINE
• NOTE: Due to protective coatings on the
engine, a small amount of smoke may be
present dudng the initial use of the
product and should be considered
normal.
1. To start a cold engine, push primer
three (3) times before trying to start.
Use a firm push. This step is not
usually necessary when starting an
engine which has already run for a few
minutes.
2. Hold operator presence control bar
down to the handle and pull starter
handle quickly. Do not allow starter
rope to snap back.
TO STOP ENGINE
• To stop engine, release operator
presence control bar.
NOTE: In cooler weather it may be
necessary to repeat pdming steps. In
warmer weather over pdming may cause
flooding and engine will not start. If you do
flood engine, wait a few minutes before
attempting to start and do not repeat
priming steps.
MOWINGTIPS
• Under certain conditions, such as very
tall grass, it may be necessary to raise
the height of cut to reduce pushing
effort and to keep from ovedoading the
engine and leaving clumps of grass
clippings. It may also be necessary to
reduce ground speed and/or run the
lawn mower over the area a second
time.
• For extremely heavy cutting, reduce the
width of cut by overlapping previously
cut path and mow slowly.
• For better grass bagging and most
cutting conditions, the engine speed
should be set in the fast position.
• Pores in cloth grass catchers can
become filled with dirt and dust with usa
and catchers will collect less grass. To
prevent this, regularly hose catcher off
with water and let dry before using.
• Keep top of engine around starter clear
and clean of grass clippings and chaff.
This will help engine air flow and
extend engine life.
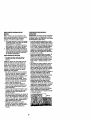
MULCHING MOWINGTIPS
IMPORTANT: Forbest performance,keep
mower hoasingfree of belt.up grassand
trash. See "CLEANING" in the Maintenance
saclJonof INs manual.
• The specialmalching blade win recutthe
grassd_ol_ngs
many timesand reduce
them in size so1hatas they fallanto the
lawn they wig cispersaintothe grassand
nofbe n_iced. Also,the mtL_rN_d
grass
will blodegradequicklyto providenutrients
f_ the lawn. Alwaysmuld_ with your
highestengine(Uabe)speedas thiswm
prov_ thebestrecurdng
ac_ ofthe
blades.
• Aveidcul_ngyourlawnwhenitlawst. Wet
grasstendsto formdumps and interferes
withthe mulchingaction. The bestlirne to
rr_w your lawn is the early aftemcon. At
thistime the grass has drlad andthe newly
cut area wil nct be expessd to the direct
San.
• For bestresults, adjustthe lawn mower
cuttingbeight sothat the lawn mowercuts
offonlythe top one-thirdof the grass
blades. If the lawn is overgrownit wil be
necessaryto ralae1beheightof cut to
reducepushi_ effortand to keepfrom
overloadingthee_ine and leaving
c_rnps of mulchedgrass.For extremely
heavy mt_Nng, reduceyourwidthof cut
by overlapping previously cut path
rnmvs_owly.
• Certain typss of grassand grasscondi_ons
may requiretl'_:|tan area be mulcheda
secondtlmatocomp_ely hidethe
clippings.When doinga ssoond out, mow
across or peq_endct_arto the fi_stcut path.
• Change your cut_ngpattemfrom week to
week. Mow northto southcoe wask than
dnangeto sast to west the nextwssk. This
vallhelp preset mailing and grainingof
the lawn.
'
10
"i
Max 1/3
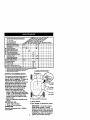
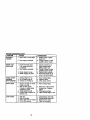
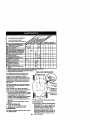
MAINTENANCE
SCHEDULE
FILL IN DATES
AS YOU COMPLETE
REGULAR SERVICE
SERVICE DATES
CheCk for LoOse FaSteners
Clean4nspect Grass Catcher
I1_
(If Equipped)
Clean
Lawn Mower
Clean Under Drive Cover
(Power-Propelted Mowers)
Check ddve beW Ileys
IPower.Propell_owersi
I,,/
I_
_
1'_
I//
fl_
Check/Sharpen/Replace Blade
t#/3
Lubrication C_lad
Clean Battety/Recha
_
_pS
I_
lt_4
IEleCtric
Start
Mow_sr_
Check Engine Og Level
!Chan_le Engine Oil
Clean Air Filter
Inspect Muffler
_/
_!,2
Ii/ 2
v'
Clean or Replace Spark Plug
_leplace Air Filter Paper Cartridge
Tha warrar_ on thislawn mower does nct
coveritemsthat havebeen subjectedto
operator_
or negigence. To receive full
valuefrom the warranty,operatormust
maintainnx_weras iastruded in thismanual.
Some a_ustmeets wil need to be made
periodicallyto properlymaintainyourunit.
AI acquslmeetsIn the Service andA_ustmerits sec',iono_tfis manuel shouldbe
checked st least once eedn season.
• Once a year, replece the spa_kplug,
replaceair filterelementand check blade
for wear. A new sperkiolugand _
air filterelementassureproperair-fuel
_re
and halp your engine mn bstter
and last longer.
• Followthe maintenancescheduleIn this
manual.
BEFORE EACH USE
1. Check engine oil level.
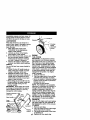
2. Check for loose fasteners.
LUBRICA11ON
ll/
11_2
;pdng
bracket
_
_
_
door hinge pin
Rear
door hinge
(_
Handle bracket mounting pins
_) Spray lubdcant
See "ENGINE" In Maintenance
Keep unitwell lubdcated(See "LUBRICATION CHAR"r ).
11
section.
IMPORTANT: Do not oil or grease
plastic wheel bearings. Viscous
lubricantswill attract dust and dirt that
will shorten the life of the self-lubricating beedngs. If you feel they must be
lubricated, use only a dry, powdered
graphite type lubricant sparingly.
3RODUCT
SPECIFICATIONS
;ERIAL NUMBER:
DATE OF PURCHASE:
SASOLINE CAPACITY/TYPE:
1.5 QUARTS (UNLEADED REGULAR)
DILTYPE (API-SF-SJ):
SAE 30 (ABOVE 32°F); SAE 5W-30 (BELOW 32°F
)IL CAPACITY:
20 OUNCES
SPARK PLUG (GAP: .045")
CHAMPION RJ19LM4
BLADE BOLT TORQUE:
35-40 FT. LBS.
, The model and sedal numbers will be found on a decal attached to the rear of the
lawn mower housing. Record beth serial number and date of purchase in the space
provided above.
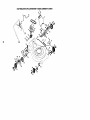
TO REPLACE BLADE
LAWNMOWER
Alwaysobservesafetymisswhenperforming 1. Position the blade adapter on the
engine crankshaft. Be sure key in
any maintenance.
"nRES
adapter and crankshaft keyway are
aligned.
• Keeptiresfreeofgasoline,
oil,or insect
control
chemicals
whichcanharmrubber. 2. Position blade on the blade adapter
aligning the two (2) holes in the blade
• Avoidstumps,
stones,dsap rids,sharp
with the raised lugs on the adapter.
objects
andotherhazardsthatmay cause
3. Be sure the trailing edge of blade
tire damage.
(opposite sharp edge) is up toward the
BLADE CARE
engine.
Forbest results,mowerblademustbe
4. Install the blade belt with the lock
kept sharp. Replacebentor damaged
washer and hardened washer into
blades.
blade adapter and crankshaft.
TO REMOVE BLADE
1. Disconnect spark plug wire from spark
plug and place wire where it cannot
come in contact with spark plug.
2. Turn lawn mower on its side. Make
sure air filter and carburetor are up.
3. Use a wood block between blade and
mower housing to prevent blade from
tuming when removing blade bolt.
NOTE: Protect your hands with gloves
and/or wrap blade with heavy cloth.
4. Remove blade belt by turning counterclockwise.
5. Remove blade and attaching hardware (bolt, lock washer and hardened
washer).
NOTE: Remove the blade adapter and
chec_ the key inside hub of blade adapter.
The key must be in good condition to work
properly. Replace adapter ff damaged.
5. Use block of wood between blade and
lawn mower housing and tighten the
blade belt, turning clockwise.
• The recommended tightening torque is
35-40 ft. Ibs.
IMPORTANT: Blade bolt is grade 8 heat
treated.
Crankshaft
Key_
/ keyway
Blade
bolt
washer
12
Trailing edge
shaft
Blade adapter
TO SHARPEN BLADE
NOTE: We do not recommend sharpening
blade - but if you do, be sure the blade is
balanced.
Care should be taken to keep the blade
balanced. An unbalanced blade will cause
eventual damage to lawn mower or
engine.
• The blade can be sharpened with a file
or on a gdnding wheel. Do not attempt
to sharpen while on the mower.
• To check blade balance, drive a nail
into a beam or wall. Leave about one
inch of the straight nail exposed. Place
center hole of blade over the head of
the nail. If blade is balanced, if should
remain in a horizontal potion. If either
end of the blade moves downward,
sharpen the heavy end until the blade is
balanced.
GRASS CATCHER
• The gross catcher may be hosed with
water, but must be dry when used.
• Check your grass catcher often for
damage or deterioration. Through
normal use it will wear. If catcher needs
replacing, replace only with a manufacturer approved replacement catcher.
Give the lawn mower model number
when ordedng.
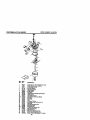
DRIVE WHEELS
5. There are arrows embossed on both
sides of the pinion gear. With the
arrow at the top of the pinion, the
arrow must point towards the front of
the mower. If the arrow points to the
rear of the mower, turn the pinion
around, then assemble to mower.
6. Place wheels back on adjuster axles.
7. Replace Iocknuts and hubcaps.
Incorrect
Wave
Washer
Pinion
E-itng,
cover
Washers
Dust
Locknut
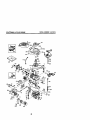
ENGINE
LUBRICA'nON
UseonlyNgh_
detergent
oilratedwith
APIservineclassification
SF.SJ. Selectthe
oil'sSAEviscosity
gradeaccording
to your
expectedoperatingtemperature.
Check rear drive wheels each time you
mow to be sure they move freely. The
wheels not turning freely means trash,
grass cuttings, etc., may be inside the
drive wheel and dust cover area and must
be cleaned out to free drive wheels.
If necessary to clean the drive wheels,
check both rear wheels.
1. Remove hubcaps and Iocknots.
2. Remove wheels from wheel adjuster
axles.
3. Remove any trash or grass cuttings
from inside the dust cover, pinion and/
or drive wheel gear teeth.
4. If you remove the drive pinions, wipe
clean with dry cloth. Reassemble dry.
Do not lubricate. Do not use oil or
grease.
NOTE: The pinion gears, on both sides of
the mower, are the same, however, they
must be installed correctly. If installed
incorrectly,the ddve system will not work.
'F
._
TBaPEI_RE
O.
_G
3_
_-
4_
E ANTICIPATED
SO.
MFOI_
e6-
IOG-
N_CT OL CHANOE
I
NOTE: Althoughmul_.viscssifyoils15W30,
10W30 etc.) improvestar_g in coldweather,
these multi-viscssify
ois wil rasult in
increasedollconsu_oUnowhen used above
32°E Check yourengine nillavel more
fre_uanUy
toevoUpo_Ue en_nedemage
from ronninglow on oi.
Changethe oil afterevery 25 houraof
operationor at leastonce a yeer ifthe lawn
mower ls notussd for25 hoursin or,e yeer.
Check the crankcase nillevel beforestarling
the angine aml aftereechfive (5) hoursof
cor_nuo_use.T_i_ten
nilplugsecurely
each ifma you cbeck1henil levbl.
13
TO CHANGE ENGINE OIL
NOTE: Before tipping lawn mower to
drain oil, drain fuel tank by running
engine until fuel tank is empty.
1. Disconnect spark plug wire from spark
plug and place wlra where it cannot
come in contact wkh spark plug.
2. Remove engine oil cop; lay aside on a
clean surface.
3. Tip lawn mower on its side as shown
and drain oil into a suitable container.
Rock lawn mower back and forth to
remove any oil trapped inside of
engine.
4. Wipe off any spilled oil from lawn
mower or side of engine.
5. Fill engine with oil. (See =ADD OIL" in
the Operation section of this manual).
6. Reconnect spark plug wire to spark
plug.
Collar
Turn
:lockwise to
CUp
remove
Slot
Airfilter
Air filter cover
Turn
counterclockwise to tighten
MUFFLER
Inspect and replace corroded muffler as it
could create a fire hazard and/or damage•
SPARK PLUG
Replace spark plugs at the beginning of
each mowing season or after every 100
hours of operation, whichever occurs first.
Spark plug type and gap setting are
shown in =PRODUCT SPECIFICATIONS"
in Maintenance section of this manual.
CLEANING
AIR FILTER
Your engine will not run properly and may
be damaged by using a dirty air filler.
Replace the air filter every 100 hours of
operation or every season, whichever
occurs first, Service air cleaner more
often under dusty conditions. Do not
wash air f_er.
TO CHANGE AIR FILTER
1. Remove the air filler by turning
clockwise to the stop and pull away
from collar.
2. Remove filler from inside of cover.
3. Clean the inside of the cover and the
collar to remove any dirt accumulation.
4. Insert new filler into cover.
5. Put air filler cover and filler into collar
aligning the tab with the slot.
6. Push in on cover and turn counterclockwise to tighten.
IMPORTANT: For bestperformance, keep
mower housingfree of built-upgrsssand
trash. Clean undersideofmower housing
_ter eachuse.
A,CAUTION: Disconnect spark plug wire
from spark plug and place wire where it
cannot come in contact with the spark
plug.
• Clean the underside of your lawn
mower by scraping to remove build-up
of grass and trash.
• Clean engine often to keep trash from
accumulating. A dogged engine runs
hotter and shortens engine life.
• Keep finished surfaces and wheels free
of all gasoline, oil, etc.
• We do not recommend using a garden
hose to clean lawn mower unless the
elactdcal system, muffler, air fitter and
carburetor are covered to keep water
out. Water in engine con result in
shortened engine life.
14
ACAUTION:
Before performingany
service or adjustments:
1. Release control bar and stop engine.
2. Make sure the blade and all moving
parts have completely stopped.
3. Disconnect sped<plug wire from spark
plug and place where it cannot come
in contact with plug.
LAWN MOWER
TO ADJUST CUTTING HEIGHT
See "TO ADJUST CU'I-I'ING HEIGHT" in
the Operation section of this manual.
REAR DEFLECTOR
The rear deflector, attached between the
rear wheels of your mower, is provided to
minimize the possibility that objects will
be thrown out of the rear of the mower
into the operator mowing position. If the
deflector becomes damaged, it should be
replaced.
TO ADJUST HANDLE
The handle on your lawn mower has
three (3) height positions - adjust to
height that suits you.
• Squeeze the bottom ends of lower
handle towards each other until the pin
in handle con be inserted into one of
the three height adjustment holes.
3-position
handle
bracket
Low
TO ASSEMBLE GRASS CATCHER
1. Put grass catcher frame into grass bag
with dgid part of beg on the bottom.
Make sure the frame handle Is outside
of the bag top.
2. Slip vinyl bindings over frame.
NOTE: If vinyl bindings are too stiff, hold
them in warm water for a few minutes. If
bag gets wet, let it dry before using.
ACAUTION: Do not run your lawn mower
without clipping deflector or approved
grass catcher in place. Never attempt to
operate the lawn mower with the rear
door removed or propped open.
Catcher _-__
frame
_
Frame
ENGINE
opening
ENGINE SPEED
Yourengine speed has been factorysst. Do
nct sttempt to incresseenginespeed or it
mayresuit_npersco_hjury,it youbellave
thetthe engine is mrlning tco fast or tco slow,
take ycor lawn rnowerto a Seamor other
quarriedservicecenter for repairand
adjustment
CARBURETOR
Yourcarburetor has a non-adjustablegxed
main Jetfor rnlxturecontrol If yourengine
does nutoperate propedydueto suspectsd
carburetorproblems, take your lawn mower
to a Seam or olherqusit_l ssrv_ conterfor
repairand a_ustmant.
IMPORTANT: Nevertamper wilhthe angine
gevernor, whichisfactory sef lor proper
eng_e speed.Overspeed_g
theeng_e
above the factory_
speed settingcan be
dangerous. If ysu thi_ the engine-governed
high speed needs adjusSng,cofltac_ycor
nearestSeam or other qualifiedservice
cer,ter, v/n_ I'_s pro_r equ_omentencl
experienca to make any necassary
edjuslments,
15
Immediately prepare your lawn mower for
storage at the end of the season or if the
unit will not be used for 30 days or more.
LAWN MOWER
When lawn mower is to be stored for a
period of time, clean it thoroughly, remove
all dirt, grease, leaves, etc. Store in a
clean, dry area.
1. Clean entire lawn mower (See
"CLEANING" in the Maintenance
section of this manual).
2. Lubricate as shown in the Maintenance section of this manual.
3. Be sure that all nuts, bolts, screws, and
pins are securely fastened. Inspect
moving parts for damage, breakage
and wear. Replace if necessary.
4. Touch up all rusted or chipped paint
surfaces; sand lightly before painting.
HANDLE
You can fold your lawn mower handle for
storage.
1. Loosen the two (2) handle knobs on
sides of the upper handle and allow
handle to fold down to the rear.
2. Squeeze the bottom ends of lower
handle toward each other until pins in
handle clear the brackets and pivot
entire handle assembly forward and
allow it to rest on mower.
• When setting up your handle from the
storage position, the lower handle will
require manually locking into the
mowing position.
IMPORTANT: When folding the handle
for storage or transportation, be sure to
fold the handle as shown or you may
damage the control cables.
pin
J
3-Positico
handle
adjustment
bracket
ENGINE
FUEL SYSTEM
IMPORTANT: It Is important to prevent
gum deposits from forming in essential
fuel system parts such as carburetor, fuel
filter, fuel hose, or tank during storage.
Also, expedance indicates that alcohol
blended fuels (called gesohol or using
ethanol or methanol) can attract moisture
which leads to separation and formation
of acids dudng storage. Acidic gas can
damage the fuel system of an engine
while in storage.
1. Drain the fuel tank.
2. Start the engine and let it run until the
fuel lines and carburetor are empty.
• Never usa engine or carburetor cleaner
products in the fuel tank or permanent
damage may occur.
• Use fresh fuel next season.
NOTE: Fuel stabilizer is an acceptable
alternative in minimizing the formation of
fuel gum deposits during storage. Add
stabilizer to gasoline in fuel tank or
storage container. Always follow the mix
ratio found on stabilizer container. Run
Operatorpresence-_
engine at least 10 minutes after adding
controlbar
.,_/ Fold
,,_"_-._
stabilizer to allow the stabilizer to reach
//// forward//
!:_ the carburetor. Do not drain the gas tank
Upperhandme--.._.//
for
,,_'//
//fS" and carburetor if using fuel stabilizer.
ENGINE OIL
Lower
/
Drain oil (with engine warm) and replace
with clean engine oil. (See "ENGINE" in
the Maintenance section of this manual).
CYLINDER
1. Remove spark plug.
2. Pour one ounce (29 ml) of oil through
spark plug hole into cylinder.
3. Pull starter handle slowly a few times
position
to distributeoil.
164. Replace with new spark plug.
rVi//
=or goJ/
CIPHER
• Do not store gasoline from one season
to another.
• Replace your gasoline can if your can
starts to rust. Rust ann/or dirt in your
gasoline will cause problems.
• If possible, store your unit indoors and
cover if to give protection from dust and
dirt.
• Cover your unit with a suitable protective cover that does not retain moisture.
Do not use plastic. Plastic cannot
breathe, which allows condensation to
form and will cause your unit to rust.
IMPORTANT: Never cover mower while
engone and exhaust areas are still warm.
CAUTION:Never store the lawn mower
with gasoline in the tank inside a building
where fumes may reach an open flame or
spark. Allow the engine to cool before
storing in any enclosure.
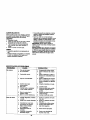
TROUBLESHOOTING
CHART
PROBLEM
CAUSE
Does not start
CORRECTION
1. Dirty air filter.
2. Out of fuel.
3. Stale fuel.
4. Water in fuel.
5. Spark plug wire is
disconnected.
6. Bad spark plug.
7. Loose blade or broken
blade adapter.
8. Control bar in released
position.
9. Control bar defective.
Loss of power
1. Rear of lawn mower
housing or cutting blade
dragging in heavy grass.
2. Cutting too much grass.
3. Dirty air filter.
4. Buildup of grass, leaves,
and trash under mower.
5. Too much oil in engine.
6. Walking speed too fast.
Poor cut uneven
1. Wom, bent or loose blade.
2. Wheel heights uneven.
3. Buildup of grass, leaves
and trash under mower.
17
1. Clean/replace air filter.
2. Fill fuel tank.
3. Drain tank and refill with
fresh, clean fuel.
4. Drain fuel tank and
carburetor and refill tank
with fresh gasoline.
5. Connect wire to plug.
6. Replace spark plug.
i 7. "r]ghtenblade bolt or
replace blade adapter.
8. Depress control bar to
handle.
9. Replace control bar.
1. Set to =Higher Cut"
position.
2. Set to =Higher Cut"
position.
3. Clean/replace air tilter.
4. Clean underside of mower
housing.
5. Check oil level.
6. Cut at slower walking
speed.
1. Replace blade. Tighten
blade bolt.
2. Set all wheels at same
height.
3. Clean underside of
mower housing.
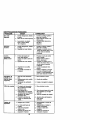
TROUBLESHOOTING
PROBLEM
Excesslve
vlbratlon
I.
CHART
CAUSE
CORRECTION
Worn, bent or loose blade.
2. Bent engine crankshaft.
Starter rope
hardto pull
1. Engine flywheel brake
is on when control bar
is released.
2, Bent engine crankshaft.
3. Blade adapter broken.
4. Blade dragging in grass.
1. Replace blade, Tighten
blade bolt.
2. Contact a Sears or other
qualified service center.
1. Depress control bar to
upper handle before
pulling starter rope.
2. Contact a Sears or other
qualified service center.
3. Replace blade adapter.
4. Move lawn mower to cut
grass or to hard surface.
Grass catcher
not filling
(If so equipped)
1. Cutting height too low.
2. Lift on blade wom off.
3. Catcher not venting air.
1. Raise cutting height.
2. Replace blade.
3. Clean grass catcher.
Hard to push
1. Grass is too high or wheel
height is too low.
2. Rear of lawn mower
housing or cutting blade
dragging in grass.
3. Grass catcher too full.
4. Handle height position not
right for you.
1. Raise cutting height.
1.
2.
3.
4.
1.
2.
3.
4,
Loss of drive
Belt wear.
Belt off of pulley.
Drive cable worn or broken.
Dirt in ddve pinions.
18
2. Raise rear of lawn mower
housing one (1)setting
higher.
3. Empty grass catcher.
4. Adjust handle height to suit.
CheclVreplace drive belt.
Check/reinstall drive belt.
Replace ddve cable.
Clean drive pinions.
Garantla ......................................................... 19
Reglas de Seguddad ................................ 19-21
Montaje ...........................................................
22
Operacibn .................................................
23-27
Mantenirniento .......................................... 28-31
Programa de Mantanimianto .......................... 29
Espesiflosciones del Produnto ...................... 29
Servicio y Adjustes ........................................ 32
Almacanamiento ....................................... 33-34
Idantificaci6n de problemas ..................... 34-35
partes de mpuesto ..................... Vea el manual
inglds del duefio
Ordan de Partes ............................. Contratapa
GAP,ANTJAUMITADA DE DOS AltOS PAPALA SEGADORA A MOTOR CRAFTSMAN
Por dua (2) a_os, a partir de la fecha de compra, cuando esta Segadora Craftsmanse mantenga,
lubrk:pey afmeseg_n las instrucdanespars la operacidny al mante_imiantoan al manual del duefio,
Sesrs mparard graifstodo ctzfecto es al materialy la rnanode obra.
Si la Segadora Craftsmanse usa para fines c_meralaleso de a.,dendo,esta garantla s_o se aplka por
noventa (90) dfasa par_ de la fecha de c<xnpra.
Esta Garantia no cubre:
• Artk;t_s qua se desgastan duranteel uso n_mal tales oornolas cuchigassegadoras _s,
les
adaptadoresde la cucNIla, las coweas, los fin_s de airs y las bujfas.
• Reparackx_esnesesariesdebido al abuso o a la negliganc_adel opstador,induy_ndose a lua
cig0_r_es dobladosy a !a falta de mantenimiantode]equipo segdn las inslzucdonesqua se induyan
en el manualdel duefio.
EL SERVIClO DE GARANTJA ESTA DISFONIBLE al devok.erla segad_a a motorCrattsman al centrQ/
deparlmentode sswldo Sesrs mas cercano an los Estados Ur'_dos.Esta garantla se aplk:aso_arnante
_
al prod,._o eote an uso an los Estadco Undo_
Esta Gamntfa le otorga derechos legales especffioos,y puede que tambk_ntenga o_zosderechos qua
vadan de estado a estade.
Seres, RoebuckandC_,D/817WA,
HoflmanEstates, lL 60179 USA
IMPORTANT1E: Esta maquina cortadaora es capaz de amputar les manos y los manos y los
pies y de lanzar objetos. Si no se observan las instrucciones de seguridad siguientes se puedan
producir lesiones graves o la muarte.
I. OPERACION
* Antes de empezar, debe familiarizarse
completamante con los contrdes y el uso
con-eclo de la maquina. Pars esto, debe leer
y comprender todas las instrucciones qua
aparecon en la maquina yen los manuales
de opemdbn.
• No ponga los manos o los pies cerca o
debajo de las parles rotatorias. Mant6ngase
alempre leJosde la abertura de la descarga.
• Permita que solamante las personas
responsables que est6n famUiadzades con
les instrucciones opemn la rr_quina.
• DespeJe al _tres de objetos tales como
piedras, Juguotes, alambres, huesos, palos,
etc. ClUepuaden set recogides y lanzados
por las nuchilles.
• Asegt_rese que el Area no se hallan
petcones, antes de segar. Pare la n_quina
si alguian entra en el _tres.
• No opera la maquina sin zapatos o can
sandalias abiertas. Pbngase siempre
zapatos s61idos.
• No tire de la segadora hacia at_s a manos
qua sea absolotamante necesade. Mira
siempre hacia abajo y hada detrds antes y
mientras que se mueve hacia atrds.
• No opere la segadora sin los respec_vos
resguardos, las placas, el recogedor de
c6sped u otros adifamantos dise ados pars
su protecck_ny segundad.
• Refi6rase alas instrucciones del fabdcante
pars el funcionamiento e instalacibn de
accesodos. Use _nicamante accesonos
aprobados por el fabdcante.
• D_enga la cuchi;la o las cuchiUes cuande
cnx_ per calzadas, calles o caminos de
grays,
• Parar el motor cads Vez qos se abandona
el aparato, antes de limpiar la segadora o de
remover residuos del tubo.
• Apagar el motor y espemr hesta que les
cuchilles es16n completarnente parades
antes de remover el receptor de hlerba.
• Segar solamante con luz del d|a o con uos
buena luz artificial.
19
• Noopere
lambquina
bajelainfluencia
del
alcohol
odelasdrogas.
• Nunca opere la rnaquina cuando la hierba
est6 mojada. Aseg0rese siempre de tener
buena traccibn en sus pies; rnantenga el
mango flrmemante y candne; nunca corm.
• Descanectar el mecanismo de propulslbn
autbnoma o el embrague de tmnsmisibn en
las segadores que Io tienen antes de pouer
en rn_mha el motor.
• Si el equipo empezam a vibmr de una
manara anormal, pare el motor y revise de
inrnediato pare avariguar la cause.
Generalmante la vibraelbn suele indicar que
existe alguna aveda.
• Siempre use gafas de seguddad o anteoJos
con protecci6n lateral cuando opere la
segadora.
II. OPERACION
SOBRE
I.AS
CUESTAS
Los accidantes ocurren con rnds frecuancia
en las cuestas. Estos accidantes ocurren
debido a resbalades o cafdas, las cuaJes
pueden resultar an graves leslones. Operar la
recortadora en cuestas requiere mayor
concentmcibn. Si se elente inseguro an una
cuesta, no la recorte.
HACER:
• Puede recortar a troves de la supedicie de
la cuesta, nunca hacia arriba y hacla abajo.
Proceda con extrema precaucibn cuando
cambie de direccibn en las cuestas.
• Renueva todos los objetos extra_os, tales
como guFjarros, rarnas, etc.
• Deha prestar atenck_n a hoyos, baches o
protuberancias. Recuerde que la hierba alta
puede esconder obstdculos.
NOHACER:
• No recorm cerca de pendientes, za_as e
terraplenes. El oparador puede perdar la
tmccibn an los pies o el equilibdo.
• No recorte cuestes demasiado inclinades.
• No recorte en hierba mojade. La reduccibn
en la tracci6n de la pisada puede causar
resbalones.
III.NII_IOS
• Nunca permita ClUelos ni_es operen la
mdquina.
• Tenga un cuidado extra cuando se aserque
a esquinas donde no hay visibilidad, a los
arbustos, drboles u otros objetos que
pueden interfedr con su lines de visibn.
IV. SERVIClO
• Tenga cuidado exlm al manejar la gaselina
y los darnerscombustibles. Son inflamables
y los gases son explosives.
- Use solamente un envase aprobado.
- Nunca remueva la tapa del dep_sito de
gasolina o agregue combustible con el
motor funcionando, parmita que el motor
se enffie antes de volvar a pone
combustible. No fume.
- Nunca vuelva a pcaer combustible an la
rndquina en recintos carmdos.
- Nunca almacane la rr_quina e el envase
del combustible dentin de algdn lugar an
donde haya una llama expuesta, tel como
la del calentador de ague.
• Nunca haga funcionar ana rr_quina dentro
de un dres cermda.
• Nunca haga ajustes o reparaciones
miantres el motor est6 en marcha.
Desconecte el cable de la buj|a, y
mantdngalo a clerta distancia de dsta para
prevenir un arranque accidental.
• Mantenga las tuercas y los pemos,
especialmente los pernos del accesorio de
la cuchilla, apretados y mantenga el equipo
en buenas condiclones.
• Nunca manipule de forma indebida los
dispoeltivos de segudded. Contrele
regularmante su fuecionamianto correcto.
• Mantanga la mdquina libre de hierba, hojas
u otras acumulaclones de desperdiclo.
LJmplelos darrames de acaite o combustible. Permita que la mdquina se enfde antes
de almacer_da.
• Pare e inspeccione el equipo el le pega a un
objsto. Repdrelo, si es cacesario, antes de
hacedo arrancar.
• En ningOncase hay que regular la altara de
las ruedes mlentras el motor est_ en
marcha.
• Los componentes del receptor de la hierba
van sujetos a desgaste, daf_os y deterloro,
que pueden expcaer las partes an
m_/imiento o permitir que objetus sean
disparados. Contrntar frecuentemante y
cuando sea necesario susYnuircon partes
aconsejadas por el fabdcante.
• Las cuchillas de la segadora estdn afilades
y pueden cortar. Cubnr las h_jas o Ilevar
guantes, y utilizar precaudones especla|es
cuando se efent0a mantenimiento anbm las
mismas.
Se pueden producir accidentes tr_gicse si el
operader ne presta atencibn ala presencia de
los ni_os. A menudo, los niSos se sJanten
etraldse por la mdquina y por la antividad de la
siega. Nunca suponga que los nifios van a
permanecar an el mismo lugar donde los vio
por Oltima yes.
• Mantanga a los nif_es elejados del _lrea de la
siege y bajo el cuidado estdcto de otra
persona adulta respousable.
. Est_ alerta y apague la mdquica el hay niSos
• No cambie el ajuste del regulador def motor
que antran al dres.
ni exceda su velocidad.
• Antes y caando este retrocediendo, mire
hacia at_ y hacia abajo para variflcar si
hey nil_os peque_os.
20
_Busque este slmbolo clue sef_ala las
prerecaucionesde seguddad de importancia.
Quiere decir - iIIATENCI(_N!!IIIIESTE
ALERTO!!! SU SEGURIDAD ESTA
COMPROMETIDA.
_,ADVERTENClA:
Siempre desconecle el
alambre de la bujfa y p(_galo donde no pueda
entrar en contacto con la bujla, para eVrtar el
arranque por accidente, durante la
preparacibn, el transporte, el ajuste o cuando
se hacen mpamciones.
_DVERTENCIA:
Los bomes, terminales y
accesodos relativos de la baterla contienen
plomo o compuestos de plomo, produclos
qufmlc_; conocidos en el Estado de California
como causa de c_tncer y defectos al
nacimlento u otros daSos reproductivos. Lavar
las manos despmts de manipulados,
_s.DVERTENCIA:
El tubo de escape del
motor, algunos de sus constituyentes y
algunos componentes del vehfculo contienen
o desprenden productos qulmicos co_ocidcs
en el Estado de California como causa de
cdncer y defectos al nacimiento u otros da_os
reproductivos.
Estosacoss_ios estaban disporibles cuando se produjo la segadora. No son fadlltados Junto al
cortaceesped, Estdndispo_bles en _ mayoda de las _er_bs de SeaJ's yen los cenlros de servicio.La
rnayodadelastiendasSeaxstambidn puede_ mandarapedir partesderepuestoparausted, siJes
_
el n0rnem del mode/o de su segadora. Algunos de estos accesodostaJvez no se apliquena
su segadora.
RENDIMIENTO
PARA SEGADORAS
DE LA SEGADORA
CON DESCARGA
TRASERA
JUEGOS PARA LA ACOLCHADORA
SEGADORAS
CON DESCARGA
TRASERA
MANTENIMIENTO
SEGADORAS
(;ON DESCARGA
LAteRAL
£NVASE$
DE GASOLINA
DE LA SEGADORA
SILENClAiDORES
CORREAS
ESTABlUZADORE$
CUCHILLAS
RLTROSDE_RE
DE CUCHILLA
21
BUJJAS
RUEDA$
ACEflrE
DELMOTOR
Lea estas instrucciones y el manual
completamente antes de tratar de montar u
oparar su segadora nueva.
IMPORTANTE: Este co_acesped viene SIN
ACEFFE O GASOLINA en el motor.
Su segadora nueva ha sido montada en la
f_bdca con la excepcibn de aquenas partes
que se dejamn sin momar por razones de
envfo, Todas las partes corno las tueross, las
arandelas, los pernos, etc,, que son
necesarias para coml_etar el montaje ban side
colocadas en la bolsa de partes. Para
asegurarse que su segadom lunoioos en
forma segura y adecuada, todes las partes y
los artfculos de ferreteda que se monten
tienen que ser apretados segummente. Use
las herramientas correctas, como sea
necesado, para asegumr que so apr_eten
adecuadamente.
3.
Rernueva el matedal de empaque de
alrededor de la barm de control.
Sus mangos pueden ajustarse para que le
acomode al segar. Refi6rase a la secci6n de
ServicJo y Ajustes en este manual.
Barra de control,
la presencia del opemdor
Mango supedor
Mango Infed(x _
PARA REMOVER LA SEGADORA DE
LA CAJA DE CARTON
Poslcl6n para segar
I.
Remueva las partes sueltas que se
incluyen con la segadora.
2. Corte las dos esquinas de los extremos de
la osja de cartdn y tienda el panel del
extrerno piano.
3. Remueva todo el matedal de empaque,
excepto la cu6a entre el mango supedor y
el inferior, y la curia que sujeta la harm de
los control que exige la presencia del
operador junto con el mango supedor.
4. Haga rodar la segadom hacla aluera de la
caja de cart6n y revfsela cuidadesamente
para verificar si todavla quedan partes
sueltas adiciona_es.
PInza del mango
Soporte de
ajuste mango
COMO PREPARAR SU SEGADORA
PARA DESDOBLAR EL MANGO
IMPORTANTE: Despliegue el mango con
mucho cuidado pare no pellizcar o daSar los
cables de control.
1. Levante la secckY_ del mango inferior a la
posict_n de operacibn y presioos las
extremidedes infedores del mando infedor
una en contra una de la otra hasta que la
pinza del mando pueda set insertada en
uno de los tres agujeros del control de la
altura.
2.
Levante la seccibn del mango superior
hasta la posicidn de operacibn, remueva la
cu6a protectora y apriete las manillas del
mango en forrna segura.
PARA INSTALAR LOS
ACCESORIOS
Su segadom los enviade lista para usarse
como una acolchadora de capa vegetal. Para
convertirla de mode que pueda ensacar,
mfldrase a "PAPA CONVERIR LA
SEGADORA" en la Seccibn de Operacibn de
este manuel.
22
FAMILIARICESE
CON
SU SEGADORA
LEA ESTE MANUAL DEL DUEllO Y I.AS REGLAS DE SEGURIDAD ANTES DE OPERAR SU
SEGADORA.
Compare las ilustraciones con su segadora pare farniliadzarse con la ubicaci_ de los diversos
controles y aJustes. Guarde este manual para referencia en el futuro.
Estos sfmbolos pueden apareser sobre su segadora o en la llteratura proporclonada
A3"rlENCK_NO
ADVERTEk_IA
MOTOR
ENCENI_DO
MOTOR
APAGADO
FIAPIDO
LENTO
ESTRANGU
LAGI(_N
COM_BI.E
ACFJI1E
con
PEUGRO, GUARDE LAB
MAN(_]YLOSPIES_S
Banadecontmlqueexige
)pemdor
delalmpul_6n
_ontml de zona del motor
Manllla _I mango
Cubleda de la impulsldn
Tapa del deposlto
de gasollna
Mango del ajustador de un solo
FIItro de aLre
Silenc_ador
Tapadel deposltode
acetledel motorconvarilla
indlcadorade nlvel
Peurtade la
IMPORTANTE: Este coHac_sped viene acolchadma
SIN ACEITE O GASOLINA en el motor.
Tap6nde _a
acolchadom
CUMPLE CON LOS REQUISITOS DE SEGURIDAD DE LA CPSC
Las segad(_s a motor, que se co,_uc_
desde la parte de alr_s, _,
Z_rs, cumple, c_ k_
es_tncbmsde seguddaddel Amedcan Na_onal Slardards Inslitu_ y de la U.S. Consumer Roduct
Safey Commissk_ La cuchlla gtracuando el motor est_ fundonando.
Bana de conlxol que exlge la presencia del
operador - tieneope sujetameabajo, junto c<_ el
_,
pare hac_ arrancar el mol_. Su_tela para
pararel motor.
Mango del aJustador de un solo punto - se
usa para ajustar la altum de colle de la
segadom,
Puerta do la acolchadora - pennite Ja
conversibn para la opemcibn de descatga o
ensacado,
Cebador - bornbea combus_bleadicionaJdesde el
carburadoral dlindm para uso cuando se necesita
hace" _
un molor 1rio.
Cordon arrancador - se usa para hacer
Barm de conbol de la Impulsion - se usa para
enganchar b segadora para movink_o hacla
ade/a/lte impulsadaa mot_.
Tapon de la acolchadora - siluada eft la at_lura
de la descan_ lmsera y debe set opilada cuando
se convlerteb opmcddn de ensacado a
descarga.
Palanca de control de la Impulsion - se usa
para enganchar la segadora para movimiento
23
hacJa ade_ante impulsada a motor.
_La
operacibn de cualquier
• [P' _
]segadora puede hacer que salten
_
_L
Jobjetos
extra_os denVo de sus
_ojos,
lo que puede producir
_dal_os
graves en 6stos. Siempre
use anteojos de seguddad o proteccibn para
los ojos mientras opere su segadora o cuando
haga ajustes o reparaciones. Recomendamos
una mascara de segurided de visibn amplia,
pare uso espejuelos o anteojos de seguddad
estandarte.
COMO USAR SU SEGADORA
CONTROL DE LA VELOCIDAD DEL
MOTOR
EL IMPULSION
• La velocidad de recorrido purde ser
selecclonada moviando la palanca de
conteol de la impulsibn ala posict6n
deceada.
• Para habilitar la man;ha adelante, tirar la
barra de mande hacla el mango.
•Para
parer el movimiento hacia adelante,
alivie la barra de control de la impulsi6n.
IMPORTANTIE: Durante la utilizacidn, guarde
siempre la barra de control de la impulsion en
contra del mango.
Bane concontr_queexl
la presencladel operado_
La velodded del motorse eslablec_ en la fdbrica
para un randmiento dptmo. La veloddad no se
puede
ajus_.
CONTROL DE ZONA DEL MOTOR
Contro_
de ia
Irnpulsidndes-
_RECAUCI_N:
,Las regulac_nes federales
e_jen que se _stale un contr_ pare el motor an
esta segad_a pare reducira un n_nimo el desgo
de _
debldoal _
con la cuchina.Por
PARAAJUSTAR LA ALTURA DE
CORTE
ningdnmotivoirate de e_irnlnarla funci_ del
corrtroldel operador. La cuchillagira cuando eJ
motor est_ _.
• Su segad(xa viane _/Jipada con una bane de
conlmlque exige la presenda del opeador, Io
o_,_reo_*_o_,eeloperador
_'t_ d_r_s_
mango de b segadom pare haceda _
operada, o
y
IMPULSION DE RECORRIDO DE
VARIASVELOClDADES
• Las cumin medas son ajuslades con una
palanca
0_ica.
• 1ire de la pelanca de ajusteshada la nJeda.
Levante la segadora, rnueva la palanca haste
delar_eala po_tcidndeseada, pare bajarb
segadora, rnueva la palanca hacia la
retaguardia.
pare uncortaailo,
baJelasruedas
Le segadora dispine de varias velocidades y
permite de escoger la rnds conveniante.
• Selecclonar la velocided rnds baja para
cortar o chapodar hierba tupida y pesada.
• Selecclonar la velocidad media para cortar o
ch;_)dar hierba normal.
• Seleccionar la velocidad mds elevada pare
cortar hierba no demesiado tupida o pare
transportar tierra.
AVISO: Mover la palanca para seliccionar la
Velocidad s_o si el motor es_ an marcha.
Mango
/
pa;a uncorte baJo,
levantelas ruedas
PARA MONTARY ADJUNTAR EL
RECOGEDOR DE C#SPED
Uever de control
1. Levante la puerta trasem de le segadora
de crisped y ponga el marco del recogedor
de c6sped a denlTo de las ranuran de la
puerta trasem.
2, El recogedor de c6sped queda asegurado
en la caja de la segadora cuando se baja
la puerta trasera pare descansar en el
bastidor del recogedor de c6sped.
d_PRECAUCK_)N: No haga funclonar su
segadora sin el desviador de recodes o sin el
rec.ogedor de c6sped, aprdoados, an su lugar.
Nunca trate de operar la segadora cuando se
ha removido la puerta trasera o cuando estst
un poco abierta.
24
Ranurzs de la
Puerta
Mango del
bast[dot del
recogedor de
Gsncho lateral del
bastldor del recogedor
PARAVACIAR EL RECOGEDOR DE
CESPED
SEGADORAS
LATERAL
CON DESCARGA
• La tap_n acolchadora debe set instalada
adentro de la abertura de la descarga
trasera.
• Abra la protecci6n contra ]a descarga y
instale el desviad_ de contra la descarga
debajo de la protecci6n como se mues_'a.
• La segadom esta lista para la opemclbn de
ta descarga.
• Para convertir a la operaci6n de ensacado o
de descarga, el desvlador de la descarga
debe ser removido y la proteccibn contra ]a
descarga debe estar cerrada.
1. Levante el recogedor de c6sped usando el
mango del bastldor.
2. Rernueva el recogedor de crisped, con los
recodes, de debajo del mango de la
segadora.
3. Vacfe los reccxtes de la bolsa usando tanto
el mango del bastidor como _1 de la bolsa.
AVISO: No arrastre la bolsa cuando la wcle;
se produ_ir_ un desgaste innecesario.
Abra la proteccl_
Pcontm la descarga
Mangodel
bastJd_r
del
r_cog_or
de c6sped
Mango
de la
bc_sa
PARA CONVERTIR LA SEGADORA
Su segadora fue enviada Iista para usarse
como acolchadora de capa vegetal. Pare
converUda a una opemck_n de ensacado o de
descarga:
SEGADORAS
TRASERA
CON DESCARGA
• Abm la puerta tmsem y remueva la tapbn
acolchadora. Gudrdela en un lugar seguro.
• Puede ahora instalar el recogedor del
c_sped.
• Para volver a la opemcibn de
acolchamiento o descarga, el tapbn
acolchador en la abertura de descarga de la
segadora.
25
PASOS
SIMPLES
DERECORDAR
• CUANDO CONVIERTASU
SEGADORA
PARA ACOLCHAMIENTO
1.
2.
PAPA ENSACAMIENTO
1.
2.
3.
TRASERO
-
La tap6n acolchadera trasera rernovida.
Recogedor del c6sped instalado.
La protecci6n contra la descarga lateral
cerrada.
PARA
1.
2.
-
La tap6n anolchadora trasera instalada.
La protecclSn contm la descarga lateral
cerrada.
DESCARGA
LATERAL-
La tap6n acolchadora trasera instalada.
La proteccibn contra la descarga lateral
instalade.
PRECNJCK_N: No haga funcionar su
segadom sin la placa de la acolchadom
aprobada en su lugar, o sin el desviador de
recortes o sin el recogsdor c6sped aprobados
en su lugar. Ngnca trate de operar la segadore
cuando se hella removtdo la puerta trasera o
cuando se ha removido a puerta Vasera o
cuando est_ un poco abierta.
ANTESDIEHACERARRANCAR EL
MOTOR
AGREGUE ACEITE
Su segadora fue enviada sin acelte en el motor.
El motor puede contener 20 oz. de aceite. Par3
el tipo y la catidad vea "MOTOR" en la secci6n
de las Mantenimieoto en este manuel.
1. AsegOrese que la segadom est6 nivelada y
qos el drea alrededor del dep6sito de
acelte est6 limpia.
2. Remueva la tapa del depbsito de aceite del
motor y rellene hasta la Iinea de llano an
8staL Vac|e el acelte lentamiente. No lo Ilane
demasiado.
AVISO: Permita que el aceite se aciente bien
en el motor para una leotura exaota. Para leer
el nivel apropiado, apdete la tapa del relleno del
acelte de motor, mmuevala pare leer la varilla
medidore del acelte.
3. Vuelva a instelar la tapa del dep6sito del
acelte y apri_tela.
• Revise el nivel del aceite antes de cade uso.
Agregue acelte si es osceserlo. Uene hasta
la Ilosa de llano en la varilla indicadore de
nivel.
• Camblo el aceite despuds de 25 horas de
operaci6n o una vez por temporeda. Puede
secesitar camblar el aceite m_ls a manudo
cuando las condiclones son polvorosas o
AGREGUE
GASOLINA
• Llese el estanque de combustible. Use
gasolloa regular, sin plomo, nueva y limpia
con el m{nimo de 87 octanos. (El uso de
gasolina con plomo aumentant los dep_itos
de d.xidode plomo y carbono y se reducird
la duraci6n de la vdlvula). No mezcle el
acede con la gasolina. Para asegurar que la
gasolina otilizada sea fresca compre
estanques los cuales puedan ser utilizados
durante los pdmeros 30 dfas.
_=ADVERTENClA:La
expedencia ha indic.ado
que los combustibles mezclados con alcohol
(conocidos como gasohol, o el use de etanol o
metanel) pueden atmer la humedad, la qua
conduce a la separaclbn y forrnaclon de
dcidos durante el elmacenamianto. La gasolina
acldica puede daF.ar el sistema del combustible de un motor durante el almacenamiento.
Pare evitar los problemas con el motor, se
debe vaciar el sistema del combustible antes
de guardado por un derfodo de 30 dlas o mds.
Vacie el estanque del combustible, haga
arrancar el motor y hdgelo funcloosr hasta que
las I[neas del combustible y el carbumdor
queden vac|os. La I_bxima temporada use
combustible nuevo. Vea las instrucciones para
El Almacenamieoto para mds informaci_.
Nunca use productos de limpleza para el
motor o pare el carbumdor en el estanque del
combustible pues se pueden producir daSos
permanentes.
_PRECABCI_N:
Llene hasta la parte infedor
del cuello de rstlono del estanque de gaso_ina.
No lo Ileos demasiado. Limpie el aceite o el
combuslible derramado. No almacane,
derrame o use gasolina cerca de una llama
expuesta.
Tapa del
Tapa d_
deposllo de acelte
SUC_aS,
26
PARAHACER
ARRANCAR
EL
MOTOR
CONSEJOS PAPA SEGAR Y
ACOLCHAR
NOTA: Debide alas capas protectoras del
motor, una cantidad paque_a de humo puede
estar presente duranto el oso iniclal del
produoto y se debe considerar normal.
1. Para hacor arrancar un motor fdo, empuje
el cebador tea (3) vecea antes (le tratado.
Empuje firn_mente. Este paso
nommlmente no os necesado cttando se
hace arrancar un motor qua ya ha estado
tuncioneado pot unos cuantos minutos.
2. Sujete la barra de conlroles que exigen la
pmsencia del opemdor abajo an el mango
y tire el mango del arreacador rApidemeate.
No permlta qua el cordon del arrancader
se devuelva abruptameate.
IMPORTAN31E: Pare obtoner el mejor readimiento
mantenga la caja de la segadma sin acurnubcbn
de odspad y basura.\_a "LIMPIF_ZA"en la secd6n
de Mantenimentode este _.
PARA PARAR EL MOTOR
• La cuchillaao01chadGraespecialva a volver a
c<xtarlos rec_tos de c_spad muchas veoss, y
los reduceea tamar3o,de modo qua si se caea
en el c_
se van a dispesarentre dste y no
se van a notar.Tambi_n, al clL_sed acotchado
se va a deshacer r='_pidamente
enlrsgando
substandas
nm_vasparsal c_sped.
S_empm
•
• Para parar el motor, suelte la bana de
controles clue exigen la prosencia del
operador.
AVISO: En climas rods frios puede qua sea
necesado repetir los peaos del cebado. En
climas rods calorosos el cebar demasiado
psede producir el ahogo y el motor no va a
arrancar. Si se ahoga el motor espam unos
cuantos minotos antes de tmtar de hacerlo
arrancar y no repita los passe del cebado.
CONSE3OS PAPA SEGAR
• Bajo ciertas condiciones, tal coma c_sped
muy alto, puede set necesario el elevar la
altuta de| corte pare reducir el estuer'zo
neceaado para empujar la segadora y pare
evitar sobrecargar el motor, dejando
montones de recortes de c&spad. Puede
qua sea necesado reducir la velocidad del
recordde y/o haga funcionar la segadora
sobre el Area por segunde vez.
• Para un corto muy pesado, reduzse el
ancho del corte pasando parcialrnenta por
enigma del lugar antedonnente codado y
siegue ieatamante.
• Para un me W ensasedo dal c6sped y para
la mayoda de ]as condiciones de colle, la
velocidad del motor debe ajustarse a la
posidt_n de r_pido.
• Los poros en los recogedores de c_kspedde
tela pueden Ilenarse con mugra y golvo con
el oso y los recogedorea recaudardn menos
cdspad. Para evitar 6sto, rocle el recogedor
con la manguera de agua, regularmente, y
d6jelo secarse antes de usado.
• Mantenga la parte supedor del motor,
alrodedor del arrancador, despejade y sin
recortes de c_sped y paja. Esto ayuderd el
flujo del atre del motor y extenderzt su
duracibn.
•
•
•
acd,che con la valocideddal motor (cuchaa)
n'_a alta, puesasi se obtead_t la major acd6n
de moode de _s cuchibs.
Evltecortaralc_spedcuandoestdmojado. []
cdsped mojadelterde a fomBr _
e
Interliem con la accibn de acokff_tdo.La major
hcra para segar al c_sped es temprano en la
tarde. A esa hora d_stese ha secado y al dma
red6n codada no queder_ expuestaal sal
dimcto.
Para obtener los meJomsresu_d_, ajuotela
altura dal cocte de la segadora de modo qua
_ta code sdamente alterclo
supederde bs
hojasde c_sped.En alcasode qua alc_sped
haya creddodemas_de, puede s_ _
al elevaf la altora del oorte para reduciral
eauerzo necesarlopara ompujarla sngadom y
pare evltar sotx'ecargarel motor, dejando
montonea de recortosde c_L%oed.
Para un
acdchamiento muy pesado, reduz_ el ancho
del c_te paeando por eacima del Ingar
antedormente codado y .s_go_ leotamente.
Ciertos _pos de cP+ped y sus condidones
pueden exigirqua tm drea tenga qua set
acotchadapor segor_a vez pare osctmder
completamentelos recortes. Cuardo se haga al
sngundocorte, sk_guealravesado o en t_-ma
perpandiculara la pasade del pdmor corte.
Cambie su pal_dnde c_te de semana a
semana. Slogoede nortea sur una semeaa y
luegosernb_e de este a oeste la ptOxima
sem,_m. Eslo evltm_:tque al _sl_d se enrede
y c_
de _Bcck_n.
I
I
La gatantla de esla segadom no culxe los
a!llctios que hart eslado sujetosal _
o a la
negligenda del q_rador. Pala recibirtodo el valor
de la garantia, el operadortiene que maniener la
segadora segOn las instnicdones descritas en
este manual
Puntal de
Hay algunos ajustes que se tienen que hacer en
f(_rna pedbdicapara poder mantenersu unidad
adecuadamente.
Tcdos los ajustes en la seccidn de Seivick) y
Ajustes de este manual tlenen que ser re_sados
per Io menos un vez por cada tempomda,
• Una vez al al_o,cami0iela bujla, I_
o caniY_
el elemento del flVo de aim y revise si la cudilla
est_ desgastada. Ur_ bujfarlueva y un
elerne_to del flltrode aim limpkYnue/oaseguran
la mezcb de _
adecuada y
ayudan a que su rn_or tuncione nlsjor y que
dunsniis.
• Sk2ael plograma de manter_mierdoen este
manual.
ANTES DE CADA USO
1.
2.
I
f
_
resorte dsl
I
I
J
freno
Bisagrade
la puerta de la
acolchadora
"(_) Bisagra de la
puerta traser
1_) Clavija de montaje
del puntal del mango
_) Rocle el lubttcantll
_) Vim "MOTOR" ell la mlcclon de Mantmlklllento
Revise el nivel del aceite del motor,
Revise si h.ay suJetadores sueltos.
LUBRICAClON
Mantenga la unidad bienluixicada (yea la "TABLA
DE LUBRICACI_),
28
IMPORTANTE: No aceite o engrase los
rodarnientos de la rueda de plastico. Los
lubdcantes viscosos atearan polvo y
mugre, Io acortara la dumcion de Io_s
rodamienta6 autolubdcantes. $1 cree que
tienen que lubricarse, use Iosarnente tin
lubdcante tlpo craflto, de polvo seco, en
forma moderada.
ESPEClFICAClONES
N_JMERO
DEL PRODUCTO
DE SERIE:
FECHA DE COMPRA:
CAPACIDAD Y TIPO DE GASOLINA:
TIPO DE ACEITE:
API-SF-SJ)
CAPACIDAD DE ACEITE:
1.5 CUARTOS (REGULAR SIN PLOMO)
SAE 30 (sobre 32°F)
SAE 5W-30 (debaio 32°F)
20 oz.
BUJIA(ABERTURA: .045"):
CHAMPION RJ19LM4
TORSI(_N DEL PERNO DE LA CUCHILLA: 35-40 FT. LBS.
El num6ro del nodelo y el de sede se encuentran en la calcomania adjunta a la
)ade trasera de la caja de la segadom. Debe registrar tanto el num6m de serie com_
a fecha de compra y mantengalos en un lugar seguro para refencla en el futuro.
SEGADORA
PARA CAMBIAR
SiempreObserve
las reglasdeseguridadcuando
hagaelrnante_relanto.
LLANTAS
• Mantengalasitantassingaselina,aceltso
substandas
qu_cas pare cantrolde insectos
quepuedenda_r la goma.
• Evitelostocanes,las piedras,lasgde_s
prolundes,losobjetseafdadosy obos peigros
quepuedende_arales _lantas.
CUIDADO DE LA CUCHILLA
1.
Para obtener los mejores resultados, la
cuchilla de la segadora tlenen que mantenerse
afilada. Cambie la cuchilla doblada o da_ada.
PARA REMOVER
LA CUCHILLA
1. Desconecte el alambre de la bujia y
p<_ngeloen donde no pueda entrar on
contacto con 6sta.
2. Haga descansar la segadora en su lado.
Aseg0rese que el filtro de elm y que el
carburador queden mirando hacia ardba.
3. Use un bloque de madera entre la cuchilla
y la caja de la segadora para evitar que la
cuchilla gire cuando se le quite el pemo.
LA CUCHILLA
Ponga el adaptador de la cuchilla en el
cigseF,al del motor. Aseg0rese que la
ranura del adaptador y que el chavetero
del ciguefiel est6n alineados.
2. Ponga la cuchilla an el adaptador de _sta
alineando los dos (2) agujeros an la
cuchiita con las salien_eselevadas an el
adeptader.
3. Aseg0rese de que el horde de salida de la
cuchitla (opuesto al borde afilado) est_
hacia ardba hacta el motor.
4, Instale el pemo de la cuchilla con la
arandela de seguddad y la arandela
endurecide en el adaptador de la cochilla y
el cigue_al,
5. Use un btoque de madera entre la cuchitla
y la caja de la segadora y apdete el pemo
de la cuchilla gi_ndolo an el sentido an que
giran las rnanillas del reloj.
• La torsi6n para apretar recomendada es de
35 - 40 pies libras.
IMPORTANTIE: El perno de la cuchilla es clase
8 tratado a calo.
Chavetemdel
ciguenal
AVISO: Proteja sus mancs con guantes y/o
envuelva la cuchilla con una tela gruesa.
4. Remueva el pemo de la cuchilla gil_ndolo
en el sentido contrado en que giran las
manillas del reloj.
5. Remueva la cuchilla y los artlculos de
fen'eterla adjuntadoms (el perno, la
arandela de seguridad y la arandela
endurecida).
AVISO: Remueva el adaptador de la cuchilla y
revise el cubo Interior de la ranura del
adeptador de la cochitla. La ranura tJene que
estar en buenas condiciones para que
funcione an forma adecuade. Cambie el
adaptador si estd dafiado.
Arandela
Pemo endutedda
de la
cuchilla
Bolde de sallda
29
Adaptador de la cuchilla
• PARA AFILAR
LA CUCHILLA
AVISO: No recomondamos el afllar la ctmhilla pero silo hace, asegdrese de que quede
balanoeada.
Se tiene clue tener cuidedo de mantenede
balanceada. Una cuchilla que no estd
ba_aoneada va a p_du, c_ event_elmen_e del%
en la segadora o en el motor.
• La cuchilla puede afilarse con una lima o en
una rueda rectiflcadora. No trate de atilarla
mientras se encuentra en la segadora.
• Pare revisar el balance de la cuchilla, clave
un clavo en una viga o en la pared. Deje
atrededor de ur_ pulgada de uP.clavo recto
expuesto, ponga el agujero central de la
cuchilla sobre la cabeza del clavo. Si ta
cuchilla est_ balanoeada debe permanecar
en la posicibn hodzonta|. Si cualquiem de los
extramos de la cuchilla se mueve hacia
abajo, afile el extremo pesado hasta que
dsta quede balanceada.
RECOGEDORDECESPED
• EJrecogedor de cdsped puede ser I1Ddadocon
elagua de lamangueraperu_ne gue eelar
seoocuando se vaya a usar.
• Revise su recogedor de cdsped a menudo para
verificars_est_ da6ado o detedorade. Sevaa
desgas_ coneluso r,
om_. Sise r_si_a
caml_arelrecogedor,
c_nblolosolamer,
teper
ur_ gue sea _
potelfabdcante.
Dd el
n0rnero dd modelo de la segadora cuando lo
ordene.
RUEDAS DE IMPULSION
Revise las ruedas de impulsion trasaras cada
vez antes de segar, para asegurarse de que
se mueven librernente. Si las ruedas no giran
libremente quiere decir que hay basura,
reccctes de c6sped, etc. dentra del _,rea de _s
ruedas de impulsion y de la cubierta contra el
polvo y tienon que limpiarse pare libaradas.
Es necesario limpiar las ruedas de impulsion;
revise ambas modes traseras.
1. Remueva los tapecubos y las tuercas de
seguddad.
2. Remueva Iss ruedas de los ejes de los
ajustadoras de las ruedas.
3. Remueva la basura y los recortes de
c_sped de denbo de la cubierla contra el
potvo, p_bn ylo de los dief_es de los
engranajes de las ruedas de impulsion.
4. Si remueve los piSones de impulsion y los
tdnquetse, asegdrese de no dafiar el sello
del pihbn cuando vuelva a instelar los
pifiones. Llmpielos y lubrlquelos con grasa
antes de volvarlos a instalar. No utillzar
acelte o grasa.
AVISO: Los pif_)nes en las dos bandas de la
segadora son inguales pero, de todas
naneras, tlenen que ser instaladas
correctamente. Se no se tnstalan
correctamente, se podda dafter el elstema de
encendido.
5.
En los dos lados de los pihones se haman
unas flechas. Si la fiecha estd en la parte
superior del piton, dsta teine pue apuntar
hacia la partre anterior de la segadera. Si la
tlecha apentara hacia at_s, girar el piton y
nontado en la segadora.
6. Ponga las ruedas de vuelta en los ejes del
ajustador.
7. Vuelva a poner las tuercas de seguddad y
los tapacubos.
Ardallo de
Tuerca de
Arande_
proleccion de la Impu_s_on
Tapacubo
MOTOR
LUBRICAClON
Usesolamer_ace_ de _
de=dtsca_ad
dasificado con la das_caddn SF-SJ de servido
API.Selecclor_lacalidaddeviscoel_dSAE
segdnsutemperature
de operacidn
esperade.
SAE VISCOS4TY GRADES
AWSO_.A pesar de que los a_sites de .
mul_viscosidad(5W30, 10W30, etc.) _
el
arranque en din_ Irlo, estos aceltse de
mullMscos._.t_d
van ha aumentarel consumode
aceile cuando se usan an temperaturessobra 32°
F. Revise d r_,el del aceitedel motorrods a
menudo,pera evitm un Ix_ble daFloen el molor,
debidoe que no tbne sufidente acdte.
Cambie el acelte despuas de 25 horas de
operadde o pe¢ Io menos ona vez al a_o si la
segadora se utiliza menos 25 horas el a_o.
Revise el rdveldel aceite del cdtter_es de
arranc_ el motor y d_
de cada c=nco(5)
horas de uso_.
Apdete el talx_ dd
ace_e _ torma segum cade _z q_e m_se d
nk_l dd ace_e.
3O
P/_RA CAMBIAR
MOTOR
EL ACEITE
DEL
AVISO: Anles de incliner _asegadorapare
drenar el aceite, drene el tanque de combustible haclando correr el motor haste qua el
tanque est& vacio.
1. DesCOnecteel alambre de la bujfa y
pbngato de modo clue no pt_eda emrar en
contaoto con dsta,
2. Rernueva la tape del dopbsito del aceite;
dejela atm lado en una supedicie Utopia.
3. Incline la cortadora de cdsped por este
coslado la| como se muf-_lm ¥ purg_e a_
aceite an un recipiente id_eo. Mueva la
segadora de atrds pare adelante para
remover todo el acoite qua se haya
quadado almpado dentro del motor,
4. Limpie _odo el aceile denaruado en la
segadora yen el lado del motor.
5. Rellene el motor con aceite. (Vea =PARA
AGREGAR EL ACEITE" en la seccibn de
Operacibn de este manual.)
6. VueNa a coneclar s4alarn_ de la _la
dsta.
CO_
QIm en elsentldoa msmanillasdel
re_ pare
Abrazadera
mmo_r
Filf_o de aim
Oreja
Cu_erta del fJttrode fdm
_ire en
el sentJdo
coNmdo laS manillaS
del reloj pare aprelar
SILENCIADOR
Inspeccioney uambie el silenciadorsi estd
corroidopuedeproducirun peligrode incendio
y/o da_o.
BUJ_AS
Cambie lus bujlas al comienzo de cada
tempomda de siege o despu_s de uada 100
home de operaci6n, Io que suceda pdmero. El
tipo de bujfa y el ajuste de la abertura
aparecen en =ESPECIRCACIONES DEL
PRODUCTO" secci6n de este manual.
FILTRO DE AIRE
Su motor pusde sufdr averlas y funcionar de
manera incorrecta con un flltm del aJre sucio.
Sustituir el papal del cartucho una vez al a_o o
tins 100 horas de funcicoamiento, m_s a
menudo si se utilize en condiciones de
suciedad y polvo particulares. No lave el filtro
de a_re.
PARA CAMBIAR
1.
2.
3,
4.
5,
6.
EL FILTRO DE AIRE
Remueva el filtro de aim _rdndolo en el
sentido en qua glre!a de las manUlas del
reloj papa apretarla, haste el tops, y retlrelo
del collar.
Remueva el fillro de la pmle Interior de la
cublarta.
Limple la parte intedor de la cublada y el
collar para remover toda acumulaci_ de
mugre.
Inserte el filtro nuevo en la cubierta.
Pcoga la cubierta del flltm de aim dentro
del collar alineando la oreja con la ranura.
Ernp_e la cubimla hacla adentro y glrela
en el sentido contrario de las rnanillas del
reloj para apretada.
LIMPIEZA
IMPORTANTE:Paraobtenerel mejor
remdrrden_,rnanter_a,lalcaJadela segad_asin
a_
de_
y basura,Lknpielapa_e
de abajode susegadoradespuesde cedeuso.
_,PRECAUCK_I: Desconec_el alambrede la
bqlay pdngaloendondenopuedaenlraren
cordacto
con6sta.
• Hagadascausar
la seo_
ensu lado.
Assgdmsequaelfillrode akey quael
carburad_Gpedenmirandohacla_'rib_
Limpielaparleinfedordesusegadom
_
pareromoverla aoJrr_addnde
c&_ed y t_.sur_
• I.irnp_el motora manudopareevitarquase
acumulela basura.Un motortapadofunciona
rn/mca]ie_tey se acorlasu duracibn.
• Mar_-oa = sqoen'k_ put, as y _s ru_as
singaso_.a,ace.e,etc.
• No reoomendamus
_ usode upamanguara
de
_rdln
para_oplar
lasegadora
arr,
enusqua_
sistemael_Irk_o,el s_ndador,elflltrodeairey
el carbumdor
estdntapadcoparaevltarquaI_
evn elaffJa.B ague_ el motorpuade
a_ortarla duracidnde dale.
31
_IPRECAUCI_N:
Antes de dar calquier
sew}co o de hacer ajustes:
1. Suelte la bana de control y pare el motor.
2. Aseg0rese que la cuchilla y que todas las
partes movibles se hayan detenide
completamente.
3. Desconecte el alambre de la bujia y
pbngalo en donde no pueda entrar en
contacto con E_sta.
SEGADORA
PARAAJUSTAR LA ALTURA DE
CORTE
Vea "PAPAAJUSTARLA ALTURADE
CORTE_ en la seccibnde Operacibnde este
manual.
DESVIADORTRASERO
Se proporciona un desviador trasero, adjunto
entre las ruedas traseras de su segadora,
para reducir a un minirno la posibilidad que
objetos seen lanzados hacia afuera de la parle
trasera de la segadora, en la posicibn en
dcnde se encuentra el operador. Si se da_a el
desviador debe carnbiarse.
PAPAAJUSTAR
EL MANGO
Elmangodesusegademcuentacon_ss (3)
ix_cionesde allura- aj0steloa laalturaquele
acomode.
• Pre_one_s _
_e_es _ mando
]nieriorunaencongaunade laotto haslaque
lapinzadelmangopuedasetinsedadaen uno
de lostinsagujemsdelcc_mlde laallura.
Apdete
Puntal
de aJuste
PARA MONTAR Y ADJUNTAR EL
RECOGEDOR DE C_SPED
• Ponga el bastider deJ recogedor de c_sped
en la bolsa del c6sped con la parte rlgida de
la bolsa en la parte inferior. Asegdrese que
el mango del bastidor est6 en el extedor de
la parte superior de la bolsa.
• Deslice los sujetadores de vinilo sobm el
bastidor.
AVISO: Si los sujetadoms de vintlo estdn muy
duros, rn6talos en agua caliente por algunos
minutos. Si se moja la bolsa, dejela que se
seque antes de usada.
_4=RECAUCKSN: No haga funcionar su
segadora sin el desviador de recortes o sin el
recogedor de c_sped, aprobados, an su lugar.
Nunca trate de operar la segadora cuando se
ha removido la puerta trasem o cuando est_
un poco ablerta.
Mango del bastidor
del bastldor
MOTOR
VELOCIDAD DEL MOTOR
La velocidad del motor ha sido ajustada en la
fdbrica. No irate de aumentar la velocidad del
motor pues se pueden producir lesiones
personales. Si cree que el motor estd
funcionando demasiado rdpido o demasiado
lento, Ileve su segadora a mas con su centro
de servicio Sears o con un otro centro de
sewicio cualificado.
CARBURADOR
Su carbumdor lJene un chorro principal fijo no
ajustable pare controlar la mezda. Si su motor
no est_ funcionando en |orma adecuada
debido a pmblernas que se sospecha vienen
del carburador, Ileve su segadora a contacto
con su centro de sewicio Sears o con un otto
centre de sen,icio cualificado para repamda y/
o ajustarla.
IMPORTANllE: Nunca rnanipule el regulador
del motor, el qua ha sldo ajustado en la fdbdca
para la velocidad del motor adecuada. Puede
ser peligroso hacer funcionar el motor a una
veloddad pot sobm el aJuste de alta velocidad
de la t=tbrica. Si cree que la veloddad alta
regulada del motor necesita ajuste,contacto
con su centre de serviclo Sears o con un otro
centre de servicio cualificado, el ClUecuenta
con el equipo adecuado y la expenencia pare
_hacer
los ajustes necesados.
I_e
prepare
susegadara
para
el
almacenandentoaJ'finalde cada _da
o si la
unidad no se va a usar per 30 d_aso n'_ts.
mango
SEGADORA
Cuando se va a guardar la segadora po¢cierto
pedodo de _lpo, I|mplela cuidadosarnente,
remuevatoda la mugre,la grasa, las hojas, etc.
Gudrdelaen un _ra_altrnplay seca,
1, Limple toda la segadora (Vea %IMPIEZA"
en la seccidn de Mantenirnento de este
manual),
2, Lubrfquela seg0n se muestra en la secci@_
de Mantenirnento de este manual.
3. Asegdrese de que tod_s las tuercas y
clavijas y todos los pemos y tomillos estSn
apretados en foma segum. Inspeccione las
partes que se mueven para verificar si
estdn dal_das, quebradas o desgastadas.
C,_mbielas si es necesado.
4. Retoque todas las superficies que est_n
oxidadas o con la pintura picads; use una
lija antes de pintar.
MANGO
Puede doblar el mango de su segadora para el
almacenamiento.
1. Suelte las dos (2) manillas del mango en
cada lado del mango superior y permita
que el mango se ddole hacia detras.
2. Apriete los extremos Infedores del mango
inferior entre sl basra qua el mango infedor
quede separado del puntal del mango,
luego mu6valo hacia adelante.
• Cuando prepare su mango a partir de la
pGsicidn de almacenamiento, el mango
inferior nesecitara cerrado manualrnente
para la po_ici_n de sega.
IMPORTANTE: Cuando doble el mango para
el almacenamiento o el tmnsporte, asegdrese
que 1o doble seg0n se rnuestm o purde da_ar
los cables de control.
Barra la
operadorextge
depmsenclal;_qu_
control_eedel
Mangosuperior
h_laCin_
Doblar/_/_,
Paalma
_
_"
,
//_/
J
Sopodede
ajuste
Mangode 3
posiciones
MOTOR
SISTEMA DE COMBUSTIBLE
IMPORTANTE: Es importa_e evitarque se
formen de_
de gorna en partes
fundarnentalesdel sistema de combustibletaJes
ccmo el cad0urador,el f_o del combu_ble, la
mangueradel combus_bleo en el estanque
duranteel almacenamiento.La experienda
tambien indicaope los combu_bles mezclados
conalcohol(conoddo cornsgasdnol o que _ene
etanolo metanol) pueden al-aer hurnedad,Io clue
conducea la separack_ y a Is fonnacidnde
addos durante el aknacenamwnto,La gasolina
acidicapuede da_ar el sisternade conbustiblede
un motorduranteelpedodode _.
• Drene el estanque de c_nbus'0_01e.
• Haga _
el motory d_jelo funcionarbasra
que las Ilneasdel cornbu_bte y el carburador
estdn vados.
• Nunca use los productospara limpiezadel
carburadoro del motoren el eslamlue de
O_i3bi.lSlJ_ p_es _ p_
p_ucir daJ_
p_Tnanentes.
• Use com_
nuevo la prdc_Lma
ternporada.
AVISO: [] estabilizadorde combusliblees una
_
aceplable pera mdudr a un mlnimo la
f_mack_ de depddtos de gorna en el oombus_d,e
durante
elperlodo
dealmacenantento.
Ag_egue
estabilizador
a lagasdinaen e_estanquede
cc_ble
o en elenvase parael
aln_cenamiento.
$iempre
s,_ga
laproporck_
de
mezclaque se encuenlra
en ele_/asedel
estabilizador.Haga lundonat el motorpor Io
rnenos 10 minutes despu_s de agmgar el
astabilizador,para pem-i_ que este _egueal
carburador.No drene la gas0ina del estanquede
_
y el carburadorsi se es_ usando
estabilizado_de cembus'lJble.
33
• ACEITE DEL MOTOR
• Sies podble,guardesuunidadenunrednto
cenadoy cObrelap_,'apmlegedacoma el
pelvoyla rnugre.
• CUbrasu ur_ad con unlorroprotector
adecuadoqueno ratengala humeded.Nouse
_.
ElpJ_L_,_o
nopusderespirar,
Ioque
permite!a fon'nack_n
de condensaci_n,
Ioque
pmducir_
lao_ddack_
de suunided.
IMPORTANTI_Nuncacubrala segadora
mienlrasel rnotory lasa_'easde escapetoda_a
estancelientes.
_CAUCI(_N;
Nuncaalmacenela segad(xa
ccogaselinaenel estanque
dentrode un&:lilido
endondek_sgasespuedenalc_nz_unallama
expussta
o unachispa.Perrnitaqusse entrfeel
mot(_antesdea._rnacenarla
en alg0nreelr_lo
cenado.
Drene el acelte (con el motorcaliente)y c_nbielo
con aceHede motor lin_ (Yea "/VK)TOFr'en la
secck_ de Mantenimento este manual.)
CLINDRO
1. Remueva la bujia.
2. Vacle una onza (29 ml) de acelte a tmv_s
del agujero de la buj[a en el cilindro.
3. Tire la manilla de armnque lentamente
unas cuantas veces para distribuir el
acelte.
4. Vuelva a montar la nueva bujla.
o11:1os
• No guarde la gasdina de una temp<xadaa la
otre.
• Cambie el envase de la gasolira si se empieza
a oxidar.La oddadbn y/o la mugs en su
g,_._ina
produdr_n
pm_rnas,
IDENTIFICACION DE PROBLEMAS
PROBLEMA
CAUSA
No a_ranca
Filtro de elm suelo.
Sin combustible.
3.
Combustible rancio.
4.
Agua en el combustible.
5.
Alambre de la bujla
desconectado.
Bujla mala.
Cushilla suelta o adaptador
de la cuchilla quebrado.
6.
7.
8.
1. Limpie,'cambie el filtro de aJre.
2. Llene el estanque de combus
tible.
3. Drene el estanque y vuelva a
nenarlo con combustible limpio
y nuevo.
4. Drene el estanque de combus
tible y el carburador y vuelva a
nenar el estanque con gasolina
nueva.
5. Conecte el alambre a la bujla.
6.
7.
Barra de control en la
poelcibn suelta.
Barra de contr_ defectuosa.
8.
1.
Cuchnla desgastada, doblada
o suelta.
1.
2.
Alture de las ruedas dispareja.
2.
3.
4.
Velocidad del motor lenta.
Acumulacibn de cdsped,
hojas o basura debajo
de la segadora.
Demasiado aceite en
el motor.
Veloeldad de recorddo
demasiado ntpida.
3.
4.
9.
Falta de fuerza
CORRECClON
1.
2.
5.
6.
34
9.
Cambie la bujla.
Apdete el perno de la cuchilla
cambie el adaptador de la
cuchilla.
Preelone la barra de control
hacia el mango.
Cambie la barre de control.
Ajuste a la poelel(_nde =Code
n_s alto."
Ajuste a la posici6n de =Corte
m_s alto._
LimpieJcarnbieel filtro de aire.
Limpie la parte infedor de la
caja de la segadora.
5.
Revise el nivel del acelte.
6.
Coile a una velocidad de
recorddo mds lenta.
IDENTIFICACII_N
DE PROBLEMAS
PROBLEMA
Mal cor_dlsparejo
CAUSA
I.
Cu_hilla desgastada, doblada
o suelta,
AJtum de las ruedas dispareja.
I.
3.
Acumulacibn de c_sped,
hojas o basura debajo
de la segadora,
3.
1.
Cuchilla desgastada, dablaba
o suelta,
CigueSal del motor dobiado.
I.
1.
El frano del volante del
1.
Presione la barra de control
hacia el mango
superior antes de tirar el
cord6n arrancador,
2.
motor est_ aplicado
cuando se suelta la barra de
control.
Ciguenal del motor dob_ado.
2.
Pongase en contacto con su
cantro de serviclo Sears o con
un otro centro de servicio
cuelificado,
Cambie el adaptador de la
cuchHla.
2.
Vlbracldn
exceslva
2.
Corddn
arrancador
dlf|cU de Urar
3.
4.
_ecogedorde
u_sped no se
liana_lvbne
Dqulpado)
I.
2.
3,
Dlffcll de empuJar
CORRECCION
1,
2.
3,
4.
2.
Caml_e la cuchilla. Apriete el
pemo de la cuchilla.
2. P6ngase en contacto con su
centro de setviclo Sears o con
un otto cantm de servlclo
cualificado.
Adaptador de la cuchilla
quebrado.
La cuchilla se arrastm en
el crisped,
3.
4.
Mueva la segadora a un lugar
en donde el c6sped ha sido
cortado o a una supedicie flrme
para hacer arrancar el motor.
Altura de corte demasiado
baja.
Levantamianto de la cuchilla
desgastado.
Recogedor sin ventilaci6n
de aire,
1.
Eleve la altura de code.
2.
Cambie !as cuchillas.
3.
Umple el recogedor de c6sp6d.
1.
Eleve la altura de co(le.
2.
Eleve la parte trasera de la caja
de la segadom (1) un lugar
n_s alto.
Vacfe el recogedor de crisped
El cdsped est_ dernasiado
alto o la altura de la rueda
demasiado baja.
Parte tmsera de la
caja/cuchilla de la segadom
arrastrandose en el cdsped.
Recogedor de cdsped
demaslado Ileno.
Posici6n de la altum del
3.
4.
mango no adecuada pare
usted.
Pi_dlda de
Impulsldn
I.
Desgaste de la correa.
2.
La correa estd fuem de
la polea.
Cable de la impulsi6n
usado o roto.
3.
4.
Cambie la cuchilia. Apdete el
pemo de la oJchiUa.
Ajuste todas las nJedas a la
misma altura.
l.impie la parte infedor de la
caja de la
segadora.
Suciedad en pihones del
mecanismo impulsor.
36
Ajuste la altura del mango de
modo que le
acomode.
1. Revise/cambie la corma de
impulsi6n.
2. Reviseh/uelva a instalar la
correa de impulsi6n,
Cambie el cable de la
impulsi6n.
4. Umpie los mot_onesdel
rnecanismo impulsor.
3,
CRAFTSMAN
ROTARY
LAWNMOWER
- -MODELNUMBER
917.379810
28
18
lO
12
CRAFTS MAN ROTARY LAWN MOWER - - MODEL NUMBER 917.379810
KEY
NO.
1
2
3
4
S
6
7
8
9
10
11
12
13
14
15
16
17
18
19
20
21
22
23
24
25
26
27
28
29
30
31
33
34
35
36
37
PART
NO
167163
161105X479
175788
132001
132004
66426
131959
87682
164265
151551
7399(_500
51793
161586
850733X004
750634
162085
151548
165261
178164
161568X479
168;_7X479
150078
163183
63124
161333
1_409
161550
88652
166036_479
851514
150267
851074
850_63
851084
166_2
17{X)45
150406
DESCRIPTION
Handle, Upper DIx Comf. (Includes Grip)
Handle, Lowe_
Boil, Cont. Wire Db( Coral. BIk
Guide, Rope, Side
Nut, Hex Lockwaaber 1/4-20
Wire, Tie
Bolt, Handle 5/16-18 x 1.75
Knob, Handle
Grip, Hd_Foam Smooth
Bolt, Sq, Neck
Nut, Hex Lockwasher Ins. 5/16-18 UNC
Cotter, Hairpin
Engine Zone control
Bracket, Uputop
Screw, Hex Washer Head Tapp_r_g10-2
Kit, Door Rear
Seal, Door
Plug, Mulcher
Kit, Housing
Handle, Bracket Asrn. Left
Handle, Bmckut Asm. Right
Sc,'ew, Hex Wshd
Bolt, Flex Head 5/16-18 x 5/8
NUt, Hex Lock Wshr 5/16-18
Baffle, Side
Screw 12 x 5/8
Skirt
Screw, Hinge 1/4-20 x 1.25
Belt Cover, Top
Adapter, Blade w/key Longer
Blade,21"
Washer, Hardened
Lockwasher, Helical Spring 3/5
Screw, Hex Head 3/8-24 x 1.38
Pu_ey, Fi_ed
Boadng Support Assy.
Bolt, Engine
KEY
NO.
38
39
40
41
45
46
48
49
50
51
52
53
54
55
56
57
58
59
60
61
62
63
64
65
66
67
68
---
PART
NO
--17g015
161358
85463
166034
166041
1696_5
1T5787X0(_
54583
169980
170047
173041
750097
1663B3X479
63601
166391X004
57808
166042
166050
145212
155552
166022X008
166043
16_29
171S62
166(_8
88349
161G58
1782:_8
DESCRIPTION
Engine, CraKa_an Medel Num bet
143.016724 (BOe Breakdown)
Grass CaIaber Bog
Grass Catcher Frame
DangerDecal
Rod, Puaey Engage
Bushing
Hendner Clip
Clamp
Screw
Spacer
Wave Washer
Belt Cover, Buttom
Screw
Cable Suppod Bracket
Nut
Bracket Assy.
Screw
V-Groove Pulley
IdJer Ann Spacer
Flange Nut
LOCknut
IdlerArm
Idler Pulley
Shoulder Bolt
Door Assy.
Muiti Cut Guard
Nut
Warning Decal (Not Shown)
Owner's Manual
Available accessode_ not included with lawn mower:
71
33623
Gaa Can (2.5 gal.)
71
33500
Fuel Stabilizer
71
33000
SAE 30W OB (20 oz.)
NOTE: All component dimensions given in U.S. inches.
1 inch ,= 25.4 mm
CRAFTSMAN ROTARY LAWN MOWER - - MODEL NUMBER 917.379810
23
2O
8_
24
CRAFTSMAN ROTARY LAWN MOWER- - MODEL NUMBER 917.379810
KEY
NO.
1
2
3
4
5
6
7
6
9
10
11
12
13
14
15
16
17
18
19
2O
21
22
23
24
PART
NO
178_16
175786
54583
179049
161537
750634
166060
132010
166049
166_Q1X004
17541011
166189
166388
1_
57079
161584
1616C2
160477X004
167650
120(X)0_2
1&3365
169911
161118X004
DESCRIPTION
Spped Control
Bail Control Ddve
Soew
DriveCable
Cover Drive
Screw Thdrol I0-25 x .50
V-Bdt
Nnt Lock Flanged 3/8-16 Zinc
Pulley Driven
Bert Keeper Bracket
Screw Hex Wash Head 10-24 X .668
Pivot Rod Cover
Transmisston Asm.
Pin Spring Thrust
Was_er Hardened
Rod Connecting
Spring Extens4on
Spdng Selector
Knob Selector Spring
E-Ring7/8
Bearing Support
Bearing Ball
Retainer Drive Asm. Strop.
Screw Hex Head Tapping 1/4-20 x .75
KEY
NO.
25
26
27
28
29
30
31
32
33
34
35
36
37
38
39
40
41
42
43
44
45
PART
NO
170011
166450
52160
12000058
88080
67725
57143
172324
145212
150182
160785 X004
160786X004
161463
163409
700279
172323
150182
83S23
18o-72216
1449"29
751152
DESCRIPTION
DdvePawl
Pinion, Drive RH
Washer
E-Ring 7/16
Cover. Dust Wheel
Washer 1/2x1-1/2
x.134
WaveWasher
Wheel 9x2
Nut Hex Flange Lock
Hubcap, Mag Platinum
Sh_t Am. Rear
Shaft Asm. Front
Retainer Front Shaft
Screw 12 x 5,'8
Clip Rntainer
Wheel 8 x 2
Hubcep, Mag Platinum
Nut, Hex Range Lock 3/8-16
Washer
Screw 114 x 2.12
Locknut
NOTE: All component dimensions given in U.S. inches.
1 inch = 25.4 mm
MODEL NUMBER
CRAFTSMAN 4-CYCLE ENGINE
143.016724
.-_370A
!
262,4
_285
110_
130
120
119
195
125
416
]
19
186
"104
185j-
8
/
239
.,
80/
370C
.
81"_"
238
250
40
MODEL NUMBER 143.016724
CRAFTSMAN 4-CYCLE ENGINE
I_-Y PART
NO. NO.
1
2
g
7
12
12A
12B
14
15
16
17
18
19
2O
30
40
41
42
43
45
46
48
50
37465
26727
33734
36557
36775
36558
36694
2&277
3_o89
34_A
31335
551018
3e251
3260O
37459
40027
4OO42
4OO06
2O381
36777
3_610A
27241
37460
52
69
7O
72
73
75
8O
81
82
83
86
89
90
92
93
100
101
10_
104
110
119
120
125
29914
37609
376O8
37615
28833
27897
3_5"/4A
3_5_OA
3_691
2O588A
55O488
611004
611112
650815
650816
34443C
010118
651007
37480
37047
36787
36_5
36780
125
126
130
135
150
151
151A
169
172
174
37288
37289
6_21A
37598
31672
31673
40017
36783
36784
3(_00
DESCRIPTION
C/tinder(IncludesKey#2 and20)
DowelPin
BmatharElement
BreatherAss_/.(Incl.#6 & 12A)
B_eatherTube
BreatherCover& Tuha (Incl.#12B)
BreatherTudeElbow
Washer
GovernorRod(IncludesKey#14)
GovernorLever
GovernorLeverClamp
Screw,TorxT-15,8-32 x 19/64"
ExtensionSpdng
OilSeal
Crankshaft
piston,Pin & RingSet (Std.)
PiSton& Pin Ass'y.(Std.) (Incl.43)
RingSet (Std.)
PistonPinRetsinlngRing
ConnectingRodAss'y.(Incl.#6)
ConnectingRUdBo_t
Valve Lifter
CamchattExh_Jet(MCR)
(IncludesKeyNumber104)
Oil PumpAss'y.
• MoungngFlangeGasket
MountingFlange(Incl.72 thru83)
OilDratnPlug(IncludesKey#73)
DrainPlugGasket
OilSeal
GovemorShaft
Washer
Govemo¢Gear Ass'./.(Incl.#81)
GovernorSpo_
Screw,1/4-20x 1-1/4"
FlyWhasi
Key
Ffywhael
BsilesilleWasher
FiywbesiNut
SolidState Igsition
SparkPlugCover
Screw,To_xT-15, 10.24x 15/16"
Cam Buching
GmuodWIm
• CylinderHeadGacket
CylloderHead
Exhau_ Valve (1/32" OS)
(IncludesKey Number151)
ExhaustVaNe Std. IncL151)
IntakeVsive (Std. (Incl.151)
Screw,5/16-18x 1-1/2"
ReslatorSparkplug (RJlgLM4)
ValveSpdng
Valve S_ng Cap
IntakeValve Seal
• VaNe CoverGasket
ValveCover
Screw, 10-24x 9/16"
P/wn"
NO, NO.
178 29752
15_ 6201
184 26756
185 37466
186 32653
189 550839
191 36559A
195 610973
207 34336
216 33086
223 650451
224 36786
238 650932
235 34338
241 36919
245 36_O5
250 37122
260 36980
261 302(30
262 650831
263A 37184
275 37462
277 650988
285 350(X)A
287 650926
290 29774
292 26460
298 28763
300 36916
301 36246
306 35647
306 37610
307 35499
309 65G5(_
310 35648
311A 37511
313 34080
347 651038
355 590701
37OA 36261
37OC 37318
370R 37317
380 640_71
390 590738
400 37613
416 36C_5
417
900
900
650780
750866
750867
DESCRIP11ON
Nut & Lock Washer, 1/4-28
Screw, 1/4-28 x 7/8"
• Carburator To Intake Pipe Gasket
Intake Pipe
Governor Unk
Screw, 114-20x 3/3"
S.E. Brake Bracket {Incl. 195)
Te_
Throttle Link
R.P.M. Adjusting Lever
Screw, 1/4-20 x 1"
• Intake Pipe Gssket
Screw, 10-32 x 48/64"
• Air Cleaner Gasket
Air Cleaner Collar
Air C!eanar FIItor
Air Cidanar Cover
Blower Housing
Screw, 10-24x 9/15"
Screw, 1/4-20 x 1/2"
Reco_]Gdlle
Muffler
Screw, 1/4-20 x 2-5/15"
Startar Cup
Screw, 8-32 x 21/64"
Fuelune
Fuet UneClamp
Screw, 1032 x 35/64"
Fuel Tank (Inr.J.292 & 301)
Fuel Cap (Back)
OII FillTube
* "O'-Ring
"O'-Rr_
Screw, 10-32 x 1/2"
Dipetlck
Hold Down Bracket
Spacsr
Screw, 10-32 x 51/64"
Stader Haodle
LubridatJonDecal
Pflmer Decat (3 X)
Warning Decal
Carburetor (Includes Key #184)
Rewlod Starlet
Gasket Set (Ind. Items Marked •)
Shark Arresto¢ Kit (Opaonsi)
(Includes Key Number 417)
Screw, 8-32 x 3/8" (Optional)
Replacement S_ Older from 71-999
Replacement Engine, orderfrom
71-999 (Not available in California)
RPM Hhgh2900 to 32OO
NOTE: ]_lid engine could have been bultt with 5907O_
etart@r.
NOTE: AN component dimensions given In U.S.
inches. 1 Inch = 25.4 rnm
41
MODEL NUMBER 143.016724
CRAFTSMAN 4-CYCI.E ENGINE
PART
NO.
DESCRIPlION
2
4
5
6
7
16
17
18
20
20A
25
27
28
640271
31615
31767
631184
631183
64(3070
65_06
631807
6510P.5
630768
6400_7
640200
631867
6310_4
632019
CarbumtDr (Ind. 184 o_ Engine Pads List)
Throttle Shaft & Lever Assembly
T_
_t_sr_ _
DustSeatWasher
DustSeal('lhrottle)
Throttle Sl_riter
ShutterScrew
Fu_l Fifting
_rott_e Crock Screw_Id_eSpeed Scr_v
Tenelon Spdng
Iote RestlrlctorScrew
Idle Reatllclor SoP/re Cap (Bk_ck)
Flout Bowl
FloatShaft
Roat
29
30
31
36
36
36A
37
40
44
47
48
60
631(_8
631021
6316_2
64_59
640080
6_766
36P.547
640030
27110A
630748
6310L_7
632"/608
NO.
--
1
*
*
"
"
_ FloatBowl'O"Ring
Inlet Needle, Seat, & Clip (InCl. 31)
SpdngClip
Pdmer BUtb/Rutelner Ring
Meln Nozzle Tube
CarburotorTube
* 'O'Ring, MelnNoZzleTube
High Speed Bowl Nut
° BowlNutWasher
* Welch Ping, Idle Mixture Well
* We_chPl_g, Atmeepha_cVent
Repair Idt (Ind. Items Marked ° in Notes)
42
MODEL NUMBER 143,016724
CRAFTSMAN 4-CYCLE ENGINE
I_EY
1
2
NO.
3
5g07G2
59GSggA
590600
NO.
590696
ReCOilStarter
Spdng Pin (Indudes Key No, 4)
Washer
OESCRIPTION
Retainer
4
590601
Wash_"
65
7
5_
590697
5906_
S_'ler
D_
Bmke Spdng
Dog Spring
8
11
590700
59070G
Starter &Housing
Pulley
Re_nd Assembly
Spr;ng Assembly
(40degree grommet)
t3
12
5g0701
590536
Stader
Starter Handle
Rope (98" x _64" dla.)
m
--
7--1_
6"--_
8
_--7
]
[_--6
_
PAqT
4
--3
(_
B--5
O----2
V--14
I_w
NO.
PART
NO.
DESCRIP_ON
_-
590739
590740
Rewind Starter
Retainer
7
8
11
590617
5go618A
5g0638
612
13
14
5g_o35
590616
590701
5.°0760
DogSprlng
pu_k_y& Rewind Spdng Assembly
Starter Housing Assembly
(40degree grommet)
Starlet Dog
Rope (98" x 9/64" dla,)
Starter
Staffer Hsndle
SpdngClip
t2
--a
III II -7
Forrepair
of majorbrandappliancesin your own home...
no matterwho made it,no matterwhosoldit!
1-800-4-MY-HOME _
(l-eOo.4e_e3)
V_el;W.Se_.eLCQ_
An,/ane,
dayorrlgit
(u.s_.andCanada)
WWW.Sealkca
Forrepairofcar_ productslikevacuums,lawnequipment,and
electronics,
callforthe nearestSears Parts and Repair Center.
1-800-488-1222
An,/,Jme,
c_yornight
(U.S.Aody)
wWw_
Forthe replacementparts,accessoriesand owner'smanuals
thatyou needto do-it-yours_f,callSears PartsDIrectsa!
1-800-366-PART
(l.aoo-,,_e7278)
6 a.m.- 11 p.m., 7daysaweek
(u.sA or_)
To purchase or inquire about a Sears ServiceAgreement
or Sears MaintenanceAgreement:
1-800-827-6855 (U.SA)
1-800-361-6665 (Carat)
7 aJ_ -5 p.m, CST, M_. - SaL
9 a.r_ - 8 p_ EST, M - F,4 gn_ SaL
HomeCentral
®
® Registered Trademark / TM Trademark / e_ Service Mark of Sears, Roebuck and Co.
® Mama Reglstrada / -_uMama de FdbriCa / su Mama de Sarvic_o de Seam. Roebuck and Co.
_c Marque de commerce / MOMarque deposde de Sears, Roebuck and Co.
178258 03.16.01 BY
Printed in U.S.A.