1
-..---
(
(
unid~n@
SWS 2500NZ
Operating Guide
----
--
I
~
J
~
-
r
-,
.--....
-
SAFETY FIRST
Congratulations on the purchase of your new Uniden SWS 2500 NZ radar
detector which has been engineered specifically for New Zealand
conditions. This model features the newest technology designed for
Radar, Laser and Safety Warning System detection and alert.
You should be aware that Safety Warning transmitters (the device that
sends your detector safety warning alerts) may not be available for use in
New Zealand at this time.
While this detector is designed to warn you of road hazards, it is not
designed as a substitute for safe, attentive driving procedures. We
encourage you to remain alert for road hazards and always obey the
posted speed limit and driving regulations at all times. Of course, this
includes ensuring that seat belts are worn at all times and that you never
drink and drive.
~
'---
-
J
::::::::===
.. .«.,,)
-
"
-.--
==....
'
-_.
Contents
Introduction. . . . . . . . . . . . . . . . . . . . . . . . . . . . . . . . . . . . . . . . . . . . . . . . 1
Feature Highlights. . . . . . . . . . . . . . . . . . . . . . . . . . . . . . . . . . . . . . . 1
Speed Detection Systems. . . . . . . . . . . . . . . . . . . . . . . . . . . . . . . . . . . . . 2
Radar. . . . . . . . . . . . . . . . . . . . . . . . . . . . . . . . . . . . . . . . . . . . . . . . . 2
Laser. . . . . . . . . . . . . . . . . . . . . . . . . . . . . . . . . . . . . . . . . . . . . . . . . . 3
Included with Your Radar Detector. . . . . . . . . . . . . . . . . . . . . . . . . . . . . 4
Controls and Functions. . . . . . . . . . . . . . . . . . . . . . . . . . . . . . . . . . . . . . . 5
LED Displays. . . . . . . . . . . . . . . . . . . . . . . . . . . . . . . . . . . . . . . . . . . . . . 7
Installation. . . . . . . . . . . . . . . . . . . . . . . . . . . . . . . . . . . . . . . . . . . . . . . . . 9
Helpful Tips. . . . . . . . . . . . . . . . . . . . . . . . . . . . . . . . . . . . . . . . . . . . 9
Adjusting the Windshield Mounting Bracket. . . . . . . . . . . . . . . . . . 10
Connecting the Power. . . . . . . . . . . . . . . . . . . . . . . . . . . . . . . . . . . . . . . 11
Vsing the Coiled Cigarette lead. . . . . . . . . . . . . . . . . . . . . . . . . . . . 11
DirectConnection
12
Replacing the Fuse. . . . . . . . . . . . . . . . . . . . . . . . . . . . . . . . . . . . . . 13
Operation. . . . . . . . . . . . . . . . . . . . . . . . . . . . . . . . . . . . . . . . . . . . . . . . . 14
Power On . . . . . . . . . . . . . . . . . . . . . . . . . . . . . . . . . . . . . . . . . . . . . 14
Volume Control. . . . . . . . . . . . . . . . . . . . . . . . . . . . . . . . . . . . . . . . 14
Full Warning. . . . . . . . . . . . . . . . . . . . . . . . . . . . . . . . . . . . . . . . . . . 15
Audio Alert Only Operation. . . . . . . . . . . . . . . . . . . . . . . . . . . . . . . 15
Visual Alert Only Operation. . . . . . . . . . . . . . . . . . . . . . . . . . . . . . 16
Auto Mute Operation. . . . . . . . . . . . . . . . . . . . . . . . . . . . . . . . . . . . 16
X Band Delete Mode. . . . . . . . . . . . . . . . . . . . . . . . . . . . . . . . . . . . 16
City Operation. . . . . . . . . . . . . . . . . . . . . . . . . . . . . . . . . . . . . . . . . 17
Memory Retention Feature. . . . . . . . . . . . . . . . . . . . . . . . . . . . . . . . 17
LED Signal Strength Meter in City Mode. . . . . . . . . . . . . . . . . . . . 18
Safety Warning System Operation. . . . . . . . . . . . . . . . . . . . . . . . . . 18
Care and Maintenance. . . . . . . . . . . . . . . . . . . . . . . . . . . . . . . . . . . . . . . 19
Troubleshooting. . . . . . . . . . . . . . . . . . . . . . . . . . . . . . . . . . . . . . . . . . . . 20
Specifications. . . . . . . . . . . . . . . . . . . . . . . . . . . . . . . . . . . . . . . . . . . . . 21
Optional Accessories & Replacement Parts. . . . . . . . . . . . . . . . . . . . . . 22
Warranty. . . . . . . . . . . . . . . . . . . . . . . . . . . . . . . . . . . . . . . . . . . . . . . . . 23
Features, Specifications, and availability of Optional Accessories are all
subject to change without notice.
Vniden@ is a registered trademark of Vniden New Zealand LTD.
=~::.:::::.:::
= :=
- --..--
.~
r--r
I
-.
--"'"
-
_.
=
"'-"-""'"
+-.
('
!
Introduction
Welcome to the world of sophisticated, early warning laser/radar
detection. You have purchased one of the most advanced laser/radar
detectors available. The SWS2500NZ is a complete integrated
laser/radar detector. It responds not only to the X-, K-, and KaSuperWideband radar in use today, but also provides 3600 detection of
the other latest speed monitoring system - the laser gun. The built-in
Safety Warning System (SWSTM)is capable of detecting a hazardous
warning signal transmitted on the K-band.
The SWS2500NZ provides distinct visual and audio alerts to warn you of
the presence of X-, K-, and Ka-SuperWideband radar signals as well as
IR laser signals. You can drive with confidence when you bring along
the SWS2500NZ.
The SWS2500NZ employs Super Stalker Technology (SST); a state of
the art electronic system designed to make this radar detector invisible to
all current VG-2 radar detector detectors. The SWS2500NZ also uses the
new D.R.O. (Dielectric Resonant Oscillator) and E.D.I.T. (Electronic
Data Interference Terminator) circuitry; giving more reliable
performance.
We are certain that you will enjoy the SWS2500NZ, and to ensure that
you get the most from its features, please read this Operating Guide
carefully before installing and operating the unit.
Feature Highlights
.
..
.
3600 Laser Detection
5 Band Coverage
Super Wideband
K/Ka Priority
. Safety Warning SystemTM
. 5 Alarm Tones
. VG-2 Undetectable
. Pulse Detection
.
SignalStrengthMeter
.
Visual/Audio Only Mode
City and Highway Modes
Engineered for New zealand
. Warning Lights
. Auto Mute Mode
..
.
. SelfTest
. Edit Circuitry
Conditions
User Selectable X Band Delete
1
T
~
A
t
=-:.::.:::::::====---==
:.-:=
e.
.-.
..
-
.--
'",
l
..- -.,
"'"
-
..
-
--
-----.-.--
[--
\
r
,- Oh
1-
-
~
I
y
-
=-+-:-
Speed Detection Systems
A speed detection device (often called a radar gun) sends out either a
microwave signal or beam of light. When this signal reaches its target,
part of the signal is reflected or bounced back toward the emitting gun.
The time required for the signal to leave the gun, bounce off an object,
and return is used to determine a vehicle's distance and speed.
Radar
Radar (Radio Detection And Ranging) is a microwave system for
detecting the speed of moving objects by reflected pulses of high
frequency radio waves. There are 3 radar bands (microwave
frequencies): X band (10.49 to 10.56 GHz), K band (24.04 to
24.26 GHz), and the "superwide" Ka band (33.4 GHz to 36 GHz).
The X band was the first used for traffic. Next came the K band which is
harder to detect. (Most instant-on radar is K band.) The Ka band was
introduced in 1987, and widened to Ka SuperWideband in 1990. The
SWS2500NZ monitors all current radar bands including the entire
Ka SuperWideband.
The radar beam is cone shaped - the narrower the beam, the greater the
resolution. A moving vehicle reflects radar signals back towards the
radar gun. The SWS2500NZ can detect the signals emitted by radar
guns, and it will sound an audio alarm and flash a warning indicator.
For continuously transmitting radar, use the SWS2500NZ to get accurate
detection from a safe distance. As the first weak signals are detected, the
alarm sounds intermittently. As the signal gets stronger (the closer it
gets), both alarms increase in intensity.
Instant-on transmitters fire a short radar pulse beam at a vehicle and
instantly read its speed. When detected at a distance, you will hear a few
beeps and see the sterength meter begin to light. Instant-On radar signals
are the most difficult to detect at a safe distance because they are
transmitted only when directed at you or the vehicle directly ahead of
you.
2
\
.
,---
-
-
~
....
.-.
.-
......
f-,
--
-
-
------
1
,1
-
_.
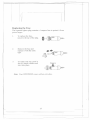
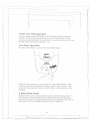
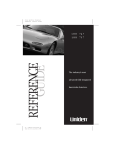
Laser
The Laser Speed Detection System, also called LIDAR (for Light
Detection and Ranging), uses a laser gun that emits infrared light pulses
just outside the spectrum of visible light. Each reflected pulse measures
the speed of the object coming toward or going away from the laser gun.
Unlike radar, the laser gun emits a very narrow beam of light, so it can
pinpoint a speeding car within traffic. The infrared beam spreads out, but
slower over a longer distance than a radar signal.
0.4 km
2.5 km
0.8 km
~"""=:~i::::::::::::t:::==:::~~=::::~::::::~:::~::~::~:::::::~::~:~~::~~:~::~.
1.5m
wide
gm
wide
3m
wide
The laser gun can acquire a speed reading as quickly as 0.3 seconds,
sometimes less. However, since it isn't easy to accurately aim at and hit a
moving target, an operator often moves the laser gun in several directions to
get a reading. So laser signals are emitted continuously for a few seconds for
each speed measurement. The SWS2500NZ can detect these iight pulses
from as far away as 2.5 km, which is about four times the effective range
of a laser gun (625 m), and about ten times its average operating range
(150-250 m).
Note: To be safe, do not ignore any warnings. Although there are
other types of radar signals that may cause inteiference, when
the SWS2500NZ detects a signal, be on the alert. It is important
to exercise caution at all times.
3
'-'-"
=
----
Included with Your Radar Detector
RDA640
Windshield
Bracket
Owner's Guide
RDA248
Hard Wire Lead
Fuses and
Spare Parts
RDA252
Coiled Cigarette
Lead
If any items are missing or damaged, contact your dealer immediately.
4
-~
'
--
----
-
-.
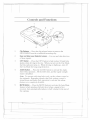
Controls and Functions
8
7
1.
ClipRelease
Pressthe clip release button to remove the
SWS2500NZ from the windshield mounting clip.
2.
RearandSideLaserDetector
Lenses- For rear and side.detection
of laser signals.
3.
CITYButton
Pressthe CITY button to help reduce X-band false
alarms while driving in the city. When you turn on the City Mode,
the City indicator turns on. While driving on highways, turn off
the City Mode for long-range detection.
4.
AUDIOButton- Pressthe AUDIO button to activate the Audio
Alert Only operation. All the LEDs dim, and the signal strength
meter is disabled.
Note; To operate with visual alert only, set the volume control to
the minimum. Remember though, that if the volume control is
turned down and Audio Only operation is selected, the alarm
features are completely disabled.
5.
MUTEButton-
Press the MUTE
button to activate the Auto Mute
feature (which produces full alert level when a signal is first
received, then automatically reduces to half volume for the rest of
the warning.
5
~
._- - -.-
--
-
----
==
~=
6.
DC 12VPowerInput-
Note;
=
Connect the DC power cord here.
Use only a Uniden@ supplied power cord or its
replacement.
7.
LEDDisplay- LEDs display visual alerts, signal strength, and
operation mode.
8.
On-OffNolumeControlAudio Alert volume.
9.
Speaker- Sounds audio alert. There are five different audio alert
Turns the power on and adjusts the
tones to distinguish each band of radar signal and laser signal
received.
6
"===:::.::::::==
=""",,=,:=:::::--=
--.-
--
~
r-
---~=
LED Displays
r-----------------
:1 2 3 4: C
I
:_~---~-~-~---~~
I
1 2 3 4
5
6
I
8 9
7
1.
X-BandSignal Indicator- A green LED lights and blinks to
indicate the presence of an X-band radar signal. The blink rate
increases as the radar source gets closer. A distinct audio alert is
also heard.
2.
K-BandIndicator
- An amber(orange)LEDlightsandblinksto
indicate the presence of a K-band radar. The blink rate increases
as the radar source gets closer. A distinct audio alert is also heard.
3.
Ka-SuperWideband
SignalIndicator- A red LED lights and blinks
to indicate the presence of a Ka-SuperWideband radar signal. The
blink rate increases as the radar source gets closer.
A distinct audio alert is also heard.
4.
LaserSignalIndicator- A red LEDunderL lightsandblinksto
indicate the presence of a laser signal. A distinct audio alert is also
heard.
5.
SWSSignalIndicator
When an early warning hazard or
informational signal is detected, the yellow SWS LED begins to
blink. A distinct audio alert is also heard.
6.
Power-OnIndicator- A green LED under P lights to indicate
power is being supplied to the unit and the unit is turned on. An
amber LED under P lights to indicate power is being supplied to
the unit and also X band is deleted.
7.
LEDSignalStrength
Meter- Four LEDs give an accurate visual
indication of the strength of radar or laser signals.
8.
CityModeIndicator
- A green LED under C lights to indicate that
you selected City Mode.
7
."".~-._.
_.. -
="
.-----.
- ..
--
~
"'~'-=
AutoMuteIndicator- A red LED under M lights to indicate that
you selected the Auto Mute feature.
9.
Note: Every time you turn on the SWS2500NZ, a self-test is performed
for all LEDs and Alert tones. You will hear in-orderfive distinct
tonesfor the X-, K-, and Ka-SuperWideband radar bands as well
asfor SWS and laser. (X Band will not be tested if switched off)
8
~="'-=:"'::':"'::=::::
==
---.
- ..-.-
--
~
,---+
~
r
._~
Installation
The SWS2500NZ uses a highly sensitive horn-type antenna and IR laser
sensor to receive radarnaser signals. Its sensitivity and range depend on
the method of installation and the direction of the antenna/sensor in
relation to the signal source. The inherent nature of radar waves makes
them reflect off metallic surfaces. That is why radar waves are so useful
for measuring the speed of a vehicle. The IR laser light may reflect only
from shiny surfaces. Both radar waves and IR laser light will, however,
pass thrvugh plastic or glass.
Before you decide where to put your radar detector, please keep in mind
these two important factors:
.
.
For safety, do not mount the SWS2500NZ in a location where it will
obstruct your driving vision.
Most vehicles have the top part of the windshield tinted. Mounting
the SWS2500NZ behind tinted or mirrored glass may reduce the
effectiveness of laser detection by reducing the amount of laser light
received by the Detector.
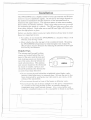
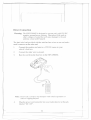
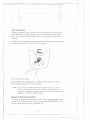
Helpful Tips
The antenna and forward looking
sensor are located behind the rear
panel of the unit, (and the rear-and
side-looking sensors are located on
top of the unit), directly behind the
mode selection keys. The antenna
and sensors should not be obstructed
by metal or metallic surfaces and
should be pointed at the horizon for
accurate long-range detection.
.
.
80 ~ 1J
Do not mount the unit behind the windshield wiper blades, radio
antenna, tinted glass area, or mirrored glass. Be sure the unit is free
from obstruction by seat backs, rear view mirror, sun visors, or the
ceiling of the automobile.
Do not mount the unit in front of the heater or defroster vents.
Do not leave the unit in direct sunlight or in the glove compartment
of a closed car for long periods of time, as extreme changes in
temperature may cause internal damage. Also, removing the unit
from the windshield makes you less susceptible to break-in and theft.
.
9
~-~', _.. '.
-'
- -.-
-:
:::-..:,:::.._---
'-'---
--
1----
------
--i
I
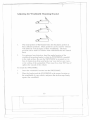
Adjusting the Windshield Mounting Bracket
~
~~
~~
1.
The metal portion of the bracket locks into the plastic portion at
three different positions. These positions can be used for vehicles
with different vertical angles of their windshields. The back
position can be used for vehicles with windshields that are slanted
back.
2.
For optimum laser detection, bend the angled portion of the
windshield mounting bracket so that the SWS2500NZ is parallel
to the road surface. Be sure the SWS2500NZ is mounted so it is
free of obstructions from seat backs, rear view mirror, sun visors,
or the ceiling of the automobile. There must be a clear 3600 line of
sight to the outside of the vehicle.
To mount the SWS2500NZ:
1.
Insert the.windshield bracket into the SWS2500NZ.
2.
Place the bracket and the SWS2500NZ in the proper location on
the windshield of your vehicle, and press the suction cups firmly
against the windshield.
10
:=
--
---
-
r
Connecting the Power
U sing the Coiled Cigarette lead
The SWS2500NZ is designed to operate on most 12 VDC negative
ground vehicle electrical systems. The power cord provided with the unit
has a cigarette lighter socket plug at one end and a small connector at the
other.
1.
Insert the small connector into the jack on the side of the unit.
2.
Insert the other end into the cigarette lighter socket of your
vehicle.
When installing the power cord, make sure that:
..
The socket is clean to allow proper contact
The power cord does not block the antenna area on the back of the
unit.
Your unit also comes with ten power cord mounting clips. You can use
these clips to attach the power cord to the window frame or other parts of
the vehicle, keeping it neat and out of the way. Use the double-sided
foam tape squares to attach each clip. Slip the power cord into the clip to
hold it securely in place.
11
,=",--"-
- ..---.-
.
"'=
~
=
.--..-.
----.--.---
--
---------
-r--i
,
~.
.. ..~--_._-_.
---
c---,
.'
r
_.
I
(
Direct Connection
Warning: The SWS 2500NZ is designed to operate only with 12V DC,
negative ground power systems. Operation of the unit on
other voltages or polarities will cause damage to the unit
and may creme afire hazard.
The hard wire lead provided with the unit has bare wires at one end, and a
small connector at the other end.
1.
Connect the positive rod wire to a 12V DC source in your
vehicle's fuse box.
2.
3.
Connect the other wire to ground.
Run the cord from the fuse box to the SWS 2500NZ.
I0000
Fuse
Box
0000
0000
DODO
Note: Ensure the cord does not inteifere with vehicle operation or
cause a iripping hazard.
4.
Plug the power cord connector into your radar detector at the jack
labeled "DC 12V".
12
-
-r-
'.. -
--
~
J
='
"
"~
-"
" -
--,I
\
Replacing the Fuse
The cigarette lighter plug contains a I-ampere fuse to protect it from
power surges.
1.
To replace the fuse,
unscrew the top of the plug.
2.
Remove the fuse and
replace it with the same
type.
3.
8~
.~
~~
To replace the top, push in
the two metal contatts and
twist into place.
Press'n
~~
Note: Your SWS2500NZ comes with an extra fuse.
13
-
-r
~
1
-=--=
r
.~.
11
~-II
(
Operation
You are now ready to enjoy the convenience and security of your
SWS2500NZ. Please read this section of the Operating Guide carefully
to familiarise yourself with the basic operation of this unit.
Power On
Turn the Volume control to switch on the power. When you power up
the SWS2500NZ, it performs a self-test of all its circuits. This test takes
about 5 seconds, during which you will hear five distinct alarm tones and
see all the LEDs. First, you will hear the X-band alarm for 2 seconds
while the X signal indicator, City, Audio, and Mute LEDs light. The test
also checks the meter LEDs. It is best to adjust the audible alarm during
this period. Then you will hear the K-band alarm, Ka-SuperWideband
alarm, Laser alarm and safety alert for I second each while the
corresponding signal indicator LED lights. (The P LED remains on until
you turn off the unit.)
After the SWS2500NZ confirms proper operation, the alert tones and all
LEDs, except the Power LED, turn off. If the Power LED does not light,
check the cigarette lighter socket connection. If the unit turns on and off
intermittently, or the alert tone sounds too often for no reason, check the
power cord connection at both ends to be sure it is not loose.
Volume Control
Adjust the Volume control
to a comfortable alarm tone
level for your vehicle. The
volume level does not have
any effect on the unit
sensitivity.
14
,--
~--
-----
i
'-,,
~
-.
r
"'-,
(
Full Warning
\Vhen the SWS2500NZ detects a radar, laser, or safety warning signal, it
emits a distinct warning tone and the corresponding alert LEDs
(X, K, Ka, L, or SWS) will light and blink. The blink rate of the LEDs
increases and the signal strength meter LEDs light successively as the
signal source comes closer.
Audio Alert Only Operation
Press the AUDIO button for Audio Alert Only operation.
When the Audio Only is selected, the visual alert and signal strength
meter are disabled. In this mode, all lighted LEDs will dim. Press the
AUDIO button again for the Full Alert (audio and visual) Mode.
(Do not set the Volume control at minimum when in Audio Alert Only
because there will be no warning.)
Note: The audio alert tonesfor the 3 radar bands and laser are all
different.
15
- --.
1-1
------,
f
-- --- - ----
-J
,
~.:::::=-==-~:::::=:==,=---="'
------
".--.---.
,..
.~
Visual Alert Only Operation
You can operate the SWS2500NZ in Visual Alert Only by setting the
Volume control at the minimum position in Full Alert Mode. At this
setting you can barely hear the audio alert in a quiet environment. Be sure
that the Audio Alert Only indicator is off.
Auto Mute Operation
Press the Mute button to activate the Auto Mute feature.
InBI
.ir.
NfeIy -ng
ayo/8m
When the Mute indicator is on, the unit is in Auto Mute Mode. In this
mode you hear the full audio alert when a signal is first received. The
audio alert automatically reduces to half volume for the duration of the
warning.
X Band Delete Mode
X Band Delete mode is indicated by the power LED glowing amber. X
Band Delete will completely disable X Band Detection and Warning.
Press the city button to toggle through (City on, X Band on), (City off, X
Band off), (City on, X Band off) and (City off, X Band on).
16
.-..----.-.
....----.-
r
\
City Operation
In highly populated areas, you may encounter many devices that use the
same'frequencies as radar signals, such as motion detectors, automatic
doors, and intrusion alarms. These devices may trigger an alert called
"falsing" .
To filter most of the weaker signals and get the most accurate radar signal
recognition, press CITY to turn on the City Mode.
The City indicator lights.
In City Mode, the combination of visual and audio alert tones varies
based on the strength of the received signal.
Note: If you use both Audio Only Alert and City modes, you won't
receive an alert until you are very close to the radar source.
If the power light glows amber, the detector will not provide any
audible or visible 'X' Band warning.
Memory Retention Feature
The memory retention feature retains operational settings in memory for
at least 2 days without power, when you turn on the SWS2500NZ, it will
be in the same mode as when you turned off.
17
-
-T
--
-
---
1
------,
--
f
-
J
---'-"
""
'---'
'-'-'--'
-----------
''---'
'
~...::::-~=-====:-===::--=~=====-
~
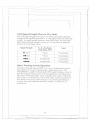
LED Signal Strength Meter in City Mode
The LED signal strength meter gives you instant information about the
strength of the signal being detected. A weak signal causes the first LED
to light. As signal strength increases, more LEDs light. All four LEDs
light when full signal strength is received. Use this meter to judge the
distance from the signal source.
X-, K-, Ka-Super
Wide Band, SWS
Laser
.000
Visual
Visual!Audio
..00
Visual
Visual/Audio
Signal Strength
...0
....
Visual/Audio
Visual/Audio
Visual/Audio
Visual/Audio
Safety Warning System Operation
The Safety Warning System (SWSTM)is a new communication system
that will provide an early warning when a road hazard exists. The
SWS2500NZ is capable of detecting the SWS signal broadcast on the Kband by either law enforecement or local departments of transportation.
The yellow SWS LED blinks, while an audible alert sounds. When this
alert sounds, you should tune to local radio traffic reports and prepare to
slow down or stop your vehicle because you could be approaching an
accident, bad road conditions caused by weather, or road crews or
construction.
18
--"--
"'"
-----f
---
--- --..
-
,
=-=
-- - ------
-- -
n
=-=---
~
Care and Maintenance
The SWS2500NZ is designed to give you years of trouble-free service.
There are no user-serviceable parts inside, and except for the fuse, no
maintenance is required. To keep your detector in new condition, follow
these important suggestions:
.
Never leave the SWS2500NZ on the windshield when you park your
vehicle. The temperature in the vehicle in summer can reach levels
above what is considered to be safe for this unit.
. To make you less susceptible to break-in and theft, remove the unit
.
from your windshield when you leave your vehicle.
Do not expose the unit to moisture. Rain, dew, road splash, or other
liquids can damage the internal components and reduce sensitivity of
the SWS2500NZ.
19
--
,-------r
1-
-
-
-'--.
------
~_._.._._-_._--_._------_.._._-_._._-_.-._._._-----_.-..-----.
=-:;-..::::=:::-:===--:::::::::::=,=--==~
~
Troubleshooting
If your SWS2500NZ does not perfonn up to expectations, try the
suggestions listed below. If you cannot get satisfactory results, contact
your local retailer or Uniden (NZ) LTD for assistance.
Unit does not operate:
(Power LED not on)
. Check the power cord. Be sure the connectors
are properly installed.
. Be sure ignition key is ON or in the accessory
position.
. Fuse blown. Check and replace.
. Check power to lighter socket.
Vehicle electrical problem exists.
Make sure that the volume control is in the ON
position.
Clean cigarette lighter socket.
Return to your retailes.
Check angle of unit.
Antenna/Sensor is obstructed. Relocate the unit
clear of any obstruction outside the windshield,
such as a wiper blade.
. Relocate the unit clear of the window tint.
Unit fails the self test.
Weak detection.
..
..
.
Inaccurate or erratic
detection:
.
Beeps over bumps or
rough road.
Beeps at same location.
Signal strength meter
registers, but no audio.
The unit bounces against
the windshield.
No X Band Detection
Beeps when vehicle
approches
.
Loose power cord.
Check both connectors.
. Power cord is broken. Check and replace.
Check that the power cord is connected at both
ends.
. Clean cigarette lighter socket.
Falsing because you have passed a motion
sensor or alarm.
.
.
.
..
.
.
For Highway use, be sure City Mode is OFF.
Increase the volume.
Reposition so that the bumpers are firmly
against the windshield.
X Band delete mode has been selected. Power
light glows amber.
. Refer to page 16 for more details.
False alarm caused by another rader detector in
closer proximity.
20
-0;;;::-
I
-.
r
I
(
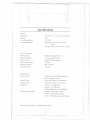
Specifications
General
Dimensions
Weight:
Power Requirements:
Temperature Range:
79mm(W)x lI7mm(D)x21
mm (H)
99 g
13.8 VDC
Operating: -20°C to 70°C (-5°F to
160°F)
Storage: -40°C to 85°C (-40°F to 185°F)
360° Laser Detector
Detector Type:
Receiver Bandwidth:
Pulse Laser Signal Receiver
Convex Condenser Lens
Pulse Width Discriminator
30 MHz
Spectral Response:
Alert Hold Time:
800 - 1l0q nm
1 second
Recei ver Type:
Sensor Front End:
Radar Detector
Recei ver Type:
Double Conversion Superheterodyne
Self-Contained Antenna
Detector Type:
Antenna Type:
Scanning Frequency Discriminator
Linear polarized, E vector vertical
X band = -114 dBmlcm2
K band = -104 dBmlcm2
Sensitivity:
Ka SuperWideband = -100 dBmlcm2
Frequency of Operation:
10.490 - 10.560 GHz (X band)
24.040 - 24.260 GHz (K band)
33.40 - 36.00 GHz (Ka SuperW1deband)
Specifications are subject to change without notice.
21
-r
f
+
--
~
- -- -.. - --- ------
-"--"-'---'
~:-=,,---"---"--,'--
"""---,-
="::::::-':=:==:::=::-:.:=:==-
.~
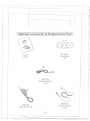
Optional Accessories & Replacement Parts
RDA640
Owner's
Guide
Windshield'
Clip
RDA249
Straight Cigarette
Lead
RDA252
Coiled Cigarette
Lead
RDA248
Hard Wire Lead
22
----
--"-
--.....
.~
_'__0
-
r
..-.
---
(
WARRANTY
1 YEAR WARRANTY
(Accessories are covered for 90 Days ONLY)
Note: Please keep your sales docket as it provides evidence of warranty. Warranty is
only valid in the country where the product has been purchased.
WARRANTOR:
Uniden New Zealand Limited
ELEMENTS OF WARRANTY: Uniden warrants to the original retail owner for the
duration of this warranty, its SWS 2500NZ rader detector (hereinafter referred to as
the Product), to be free from defects in materials and craftsmanship with only the
limitations or exclusions set out below.
WARRANTY DURATION: This warranty to the original retail owner only, shall
terminate and be of no further effect ONE (I) Year after the date of original retail sale.
This warranty will be deemed invalid if the product is: (A) Damaged or not maintained
as reasonable and necessary, (B) Modified, altered or used as part of any conversion
kits, subassemblies, or any configurations not sold by Uniden. (C) Improperly
installed, (D) Repaired by someone other than an authorized Uniden Repair Agent for
a defect or malfunction covered by this warranty, (E) Used in conjunction with any
equipment or parts or as a part of a system not manufactured by Uniden, (F) Installed,
programmed or serviced by anyone other than an authorized Uniden Repair Agent, (G)
Where the Serial Number label of the product has been removed or damaged beyond
recognition.
PARTS COVERED: This warranty covers the product for One year. All accessories
are covered for 90 Days only.
ST ATEMENT OF REMEDY: In the event that the product does not conform to this
warranty at any time while this warranty is in effect, the warrantor at its discretion,
will repair the defect or replace the product and return it to you without charge for
parts and service. THIS WARRANTY DOES NOT COVER OR PROVIDE FOR
THE
REIMBURSEMENT
OR
PAYMENT
OF
INCIDENTAL
OR
CONSEQUENTIAL DAMAGES. THIS GUARANTEE IS IN ADDITION TO AND
DOES NOT IN ANYWAY AFFECT YOUR RIGHTS UNDER THE CONSUMER
GUARANTEE ACT.
WARRANTY CARD: If a warranty card has been included with this product then
please fill it in and return to us within 14 days of purchase. Your name and the Serial
number of the product will then be registered in our database and this will help us
process your claim with greater speed and efficiency should you require warranty
service.
PROCEDURE FOR ORT AINING PERFORMANCE OF WARRANTY: In the
event that the product does not conform to this warranty, the Product should be
shipped or delivered, freight pre-paid, with evidence of original purchase (e.g., a copy
of the sales docket),
with a full description
of the problem,
to the warrantor
at:
UNIDEN NEW ZEALAND LIMITED
150Harris Road
East Tamaki, Auckland
Ph (09) 2738383 FAX (09) 2740009
23
.-
'--
-0- o. 0
--
-r-
-
i
=-"==
h
_.
(
Covered under one or more of the following V.S. patents:
4,622,553
4,698,632
4,709,407
4,791,420
4,831,498
5,315,302 5,469,287
5,579,012
unid~n@
<91997 Uniden New Zealand Ltd. All rights reserved.
USZZO 1064CZ
- -. --
Printed in the Philippines
--
------
[--
,