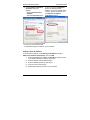
1
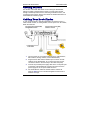
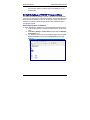
RouteFinder® SOHO
SOHO Security Appliance
EDGE Models
RF825-E, RF825-E-AP
CDMA Models
RF825-C-Nx, RF825-C-Nx-AP
Quick Start Guide
RouteFinder RF825 Series
Quick Start Guide
RouteFinder SOHO Security Appliance Quick Start Guide
Models:
EDGE Models: RF825-E, RF825-E-AP
CDMA Models: RF825-C-Nx, RF825-C-Nx-AP
Document Number 82100286L, Revision B
Copyright
This publication may not be reproduced, in whole or in part, without prior expressed written
permission from Multi-Tech Systems, Inc. All rights reserved.
Copyright © 2007. Multi-Tech Systems, Inc. makes no representations or warranty with respect
to the contents hereof and specifically disclaims any implied warranty of merchantability or
fitness for any particular purpose. Furthermore, Multi-Tech Systems, Inc. reserves the right to
revise this publication and to make changes from time to time in the content hereof without
obligation of Multi-Tech Systems, Inc. to notify any person or organization of such revisions or
changes.
Revision
Date
Description
A
B
06/19/07
11/07/07
Initial release. Software version 1.30
Software version 1.40. Removed Wireless Activation instructions.
Patents
This device is covered by one or more of the following U.S. Patent Numbers: 6,219,708;
5,301,274; 5,309,562; 5,355,365; 5,355,653; 5,452,289; 5,453.986.
Trademarks
RouteFinder, Multi-Tech and the Multi-Tech logo are registered trademarks of Multi-Tech
System, Inc. Windows is a registered trademark of Microsoft.
World Headquarters
Multi-Tech Systems, Inc.
2205 Woodale Drive
Mounds View, Minnesota 55112
Phone: 763-785-3500 or 800-328-9717
Fax: 763-785-9874
Internet Address: http://www.multitech.com
Technical Support
Country
By Email
By Phone
Europe, Middle East, Africa
U.S., Canada, all others
[email protected]
[email protected]
+(44) 118 959 7774
(800) 972-2439 or +763-717-5863
2
Quick Start Guide
RouteFinder RF825 Series
Introduction
Welcome to the world of Internet security. Your Multi-Tech RouteFinder
SOHO Internet security appliance, RF825 series, is ideal for the small
office or home office (SOHO) that needs secure access to a corporate
LAN.
The RF825 CDMA/EDGE-AP builds offer secure 802.11b/g Wi-Fi®
wireless connectivity.
RouteFinder Ship Kit Contents
The RouteFinder shipping box contains the following items:
• One RF825 RouteFinder
• Power Supply
• RJ45 Ethernet Cable
• 2.4 GHz 5dBi SWI-Reverse-F Swivel Access Point Antenna
(Included with the Wi-Fi® models only)
• 2dB Cellular Antenna (not included with all models)
• This Quick Start Guide
• A CD with a 30-day evaluation copy of IPSec VPN Client software
(not the full working version).
• One RouteFinder CD which contains RouteFinder documentation
and Adobe Acrobat Reader.
If any of the items is missing or damaged, please contact Multi-Tech
Systems, Inc.
Safety Warnings
Ethernet Ports Caution
The Ethernet ports are not designed to be connected to a Public
Telecommunication Network.
Handling Precautions
All devices must be handled with certain precautions to avoid damage due
to the accumulation of static charge. Although input protection circuitry has
been incorporated into the devices to minimize the effect of this static build
up, proper precautions should be taken to avoid exposure to electrostatic
discharge during handling and mounting.
Caution: Maintain a separation distance of at least 20 cm (8
inches) between the transmitter’s antenna and the body of the
user or nearby persons. The modem is not designed for, nor
intended to be, used in applications within 20 cm (8 inches) of the
body of the user.
3
RouteFinder RF825 Series
Quick Start Guide
Front and Back Panels
CDMA Front Panel
EDGE Front Panel
LEDs
Power
Status
Description
Lights when power is being supplied to the RouteFinder.
When functioning normally, the LED blinks. The LED is a
solid light when the RouteFinder is booting up, saving the
configuration, restarting, or updating the firmware.
LAN
Lights when a successful connection to the 100BaseT LAN
10/100M
is established. Off when connected to the 10BaseT.
LAN Link/ Lights when the LAN port has a valid Ethernet connection.
ACT
Blinks when it is receiving or transmitting data.
WAN
Lights when a successful connection to the 100BaseT
10/100M
WAN is established. Off when connected to the 10BaseT.
WAN Link/ Lights when the WAN port has a valid Internet connection.
ACT
Blinks when it is receiving or transmitting data.
Modem
TD Transmit Data. Blinks when the modem is
transmitting data to your wireless carrier.
RD Receive Data. Blinks when the modem is receiving
data from your wireless carrier.
CD Carrier Detect. Lights when the modem detects a
valid carrier signal from a wireless carrier.
TR (Data) Terminal Ready. Lights when the modem is
trying to establish a wireless connection.
LS Link Status.
EDGE: Blinks when there is network activity between
carrier and cellular module. Otherwise, light will be off.
CDMA: Continuous “on” – The wireless modem is
not registered on the network.
Flashing – Network registration OK.
Off – Modem is off (not ready) or in download mode.
4
Quick Start Guide
RouteFinder RF825 Series
CDMA & EDGE Back Panel
CDMA-AP & EDGE-AP Back Panel
Connector
GSM/EDGE
Antenna
Connector
Handset
WAN
LAN Ports
+9 Volt to
32VDC
Reset
802.11
Description
2 dBi cellular antenna connector.
Note: The antenna must be attached in order for the
RouteFinder to be operational.
Connector for a handset.
WAN (10/100BaseT) port connects the DSL modem or
cable modem.
There are 4 LAN ports. You can connect to PCs, FTP
servers, printers, or other devices you want to put on
your network.
RouteFinder power source can range from 9 volts to
32VDC.
The Reset button resets the RouteFinder to its factory
defaults. Press and hold the button until the Status LED
blinks, and then release it. Do not press this button
unless you want to restore all settings to the factory
defaults.
2.4 GHz 5dBi SWI-Reverse-F antenna connector.
Note: The antenna must be attached in order for the
RouteFinder to be operational.
5
RouteFinder RF825 Series
Quick Start Guide
Getting Started
This section of the Quick Start Guide covers cabling the RouteFinder,
setting up TCP/IP communications in order to connect to the Internet
through a wireless provider's service, activating a wireless account, and
connecting to the Internet. See the User Guide for detailed information on
the RouteFinder software program.
Cabling Your RouteFinder
To use your RouteFinder, make the appropriate connections to PCs, a
cable or xDSL modem, an analog modem, and AC power. For AP models,
attach the antennas.
1.
2.
3.
4.
6
Turn the power off on all network devices (PCs, cable modems,
DSL modems, analog modems, and the RouteFinder).
Plug the RJ-45 cable into the Ethernet port on the PC and the
LAN port on the RouteFinder. (If you have more than one PC,
connect the others in the same way to the other LAN ports).
Connect the provided power supply cable to the 9 volt power port
on the back of the RouteFinder, and plug the other end of the
power supply into an AC power outlet as shown.
For the RF825-AP, attach the cellular antenna and the AP
antenna. Note: Be sure to locate this appliance where there is
wireless coverage.
Quick Start Guide
5.
RouteFinder RF825 Series
If a DSL or cable modem is desired, connect a network cable
from the DSL modem or cable modem to the WAN port on the
RouteFinder.
Establishing a TCP/IP Connection
The following directions establish a TCP/IP connection at the workstation
so the PC can communicate with the RouteFinder. The RouteFinders have
built-in DHCP functionality, so you can set the PC to obtain a dynamic IP
address. The following directions were written using a Windows 2000+ /
XP operating system.
Obtaining a Dynamic IP Address
To obtain a dynamic IP address so it can be assigned to the Ethernet port:
1. Make the RouteFinder connections as described on the previous
page.
2. Click Start | Settings | Control Panel. Double-click the Network
Connections icon.
3. The Network Connections screen displays. Right-click the Local
Area Connection icon and choose Properties from the drop
down list.
7
RouteFinder RF825 Series
4. The Local Area Connection
Properties dialog box
displays.
• Select Internet Protocol
[TCP/IP].
• Click the Properties button.
Quick Start Guide
5. Once you click the Properties
button, the following screen
displays. To have your DCHP client
obtain a dynamic IP address, click
the Obtain an IP address
automatically button.
6. Close out of the Control Panel.
7. Repeat these steps for each PC on your network.
Setting a Fixed IP Address
To set a Fixed IP Address, check Specify an IP address instead of
Obtain an IP address automatically. Then click OK.
1. Enter the workstation IP address as 192.168.2.x. Note that the x
in the address stands for numbers 101 and up.
2. Enter the Subnet mask as 255.255.255.0
3. Enter the Default gateway as 192.168.2.1
4. Close out of the Control Panel.
5. Repeat these steps for each PC on your network.
8
Quick Start Guide
RouteFinder RF825 Series
Obtaining and Activating a Wireless
Account
You may want to use a wireless connection to the Internet in case your
Ethernet WAN connection goes down. Before you can use the wireless
feature, you must obtain a wireless account through a service provider and
then activate the account.
Activation Notices
Please see the wireless account Activation Notices located on the
MultiModem CD. Choose the one for your wireless network provider and
follow the directions to activate your account. These directions are also
included in your ship kit.
Connecting to the Internet
Through the Cellular Provider’s
Service
Important Note About Provider Fees
Your wireless service provider will charge you for your data usage. Please
check with your provider to make sure you are aware of their charges.
If you plan to use the RouteFinder for large amounts of data transfers,
Multi-Tech recommends an unlimited data plan with your account. MultiTech will not be responsible for any charges relating to your bill.
Connecting to the Internet Steps
1.
2.
3.
4.
5.
6.
7.
8.
Turn on your PC and login. Make sure your LAN connection is
set to Obtain an IP Address Automatically (see the section
Setting a TCP/IP Connection)
Connect the RouteFinder LAN port to the PC using the RJ45
cable and apply power by plugging in the power cable.
Attach the antennas.
For EDGE models, make sure your SIM card is inserted correctly.
From the workstation, open the command window by clicking the
Start button and selecting Run.
Type CMD to open the command window. Click OK.
When the command window opens, type IPCONFIG.
Check to make sure your LAN connection has received an IP
address in the 192.168.2.x subnet from the RouteFinder. If not,
type IPCONFIG /RELEASE, and then type IPCONFIG /RENEW
to see if you receive an IP address. Close the command window.
9
RouteFinder RF825 Series
9.
Quick Start Guide
Open a Web browser and complete the following:
• In the Address bar type http://192.168.2.1
This opens the Routefinder's Web Management software.
See the User Guide for more about the software.
• Click Go.
• The Login screen displays.
10.
• Type the following:
For Username: admin.
For Password: admin
Once you are logged in, you must setup the PPP functionality.
Select Network Setup from the Menu bar, and then select PPP
Cellular/Analog Backup when the Network Setup screen displays.
See the User Guide for an example of this screen.
Enter the following on the PPP Cellular/Analog Backup screen to
configure the PPP dialer:
Status:
Check this box to enable PPP.
Dial-on-Demand: Select Disable (select disable to stay
connected at all times).
Idle time out:
0 (zero indicates that the connection will not
disconnect)
User Name:
Enter your user name. There is no default.
Password:
Enter your password. There is no default.
Baud Rate:
For CDMA models, select 115200.
For EDGE models, select 230400.
10
Quick Start Guide
RouteFinder RF825 Series
Dial Number:
11.
12.
13.
14.
15.
16.
17.
18.
19.
For CDMA models, type #777
For EDGE models, type *99***1#.
Save:
Click the Save button.
Init String 1:
For EDGE models, type
AT+CGDCONT=1,"IP","<APN>"
Note: The APN (Access Point Name) is
assigned by your wireless service provider.
An access point is an IP network to which a
mobile device can be connected.
Signal Strength Command: For CDMA, enter AT+CCED.
For EDGE, enter AT+CSQ.
Save: Click the Save button.
Click Save & Restart (located on the Menu bar).
After the RouteFinder has restarted and the Status light is
flashing, wait for about 1 minute to be sure that the TR and CD
LEDs are lit and showing a solid light (not blinking).
From the workstation, open the command window by clicking the
Start button and selecting Run.
Type CMD to open the command window. Click OK.
When the command window opens, type IPCONFIG /RELEASE
to release your current IP received from the RouteFinder.
Then type IPCONFIG /RENEW to renew your IP address from
the RouteFinder. You should also receive a DNS address from
the RouteFinder.
Close the command window.
Open a Web browser. You are now connected to the Internet.
To verify a connection, go to the RouteFinder's software screen,
Statistics & Logs > PPP Cellular/Analog Log.
To Disable Your Cellular Connection
Uncheck the Status box for the PPP option by using the RouteFinder's
Web Management software Wizard Setup screen or select Network Setup
> PPP Cellular/Analog Backup and disable PPP.
Additional Configuration of the Cellular Modem
You may want to further communicate directly to the cellular modem for
checking signal strength, verifying network registration, and/or
troubleshooting your Internet connection. This information is available in
the User Guide.
11
82100286L