1
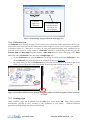
User Guide
© 2004 Virtual Ink Corporation
Brighton Landing East, 20 Guest Street – Suite 520
Boston, Massachusetts 02135 USA
CONTENTS Chapter 1:
Introduction to mimio Studio ....................................... 1‐1
1.1.
What is mimio Studio?.......................................................................................................... 1‐1
1.2.
Important Terminology ........................................................................................................ 1‐1
1.3.
Minimum system requirements .......................................................................................... 1‐1
1.4.
What’s new in mimio Studio, Version 4.0? ........................................................................ 1‐1
1.5.
How is mimio Studio different from earlier mimio software?........................................ 1‐2
1.6.
Can I install and use mimio Studio and also keep and user my earlier version 2.74 mimio software? .................................................................................................................................. 1‐3
1.7.
Using this manual.................................................................................................................. 1‐3
Chapter 2:
2.1.
Setting Up Your mimio Hardware ............................... 2‐4
Setting up your mimio capture device ............................................................................... 2‐4
Chapter 3:
Starting the mimio Studio software............................. 3‐6
Chapter 4:
mimio Studio Settings .................................................... 4‐7
4.1.
4.2.
4.3.
4.4.
4.5.
4.6.
Adjusting pen settings .......................................................................................................... 4‐7
Adjusting device settings ..................................................................................................... 4‐7
Adjusting Software Update options ................................................................................... 4‐8
Interactive Settings options .................................................................................................. 4‐9
Adjusting NetMeeting options ............................................................................................ 4‐9
Adjusting mimio Notebook options ................................................................................. 4‐10
Chapter 5:
5.1.
5.2.
Overview of mimio Studio ..........................................5‐12
mimio Notebook.................................................................................................................. 5‐12
mimio Tools.......................................................................................................................... 5‐12
Chapter 6:
Using mimio Studio in Ink Recording mode............. 6‐1
6.1.
Using the capture device buttons........................................................................................ 6‐1
6.1.1. New Page ........................................................................................................................... 6‐1
6.1.2. Tag Page............................................................................................................................. 6‐1
6.1.3. Print .................................................................................................................................... 6‐1
6.1.4. Maximize/Minimize ......................................................................................................... 6‐1
6.1.5. Calibration and Interactive Mode button...................................................................... 6‐2
Chapter 7:
Using the mimio Notebook ........................................... 7‐3
7.1.
Working with pages .............................................................................................................. 7‐3
7.1.1. Inserting a New and Duplicate pages ............................................................................. 7‐3
7.1.2. Inserting pages from another mimio Notebook ........................................................... 7‐3
7.1.3. Using copy, cut and paste................................................................................................ 7‐4
7.1.4. Changing the page size .................................................................................................... 7‐4
7.1.5. Reordering pages .............................................................................................................. 7‐4
7.1.6. Fullscreen view ................................................................................................................. 7‐5
7.1.7. Printing pages ................................................................................................................... 7‐5
7.1.8. Saving documents............................................................................................................. 7‐6
7.1.8.1.
Saving as ink files .................................................................................................... 7‐6
7.1.8.2.
Saving pages in other file formats......................................................................... 7‐6
7.1.8.2.1. HTML .................................................................................................................. 7‐7
7.1.8.2.2. Saving pages as images..................................................................................... 7‐7
7.2.
Working with objects ............................................................................................................ 7‐7
7.2.1. Creating and editing Ink, Lines, and Graphic Objects................................................. 7‐7
7.2.1.1.
Inserting ink ............................................................................................................. 7‐7
7.2.1.2.
Changing line width and color properties for pen, line, and object tools ....... 7‐8
7.2.2. Inserting text on Notebook pages................................................................................... 7‐8
7.2.2.1.
Editing text ............................................................................................................... 7‐8
7.2.3. Inserting an image from a file ......................................................................................... 7‐9
7.2.4. Inserting backgrounds and pictures from the gallery ................................................. 7‐9
7.2.5. Inserting a file image background................................................................................ 7‐10
7.2.6. Inserting a Screen Markup background ...................................................................... 7‐10
7.2.7. Importing Pictures onto a Notebook Page .................................................................. 7‐11
7.2.8. Manipulating (Moving, Resizing, Rotating) objects .................................................. 7‐11
7.2.8.1.
Moving objects....................................................................................................... 7‐11
7.2.8.2.
Resizing objects...................................................................................................... 7‐11
7.2.8.3.
Grouping objects ................................................................................................... 7‐12
Chapter 8:
Using the Interactive Mode ........................................... 8‐1
8.1.
Introduction to Interactive mode ........................................................................................ 8‐1
8.2.
Using right click..................................................................................................................... 8‐2
8.3.
Using the floating keyboard tool......................................................................................... 8‐3
8.3.1. Using the spotlight tool.................................................................................................... 8‐3
8.3.2. Using the reveal tool......................................................................................................... 8‐4
8.3.3. Accessing a web browser................................................................................................. 8‐4
Chapter 9:
9.1.
9.2.
9.3.
Frequently Asked Questions (FAQ).................................................................................... 9‐1
Common interference problems.......................................................................................... 9‐1
Calibrating problems during Interactive Mode ................................................................ 9‐1
Chapter 10:
Troubleshooting............................................................... 9‐1
Copyright and Legal Information ...........................10‐2
Chapter 1: 1.1.
Introduction to mimio Studio What is mimio Studio? mimio Studio is a suite of productivity tools designed to assist you in the creation, capture, assembly and interactive presentation of information. mimio Studio software can be used stand alone or in conjunction with a mimio capture device. When used with a mimio capture device and a projector, mimio Studio turns your whiteboard into a powerful presentation and instruction tool. mimio Studio and a mimio capture device can also be used, without a projector, to capture handwritten notes, diagrams and drawings from the whiteboard for later editing, printing, and/or distribution in a variety of data formats. 1.2.
•
•
•
•
1.3.
Important Terminology Digital Ink Recording Mode – mimio system is being used to record actual whiteboard notes, diagrams, drawings written on the board with dry erase whiteboard markers in the mimio stylus pens or erased with the mimio eraser Interactive Mode – mimio system is used with a data projector image displayed and calibrated on the board which can be controlled using a mimio stylus pen containing the mimioMouse insert instead of an Expo marker. mimio “connected” – mimio capture device is attached to the computer via USB cable (or via new wireless interface module) and is linked to the Studio software in Digital Ink Recording Mode. The image of the capture device is shown on the whiteboard “page” in the software (see Figure 1‐1). mimio “attached” – mimio capture device is attached to the computer via USB cable (or via new wireless interface module) and system can operate in Interactive Mode. The image of the capture device is NOT shown on the whiteboard “page” in the software. Minimum system requirements The minimum system requirements for mimio Studio are: •
•
•
•
•
1.4.
•
•
•
•
•
•
•
•
Windows® Compatible PC with a Pentium II, 400 MHz processor minimum. Microsoft Windows 98SE, Me, 2000 or XP operating system. 64 MB RAM minimum (128 MB RAM recommended). 20 MB free disk space. CD‐ROM drive or internet connection to download the software installer. What’s new in mimio Studio, Version 4.0? Simplified and sleek user interface (see Figure 1‐1) Extended object support, including ink, lines, shapes, text, and images Full page sorting, including adding, deleting, and moving pages Background image support, including an extensive gallery of templates and picture objects Advanced interactive and presentation tools, including reveal, spotlight, floating keyboard, and web browser access Enhanced screen markup capabilities, including auto‐archived markups Extendable *.ink file format based on XML with anti‐aliasing (smooth lines) Multiple mimio devices (up to 4) can be connected or combined on a single PC. Quick Start Guide
Introduction to mimio Studio • 1‐1
3
1 2 4 5 Figure 1‐1: mimio Studio software user interface Callout 1 2 3 4 5 User Interface Description Single page view Multiple page view Full Screen view mimio Tools button mimio Settings button Table 1‐1: mimio Studio User Interface Features 1.5.
How is mimio Studio different from earlier mimio software? mimio Studio adds a vast array of powerful editing and interactive tools and greatly expanded capabilities to mimio Xi and mimioBoard but some attributes are fundamentally different from earlier mimio software versions and should be noted. • mimio Studio records Ink data as image “objects”, not as “stroke‐over‐time” data. Your Ink strokes recorded in mimio Studio cannot be replayed nor can they be exported to playable or animated formats like QuickTime, iMovie, or Real Player boardCast. • As “object” data, digital “Ink” recorded in mimio Studio can be integrated and edited on the same mimio Studio page with other data types such as background and foreground images and templates, text, and graphics. • Optional mimio software plug‐ins such as writingRecognition, classRoom, and boardCast do not install or run in mimio Studio at this initial release. • Control Panels are not supported in mimio Studio. Quick Start Guide
Introduction to mimio Studio • 1‐2
•
•
mimio Studio supports Digital Ink recording (with markers) and Interactive whiteboard functions as two distinct modes, between which the user can easily switch. Ink recording and interactive modes do not operate on the same board at the same time as in earlier version 2.x mimio software. Ink files recorded in earlier versions of mimio software can be opened in mimio Studio. Ink files recorded in mimio Studio cannot be opened in earlier 1.x or 2.x versions of mimio software. 1.6. Can I install and use mimio Studio and also keep and user my earlier version 2.74 mimio software? Installing and using mimio Studio and another mimio application may cause random conflicts and application performance and connection errors. While they will not damage your system or cause data loss, it should be understand that this type of configuration is not endorsed by Virtual Ink for optimum performance of the mimio system. When you install mimioStudio, it will overwrite the existing mimio v. 2.7x or earlier mimio software installed, including any plug‐ins. You should therefore determine in advance, based on the feature differences described above, which mimio software is right for you.
1.7.
Using this manual Please note that in the following pages, when referring to actual commands, options or names as actually displayed in the mimio Studio software the terms are formatted Bold in Arial font. Quick Start Guide
Introduction to mimio Studio • 1‐3
Chapter 2: 2.1.
Setting Up Your mimio Hardware Setting up your mimio capture device mimio capture devices compatible with mimio Studio attach to the system via a USB cable. The illustrations below feature mimio Xi. Please refer to the set‐up instructions for your mimioBoard or other Studio compatible mimio technology device. 1. Plug the included mini‐USB cable into the socket on the bottom recessed end of the bar (Error! Reference source not found.). Figure 2‐1: Plugging the mini‐B USB cable into mimio Xi. 2.
Attach the mimio capture bar to your whiteboard or other writing surface using the plastic mounting brackets included with the system (refer to Error! Reference source not found.). Using the mounting brackets does not require you to use the capture bar in only that location ‐ the capture bar can be removed, used elsewhere, and returned to the clips afterwards. You can purchase additional mounting brackets if your mimio Xi is used routinely in multiple locations. The mimio Xi can also be attached using the built‐in suction cups for temporary use in any whiteboard location. Quick Start Guide
Setting Up Your mimio Hardware • 2‐4
3.
Follow these steps to mount the brackets. Note that the removable 3M “Command” adhesive tabs can be replaced with new tabs that can be purchased at most large home improvement retailers. Step 1: Snap the mounting Step 2: Carefully brackets over the suction cups, peel the backing making sure they clip into the from the adhesive recesses on the edges of the bar. strips. Step 3: mimio Xi should be mounted in the upper left‐hand corner of your whiteboard. Step 4: mimio Xi can be removed by pulling up on one edge of the bar and pulling it gently out of the brackets. Figure 2‐2: Installing mimio Xi onto a whiteboard. 4.
Install mimio Studio which includes the drivers for the mimio hardware system. 5.
Plug the other end of the USB cable into your system USB port (refer to Error! Reference source not found.). The capture bar should be automatically detected and can be verified in mimio Settings (Chapter 4.2). Refer to your system documentation if you canʹt find the USB port, or if your capture bar is not automatically detected. Figure 2‐3: Plugging the USB cable into your PC Quick Start Guide
Setting Up Your mimio Hardware • 2‐5
Chapter 3: Starting the mimio Studio software One way to open mimio Notebook is by double‐clicking on an associated .ink file in Windows Explorer. Any file that has a mimio originated ʺ.inkʺ file extension is associated with mimio Notebook when mimio Studio is installed. NOTE: Both mimio Studio and earlier version mimio software use the “.ink” file extension. Once saved in mimio Studio any Ink file recorded in the earlier time based mimio software will only open in mimio Studio. If you wish to retain the replay capabilities of your Ink files recorded in earlier mimio software, save them as a different filename in mimio Studio. Another way to open mimio Notebook is to go to the Windows Start Menu, select ʺAll Programsʺ, then the folder ʺmimioʺ. Inside this folder there should be a link for mimio Notebook: click on it. See Figure 3‐1. Figure 3‐1: mimio folder within Windows Start menu From the mimio icon that appears in the lower right Windows system tray on your PC desktop you can access mimio Notebook, mimio Tools, mimio Studio Settings and mimio Studio Help by right clicking on the icon and selecting the desired module. Please refer to Figure 3‐2. Figure 3‐2: mimio system tray icon right‐click popup menu Close mimio Studio completely by clicking on Exit. Quick Start Guide
Starting the mimio Studio software • 3‐6
Chapter 4: mimio Studio Settings mimio Studio Settings is a menu of options for setting and customizing the properties and characteristics of your mimio system, sessions and documents, including Pen settings, Capture Devices, Software Updates, Interactive Mode, NetMeeting links, and mimio Notebook files. 4.1.
Adjusting pen settings The pen settings dialog allows you to change the width and color assignment of all the mimio hardware pens. These settings will then be used for the hardware pens (mimio Stylus with Expo marker) in Ink Recording mode. A preview pane will dynamically display the stroke appearance for each pen according to the selected settings. You must have a mimio device attached to your system to change pen settings. Figure 4‐1: Pen options within the Settings dialog 4.2.
Adjusting device settings You must be in the mimio Studio Settings dialog to adjust device options. From Devices you can configure the Device Mounting orientation of one or more capture devices and the Surface Size of the whiteboard being used can be set in the software (Error! Reference source not found.). Select the mimio capture device you wish to configure using the ʺDeviceʺ dropdown list. If you only have one device then it is selected by default. Up to four mimio capture devices can be connected to the same computer. Note that the software detects and identifies each attached mimio device by its serial number. Surface Size ‐ to adjust the surface area covered by your mimio capture device. Not all devices support variable surface sizes. Surface Size can be set manually by selecting the Width and Height or use “Auto
Size” to set your whiteboard size by touching in the lower right hand corner of the actual board with one of the mimio Stylus Pens. Mounting Style ‐ adjust the mounting orientation of your mimio capture device to Vertical for landscape oriented whiteboards or Horizontal for portrait oriented whiteboards. Not all devices support variable mounting styles. Quick Start Guide
mimio Studio Settings • 4‐7
Figure 4‐2: Device options within the Settings dialog Combine ‐ multiple mimio capture devices can be attached to the computer. This button enables two or more (up to 4) capture devices to be combined into a single large surface. Click on Combine to view the Create Extended Surface dialog. Decide whether your devices will be combined in a horizontal or vertical fashion. The image below the drop‐down selection will pictorially reflect your choice. Press ʺNew Pageʺ (the top button) on each mimio capture device in the order indicated by the bull’s eye in the image. Split – use this button to separate a single large surface into separate boards & Notebook documents for each attached capture device. Settings ‐ provides access to advanced device specific settings. Defaults ‐ resets the Studio software settings for the standard installation defaults. 4.3.
Adjusting Software Update options From this mimio Studio Settings option you can check the ʺNotify me when updates are availableʺ checkbox at the bottom of the dialog to direct mimio Studio to periodically check for software updates. This is recommended to insure that you always have the most up‐to‐date and bug free version of mimio Studio. Uncheck this checkbox to avoid the periodical checks. When updates are detected you can Install or obtain Details of the update prior to installation. Figure 4‐3: Software update options within the Settings dialog Quick Start Guide
mimio Studio Settings • 4‐8
4.4.
Interactive Settings options The ʺInteractiveʺ section of the mimio Studio Settings dialog (see Figure 4‐4) permits you to calibrate or enable (if calibration has already been done) Interactive mode operation when a projected computer desktop is displayed on a whiteboard to which the mimio capture device is attached. Calibrate ‐ click on this button to enter Interactive mode by initiating calibration of the projector image on the board. Follow the instructions on the screen, pressing the stylus down in all nine calibration target points. Enable – click here to enter Interactive mode when calibration has already been completed. Disable – click here when button is so labeled to exit Interactive mode. Use previous calibration – check this box to automatically enter Interactive mode using the most recent calibration. It is best to select this option only when your mimio device board surface and your data projector are in fixed positions and cannot be moved. The default is unselected. Figure 4‐1: Interactive options within the Settings dialog 4.5.
Adjusting NetMeeting options The ʺNetMeetingʺ section of the Settings dialog (Figure 4‐5) enables a mimio device to provide input for Internet conferencing sessions using Microsoft NetMeeting. Enable NetMeeting interaction – when checked your mimio Digital Ink recorded data will also appear in the NetMeeting “virtual” whiteboard if a NetMeeting session is active. The NetMeeting virtual whiteboard can be viewed by meeting participants in remote locations. Select a specific device from the drop‐down list if you wish to limit NetMeeting input to a specific mimio capture device. To allow input from all devices to NetMeeting, select ʺAny Deviceʺ from the Device list. Quick Start Guide
mimio Studio Settings • 4‐9
Figure 4‐2: NetMeeting options within the Settings dialog 4.6.
Adjusting mimio Notebook options The ʺmimio Notebookʺ section of the Settings dialog (Error! Reference source not found.) provides options for setting General parameters for the mimio Studio application, the operating Mode of the mimio capture device, and the treatment of Digital Ink data recorded and stored in Local Storage on a mimio Xi device when that device is connected to the Studio software. Figure 4‐3: Notebook options within the Settings dialog General Settings
Enable audio feedback ‐ when checked (default), the PC will make sounds to indicate when the New Page, Tag Page, Print and Maximize/Minimize buttons on the mimio capture device are pressed during Ink Recording mode. Enable smooth ink and objects ‐ when checked (default) mimio Studio will apply anti‐aliasing to drawn lines and objects when data is displayed, giving them a smoother appearance. Unselecting this will increase performance/speed of mimio Notebook, but objects will appear to have slightly jagged edges. Enable auto grouping of ink ‐ when checked (default), all strokes written with the same physical pen will be combined into the same object. This group can later be ungrouped into separate strokes for individual manipulation (via the Format menu). If you un‐select this checkbox, each pen stroke will be a separate individually selectable and editable object. Quick Start Guide
mimio Studio Settings • 4‐10
Enable auto recovery ‐ when checked (default) any unsaved data in the Notebook when either the system or computer shuts down will appear in Notebook the next time it runs. Mode Settings
mimio Studio operates with a mimio device in either one of two modes. Interactive – when selected as the active mode, the mimio hardware will automatically enable interactive operation with a projected computer image on the whiteboard, using the a mimio stylus pen as a mouse, when a Studio Notebook file is opened. When in the Interactive Mode, the mimio device must be physically attached to the computer via USB cable but is not “Connected” in the software. Recording – when selected (default), the mimio Studio Notebook will record actual whiteboard notes made with Expo markers in the mimio stylus pens as digital “Ink”. When mimio Studio operates in Recording Mode, the mimio device is both attached physically and “Connected” to the software. The image of the device will appear on the displayed “page” in the software. When Recording mode is selected: Connect to available device on file new – when checked the mimio device will “Connect” to the software in Recording mode each time a new Notebook file is opened. Connect to device when any pen is used ‐ when checked the use of any mimio stylus pen on the board when mimio is attached will automatically open a Notebook page and record the Ink data. Local Storage
A mimio Xi capture device is able to record and store digital “Ink” data in the flash memory of the Xi capture bar itself, even when not attached or connected to a computer. Download data when local storage is detected – if box is checked (default), any stored Ink data will automatically download into a Notebook page when the mimio Xi device is connected. Clear local storage after successful download – if box is checked (default), the flash memory storage on the Xi bar will be cleared after stored data is downloaded. Quick Start Guide
mimio Studio Settings • 4‐11
Chapter 5: 5.1.
Overview of mimio Studio mimio Notebook The mimio Studio Notebook provides users with a multi‐page workspace (see Figure 1‐1). Using the Notebook is very similar to using other word processing or presentation software applications. You can create new mimio native ʺInkʺ format files, open, edit, and save old Ink files, and print pages from Ink files. Notebook files can also be saved in other file formats including HTML, JPEG, PNG, GIF, BMP and TIFF. mimio Studio and the Notebook can be used as a stand‐alone application on your computer, without an attached mimio hardware device, to assemble and arrange material for later interactive presentation and editing at the whiteboard. Notebook software can be used with the mimio device “connected” in the Ink
Recording mode to record data from your actual writing on the whiteboard with dry erase markers in the mimio stylus pens. With mimio device hardware attached but not “connected”, and with a data projector image on the whiteboard, the projected computer desktop can be calibrated and Notebook software can be used in the Interactive mode to add, edit, re‐arrange, and present data. Pages in the Notebook can be viewed, presented, and edited in three different views (Figure 1‐1). The Single
Page view displays one page of the file at a time. Multi-Page view displays the pages as thumbnails that can be re‐ordered, duplicated, or deleted. Full Screen view shows one page of the file without menus and with minimal user interface, to create a cleaner look in presentations. 5.2.
mimio Tools Working in Notebook, users can access mimio Tools from a floating palette that appears by default in the lower left corner of the desktop (Figure 5‐). mimio Tools provides a comprehensive set of interactive tools and resources to create, assemble, and present information. You can create objects on any page of the Notebook using text boxes, ink and highlighter pens, straight lines, arrows, circles, squares, and other shapes. Images can also be imported into pages in the Notebook software as foreground objects or as background images or templates. mimio Tools can be used to modify existing pages within the Notebook and for marking up pages or screens “captured” from any application or computer screen. Figure 5‐1: mimio Tools dialog The resources of mimio Tools are accessed from two rows in a floating toolbar on the computer screen. The first row contains tools used to add or edit data on pages in the Notebook or for annotation when in Screen Markup mode. This includes pens, highlighters, an eraser, line & arrow tools, several shapes including rectangle and ellipses, and text boxes. You also have the ability to insert pictures or backgrounds from the Gallery, a file, or a directory of saved Screen Markups. When any tool in mimio Tools is selected, the floating mimio Tools dialog will expand to reveal settings options for the tools including, color palettes, sliders for line or stroke thickness, color fill, and text formatting when the Text Box tool is selected. Please refer to Figure 5‐ for an example of the context sensitive editing area for the pen tool. Quick Start Guide
Overview of mimio Studio • 5‐12
Figure 5‐2: mimio Tools pen settings The bottom row of mimio Tools contains buttons that enable changing the “mode” of the application and access to additional content creation and presentation functions. The Interactive button is used to calibrate mimio Studio with a projector to make the projected image on the whiteboard interactive. The Mouse button Markup tool toggles mimio Studio between Interactive and Screen Markup modes. The Screen
allows you to freeze the screen, annotate it, and save it to a directory. The Right Click tool allows you to simulate a right mouse click using the mimio pen when in Interactive mode. The Keyboard button launches the standard Windows on‐screen keyboard so that you can enter text or keyboard commands from the whiteboard. The Spotlight tool allows you to focus audience attention on a specific portion of the screen, while hiding the rest of the screen (Figure 5‐3). Figure 5‐3: Example of Spotlight tool in use Quick Start Guide
Overview of mimio Studio • 5‐13
The Reveal tool provides a blind that can be raised or lowered to control how much of the top of the screen is viewable by the audience (Figure 5‐4). The Web Browser button browser to your default home page. allows you to launch a web Figure 5‐4: Example of Reveal tool in use Quick Start Guide
Overview of mimio Studio • 5‐14
Chapter 6: Using mimio Studio in Ink Recording mode The mimio hardware system can be used with standard dry erase markers inserted in the mimio stylus pens to record ordinary whiteboard notes, diagrams or illustrations (Figure 6‐1). Figure 6‐1: mimio Xi “Connected” in Ink Recording mode 6.1.
Using the capture device buttons In the connected Ink Recording mode, the 5 buttons on the mimio capture device can be used to perform or activate various functions of the mimio system (Figure 6‐2). If audible feedback is enabled in mimio Settings, the button activated commands will be accompanied by a sound from the computer. 6.1.1. New Page Pressing the top button on the mimio capture device will save a copy of the current “page” of whiteboard notes and will create a new blank page for adding new digital Ink information. 6.1.2. Tag Page Pressing the second button from the top on the capture device will create a duplicate copy of the current board page, retaining the existing Digital Ink data, which can be edited or augmented. 6.1.3. Print The middle button on the capture device will print the current board page to the default printer of the connect computer. If the printer is a color printer, the print will be in color matching the actual markers used. 6.1.4. Maximize/Minimize The fourth button down on the capture device will maximize or minimize the Studio Notebook window. Quick Start Guide
Using mimio Studio in Ink Recording mode • 6‐1
6.1.5. Calibration and Interactive Mode button Pressing the bottom button of the capture device while in the Digital Ink recording mode will switch the Studio application to the Interactive mode and initiate the calibration process if not already completed. Power Button
Memory Reset Button
New Board/Page
Tag Board/Tag Page
Print
Maximize/Minimize Window
Interactive Mode/ Calibration
Pen Activity LED Indicator
Memory LED Indicator
Recessed connection point for mini B USB cable
Recessed connection point for AC Adaptor
Figure 6‐2: Button interface on mimio Xi capture bar Quick Start Guide
Using mimio Studio in Ink Recording mode • 6‐2
Chapter 7: Using the mimio Notebook The Studio features and functions described in the following Chapters can be accessed from the computer when using the software without a mimio device attached or at the whiteboard using the mimio system in Interactive mode. 7.1.
Working with pages 7.1.1. Inserting a New and Duplicate pages A new page can be inserted at any location in a Notebook file. The new page will have the same page size as the page being viewed when the new page was inserted. •
In the Insert menu at the top of the Notebook, select ʺNew Pageʺ or “Duplicate Page”. Please refer to Figure 7‐. •
Alternately, click on the New Page icon toolbar. or the Duplicate Page icon on the main Notebook Figure 7‐1: Insert pull‐down menu within Notebook software (with mimio Xi device “connected”) 7.1.2. Inserting pages from another mimio Notebook Pages can be copied from one Notebook file to another by copying from the Multi Page View of one Notebook file to the Multi Page View of the desired destination Notebook file (Figure 7‐2). Figure 7‐2: Multi‐page view with page selected for copying Quick Start Guide
Using the mimio Notebook • 7‐3
7.1.3. Using copy, cut and paste Selected pages can be copied, cut and pasted from the Edit menu into other Notebook documents or as images in other Windows applications by using the Edit menu or by clicking on the buttons for Copy , Cut , and Paste on the Toolbar. These operations can also be accessed by right clicking on the page thumbnail in Notebook (Figure 7‐2). 7.1.4. Changing the page size The Page Size settings will determine how your data appears on and “fits” to the page. Your settings may be applied to a selected page only or to all pages in the Notebook document. You can also choose to have the selected Page Size settings apply to all new pages later added. When a mimio device is “connected” to the Notebook in Ink Recording mode you can choose to have the Page Size settings applied to all pages created with the connected device. 1.
Open the File menu at the top of Notebook, and select ʺPage Setupʺ. The Page Setup dialog will appear. See Figure 7‐. 2. Select the desired page size from the drop‐down list at the top of the dialog. You can choose page sizes based on board size in inches or based on computer display images size in pixels/points. A Preview Pane permits you to see how the data will appear on the selected size page before you make the final selection. 3. Select whether the new page size will Apply To to the Whole Document (all pages in the Notebook file) or to Current Page (selected page) only. 4. Check the checkbox if you want All new pages or all pages created with The connected device to adhere to the page size you chose. If you check the box for The connected device the Surface Area setting in mimio Settings will be set to match your selection. 5. Click OK to leave the Page Size dialog. NOTE: Background templates from the mimio Tools Image Gallery are designed for optimum display at page size setting of 1280 x 1024 points. Figure 7‐3: Notebook page setup dialog boxes (with and without connected mimio device) 7.1.5. Reordering pages Pages can be reordered from within the Multi Page View of the Notebook software. 1.
2.
3.
Open the View menu at the top of the window and select ʺMulti Pageʺ to enter Multi Page View mode. Select the pages you wish to reorder. Left click and hold on one of the selected pages. Move the cursor until you see a black line appear where you wish to move the pages. Release the left click, and the pages will move to the new location (Figure 7‐). Quick Start Guide
Using the mimio Notebook • 7‐4
} 2 selected pages to be reordered
A vertical black line indicates the new location for the selected paged. Figure 7‐4: Reordering of pages within the multi‐page view 7.1.6. Fullscreen view The Fullscreen view displays the page or board surface area without the Studio application toolbars, pull‐
down menus, status bars, and window frame and scroll bars (Figure 7‐5). This view is useful for presentation of Notebook pages as a “slide show” or when you wish your Digital Recording mode whiteboard to be projected onto a screen for a large audience. Fullscreen view has a small floating toolbar that provides Previous Page and Next Page navigation buttons, a New Page button to insert a new page, and a Close button that will exit Fullscreen view and return to Single Page view. •
•
To enter Fullscreen view, open the View menu at the top of Notebook and select Fullscreen or click on the Fullscreen icon on the far right of the Notebook Toolbar (see Figure 1‐1) By double clicking on the small Fullscreen navigation toolbar that appears on the bottom right of the screen, you can convert it to a bar on the bottom of the screen with controls on the left side. Figure 7‐5: Notebook Fullscreen view (floating Navigation toolbar and fixed Navigation toolbar on bottom of screen) 7.1.7. Printing pages Mimio Notebook pages can be printed from the Print menu option under File. Pages can be printed monochrome, grayscale or color, according to the capabilities of your printer. Standard Windows application printing dialogs and protocols are followed. Quick Start Guide
Using the mimio Notebook • 7‐5
7.1.8. Saving documents mimio Studio offers a wide array of file format options for saving your Notebook data. These are accessed from the Save As option under the File menu (Figure 7‐6). Figure 7‐6: Notebook Save As dialog 7.1.8.1. Saving as ink files mimio Notebook saves its documents in the .ink format by default. This format is specific to mimio Studio software, and is the best way to preserve all the information created in mimio Notebook. It is also by far the most efficient and compact data format for storing whiteboard notes created either with marker pens or using the pen tools interactively. 7.1.8.2. Saving pages in other file formats Choose Save As from the File menu and the dialog shown in Figure 7‐6 will appear. Choose the desired format from the Save as type pull down menu and enter the desired File name. When you click on Save,
the dialog shown in Figure 7‐7 will appear to permit selection of the pages from your Notebook file which you desire to save to the selected format. Figure 7‐7: Select Pages dialog used in ʺSave As webpageʺ sequence Quick Start Guide
Using the mimio Notebook • 7‐6
7.1.8.2.1.
HTML This is best suited for creating portable presentations, to be displayed on computers that do not have mimio Studio installed and for posting mimio Studio data to web pages. Choose Web Page (*.html) from the Save As pull down. Multiple files will be created when saving in HTML format. There will be a folder created with the same name as the HTML header page that contains many support images and HTML pages. Make sure to move both the main page and the support directory together if you wish to upload or transfer your HTML presentation to a webpage or another computer. 7.1.8.2.2.
Saving pages as images mimio Notebook can save pages in 5 bitmap file formats and 2 vector file formats. The 5 bitmap file formats are (compatible with a wide array of software applications and suitable as embedded images in web pages): •
BMP (Windows bitmap), GIF, JPG (jpeg compressed image), PNG (portable network graphic), TIFF (general bitmap image standard). The 2 vector file formats (ideally suited for embedding in documents or where scalability is desired): •
EMF (Enhance Metafile(, WMF (Windows Metafile) Multiple image files will be saved in the directory if you chose more than one page to save. Each will have a number appended to the filename you provided in the file dialog. 7.2.
Working with objects 7.2.1. Creating and editing Ink, Lines, and Graphic Objects mimio Tools enables the creation in Interactive mode of a wide variety of objects on any Notebook page. Any existing Ink (created with markers or with pen tools in Interactive mode), Lines, or Objects on any Notebook page can also be edited by selecting them with the cursor and then applying the desired effects from the mimio Tools palette of options. 7.2.1.1. Inserting ink Ink data is drawn as freeform lines using a mimio stylus pen. Ink can be inserted into a mimio Notebook document by writing with a mimio stylus containing an Expo marker in Ink Recording mode or using a mimio stylus with plastic insert as a mouse in the Interactive mode with the Pen , Highlighter , and Eraser selected by clicking on the buttons in the top row of mimio Tools. The preview pane in mimio Tools permits easy viewing of the effect of changing the thickness of Pen, Highlighter, and Eraser strokes using the slider below the color panels. Figure 7‐8: mimio Tools toolbar with the Pen, Highlighter & Eraser tools selected mimio Notebook will automatically group multiple ink strokes together if you have chosen “Enable auto
grouping of ink” in the mimio Notebook section of the mimio Settings Dialog. This can save effort when modifying the Ink data later. Quick Start Guide
Using the mimio Notebook • 7‐7
7.2.1.2. Changing line width and color properties for pen, line, and object tools The center section of mimio Tools appears when any pen tool (Pen, Highlighter, Eraser) or graphic tool (Line, Rectangle, Ellipse, Polygon) with variable color properties is selected. The setting options allow you to adjust the color and the width of the pen, line or object border and view the appearance of selected settings in the preview pane (Figure 7‐. •
•
Change the ink or line color by left‐clicking on one of the color blocks in the center panel. The crossed‐out color block produces an invisible pen. If the color you wish to use cannot be found in the . A dialog will appear, allowing you to customize the available blocks, click on the color selector ink color. Once you choose a color, save as a custom color, and press OK, the dialog will close and the color will be reflected in the preview image to the left. Change the color and the width of the shapeʹs border using the same color blocks and slider used to change ink color and see a preview of the selection (Figure . •
Figure 7‐9: Shape settings in the mimio Tools toolbar Change the fill color for any shape object by left‐clicking on one of the color swatches in the right panel of the center section of the expanded mimio Tools dialog. Select the grey crossed‐out color block to choose no fill color, in which case the inside the shape will be transparent as will be indicated in the preview pane. For custom fill colors click on the fill selector icon (bucket pouring into block). 7.2.2. Inserting text on Notebook pages By selecting the Text button from the top row of mimio Tools a text box will be added to any selected area of the page. Drag the cursor to set the box to the desired size. From the computer keyboard or from the floating keyboard projected on the whiteboard, you can add any text within the box. When the Text button is selected mimio Tools will expand to reveal a full set of standard Windows text editing tools, including Font pull down menu, Font Size pull down menu, Bold
, Italics
, Underline
, Font Color
, and Left , Center & Right text justification . Figure 7‐10: mimio Tools toolbar with the text tool selected The cursor will continue to create text boxes until you select another mode from the top row of mimio Tools. 7.2.2.1. Editing text You must be using the Cursor/Selection mode to edit the text in a text box. Double‐click on the text box you wish to edit. A text cursor will appear at the beginning of the text boxʹs contents (Figure 7‐11). Edit the Quick Start Guide
Using the mimio Notebook • 7‐8
text as you would in any word processing application. You can select text for cutting, copying, or to apply a new format. You can also paste text into the text box. Figure 7‐11: Sample text box showing the text cursor 7.2.3. Inserting an image from a file The Image pull down menu far right button of mimio Tools enables the importing and placing of image data onto any Notebook page, either as a background or as a foreground image object on the page (Figure 7‐12). Figure 7‐12: mimio Tools toolbar showing the Image pulldown list 7.2.4. Inserting backgrounds and pictures from the gallery Bring up the Gallery from the Image pull down. Find the Background or Picture you wish to insert into the document (Figure 7‐13). Double‐click on the on the desired Background or Picture. A Picture will appear on the current Notebook page in the upper left‐
hand corner from where it can be moved or resized. Figure 7‐13: mimio Gallery navigation If you select a Background, it will cover the whole page and will not be able to be moved or resized. If you wish to set the background for multiple pages at once, select the pages in the Multi Page view . Remember that optimum page size for background images selected from the gallery is 1280 x 1024 selected from Page Setup under the File menu. Quick Start Guide
Using the mimio Notebook • 7‐9
7.2.5. Inserting a file image background Open the Insert menu at the top of Notebook, and select ʺSet Current Backgroundʺ. A File dialog will open. Select the file that you wish to insert as a background, and click OK. The image will be placed in the background of the current page, or all selected pages. NOTE: The imported background image will scale to fill the page edge to edge. If the image pixel resolution or aspect ratio is not of a suitable level or range the background image display resolution may be poor or the image will be distorted from “stretching” on either the vertical or horizontal axis. 7.2.6. Inserting a Screen Markup background mimio Studio will create a directory of image files captured from any Application page, Web Page, or other screen of the computer when the Screen Markup button is clicked from mimio Tools. This will freeze the screen and permit the use of any mimio Tools to markup or edit the image. These Screen Markups can then be saved by pressing on the Screen Markup button again. They are save in a directory from which they can be accessed and imported into the Notebook from Screen Markups in the Image pull down menu (Figure 7‐). Find the screen markup image you wish to insert into the Notebook from the series displayed in the center panel of mimio Tools (Figure 7‐14). There wonʹt be any screen markup images if youʹve never used Screen
Markup mode. Figure 7‐14: Screen Markups window Double‐click on the screen markup image you wish to add to your document. It will be added to the current Notebook file as the last page. From within Notebook, any markups or graphics added while in Screen Markup mode can be further edited. All captured screen markup images are retained in the Screen Markup directory. To remove any Screen
Markup, right click on the image in the center of mimio Tools and select “Delete”. From the right click dialog, a variety of other functions can also be accessed (Figure 7‐15) Figure 7‐15: Right click menu from Screen Markups To exit Screen Markup mode, Select the Mouse button Quick Start Guide
on the bottom row of mimio Tools. Using the mimio Notebook • 7‐10
7.2.7. Importing Pictures onto a Notebook Page Open the Insert menu at the top of Notebook, and select ʺImport Pictureʺ. Alternately, select the Import
Picture entry from the Image pull down in mimio Tools.
7.2.8. Manipulating (Moving, Resizing, Rotating) objects 7.2.8.1. Moving objects When you see a move cursor while clicking or hovering on an object on the page, you are in the right place to initiate movement of the object when you left‐click. Simply drag the object to the desired location. 7.2.8.2. Resizing, Rotating, and Re‐ordering objects Select the objects you wish to resize or rotate. Left‐click and drag any of the corner points of any of the bounding rectangles to resize them. Left click on the green rotation dot and drag the cursor in any rotational direction. Release the control point when you are done resizing or rotating. You can also position object on top or underneath each other by right clicking on the object and selecting the desired options under Order (Figure 7‐. Resize cursor
Rotate cursor
Re‐ordering dialog Figure 7‐16: Examples of resizing, rotating, and re‐ordering an object Quick Start Guide
Using the mimio Notebook • 7‐11
7.2.8.3. Grouping objects Multiple objects of any kind can be combined into a group, and treated as a single object. The group object can be manipulated like any other object, and combined with other objects to form a larger group. Groups can also be disbanded into their component objects for individual object editing (Figure 7‐17). 1.
2.
3.
Select the objects you wish to include in the group. You can use the Selection cursor tool to surround and select strokes or objects or hold the Shift Key down as you select strokes or objects one by one to group. Right‐click on any of the objects, or on any of the control points of the bounding regions. At the bottom of the right‐click menu select ʺGroupingʺ. Or, left‐click on the Format menu at the top of mimio Notebook. At the bottom of the Format menu, select ʺGroupingʺ. Select ʺGroupʺ to combine the objects into a group. The group will be treated as a single object until it is ungrouped. To ungroup a group object, select the group, return to the ʺGroupingʺ menu by one of the methods listed above, and select ʺUngroupʺ. Only the top level group will be disbanded: if the group contains other groups as members, the subgroups will not be automatically disbanded as well. Figure 7‐17: Example of Ink data object Grouped as single object and Ungrouped with each stroke an editable object Quick Start Guide
Using the mimio Notebook • 7‐12
Chapter 8: Using the Interactive Mode A projector combined with a mimio capture device can be a powerful tool for presenting information with full computer control while at the whiteboard. While in Interactive Mode your mimio stylus controls the motion of the cursor on your screen, as an interactive touch mouse. You can also mark up the screen with any of the tools in mimio Notebook. Additional presentation tools are also available in mimio Tools (Spotlight and Reveal) as well as direct access to the internet. You can set the mimio Studio Settings to use previous calibration settings when you enter Interactive mode if your whiteboard and projector are in fixed position. 8.1.
Starting Interactive mode You can initiate Interactive mode from Ink Recording Mode or directly from the start of your mimio Studio session, once you have projected your computer desktop onto the board. 8.1.1. Starting Interactive mode from Ink Recording mode 1.
2.
Press on the bottom button of the mimio capture device. The projector image on your whiteboard will change to the calibration screen as shown in Figure 8‐1. Figure 8‐1: Interactive mode calibration screen 3.
4.
Place the plastic mimioMouse insert into one of the stylus pens Follow the instructions on the screen, pressing the interactive stylus down at the center of each calibration target. It is recommended to hold the stylus as perpendicular as possible to the board when calibrating and using the stylus in Interactive mode. This will produce consistent accuracy. 5.
When the previous calibration target disappears, press it down in the center of the next calibration target. The calibration screen will disappear once you have done this nine times, and you will be in Interactive Mode. The Mouse (bottom left) button in mimio Tools will be depressed to indicate that you are in Interactive Mode. Quick Start Guide
Using the Interactive Mode • 8‐1
8.1.2. Starting Interactive mode from mimio Settings 1.
2.
3.
4.
Open mimio Settings by right clicking on the Studio icon on the task bar or double clicking on the Settings button on the lower right Notebook window (Figure 8.2). Click on Calibrate if you need to calibrate the projected image. The calibration screen will appear on the board. Follow the calibration steps described in 8.1.1 . If Calibration settings are already saved, click on Enable and mimio Studio will enter Interactive mode. Figure 8‐2: Interactive settings in the Notebook Settings dialog 8.1.3. Starting, Exiting and Recalibrating Interactive mode from mimio Tools 1.
2.
3.
Click on the Interactive button on the bottom row of mimio Tools. If you have stored calibration settings the software will enter Interactive mode. If you do not have stored calibration settings the calibration screen (Figure 8‐1) will appear. Follow the calibration procedure described in 8.1.1. You can exit or recalibrate Interactive mode by pressing on the Interactive button while in Interactive mode. A dialog will appear, asking if you wish to Exit, Recalibrate or Cancel (Figure 8‐
3). Figure 8‐1: Interactive mode recalibration / exit dialog 8.2.
Using right click Pressing the Right Click button on the bottom row of mimio Tools will cause the next mimio stylus press to be interpreted as a right‐click. Click in the location where you wish to generate the right‐click. Quick Start Guide
Using the Interactive Mode • 8‐2
8.3.
Using the floating Keyboard tool The floating keyboard allows you to enter text with the mimio stylus in Interactive Mode right on the board. 1.
2.
3.
4.
Select the Keyboard button on the bottom row of mimio Tools. The on‐screen keyboard will appear on the screen (Figure 8‐2). Place the cursor into the text box of a Studio Notebook page or into any document from a text editing application (ie. Word, PowerPoint, Excel) . Press the keys of the on‐screen keyboard with the mimio stylus and the text will appear in the focused window. You can change the window focus at any time to redirect the text. Close the keyboard by clicking on the Close button in the windowʹs upper right‐hand corner. Figure 8‐2: Floating keyboard interactive tool 8.3.1. Using the Spotlight tool The Spotlight tool blocks the entire screen except for a small region: the ʺspotlightʺ. This spotlight can be reshaped, resized, and moved around the screen (Figure 8‐5) and can be used with any application, not just mimio Studio. This allows a presenter to focus the audience’s attention on a specific region of the screen. •
To activate the spotlight tool, click on the Spotlight button •
To exit the spotlight tool, click on the Close button at the top of the spotlightʹs shaded area. Alternately, you can select Exit in the Spotlight menu. Click in any portion of the shaded area and drag the mouse in any direction to move the spotlight. •
on the bottom row of mimio Tools. you can change the Shape, Size, and Transparency or Exit the From the menu option button Spotlight feature. Size of the Spotlight can also be changed by grabbing and dragging the border. Figure 8‐3: Spotlight tool menu options Quick Start Guide
Using the Interactive Mode • 8‐3
8.3.2. Using the Reveal tool The Reveal tool creates a “shade” that can be raised or lowered over the contents of the screen, as if you are moving a blind up or down from the bottom of the screen. This allows a presenter to expose bullet points or other information in a progressive fashion with the Reveal screen (Figure 8‐6). •
•
To activate the Reveal tool, click on the Reveal button on the bottom row of mimio Tools. Left‐click anywhere on the reveal toolʹs shaded area. The cursor will change to a vertical move icon •
indicating the shade can be moved up and down. Drag the shade to the desired height, and release. •
To exit the Reveal tool, click on the Close button at the top of the Reveal toolʹs shaded area. Alternately, you can change Transparency of the screen or Exit from the Reveal menu in the top right corner of the screen. Figure 8‐6: Example of the Reveal tool in use 8.3.3. Accessing a web browser Click on the Web Browser button on the bottom row of mimio Tools. A web browser will open to your default home page. Note that you can use Screen Markup mode to capture, markup and highlight any webpage and then bring it into your mimio Notebook file. Quick Start Guide
Using the Interactive Mode • 8‐4
Chapter 9: 9.1.
Troubleshooting Frequently Asked Questions (FAQ) Please visit our support webpage at http://www.mimio.com/support for the up‐to‐date mimio FAQ. All of the mimio products include free phone and e‐mail support. Email: techsupport@virtual‐ink.com (United States and Canada) or techsupport.europe@virtual‐ink.com (Europe) Telephone: 1‐877‐846‐3721 (United States and Canada) or +44 870 458 3366 (Europe) Web Site: http://www.mimio.com/support. With all support inquiries, please provide us with the following information: •
•
•
•
•
9.2.
mimio model number (located on the mimio serial number label) mimio software version number Operating system on computer Make and model of computer Description of problem Common interference problems The mimio capture device uses infrared (IR) and ultrasound (US) signal tracking technology to identify and the position of the mimio styli and eraser. The mimio capture device receives IR and US energy transmitted by the mimio styli (pens) and eraser. This tracking technology may be susceptible to interference if other sources of IR and US are present in the room. While the design of the mimio detection circuit is optimized to filter external sources of IR and US energy, it is not possible to guarantee optimum operation under all conditions. Listed below are a few known environments that can interfere with the mimio capture device sensor circuitry and its ability to accurately identify and track the mimio styli and eraser. Workarounds and/or possible solutions are identified where available. •
•
9.3.
Wattstopper and some other brands of motion detector – this dual technology occupancy sensor (DTOS) device uses both passive infrared (PIR ‐ presents no problem to mimio capture device) and active ultrasound at 40Khz (problematic to mimio capture device). It is not possible for the Wattstopper device and mimio capture device to operate simultaneously in the same room. In order to use your mimio capture device in a room with a Wattstopper, the Wattstopper motion sensor must be disabled or covered. An alternative manufacturer of DTOS devices that is compatible with mimio capture devices has been identified: SensorSwitch (uses PIR and an audio microphone). SensorSwitch can replace Wattstopper units with their own PIR/Audio sensor modules. SensorSwitch can be found at http://www.sensorswitch.com/. Direct sunlight – direct sunlight on the mimio capture device can result in the IR sensors being ʺfloodedʺ with IR and thus unable to function. To avoid direct sunlight on the mimio capture device, either reposition the whiteboard or the mimio capture device out of the direct sunlight or pull down the shades or close the blinds in the room. Calibrating problems during Interactive Mode An incorrectly set Surface Area setting in mimio Settings may prevent one or more pen clicks on a calibration point from being recognized. This will result in the user being unable to enter Interactive Mode. Make sure that your Surface Area setting is large enough to encompass your projected display. Quick Start Guide
Troubleshooting • 9‐1
Chapter 10: Copyright and Legal Information © Copyright 1999‐2004 Virtual Ink Corporation. All Rights Reserved. mimio and Virtual Ink are registered trademarks of Virtual Ink Corporation. Windows and NetMeeting, PowerPoint, Word, and Excel are registered trademarks of Microsoft Corporation. Portions of mimio Gallery © 2003‐2004 www.clipart.com. All other marks are trademarks or registered trademarks of their respective holders. Quick Start Guide
Copyright and Legal Information • 10‐2
Limited Warranty Virtual Ink warrants that your mimio® bar and related accessories (ʺHardwareʺ) will be free from defects in materials and workmanship under normal use and service for a period of two (2) years from the date of purchase. Your sales receipt is your proof of the date of purchase. By registering your product, you can receive an additional 3 year extended warranty at no additional expense. If you think you have defective Hardware, contact Virtual Ink technical support at http://www.mimio.com/support for verification. Before returning a failed unit, you must obtain a Return Material Authorization (RMA) number from Virtual Ink. The RMA number should be prominently displayed on the outside of the returned package and on the accompanying packing list. Virtual Ink will not accept any returns without an RMA number. Virtual Inkʹs sole obligation and entire liability under this limited warranty shall be, at Virtual Inkʹs option, either the repair or replacement of the defective Hardware, or parts thereof; provided, however, that you are responsible for (i) the cost of transportation of the Hardware to the designated service location, and (ii) any loss or damage to the Hardware resulting from such transportation. All exchanged parts or Hardware replaced under this limited warranty shall become the property of Virtual Ink. The repair part or replacement may not be new but will be in good working order. Virtual Ink shall have no responsibility to replace the hardware if the failure of the Hardware has resulted from accident, abuse, misuse, negligence, unauthorized modification or repair, unsuitable physical operating environment, improper maintenance by you or failure caused by product for which Virtual Ink is not responsible. This limited warranty does not cover software or consumable products, such as batteries. VIRTUAL INK AND ITS AGENTS AND SUPPLIERS DISCLAIM ALL OTHER WARRANTIES, EXPRESS OR IMPLIED, INCLUDING, BUT NOT LIMITED TO, IMPLIED WARRANTIES OF MERCHANTABILITY, NONINFRINGEMENT AND FITNESS FOR A PARTICULAR PURPOSE. ANY IMPLIED WARRANTIES THAT MAY BE IMPOSED BY LAW ARE LIMITED TO THE DURATION OF THIS LIMITED WARRANTY. IN NO EVENT SHALL VIRTUAL INK OR ITS AGENTS OR SUPPLIERS BE LIABLE FOR ANY DAMAGES WHATSOEVER (INCLUDING, WITHOUT LIMITATION, SPECIAL, INCIDENTAL, CONSEQUENTIAL, OR INDIRECT DAMAGES FOR PERSONAL INJURY, LOSS OF BUSINESS PROFITS, BUSINESS INTERRUPTION, LOSS OF BUSINESS INFORMATION, OR ANY OTHER PECUNIARY LOSS) ARISING OUT OF THE USE OF OR THE INABILITY TO USE THE HARDWARE, EVEN IF THEY HAVE BEEN ADVISED OF THE POSSIBILITY OF SUCH DAMAGES. In the event any of the above limitations are held unenforceable, Virtual Inkʹs and its agentsʹ and suppliersʹ entire liability under this limited warranty shall be limited to the amount actually paid by you for the Hardware. Some states/jurisdictions do not allow (i) the exclusion of implied warranties, (ii) limitations on the duration of an implied warranty, or (iii) the exclusion or limitation of liability for consequential damages, so the above limitations or exclusions may not apply to you. This limited warranty gives you specific legal rights and you may also have other rights which vary from state/jurisdiction to state/jurisdiction. Quick Start Guide
Copyright and Legal Information • 10‐3
Quick Start Guide
Copyright and Legal Information • 10‐1