1
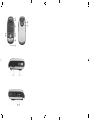
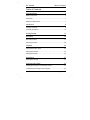
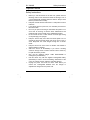
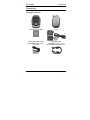
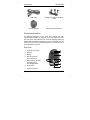
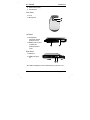
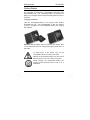
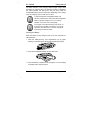
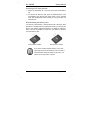
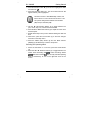
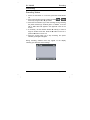
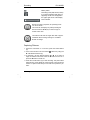
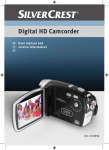
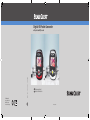
Digital HD Pocket Camcorder
TARGA GmbH
Lange Wende 41
D-59494 Soest
www.silvercrest.cc
M a t - N o : 1 5 772 6 1, 156 5 984
with photo and MP3 modes
6
GB
IE
User manual and
service information
DV-1000HD
DV-1000HD
Table of Contents
Table of Contents
Important Notice
3
Safety Instructions........................................................................... 3
Conformity....................................................................................... 7
Disposal of Old Devices .................................................................. 7
Introduction
9
Package Contents........................................................................... 9
Controls and buttons ..................................................................... 10
Getting Started
12
Recording
19
Recording Videos.......................................................................... 19
Capturing Pictures......................................................................... 20
Playback
22
Playing Back Video Clips .............................................................. 22
Playing Back Photos ..................................................................... 24
Playing Back Music ....................................................................... 25
Setup Menu
27
Deleting Recordings...................................................................... 29
Connectors and Ports
31
Viewing Recordings on a Television Screen ................................. 31
Transferring Recordings to the Computer ..................................... 33
English - 1
Table of Contents
DV-1000HD
Connecting the Headphones ........................................................ 35
Appendix
36
Installing the Software .................................................................. 36
Technical Specifications ............................................................... 37
Warranty Information .................................................................... 39
2 - English
DV-1000HD
Safety Instructions
Important Notice
Safety Instructions
Before you use this device for the first time, please read the
following notes in this manual and heed all warnings, even if
you are familiar with handling electronic devices. Always check
that the product works correctly.
Keep this manual with the instructions in a safe place for future
reference.
If you sell the device or pass it on, it is essential you hand over
this manual also.
Do not try to open the housing or reassemble the product. You
are at risk of receiving an electric shock. Maintenance and
repairs should only be carried out by qualified technicians.
Do not look at the sun or other sources of intense light. Doing
so may damage your eyesight.
Keep the device away from water and other liquids. Do not
operate the device with wet hands and do not use it in rain or
snow. Dampness can cause danger through fire or electric
shock.
Keep the device out of the reach of children and animals to
avoid accidents or damage.
Switch the device off immediately if you notice it emitting
smoke or strange noises. Contact customer service. Never try
to repair the device yourself.
Only use the supplied charger cradle DJ04V20500A to
recharge the product battery.
Use this device only with the supplied rechargeable battery
(PAC-0040) in order to avoid overheating, deformation of the
cover, fire, electric shocks, explosion and other dangers.
Unplug the power cord from the mains outlet before you
remove the rechargeable batteries from the charger or
separate the charger from the power cord.
English - 3
Safety Instructions
DV-1000HD
In the event of a defect in the product or its accessories,
unplug the power cord from the mains immediately.
Also, when there is the possibility of thunderstorms, unplug the
power cord from the wall outlet.
Never try to heat, disassemble or short-circuit the rechargeable
battery. Do not throw the rechargeable battery into fire.
Warning: Notice concerning separation from the mains
In order to completely disconnect the charger from the mains,
unplug the power cord from the wall outlet. The wall outlet where
the charger is connected must be easy to access so that the power
cord can be pulled out quickly in case of emergency. Unplug the
power cord from the mains when you will not be using it for a long
while (e.g. when going on holiday) in order to avoid the danger of
fire. Do not hold the power cord with wet hands.
The device is not for use in rooms with a high temperature or
humidity and must be kept free of dust. Position the device on a
stable, even surface and do not place any objects on the device.
Always make sure that:
no direct heat sources (e.g. heating) can affect the device;
no direct sunlight or bright artificial light reaches the device;
contact with sprayed and dripping water and abrasive liquids
must be avoided and the device should never be operated
near water. It must especially never be immersed (do not place
any recipients containing liquids such as beverages, vases,
etc. onto or next to the device);
no fire sources (e.g. burning candles) are placed on or near
the device;
no foreign bodies are introduced into the device;
the device must not be subject to any great temperature
changes as this may cause moisture through condensation;
the device should not be subject to excessive shock and
vibrations.
4 - English
DV-1000HD
Safety Instructions
Children
Electrical devices do not belong in the hands of children. Do not
allow children to use electrical devices when not under supervision.
Children may not comprehend the presence of potential risks.
Rechargeable batteries and small parts represent potential choking
hazards. Keep batteries out of reach of children. If a rechargeable
battery is swallowed, seek medical help immediately. Keep all
packaging away from children as this can cause suffocation.
Charger and Rechargeable Battery
Insert the rechargeable battery with the correct polarity. Never
throw a rechargeable battery into fire. Remove the rechargeable
battery when the device is not to be used for a long time.
Danger of Explosion!
Non-intended use may cause explosion and danger to life. Only
replace the rechargeable battery with an equivalent or a type
recommended by the manufacturer. Never replace any batteries in
an explosion-sensitive environment. While inserting or removing
the batteries a spark may be produced causing an explosion.
Explosion-sensitive areas will normally (but not always) be labelled.
These include fuel storage areas such as below deck on a boat,
fuel line or tank areas, environments where the air contains
inflammable substances (e.g. cereals, dust or metal powder, etc.)
and any areas where you should normally switch off your car
engine.
Respect the environment. Old rechargeable batteries do not belong
in with domestic waste. They must be handed in to a collection
point for old batteries.
Cables
Always hold cables by the plug and never pull on the cable itself.
Never hold the power cord with wet hands as this may cause a
short circuit or electric shock. Never place the device, heavy
objects or furniture on the cable and take care that the cord does
not become trapped, especially at the plug and sockets. Never
English - 5
Safety Instructions
DV-1000HD
make knots in the cable and do not tie it together with other cables.
All cables should be positioned so that nobody can trip over them
or be obstructed by them. A damaged power cord can cause a fire
or an electric shock. Inspect the power cord from time to time. Do
not use an adapter plug or extension cable that does not meet the
required safety standards.
Repair and Maintenance
Repairs are required when this device has been damaged in any
way: for example, when the charger or the housing of the DV1000HD is damaged, when liquid or objects have entered the
device, when the product has been exposed to rain or moisture,
when the product does not work normally or if the product has been
dropped. If you notice any smoke, unusual noise or strange smells,
switch off the device immediately and unplug the power cord from
the power supply. In these cases the device should not be used
further and should be inspected by authorized service personnel.
Please contact qualified personnel when servicing is needed.
Intended Use
This is an information technology device. It has been designed for
video and photo recording and playback as well as for playing back
music files. It may only be used for private use, not industrial or
commercial purposes. In its default configuration, this product has
not been designed for medical, lifesaving, rescue or life-maintaining
purposes. Only connection cables and external devices may be
used that comply with safety standards and the electromagnetic
compatibility and shielding quality of this device.
Do not make any changes to the device or the supplied
accessories yourself. The manufacturer will not be liable for any
damages resulting from unauthorised modifications. Furthermore,
modifying the device in any way will void the warranty.
6 - English
DV-1000HD
Safety Instructions
Danger Through Noise Disturbance
Caution when using the supplied headphones. Listening at
high volume can harm the user’s auditory system.
Conformity
This device and its supplied accessories have been
tested and approved for compliance with the basic and
other relevant requirements of the EMC Directive
2004/108/EC, as well as the Low-voltage Directive
2006/95/EC. The Declaration of Conformity can also
be found at the end of this User's Manual.
Any changes to the equipment other than those recommended by
the manufacturer may lead to these directives no longer being met.
Only use the accessories recommended by the manufacturer. If
you are not using the device within the Republic of Germany, you
must observe the regulations and laws in the country of use.
Disposal of Old Devices
Devices marked with this symbol are subject to the
European Directive 2002/96/EC. All electric and
electronic devices must be disposed of separately from
household waste at established bodies.
Avoid hazards to the environment and dangers to your personal
health by disposing of the device properly. For further information
about proper disposal, contact your local government, disposal
bodies or the shop where you bought the device.
Respect the environment. Old rechargeable batteries do not belong
in with domestic waste. They must be handed in to a collection
point for old batteries.
English - 7
Safety Instructions
DV-1000HD
Icons Used in this User’s Manual
This icon denotes important information for the safe
operation of the product and for the user’s safety.
This icon denotes further information on the topic.
This icon warns you about possible damage to the
user’s hearing.
8 - English
DV-1000HD
Introduction
Introduction
Package Contents
Camcorder DV-1000HD
Pouch
Rechargeable battery PAC
ELECTRONICS CO., LTD.,
PAC-0040
Charger SCOPE
TECHNOLOGY CO., LTD,
DJ04V20500A and power cord
AV-cable
HDMI cable
English - 9
Introduction
DV-1000HD
USB cable
Headphones, SilverCrest IEHS
1000
CD with software
User's manual (not shown)
Controls and buttons
An additional illustration of the items and controls and their
corresponding numbers can be found on the inner page of the foldout cover of this User’s Manual. You can keep this page folded out
whilst reading the different chapters of this User’s Manual. This will
permit you to refer to the corresponding items or connection port of
your camcorder at any time.
Rear Panel
1
Eyelet for neck strap
2
Speaker
3
Display
4
Direction buttons /
Recording button
5
Mode selector (MODE)
and start/ stop for
recording/playback
6
Power LED
7
Tripod connection
10 - English
DV-1000HD
8
Delete button (DEL)
9
On/Off button
Introduction
Front Panel
10 Lens
11 Microphone
Left Panel
12 Headphones
receptacle (behind
protective cover)
13 Battery/memory card
compartment
(behind protective
cover)
Right Panel
14 USB port*
15 HDMI ports (type
C)*
* the USB and HDMI ports are located behind a protective cover.
English - 11
Getting Started
DV-1000HD
Getting Started
The camcorder is powered by a rechargeable Lithium-Ion (PAC
ELECTRONICS CO., LTD., PAC-0040) battery. On delivery, the
battery is not charged. Please charge the battery before first use of
the device.
Charging the Battery
Insert the rechargeable battery in the charger cradle SCOPE
TECHNOLOGY CO., LTD, DJ04V20500A so that the contacts
(+) and (-) correspond to the rechargeable battery and charging
tray markings.
Make sure that the battery clicks into place on the charger. Next
connect the power cord to the charger and plug the power cord to a
wall outlet.
To supply power to the camera, only use the
rechargeable Lithium-Ion battery PAC-0040.
Remove the rechargeable battery from the camera
when the device is not to be used for a long time.
During charging, the rechargeable battery and
charging device will become warm. This is not a
malfunction.
12 - English
DV-1000HD
Getting Started
The status indicator of the charging cradle will light orange whilst
the battery is charging. When the charging process is completed,
the status indicator will light green. You can then insert the
rechargeable battery into the camcorder. Depending on the charge
level, the charging cycle can take up to 3 hours.
If, after inserting the rechargeable battery, the
indicator remains green, this means the rechargeable
battery is already charged or it is not correctly
inserted. In this case, check the polarity.
The charger consumes electricity in idle mode. To
avoid any kind of power consumption, you should
separate it from the mains. To do this, unplug the
mains plug from the wall outlet.
Inserting the Battery
When the battery is fully charged, insert it into the camcorder as
indicated below.
1. Open the battery/memory card compartment (13) by gently
pushing on the marking and sliding it downwards (see figure).
2. Insert the rechargeable battery into the camcorder.
3. Close the battery compartment by closing the cover and sliding
it upwards until it clicks into place.
English - 13
Getting Started
DV-1000HD
Inserting an SD Card (optional)
By using the SD memory card (not included in the package) you
can increase the camcorder's storage capacity for saving your
videos and photos. When a memory card is inserted, all the
recorded contents will be saved onto it. If there is no memory card
inserted, your photos and videos will be saved to the internal
memory of the camcorder.
1. Power the camcorder off. To do this, press the On/Off button
(9).
2. Open the battery/memory card compartment (13) by gently
pushing on the marking and sliding it downwards (see figure).
3. Then insert the memory card with the metal contacts facing
forward into the card slot. The label must face towards the
display. Slide the card fully into the slot opening until the card
clicks into place. Close the memory card compartment by
sliding the cover in the opposite direction.
If the storage capacity on the memory card or the
internal memory is exhausted, an icon with an
exclamation mark and the message MEM will
appear in the upper-right corner of the display. The
video being currently recorded will be saved and the
recording will be cancelled.
14 - English
DV-1000HD
Getting Started
Removing an SD Card (optional)
1. Power the camcorder off. To do this, press the On/Off button
(9).
2. To remove the memory card, open the battery/memory card
compartment (see above) and gently press on the inserted
card. This will protrude a little so that you can get a hold of it
and remove it.
Write-Protecting the Memory Card
The memory card features a write-protection tab. When the write
protection is enabled (see the right figure below) you will only be
able to view existing videos and pictures, not delete or edit them.
Also, it will not be possible to record any new videos or pictures
onto the memory card.
Write protection disabled
Write protection enabled
If you insert a write-protected memory card, in the
upper-right corner of the display an “SD “icon with a
red exclamation mark will appear. In this case, you
cannot record any videos or photos.
English - 15
Getting Started
DV-1000HD
Switching the Camcorder On and Off
Press the On/Off button (9) to power the camcorder on.
Press the On/Off button (9) again to power the camcorder off.
Checking the Remaining Battery Capacity
In the upper-left corner of the display there is a battery icon
showing the current battery capacity.
Setting Date and Time
1. Power the camcorder on. To do this, press the On/Off button
(9).
2. Press the Delete (DEL) button (8) and the Mode selector
(MODE) (5) simultaneously to open the setup menu.
16 - English
DV-1000HD
Getting Started
3. Press the direction button T (4) four times to highlight the Date
and Time icon .
4. Press the Recording button (4). The current date and time will
appear and the year is highlighted.
The date is shown in Year/Month/Day notation, the
time is shown in 12-hour format from 00:00 to 11:59.
The system distinguishes between ante meridian
(AM) and post meridian (PM).
5. Use the W or X direction buttons (4) to toggle between the
year, month, day, hour, minute and second fields.
6. Press the T or S direction buttons (4) to adjust the value of the
selected option.
7. Repeat these steps until you have finished setting the date and
time.
8. When done, press the record button (4) to save the changes
and return to the setup menu.
9. Press the Delete (DEL) button (8) and the Mode selector
(MODE) (5) simultaneously to exit the setup menu.
Switching the Operating Mode
1. Power the camcorder on. To do this, press the On/Off button
(9).
2. Press the S or T direction buttons (4) to toggle between the
modes Video Recording HD
, Video Recording WVGA
and Photo Camera . The currently selected operating
mode is indicated by an icon in the upper-left corner of the
screen.
English - 17
Getting Started
DV-1000HD
Operating mode icon
During recording or playback, the operating mode
icon is not shown.
The HD and WVGA settings determine the size of the recording
(resolution) in pixels. As a general rule: The higher the resolution,
the more storage space is required. The following settings are
available:
Designation
18 - English
Resolution in
pixels
Description
1280 x 720
High quality
848 x 480
Normal quality
2304 x 1296
Equivalent to a
photographic resolution
of 3 megapixel
DV-1000HD
Recording
Recording
Recording Videos
1. Power the camcorder on. To do this, press the On/Off button
(9).
or
,
2. If the current mode is not set to video recording
select it by using the S or T (4) buttons.
3. Press the record button (4) to start recording. During recording
the power indicator (6) will blink green. In addition, a red dot
with a “REC” label will appear in the upper-left corner of the
screen.
4. If necessary, use the direction buttons W or X (4) to select a
larger or smaller scene area. Press the X button to zoom in or
press the W button to zoom out.
5. Press the record button (4) to stop recording. The power
indicator (5) will light solid green.
During recording, different icons may appear on the display
informing you about the current settings.
English - 19
Recording
DV-1000HD
Battery status
Recording mode (HD, WVGA, Photo)
If you have inserted an SD card (not
supplied), the SD icon will appear in
the upper-right corner of the display.
Zoom indicator
During recording or playback, the operating mode
icon is not shown.
The zoom bar will display only whilst pressing the
direction buttons W or X (4) to select a larger or
smaller scene area.
The maximum file size for single video files is approx.
3.66GB for HD recordings and approx. 2.2GB for
WVGA recordings.
Capturing Pictures
1. Power the camcorder on. To do this, press the On/Off button
(9).
2. If the current mode is not set to Photo , select it by using the
S or T direction buttons (4).
3. If necessary, use the direction button W or X (4) to select a
larger or smaller scene area. Press the X button to zoom in or
press the W button to zoom out.
3. Press the record button (4) to start recording. The photo taken
will be shown on the display for a few seconds. Then the device
returns to capture mode and you can take more pictures if you
want.
20 - English
DV-1000HD
Recording
In photo mode, different icons may appear on the display informing
you about the current settings. These are identical to the icons for
video recording. See also page 19 – Recording Videos.
English - 21
Playback
DV-1000HD
Playback
You can play back your recorded videos, and photos on the
camcorder screen, on a TV set or on your computer. The following
two sections show you how to play back your videos or photos on
the camcorder display. Furthermore, if you use an SD card (not
supplied), you can copy any music files onto the card and use your
camcorder as an MP3 player to enjoy the music.
Playing Back Video Clips
To be able to play back your recordings on the camcorder screen,
first you have to switch to playback mode. This is done as follows:
1. Power the camcorder on. To do this, press the On/Off button
(9).
2. Press the mode selector button (MODE) (5) to toggle between
the modes Recording (Photo and Video) and Playback (Photo,
Video and Music). A preview of the last recorded file will
appear.
3. Select the desired video. To do this, press the S or T direction
buttons (4) to skip to the next or previous recording.
A counter will appear in the upper-right corner of the
display showing the number of the current recording
and the total number of recordings. For example 2/5
means that the current recording is the second of
five. On the bottom of the display you will see the
duration of the recorded video file.
Videos can be distinguished from photos as the total
playback time will be shown for video files only.
4. Press the record button (4) to start playback. A counter will
appear in the lower-right corner of the screen indicating the
video playback time. On its left a progress bar will appear
showing the current playtime position within the total recording.
The following special functions are available during playback:
22 - English
DV-1000HD
Playback
•
Press the record button (4) to pause playback. Press the
button again to resume playback.
•
Press the direction buttons S or T (4) to adjust the audio
volume. The current volume is indicated by an adjustment
bar.
•
Press the Delete button (DEL) (8) to stop playback.
•
Press the direction buttons W or X (4) multiple times for
rewind or fast forward playback. The playback speed will
change cyclically with each press of the button as follows:
2x, 4x, 8x, 16x, Normal.
•
Press the mode selector button (MODE) (5) multiple times
to obtain a slow-motion playback at 1/2, 1/4, 1/8 or 1/16 of
the normal playback speed. To quit the slow-motion
playback, press the mode selector button (MODE) (5) as
many times as necessary until normal playback is
reached.
Thumbnail view: Toggle to playback mode and press
the W direction button (4) to obtain a thumbnail view
of your recordings. Then press the S, T, W or X
direction buttons (4) to select the desired recording
and press the recording button (4) to play it back.
You can also connect the supplied headphones to listen to the
recorded sound. For more information, see page 35 – Connecting
the Headphones.
You can also play recorded videos on your TV set or
computer. For more information, see pages 31 and
33.
English - 23
Playback
DV-1000HD
Playing Back Photos
To be able to play back your photos on the camcorder screen, first
you have to switch to playback mode. This is done as follows:
1. Power the camcorder on. To do this, press the On/Off button
(9).
2. Press the mode selector button (MODE) (5) to toggle between
the modes Recording (Photo and Video) and Playback (Photo,
Video and Music). A preview of the last recorded file will
appear.
3. Select the desired photo. To do this, press the S or T direction
buttons (4) to skip to the next or previous recording.
A counter will appear on the upper-right corner of the
display showing the number of the current recording
and the total number of recordings. For example 2/5
means that the current recording is the second of
five.
Photos can be distinguished from videos as the total
playback time will not be shown for photos.
Thumbnail view: Toggle to playback mode and press
the W direction button (4) to obtain a thumbnail view
of your recordings. Then press the S, T, W or X
direction buttons (4) to select the desired photo and
press the recording button (4) to view it in full-screen
mode.
24 - English
DV-1000HD
Playback
Playing Back Music
You can also use your camcorder as an MP3 player. To do this you
need an SD memory card (not supplied) and to first copy the
desired music files onto it using your computer. See also page 13 Inserting an SD Card (optional).
Warning! In order to be able to playback MP3 music
files, you have to place them into a folder “MUSIC”
on the SD card. The folder “MUSIC” must be
created in the root folder on the SD card otherwise
your camcorder will not be able to find nor play the
MP3 files. Furthermore, no files contained in
subfolders of the “MUSIC” folder can be played.
1. Power the camcorder on. To do this, press the On/Off button
(9).
2. Press the mode selector button (MODE) (5) to toggle between
the modes Recording (Photo and Video) and Playback (Photo,
Video and Music). Press the mode selector button (MODE) (5)
a second time to select the “Music” option and then press the
recording button (4) to show a list of the found music files.
3. Select the desired music file. To do this, press the S or T
direction buttons (4) to skip to the previous or next file.
A counter will appear in the top-centre of the display
showing the number of the current music file and the
total number of music files. For example 2/5 means
that the current music file is the second of five.
4. Press the record button (4) twice to start music playback. A time
counter will appear in the centre of the screen indicating the
song playback time.
The following special functions are available during playback:
•
Press the record button (4) to pause playback. Press the
button again to resume playback.
English - 25
Playback
DV-1000HD
•
Press the direction buttons S or T (4) to adjust the audio
volume. The current volume is indicated by an adjustment
bar.
•
Press the Delete button (DEL) (8) to stop playback.
•
To do this, press the W or X direction buttons (4) to skip
to the previous or next music file.
30 seconds after the last press of the button the
display will switch off automatically but music
playback will continue. This function has been
designed to save battery power. Press any button to
switch the display on again.
After all songs stored on the SD card (not supplied)
have finished playing, playback will automatically
resume from the beginning.
You can also connect the supplied headphones to enjoy music
playback in stereo quality. For more information, see page 35 –
Connecting the Headphones.
26 - English
DV-1000HD
Setup Menu
Setup Menu
The camcorder features a setup menu that allows you to customise
the basic properties of your camcorder.
1. Power the camcorder on. To do this, press the On/Off button
(9).
2. Press the Delete (DEL) button (8) and the Mode selector
(MODE) (5) simultaneously to open the setup menu.
3. Press the S or T direction buttons (4) to select a setting.
4. Press the W or X direction buttons (4) to select an option.
5. When ready, press the Delete (DEL) button (8) and the Mode
selector (MODE) (5) simultaneously to exit the setup menu. Any
changes will be saved automatically.
In the following we describe the available options:
Power-On Sound
Here you can enable or disable the power-on sound and adjust its
volume.
TV Standard
Choose between the TV systems PAL or NTSC. NTSC is the
colour system used in America and Japan, PAL is used in Europe.
This setting only applies when playing back using the video cable.
English - 27
Setup Menu
DV-1000HD
Mains Filter
Select the mains frequency to avoid any interference caused by
fluorescent lighting. A mains frequency of 50 Hz is used across
Europe; in America the mains uses a frequency of 60 Hz.
Format
This function lets you delete all contents from your memory card
and renew the file saving structure on your card (formatting).
Warning! All saved videos, pictures and music files
will be erased and cannot be restored. Make sure
that all recordings you want to keep have been
backed-up on a different medium.
Date/Time
Set the date and time (see also page 16 – Setting the Date and
Time).
Compression
The compression determines the file size of your recordings. As a
general rule: The lower the compression, the more storage space is
required. The following settings are available:
Compression
Description
Low compression: offers a higher
resolution, but more storage space is
required.
High compression: requires less storage
space, but offers a lower resolution.
28 - English
DV-1000HD
Setup Menu
Deleting Recordings
If necessary, you can delete any undesired or bad recordings. You
can also delete files to free-up some space when the internal
memory or memory card is full.
Deleting A Recording
1. Power the camcorder on. To do this, press the On/Off button
(9).
2. Press the mode selector button (MODE) (5) to toggle to
Playback (Photo and Video) mode. A preview of the last
recorded file will appear.
3. Select the recording that you want to delete. To do this, press
the S or T direction buttons (4) to skip to the next or previous
recording.
4. Press the Delete button (DEL) (8) and press the W or X
icon (Delete a single file).
direction buttons (4) to select the
5. Then press the record button (4) to confirm the deletion
process. If you decide not to delete, return to the
icon and
then press the record button (4).
Warning! After a recording has been erased, it
cannot be restored.
English - 29
Setup Menu
DV-1000HD
Deleting All Recordings
This option lets you erase all recordings (videos and photos) at
once.
1. Power the camcorder on. To do this, press the On/Off button
(9).
2. Press the mode selector button (MODE) (5) to toggle to
Playback (Photo and Video) mode. A preview of the last
recorded file will appear.
3. Press the Delete button (DEL) (8) and press the W or X
icon (Delete all files). Then
direction buttons (4) to select the
press the record button (4).
icon and press the record button (4) to
4. Next select the
confirm the deletion process, or select the
(Cancel) icon and
press the record button (4) if you don’t want to erase the
recordings.
Warning! After your recordings have been erased,
they cannot be restored.
30 - English
DV-1000HD
Connectors and Ports
Connectors and Ports
Viewing Recordings on a Television Screen
Any recordings that you can view on the camcorder display can
also be played back on a regular TV set. For this, your television
set must have an appropriate Video In connector.
Depending on the connectors available on the TV set, you can use
the AV cable or the HDMI cable. The HDMI cable will provide digital
picture and sound and therefore offers the best quality.
Connecting via the HDMI Cable
1. Please make sure that your camcorder is powered off.
2. Open the cover of the ports (14) and (15) and insert the smaller
connector of the HDMI cable into the HDMI port (15) of your
camcorder.
3. Plug the larger connector of the HDMI cable into the HDMI
receptacle of your TV set.
4. Select the HDMI channel corresponding to the above input
connectors on your TV set. If necessary, read the User Manual
of your TV set for more information on how to do this.
5. Press the On/Off button (9) to power the camcorder on. The
device display remains off while the picture will be shown on the
TV Screen.
6. Further operation is as usual, the only difference is that the
picture will show on the TV screen instead of on the device
display.
English - 31
Connectors and Ports
DV-1000HD
Connecting via the AV Cable
1. Please make sure that your camcorder is powered off.
2. Open the cover of the ports (14) and (15) and insert the
connector of the AV cable into the USB port (14) of your
camcorder.
3. Insert the AV connectors into the corresponding inputs of your
TV set (yellow connector to VIDEO IN, white and red
connectors to AUDIO IN). Please also consult the User Manual
of your TV set for more information.
4. Select the AV channel corresponding to the above input
connectors on your TV set. If necessary, read the User Manual
of your TV set for more information on how to do this.
5. Press the On/Off button (9) to power the camcorder on. The
device display remains off while the picture will be shown on the
TV screen.
6. Further operation is as usual, the only difference is that the
picture will show on the TV screen instead of on the device
display.
32 - English
DV-1000HD
Connectors and Ports
Transferring Recordings to the Computer
There are two possible ways to copy recordings from the
camcorder to a computer:
by connecting the device to a computer via the USB cable
by inserting the memory card (not included) into a card
reader
Be careful when renaming any folders and files. Do
NOT try to change the folder or file names stored on
the device from the computer otherwise you may
not be able to play back any files contained here
with your camcorder.
After you have copied your files or folders to the
computer, you can rename or edit them on the
computer.
Using the USB port
Windows® 7, Windows Vista® and Windows® XP/2000 operating
systems will detect the camcorder automatically as a mass storage
device.
1. Please make sure that your camcorder is powered off.
2. Open the port cover and insert the connector of the USB cable
into the USB port (14) of your camcorder.
3. Plug the USB connector into a free USB port on your poweredon computer.
4. Press the On/Off button (9) to power the camcorder on. The
computer will detect the built-in memory or the memory card (if
any) as a removable disk and will create a new drive with the
next available drive letter. The camcorder display remains off
and the power indicator (6) lights green.
English - 33
Connectors and Ports
DV-1000HD
5. Open My Computer on your PC and double-click on the new
removable disk drive. All recorded files can be found in a
subfolder of the folder “DCIM” on this disk drive.
6. Now you can copy the recorded files from the camcorder into a
folder of your choice on the computer’s hard disk.
While the camcorder is connected to the computer,
its buttons do not respond. To be able to operate the
camcorder buttons again, you must first safely
remove it from the computer. Please note that you
should not simply disconnect the USB cable from
your computer, but remove it safely. This is done as
follows:
®
®
Windows Vista and Windows XP/2000: click with
the left mouse button on the "Safely Remove
Hardware" icon in the task bar beside the system
clock.
Windows® 7: right-click on the removable disk drive
and then select “Eject” from the context menu that
appears.
For more information, see the User’s Manual or
online help of your operating system.
Using a Card Reader
If your computer features a card reader supporting SD memory
cards, you can read the memory card’s (not supplied) contents
directly. To do this, power the camcorder off and remove the
memory card (see page 15 – Removing an SD Card (optional)).
1.
Insert the memory card into the card reader of your
computer
(normally
labelled
SD/MMC).
The PC will add the memory card contents under the drive
letter in My Computer representing the card reader.
34 - English
DV-1000HD
2.
Connectors and Ports
Open My Computer on your PC and double-click on the
disk drive representing the card reader.
All recorded files can be found in the folder “DCIM” on this
disk drive.
3.
Now you can copy the recorded files from the camcorder
into a folder of your choice on the computer’s hard disk.
Connecting the Headphones
You can also connect the supplied headphones SilverCrest IEHS
1000 to listen to the sound of video and music files. For music
playback you can enjoy your songs in stereo quality.
Caution when using the supplied headphones.
Listening at high volume can harm the user’s auditory
system.
To connect the headphones:
1. Open the protective cover (12) by pulling carefully on the top of
the cover with your fingernail.
2. Plug the jack-type connector of the headphones into the
headphones jack found behind the protective cover.
English - 35
Appendix
DV-1000HD
Appendix
Installing the Software
System Requirements
Windows® 7, Windows Vista™ or Windows® XP
Free USB port or card reader
Software
The software can be found on the supplied CD. You can use it to
edit your videos and even upload them easily to YouTube,
Facebook, etc., store them on AVCHD media, or create photo
books and albums.
You must connect your camcorder to the computer
before inserting the CD into your CD or DVD drive
otherwise the software will not detect the camcorder
and not install.
1. Use the USB cable to connect the device to your computer (see
page 33 - Using the USB port).
2. Power the camcorder on.
3. Insert the supplied CD into the CD or DVD drive of your
computer. The software should install and launch automatically
otherwise double-click on the file “TotalMediaHDCam.exe”
contained in the CD main folder.
The files stored on your camcorder should be imported
automatically into TotalMediaHDCam. After this you can edit
them. For more information, see the online help of
TotalMediaHDCam.
36 - English
DV-1000HD
Appendix
Technical Specifications
Capture sensor
1.0-megapixel CMOS sensor
Lens
Fixed lens, focal distance:
f = 3.99mm, aperture: F = 2.8
Colour LCD
2-inch TFT, 640x240 pixel
Shutter speed
1/2s - 1/2000s
File format
Video: AVI (H-264, WVGA), 30 fps
Photo: JPEG (EXIF), DCF, DPOF
White balance
Automatic
Exposure compensation
-2.0EV to +2.0EV (automatic)
Zoom
approx. 2x digital zoom
Storage media
128 MB internal flash memory
(partially used by the operating
system),
SD memory card (not supplied)
TV Out
PAL, NTSC
Connectors and Ports
headphones jack 3.5mm, max. output
voltage 100 mV
USB 2.0
HDMI (type C)
Power Supply
Rechargeable Li-Ion battery, PAC
ELECTRONICS CO., LTD., PAC0040, 3.7 V, 1100 mAh
Operating temperature
0°C - 35°C
Microphone
Integrated
Speaker
Integrated
Dimensions
67 x 107 x 26 mm (W x H x D)
Weight
88 g (without battery)
Headphones
SilverCrest IEHS 1000, Broadband
characteristic voltage 245mV
English - 37
Appendix
Battery charger
DV-1000HD
SCOPE TECHNOLOGY CO., LTD,
DJ04V20500A
Input: 100-240V AC, 50-60 Hz, 0,07A
Output: 4.2V DC 500mA
38 - English
DV-1000HD
Appendix
Warranty Information
English - 39
Appendix
40 - English
DV-1000HD
DV-1000HD
Appendix
English - 41
Appendix
42 - English
DV-1000HD